Worx Landroid M WG794E User manual

WG794E
P02
P18
P34
P50
P66
Lawn Mowing Robot
Græsslående robot
Nurmikon leikkausrobotti
Robot-gressklipper
Gräsklipparrobot
EN
DK
FIN
NOR
SV

Lawn Mowing Robot EN
2
TABLE OF CONTENTS
1. Safety Instruction
1.1 General & Additional safety instruction
1.2 Information on the Landroid®M
2. Technical Data and Component List
2.1 Technical data
2.2 Component list
3. Understanding Your Landroid®M
3.1 How does my Landroid®M know what to mow?
3.2 How does my Landroid®M know where to go?
A. Finding the charging base
B. Rain sensors
C. Sensing the boundary wire
D. Starting and stopping while mowing
3.3 How big of an area can my Landroid®M mow?
3.4 How efficiently will my Landroid®M mow the grass?
4. Boundary Wire Basics
4.1 Pegging the Boundary Wire
4.2 Burying the Boundary Wire
4.3 Joining the Boundary Wire
4.4 Turn on and test installation
5. Maintenance
5.1 Keep it Sharp
A. Rotate and Flip the Blades
B. Replace the Blades
5.2 Keep it Clean
A. Cleaning the Body
B. Cleaning the Underside
C. Clean the contact pins and the charging strips
5.3 Battery Life
5.4 Winter Hibernation
5.5 Replacing the Battery
6. Declaration of Conformity
3
3
5
6
6
7
9
9
10
10
10
10
10
11
11
12
12
12
13
13
13
13
13
14
14
14
14
15
15
15
16
17
ORIGINAL INSTRUCTIONS

Lawn Mowing Robot EN
3
1. Product Safety
1.1 Safety Warnings for your lawnmower
WARNING: Read all safety warnings and all instructions. Failure to follow the warnings and instructions
may result in electric shock, fire and/or serious injury.
Carefully read the instructions for the safe operation of the machine.
Save all warnings and instructions for future reference.
•This appliance is not intended for use by persons (including children) with limited physical, sensory or mental
capabilities, or lack of experience and knowledge, unless they have been given supervision or instruction concerning
use of the appliance by a person responsible for their safety.
•Children should be supervised to ensure that they do not play with the appliance.
IMPORTANT
READ CAREFULLY BEFORE USE
KEEP FOR FUTURE REFERENCE
SAFE OPERATION PRACTICES
Training
a) Read the instructions carefully. Make sure you understand the instructions and are familiar with the controls and the
proper use of the appliance;
b) Never allow people unfamiliar with these instructions or children to use the appliance. Local regulations can restrict the
age of the operator;
c) The operator or user is responsible for accidents or hazards occurring to other people or their property
Preparation
a) Ensure the correct installation of the automatic perimeter delineation system as instructed.
b) Periodically inspect the area where the appliance is to be used and remove all stones, sticks, wires, bones, and other
foreign objects.
c) Periodically visually inspect to see that the blades, blade bolts and cutter assembly are not worn or damaged. Replace
worn or damaged blades and bolts in sets to preserve balance.
d) On multi-spindle appliances, take care as rotating one blade can cause other blades to rotate.
e) WARNING! The lawnmower shall not be operated without the guard in place.
OPERATION
1. GENERAL
a) Never operate the appliance with defective guards, or without safety devices, for example deflectors, in place;
b) Do not put hands or feet near or under rotating parts. Keep clear of the discharge opening at all times;
c) Never pick up or carry an appliance while the motor is running;
d) Turn off the machine.
- Before clearing a blockage.
- Before checking, cleaning or working on the appliance.
e) It is not permitted to modify the original design of robotic lawnmower. All modifications are made at your own risk.
f) Start robotic lawnmower according to the instructions. When the main switch is in the ON position, make sure you
keep your hands and feet away from the rotating blades. Never put your hands and feet under the mower.
g) Never lift up robotic lawnmower or carry it around when the main switch is in the ON position.
h) Do not let persons who do not know how robotic lawnmower works and behaves use the mower.
i) Do not put anything on top of robotic lawnmower or its charging station.
j) Do not allow robotic lawnmower to be used with a defective blade disc or body. Neither should it be used with
defective blades, screws, nuts or cables.
k) Do not use robotic lawnmower if the main switch does not work.
l) Always switch off robotic lawnmower using the main switch when you do not intend to use the mower. Robotic
lawnmower can only start when the main switch is moved to the ON position and the correct PIN code has been
entered.
2. ADDITIONALLY WHEN THE APPLIANCE IS OPERATING AUTOMATICALLY
a) Do not leave the machine to operate unattended if you know that there are pets, children or people in the vicinity.
3. ADDITIONALLY WHEN USING THE MANUAL CONTROLLER
a) Mow only in daylight or in good artificial light;
b) Avoid operating the equipment in wet grass;
c) Do not operate the appliance when barefoot or wearing open sandals. Always wear substantial footwear and long trousers;

Lawn Mowing Robot EN
4
d) Always be sure of your footing on slopes;
e) Use extreme caution when reversing the appliance towards you;
f) Always switch on the motor according to instructions with feet well away from the blades(s);
MAINTENANCE AND STORAGE
WARNING! When the mower is turned upside down the main switch must always be set to the
OFF position.
The main switch should be set to the OFF position during all work on the mowers under frame, such
as cleaning or replacing the blades.
a) Keep all nuts, bolts and screws tight to be sure the appliance is in safe working condition;
b) Inspect the robotic lawnmower each week and replace worn or damaged parts for safety;
c) Check especially that the blades and blade disc are not damaged. Replace all blades and screws at the same time if
necessary so that the rotating parts are balanced.
d) Ensure that only replacement cutting means of the right type are used;
e) Ensure that batteries are charged using the correct charger recommended by the manufacturer. Incorrect use may
result in electric shock, overheating or leakage of corrosive liquid from the battery;
f) In the event of leakage of electrolyte flush with water/neutralizing agent, seek medical help if it comes into contact with the eyes etc;
g) Servicing of the appliance should be according to manufacturers instructions.
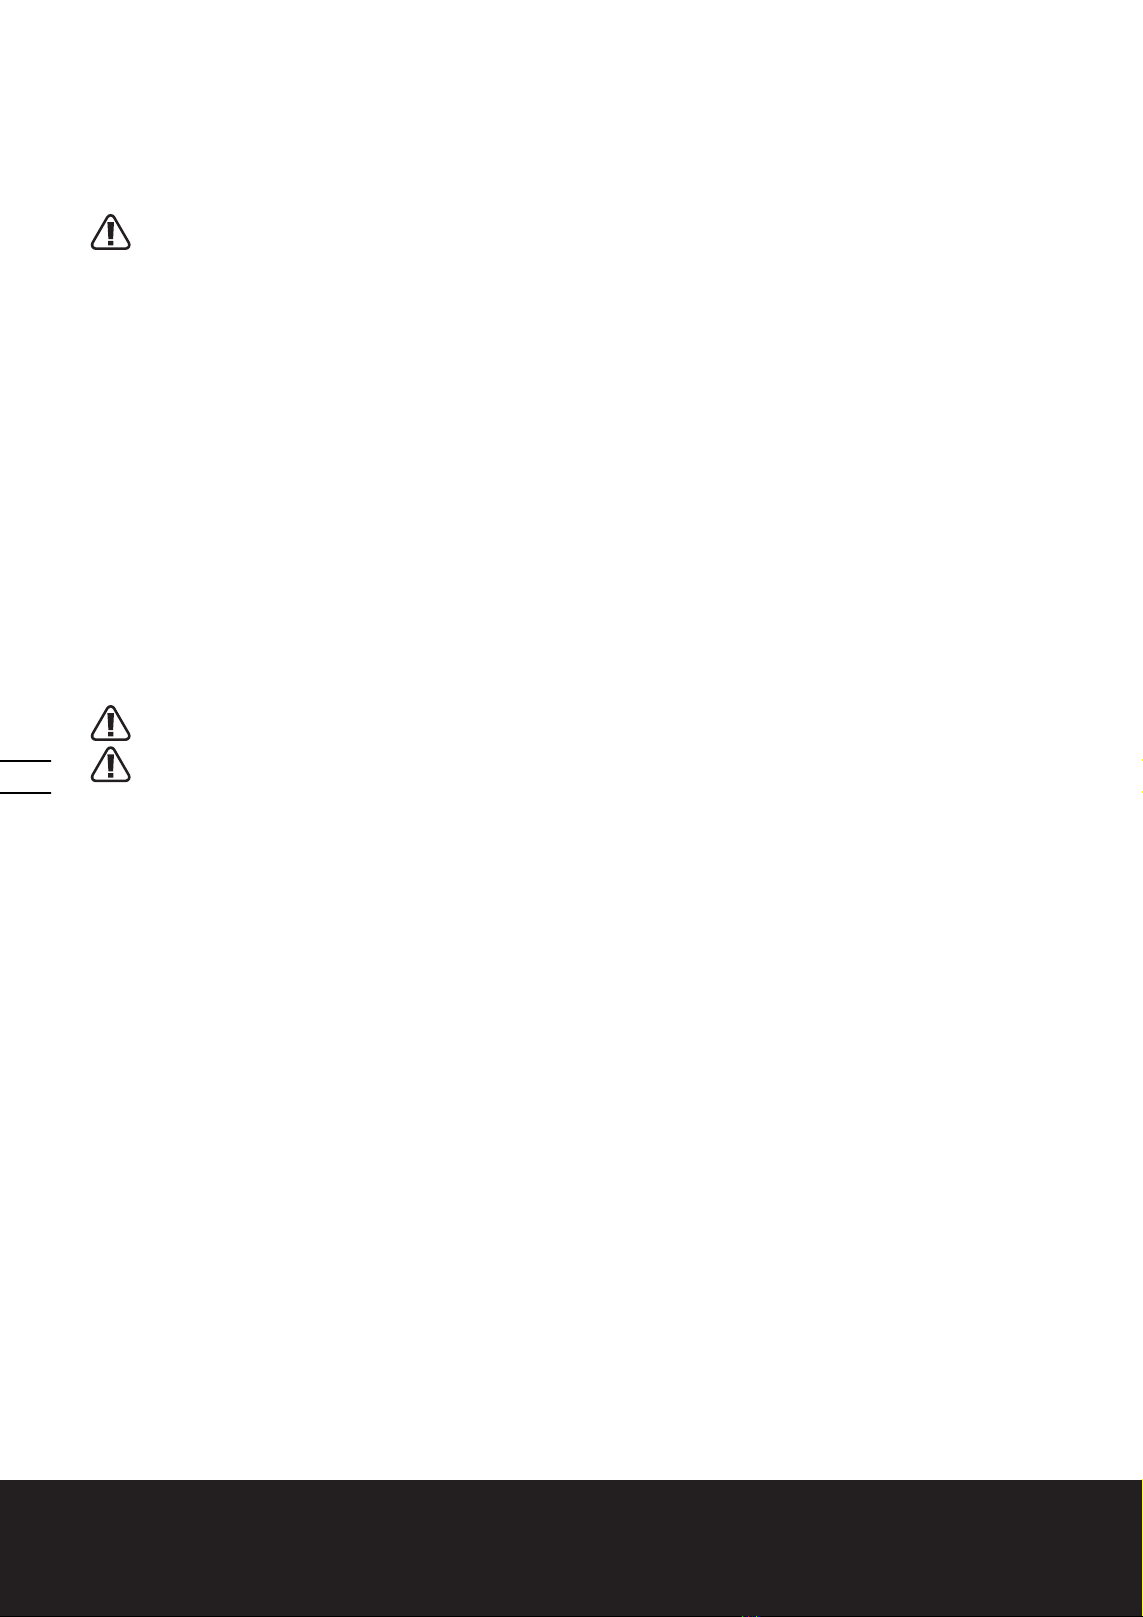
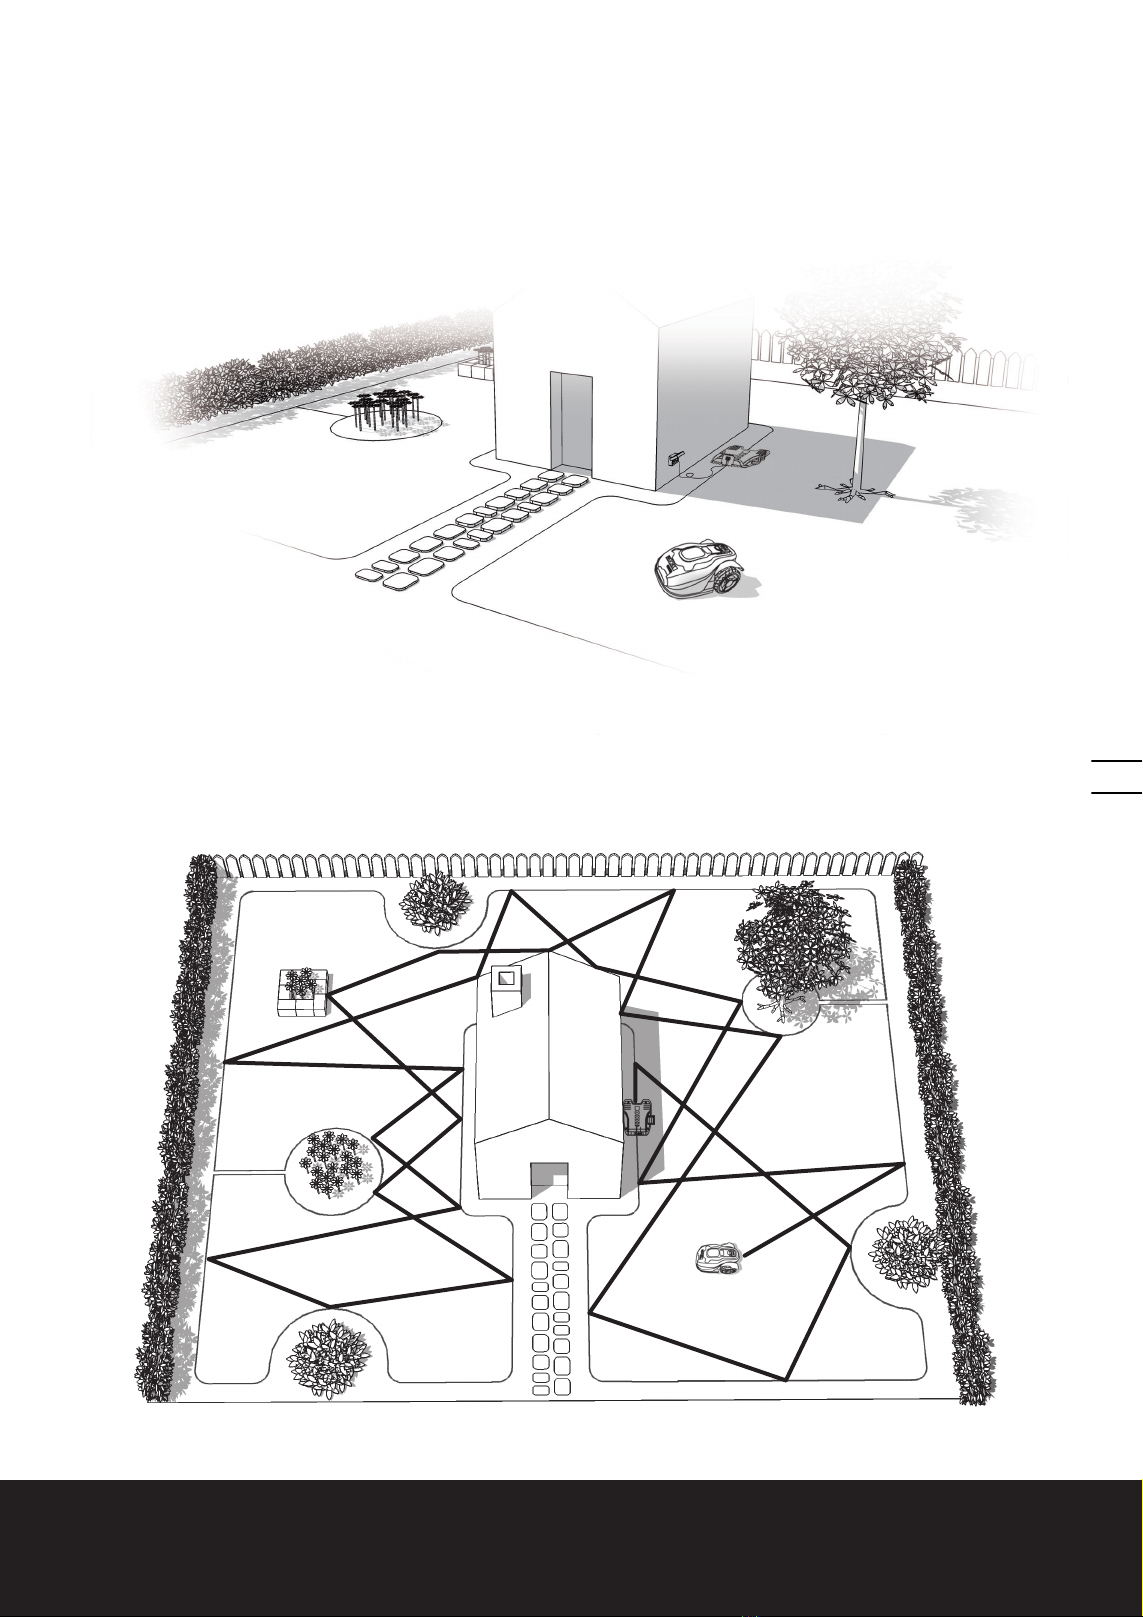
Transport
The original packaging should be used when transporting robotic lawn mower over long distances.
To safely move from or within the working area:
a) Press the STOP button to stop the mower. If the anti-theft alarm is activated, enter the first digit of the PIN code.You
select the four digit PIN code when you start the mower for the first time.
b) Move the main switch to the OFF position if you intend to carry the mower.
c) Carry the mower by the handle at the rear under the mower. Carry the mower with the blade disc away from the body.
WARNING! The appliance is only to be used with the unit provided.
Safety warnings for battery pack
a) Do not dismantle, open or shred cells or battery pack.
b) Do not short-circuit a battery pack. Do not store battery packs haphazardly in a box or drawer
where they may short-circuit each other or be short-circuited by conductive materials. When battery
pack is not in use, keep it away from other metal objects, like paper clips, coins, keys, nails, screws or other small metal
objects, that can make a connection from one terminal to another. Shorting the battery terminals together may cause
burns or a fire.
c) Do not expose battery pack to heat or fire. Avoid storage in direct sunlight.
d) Do not subject battery pack to mechanical shock.
e) In the event of battery leaking, do not allow the liquid to come into contact with the skin or eyes.
If contact has been made, wash the affected area with copious amounts of water and seek medical
advice.
f) Seek medical advice immediately if a cell or battery pack has been swallowed.
g) Keep battery pack clean and dry.
h) Wipe the battery pack terminals with a clean dry cloth if they become dirty.
i) Battery pack needs to be charged before use. Always refer to this instruction and use the correct
charging procedure.
j) Do not maintain battery pack on charge when not in use.
k) After extended periods of storage, it may be necessary to charge and discharge the battery pack
several times to obtain maximum performance.
l) Battery pack gives its best performance when it is operated at normal room temperature (20°C ± 5°C).
m) When disposing of battery packs, keep battery packs of different electrochemical systems
separate from each other.
n) Recharge only with the charger specified by WORX. Do not use any charger other than that
specifically provided for use with the equipment. A charger that is suitable for one type of battery pack may
create a risk of fire when used with another battery pack.
o) Do not use any battery pack which is not designed for use with the equipment.
p) Keep battery pack out of the reach of children.
q) Retain the original product literature for future reference.
r) Remove the battery from the equipment when not in use.
s) Dispose of properly.

Lawn Mowing Robot EN
5
1.2 Information on the Landroid®M
WARNING - Robotic lawnmower can be dangerous if incorrectly used.
Read through the Operator’s manual carefully and understand the content before using your robotic
lawnmower.
WARNING - Keep a safe distance from the machine when operating.
WARNING - Operate the disabling device before working on or lifting the machine.
Keep your hands and feet away from the rotating blades. Never place your hands or feet close to or under
the body when robotic lawnmower is in operation.
Robotic lawnmower can only start when the ON/OFF button press ON and the correct PIN code has been
entered. Inspection and /or maintenance must be carried out with the main switch set to OFF.
WARNING - Do not ride on the machine.
Do not wash the machine with a high pressure washer
Do not burn
Batteries may enter water cycle if disposed improperly, which can be hazardous for ecosystem. Do not
dispose of waste batteries as unsorted municipal waste.
Li-Ion battery.This product has been marked with a symbol relating to ‘separate collection’ for all battery
packs and battery pack. It will then be recycled or dismantled in order to reduce the impact on the
environment. Battery packs can be hazardous for the environment and for human health since they contain
hazardous substances.
This product has been marked with a symbol relating to removing electric and electronic waste. This means
that this product shall not be discarded with household waste but that it shall be returned to a collection
system which conforms to the European Directive 2002/96/CE. It will then be recycled or dismantled in
order to reduce the impact on the environment. Electric and electronic equipment can be hazardous for the
environment and for human health since they contain hazardous substances.

Lawn Mowing Robot EN
6
2. Technical Data and Component List
2.1 Technical data
Type: WG794E (790-799-Designation of machinery, representative of lawn mowing robot)
Rated voltage 28V Max*
No load speed 2800/min
Cutting diameter 180mm
Cutting height 20-60mm
Cutting height positions 5
Battery type Lithium-Ion
Battery model WA3225
Charging time 1.5h approx.
Charger model WA3716
Charger rating Input: 100-240V~50/60Hz, 50W
Output: 24-28V Dc, 1.5A
Machinery weight 8.9kg
Protection degree IPX4
*Voltage measured without workload. Initial battery voltage reaches maximum of 28 volts. Nominal voltage is 25.2volts.
Noise and technical data
A weighted sound pressure 44.5dB(A), KPA: 3.25dB(A)
A weighted sound power 63dB(A)
Wear ear protection when sound pressure is over 80dB(A)
Accessories
Charging base with 15m extension cable 1
Blades (WA0176) 9
Screws 9
Wire pegs (WA0179) 200
180m boundary wire 1
Charging base fixing nails 4
Power adaptor (WA3716) 1
Boundary wire distance gauge 2
Hex key 1
We recommend that you purchase genuine accessories listed in the above list from the same store that sold you the tool.
Use good quality accessories marked with a well-known brand name. Refer to the accessory packaging for further details.
Store personnel can assist you and offer advice.

Lawn Mowing Robot EN
7
2.2 Component List
68
75
9
10
11
12
13
23
2221
17
19
16
18
3
4
2
1
25
20
24
15
14

Lawn Mowing Robot EN
8
1. HANDLE BAR
2. LOW VOLTAGE CABLE
3. CONTACT PINS
4. CHARGING BASE
5. CHARGING STRIP
6. DISPLAY WINDOW
7. CONTROL PANEL COVER
8. STOP BUTTON
9. RAIN SENSOR
10. REAR DRIVING WHEEL
11. HANDLE
12. BATTERY PACK
13. BLADE TURNING DISC
14. CUTTING BLADE
15. FRONT WHEEL
16. START KEY
17. DISPLAY
18. KEYPAD
19. ON/OFF KEY
20. POWER ADAPTOR
21. BOUNDARY WIRE (180m)
22. WIRE PEGS
23. CHARGING BASE FIXING NAILS
24. BOUNDARY WIRE DISTANCE GAUGE
25. HEX KEY

Lawn Mowing Robot EN
9
3. Understanding Your Landroid®M
We would like to congratulate you on your new purchase of the Landroid®M and entering into the care-free life of automatic
mowing. In the following, We would like to help you better understand how your Landroid®M thinks.
3.1 How does my Landroid®M know what to mow?
The Landroid®M chooses its direction at random. It will make sure your entire lawn is evenly mowed without leaving
behind any unattractive mowing paths (See Fig. A).
A

Lawn Mowing Robot EN
10
3.2 How does my Landroid®M
know where to go?
Your Landroid®M is capable of doing things on its own.The
Landroid®M knows when it needs to go to its Charging Base (4) to
charge, can sense when it is raining, can stop itself if it senses a
problem, and knows to stop, draw back, and then turn around when
it bumps into something blocking its path, such as a person, pet, or
other object. The Landroid®M will also automatically stop its Blade
Turning Disc (13) from rotating if it is lifted off the ground to prevent
an accident.
A. Finding the charging base
When your Landroid®M needs to recharge, it will stop mowing and
follow the Boundary Wire (21) in an anti-clockwise motion back to its
Charging Base. Landroid®M will automatically stop rotating its Blade
Turning Disc when returning to its Charging Base. However, if it is
required to go back the Charge Base manually (when you press the
home button), the BladeTurning Disc will rotate and cut the grass
near the boundary wire. So if you want to mow the grass
near the boundary wire, just press the home button. We
suggest you use this function when the battery power
is more than 75%. You can check the battery power in
the display.
B. Rain sensors
The Landroid®M is fitted with a Rain Sensor (9) that will detect
rain drops and tell the Landroid®M to stop mowing and follow the
Boundary Wire back to its Charging Base (See Fig. B ).
The Landroid®M is programmable to have a delay start function
(0 – 180 mins) when it rains. When the rain sensors are wet, the
Landroid®M returns to its docking station. Only when the rain sensors become dry will the Landroid®M begin the delay
start countdown or return to mowing immediately. See the Programming and Troubleshooting Guide for more details.
C. Sensing the boundary wire
The Landroid®M always obeys the border set by the Boundary Wire and uses two sensors at its front to sense when it is
getting close(See Fig. C). Before changing direction, the Landroid®M will overrun the Boundary Wire up to 20cm*.
*This is the recommended distance. Use the provided distance gauge to ensure proper installation.
D. Starting and stopping while mowing
If you would like to command the Landroid®M to stop mowing, then simply press the STOP button (8) on top of the
mower. To start mowing. open the Control Panel Cover and press the ON/OFF key, then press start key directly or input
your further commands, then press the START key (See Fig. D,E )
B
C
DD E

Lawn Mowing Robot EN
11
If the Landroid®M senses that something is wrong, it will display a fault message on the Display (16), and will turn itself off
if it does not receive any input from the user within 20 min (for information on fault messages refer to the Programming
and Troubleshooting Guide).
To resume:
• PresstheSTOPKeytocorrecttheproblems.
• PressON/OFFKey(19)twicetorestartthemachine.
• PressSTART Key.
• NowtheLandroid®M will begin to mow!
3.3 How big an area can my Landroid®M mow?
Your Landroid®M is capable of mowing areas of up to around 1000m2, although this depends on various factors, such as:
• Speciesofgrassinyourlawnanditsgrowthrate.
• SharpnessoftheCuttingBlades(14).
• Humidity.
• Surroundingtemperature.
• AmountofobstaclesinyourLawn.
If the surrounding temperature is very hot where you live then your Landroid®M may charge at a slightly slower rate. The
Landroid®M uses less energy in open areas that have fewer obstacles, such as flower beds, fountains, walkways, etc…
You could find more details about default work time of Landroid®M in following table:
Landroid®M WG794E - AUTO MOWING TIME SCHEDULE.
Area m2
Auto
Mowing
Runtime -
Hours
Monday
Mowing
Hours
Tuesday
Mowing
Hours
Wednesday
Mowing
Hours
Thursday
Mowing
Hours
Friday
Mowing
Hours
Saturday
Mowing
Hours
Sunday
Mowing
Hours
100 37:00-8:30 / / 7:00-8:30 / / /
200 77:00-8:24 7:00-8:24 7:00-8:24 7:00-8:24 7:00-8:24 / /
300 87:00-8:36 7:00-8:36 7:00-8:36 7:00-8:36 7:00-8:36 / /
400 11 7:00-9:12 7:00-9:12 7:00-9:12 7:00-9:12 7:00-9:12 / /
500 13.5 7:00-9:42 7:00-9:42 7:00-9:42 7:00-9:42 7:00-9:42 / /
600 16.5 7:00-10:18 7:00-10:18 7:00-10:18 7:00-10:18 7:00-10:18 / /
700 19 7:00-10:48 7:00-10:48 7:00-10:48 7:00-10:48 7:00-10:48 / /
800 21.6 7:00-11:18 7:00-11:18 7:00-11:18 7:00-11:18 7:00-11:18 / /
900 24.3 7:00-11:54 7:00-11:54 7:00-11:54 7:00-11:54 7:00-11:54 / /
1000 27 7:00-12:24 7:00-12:24 7:00-12:24 7:00-12:24 7:00-12:24 / /
Mowing times are different for every lawn depending on the factors mentioned previously. Gradually adjust the time you
allow your Landroid®M to mow each day until you find the most suitable setting.
You can also program Landroid®M working time to suit your schedule – refer to Programming Guide.
3.4 How efficiently will my Landroid®M mow the grass?
The Landroid®M’s cutting height can be adjusted between 2cm - 6cm. Before starting your Landroid®M for the first time,
you should cut the grass to the height not more than 9cm.Then make sure you open the Control Panel Cover (7) and set
the cutting height to its maximum cutting height of 6cm (See Fig. F, G).
Your Landroid®M will cut its best in dry weather. It does not like wet grass, which can build up on the Blade Turning Disc (13)
and within the motor, and can also cause loose traction and slippage while working.
Your Landroid®M is afraid of Lightening Storms. In case of a Lightening Storm, protect the Landroid®M by unplugging the
Charging Base (4), disconnecting the Boundary Wire (21), and making sure the Landroid®M is not allowed to charge.
Your Landroid®M loves mowing grass and requires its Cutting Blades (14) to be kept in good condition to cut at its best. The
Landroid®M can do most things by itself, but will need your help sometimes to prevent damage to itself.
• NeverlettheLandroid®M travel over gravel.
• RemoveorblockoffobstaclesthattheLandroid®M could accidentally climb on and damage its Blade Turning Disc.
• Removealldebrisandforeignobjectsfromyourlawn.

Lawn Mowing Robot EN
12
G
4. Boundary Wire Basics
4.1 Pegging the Boundary Wire
Use the Boundary Wire Distance Gauge (24) to set the correct
distance from the border of your lawn (More than 35cm*).
* This is the recommended distance. Use the provided distance
gauge to ensure proper installation.
If your neighbor also uses a Landroid®M, then you
must keep a spacing of at least 2 metres between your
Boundary Wire and your neighbors.
Please be aware that your Landroid®M will not be able
to receive a signal from the Boundary Wire beyond the
distance of 18m.
The boundary wire must outline the intended mowing area exactly.
Your Landroi
d
®
M will become confused by extra bends or coils of Boundary Wire that are not part of its mowing area ( See
Fig. H). If there is excess Boundary Wire after the mowing area has been outlined, then cut it off and store this additional wire
in a separate location. However, it is important to leave the necessary length where it connects to the Charging Base so it can
be connected and still remain buried.
4.2 Burying the Boundary Wire
We recommend that you bury your boundary wire a few centimeters underground.This will ensure trouble-free operation
year after year, season after season. For burying the Boundary Wire you may purchase the optional WORX Territorial Marker
Tool accessory at the same store that sold you your Landroid®M.
If you are planning to bury the Boundary Wire then it should be noted that when entering its Charging Base for the first
time, your Landroid®M may find problems with the way you have laid the wire. It is recommended to first peg down the
Boundary Wire to the lawn so it is easy to make adjustments if necessary.This will allow the Landroid®M to become
adjusted to its new environment and ensures it will successfully work with the charging base before the Boundary Wire is
buried.
When you have completed installing the boundary wire, it is recommended that you ask Landroid®M to follow the
boundary wire by pressing the home button.
Whilst observing Landroid®M locating the charging station you can then make alterations to the boundary wire route to
ensure trouble free tracking of the boundary wire by Landroid®M when locating the charging station.
H
F

Lawn Mowing Robot EN
13
4.3 Joining the Boundary Wire
The Boundary Wire (21) can be extended simply by splicing the ends
and connecting it to the ends of another piece of wire. You can use
insulating tape to secure the joined part of the wire. (See Fig. I)
4.4 Turn on and test installation
If the charger light does not come on, then check the power
connections.
If the charger base LED is flashing green, check if the boundary wire
is connected correctly.
Red light on: charging.
Red light flashing: error message, refer toTrouble Shooting and
correct the problems.
Green light flashing: check if the boundary wire is connected correctly.
When the green light on the charging base is on, place your Landroid®M over the boundary wire, if Landroid®M follows the
boundary it is connected correctly.
If your Landroid is inside its territory but the display says “out of cutting area” ,and the charger base LED is green, it means
you clamped the boundary wire ends incorrectly. Just reverse them.
5. Maintenance
Your Landroid®M needs to be checked from time to time. The Landroid®M works hard and after time needs a good
cleaning as well as having some parts replaced, as they can become worn.
In the following we want to let you know how to take care of your Landroid®M.
5.1 Keep it sharp
WARNING: Before cleaning, adjusting, or replacing the Blades, turn your Landroid®M OFF by
pressing the ON/OFF Button to OFF and put on protective gloves.
WARNING! When fitting new blades, make sure you replace ALL the blades. Always use new
screws when fitting blades . This is important to ensure blade retention. Failure to use new
screws could cause serious injury.
The Landroid®M does not cut grass like other mowers. Its
Cutting Blades (14) are razor sharp on all 4 edges and spin in
both directions for maximum cutting capacity (See Fig. J ). Each
blade of your Landroid®M has 4 cutting edges. Depending on the
frequency the Landroid®M mows your lawn, the cutting blades will
need to be flipped/rotated periodically for a new cutting edge. If
your Landroid®M is programmed to mow the lawn every day then
the cutting blades will need to be rotated monthly for the best
mowing results. Each cutting blade will last up to 4 months when
it is programmed to mow every day. When the cutting blades are
dull and worn out, they should be replaced with the spare blades
provided with your Landroid®M. Spare blades are also available at
your nearest WORX retailer.
A. Rotate and flip the blades
Your Landroid®M carries 3 Blades that are all screwed onto your its BladeTurning Disc (13). The Blades are what let the
Landroid®M do its job and need care and attention. Every once in awhile, you should simultaneously rotate and flip all 3
blades for a perfect cut. When rotating and flipping the Blades, make sure all the Blades are adjusted at the same time
or else it could make the Blade Disc off balance. If your Landroid®M mows on a normal schedule (daily) then the Blades
should last one season if they are rotated and flipped every month. Always check to see if the Blades are chipped or
damaged and replace them if they are.
43
1 2
J
I

Lawn Mowing Robot EN
14
B. Replace the blades
After some time, usually every season, your Landroid®M’s Blades
will need to be replaced. Your Landroid®M does not like mowing
while using Blades of different age and quality. So when replacing
the Blades, make sure to replace all of them at the same time.
You can replace them with one of the three spare Blade kits and
extra Blade screws supplied with your Landroid®M.
Before attempting to replace your Landroid®M’s Blades, turn the
power off and put on protective gloves. Then follow these steps:
1. Gently flip the Landroid®M over.
2. Take the screws off the Blades with a screwdriver
3. Firmly screw on the new Blades (See Fig. K)
IMPORTANT: After screwing the Blade to the Blade
Disc, make sure the Blade is able to spin freely.
5.2 Keep it clean
WARNING: Before cleaning turn your Landroid®M OFF by pressing the ON/OFF Button. Put on
protective gloves before cleaning the Blade Turning Disc (13) and do not use running water.
(See Fig. L,M)
A. Cleaning the body
Your Landroid®M will live a much happier and longer life if it is cleaned regularly. Although, as your Landroid®M is an
electric machine, you will need to take care when cleaning, so DO NOT use a hose, high pressure washers or otherwise
pour running water on your Landroid®M, it is best to use a spray bottle filled with water. When cleaning the machine body
use a soft brush or clean cloth and avoid using solvents or polishes (See Fig. L) .Lastly, make sure that you remove all
build up of grass clippings and debris.
B. Cleaning the Underside
Again, it is important that you power the Landroid®M OFF using the ON/Off Button and wear protective gloves
before touching the Blade Turning Disc (13).
First, flip your Landroid®M upside down to expose its underside.
Here you will see the Blade Disc (a), the chassis (b), and the Front (15)
and Driving (10) Wheels. Clean everything thoroughly with a soft
brush or moist rag.(See Fig. M)
Rotate the Blade Disc to make sure it moves freely and that there
is not anything lodged between it and the surrounding Motor Frame
Box. Also, make sure the Blades are able to spin freely and that
there's no grass obstructing them.
IMPORTANT: Remove any lodged debris so that it does not cause
a crack in the Blade Disc. Even the tiniest crack can decrease your
Landroid®M's mowing output.
LM
(b)
(a)
K

Lawn Mowing Robot EN
15
C. Clean the contact pins and the charging strips
Clean the Contact Pins (3) located on the Charging Base (4) and the Charging Strip (5 )located on the Landroid®M using a
cloth. Remove any build up of grass clippings and debris around the contact pins and charge strips periodically to ensure
the Landroid®M successfully charges each time.
5.3 Battery life
The heart of the Landroid®M is its 28-volt lithium-ion battery. No
maintenance is required. For proper storage of the battery, make sure
it is fully charged in kept in a cool dry place between (20°C-60°C).
The life-span of the Landroid®M’s battery depends on various factors,
such as:
• Thetimespanofthemowingseasoninyourregion
• AmountofhourstheLandroid®M mows per day
• Batterymaintenanceduringstorage
Landroid®M can be charged manually without the boundary wire.
(See Fig. N)
To manually charge the battery without connecting the
boundary wire to the charging base;
1. Connect the Charging Base to a suitable power
supply.
2. Manually dock the Landroid®M into the Charging Base while the Landroid®M is powered off.
3. The charging base red light will turn on.
4. Within 3 seconds and before the charging base light turns green, press the Landroid®M power ON/
OFF button.
5. Landroid®M will begin to charge.
5.4 Winter hibernation
Your Landroid®M will live longer and healthier if it is allowed to hibernate. So even though it is tough, we would recommend
that you store your Landroid®M in your shed or garage during the winter.
Before you prepare your Landroid®M for winter hibernation, we recommend you:
• ThoroughlycleanyourLandroid®M.
• Fullychargethebattery.
• Turnthepoweroff.
To maximize the battery’s life, it is recommended to fully charge the battery before storage during winter.
The Boundary Wire can be left in the ground although its ends should be protected, such as placed in a tin can with grease.
If the Charging Base is left outside for winter, leave the Boundary Wire connected.
NOTE: Before storing for winter, you can take your Landroid®M to a dealer for a thorough cleaning and tune-up, where its
functions will be tested and worn parts will be replaced.
When bringing the Landroid®M back to work after winter hibernation, make sure the Charging Strips (5) and Contact Pins (3)
are clean, it is recommended to use a fine grade emery cloth to clean. Then make sure the date and time are correct and
send the Landroid®M back to what it loves doing: mowing.
1
2
N

Lawn Mowing Robot EN
16
5.5 Replacing the battery
WARNING: Press the ON/OFF Key to OFF before attempting any adjustment, replacement or repair.
If you need to replace the Battery, follow these steps:
1. Gently turn your Landroid®M upside down.
2. Remove the four screws on the battery cover. (See Fig. O)
3. Take out the old battery. (See Fig. P)
4. Put in the new battery.
5. Firmly replace the 4 screws.
Environmental Protection
Waste electrical products should not be disposed of with household waste. Please recycle where facilities exist.
Check with your Local Authority or retailer for recycling advice.
Plug Replacement (UK & Ireland Only)
If you need to replace the fitted plug then follow the instructions below.
IMPORTANT
The wires in the mains lead are colored in
accordance with the following code:
Blue – Neutral
Brown – Live
As the colors of the wires in the mains lead of this appliance may not correspond with the coloured markings identifying the terminals in
your plug, proceed as follows. The wire which is coloured blue must be connected to the terminal which is marked with N.The wire which
is coloured brown must be connected to the terminal which is marked with L.
WARNING: Never connect live or neutral wires to the earth terminal of the plug. Only fit an approved BS1363/A plug and the
correct rated fuse.
NOTE:If a moulded plug is fitted and has to be removed take great care in disposing of the plug and severed cable, it must be destroyed
to prevent engaging into a socket.
Connect
Blue to N
(neutral)
Outer sleeve
firmly clamped
Cable grip
Brown L (live)
13 Amp fuse approved
to BS1362
OP

Lawn Mowing Robot EN
17
Declaration of Conformity
We,
POSITEC Germany GmbH Konrad-Adenauer-Ufer 37 50668 Köln
Declare that the product
Description WORX Lawn Mowing Robot
Type WG794E (790-799-Designation of machinery, representative of lawn mowing robot)
Function Cutting grass
Complies with the following Directives,
2006/42/EC, 2004/108/EC, 2011/65/EU, 2000/14/EC amended by 2005/88/EC
2000/14/EC amended by 2005/88/EC:
Conformity Assessment Procedure as per Annex V.
Measured Sound Power Level: 61.95dB(A)
Declared Guaranteed Sound Power Level: 63dB(A)
Standards conform to,
EN ISO 12100-1
EN ISO 12100-2
EN ISO 14121-1
EN ISO 3744
EN 55014-1
EN 55014-2
The person authorized to compile the technical file,
Name Russell Nicholson
Address Positec Power Tools (Europe) Ltd, PO Box 152, Leeds, LS10 9DS, UK
2014/05/09
Leo Yue
POSITEC Quality Manager PIN Code Area:

Græsslående robot DK
18
INDHOLDSFORTEGNELSE
1. Sikkerhedsvejledninger
1.1 Generelle og særlige sikkerhedsvejledninger
1.2 Oplysninger om din Landroid®M
2. TEKNISKE DATA OG PAKKENS INDHOLD
2.1 Tekniske data
2.2 Komponentliste
3. Lær din Landroid®M at kende
3.1 Hvordan ved min Landroid®M hvilken græsområder, den skal slå?
3.2 Hvordan ved min Landroid®M hvor den skal køre hen?
A. Sporing til opladestationen
B. Regn-sensorer
C. Sporing af grænsekablet
D. Start og standsning under kørsel
3.3 Hvor stort en græsplæne kan min Landroid®M slå?
3.4 Hvor effektivt vil min Landroid®M slå min græsplæne?
4. Grundlæggende om grænsekablet
4.1 Fastgørelse af grænsekablet til jorden
4.2 Nedgravning af grænsekablet
4.3 Sammenspænding af grænsekablet
4.4 Opstart og test at installationen
5. Vedligeholdelse
5.1 Hold den skarp
A. Drejning og vending af klingerne
B. Udskiftning af klingerne
5.2 Hold den ren
A. Rengøring af karosseriet
B. Rengøring af undersiden
C. Rengør kontaktpladerne og opladekontakterne
5.3 Batteriliv
5.4 Vinterdvale
5.5 Udskiftning af batteriet
6. Konformitetserklæring
ORIGINAL BRUGSANVISNING
19
19
21
22
22
23
25
25
26
26
26
26
26
27
27
28
28
28
29
29
29
29
29
30
30
30
30
31
31
31
32
33

Græsslående robot DK
19
1. Sikkerhedsvejledninger
1.1 Generelle og særlige sikkerhedsvejledninger
ADVARSEL: Læs alle sikkerhedsadvarslerne og alle vejledningerne. Følges advarslerne og
instruktionerne ikke, kan det føre til elektrisk stød, brand og/eller alvorlig personskade.
Læs alle vejledningerne omhyggeligt, så denne maskine betjenes på en sikker måde.
Gem alle advarsler og vejledninger til senere brug.
•Dette apparat er ikke beregnet til brug af personer (herunder børn), med begrænsede fysiske, sensoriske eller mentale
evner, eller personer med manglende erfaring eller viden, medmindre de er blevet vejledt eller instrueret i hvordan
apparatet bruges, af en person med ansvar for deres sikkerhed.
•Børn skal være under opsyn, for at sikre de ikke leger med apparatet.
VIGTIGT
LÆS FORSIGTIGT FØR BRUG
BEHOLD TIL SENERE BRUG
SIKKER BRUGSPRAKSIS
Brugsoplysninger
a) Læs instruktionerne omhyggeligt. Sørg for, at du forstår vejledningerne, og at du er bekendt med betjeningsknapperne
og hvordan apparatet bruges ordentligt.
b) Lad aldrig personer, som ikke er bekendte med disse vejledninger, eller børn bruge apparatet. Den lokale lovgivning kan
begrænse alderen på brugeren.
c) Brugeren er ansvarlig for mulige uheld og farlige situationer for andre personer og deres ejendom.
Forberedelse
a) Sørg for, at områdeafgrænsningen udføres korrekt, som beskrevet i vejledningerne.
b) Efterse regelmæssigt områder, hvor apparatet skal bruges, og fjern alle sten, pinde, ledninger, knogler og andre genstande.
c) Efterse regelmæssigt skæreklingen, boltene og samlingerne, og sørg for at de ikke er nedslidte eller beskadigede.
Udskift nedslidte eller beskadigede skæreklinger og bolte i sæt, så du bibeholder balancen.
d) På apparater med flere aksler, skal du være forsigtig når du drejer klingen, da den anden kan ske også at dreje.
BETJENING
1. GENERELT
a) Brug aldrig apparatet med ødelagte skærme, eller uden at sikkerhedsanordningerne, så som afvigelsesskærmene, er på plads.
b) Put ikke hænderne eller fødderne under drejende dele. Sørg altid for, at holde dig væg fra udstødningsåbningen.
c) Saml ikke ting op, eller bær på ting, mens apparatets motor kører.
d) Sluk for maskinen
- Før du renser maskinen for blokerende elementer.
- Før du efterser, rengøre eller arbejder på apparatet.
e) Det er ikke tilladt, at ændre på græsslåmaskinens originale design. Alle ændringer som laves er på dit eget ansvar.
f) Start græsslåmaskinen som beskrevet i vejledningerne. Når kontakten står på ON (tændt), skal du sørge for at holde
dine hænder og fødder væk fra de drejende klinger. Put aldrig dine hænder eller fødder under græsslåmaskinen.
g) Du må aldrig løfte græsslåmaskinen, eller bære rundt på den mens kontakten står på ON (tændt).
h) Lad ikke personer, som ikke ved hvordan græsslåmaskinen virker og opfører sig, bruge den.
i) Undgå, at stille ting oven på græsslåmaskinen eller dens opladestation.
j) Undgå, at bruge græsslåmaskinen med en ødelagt klinge eller karrosseri. Og den må heller ikke bruges med ødelagte
klinger, skruer, møtrikker eller kabler.
k) Undgå, at bruge græsslåmaskinen, hvis kontakten ikke virker.
l) Sluk altid for græsslåmaskinen på kontakten, når du ikke har i sinde at bruge den. Græsslåmaskinen kan kun starte når
kontakten står på ON (tændt), og den rigtige PIN-kode er blevet indtastet.
2. NÅR APPARATET BRUGES AUTOMATISK
a) Efterlad ikke maskinen i brug uden opsyn, hvis du ved der er kæledyr, børn eller andre personer i nærheden.
3. NÅR APPARATET BRUGES MANUELT
a) Slå kun græsset i dagstimerne, eller hvis der er tilstrækkeligt med kunstig lys.
b) Undgå, at bruge apparatet i vådt græs.
c) Undgå, at bruge apparatet når du går med bare fødder, eller åbne sandaler. Brug altid passende fodtøj og langbukser.
d) Sørg altid for, at du står sikker på skråninger.
e) Vær yderst forsigtig, når du bakker apparatet mod dig selv.
f) Tænd altid for motoren, som beskrevet i vejledningerne, med fødder væk fra klingerne.

Græsslående robot DK
20
VEDLIGEHOLDELSE OG OPBEVARING
ADVARSEL! Når græsslåmaskinen vender på hovedet, skal kontakten altid stå på OFF (slukket).
Kontakten skal hele tiden stå på OFF (slukket), når der arbejdes på græsslåmaskinens underside, f.eks.
når du skal rengøre eller skifte klingerne.
a) Sørg for, at alle møtrikker, bolte og skruer sidder ordentlig fast, så du sikre at apparatet er sikker stand.
b) Efterse græsslåmaskinen hver uge, og skift nedslidte eller ødelagte dele.
c) Kontroller, at klingerne og klingeskiven ikke er beskadigede. Skift alle klinger og skruer på samme tid, så de drejende
dele er balancerede.
d) Sørg for, at du udskifter skæreelementerne med den rigtige type.
e) Sørg for, at batterierne oplades med den rigtige oplader, som er blevet anbefalet af producenten. Forkert brug kan føre
til elektrisk stød, overophedning eller udslip af ætsende væsker fra batteriet.
f) I tilfælde af udslip af elektrolyt, skal du skylle med vand/neutraliserende middel, og søg lægehjælp hvis det kommer i
kontakt med dine øjne.
g) Reparation af apparatet skal ske i henhold til producentens vejledninger.
Transport
Når græsslåmaskinen skal transporteres over længere afstande, skal du bruge originalemballagen.
Sådan flyttes græsslåmaskinen sikker fra eller indenfor arbejdsområdet:
a) Tryk på STOP knappen for at standse plæneklipperen. Hvis tyverialarmen aktiveres, indtast det første ciffer af PIN-
koden. Du vælger den firecifrede PIN-kode, når du starter plæneklipperen første gang.
b) Stil kontakten på OFF (slukket), hvis du har i sinde at løfte græsslåmaskinen.
c) Løft græsslåmaskinen i bærehåndtaget bagpå undersiden. Løft græsslåmaskinen med klingeskiven væk fra kroppen.
ADVARSEL! Dette apparat må kun anvendes som den er leveret.
Sikkerhedsforskrifter til batterisæt
a) Sekundærelementer eller batterisæt må ikke skilles ad, åbnes eller knuses.
b) Et batterisæt må ikke kortsluttes. Batterisæt må ikke opbevares lemfældigt i en kasse eller
skuffe, hvor de kan kortslutte hinanden eller kortsluttes af ledende genstande. Når batterisættet ikke
er i brug, skal det holdes væk fra andre metalgenstande, såsom papirclips, mønter, nøgler, søm, skruer eller andre
små metalgenstande, der kan skabe en forbindelse fra en pol til en anden, Kortslutning af batteripoler kan medføre
forbrændinger eller brand.
c) Batterisæt må ikke udsættes for varme eller ild. Må ikke opbevares i direkte sollys.
d) Batterisæt må ikke udsættes for mekaniske stød.
e) I tilfælde af at et batteri lækker, må væsken ikke komme i kontakt med huden eller øjne. Hvis der
er sket kontakt, skal det berørte område vaskes med rigelige mængder vand, hvorefter der søges
lægehjælp.
f) Søg straks lægehjælp, hvis et element eller batterisæt er nedsvælget.
g) Opbevar batterisæt på et rent og tørt sted.
h) Aftør batterisættets poler med en tør klud, hvis de bliver snavsede.
i) Batterisæt skal oplades før anvendelsen. Anvend altid den korrekte oplader, og læs producentens
anvisninger eller brugervejledning for, hvordan batterierne oplades korrekt.
j) Et batterisæt må ikke efterlades til opladning i længere tid, hvis det ikke anvendes.
k) Efter længere opbevaringsperioder kan det være nødvendigt at oplade eller aflade batterisættet
flere gange for at op den optimale ydelse.
l) Batterisæt yder mest optimalt, når de anvendes ved normal stuetemperatur (20°C ± 5°C).
m) Ved bortskaffelse af batterisæt, skal batterisæt af forskellige elektrokemiske systemer holdes
adskilte fra hinanden.
n) Genoplad kun med laderen specificeret af WORX. Anvend ingen anden oplader end den, der
specifikt er beregnet til brug med udstyret. En oplader, der passer til en type batterisæt kan skabe risiko for
brand ved brug med et andet batterisæt.
o) Brug kun det korrekte batteri til udstyret.
p) Batterisættet skal opbevares utilgængeligt for børn.
q) Opbevar den originale produktlitteratur til fremtidig brug.
r) Batterisættet skal fjernes fra udstyret, når det ikke er i brug.
s) Bortskaffes på en miljørigtig måde.
Other manuals for Landroid M WG794E
4
Table of contents
Languages:
Other Worx Lawn Mower manuals

Worx
Worx Landroid User manual

Worx
Worx WG753 User manual

Worx
Worx Landroid M User manual

Worx
Worx WA0862 User manual

Worx
Worx Landroid WR130E User manual

Worx
Worx Landroid WR141E User manual

Worx
Worx WG730E.9 User manual

Worx
Worx LANDROID WG757E User manual

Worx
Worx Landroid WR130E User manual

Worx
Worx Landroid WR141E User manual

Worx
Worx S Basic LANDROID User manual

Worx
Worx Landroid Specification sheet

Worx
Worx Landroid WR101SI User manual

Worx
Worx WG773E User manual

Worx
Worx LANDROID WA3766 User manual

Worx
Worx Landroid WR140E User manual

Worx
Worx WG711E User manual

Worx
Worx WG779E Installation manual

Worx
Worx WG773E User manual

Worx
Worx Landroid WG795E User manual