Wren Kitchens WRWC60DDBKED Operator's manual

Built-In Beverage Cooler
60 cm Beverage Cooler

1
NOTE: This User Instruction Manual contains important information, including safety & installation points, which
will enable you to get the most out of your appliance. Please keep it in a safe place so that it is easily available for
future reference, for you or any person not familiar with the operation of the appliance.
CONTENTS
Environmental note
- 1 -
Important safety information - 1 -
Use of the appliance - 1 -
Before using your appliance - 2 -
Refrigerant - 2 -
Child safety - 2 -
General safety - 3 -
Service - 3 -
Description of the appliance - 4 -
Product features - 4 -
Control panel - 4 -
Description of the product features - 4 -
Using your Wren beverage cooler - 5 -
Before switching on - 5 -
During first use - 5 -
Switching on the appliance and setting the temperature - 6 -
Wine or Beverage Storage - 6 -
Loading the beverage cooler - 6 -
Storing your wines and beverages - 7 -
Storage problems - 8 -
Cleaning and maintenance - 9-
Defrosting - 9 -
Removing the shelves for cleaning - 9 -
Moving your beverage cooler - 9 -
Power failure - 10 -
Vacation time - 10 -
Installation - 10 -
Electrical connection - 10 -
Positioning - 10 -
Built-in installation - 11 -
Adjusting the height and leveling of your beverage cooler - 12 -
Installing the handle - 12 -
Troubleshooting - 13 -

2
Technical data - 14 -

1
Environmental note
Note: Before discarding an old appliance, switch off and disconnect it from the power supply. Cut off
and render any plug useless.Cut the cable off directly behind the appliance to prevent misuse. This
should be undertaken by a competent person. Disable the door lock to make sure that children cannot
get stuck inside the appliance.
ENVIRONMENT-FRIENDLY DISPOSAL
The symbol above and on the product means that the product is classed as Electrical or Electronic
Equipment and should not be disposed of with household or commercial waste at the end of its
useful life. The Waste of Electrical and Electronic Equipment (WEEE) Directive (2012/19/EU) was put
in place to ensure that products are recycled using the best available recovery and recycling
techniques, minimizing the impact on the environment, treating any hazardous substances and avoiding the
proliferation of landfill. Contact local authorities for information on correct disposal of Electrical or Electronic
Equipment.
oThe packaging materials use are environmentally friendly and can be recycled.
oPlease discard all packaging material with due regard for the environment.
Important safety information
Your safety is of the utmost importance to Wren. Please
make sure that you read this instruction booklet before
attempting to install or use the appliance. If you are
unsure of any of the information contained in this
booklet, please contact the Wren Advice Line.
IMPORTANT: Any installation work must be carried out
by a qualified electrician or competent person.
Use of the appliance
oYour appliance is only designed to be used in the home. It is
suitable for storing and chilling alcoholic wines, juices,

2
nutritional drinks, soft drinks,snacks,water,beer,etc., cold and
fresh.. NO food stuffs must be stored in the
appliance. If it is used for any other purpose or it is
not used correctly, then Wren will accept no liability
for any damage that is caused.
oAltering the specification of the appliance must not be
attempted for reasons of safety.
Before using your appliance
oCheck the appliance for any signs of transport damage. If you
notice any damage, then you should not connect your
appliance to your mains supply and should contact your
retailer.
Refrigerant
oYour appliance contains R600a refrigerant, which is a natural
gas that does not contain CFCs that can damage the
environment. However it is a flammable substance, therefore
care should be taken:
▪During the transportation and installation of the appliance,
make sure that the refrigeration pipework does not get
damaged.
▪If it does become damaged then sources of ignition and
open flames should be avoided. Also the room that the
appliance is situated in should be thoroughly ventilated.
oDo not place any objects on top of the appliance,
as this may damage the table top.
Child safety

3
oPackaging material should be kept away from children.
oChildren should not be allowed to touch the controls
or play with the appliance.
General safety
oDo not pull on the power supply cable to remove the plug from
your mains supply socket.
oDo not pull out or insert the plug with wet hands.
oDo not attempt to use your appliance outdoors or any place
where it is likely to come into contact with the elements.
oBefore cleaning the appliance or performing maintenance
work, ensure that the appliance has been disconnected from
your mains supply.
oNever allow the back coils of the appliance to come into
contact with the wall surface.
oAlways ensure that the location where you are installing your
appliance is free of stored items such as papers and other
flammable materials.
oNever block the ventilation openings of the appliance, either on
the inside or its exterior.
oIt is vital to keep your appliance well ventilated, so
that there is proper air flow between the bottom of
the unit and the plinth/kick plate which it is sitting
on.
oDo not place electrical devices inside of the appliance, such as
mixers or ice cream makers.

4
Service
You should not attempt to repair the appliance yourself,
as this could cause injury or a more serious malfunction.
If you require a service call, then please contact the
Customer Care Department Tel- 0333 247 1128.
Description of the appliance
Product features
1. Control Panel 5. Decorative frame
2. Tempered Glass Door 6. Legs
3. Handle 7. Shelves
4. Gasket
Control panel

5
The control panel is located at the top or in the middle of the appliance.
1. Light control button
2. Temperature zones shift key
3. Upper temperature zone indicator
4. Lower temperature zone indicator
5. Temperature plus button
6. Temperature minus button
Description of the product features
Control panel
oThe control panel is located in the middle of the appliance, behind the glass door.It is easy to set the
temperature of the appliance and see what temperature the appliance is set to.
One cooling zone
oThere is two cooling zones side by side of your beverage cooler.
oThe cooling zone has a temperature control and temperature display.
Interior light
oThe cooling zone has an interior light. The light can be switched on and off by using the light control
button (1).
The beverage cooler shelves
oThe wooden shelves are fully adjustable to suit various bottle shapes and sizes.
oTo prevent damaging the door gasket, make sure the door is fully open when pulling shelves out of the rail
compartment.
oFor easy access to the bottles stored, pull the shelves out approximately 1/3 of the way.
Using your Wren beverage cooler
Before switching on

6
oMake sure that it has been installed by a suitably qualified person, as per the information contained in
Wren’s installation instructions.
oAfter delivery, wait for eight hours before connecting the appliance to your mains supply. This will allow
any refrigerant gasses that may have been disturbed during the transportation process to settle.
oThe outside of the appliance and the removable accessories contained within it, should be cleaned with a
solution of liquid detergent and water.
oThe interior of the appliance should be cleaned with a solution of sodium bicarbonate
dissolved in lukewarm water. The interior and accessories should be thoroughly dried,
after the cleaning process has been completed.
oThere can be an odour when you first switch on the appliance. It will lessen as the
appliance starts to cool.
During first use
IMPORTANT: When you use the beverage cooler for the first time or restart the appliance after it has been
turned off for a long time, there could be a few degrees variance between the temperature you select and the
one indicated on the LED display. This is normal and it is due to the length of activation time. Once the
beverage cooler has been running for a few hours everything will be back to normal.
oWhen you first switch on the appliance, the compressor will run continuously until the beverage cooler
reaches a cool enough temperature.
oDuring this period of time, you should try not to open the door frequently or place bottles inside of the
appliance.
oIf the unit is switched off or unplugged, you must allow at least 5 minutes before restarting the appliance
or reconnecting it to your mains supply.
Switching on the appliance and setting the temperature
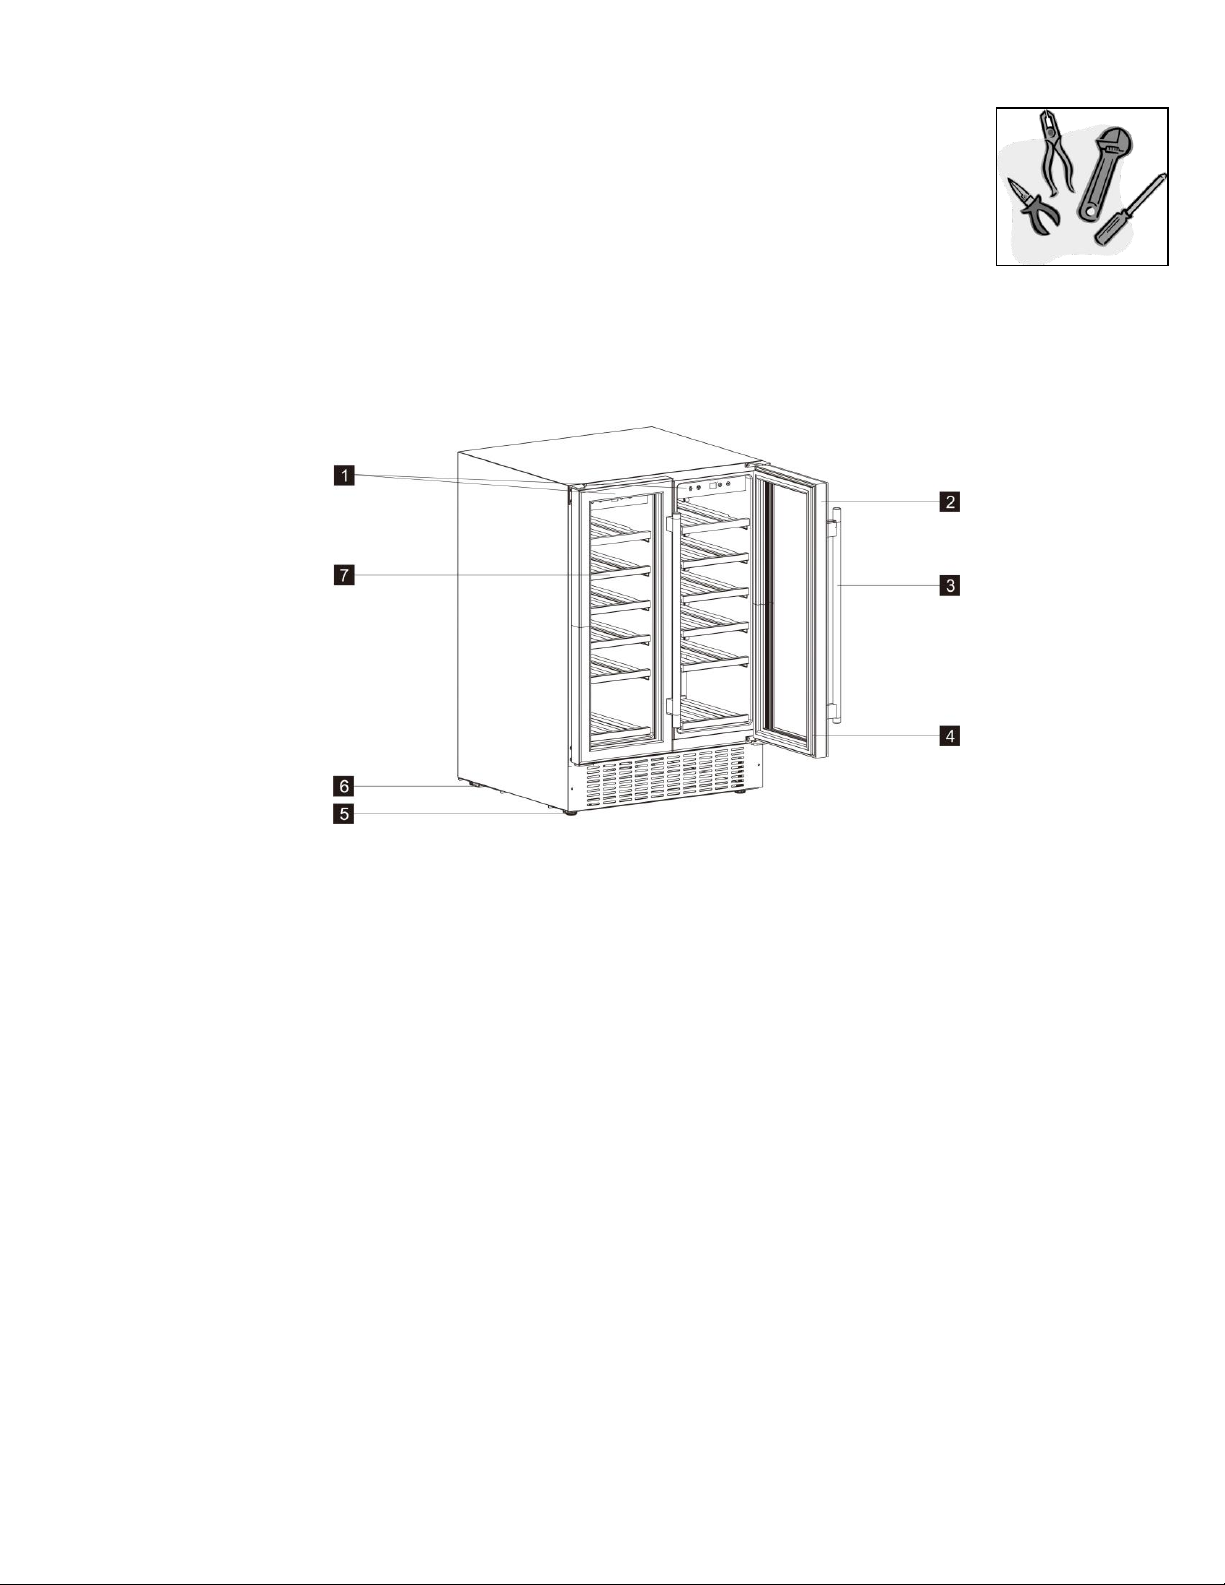
oTo switch the appliance on or off, press the Light control button(1) and Temperature zones shift key(2) at
the same time for 5seconds.
oThe temperature setting for the appliance is adjustable within the range of 2°C - 22°C.
oUse the temperature plus (5) and minus (6) buttons to set the desired internal temperature.
oThe temperature will increase by 1°C if you touch the plus button once and will decrease by the same
amount if you press the minus button once.
oWhen you set to a new temperature, the display flashes 2 seconds and then it will display the new set
temperature.
ATTENTION: In the event of a power cut keep the appliance door closed to maintain temperature. Once power
is restored the Beverage Cooler will remember the previous set temperature.
IMPORTANT: When the temperature of the cooler is changed, the compressor works harder to reach the
required temperature. During this time, the side panels of the beverage cooler can reach up to 45°C however
they will cool down when the set temperature is reached.

7
Wine or Beverage Storage
For 750 ml Bordeaux bottles Max: 46 bottles standard
The humidity control box
oThe appliance is equipped with a system for maintaining the correct level of
humidity.Under extremely dry environmental conditions, you may have to add
some water into the humidity box provided with your beverage cooler.
oFill the small plastic reservoir (humidity box) ¾ full with water, and fit onto
the runners found on the top shelf of the appliance. Check the water level
regularly and refill as necessary.
oPlease ensure the reservoir is positioned correctly on the runners on the
top shelf to avoid the possibility of water spillage.
Loading the beverage cooler
oIMPORTANT: Your appliance is ideally suited to store 0.75 litre Bordeaux style beverage
bottles or 0.33 litre cans. While it can store larger bottles, you must make sure that they do not
prevent the door from shutting properly.
oAlways check that you can close the door without it fouling on a wine bottle or beverages ,
before shutting it.
oWhen loading several bottles of wine or beverage at once, it will take longer for the appliance to cool
the individual bottles.
oAs many bottles or cans may differ in size and dimensions, the actual number of bottles you are able to
store may vary. The maximum storage number is based on standard 0.75 litre Bordeaux style wine
bottles or 330 litre cans.
Storing your wines and beverages
The chart below indicates the ideal storage temperatures for different types of wine and beverage:-
°C °F Beverage Style
12
53
Water
10
50
Black Ale
8
46
Juice

8
°C °F Wine Style
9
66
Armagnac, Brandy, Cognac
18
64
Full Bodied Red Wines, Shiraz
17
62
Tawny Port
15
59
Medium Bodied Red Wines
14
57
Amontillado Sherry
13
55
Light Bodied Red Wines
12
54
Full Bodied White Wines
11
52
Medium Bodied White Wines
10
50
Rosé, Light Bodied White Wines
9
48
Vintage Sparkling
8
46
Fino Sherry
7
45
Non Vintage Sparkling
* Light red wines, such as Beaujolais, Pinot Noir and Cabernet Franc benefit from being served slightly cooler than
full-bodied reds.
** Chardonnay is often served too cold. You should chill it at a warmer temperature inside of your beverage
cooler. Or leave it to warm slightly when you remove it from your beverage cooler.
oTemperature stability is the most important factor when it comes to storing wine.
oExposure to light, vibrations or fluctuations in temperature and humidity can all cause wine to spoil. When
properly stored, wines not only maintain their quality but many will actually improve in aroma, flavour
and complexity as they mature.
oWines kept at a higher temperature will age faster. Wine that is exposed to temperatures that are greater
than 21°C will suffer from poorer flavour and aroma.
oIf wine is kept at too low a temperature, this can result in the development of harmful deposits. A
humidity of 70% is ideal for keeping corks from shrinking.
oAfter a bottle of wine has been opened, the wine comes into contact with air. So it is best to store the
remainder of the bottle upright, to minimize the surface area of the wine that is coming into contact with
the air.
oOnce opened, wine will remain in a drinkable condition for two days for delicate whites or three days for
rich reds, as long as the bottle as been resealed. You should make sure that the seal is firm by checking
the stopper.
oSpecial stoppers that keep wine sparkling and Champagne bubbling for one or two days after opening, can
be bought at most good wine shops.
7
45
Sour Beers
7
45
Pale Ale
7
45
Dark Lagers
6
43
Iced Coffee
5
42
Premium Lagers
4
40
Wheat Beers
3
38
Light, Pale Lagers
3
38
Coca-Cola
2
35
Dairy

9
oWhen stored correctly, white wines can keep well for up to two years. Full bodied reds will age well for
ten years and dessert wines will age well for up to twenty years.
oWhen you buy a bottle of wine, you should transfer it to a suitable storage location immediately (if you
are not going to store it in your beverage cooler).
oCheaper bottles of wine will not age as well as more expensive ones.
oTo make the most of the bouquet and taste of your wine, never fill more than half a glass at a time. It will
also help if the shape of your wine glass is appropriate for your wine. The size and shape of your wine
glass’s bowl will determine the intensity and complexity of the bouquet. The stem should be long enough
to allow you to avoid hand contact with the bowl of the glass and should be tulip-shaped or tapered at the
top.
Storage problems
Corking- a tiny percentage of bottled wine (about 1%) will suffer from this. The cork reacts with the wine and
gives it a musty, unpleasant taste. It is the most common wine storage problem and is caused by harmless
bacteria growing on the cork. As unfortunate as this is, there is nothing to do but to discard all of the wine in the
affected bottle. This is not to be confused with small fragments of cork floating in the wine itself, which will not
impair the flavour.
Oxidisation- when wine has been opened and left for longer than a day; it tends to lose its aroma and colour,
giving an overall flat taste. The only way to avoid this, it to either drink the wine on the same day it was opened
or to use a vacuum device specially designed for removing oxygen from opened wine bottles. If you use such a
device, the wine should still be consumed shortly afterwards.
Ullage- this is loss of wine from the bottle by evaporation or leakage. Signs of ullage include wine seeping around
the cork, a protruding cork or a stained label. It can happen if the bottle has been allowed to get too warm. The
wine may still be drinkable, if the leakage was recent; however, you should be aware that if the wine cools down
again, contraction can cause more air to be sucked into the bottle and result in further deterioration.
Slight effervescence in still wine- this isn’t really a problem with the way the wine has been stored, but as a result
of incomplete malolactic fermentation before the wine was bottled. A good way to get rid of the effervescence is
to let the wine breathe. Alternatively you can use a bottle vacuum device, after about five minutes the
effervescence will vanish.
Sediment- this is not normally a problem, however both red and white wines can produce sediment after a
number of months in a bottle. The sediment consists of tartrate crystals and is totally harmless. If anything the
building of sediment can be considered a good sign because it means that the wine was not subjected to much (if
any) filtering, meaning that the flavours and aromas should be preserved better.
A good way to get around sediment (if it is a problem) is to stand the bottle upright, the day before opening, so
that the sediment can settle to the bottom of the bottle.
You can also decant your wine; decanting will “open up” the flavour of both young and old wines, but younger
wines in particular. To decant, pour the wine slowly and evenly into your decanter.
Cleaning and maintenance

10
WARNING: PLEASE ENSURE THAT YOUR APPLIANCE IS DISCONNECTED FROM YOUR MAINS
SUPPLY BEFORE ATTEMPTING TO CLEAN IT.
oDo not clean the appliance by pouring water onto it or spraying water
over it.
oThe interior of the beverage cooler should be cleaned periodically, using a solution of
bicarbonate of soda and lukewarm water.
oClean the accessories separately with soap and water. Do not clean them in a dishwasher.
oDo not use abrasive products, detergents or soaps.
oAfter washing the appliance, wipe over the area that you have cleaned with a damp cloth
and then dry it thoroughly.
oWhen cleaning is complete, dry your hands and then reconnect the plug to your mains
supply.
Defrosting
oDefrosting occurs automatically inside of the beverage cooler during operation. The defrost water is
collected by the evaporating tray and evaporates automatically.
oThe evaporating tray and defrost water drain hole should be cleaned periodically. This will prevent water
from collecting in the bottom of the beverage cooler, instead of flowing down the defrost drainage
channel and drain hole.
oYou can also pour a small amount of water down the drain hole to clean inside of it.
oYou should be careful to make sure that wine bottles do not touch the rear wall of the appliance, as this
can interrupt the automatic defrosting process and deflect water into the base of your beverage cooler.
Removing the shelves for cleaning
oBefore cleaning your appliance,please make sure to remove all the shelves from the compartment.
Moving your beverage cooler
If you need to move your beverage cooler to another location you should follow the steps outlined below.
oRemove all items from the beverage cooler.
oSecurely tape down all loose items such as the shelves inside of the appliance.
oTurn the adjustable foot up to the base to avoid damage.
oTape the door closed.
oEnsure the appliance stays secure in the upright position during transportation. Also protect the outside of
the appliance with a blanket or similar item.
Power failure
oMost power failures are corrected within a few hours and should not affect the temperature of your
appliance if you minimize the number of times the door is opened.

11
oIf the power is going to be off for a longer period of time, you need to take the proper steps to protect the
contents.
IMPORTANT: If the appliance is unplugged, the power is lost or turned off you must wait 3 to 5 minutes before
restarting the beverage cooler. If you attempt to restart before this time delay, the beverage cooler will not
turn on.
Vacation time
Short holidays: Leave the beverage cooler in operation for holidays of less than 3 weeks.
Long absences: If the appliance will not be used for several months, remove all items, turn off the appliance and
unplug the electricity cable. Clean and dry the interior thoroughly. To prevent odour and mould growth, leave the
door open slightly by blocking it open if necessary.
Installation
IMPORTANT: Before installation and usage read all the instructions and make sure that the voltage (V) and the
frequency (Hz) indicated on the rating plate are exactly the same as the voltage and frequency in your home.
The rating plate can be found on the front left edge of the inside of the beverage cooler.
The manufacturer declines all responsibility in the event of the installer failing to observe all the accident
prevention regulations in force, which are necessary for normal use and the regular operation of the electric
system.
Electrical connection
YOUR BEVERAGE COOLER IS INTENDED FOR FITTED AND PERMANENT INSTALLATION.
We recommend that the appliance is connected by a qualified electrician, who is a member of the
N.I.C.E.I.C. and who will comply with the I.E.E. and local regulations.
Positioning
oIt is advisable that your appliance is only installed in a location where the ambient temperature of the
room, corresponds with the climate classification that is stated on the rating plate of your appliance. Your
appliance may not function correctly if the ambient temperature falls outside of the following ranges.
Climate classification
Appropriate ambient temperature
SN
+10 to +32 degrees centigrade
N
+16 to +32 degrees centigrade
ST
+18 to +38 degrees centigrade
T
+18 to +43 degrees centigrade
oPositioning the appliance requires two people in order to avoid injuries or damage to the appliance.
oYour appliance should not be located in direct sunlight or exposed to continuous heat or extremes of
temperature (e.g. next to a radiator or boiler). If this is not feasible, then you should install an insulation
plate between the appliance and the adjacent heat source.
oYou should check whether there is an electrical socket available, which will be accessible after your
appliance is installed.

12
oPlace the appliance flatly and firmly on a solid base. The appliance is fitted with adjustable feet on the
front side, which should be used to level the appliance.
oBe sure to leave enough space for the opening of the door, to avoid damage to the appliance or personal
injury.
oIMPORTANT: The vent at the base of the appliance is for ventilation. Nothing
should be placed in front of this vent; otherwise your beverage cooler may not
operate properly.
Built-in installation
oYour beverage cooler can be used as a freestanding or a built in unit. The clearances shown in the above
drawing should be followed for both types of installation.
oIn particular the depth dimension must be observed.
oIMPORTANT: The vent at the base of the appliance is for ventilation. Nothing should be placed in front
of this vent; otherwise your beverage cooler may not operate properly.
oA decorative plinth can be fitted to the front of the base vent as long as the cut out shown in the diagram
below is made in the plinth. This cut out is required whether the vent is removed or not.
Adjusting the height and
leveling of your beverage cooler
oThe appliance is equipped with adjustable feet, so that the height may be adjusted to level the cooler on
uneven floor surfaces.
oWe recommend that two people carry out this procedure.

13
oThe height must be adjusted prior to building the appliance into the housing unit and it should be set at
such a height that the top panel of the appliance fits exactly below the kitchen worktop.
oThe appliance height is 865mm when produced in factory,can adjust height from 865-920mm by adjusting
the feet.
oPull down the appliance carefully approximately 60°to allow access to the adjustable feet.
oTake care to ensure the cooler is supported at all times.
oTwist the foot into a suitable position to level the cooler from 870 to 920mm.
oRepeat these steps for the other adjustable feet.
IMPORTANT: If the appliance is not level, then the door and door seal may be affected.
IMPORTANT: Do not move the appliance when the feet are adjusted high.
Installing the handle
oRemove the door gasket on the side you wish to install the handle.
You can see two designated holes for handle installation.
oInstall the handle tightly as shown in the diagram above with the
two screws, lock washers and flat washers provided.
oReplace the door gasket.
IMPORTANT: DO NOT HEAT THE DOOR SEAL ON ANYTHING BUT THE
LOWEST HEAT SETTING, OR HEAT THE SEAL FOR A LONG PERIOD OF TIME.
OTHERWISE DAMAGE MAY BE CAUSED TO THE DOOR SEAL, WHICH WOULD NOT BE RECTIFIED UNDER THE
GUARANTEE FREE OF CHARGE.
IMPORTANT: WHEN YOU HAVE REVERSED THE DOOR OF THE APPLIANCE, IF YOU HAVE
PLACED THE APPLIANCE ON ITS BACK, YOU MUST WAIT FOR 8 HOURS BEFORE SWITCHING
THE APPLIANCE BACK ON.
Troubleshooting
IMPORTANT: If your beverage cooler appears not to be operating properly, before contacting the Customer
Care Department, please refer to the checklist below.

14
PROBLEM
POSSIBLE CAUSE
Appliance does not operate
Not plugged in.
The circuit breaker has tripped or the fuse has blown.
Temperature inside the appliance is too warm.
The temperature controls are set too warm. Set the temperature
controls to a cooler setting and allow several hours for the
temperature to stabilise.
The door is being kept open too long or is being opened too
frequently, which is allowing warm air to enter the appliance.
The door is not closed completely.
The door gasket is not sealing correctly.
The appliance has recently been disconnected from the mains
supply; it will take at least four hours for it to get down to
temperature again.
Temperature inside the appliance is too cold
The temperature controls are set too cold. Set the temperature
controls to a warmer setting and allow several hours for the
temperature to stabilize.
Vibration
Check to ensure that the appliance is on a level surface.
The appliance is touching the back wall behind it.
Re-position the appliance and move it from the wall.
If vibration continues to occur, then turn off the appliance and
unplug it from your mains supply. Then contact the Customer
Care Department for assistance.
Moisture is forming on the inside of the appliance.
The door is slightly open.
The door is being kept open too long or is being opened too
frequently. Open the door less often.
The door is not sealed properly.
Moisture is forming on the outside of the appliance.
The door is slightly open, causing cold air from inside the
appliance to meet warm, moist air from the outside.
IMPORTANT: If your appliance appears not to be operating correctly, then you should disconnect it from your
mains supply and then contact the Customer Care Department.
DO NOT ATTEMPT TO REPAIR THE APPLIANCE YOURSELF.
Please note that if an engineer is asked to attend whilst the product is under guarantee and finds that the
problem is not the result of an appliance fault, then you may be liable for the cost of the call out charge.
The appliance must be accessible for the engineer to perform any necessary repair. If your appliance is installed
in such a way that an engineer is concerned that damage will be caused to the appliance or your kitchen, then
he will not complete a repair.
This includes situations where appliances have been tiled in, sealed in with sealant, have wooden obstructions
placed in front of the appliance, like plinths. Or any installation other than the one specified by Wren has been
completed.
Please refer to the conditions of guarantee that appear on the warranty card that you receive with the appliance.
IMPORTANT: Wren operates a policy of continuous improvement and reserves the right to adjust and modify its
products without prior notification.
Technical Data
Manufacturer
Wren

15
Model Number
WRWC60DDBKED / WRWC60DDSSED
Product Category
2 –Refrigeration-cellar, Cellar and wine storage appliances
Energy Efficiency Class (1)
G
Annual Energy Consumption (2)
146 kWh
Storage Volume of Fridge Compartment
116 litres
Storage Volume of Freezer Compartment
N/A
Star Rating
N/A
Coldest Storage Temperature
2°C
Frost Free Compartments
Yes
Temperature Rise Time
3 Minutes
Freezing Capacity
N/A
Climate Class (3)
N,ST
Noise Level
42 dB
Installation Type
Built-in
Materials
Case
Steel
Door
Glass
Unit Dimension(WxDxH)(mm)
595x614x870
Maximum Ambient Temperature
38°C
Rated Voltage
220-240V AC
Rated Frequency
50Hz
Protection Type
I
This appliance is intended to be used exclusively for the storage of wine.
(1) This refrigerating appliance is not suitable for freezing foodstuffs.
(2) The Beverage Cooler is recommended to be designed at 2-22°C.
(3) The shelves is placed in factory mode that result in the most efficient use of energy for the refrigerating
appliances.
(4) If food is stored for a long time,it is recommended to wrap it in plastic wrap and set the temperature lower.
(5) Children aged from 3 to 8 years are allowed to load and unload refrigerating appliances.
(6) To avoid contamination of food, please respect the following instructions

16
- Opening the door for long periods can cause a significant increase of the temperature in the
compartments of the appliance.
(7) On a scale from A (highest efficiency) to G (lowest efficiency).
(8) Annual energy consumption based on standard test results for 24 hours. The actual energy consumption will
depend on how the appliance is used and where it is located.
(9) This appliance is intended to be used at an ambient temperature between “16°C” (lowest temperature) and
“38°C” (highest temperature).
If the refrigerating appliance is left empty for long periods, switch off, defrost, clean, dry, and leave the door
open to prevent mould developing within the appliance.
For after sales, service and spares call:
0333 247 1128
IM 60cmDD winecellar 20210505
This manual suits for next models
1
Table of contents
Popular Accessories manuals by other brands

PCB Piezotronics
PCB Piezotronics ICP 123A24 Installation and operating manual

ORION TELESCOPES & BINOCULARS
ORION TELESCOPES & BINOCULARS 51874 instruction manual

August
August LP107T user manual

Heaven Fresh
Heaven Fresh HF 980 instruction manual

turck
turck LTX-R10 Series manual

GSL TECHNOLOGY
GSL TECHNOLOGY 24100U user manual