WSL TyrePal TC215/ESK User manual

TC215/ESK 20140812 ©TyrePal 2014
TyrePal TPMS External Sensor Kit
TC215/ESK
User manual
Innovative safety solutions for your peace of mind

2 TC215/ESK 20140812 ©TyrePal 2014
1. INTRODUCTION
This kit provides additional sensors to go with the
TC215OEK monitor, for monitoring spare wheels on
a trailer or the tyres on a towing car. The sensors
can be used for tyre pressures up to 99psi.
The pack contains sensors, 2 locking keys, 1 pack of
seals/ screws, 1 pair sensor tools, a label set and
this instruction manual.
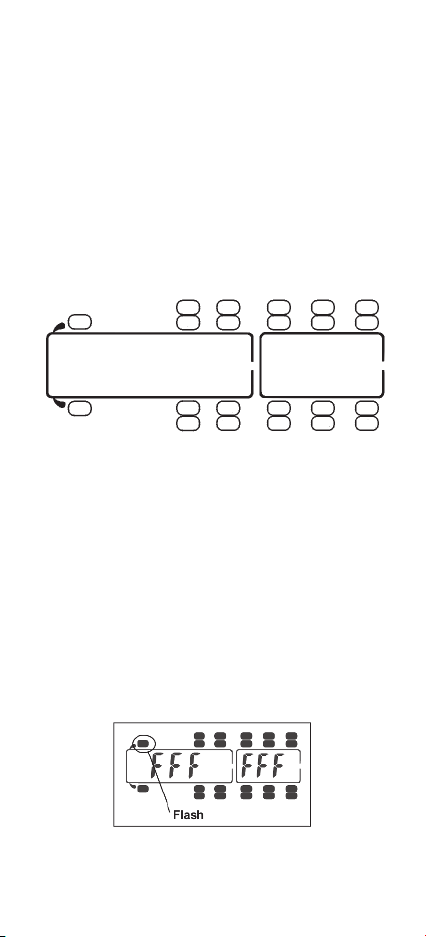
The TyrePal TPMS system can monitor up to 22
tyres on a car and trailer, but once the sensors are
registered to the monitor, it only displays the wheel
positions where sensors are registered.
2. IMPORTANT SAFETY NOTES
The TyrePal TPMS system can help you maintain
tyre pressures for safety, fuel economy, tyre life and
environmental impact.
It is your responsibility to ensure that it is suitable
for your particular vehicle and that it is working
correctly and properly maintained. Check the sensors
and valve stems regularly, as some road salts can
cause corrosion.
The system does not replace the need to carry
out regular checks on the condition and wear
of the tyres.
Keep the small parts and especially the batteries out
of the reach of children. If a battery is swallowed,
consult a doctor. Do not hold a battery with metallic
tweezers as it will cause a short circuit and may lead
to burning or explosion of the battery.

TC215/ESK 20140812 ©TyrePal 2014 3
3. BEFORE INSTALLATION
Before installing the system, ensure that it is suitable
for your vehicle.
Check that the operating pressure of your tyres is
within the range of the system. i.e. 0-6.8 bar (0-
99psi).
Check that tyre valve stems are in good condition
before fitting the sensors. We do not recommend
using the system with aluminium valve stems as
interaction between the sensor and the valve stem
will cause corrosion.
Do not fit sensors to tyres that have been treated
with internal tyre sealant. The sealant may
damage the sensor or impair its action.
To avoid danger of damage to the sensors, check
that sensor valve caps will remain mainly within
the outside profile of the tyres when fitted.
If the distance from the rear wheels to the monitor
is greater than about 7 metres, we recommend the
use of a TyrePal Smart Relay to increase the range
of the sensors and improve the stability of the sys-
tem.
3.1 Wheel balancing
The weight of the sensors is within the tolerance
generally achieved for wheel balancing, so there is
usually no need for the wheels to be rebalanced
after installing the system. If vibration is felt when
driving at speed after fitting the system, the wheels
must be rebalanced.

4 TC215/ESK 20140812 ©TyrePal 2014
3.2 Sensors and wheel positions
Sensors are interchangeable and can be registered
to any of the 22 possible wheel positions that can be
displayed on the monitor. Once sensors are
registered, the display only shows data from the
registered positions. We recommend that you label
each sensor to identify its position and record the
positions here:
4. INSTALLATION
4.1 Install and register the sensors
The following procedure registers the sensors as
they are installed.
1. In standby mode, press and hold the CODE
button for 3 seconds. Release it after the beep
to enter coding mode. A flashing tyre icon is
displayed. If no sensor is registered to this
position, the letters FFF FFF are shown. If a
sensor is already registered, the sensor ID is
shown.

TC215/ESK 20140812 ©TyrePal 2014 5
2. Press the +or –button to select the desired
tyre position.
3. Screw the sensor onto
the tyre valve. As it
senses the air pressure,
the sensor sends its ID
code to the monitor.
The monitor beeps and stores the tyre position
with that sensor ID. If it does not register within
a few seconds, unscrew the sensor and try
again.
4. Press +or –buttons to select the other tyres
and repeat for all the tyres that are to be
monitored.
5. When all sensors are registered, press and hold
the CODE button to exit.
If you need to delete a setting, use the +or –
buttons to select the tyre position then press and
hold the SET button for three seconds. A double
beep confirms the ID has been deleted.
Note: If a sensor is coded twice to the same
monitor, the previous setting will be deleted.
4.2 Lock the sensors
For added security, use the
locking screw in the sensor
can be tightened onto the
valve stem using the hex
key, but do not over tighten.
If it is difficult to reach, take
the sensor off and insert the locking screw into a
different hole. Keep the hex key in a safe place!

6 TC215/ESK 20140812 ©TyrePal 2014
4.3 Test for leaks
When the sensors have been installed, test for leaks
by brushing a little detergent and water on the valve
stems. If bubbles appear, release the locking screw
and re-tighten the sensor.
5. NORMAL OPERATION
5.1 Sleep mode
The sensors have a sleep mode, which means that
when the vehicle has been stationary for several
minutes, they stop transmitting to save battery
power. If the monitor is awake at this time, it will
continue to display the latest received data for a
period of time and then show a blank for tyre
positions where no data has been received. Please
note that it may take a few minutes for the monitor
to receive signals from all the sensors when it first
wakes up.
If a sensor battery is low, or if a signal is not
received from a sensor for a period of 60 minutes,
the monitor issues an alert.
5.2 Sensor battery alert
When a sensor battery needs replacing, a
low sensor battery icon is shown, and the
appropriate tyre icon flashes.

TC215/ESK 20140812 ©TyrePal 2014 7
6. REPLACING SENSOR BATTERIES
When the sensor low battery icon is showing on the
monitor and a corresponding tyre icon is flashing,
the sensor battery needs to be replaced. The battery
is a CR1632 lithium cell, which is available from
TyrePal Ltd.
1. Use the hex key to slacken the locking screw,
then take the sensor off the tyre valve.
2. Use the sensor tools to remove the battery
cover from the sensor and expose the battery.
3. Replace the CR1632
battery making sure
the positive + side is
upwards and that it
goes inside the metal
cage, not on top of it.
4. Check that the waterproof rubber seal is in
good condition and is correctly positioned. Then
replace the battery cover, using the sensor tool
to replace the cover.

8 TC215/ESK 20140812 ©TyrePal 2014
7. TROUBLESHOOTING AND MORE
INFORMATION
Additional information about the system, including
troubleshooting and advice on managing tyre
pressures is provided on the TyrePal web site,
www.tyrepal.co.uk, where it is regularly updated.
8. SPARES, SERVICE AND WARRANTY
Spare parts including batteries and replacement
sensors are available to purchase from the TyrePal
web site.
Please register your guarantee by completing details
on our web site.
The system is warranted to be free from
manufacturing defects and is guaranteed for a
period of twelve months from date of purchase.
There are no user-serviceable parts inside the
monitor and if internal parts have been tampered
with, the warranty may be void. The warranty does
not affect your statutory rights.
Wheel Solutions Limited,
Unit 2 Upper Keys Business Park, Keys Park Road,
Hednesford, Cannock, Staffs WS12 2GE
Table of contents