Xcube SingMaxx 520 User manual


36
5.5 Certifications, Liability, and Trademarks
Certifications
The player is CE and FCC certified and compliant with RoHS requirement.
Limited Liability
The manufacturer or dealer is NOT responsible for any accidental
damage including bodily injury resulting from misuse or improper
operation by user
Trademark
Windows Media Player 10/11 and Windows 98/2000/ME/XP/VISTA are
registered trademarks of Microsoft Corporation in the United States
and/or other countries.
All other trademarks are the property of their respective owners.
SingMaxx is a registered trademark of XCUBE Technology Inc. in Taiwan
and/or other countries.
52
3
SingMaxx 520
User Manual
English
NOTICE
Please note that separate permanent written records are kept for all important data.
Data may be lost or altered in virtually any electronic memory product due to
different circumstances. We assume no responsibility for data lost or otherwise
rendered unusable as a result of improper use, repairs, defects, battery replacement
or any other cause. Therefore, we assume no responsibility, directly or indirectly, for
financial losses or claims from third parties resulting from the use of this product or
any of its functions.
The information provided in this manual is subject to change without notice.
1

4
CAUTION
WARNING
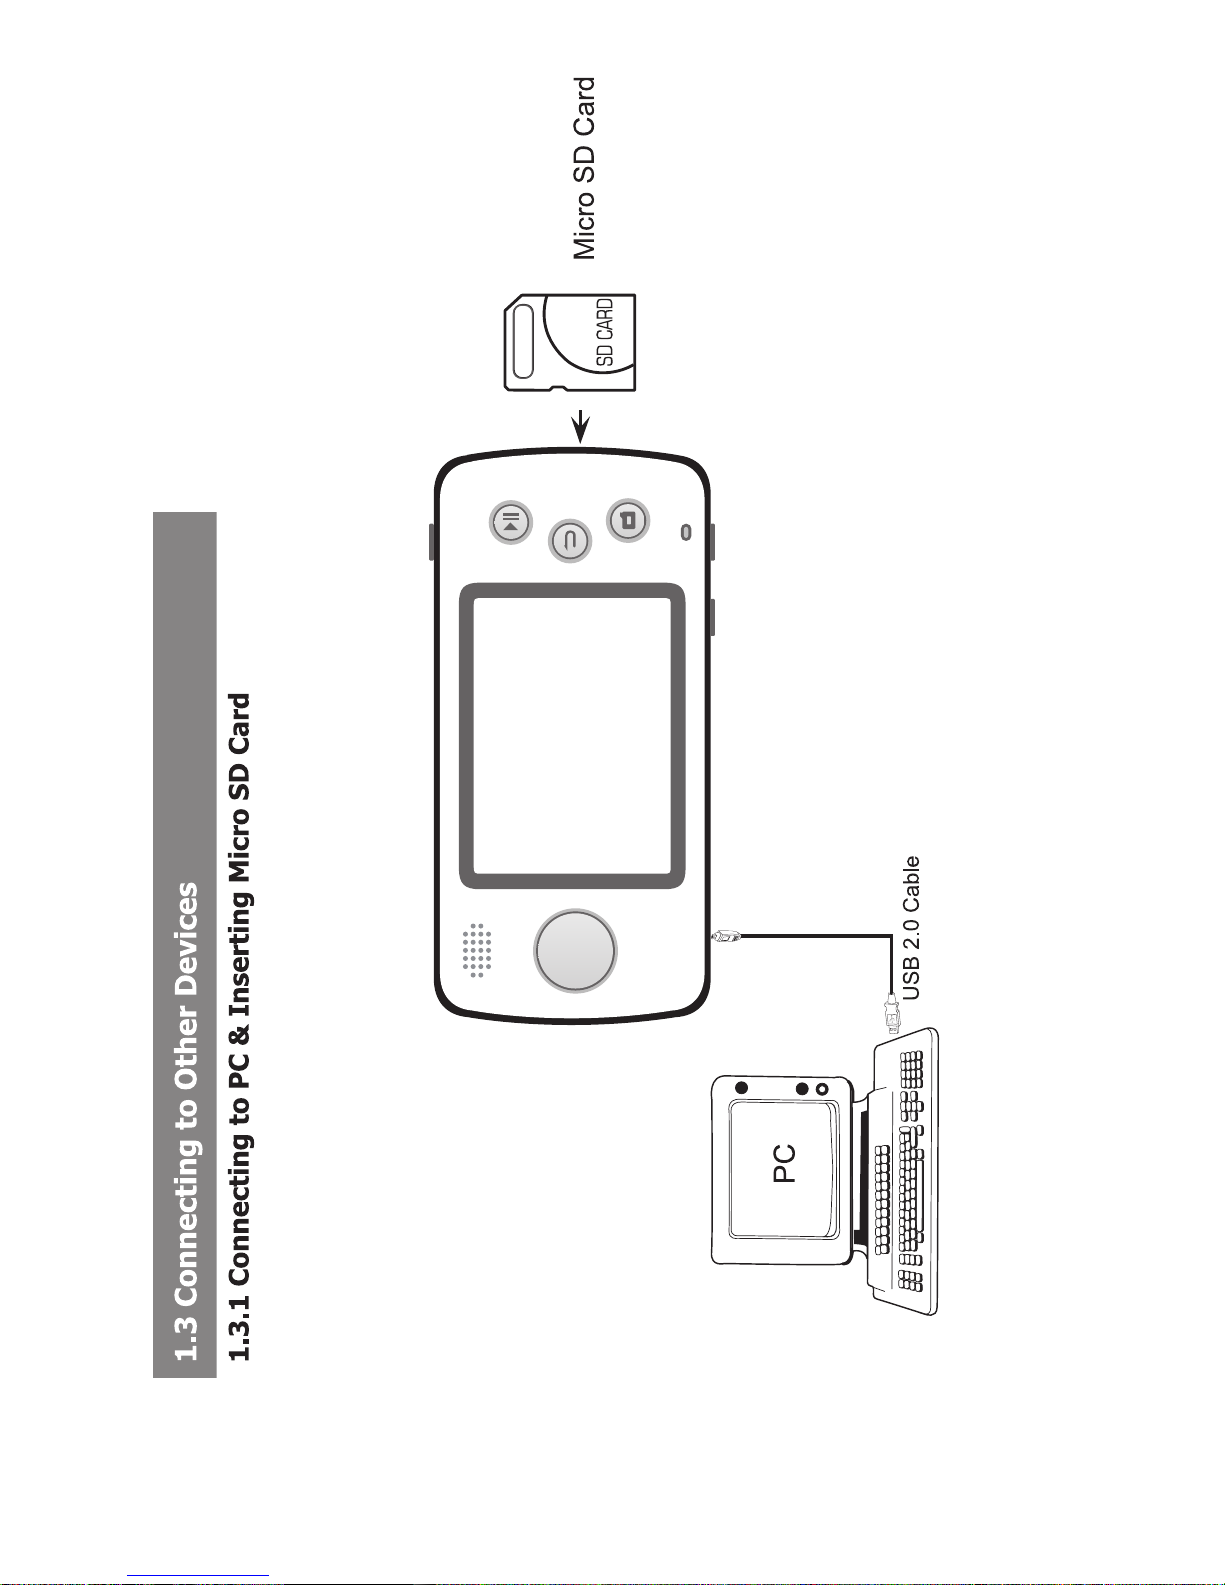
!Please do not disconnect the Player from the computer during reading or writing, or
else it may cause data loss.
!Please use the USB interface at the back of the host computer (the USB interface at
the front of the host computer may be fitted with low power ports. Extended and/or
improper use, can cause an insufficient supply of power, which may cause the USB
equipment to malfunction.
!If the disk cannot be found or the folders or files cannot be viewed, please format
the disk when connected to the computer.
!Do not drop the Player or apply excessive force to it.
! Do not subject the Player to extreme temperatures. Since the product is not
waterproof, do not use it or store it where fluids can splash onto it. Raindrops, water
spray, juice, coffee, steam, perspiration, etc. will also cause malfunction.
!Clean only with a soft, dry cloth.
WARNING
! NEVER dismantle, repair, or rebuild the player. It may cause player
damage without warranty.
2
35
Chapter 5: OTHERS
5.1 Menus
Menu One
In the main menu mode, press the to access Lock commands.
Press to lock the player.
To unlock the player, press and choose unlock and then press
to release the lock.
Menu Two
In any submenu, press the to access Menu or Lock commands.
Menu Three
In the submenu of file list, press to access commands including:
mark all, mark, delete, pmenu and lock.
5.2 Using Windows Media Player 10/11
1. If your computer has never used Windows Media Player, please go to
the Microsoft official website to download Windows Media 10 or
above.
2. After downloading, please follow the instructions to install.
3. After installing successfully, you can click [start synchronize] to start
transfer the music, video and photo files to the player.
4. For the first time connecting the player to the computer, the player
may be considered as a Media Player. Please uninstall the Media
Player device first.
5.3 Using MP4 Maker to convert video formats
1. Install the MP4 Maker converter tool first
2. After installing successfully, click MP4 Maker to run the program
3. After setting, select the file(s) and press Convert to convert files.
If conversion is successful, copy the converted files to the player.
5.4 Low Battery
If the player is in low battery status, the system will prompt Low
Battery Shutting Down….., and, the system will shut down
automatically after 5 seconds.
Please recharge the player in time. The player supports USB power
supply, which can be used while playing.
51

35
Chapter 5: OTHERS
5.1 Menus
Menu One
In the main menu mode, press the to access Lock commands.
Press to lock the player.
To unlock the player, press and choose unlock and then press
to release the lock.
Menu Two
In any submenu, press the to access Menu or Lock commands.
Menu Three
In the submenu of file list, press to access commands including:
mark all, mark, delete, pmenu and lock.
5.2 Using Windows Media Player 10/11
1. If your computer has never used Windows Media Player, please go to
the Microsoft official website to download Windows Media 10 or
above.
2. After downloading, please follow the instructions to install.
3. After installing successfully, you can click [start synchronize] to start
transfer the music, video and photo files to the player.
4. For the first time connecting the player to the computer, the player
may be considered as a Media Player. Please uninstall the Media
Player device first.
5.3 Using MP4 Maker to convert video formats
1. Install the MP4 Maker converter tool first
2. After installing successfully, click MP4 Maker to run the program
3. After setting, select the file(s) and press Convert to convert files.
If conversion is successful, copy the converted files to the player.
5.4 Low Battery
If the player is in low battery status, the system will prompt Low
Battery Shutting Down….., and, the system will shut down
automatically after 5 seconds.
Please recharge the player in time. The player supports USB power
supply, which can be used while playing.
50
5
CONTENTS
Chapter 1: Before Starting
1.1 Contents
1.2 Control Buttons and Definitions
1.2.1 Location of Control Buttons
1.2.2 Definition of Control Buttons
1.3 Connecting to other Devices
1.3.1 Connecting to PC & Inserting Micro SD Card
1.3.2 Connecting to Headphone or Speaker
1.3.3 Connecting to TV
1.3.4 Connecting to TV & Stereo System
1.4 Installing Software
1.4.1 Installing MP4 Maker
1.4.2 Installing Windows Media Player 10/11
Chapter 2: Basic Operations
2.1 Turning on/off the Player
2.2 Submenu Key
2.3 Copying Files/Folders to the Player
2.4 Connecting to TVs & Stereos
2.5 Connecting to Microphones
2.6 Holding the Player
2.7 Battery Charging
2.8 Resetting
Chapter 3: Using SingMaxx 520
3.1 Karaoke
3.1.1 Adding Music or Videos to the Player
3.1.2 Putting Music or Video into a Playlist
3.1.3 Parameter Settings
3.1.4 Singing Songs
3.2 Music
3.2.1 Music Playback
3.2.2 Basic Operations
3.2.3 Parameter Adjustment
3.2.4 Other
3.3 Photo
3.3.1 Basic Operations
3.3.2 Slide Show settings
3.3.3 Wallpaper Settings
3.4 Video
3.4.1 Locating the Video
3.4.2 Basic Operations
3.4.3 Add videos to Karaoke
3.5 Game
3.5.1 Playing Games
3.5.2 Exit the Game
3.5.3 Other Controls
3.6 Recording
3.7 Folder
Chapter 4: Player Settings
4.1 USB Mode
4.2 Language
4.3 Output Mode
4.4 Backlight Time
4.5 Power Off Time
4.6 Load Default
4.7 Customize EQ
4.8 System Information
Chapter 5: Other
5.1 Submenus
5.2 Using MP4 Maker to convert video formats
5.3 Using Windows Media Player 10/11
5.4 Low Battery
5.5 Certifications, Liability, and Trademarks
5.6 Troubleshooting
3

5
CONTENTS
Chapter 1: Before Starting
1.1 Contents
1.2 Control Buttons and Definitions
1.2.1 Location of Control Buttons
1.2.2 Definition of Control Buttons
1.3 Connecting to other Devices
1.3.1 Connecting to PC & Inserting Micro SD Card
1.3.2 Connecting to Headphone or Speaker
1.3.3 Connecting to TV
1.3.4 Connecting to TV & Stereo System
1.4 Installing Software
1.4.1 Installing MP4 Maker
1.4.2 Installing Windows Media Player 10/11
Chapter 2: Basic Operations
2.1 Turning on/off the Player
2.2 Submenu Key
2.3 Copying Files/Folders to the Player
2.4 Connecting to TVs & Stereos
2.5 Connecting to Microphones
2.6 Holding the Player
2.7 Battery Charging
2.8 Resetting
Chapter 3: Using SingMaxx 520
3.1 Karaoke
3.1.1 Adding Music or Videos to the Player
3.1.2 Putting Music or Video into a Playlist
3.1.3 Parameter Settings
3.1.4 Singing Songs
3.2 Music
3.2.1 Music Playback
3.2.2 Basic Operations
3.2.3 Parameter Adjustment
3.2.4 Other
3.3 Photo
3.3.1 Basic Operations
3.3.2 Slide Show settings
3.3.3 Wallpaper Settings
3.4 Video
3.4.1 Locating the Video
3.4.2 Basic Operations
3.4.3 Add videos to Karaoke
3.5 Game
3.5.1 Playing Games
3.5.2 Exit the Game
3.5.3 Other Controls
3.6 Recording
3.7 Folder
Chapter 4: Player Settings
4.1 USB Mode
4.2 Language
4.3 Output Mode
4.4 Backlight Time
4.5 Power Off Time
4.6 Load Default
4.7 Customize EQ
4.8 System Information
Chapter 5: Other
5.1 Submenus
5.2 Using MP4 Maker to convert video formats
5.3 Using Windows Media Player 10/11
5.4 Low Battery
5.5 Certifications, Liability, and Trademarks
5.6 Troubleshooting
4
34
4.6 Load Default
Default Settings: Initialize the system settings which you define to return
to the default setting.
Warning:
Press Clear All button, it may delete all stored files in the player.
4.7 Customize EQ
To set the customize EQ, press or to enter the EQ setting
diagrams.
Use and to identify the frequency and then use and
to adjust. Press to go back to the Setting menu.
4.8 System Information
The software version and the memory status can be viewed in the
system information.
49

34
4.6 Load Default
Default Settings: Initialize the system settings which you define to return
to the default setting.
Warning:
Press Clear All button, it may delete all stored files in the player.
4.7 Customize EQ
To set the customize EQ, press or to enter the EQ setting
diagrams.
Use and to identify the frequency and then use and
to adjust. Press to go back to the Setting menu.
4.8 System Information
The software version and the memory status can be viewed in the
system information.
48
6
Chapter 1: BEFORE START
Warning:
! The player requires Windows 98/2000/ME/XP or above operating system.
! Windows Media Player WMP 10/11 requires Windows XP or above operating
system. Go to the Microsoft official website to update the program.
1.1 Contents
Basic Package (Package A) Including:
SingMaxx 520 Main Set
CD-ROM Software Carrying Bag
User Manual Earphones
USB 2.0 Cable Power Adapter
Optional Accessories
AV Cable SA-221
Mini Microphones SA-231 Microphones SA-232
Package B Including:
All contents of package A
AV Cable SA-221
Package C Including:
All contents of package A
AV Cable SA-221
Mini Microphones SA-231
Package D Including:
All contents of package A
AV Cable SA-221
Microphones SA-232
1.2 Control Buttons and Definitions
1.2.1 Location of Control Buttons
5

6
33
4.4 Backlight Time
You can set the backlight duration. After setting the backlight time, if no
buttons are pressed, the backlight will automatically turn off in order to
save the battery power.
The selections are 10 / 15 / 20 / 60 seconds and Always ON.
4.5 Power Off Time
This is usually used in the music playing mode. After setting, if buttons
are not pressed when playing music, the player will automatically turn off
according to setting time.
The selections are OFF, 10 minutes, 30 minutes, 1 hour, and 2 hours.
47

32
4.3 TV Mode
The player can be set to display on TV ( NTSC or PAL system). The light
of LCD will be off when connecting to TV.
The player can connect to TV by using the TV Hot-Key
.
Keep press
for 5 seconds and release, the display will toggle
between LCD and TV.
Please refer to Chapter 1.3 and 2.4 for detail connection descriptions.
46
7
1.2.2 Definition of Control Buttons
Definition
Item
Button
When to Use
Reset
①
System Reset, used when the player get stuck
Power/Submenu
②
Power on/off (when in main menu)
Submenu (when not in main menu)
Play/Pause
③
Play or Pause
Return
④
Return to Previous Page
TV
⑤
Switch Hot Key Between TV and LCD
Up
⑥
Move Cursor Up
Down
⑦
Move Cursor Down
Right
⑧
Move Cursor Right, Playback
Left
⑨
Move Cursor Left
Lock Switch
⑩
Shut Down Player After Power Off
Right Hand Side: ON
Left Hand Side: OFF
1.3 Connecting to Other Devices
1.3.1 Connecting to PC & Inserting Micro SD Card
7

8
31
4.2 Language
Eleven languages are available: English, Simplified and Traditional
Chinese, Dutch, German, Spanish, French, Italian, Portuguese, Thai, and
Russian.
45

30
Chapter 4: SETTINGS
4.1 USB Mode
This item must be set before connecting to the computer. There are
three modes selection.
MTP Mode
When connecting to a computer, it is possible to upload or download
data by using Windows Media Player 10 (or above) to synchronize the
music/video/photo files. This mode is only used in the Windows XP
system (or above).
Before synchronization, please set the player to MTP Device. Use a USB
2.0 cable to connect the player to the computer. Open Windows Media
Player 10 or above, then synchronize music/video/photo to the player, or
download the data to the DATA folder.
Mass Storage (MSC) Mode
When connecting to a computer, it is possible to upload or download
data by using mass storage mode. This mode is only used in the
Windows 98/2000/ME/XP system (or above).
Please set the player to Mass Storage. Use a USB 2.0 cable to connect
the player to the computer. Open files management system and put the
music/video/photo/others files to the player.
The player will perform automatic synchronization after unplugging the
USB cable. It will allow all the downloaded files to be synchronized into
database system.
USB Charging Mode:
The player can be charged in a computer with any system, for charging
only, however it is not possible to upload or download data in other
systems. In this mode, the player can do any normal operations at the
same time.
44
9

10
30
Chapter 4: SETTINGS
4.1 USB Mode
This item must be set before connecting to the computer. There are
three modes selection.
MTP Mode
When connecting to a computer, it is possible to upload or download
data by using Windows Media Player 10 (or above) to synchronize the
music/video/photo files. This mode is only used in the Windows XP
system (or above).
Before synchronization, please set the player to MTP Device. Use a USB
2.0 cable to connect the player to the computer. Open Windows Media
Player 10 or above, then synchronize music/video/photo to the player, or
download the data to the DATA folder.
Mass Storage (MSC) Mode
When connecting to a computer, it is possible to upload or download
data by using mass storage mode. This mode is only used in the
Windows 98/2000/ME/XP system (or above).
Please set the player to Mass Storage. Use a USB 2.0 cable to connect
the player to the computer. Open files management system and put the
music/video/photo/others files to the player.
The player will perform automatic synchronization after unplugging the
USB cable. It will allow all the downloaded files to be synchronized into
database system.
USB Charging Mode:
The player can be charged in a computer with any system, for charging
only, however it is not possible to upload or download data in other
systems. In this mode, the player can do any normal operations at the
same time.
43

29
3.7 Folder
All the files stored in this player, including music, videos, photos, words
and other materials, are from the USB device.
Select desired folder, then press to open or to view the file.
42
11

11
1.4 Installing Software
1.4.1 Installing MP4 Maker
1. Insert the installation CD into your computer to display the
installation process screen
2. Select and double click MP4 Maker to complete the installation
process following the onscreen instructions
NOTE:
Minimum system requirements for using MP4 Maker
Windows 98 SE/ME/2000/XP and above
64MB or greater memory
30MB or greater hard disk space
1.4.2 Installing Windows Media Player (WMP) 10/11
1. Insert the installation CD into your computer to display the
installation process screen
2. Select and double click WMP 10 to complete the installation process
following the onscreen instructions
NOTE:
1. The installation CD only provides the WMP10 program, please visit
the Microsoft website for WMP11 download and installation
2. Minimum system requirements for using WMP10
Windows XP or above
64MB or greater memory
30MB or greater hard disk space
3. For more information on using Windows Media Player 10/11, refer to
Chapter 5.3
4. To connect the player to Windows Media Player, select Setting > USB
Mode > MTP Mode and press
12
28
3.6 Recording
This is the recording application mode, it supports WAV format.
You can set the desired sample rate, which includes 44.1K, 32K and 16K.
Basic Operations
Recording: Choose Recording and press
Pause: Press when recording
Return: Press and go back to previous menu
Listen to Recording files: Enter the Recording File List and choose the
file and press to playback
Volume Adjustment: Press and use or to adjust the
volume
Note:
1. Please make sure that the battery has enough power before
recording.
2. The recorded file will be saved in the Recoding>Recording File List.
41

28
3.6 Recording
This is the recording application mode, it supports WAV format.
You can set the desired sample rate, which includes 44.1K, 32K and 16K.
Basic Operations
Recording: Choose Recording and press
Pause: Press when recording
Return: Press and go back to previous menu
Listen to Recording files: Enter the Recording File List and choose the
file and press to playback
Volume Adjustment: Press and use or to adjust the
volume
Note:
1. Please make sure that the battery has enough power before
recording.
2. The recorded file will be saved in the Recoding>Recording File List.
40
12
Chapter 2: BASIC OPERATIONS
2.1 Turning on/off the Player
ALWAYS use to turn on/off the player.
USE Lock Switch to lock the player after power off.
Power on: Press the button on the player
Power off: Press the button for 5 seconds until the power-off
signal appears.
Note:
1. The power can be turned off only when the player is in main Menu.
2. Turn the Lock switch to left-hand (off) side after power off for safety.
Warning:
NEVER turn the Lock switch off when the player is still on. It may cause
system failure.
2.2 Submenu Key
The button will become to submenu key when the player is not in
main menu. Press button, the submenu bar will appear when the
player is not in the main menu.
2.3 Copying Files/Folders to the Player
There are two ways to add music, videos, photos and other files to the
folder in the player; through the file folders in Windows (Setting>USB
Mode>Mass Storage) or through Windows media player 10 and above
(Setting>USB Mode>MTP Device).
When Windows recognizes the player it will assign a drive letter. Open
the drive. Files can be dragged and dropped or copied and pasted into
the MEDIA folder of the player.
This is the mass storage mode (hard drive MSC mode). When shut
down and disconnected from the computer it automatically organizes
files. Lyrics files (CDG format and LRC format) with the same name as
music files stored in the LRC folder (Xdata>LRC) will synchronize lyrics
on the screen with the music to be played.
The second method is to add files using Windows Media Player 10 or
above. In Windows Media Player choose the left tab copy to CD or
Device. Songs, photos or videos can then be dragged or copied to the
player. Album art work can also be added to be displayed on the player
screen when playing the song.
The player can access files from Micro SD cards inserted in the media
port on the side of the player. Files can be accessed through the Folder
menu.
13

12
Chapter 2: BASIC OPERATIONS
2.1 Turning on/off the Player
ALWAYS use to turn on/off the player.
USE Lock Switch to lock the player after power off.
Power on: Press the button on the player
Power off: Press the button for 5 seconds until the power-off
signal appears.
Note:
1. The power can be turned off only when the player is in main Menu.
2. Turn the Lock switch to left-hand (off) side after power off for safety.
Warning:
NEVER turn the Lock switch off when the player is still on. It may cause
system failure.
2.2 Submenu Key
The button will become to submenu key when the player is not in
main menu. Press button, the submenu bar will appear when the
player is not in the main menu.
2.3 Copying Files/Folders to the Player
There are two ways to add music, videos, photos and other files to the
folder in the player; through the file folders in Windows (Setting>USB
Mode>Mass Storage) or through Windows media player 10 and above
(Setting>USB Mode>MTP Device).
When Windows recognizes the player it will assign a drive letter. Open
the drive. Files can be dragged and dropped or copied and pasted into
the MEDIA folder of the player.
This is the mass storage mode (hard drive MSC mode). When shut
down and disconnected from the computer it automatically organizes
files. Lyrics files (CDG format and LRC format) with the same name as
music files stored in the LRC folder (Xdata>LRC) will synchronize lyrics
on the screen with the music to be played.
The second method is to add files using Windows Media Player 10 or
above. In Windows Media Player choose the left tab copy to CD or
Device. Songs, photos or videos can then be dragged or copied to the
player. Album art work can also be added to be displayed on the player
screen when playing the song.
The player can access files from Micro SD cards inserted in the media
port on the side of the player. Files can be accessed through the Folder
menu.
14
27
3.5 Game
Download the games from your computer or the Internet to the player. It
supports GBC, NES and LUA formats, and can store them to related
folders. GBC and NES folders belong to the system. If you delete them,
the player will malfunction.
The player has Magic Cube, Gobang, Bomb, Tetris, Bee and Car Race,
which are stored in the LUA folder.
Warning:
ONLY use the legal games. User is responsible for the game downloaded
from Internet.
3.5.1 Playing games
1. Select the game from the folder, then press
2. Press to confirm the selection
3. Use the 4-direction joystick for going up, down, right, and left
4. Use for jumping if program needed
3.5.2 Exit the Game
Press both and , choose Quit and press to
exit the game
3.5.3 Other Controls
Press both and
The screen will show the options for
Quit
Mute
Volume
Brightness
Return
2. Use and to locate the options
3. Use and to adjust the Volume and Brightness
39

27
3.5 Game
Download the games from your computer or the Internet to the player. It
supports GBC, NES and LUA formats, and can store them to related
folders. GBC and NES folders belong to the system. If you delete them,
the player will malfunction.
The player has Magic Cube, Gobang, Bomb, Tetris, Bee and Car Race,
which are stored in the LUA folder.
Warning:
ONLY use the legal games. User is responsible for the game downloaded
from Internet.
3.5.1 Playing games
1. Select the game from the folder, then press
2. Press to confirm the selection
3. Use the 4-direction joystick for going up, down, right, and left
4. Use for jumping if program needed
3.5.2 Exit the Game
Press both and , choose Quit and press to
exit the game
3.5.3 Other Controls
Press both and
The screen will show the options for
Quit
Mute
Volume
Brightness
Return
2. Use and to locate the options
3. Use and to adjust the Volume and Brightness
38
13
Follow the following procedures on copying files/folders
1. Choose MTP device or Mass Storage (Default) first through
Setting>USB Mode> MTP device (or Mass Storage)
2. Connect the player to your computer using the USB 2.0 cable. The
LCD will display the connection mode.
3. Click on the dialogue column displayed on the computer screen.
4. After selecting a file or folder in your computer, drag and drop it into
the drive for the player (Windows will assign a drive letter).
5. Use the right mouse button and select Delete to remove a file or
folder.
6. Unplug the USB cable and the files will synchronize automatically.
Note:
1. When you are transferring data using the USB cable, NEVER
disconnect it or turn off the player; data may be lost or the player
could be damaged.
2. NEVER delete the system folder, it may cause system malfunction.
3. Always put media files or folders under Media folder.
4. Always put LRC and CDG files under Xdata>LRC folder.
5. Always put GBC files under Xdata>GBC folder
6. Always put NES files under Xdata>NES folder
15

13
Follow the following procedures on copying files/folders
1. Choose MTP device or Mass Storage (Default) first through
Setting>USB Mode> MTP device (or Mass Storage)
2. Connect the player to your computer using the USB 2.0 cable. The
LCD will display the connection mode.
3. Click on the dialogue column displayed on the computer screen.
4. After selecting a file or folder in your computer, drag and drop it into
the drive for the player (Windows will assign a drive letter).
5. Use the right mouse button and select Delete to remove a file or
folder.
6. Unplug the USB cable and the files will synchronize automatically.
Note:
1. When you are transferring data using the USB cable, NEVER
disconnect it or turn off the player; data may be lost or the player
could be damaged.
2. NEVER delete the system folder, it may cause system malfunction.
3. Always put media files or folders under Media folder.
4. Always put LRC and CDG files under Xdata>LRC folder.
5. Always put GBC files under Xdata>GBC folder
6. Always put NES files under Xdata>NES folder
16
26
3.4 Video
The player only supports 320x240 pixels AVI format, other formats
require conversion to AVI format with the MP4 Maker management tool.
3.4.1 Locating the Video
1. Choose All or Search by title to locate the video
2. All videos will be listed in alpha (0~9, A~Z) when you enter the
Search by title
3. Press to playback the video
3.4.2 Basic operations
Volume control: press first and using or
to adjust the volume
FF (Fast Forward): pressing
FR (Fast Rewind): keep pressing
Pause: press when playback
Skip: press
3.4.3 Add Videos to Karaoke
1. Choose All or Search by title to locate the video
2. Press and the submenu bar will appear at the right side of
LCD display
3. Use or and choose To Karaoke, press and exit
37

26
3.4 Video
The player only supports 320x240 pixels AVI format, other formats
require conversion to AVI format with the MP4 Maker management tool.
3.4.1 Locating the Video
1. Choose All or Search by title to locate the video
2. All videos will be listed in alpha (0~9, A~Z) when you enter the
Search by title
3. Press to playback the video
3.4.2 Basic operations
Volume control: press first and using or
to adjust the volume
FF (Fast Forward): pressing
FR (Fast Rewind): keep pressing
Pause: press when playback
Skip: press
3.4.3 Add Videos to Karaoke
1. Choose All or Search by title to locate the video
2. Press and the submenu bar will appear at the right side of
LCD display
3. Use or and choose To Karaoke, press and exit
36
14
2.4 Connecting to TVs & Stereos
The player is equipped with an AV-out interface.
1. Plug the 3.5mm connector of the AV cable (SA-221) into the AV-out
jack and connect to a TV or Stereo with the other end.
2. When the player is on, press the button for 3 seconds and
then release. The signal will go on the TV.
3. Press the button again to switch back to LCD display.
4. Please also refer to chapter 1.3 Connecting to Other Devices for detail
connection configuration.
Note:
1. Always connect to the video input with the yellow connector,
audio-right input with the red connector, and audio-left with the
white connector.
2. Using SingMaxx SA-221 standard AV cable is recommended. Other
vendor’s AV cables may NOT work properly because of different
configuration.
Warning:
Display switch between TV and LCD is NOT allowed when playback video
file.
17

15
2.5 Connecting to Microphones
There is an embedded MIC input in front of the player and two
microphone (MIC-A, MIC-B) input jacks in the bottom of the player.
The embedded MIC can be used for voice recording or karaoke singing.
It does not have the echo function when singing.
MIC-A and MIC-B allow a microphone with a 3.5mm connector to
connect and sing in duet.
Note:
1. To obtain higher quality, SA-231 / SA-232 uni-directional, dynamic
microphones are recommended.
2. Always connecting the microphone into the player before playback
the karaoke song, or it may cause a noisy echo sound.
18
25
3.3.3 Wallpaper Settings
1. Locate your favorite photo in the thumbnail preview mode by using
Joystick and press the submenu will appear in the right side
of LCD display
2. Choose [Set BG(H)] and press . Wait for 3~5 seconds and the
wallpaper will change to new chosen photo.
35
Table of contents
Other Xcube Media Player manuals