XFactory X - 6 SQUARED User manual

K021 Instructions v1.0 First Things Page 1
X – 6 SQUARED
K 021 KIT
INSTRUCTION MANUAL
Version 1.0
X – 6 SQUARED KIT

K021 Instructions v1.0 First Things Page 2
CONTENTS
First Things…………………………………….. 3
A Front Arms & Hubs………………………… 5
B Complete The Front End…………………. 12
C Differential…………………………………. 20
D Transmission………………………………. 25
E Transmission Installation…………………. 32
F Build the C-CVDs…………………………. 38
G Rear Control Arms……………………….. 43
Build The Shocks …………………………….. 48
H Rear Tower, Shocks,Turnbuckles………. 55
I Finish It Up………………………………….. 62
Final Set-Up & Prep…………………………… 70
Tuning Section…………………………………. 73
Parts List……………………………………….. 83

K021 Instructions v1.0 First Things Page 3
X – 6 SQUARED ASSEMBLY INSTRUCTIONS
FIRST THINGS FIRST
A) ASSUMPTIONS These instructions assume several things:
1. You have at least some experience building R/C cars. These
instructions are not written for a first-timer.
2. You have the usual assortment of R/C tools.
If you do not meet both assumptions above, please contact us.
Contact information is on Page 4.
B) We suggest you have a clean, well-lighted work area.
C) Before threading screws or ball studs into plastic parts, tap the hole with a
4-40 tap.
D) All references to right and left are from the viewpoint of the driver sitting in
the car facing forward.
E) This Kit contains many parts; most are supplied by X Factory, others are
genuine Team Associated parts. A complete parts list is at the end of this
manual.
F) Many AE parts are supplied on “trees.” When you remove those parts from
the trees, we suggest you do so with a twisting motion to reduce flashing
on the parts, then dress the parts with a file prior to assembly.
G) To photograph this manual, we assembled the car several times. In some
photos, parts you have already assembled are “missing.” This was done
deliberately so you may clearly see this particular step. Follow the steps in
order and you’ll get to the end quickly.

K021 Instructions v1.0 First Things Page 4
SOME IMPORTANT INFORMATION
This is the first time we have made the entire Kit – always before we have made
Conversion Kits. We know we are not perfect. If you experience the slightest
difficulty assembling your X – 6 Squared – if you have trouble with an instruction
or if something does not fit properly – please contact us immediately. Even if you
figure out what needs to be done or modify the part to fit, we will make changes
to help the next person.
Here at X Factory we do not have customers. You have become a member of a
world-wide Family of R/C racing enthusiasts who love working on their cars,
trying new things, helping each other at the track, and winning races. The Family
constantly gives us ideas for new products or improvements to existing products.
We welcome and encourage this input. Thanks in advance for your help!
E-mail cha[email protected]
Phone +01 1-419-877-1787
(U.S.A.)
Snail mail
X Factory R/C Racing Products
P.O. Box 2361
Whitehouse, Ohio 43571 U.S.A.
These instructions are available on our
Web site, www.xfactoryrc.com in the
Tech section. Many of the color photos
on the web are better than the black
and white versions here. You are
welcome to download all or any part
of the website manual.
THANK YOU FOR YOUR
CONFIDENCE IN
THE NEW MATH!
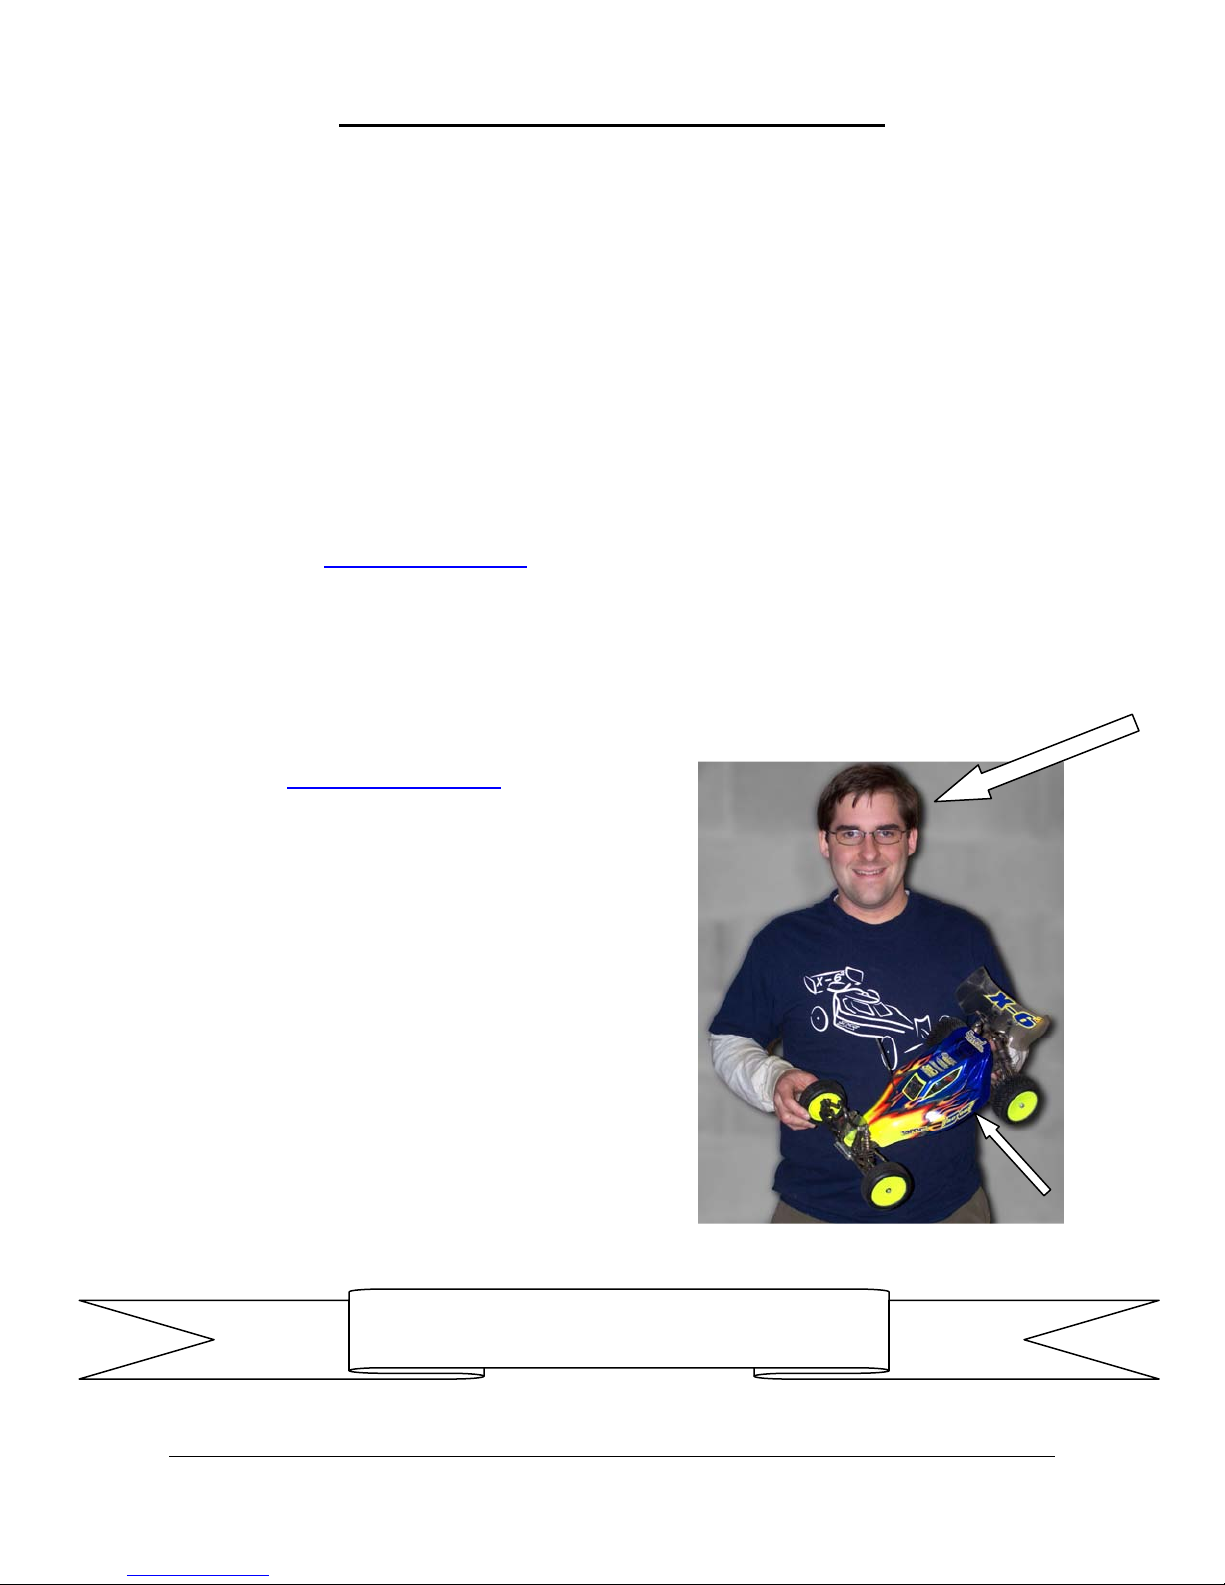
Chief Engineer and designer
Of the X – 6 Squared
Paul Sinclair (large arrow)
His X – 6 Squared (small arrow)
WELCOME TO THE
X FACTORY FAMILY!!

K021 Instructions v1.0 Bag A Page 5
BAG A
FRONT ARMS AND HUBS
CASTER BLOCKS
A1) Remove the steering blocks (ASC 9581), two front axles (2601), two 1/4”
button head screws (6041), and two 1/4” ball studs (6171) from Bag A.
Also pull out the bag of black Dirtz Dialed Partz shims (5701). There are
enough shims in this bag to do the entire car, so take out four .030” shims
(the small ones) now and save the rest in the bag. These shims will be
used throughout the build.
A2) Put the smaller diameter end of one axle into a steering block from the
outside, lining up the axle’s hex with the hex in the block. Push the axle in
until it seats fully, then secure from the inside with a 1/4” button head
screw. You may want to put the smallest drop of thread lock on this
screw. Repeat for the other steering block and axle.

K021 Instructions v1.0 Bag A Page 6
A3) Check the set-up sheet and Tuning Section to determine how many Dirtz
Dialed Partz .030” shims to use for the tie-rod ball studs. These shims
adjust bump steer. Here we are using two. Slide the same number of
shim(s) onto the threaded ends of each ball stud, and install the ball studs
into the top of the steering blocks. The top is the side with the re-
enforcing rib. The bottom has the letter denoting which side this block fits.
A4) Remove the bag with six hinge pins
(ASC 9622) from Bag A. The bag has
three pair of pins: long (rear outer),
middle (front outer), and short (front
king pins). The (short) king pins will
be used now, the (middle) front outer
pins will be used later in Bag A, and
you must save the (long) rear outer
pins for Bag G. You’ll be using more
Dirtz Dialed Partz shims in Bag G, so
you might want to put the long pins in
there for now.

K021 Instructions v1.0 Bag A Page 7
A5) Remove the 30°caster blocks (ASC 9593), two king pins (the shortest
ones), two 2-56 X 1/8” button head screws (6053), two 3/16“ ball studs
(6170), and four Dirtz Dialed Partz .030” shims from Bag A. Check the
set-up sheet and Tuning Section to determine which hole to use for your
ball stud. Here we have used the A hole (inside) for the ball stud. When
on the car, the ball stud land is to the rear of the caster block. Install a
3/16” ball stud from the front in each caster block.
A6) Check the set-up sheet and Tuning Section to determine where you will
shim your steering blocks. Here the steering block is in the lowest position
with both shims at the top. Put the left steering block into the left caster
block and slide the king pin up from the bottom. As the pin emerges from
the top of the steering block, add two Dirtz Dialed Partz .030” shims, then
slide the pin the rest of the way into the top of the caster block.

K021 Instructions v1.0 Bag A Page 8
A7) Secure the king pin with the 2-56
X 1/8” screw. You’ve got to push
on these screws to get them to
thread in, once the head of the
screw contacts the king pin, stop
tightening. Do not be a gorilla
here because these little screws
strip easily and they are just there
to hold in the pin.
FRONT ARM ASSEMBLY
A8) Now remove from Bag A the two front control arms (ASC 9578), two outer
hinge pins, and two 2-56 X 1/8” button head screws. From the shim bag,
remove the two Dirtz Dialed Partz .140” shims (the big ones). The holes
for mounting the shocks are at the rear of the control arms. Gather
together a front control arm and the right caster block assembly.
A9) The hinge pin hole in 30ocaster blocks is notoriously tight. Team drivers
have a 7/64” ream in their tool box and use it here. Start the hinge pin
into the arm from the rear. The shock mounting holes are to the rear of
the arm. Consult the set-up sheet and Tuning Section to determine where
you will shim the caster block. Here we show the block forward, so the
shim is to the rear. As the hinge pin emerges from the rear part of the

K021 Instructions v1.0 Bag A Page 9
arm, put the shim on and push the pin through the shim. Now add the
caster block assembly, keeping the steering block ball stud to the rear and
the caster block ball stud up. Slide the hinge pin all the way through and
into the front part of the arm.
A10) Time for another one of those little screws. Install
a 2-56 X 1/8 button head screw from the rear of the arm to hold the hinge
pin in. Watch out for the gorilla!
A11) Repeat for the left side.

K021 Instructions v1.0 Bag A Page 10
BULKHEAD ASSEMBLY
A12) Install another one of those
2-56 X 1/8” button head
screws into the rear of each
control arm where the inner
hinge pin goes. Yes, do this
now. Just snug the screw
down to the arm.
A13) Remove the bulkhead (ASC 9563) and bag with two inner hinge pins from
Bag A. Place the bulkhead right side up on the bench. The “flat” side with
the recessed holes is the top. Place the right arm on the right side of the
bulkhead and slide the hinge pin through the front of the arm, the
bulkhead, and into the back of the arm until the pin just touches the little
button head screw. Don’t push the little screw out! The pin will protrude
from the front of the arm.
A14) Repeat for the left arm.

K021 Instructions v1.0 Bag A Page 11
A15) Remove the blue hinge pin brace (ASC 9665) and two 2-56 X 5/16” cap
head screws (6055) from bag A. Place the outer holes of the brace over
the two hinge pins (arrows); the brace’s inner holes go over the bosses in
the bulkhead. Secure the brace with the two screws through the inner
holes. Gorilla warning! He’s banging on his cage and wants to get out!
Over-tightening may bind up the control arms or strip the little threads.
Team tip: File away any flashing on the parting line of the control arms
where the front brace goes to prevent binding.
The bulkhead-control arm assembly is complete.
Set this assembly aside until step B13.

K021 Instructions v1.0
Bag B
Page
12
BAG B
COMPLETE THE FRONT END
SERVO SAVER
B1) Before proceeding with Bag B, please note: AE instructions tell us to put grease
on the joint between the servo saver bellcranks. Many X Factory Team drivers
do not. The problem with the AE servo saver is too much movement, not too
little. In fact, many Team drivers CA glue the two bellcranks together. This
increases the risk of either damage to the servo, breaking the bellcranks, or
breaking the servo horn, but you’ll get a much more direct feel to the steering.
Some drivers complain their car is pushing when the real problem is movement
in the servo saver assembly.
B2) Remove the bag of plastic steering parts (ASC 9659) and the bag of servo saver
hardware (ASC 9610) from Bag B. Based on the above, put a bit of grease on
the lower servo saver bellcrank where it rides against the upper bellcrank.
(center photo) Or not. Put the two parts together. (right photo)
B3) Place the two thin shims in the upper servo saver bellcrank as shown in the right
photo.

K021 Instructions v1.0
Bag B
Page
13
B4) Now put the spring over the shims.
B5) Place the large washer over the metal servo saver bolt. Screw the servo saver
bolt down into the servo saver assembly. Be careful so the washer and bolt
assembly fits properly over the spring. The hex on the bolt is 9mm, although a
3/8” wrench will get the job done. Don’t be a gorilla here -- it’s easy to strip the
threads out of the lower bellcrank. You want the bolt snug on the bellcrank, but
not overtightened. More tension on the bolt does “tighten” the saver, once it
touches the saver that’s it.
B6) Install a 3/16” ball stud (6170) in the end of the upper servo saver bellcrank.

K021 Instructions v1.0
Bag B
Page
14
STEERING ASSEMBLY
B7) Now use the little bag with 2 screws and 2 bushings. You will also need the
steering rack and servo saver assembly. (left top) Insert a bushing into the left
side of the steering rack as shown in the right top photo. The bushing goes down
from the top and will fit between the two plastic pieces. (right top) Line up the
servo saver assembly on top of the bushing and secure with a 7/16 buttonhead
screw from the bag by putting the screw up from the bottom. (Right bottom)
B8) Repeat the procedure with the remaining bushing and 7/16” screw to attach the
right bellcrank to the steering rack.

K021 Instructions v1.0
Bag B
Page
15
B9) Put a 3/16” ball stud (6170) in the front hole on each side of the steering rack.
The rear hole is used for inline axles.
B10) Install a 1/8” X 1/4” bearing (6205) in the recess on the bottom of the two
bellcranks. Place a third bearing in the recess on top of the right bellcrank, and
the fourth bearing in the recess on top of the servo saver bolt. Watch out,
because the bearing in the saver bolt likes to fall out.
B11) Put the two steering bolts (ASC 9640) in the same direction through the steering
brace.

K021 Instructions v1.0
Bag B
Page
16
B12) Now put the steering bolts up from the bottom through the right bellcrank (short
bolt) and the servo saver (long bolt). The brace remains on the bottom. Bolt the
steering assembly to the underside of the top plate (ASC 9566). Be certain all
four bearings remain in place. Snug these bolts down so they won’t come loose,
but do not over tighten to bind up the steering. Keep the gorilla in his cage.
FINISH THE FRONT END
B13) Find your bulkhead assembly from Bag A and line up the bosses underneath the
front of the top plate with the recesses in the bulkhead. Be sure the bulkhead
and top plate are both facing forward, as in the photos, and press the top plate
into the bulkhead. The top plate must seat well into the bulkhead.

K021 Instructions v1.0
Bag B
Page
17
B14) Position the bulkhead and top plate assembly on the front of the chassis (1006).
Be certain the three rear holes on the top plate fit down properly over the three
posts near the front of the chassis.
B15) Secure the bulkhead with two 5/8” flat head screws (6024) from under the
chassis through the two rear holes in the nose. Leave these screws finger tight
until inst. B16 below.
B16) Using the three 1/2” cap head
screws (6002), secure the rear of
the top plate to the chassis. Be
sure you pre-tap the chassis with a
4-40 tap. Now tighten the two
screws below the chassis from inst
B15 above.

K021 Instructions v1.0
Bag B
Page
18
B17) Position the bumper (ASC 9562) under the
chassis so it covers the two screws from B12
above and is over the two forward holes in the
chassis. Install the bumper with two 5/8” flat
head screws.
B18) Consult the set-up sheet and Tuning Section to determine how many .030” Dirtz
Dialed Partz shims you will use under your inner ball stud, and which hole the
stud will go in. Place the shim(s) if any under a 3/8” ball stud (6172) and install it
down from the top into one side of the shock tower. Photos show two shims and
the #1 (inside) hole. Repeat for the other side of the tower.
B19) Install two 4-40 X 3/4” cap head (6004) upper shock mounting bolts in the top of
the tower. Consult the set-up sheet and Tuning Section to determine which hole
you will use. These photos show the mounting bolt in the #2 (center) hole. Put
the bolt in from the front of the tower and tighten a nut (6070) against the back of
the tower.

K021 Instructions v1.0
Bag B
Page
19
B20) Install the shock tower onto the front of
the top plate using four 3/8” cap head
screws (6001). The heads of the
screws fit into recesses in the front of
the tower. These bolts should be snug;
however, the gorilla, somehow loose
now from his cage, regrets making them
too tight when, on the ninth time he
removes the tower, the holes are
stripped.
That’s it -- Front end is done!

K021 Instructions v1.0 Bag C Page 20
BAG C
DIFFERENTIAL
C1) Remove the diff rings (ASC7677) and outdrives (ASC 7667 & 7668) from Bag C.
Place a small amount of diff lube on each outdrive as shown by the arrows. The
only purpose of this is to hold the rings on the outdrives during assembly. Then
put one ring on each outdrive. Wipe off excess lube. Set the female outdrive
aside for now. (Diff lube not included.)
C2) Remove the diff spring (ASC7677) from Bag C and compress it fully with a pliers
to “break in” the spring. Now take the white tree (ASC7677) from Bag C and
remove the locking T-nut. Carefully trim any flashing, but do not remove the two
“ears” which hold the T-nut in the outdrive. (arrows)
C3) Place the spring into the male outdrive as shown, then the T-nut, with the T-nut
“ears” to the outside. (arrows) Set the male outdrive aside for now.
Other manuals for X - 6 SQUARED
1
Table of contents
Other XFactory Motorized Toy Car manuals