manuals.online logo
Brands
  1. Home
  2. •
  3. Brands
  4. •
  5. XHDATA
  6. •
  7. Radio
  8. •
  9. XHDATA D-109WB User manual

XHDATA D-109WB User manual

Other XHDATA Radio manuals

XHDATA D-328 User manual

XHDATA

XHDATA D-328 User manual

XHDATA D-608 User manual

XHDATA

XHDATA D-608 User manual

XHDATA D-318 User manual

XHDATA

XHDATA D-318 User manual

XHDATA D-109 User manual

XHDATA

XHDATA D-109 User manual

Popular Radio manuals by other brands

Grundig G6 AVIATOR owner's manual

Grundig

Grundig G6 AVIATOR owner's manual

Makita DMR114 instruction manual

Makita

Makita DMR114 instruction manual

PURE Move R3 manual

PURE

PURE Move R3 manual

Motorola CP040 Detailed service manual

Motorola

Motorola CP040 Detailed service manual

Bosch GPB18V-5C Operating/safety instructions

Bosch

Bosch GPB18V-5C Operating/safety instructions

Ocean Digital WR-230 user manual

Ocean Digital

Ocean Digital WR-230 user manual

Realistic TRC-457 owner's manual

Realistic

Realistic TRC-457 owner's manual

Uniden AX 144 owner's manual

Uniden

Uniden AX 144 owner's manual

SIGNIFY EA2173 instruction manual

SIGNIFY

SIGNIFY EA2173 instruction manual

auna multimedia 10026443 user manual

auna multimedia

auna multimedia 10026443 user manual

GME TX680 instruction manual

GME

GME TX680 instruction manual

Motorola MTM5 00 Series Basic service manual

Motorola

Motorola MTM5 00 Series Basic service manual

Tivoli Audio ONE+ owner's manual

Tivoli Audio

Tivoli Audio ONE+ owner's manual

Sirius Satellite Radio SDVK1 installation guide

Sirius Satellite Radio

Sirius Satellite Radio SDVK1 installation guide

Sirius XM RAdio EDGE user guide

Sirius XM RAdio

Sirius XM RAdio EDGE user guide

Trevi XF 100 user guide

Trevi

Trevi XF 100 user guide

EisSound KBSound iSelect user manual

EisSound

EisSound KBSound iSelect user manual

Kirisun DM588-02 user manual

Kirisun

Kirisun DM588-02 user manual

manuals.online logo
manuals.online logoBrands
  • About & Mission
  • Contact us
  • Privacy Policy
  • Terms and Conditions

Copyright 2025 Manuals.Online. All Rights Reserved.

WB/NOAA emergency weather warning radio
SOS emergency distress sound and light alarm
FM/MW/LW/SW/NOAA
Global Band High Performance
Professional Radio
Wireless cell phone call
Operation manual
https://xhdata.com.cn/pages/xhdata-d-109-wb-manual
XHDATA
Function indication
Key lock/display switch
:Store radio frequency selection button
(VM) Manual tuning frequency of tuning knob (VF)
:Long press for automatic frequency browsing mode
:AM bandwidth switching/LCD backlight
permanently on and intelligent control switch
:Voice/Music Switch
:Receive DX remote and LOC local proximity
receive mode switching
Manual tuning weather warning reception
band / ALERT weather warning automatic
scanning warning reminder reception mode+
Shortwave meter band switching/
Automatic search of shortwave meter band
Shortwave meter band switching/
Automatic search of shortwave meter band
AM/LW band selection/automatic tuning storage
FM/Automatic tuning storage
Power switch/Sleep shutdown time
setting
:Long press to turn on the emergency distress sound
and light alarm function
ALARM(B) setting/Alarm switch
ALARM(A) setting/Alarm switch
Time setting/display time
Bluetooth function/wireless phone call
Radio memory station selection/and frequency
tuning/Select the previous next song when playing
Bluetooth music
Play or pause selection
TF card play and repeat mode selection
:Long press
4 button to switch the
FM stereo/mono
:Long press 6
button to switch the
BB sounds ON/OFF
FM receiving frequency range switching
AM 9K/10K frequency step switching
12/24 time system switching
Delete radio frequency
Memory radio frequency
Tuning knob
Volume knob
Type-c: DC IN 5V
FM/SW external
antenna jack
Earphone jack
Function indication
System reset
Battery level display
Low power Full power
Sleep Scheduled Shutdown Start
Bb Sound Alarm
Radio Alarm
Alarm A start icon
Alarm B start icon
Radio signal field strength
AM/PM time display
SW meter wave display
Alarm A time display icon
Alarm B time display icon
Memory station number display icon
Temperature display
Small display area
Main display area
Time/frequency/playback time display
FM STEREO
Bluetooth function symbol
TF card icon
Setting icon of radio station timing startup
FM/MW/SW/LW band display icon
AM/PM time display
Suitable for playing music
Suitable for voice listening, news and so on
Weather warning reception bands
Automatic scanning of reception status icons
Battery charging display
Radio signals strength scale
Radio Signal-to-noise ratio scale value
Mobile phone call prompt symbol
Single Repetition
Radio search station frequency icon
AM frequency unit
FM frequency unit
Disk locking symbol
Local proximity reception
Operation introduction
POWER
Please correctly install the positive and negative electrodes of 3.7V(18650)
lithium battery into the battery box
External 5V Type-c charging socket power supply
POWER ON/OFF
Power on: short press power button,display screen shows "ON"
Power off: short press power button,display screen shows"OFF"
Radio Operation
SET THE FREQUENCY COVERAGE
(It needs to be set in the power off state)
Different countries, medium wave, FM frequency coverage is different,
please set according to the situation of different countries
Long press the number key (3), you can switch the time to 24 hours or
12 hours
FM frequency range setting:
After press and hold the number key (1),by short pressing the number
key(1),the screen will say 64,76,87,87.5,
Denote frequency coverage as:
64-108MHZ, 76-108MHZ, 87-108MHZ, 87.5-108MHZ
MW frequency selection step interval Setting and temperature display
synchronous switching:Long press the number key (2) for 3 seconds
When it shows 9:the medium wave frequency will step to 9KHz. Frequency
coverage range:522-1620KHz.
(suitable for Asia, Europe.Africa and Oceania)
In this state, the temperature displays Celsius(℃)
When it shows 10 :the medium wave frequency will step to 10KHz.
Frequency coverage range:520-1710KHz (suitable for North and South America)
In this state, the temperature displays Fahrenheit( )
Long press the(MW/LW)button,and the display(ON)indicates the
open (LW)band Long press again Display (OFF) off
Enter radio mode
Press (POWER) key to (ON)
Adjust the volume to the appropriate position
Select band
Short press (FM) key, or (MW/LW or SW -/SW +)
Switch short wave meter band: Repeated short press(SW -/SW +)
When receiving FM and SW, you can choose to use pull rod antenna
or external antenna. (Plug the external antenna into the ANT jack)
Turn the fuselage angle when MW and LW are used to obtain the best
receiving sensitivity
Search station frequency
Tune the radio frequency
Manually tune the radio frequency (VF)
Short press (VM/VF) key
Turn the tuning knob slowly and quickly(TUNING)
Scanning frequency (VF)
Long press (SCAN) button to enter browsing. When the station is
scanned, it will stop for 5 seconds.Short click (SCAN) to stop searching
Input the radio frequency with the number keys(VF)
The preferred current band radio frequency is entered directly with the
numeric key
Search for memory stations
Manual memory station(VF)
Select the preferred band
Select radio frequency to memory
Short press (MEMORY) key, radio station code flashes
in the upper right corner
Press the (MEMORY) key again to remember
Fully automatic scanning memory
Select band
Long press the corresponding band key to automatically scan
and memorize the radio frequency
Two modes of shortwave automatic search
Long press the (SW -) key for 3 seconds for the full meter band
search memory mode
Long press the (SW +) key for 3 seconds as the current meter Band
search memory mode Tips
The radio signal will be affected by such factors as season/time period/weather,
receiving environment, electromagnetic interference and receiving antenna
angle and azimuth. Therefore, ATS memory should be updated frequently
Access memory radio station(VM)
After the station search is completed, you can enter the memory Radio
mode or press the (VM/VF) key briefly
Turn the (TUNING) button to switch the memory radio frequency
Input the frequency number of the memory station directly with the
number keys
Auto scan memory radio frequency(VM)
Select band, short press(VM/VF) key, press and hold the (VM/VF) key
for 3 seconds to enter the automatic browse mode
Scan each memory radio station number for 5 seconds, and short press
the SCAN key briefly to select listening. No action, continue to scan the
address number of the next radio station
Delete memory station method
Select Delete Memory Station
Short press the (VM/VF) key to enter the state of retrieving memory station
Select band
Turn the (TUNING) button to select the radio station number frequency
to be deleted
Long press (DELETE) key for 3 seconds to display [DEL], and short press
again to confirm deletion
Delete all memory stations of the current band
Short press the (VM/VF) key to enter the state of retrieving memory
station(VM)
Select band
Press and hold the (DELETE) key until the sub display area display (ALL),
release it and press it briefly again to confirm the deletion of all
Delete all memory radio frequencies
Turn off a machine
Press and hold the (DELETE) key for 3 seconds until [DEL] and [ALL] flash,
and then press and hold the (BT) key for 3 seconds to confirm the deletion
Switch AM bandwidth
Continuous short press (BW/ ) can switch AM bandwidth
FM stereo switch
FM is mono radio mode when horn is used for radio reception
In the headset receiving FM station state, short press the (ST) key,
stereo symbol ( ) display. Short press the (ST) key again to
show cancel, stereo off.
Stereo Headphone Output
This machine is equipped with FM and Bluetooth/MP3 stereo headset
output. Use the 3.5 headphone jack.
FM/SW external input jack
The machine is equipped with FM/SW external antenna 3.5 headphone
jack to improve the indoor reception sensitivity of FM/SW radio
Tips
Stereo will not be turned on when the radio station uses mono
radio or the reception signal is weak.
SOS Signal Function Use
In any state, long press (SOS) to turn on the sound and light synchronized
distress signal. Press and hold again to turn it off.
Skype: radiwow
Email: [email protected]
Facebook:XHDATA
http://www.xhdata.com.cn
Whatsapp: +86 18025193267
XHDATA
NOAA/WB Use of Emergency Weather Warning Bands
Manually tuned to receive NOAA radio frequency signals
Short press (Power) button to (ON)
Short press (WB) button to enter NOAA radio band, turn (TUNING)
button to search "NOAA".
There are 7 channels: 1. 162.400MHZ 2. 162.425MHZ 3. 162.450MHZ
4. 162.475MHZ 5. 162.500MHZ 6. 162.525MHZ 7. 162.550MHZ
(ALERT) Automatic Scanning to Receive Radio Warning Signals
Short press (Power) button to (ON)
Long press (WB) button to enter NOAA radio band.
There are 7 channels: 1. 162.400MHZ 2. 162.425MHZ 3. 162.450MHZ
4. 162.475MHZ 5. 162.500MHZ 6. 162.525MHZ 7. 162.550MHZ
When a "NOAA" weather warning radio channel sends out warning signals,
the unit will automatically send out sound and light warning signals to remind
users to receive weather warning information. Short press "WB/ALE" can enter
to receive the radio warning voice information.
NOTE
The NOAA/WB Emergency Weather Warning radio band applies to the United
States. When listening to NOAA/WB weather broadcasts, the user must verify
that the weather broadcast channel frequency corresponds to the city or state
in which the user is located. Reconfirm the weather channel frequency when
leaving the city and state area.
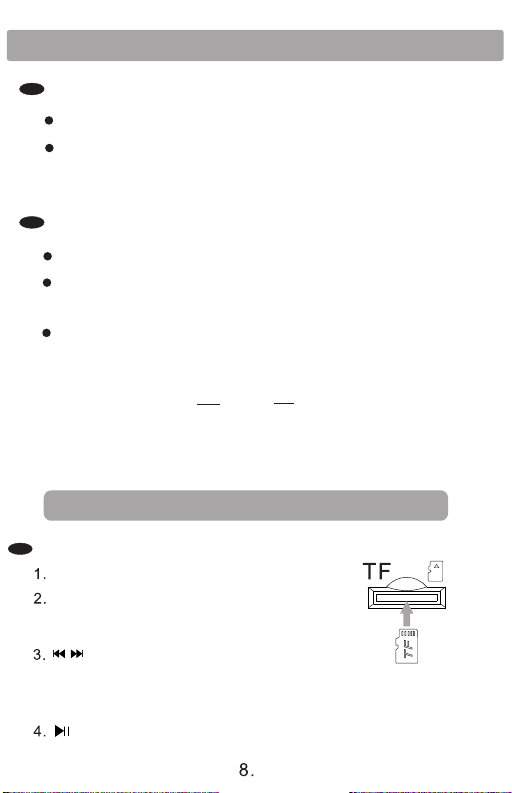
Bluetooth/MP3 Playback Function
TF Card MP3 player
Insert TF card with music file
Press the (MUSIC) key briefly to enter
the TF card MP3 playing state
Short press these two keys to select
the previous song and the next song [TUNING]
can also select songs. Long press for fast rewind
and fast forward functions
Play/pause function button