Xirrus XR-1000H Series User manual

Quick Installation Guide
for
XR-1000H Series
Wireless Arrays
November, 2012

XR-1000H Quick Installation Guide
isaregisteredtrademarkofXirrus,Inc.Allothertrademarksandbrandnamesare
marksoftheirrespectiveholders.
Allrightsreserved.Thisdocumentmaynotbereproducedordisclosedinwholeorinpartby
anymeanswithoutthewrittenconsentofXirrus,Inc.
DocumentPartNumber:812‐0085‐003,RevisionB,November,2012

XR-1000H Quick Installation Guide
- i -
CONTENTS
1)YouNeedtheFollowingItems........................................................................................................1
2)ChooseaSuitableLocation..............................................................................................................1
3)PreparetheMountingLocation.......................................................................................................2
4)InstalltheMountingPlate................................................................................................................2
5)MounttheArrayonaPoleorWall.................................................................................................3
5a)PoleMounting..............................................................................................................................3
5b)WallMounting.............................................................................................................................5
6)GroundtoEarthGround..................................................................................................................5
7)InstallanAntenna..............................................................................................................................6
8)PreparetheEthernetCablewiththeWaterproofShell................................................................6
9)ConnecttheCables............................................................................................................................7
10)LogIntotheArray..........................................................................................................................8
11)ConfiguretheArray........................................................................................................................9
12)SecureLowLevelAccesstotheArray.......................................................................................10
Drawings...............................................................................................................................................11
XR‐1230HDimensions....................................................................................................................11
MountingBracketDimensions.......................................................................................................12
CustomerSupport................................................................................................................................12
Notices,Warnings,&ComplianceStatements................................................................................12
Notices...............................................................................................................................................12
Warnings...........................................................................................................................................14
WiFiAllianceCertification.............................................................................................................15
FederalCommunicationsCommission(FCC)Statements&Instructions...............................15
IndustryCanadaStatementsandWarnings................................................................................17
EUDirective1999/5/ECComplianceInformation.......................................................................18
RFExposure......................................................................................................................................21
SoftwareLicenseandProductWarrantyAgreement.....................................................................24
HardwareWarrantyAgreement........................................................................................................28

XR-1000H Quick Installation Guide
- ii -

XR-1000H Quick Installation Guide
- 1 -
XR-1000H Quick Installation Guide
TheXR‐1000HSeriesHardenedWirelessArrayprovidesXirrus
Arraytechnologyinahardenedcaseforinstallationoutdoorsand
inotherharshenvironments.Thisguidedescribeshowtoinstallthe
XR‐1000Honapoleorwallandexecutetheinitialpowerupofthe
Array.Thepoleorwallcanbeastructurethatisinstalledatground
leveloronaroof.TheXR‐1000HisnotcompatiblewithotherXirrus
mountingoptions.Foradditionalinformation,seetheWireless
ArrayUser’sGuide.
ThisdocumentisintendedONLYforXR‐1000HmodelArrays.ForotherXRmodels,
pleaseseetheQuickInstallationGuideforthatArrayfamily.
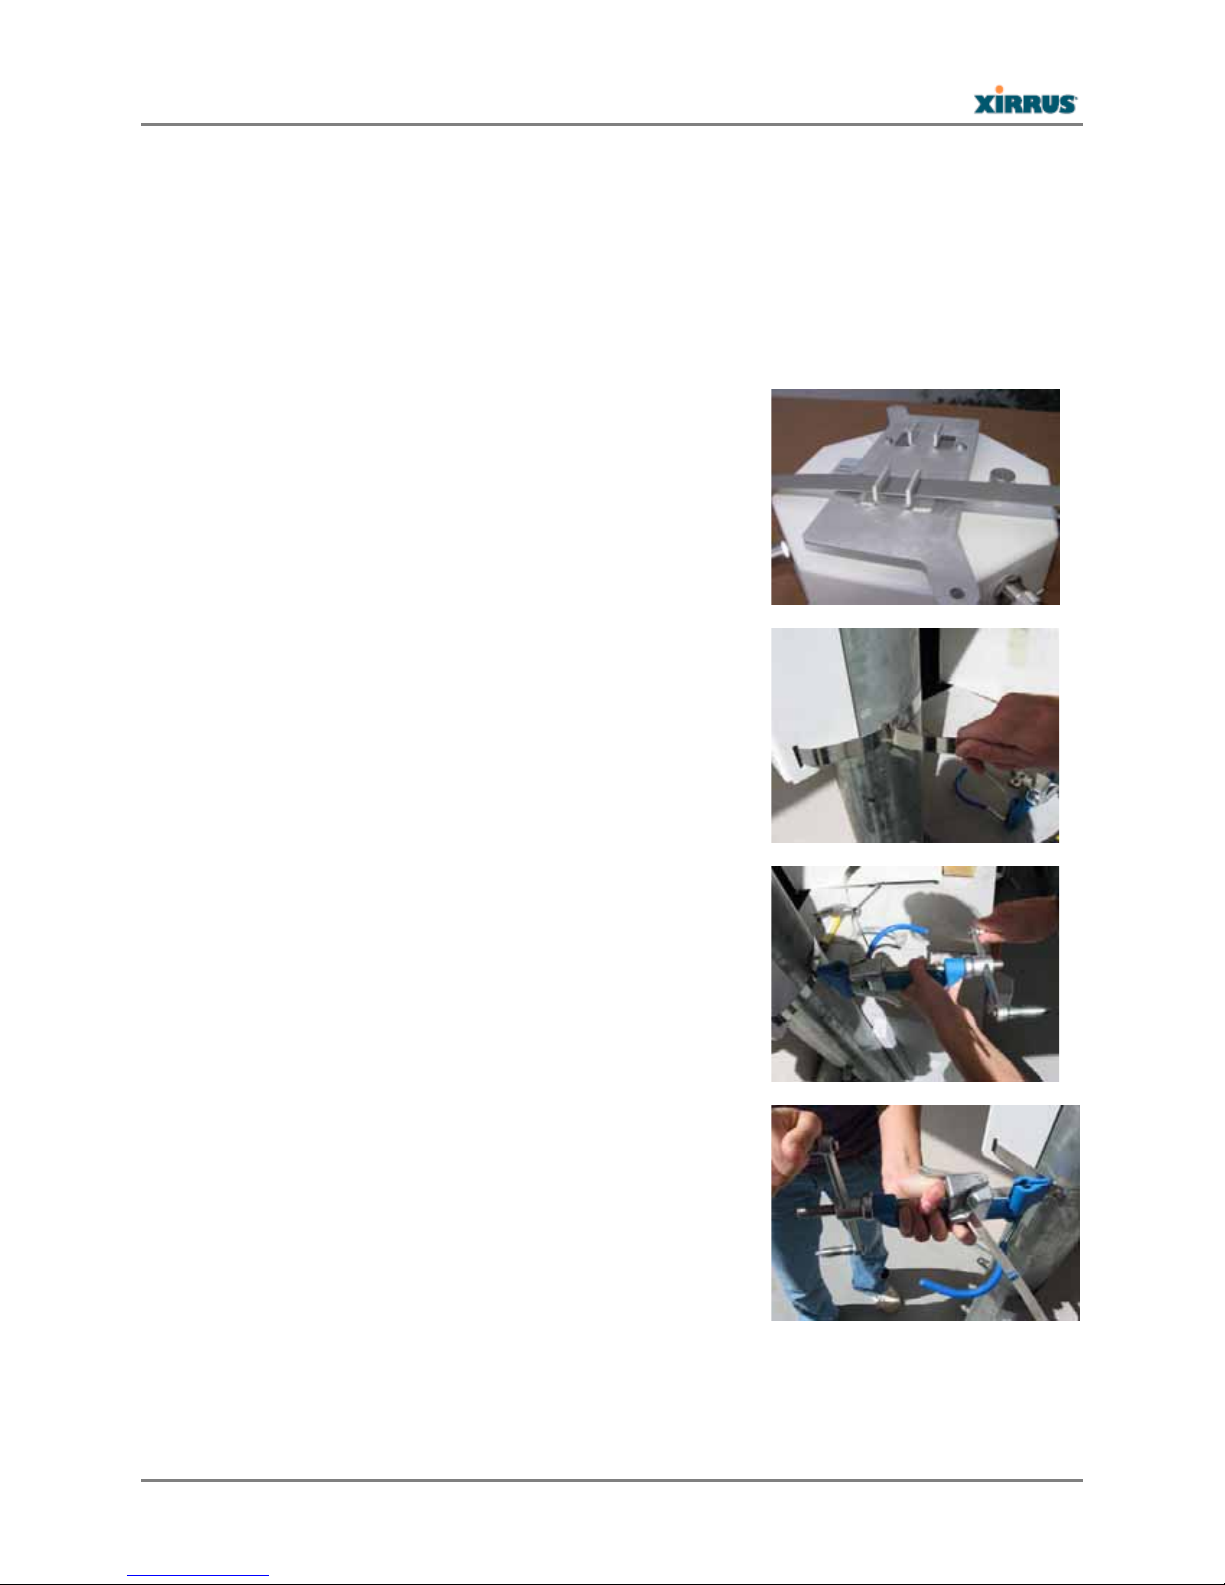
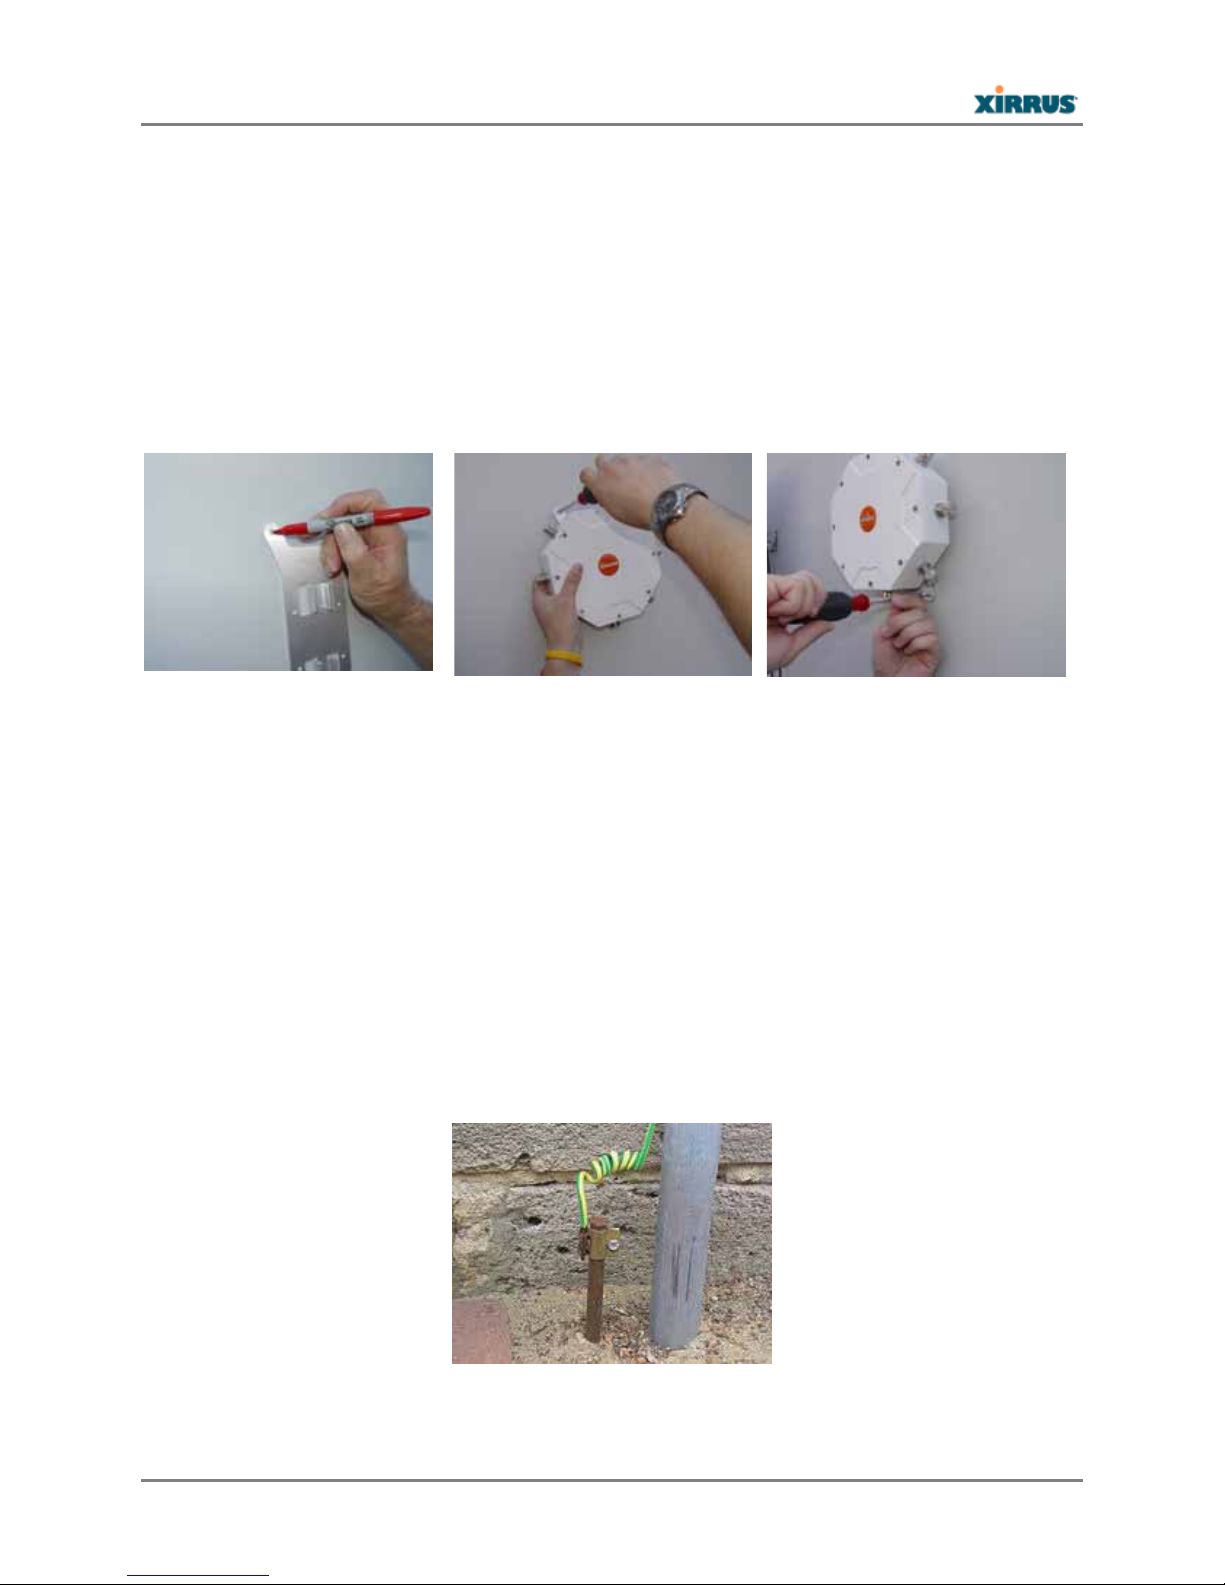
1) You Need the Following Items
AccessoryKit(includedineachWirelessArraycarton)containsmountingbracketandshort
groundwire.
Appropriatetools,bands,screws,and/oranchorsrequiredforthedesiredmounting
location.(notprovidedwiththeArray)
WorkstationwithaWebbrowsertoconfiguretheWirelessArray.
RJ‐45Ethernetconnection(s)toyourwirednetwork.
Power—XR‐1000HArraysarepoweredviaPoweroverGigabitEthernet(PoGE)usingan
EthernetCat5eorCat6cablethatalsocarriesdatatraffic.Youmustprovideanetwork
connectionandEthernetcablerunfromaXirrusPoGEPowerInjectorportfortheArray
Gigabitport.TheXirrusPoGEPowerInjectorrequiresanACoutlet.UseonlyXirrus‐
suppliedPoGEinjectors.SeethePoGEInstallationGuideformoreinformation.XR‐1000H
Arraysarepoweredbyoneinjectorportratedat33Worhigher.
2) Choose a Suitable Location
TheXR‐1000HseriesistestedtoIP67waterproofanddustproofrequirementstoprotect
againstseverewetanddustyenvironments.Foroptimalplacement,werecommendthatasite
surveybeperformedbyaqualifiedXirruspartner.
Choosealocationthatisnotsubjectedtosubmersion.
Directsunlightmayraisetheeffectiveambienttemperaturemanydegreesabovetheair
temperature.Itisbesttochoosealocationthathassomelevelofprotectionfromthesun.
ThemaximumcablelengthbetweentheXR‐1000HandtheRJ‐45EthernetNetwork/PoGE
Injectoris100meters.
TheXR‐1000HseriescanoperatefromaWirelessDistributionSystem(WDS)link.However,
theunitwillneedtobeconfiguredviatheEthernetconnectionpriortomountingandpower
muststillbesuppliedviatheRJ‐45Ethernetconnector.

XR-1000H Quick Installation Guide
- 2 -
KeeptheunitawayfromelectricaldevicesorappliancesthatgenerateRFnoise—atleast3
to6feet(1to2meters).
3) Prepare the Mounting Location
PartofthemechanicalinstallationistoensurethattheArrayisgroundedtoearthgroundto
dissipateanystaticelectricchargethatmaydevelopduetowind.
DetermineagoodelectricalearthgroundpointneartheArraymountinglocation.Ifan
earthgroundpointisnotavailable,consultanelectriciantohaveoneinstalled.
Crimpaterminallugtoasufficientlengthof16gaugewiretoreachfromthemounted
Arraytotheearthgroundpoint.
BeforetheArrayisattachedtoawallorpole,securetheterminallugtotheArraywiththe
#6screwprovidedinthelocationshown.
4) Install the Mounting Plate
Theaccessorykitincludesasmallmountingplate.Mountingplatedimensionsareincludedin
theDrawingssectionattheendofthisguide.Themountingplatecanbeusedforwallorpole
mountingbasedonreversingthesideoftheplateexposed.
For Pole Mounting: For Wall Mounting:

XR-1000H Quick Installation Guide
- 3 -
5) Mount the Array on a Pole or Wall
5a) Pole Mounting
Forpolemounting,Xirrusrecommendsusingmetalstraps(notincludedwiththeArray).The
metalstrapscanbeobtainedfromBAND‐IT‐IDEX,Inc.(www.BAND‐IT‐IDEX.com).Seetheir
websiteforadditionalcontactinformation.CompletethefollowingstepstomounttheArrayto
apole.
Installthemetalbandsthroughtheholesinthemounting
bracket.
HandtightentheBand‐Itstrapthroughthepolemounting
bracket,threaditthroughthestrapbuckleandthenbend
thestrapback.
UsingtheBand‐Ittool,placethetoolontothestrap.
RotatetheBand‐Ittoolsothatitcanpulltheexcessstrap
throughthebuckleandturnthecrankuntilthestrapisvery
tight.

XR-1000H Quick Installation Guide
- 4 -
Oncethestrapissatisfactorilytight,rotatetheBand‐Ittool
backsothatthestrapcannotslidebackthroughthebuckle.
UsingthebuiltincuttingtoolontheBand‐Ittool,cutthe
excessstrap.
Yourinstallationshouldnowappearasshownhere.
Usingahammer,bendbackandflattentheremainingstrap.
Usingahammer,bendandflattenthetwotabsonthe
buckle,sothattheyholdtheflattenedstrapendinplace.
Thecompletedattachmentshouldhavethemountingbracketfirmlyseatedagainstthepole.
Onebandshouldbeenoughformostinstallationshoweverasecondbandcanbeusedfor
additionalmountingsecurity.

XR-1000H Quick Installation Guide
- 5 -
5b) Wall Mounting
PlacetheArrayinthedesiredlocationandmarkthelocationofthemountingholesonthe
wall.
Drillandpreparetheholesforthedesiredscrewtype.Inmetalwallstheholesmaybe
tappedtotheproperthreadoralternativelytheArraymaybemountedwithsheetmetal
screws.Forconcretewallsaplasticanchorandscrewaresuggested.
Note:Mountingscrewsforattachingtheplatetothewallarenotprovidedinthekit.
AttachtheArraytothemountingplatebeforeattachingthemountingplatetothewall.
6) Ground to Earth Ground
WARNING:Thisequipmentmustbeexternallygroundedusingacustomer‐supplied
groundwirebeforepowerisapplied.Contacttheappropriateelectricalinspection
authorityoranelectricianifyouareuncertainthatsuitablegroundingisavailable.
PartofthemechanicalinstallationistoinsurethattheArrayisgroundedtoearthgroundto
dissipateanystaticelectricchargethatmaydevelopduetowind.InStep3,yousecureda
terminallugtotheArraywiththeprovided#6screw(seeStep3ifthishasnotbeendone).
AfterStep3iscompletedandtheArrayismountedtothewallorpole,attachthe16gauge
wirefromtheArraytotheelectricalearthgroundpointthatyoulocatedorhadinstalledin
step3.ThefollowingillustrationshowsanearthgroundconnectionwheretheArrayis
mountedonapoleatgroundlevelandthe16gaugewireisattachedtoastakedriveninto
theground.
Continuetheinstallationbymountingtheantennaandattachingthecablesasdescribedin
Steps7,8,and9.

XR-1000H Quick Installation Guide
- 6 -
7) Install an Antenna
NOTE:UseonlyXirrus‐approvedexternalantennassuppliedbythemanufactureror
purchasedfromXirrus.AlsoseetheNoticesandWarningsregardingexternalantennas
intheWarning&Noticessectionofthisguide.
Lowlosscableisavailablesuchthattheantennacanbemountedinanappropriatelocationthat
couldbeseveralfeetawayfromtheArray.UseoneofthefollowingXirrus‐approvedantennas:
MIMOOmnidirectionalAntennawithN‐StylePlugConnectors
2.4/5.8GHzDualPolarizedPanelAntenna
EitherantennacanbepurchasedfromXirrusorfromtheantennamanufacturer.
Antenna Xirrus Manufacturer
MIMO Omnidirectional
Antenna with N-Style Plug
Connectors
Part #: ANT-OMNI-MIMO-01
Description: 6dBi dual band 3
x 3 omni-directional antenna
Part #: M6060060MO1D33607
Manufacturer: Terrawave
Solutions
(www.terrawave.com)
2.4/5.8GHz Dual Polarized
Panel Antenna Part #: ANT-DIR-MIMO-01
Description: 14dBi, dual band
polarized 3 x 3 panel antenna
Part #: HG2458-14DP-3NF
Manufacturer: L-COM, Inc.
(WWW.L-COM.COM)
TheMIMOOmnidirectionalantennaincludesanL‐Bracketformastorwallmounting.The
DualPolarizedPanelantennaissuppliedwithatiltandswivelmastmountkit.
FortheDualPolarizedPanelAntennaN‐Femaleconnectorinterface,youwillneedamale‐to‐
malecabletoconnecttheantennatotheArray.ThiscablecanbeorderedfromXirrus(Cable
PartNumber:ANT‐CAB‐400‐2‐MM)orfromthemanufacturer(L‐COMPartNumber:CA‐
NMRNMF002).
8) Prepare the Ethernet Cable with the Waterproof Shell
Placethesplitwasherandsplitrubbergrommetoverthecable.
Slideallthesectionstogetherandtightenthenutontheendto5kgbutnotmorethan8kg
torqueforcetoinsureawatertightfit.

XR-1000H Quick Installation Guide
- 7 -
9) Connect the Cables
AllXR‐1000HArraysarepowereddirectlyviatheirGigabitEthernetconnectionandthatpower
mustbeprovidedusingaXirrusPoGEInjector.SeethePoGEInstallationGuidefordetailsonthe
Xirrus‐suppliedinjectormodulesandArraycompatibility.
Power:TheseArraysareonlypoweredthroughtheGIGPOEport.OnlyXirrus‐supplied
powerinjectorsmaybeused.
Data:DataissuppliedtotheGigabitportviathesamecablethatpowerstheArray.
ConnecttheEthernetcablecarryingdataandpowerfromthePoGEinjectortotheArray’s
GIGPOEportasindicated.
ThefollowingillustrationshowsatypicalpolemountedXR‐1000Hinstallationaftertheantenna
isinstalledandcableattachmentshavebeencompleted.
ThefollowingillustrationshowsatypicalwallmountedXR‐1000Hinstallationaftertheantenna
isinstalledandcableattachmentshavebeencompleted.

XR-1000H Quick Installation Guide
- 8 -
10) Log In to the Array
EstablishanetworkconnectiontotheArrayusingawebbrowser.IntheURLfield,enterthe
IPaddressassignedbyyourDHCPserver.IfyouareusingDHCPandDNS,usetheArrayʹs
defaulthostname,whichisitsserialnumber(forexample,XR0823090CACD).
Beawareofthefollowing:
−Bydefault,theArraytriestoobtainanIPaddressviaDHCP.Ifitcannotdoso,the
factorydefaultisastaticIPaddressof10.0.2.1withamaskof255.255.255.0onitsGigabit
POEport.
Takecaretoensurethatyournetworkisnotusingthe10.0.2.1IPaddresspriorto
connectingtheArraytothenetwork.
−ToconnecttotheArrayinthiscase,youmustsetyourcomputertobeinthesame
subnetastheArray:setyourIPaddresstobeinthe10.0.2.xxsubnet,andsetitssubnet
maskto255.255.255.0.Ifthissubnetisalreadyinuseonyournetwork,youmayconnect
yourcomputerdirectlytotheArraybyconnectingthecomputertothepowerinjector’s
INporttemporarily(thisportmaybecalledtheSWITCHportortheDATAporton
yourinjector).
−IftheassignedIPaddressisunknown,youmayusetheXirrusXirconutilityto
communicatewithanyXR‐1000onthelocalnetwork.NotethattheXR‐1000Seriesdoes
nothaveaconsoleport,soXirconhasbeenspecificallydesignedtosubstitutefortheuse
ofaconsoleport.See“SecureLowLevelAccesstotheArray”inStep12formore
informationaboutXircon.Forthebestresults,youmaywishtoconnectyourcomputer
directlytotheArrayasdescribedinthepreviousparagraph.
IfyourbrowserreportsaSecurityexception,acceptitandcontinueontotheArray’sWeb
ManagementInterface(WMI).
Attheloginprompt,enterthedefaultusername/password(thedefaultisadminforboth).
YouarenowloggedintotheWirelessArray

XR-1000H Quick Installation Guide
- 9 -
11) Configure the Array
ClickExpressSetup
AlicenseisneededtoenablethefullfunctionalityoftheArray.Withoutalicense,theArray
canbepoweredupandwillonlyhaveabasicwirelessnetworkconfigurationincludingjust
oneoperatingradio.TheArray’slicenseisnotinstalledatthefactory.Enterthekeyinthe
LicenseKeyfield.Thekeywasprovidedtoyouinanemailasanattachmentintheformof
anExcelfile(.xls).Enterthekeyexactlyasitappearsinthefile.ClicktheApplybutton.
IntheAdminSettingssection,changeboththedefaultadminusernameandpasswordto
improveArraysecurity.EnterNewAdminUserandNewAdminPassword,thenConfirm
AdminPassword.LeaveNewAdminPrivilegeLevelatread/write.ClickApplyAdmin
Settingswhendone.
Besuretorecordthenewaccountnameandpassword,becausethedefaultadminuser
willbedeleted!
IfyoumakechangestotheSSIDSettingssection,clicktheassociatedApplybuttonto
applyyourchanges.

XR-1000H Quick Installation Guide
- 10 -
ClickSaveChangestoFlashontheupperrighttosaveyoursettings.
ClickExecuteatthebottomofthepagetosetup/enableallIAPs(radios)automatically.
Forimprovedsecurity,youmustalsotaketheadditionalstepsdescribedin“SecureLow
LevelAccesstotheArray”inStep12.
WithabasicconfigurationestablishedtheWirelessArrayisnowfunctional.Refertothe
WirelessArrayUser’sGuideforadditionalconfigurationinformation.Lookforthesection
titledPerformingtheExpressSetupProcedureneartheendoftheInstallingtheWirelessArray
chapteroftheGuideformoredetailsonExpressSetupsettings.Thechaptertitled
ConfiguringtheWirelessArraydiscussesallofthesettingsavailablefortheArray.
Note:Thechannelsetavailableinanoutdoorapplicationisdifferentthanindoorso
somechannelstypicallyusedwillnotbeshown.
12) Secure Low Level Access to the Array
ManagementoftheXirrusArrayisdoneviatheWebManagementInterface(WMI)or
CommandLineInterface(CLI).TheArrayalsohasalowerlevelinterface:XBL(XirrusBoot
Loader),whichallowsaccesstomoreprimitivecommands.Youwon’tnormallyuseXBLunless
instructedtodosobyXirrusCustomerSupport.Forpropersecurity,youshouldreplacethe
defaultXBLloginusernameandpasswordwithyourown,asinstructedbelow.XBLhasitsown
usernameandpassword,separatefromtheArrayOSAdminUserandPassword(usedfor
loggingintotheWMIandCLI).
XirrusalsoprovidestheXirconutilityforconnectingtoArraysthatarenotreachableviathe
normalaccessmethods(suchasSecureShell(SSH)orWMI)andthatdonothaveaphysical
consoleport(XR‐1000),orwhoseconsoleportisnotaccessible.XircondiscoversArraysonyour
networksubnetandcanthenestablishanencryptedconsolesessiontotheArrayviathe
networkeveniftheArrayIPconfigurationisincorrect.XirconallowsyoutomanagetheArray
usingCLI,justasyouwouldifconnectedtotheconsoleport.Xirconalsohasanoptionfor
easilyaccessingXBL.
XirconaccesstotheArraymaybecontrolled.SinceXR‐1000Arraymodelsdonothavea
consoleport,thesemodelshaveXirconaccesstobothXBLandCLIenabledbydefault.For
Arraysthatdonothaveaconsoleport,toavoidpotentiallybeinglockedoutoftheArray,
XirconshouldalwaysbeenabledattheXBLlevelatleast.
IfyoudisableXirconaccesstobothXBLandCLIonXR‐1000models,youmustensure
thatyoudonotlosetrackoftheusernameandpasswordtologintoCLI/WMI!Inthis
situation,thereisnowaytorecoverfromalostpassword,otherthanreturningthe
ArraytoXirrus.IfyouhaveXirconaccesstoXBLenabled,youcanresetthepassword,
butthisrecoverywillrequiresettingtheunittofactorydefaultswithlossofall
configurationdata.
UsethefollowingstepstoreplacethedefaultXBLusernameandpassword.ThesestepsuseCLI
commands.

XR-1000H Quick Installation Guide
- 11 -
1.ToaccessCLIviatheWMI,clickCLIundertheToolssectionontheleft.
2.IfXirconaccessattheXBLlevelistobeallowed,usethefollowingthreecommandstochange
theXBLusernameandpasswordfromthedefaultvaluesofadmin/admin.Intheexample
below,replacenewusernameandnewpasswordwithyourdesiredentries.Notethatthese
entriesarecase‐sensitive.
(config)#boot-env set username newusername
(config)#boot-env set password newpassword
(config)#save
3.ItispossibletochangeXirconaccesspermissiontoallowXircontoaccesstheArrayattheCLI
levelonly,orattheXBLlevelonly.SeetheXirconUserGuidefordetails.
Drawings
XR-1230H Dimensions

XR-1000H Quick Installation Guide
- 12 -
Mounting Bracket Dimensions
Customer Support
XirrusCustomerServiceRepresentativesareavailable24x7via:
Email:[email protected]
Chat:(AvailableMon‐Fri12AM‐12AMPST)
Phone:
UnitedStatesandCanada:+1.800.947.7871(USTollFree)or+1.805.262.1600(Direct)
Europe,MiddleEast,andAfrica:+44.20.3239.8644
Australia:1300XIRRUS(1300947787‐LocalCallCost)
AsiaandOceania:+61.2.8006.0622
Latin,Central,andSouthAmerica:+1.805.262.1600
Notices, Warnings, & Compliance Statements
Notices
Readalluserdocumentationbeforepoweringthisdevice.Pleaseverifytheintegrityofthe
systemgroundpriortoinstallingXirrusequipment.Additionally,verifythattheambient
operatingtemperaturedoesnotexceed65°C.

XR-1000H Quick Installation Guide
- 13 -
SoftwareusedbythemodularAccessPoints(APs)iscoveredbytheXirrusSoftwareLicense
andProductWarrantyAgreement.
Non‐ModificationStatement:Unauthorizedchangesormodificationstothedevicearenot
permitted.UseonlyXirrus‐approvedexternalantennassuppliedbythemanufacturer.
ModificationstothedevicewillvoidthewarrantyandmayviolateFCCregulations.
ULStatement:UseonlywithlistedITEproduct.
OperatingFrequency:TheoperatingfrequencyinawirelessLANisdeterminedbythe
accesspoint.Itisimportantthattheaccesspointiscorrectlyconfiguredtomeetthelocal
regulations.IfyouhavequestionsregardingthecomplianceofXirrusproducts,please
contactusat:Xirrus,Inc.,2101CorporateCenterDrive,ThousandOaks,CA91320,USA.
Tel:1.805.262.1600/1.800.947.7871TollFreeintheUS,Fax:1.866.462.3980,www.xirrus.com
The2‐GHzb/g/nradiooperatesin2.4GHzISMband.Itsupportschannels1‐11inUS,1‐13
inEurope,and1‐13inJapan.Ithastwotransmitterswithamaximumtotaloutputpowerof
25dBmfor802.11b/g/noperation.Outputpowerisconfigurableto5levels.Ithasthree
receiversthatenablesmaximum‐ratiocombining(MRC).
The5‐GHza/nradiooperatesintheUNII‐2band(5.25‐5.35GHz),UNII‐2Extended/ETSI
band(5.47‐5.725GHz),andtheupperISMband(5.725‐5.850GHz).Ithastwotransmitters
withamaximumtotaloutputpowerof26dBmforUNII‐2andExtended/ETSIbandsforthe
A‐domain.ThetotalmaximumoutputpowerfortheupperISMbandis28dBmforA‐
domain.Powersettingswillchangedependingontheregulatorydomain.Outputpoweris
configurablefor5powerlevelsin3‐dBsteps.Itsthreereceiversenablemaximum‐ratio
combining(MRC).
Highpowerradarsareallocatedasprimaryusers(meaningtheyhavepriority)inthe
5250MHzto5350MHzand5650MHzto5850MHzbands.Theseradarscouldcause
interferenceand/ordamageWirelessLANdevices.
CalculatingtheMaximumOutputPower:Theregulatorylimitsformaximumoutputpower
arespecifiedinEIRP(equivalentisotropicradiatedpower).TheEIRPlevelofadevicecan
becalculatedbyaddingthegainoftheantennaused(specifiedindBi)totheoutputpower
availableattheconnector(specifiedindBm).
TheFCClimitstheamountofpowerthisdevicecantransmit.Powertransmittedisa
combinationoftheamplificationofthesignalandtheantennagain.Theeffectiveantenna
gain(antennagainminuscableloss)mustbelessthanorequalto6dBiat5GHzand4dBiat
2.4GHz.

XR-1000H Quick Installation Guide
- 14 -
Warnings
GENERAL SAFETY GUIDELINES
WARNING:Thiswarningsymbolmeansdanger.Youareinasituationthatcould
causebodilyinjury.Beforeyouworkonanyequipment,beawareofthehazards
involvedwithelectricalcircuitryandbefamiliarwithstandardpracticesfor
preventingaccidents.
WARNING:Onlytrainedandqualifiedpersonnelshouldbeallowedtoinstall,
replace,orservicethisequipment.
WARNING:Ultimatedisposalofthisproductshouldbehandledaccordingtoall
nationallawsandregulations.
WARNING:IncorrectinstallationofXirrusArraysmayinvalidateFCC,CEmark,or
otherregulatorycomplianceapprovals.Customersareresponsibleforanylegal
violationsfromoperationofun‐approvedequipmentorincorrectinstallation.
WARNING:DonotoperatetheArraynearunshieldedblastingcapsorinan
explosiveenvironmentunlessthedevicehasbeenmodifiedtobeespeciallyqualified
forsuchuse.
CAUTION:Theliquid‐tightadaptersmustbeusedonallinput/outputconnectionsto
theArraywheretheinstallationisanon‐hazardouslocation(andconduitisnotused).
POWER
WARNING:Readtheinstallationinstructionsbeforeconnectingthesystemtothe
powersource.
WARNING:Installationoftheequipmentmustcomplywithlocalandnational
electricalcodes.
WARNING:Thisequipmentmustbeexternallygroundedusingacustomer‐supplied
groundwirebeforepowerisapplied.Contacttheappropriateelectricalinspection
authorityoranelectricianifyouareuncertainthatsuitablegroundingisavailable.
WARNING:Donotworkonthesystemorconnectordisconnectcablesduringperiods
oflightningactivity.
WARNING:Toreducetheriskoffire,useonlyNo.26AWGorlarger
telecommunicationlinecord.
CAUTION:WhentheArrayisinstalledoutdoorsorinawetordamplocation,theAC
branchcircuitthatispoweringtheInjectorshouldbeprovidedwithgroundfault
protection(GFCI),asrequiredbyArticle210oftheNationalElectricalCode(NEC).

XR-1000H Quick Installation Guide
- 15 -
CAUTION:XirrusPoGEInjectorsrelyonthebuilding’sinstallationforovercurrent
protection.Ensurethatafuseorcircuitbreakernolargerthan120VAC,15A(U.S.)or
240VAC,10A(International)isusedonallcurrent‐carryingconductors.
EXTERNAL ANTENNAS
WARNING:Inordertocomplywithradiofrequency(RF)exposurelimits,the
antennasforthisproductshouldbepositionednolessthan20cmfromyourbodyor
nearbypersons.
WARNING:Donotlocatetheantennanearoverheadpowerlinesorotherelectric
lightorpowercircuits,orwhereitcancomeintocontactwithsuchcircuits.When
installingtheantenna,takeextremecarenottocomeintocontactwithsuchcircuits,
becausetheymaycauseseriousinjuryordeath.Forproperinstallationandgrounding
oftheantenna,pleaserefertonationalandlocalcodes(forexample,U.S.:NFPA70,
NationalElectricalCode,Article810,Canada:CanadianElectricalCode,Section54).
Thisdevicehasbeendesignedtooperatewithantennashavingamaximumgainof4
dBifor802.11and14dBiforthesensor(802.15.4)radiointhe2.4GHzbandand7dBi
inthe5GHzband.Antennashavingagaingreaterthan6dBarestrictlyprohibitedfor
usewiththisdevice.Therequiredantennaimpedanceis50ohms.
Toreducepotentialradiointerferencetootherusers,theantennatypeanditsgain
shouldbesochosenthattheequivalentisotropicallyradiatedpower(EIRP)isnot
morethanthatpermittedforsuccessfulcommunication.
WiFi Alliance Certification
Federal Communications Commission (FCC) Statements & Instructions
FCC Declaration of Conformity Statement
ThisdevicecomplieswithPart15oftheFCCRules,withoperationsubjecttothefollowingtwo
conditions:(1)Thisdevicemaynotcauseharmfulinterference,and(2)thisdevicemustaccept
anyinterferencereceived,includinginterferencethatmaycauseunwantedoperation.This
equipmenthasbeentestedandfoundtocomplywiththelimitsforaClassAdigitaldevice,
pursuanttoPart15oftheFCCrules.Theselimitsaredesignedtoprovidereasonableprotection
againstharmfulinterferenceinaresidentialinstallation.Thisequipmentgenerates,usesand
canradiateRFenergyand,ifnotinstalledandusedinaccordancewiththeinstructions,may
causeharmfulinterferencetoradiocommunications.However,thereisnoguaranteethat
interferencewillnotoccurinaparticularinstallation.Ifthisequipmentdoescauseharmful

XR-1000H Quick Installation Guide
- 16 -
interferencetoradioortelevisionreception,whichcanbedeterminedbyturningtheequipment
offandon,theuserisencouragedtotrytocorrecttheinterferencebyoneormoreofthe
followingsafetymeasures:
Reorientorrelocatethereceivingantenna.
Increasetheseparationbetweentheequipmentandthereceiver.
Consultthedealeroranexperiencedwirelesstechnicianforhelp.Useofashieldedtwistedpair
(STP)cablemustbeusedforallEthernetconnectionsinordertocomplywithEMC
requirements.
FCC-Specific Instructions
TheFCC,NationalTelecommunicationsandInformationAdministration(NTIA),Federal
AviationAdministration(FAA),andindustryareworkingtoresolveinterferencetoTerminal
DopplerWeatherRadar(TDWR)systemsusednearairportsthathasoccurredfromsome
outdoorwirelesssystemsoperatinginthe5470MHz–5725MHzband.Thesewirelessdevices
aresubjecttoSection15.407ofourrulesandwhileoperatingasamasterdevicetheyare
requiredtoimplementradardetectionandDynamicFrequencySelection(DFS)functions.
Devicesmustbeprofessionallyinstalledwhenoperatinginthe5470–5725MHzband
Anyinstallationofeitheramasteroraclientdevicewithin35kmofaTDWRlocationshall
beseparatedbyatleast30MHz(center‐to‐center)fromtheTDWRoperatingfrequency(as
shownintheTDWRlocationathttp://www.spectrumbridge.com/udia/home.aspx).Thiswill
requirethatchannel116isnotusedintheselocations.
Theinstallersandtheoperatorsmustregisterthedevicesintheindustry‐sponsored
databasewiththeappropriateinformationregardingthelocationandoperationofthe
deviceandinstallerinformation.AvoluntaryWirelessInternetServiceProviders
Association(WISPA)sponsoreddatabasehasbeendevelopedthatallowsoperatorsand
installerstoregisterthelocationinformationoftheUnlicensedNationalInformation
Infrastructure(UNII)devicesoperatingoutdoorsinthe5470–5725MHzbandwithin35km
ofanyTDWRlocation(seehttp://www.spectrumbridge.com/udia/home.aspx).This
databasemaybeusedbygovernmentagenciestoexpediteresolutionofanyinterferenceto
TDWRs.
FCC Safety Compliance Statement
TheFCCwithitsactioninETDocket96‐8hasadoptedasafetystandardforhumanexposureto
radiofrequency(RF)electromagneticenergyemittedbyFCCcertifiedequipment.Whenused
withapprovedXirrusantennas,XirrusXRproductsmeettheuncontrolledenvironmentallimits
foundinOET‐65andANSIC95.1,1991.Properinstallationofthisradioaccordingtothe
instructionsfoundinthismanualwillresultinuserexposurethatissubstantiallybelowthe
FCCrecommendedlimits.
This manual suits for next models
1
Table of contents
Other Xirrus Speakers System manuals