XONTEL XT-20W-BA User manual

XonTel XT-20W-BA
Active Bluetooth TWS Ceiling Speaker (20 Watt )
Installation Manual
Before start the installation :
Make sure you design your Speaker Location & Qty in the right way to sound cover the area in
a good way ,below Diagram can help in this , and if you are not sure of the result pls test all the
speakers on the ground in your location before you install them on the Ceiling and before you
open the Speaker hole to make sure of the Sound coverage .
Note : Coverage Area below is for the one Speaker .

Wires connection from XT-20W-BA to the 3pcs XT-20W-BP

Note :
Pleas first pull out the plug of the Green socket ( SP1,SP2,SP3 ) for easy fixing the
Cable from the 3pcs (XT-20BP) Speakers to the Green Socket in the back of XT-20BA .
Please make sure you connect the (Red/Black) connector as prescribed ( + ) and ( - ) active
speaker,Use a good quality copper wire with a diameter at least 1mm² ! Link out to the outer
Passive Ceiling speaker (XT-20BP) , The ( + ) and ( - ) polarity cannot be reversed !!!! .
AUX INPUT:
Connect an external audio device to this jack. This enables you to conveniently connect a CD or
Mp3 ,TV player and play .
DC POWER SOCKET:
Use it to connect the DC15V power Adapter.

Installation Steps
Before you Cut the below Hole in your Ceiling make sure you have enough space 15cm
for your Speaker height inside the ceiling .
1- Open the hole in the Ceiling , size 165mm = 16.5cm
2- Pull the sound wires between the speakers and connect them in a good way .
3- Connect the Power Cable to the (XT-20BA) Speaker Socket and then Link
the 230V power source to the Speaker DC15V Power adapter .

4- Once the hole is cut remove the protective grill and insert the speaker in the
hole,and make sure the fastening hooks are unscrewed .

5- Tighten the fastening Screw in a clockwise direction until the speaker is Locked .
6- Insert the protective grill

UHF Microphone
Note : UHF Wireless Microphone supports up to 30M Range in Open
Space ,make sure to use NEW batteries.
Switch ON/OFF :
1- Short Press the ( Power ) button for 1 Second to turn on the UHF Microphone.
2- Long Press the ( Power ) button for 2 Second to turn Off .
Change Frequency Channel :
Short Press the ( SET ) Key will change to the next Frequency Channel .
Add a Second UHF microphone to the same (XT-20BA) Active Speaker .
Make sure The UHF microphone is close to the active ceiling speaker within (1 meter),
Press the ( Power + SET ) button at the SAME TIME for 6 seconds , ( ID ) text will
appears on the display. Check now the Mic should be connected to the Speaker .
Note : (XT-20BA) Active Speaker can only Accept Max 2pcs UHF microphone at the same
time speaking.

The UHF microphone is connected to the active speaker (XT-20BA). But the UHF microphone has
no voice transmission.
Solution :
A- The UHF microphone is close to the active ceiling speaker within 1 meter,Turn on the active
speaker state.
B- First of all press the (Power) button + (SET) button at the SAME TIME for 6 seconds, ( ID ) text will
appears on the display, Press and must hold,
C- Turn off the active speaker and restart. Release the button after 3-5 seconds.
D- The UHF microphone will automatically recognize the ID code.( After completing the operation, Avoid
the UHF microphone ID code cross-frequency interference. The UHF microphone automatically
connects.).
The UHF microphone is connected to the active speaker. But the UHF microphone makes
noise or interferes with the other UHF frequency .
Solution :
A- The UHF microphone is 1 meter close to the host active speaker. Turn on the active
speaker state.
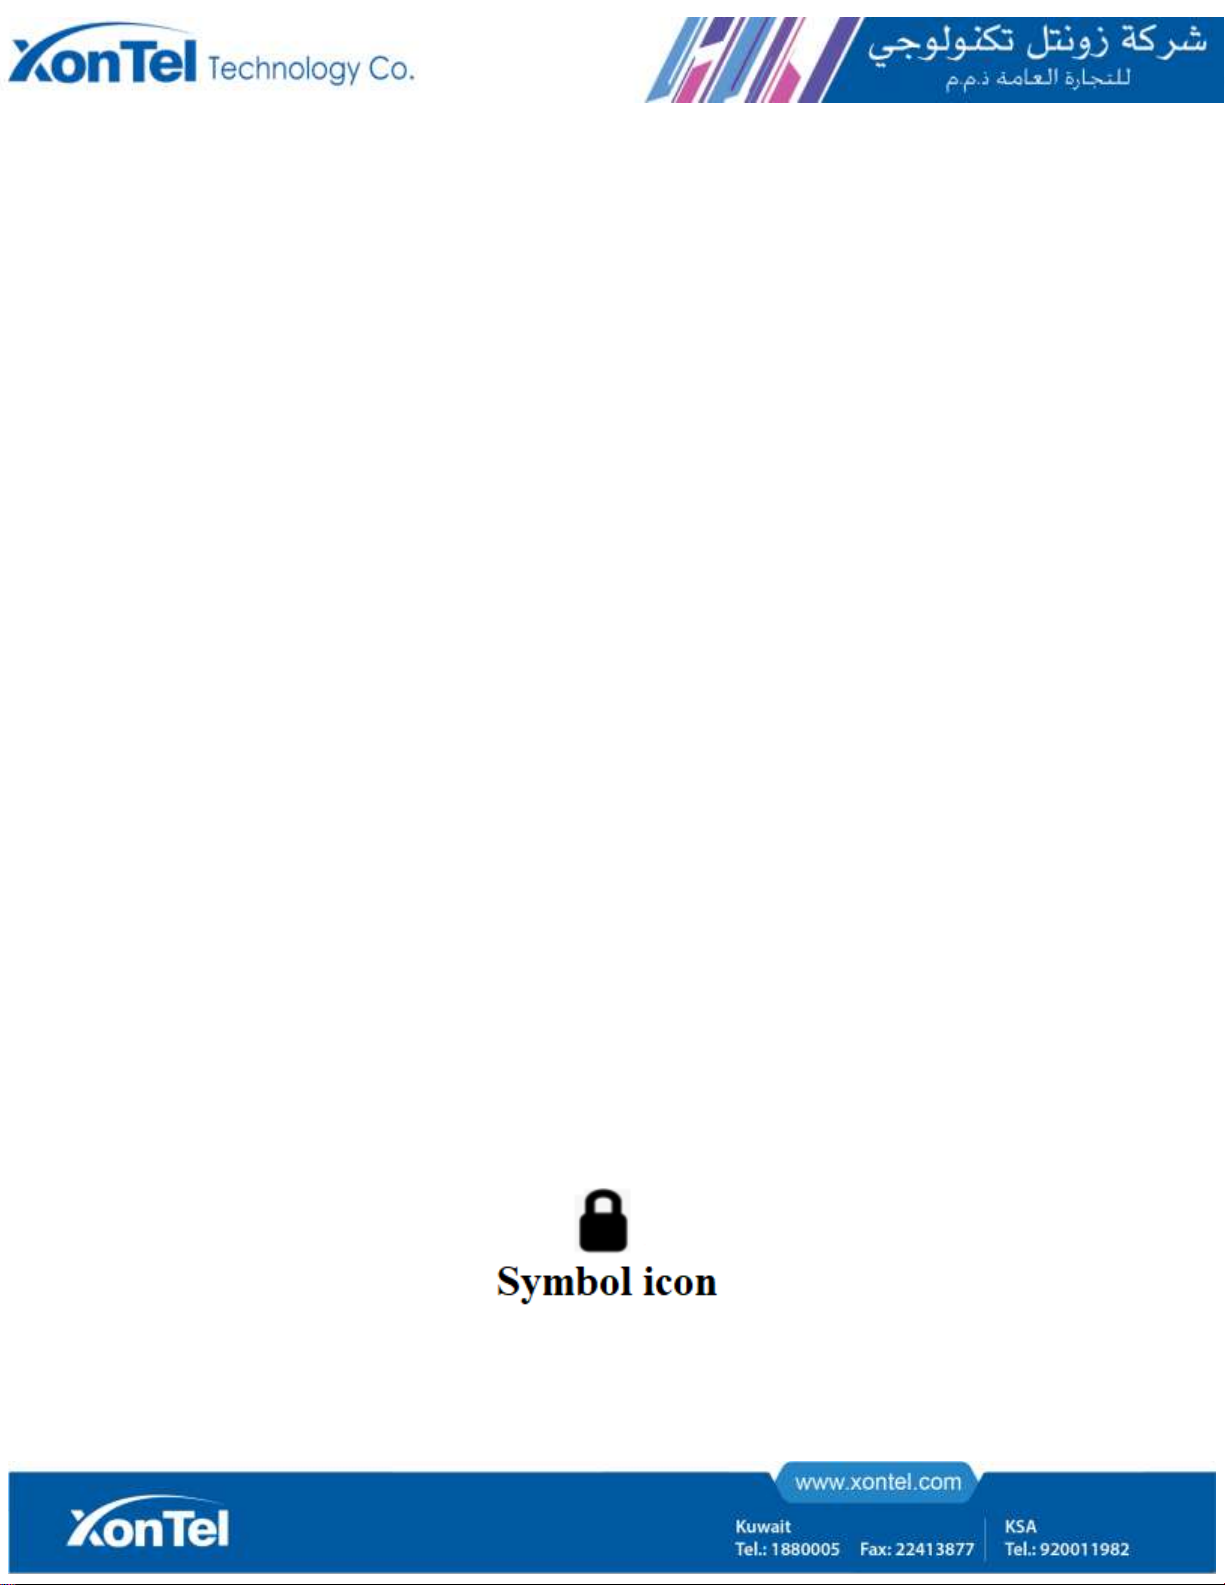
B- Press the (Power) button + (SET) button both at the SAME TIME, The display will
shows the Symbol icon .
C- After the calibration frequency is completed, The display shows the symbol icon on the
Mic screen .
After completing the operation, The UHF of ID code both recognizes re-pairing.The
UHF microphone will automatically track ID code, The UHF microphone does not make noise.

Remote Control
The Remote control can manage all the main function,in case of wrong operation check the
batteries charge and if needed replace it

1- Power ON/Off.
2- Mute.
3- increase the volume.
4- reduce the volume.
5- increase the UHF microphone volume.
6- reduce the UHF microphone volume.
7- choose the desired mode.( Bluetooth, Aux input)
8- Enable the BlueTooth TWS Function (Must set two speakers,Same Model in bluetooth
mode.
9- ON/OFF BlueTooth .
10- Press this key and release it to skip to the next Track Sound .
11-Press this key and release it to skip to the previous track.
12-Pause the selected track and Play it Back again

Pair One remote control to one active ceiling speaker:
After the active ceiling speaker is turned on,Press the these buttons ( UV- )+ (UV+ ) in the
remote at the same time for 3-5 seconds.
Pair remote control to many active ceiling speaker , Pls follow below steps :
1- Power off the first Active speaker which is already Paired to the remote Control .
2- Press Both buttons ( UV- )+ (UV+ ) in the remote at the same time and start the
Second Active speaker to Pair it with the Remote control ..
3- after Pairing success , Power On the first Active speaker , Now you have two
Active speakers Paired to the same Remote.
( this step can Help to Activate the TWS Feature ) .
TWS Function setting steps :
1- Power off the first Active speaker which is already Paired to the remote Control .
2- Press Both buttons ( UV- )+ (UV+ ) in the remote at the same time and start the
Second Active speaker to Pair it with the Remote control ..
3- after Pairing success , Power On the first Active speaker , Now you have two
Active speakers Paired to the same Remote.
4- Make sure Both speakers are Set to Bluetooth Mode using ( Mode ) Button .
5- Press TWS Button for 3-5 seconds to pair with TWS on both Active speakers, when TWS
Activitaed , both Speakers will announce TWS is Activated , you will find only one
( XonTel XT-20BA) in your Mobile Bluetooth when you Search .
Microphone Priority function, you can activate the ( Priority )
function between the Bluetooth and Microphone which will automatically
reduce the input signals level to give priority to the Microphone volume
, once you stop speaking , the Music volume will automatically resume to
same previous level
Table of contents
Other XONTEL Speakers manuals