XONTEL XT-M5CAM User manual

XT-M5CAM
5MP IP Dome Camera
(Built-in PoE)
User Manual

Contents
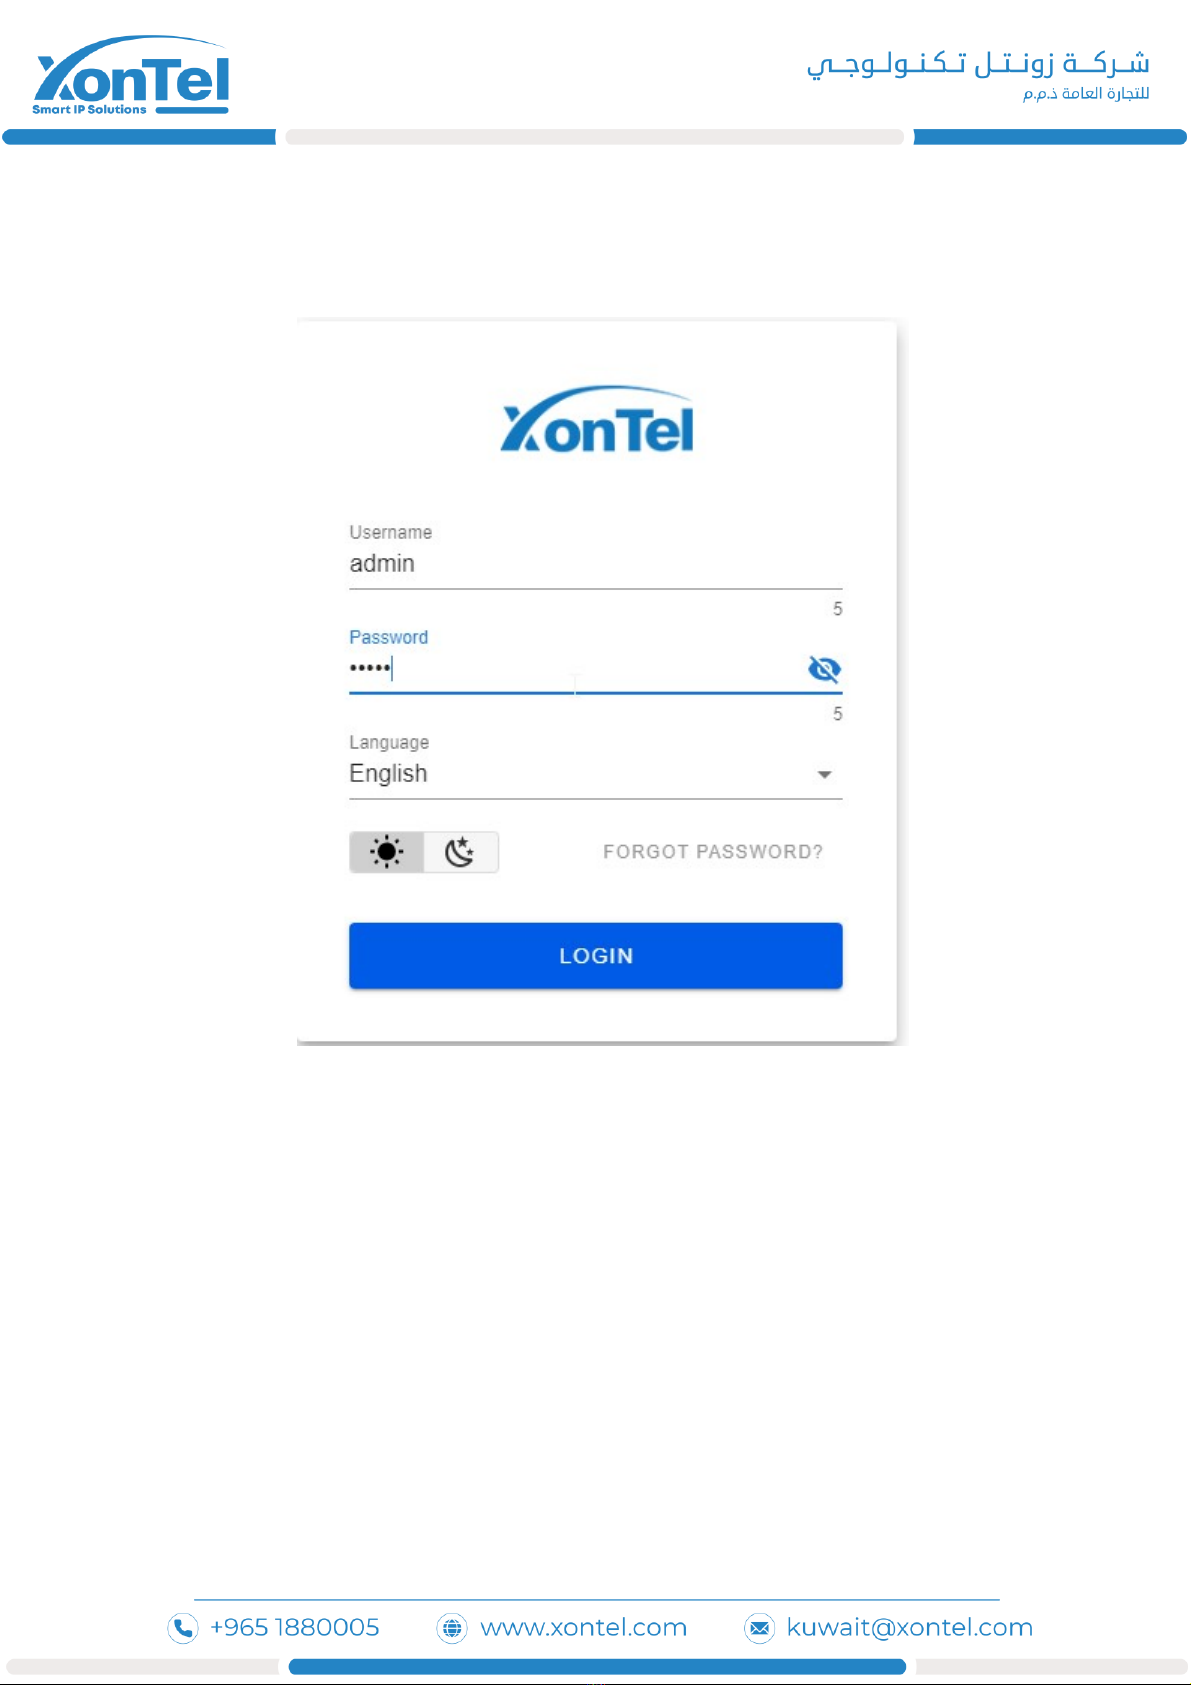
1.Login interface ………………………………………………………………………………………………………………………… 3
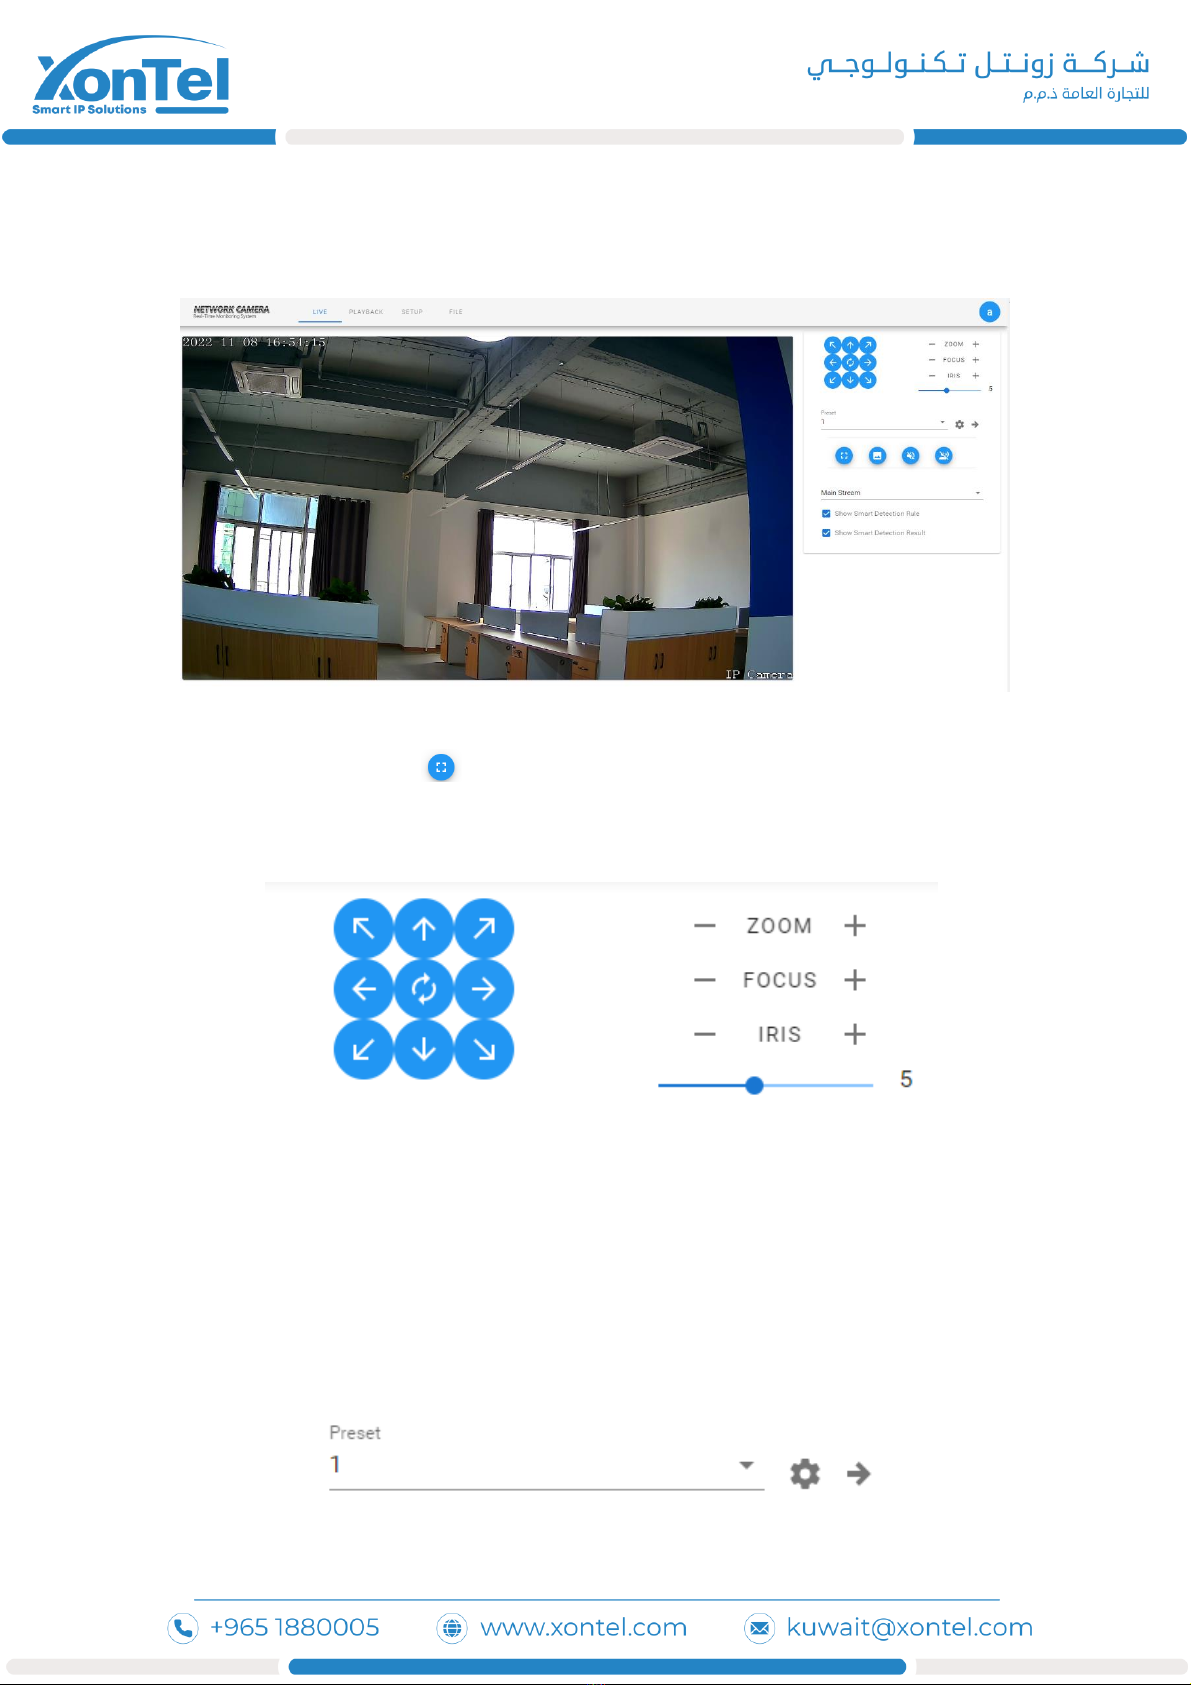
Real-time Preview ……………………………………………………………………………………………………………………….. 4
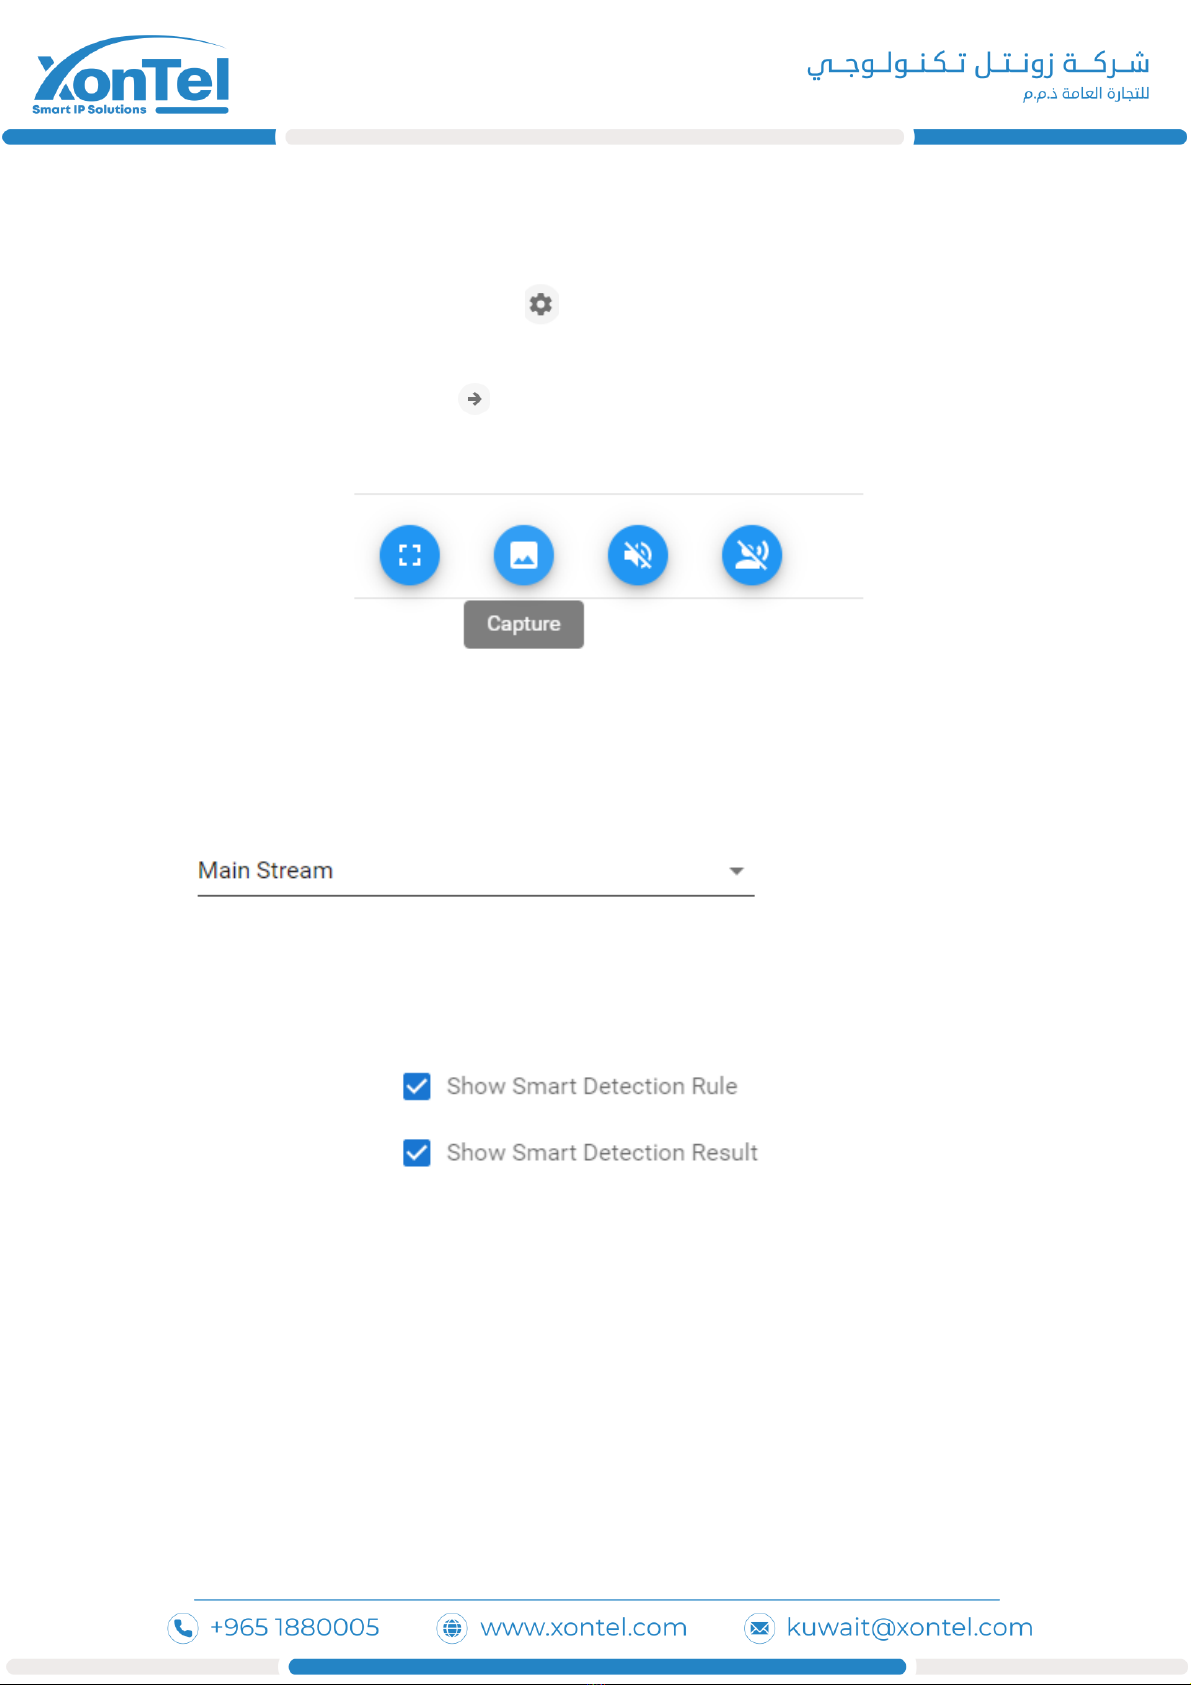
2.1 Full screen preview ……………………………………………………………………………………………………………………. 4
2.2 PTZ control …………………………………………………………………………………………………………………………………. 4
2.2 Stream type selection ………………………………………………………………………………………………………………… 5
2.3 Display intelligent detection ………………………………………………………………………………………………………. 5
Playback …………………………………………………………………………………………………………………………………………… 6
Parameter configuration ……………………………………………………………………………………………………………...…… 7
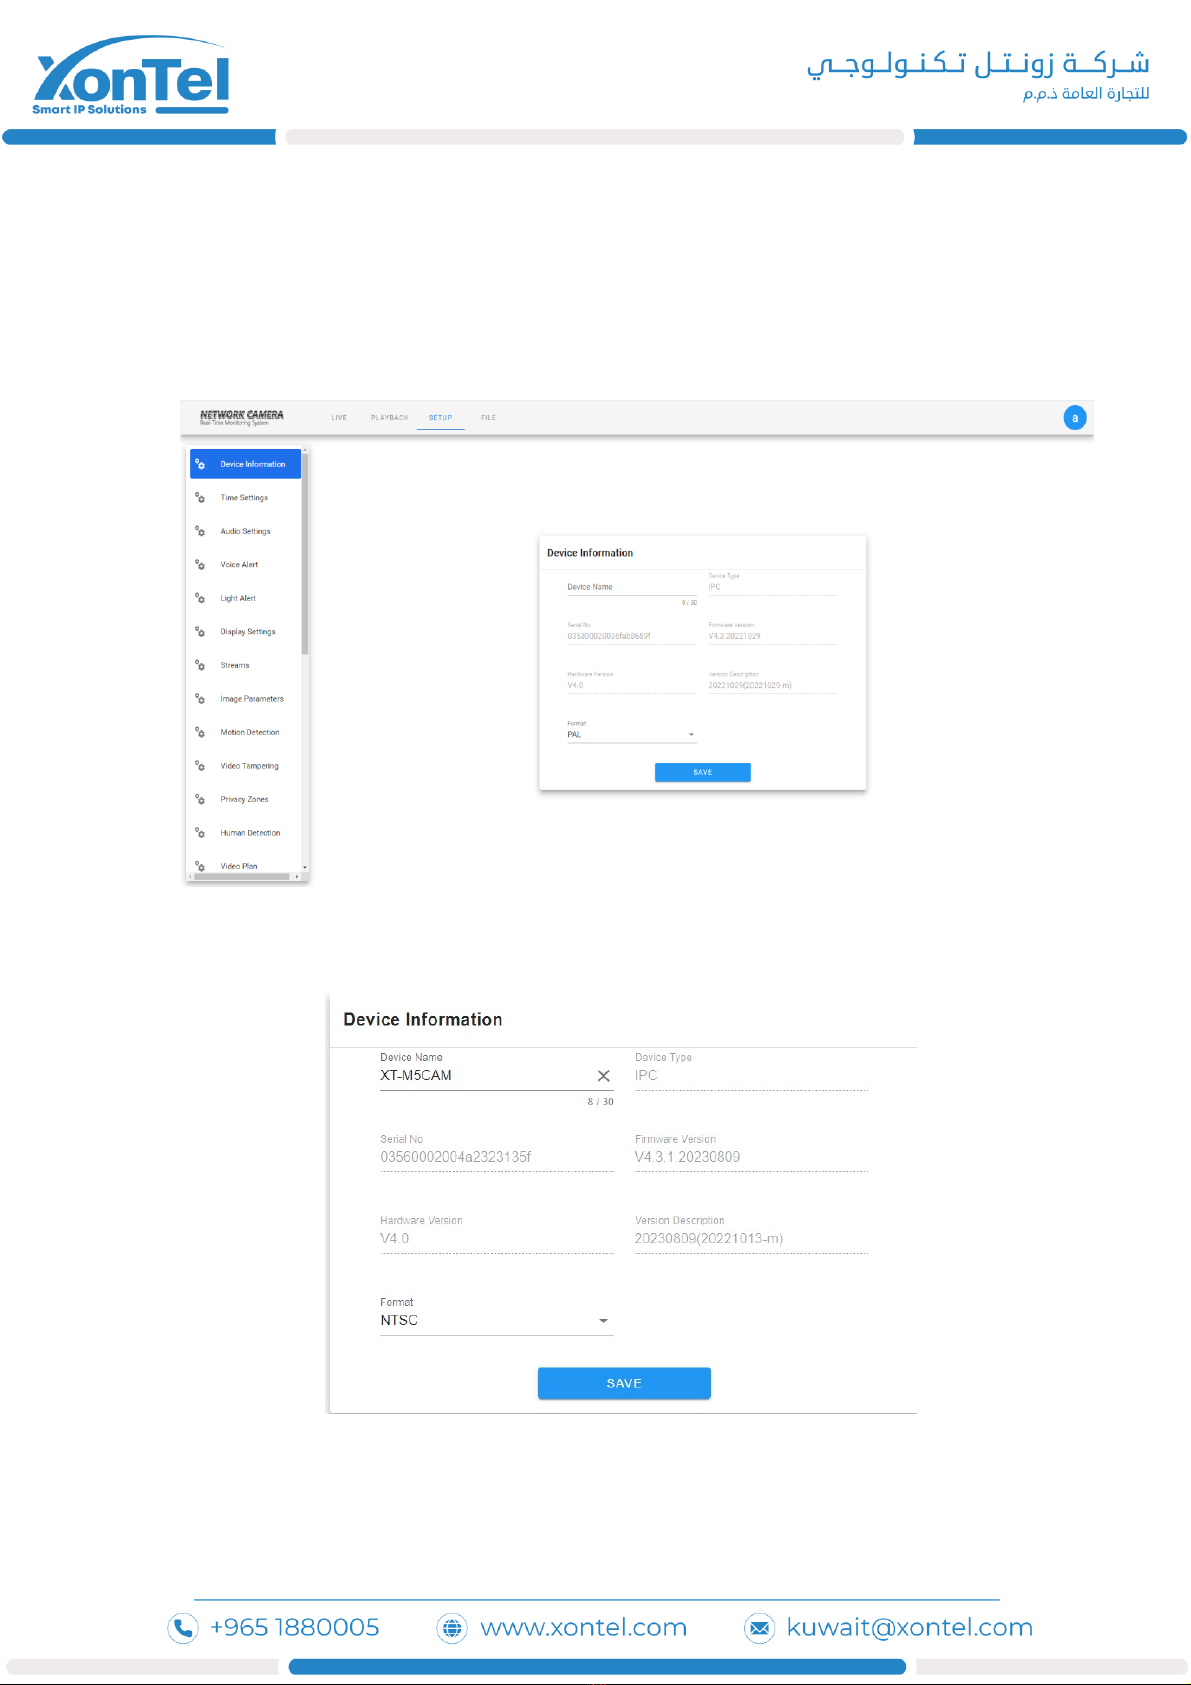
4.1 Device Information ......…................................................................................................................. 7
4.2 Time Settings ………………………………………………………………………………………………………………………………. 8
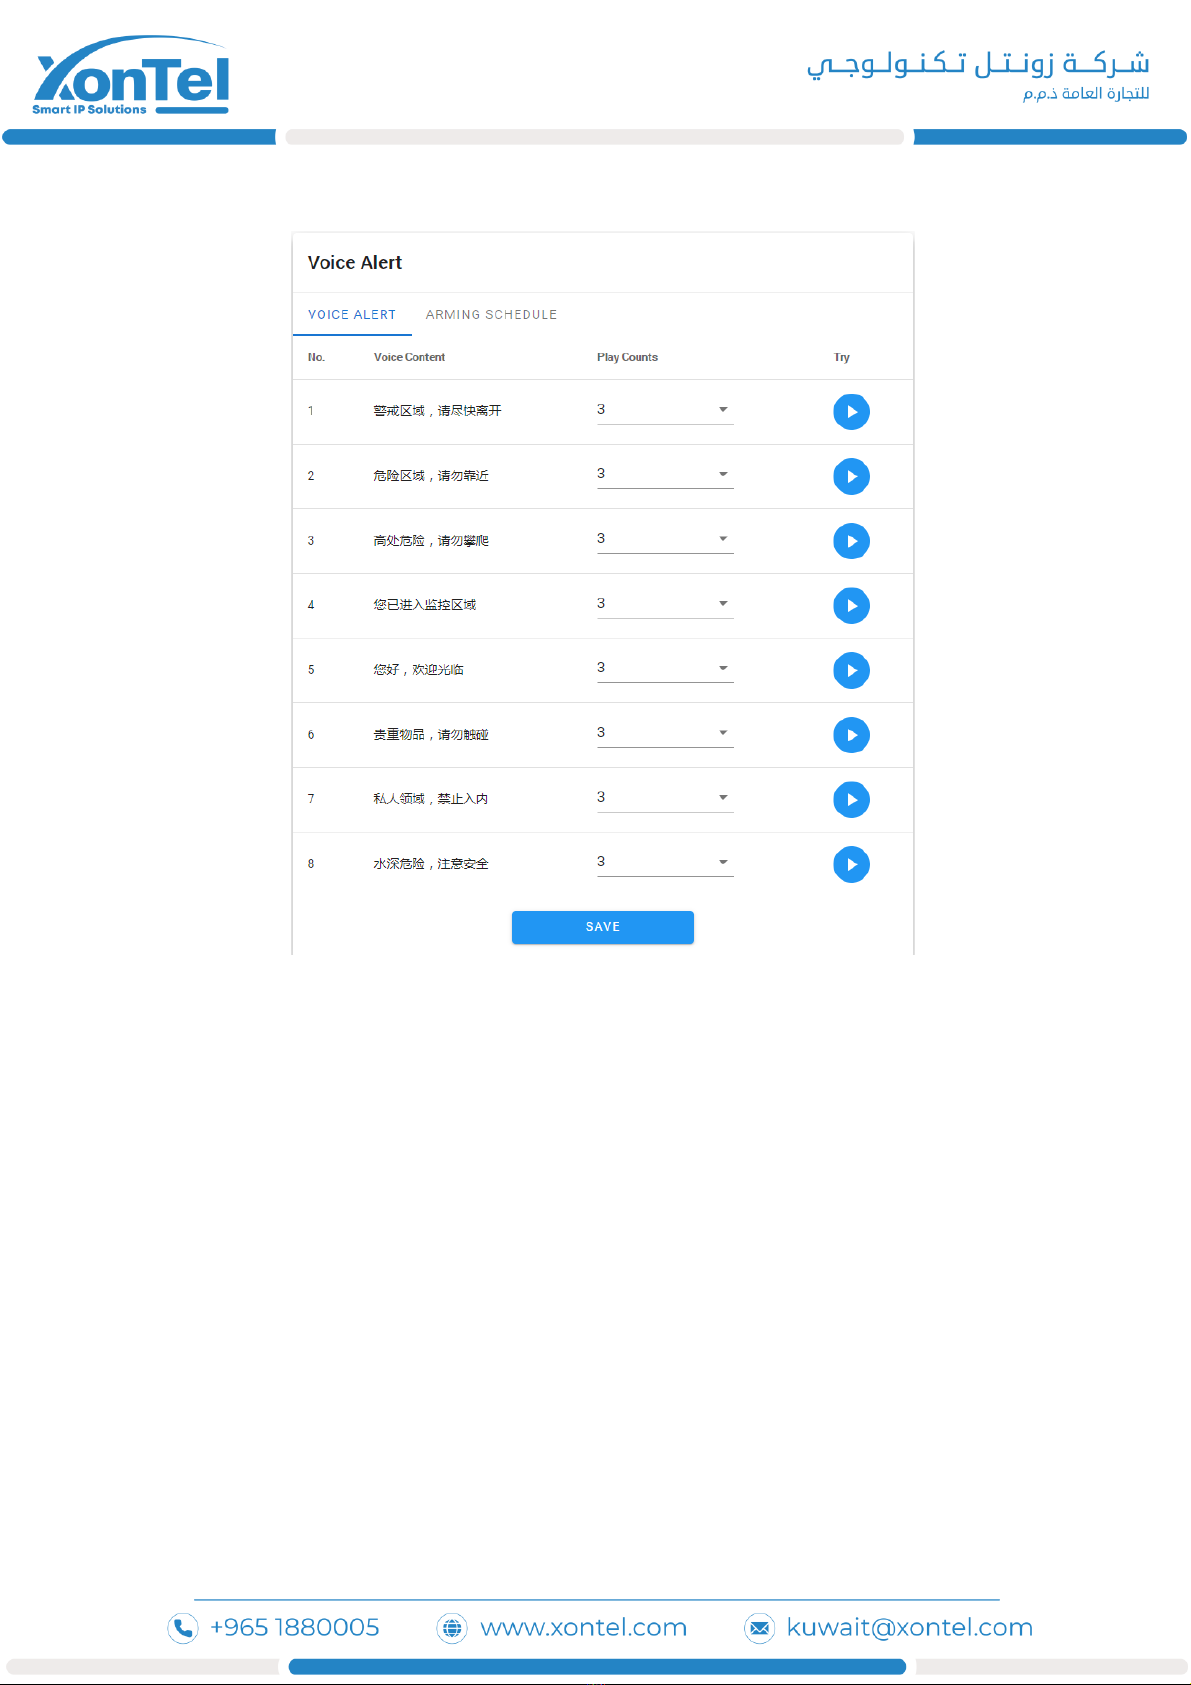
4.3 Voice output settings …………………………………………………………………………………………………………………... 9
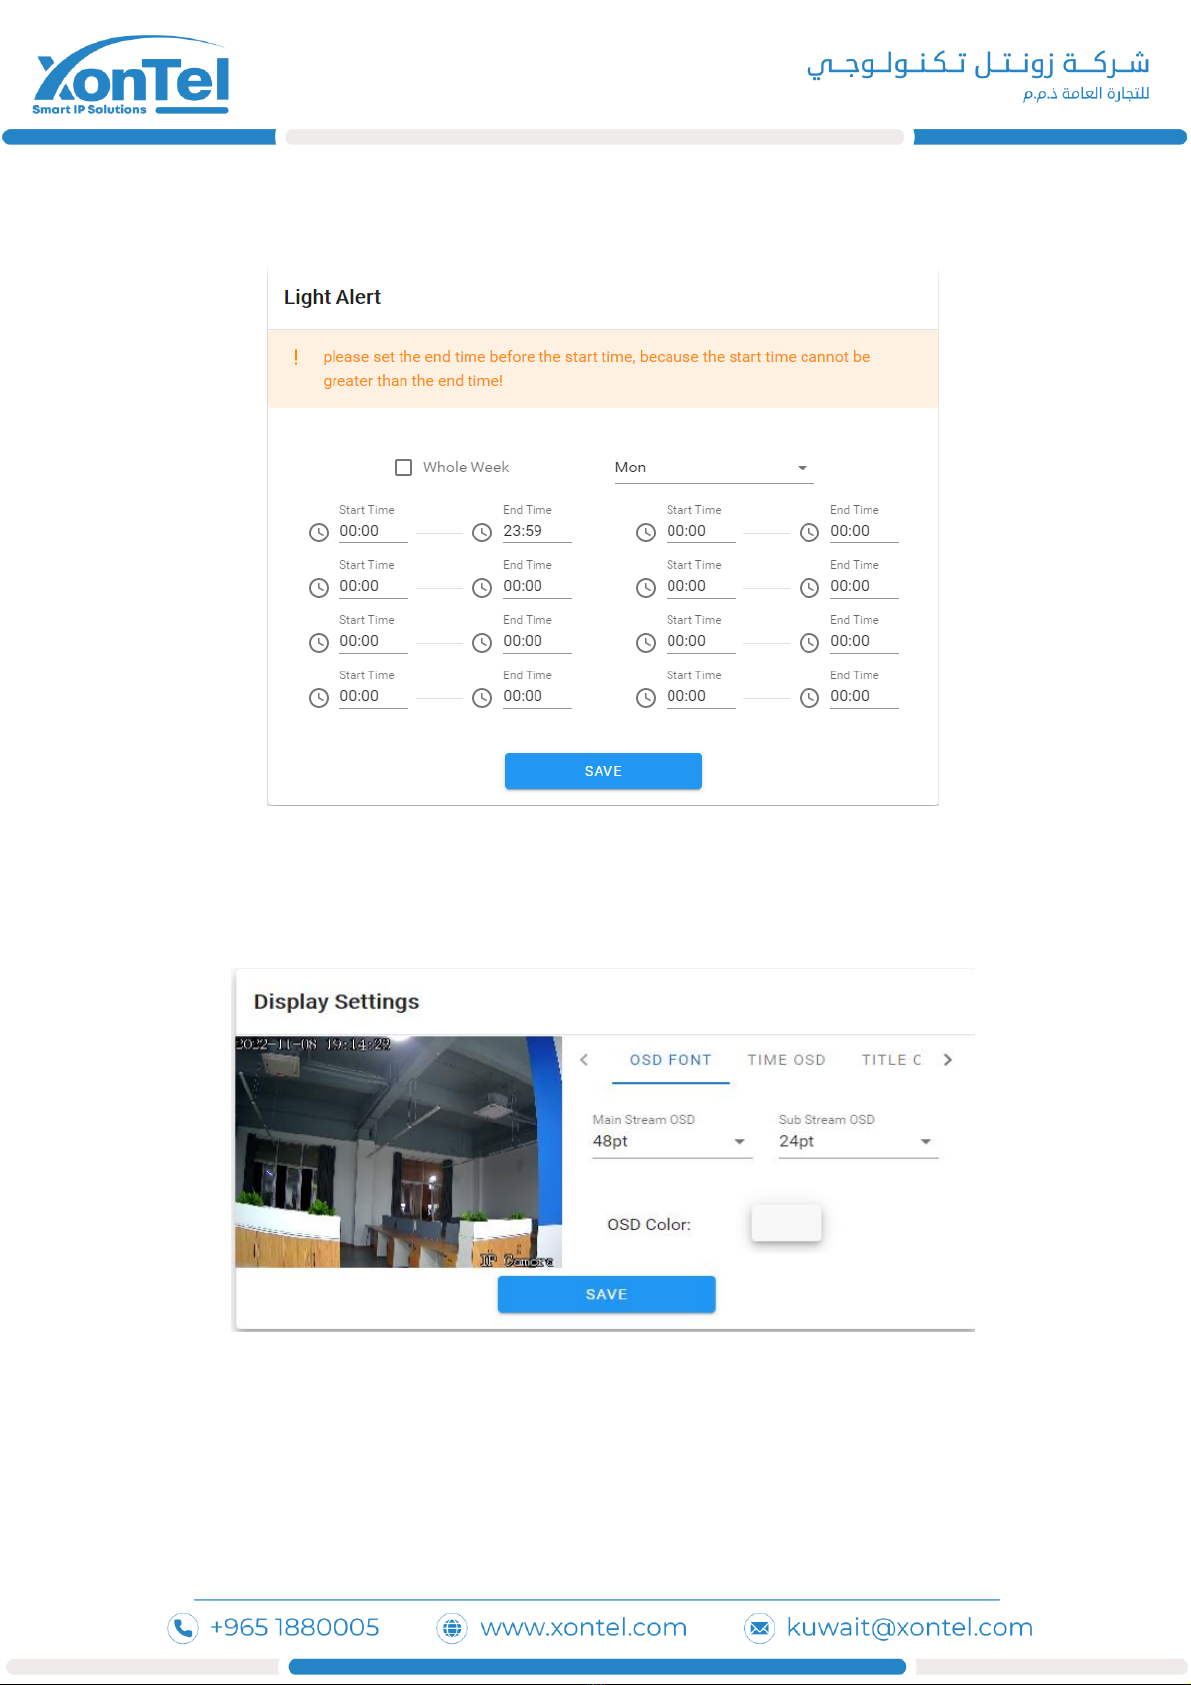
4.4 Alarm lamp output …..........................................……………………………………………........................... 10
4.5 Display Settings....................................................... ………………………………………………......................... 10
4.6 Encoding settings............................................................................................................................... 11
4.7 Image Parameters.............................................................................................................................. 12
4.8 Motion Detection............................................................................................................................... 13
4.9 Video Tampering................................................................................................................................ 14
4.10 Privacy Zones.................................................................................................................................... 14
4.11 Human Detection............................................................................................................................ 15
4.12 Video Plan....................................................................................................................................... 16
4.13 Network Settings............................................................................................................................. 16
4.14 RTMP Settings................................................................................................................................. 17
4.15 Management Platform.................................................................................................................... 17
4.16 Multicast Config.............................................................................................................................. 18
4.17 Email Settings.................................................................................................................................. 19
4.18 FTP Settings .................................................................................................................................. 19
4.19 Alarm Input..................................................................................................................................... 20
4.20 Alarm Output ................................................................................................................................ 20
4.21 User Settings ................................................................................................................................. 21
4.22 Storage Management..................................................................................................................... 22
4.23 System Update............................................................................................................................... 22
4.24 Device Maintenance....................................................................................................................... 23
4.25 Developer ..................................................................................................................................... 23
5.FILE Management ................................................................................................................................ 24
6.Logout .................................................................................................................................................. 24

1.Login interface
Enter the IP address of the camera in Google or Firefox (the default IP address is
192.168.1.188) to enter the login interface, as shown below:
Username:admin
Password:admin
Language Arabic and English can be selected:
Forgot password: click this button to reset the password according to the wizard;
Select the sun icon to use the white page, and select the moon icon to use the black
page;
Click [Login] to successfully log in to the camera.

Real-time Preview
After successful login, the interface is as follows:
Note: The device needs to be inserted with a TF card as a full function
display interface, otherwise, the device is a simple display interface.
2.1 Full screen preview
Click the full screen icon to preview the full screen, and press ESC to exit the full
screen
2.2 PTZ control
PTZ control: Eight direction keys can control the rotation of front-end equipment, and
the middle is automatic rotation
Zoom:Adjustable zoom size
Focuse:Adjustable focus size
Iris:Adjustable iris size
Speed:The slider can control the speed of the PTZ

【Preset point setting】First, turn the camera to the desired position through the
direction button controlled by the PTZ, then select a preset number in the "preset point"
drop-down list, and finally click the setting button.
【Preset point call】Select a preset number to be called from the "preset point" drop-
down list, and then click the call button.
【Capture】Preview the snapshot, and click it to automatically pop up the snapshot
saving path file
【Sound】Turn on/off sound preview
【Talk】Turn on/off voice intercom
2.2 Stream type selection
Select the current main stream preview or sub stream preview
2.3 Display intelligent detection
Display intelligent detection rules: select whether to display intelligent detection types
Display intelligent detection results: select whether to display the statistical results of
intelligent detection

Playback
Click "Video Playback" to enter the playback interface, select the time to call the video,
click seach button
the video will be automatically retrieved;
play:Start current playback;
stop:Stop current playback;
Slow:Slow down playback speed (1/2, 1/4, 1/8, 1/16 times respectively);
Fast:Speed up playback (2, 4, 8, 16 times respectively);
Full screen:the playback screen will be displayed in full screen;
Sound:The sound in the video can be turned on/off.
Double click the position of the search bar to play, or click the "Play" button to start
playback.
(Note: This function requires the device to support TF card storage. )

Parameter configuration
Note: The device needs to be inserted with a SD card as a full function display
interface, otherwise, the device is a simple display interface.
4.1 Device Information
Equipment Name: the name of the equipment can be set.
Equipment Type: displays the equipment type.

Serial Number: displays the product serial number.
Master version: displays the software program version date.
Hardware Version: Displays the version number of the hardware motherboard.
System: PAL and NTSC image system can be switched.
4.2 Time Settings
Manual timing: set IPC time manually.
synchronization with PC: synchronize the current PC time.

4.3 Voice output settings
Voice alarm output: you can set the playing times of 8 voice alarms and click to listen.
Arming Schedule: The Arming Schedule of voice broadcast can be set.

4.4 Alarm lamp output
You can set the defense time of alarm lamp output, and click the [Save] button after
setting to take effect.
4.5 Display Settings
OSD font: the OSD font size of the interface can be adjusted.
Time OSD: Time OSD format and position can be adjusted.
Title OSD: adjust the content, format and location of the title OSD.
Multiline OSD: add multiline user-defined OSD character content and position, and you
can select whether to display it.
Hue: brightness/contrast/saturation/hue can be adjusted.

4.6 Encoding settings
Stream compression type: the main stream and sub stream coding types can be
selected.
Code stream type: including composite stream and video stream;
Resolution: The front-end IPC supports several resolutions, and the corresponding ones
will be displayed here.
Video frame rate: different values can be selected from the drop-down list. The default
value is Full Frame Rate.
Code type: including H264/H265;
Code Level: you can select a code level, including Baseline, MainProfile, and HighProfile.
I frame interval: I frame interval can be set.
Bit rate type: including fixed rate and variable rate.
Bit rate: different bit rates can be set for different channels.
Image quality: six types can be selected: best/sub good/good/average/poor/worst.

4.7 Image Parameters
Day night switch: divided into external trigger, automatic, color, black and white. The
day and night switching mode of non-infrared network model is automatic by default,
and the day and night mode of infrared network model is external trigger by default.
The user selects the day and night switching mode according to the network machine
model and the actual use scenario;
Color mode: divided into three types: standard, gorgeous and natural; The color mode
defaults to standard;
IRCUT trigger: it is divided into forward/reverse, which is related to the actual IRCUT
hardware;
Switching time: the day night switching delay value (0-30) is 3 seconds by default;
Day night switching threshold: the default value is 20, and the threshold range is 0-255.
The value can be adjusted according to customer needs;
Night day switching threshold: the default value is 35, and the threshold range is 0-255.
The value can be adjusted according to customer needs;
Fill light setting: light mode, switching mode and light brightness can be set.
Advanced settings: you can set image mode, wide dynamic mode, 3D time domain.
sharpness, defogging function, night frame reduction, and white balance.
Exposure control: backlight mode, exposure allocation strategy, gain control, shutter
and infrared light receiving can be set.
GAMMA: GAMMA value and power frequency can be set.

4.8 Motion Detection
Parameter setting: you can set whether to enable the detection function, set the
detection sensitivity, and set the detection area.
Deployment Time: you can set the deployment time from Monday to Sunday.
Linkage setting: you can set the linkage to upload email, video, FTP, alarm light, alarm
output, capture, and voice broadcast.

4.9 Video Tampering
Parameter configuration: you can set whether to enable the detection function, set the
detection sensitivity, and set the detection area.
Deployment Time: you can set the deployment time from Monday to Sunday.
Linkage setting: you can set the linkage to upload email, video, FTP, alarm light, alarm
output, capture, and voice broadcast.
4.10 Privacy Zones

Enable: privacy masking can be enabled or disabled.
Setting area: In the preview interface of Setting Area, press and hold the left mouse
button and drag to select the area to be masked.
Clear: click "Clear" to clear the area specified by IPC.
4.11 Human Detection
Parameter setting: you can set whether to enable the human shape detection function;
The minimum human shape pixel size can be set to be the minimum human shape pixel
size detected; The video stream can be superposed to the human frame; Detection area
and shielding area can be set.
deployment Time: you can set the deployment time from Monday to Sunday;
Linkage area: linkage upload email, video, FTP, alarm light, alarm output, capture and
voice broadcast can be set.

4.12 Video Plan
Parameter configuration: video recording mode, pre-recording time and video
recording delay can be set.
Deployment Time: you can set the deployment time from Monday to Sunday.
4.13 Network Settings
Basic setting: static IP or DHCP mode can be set;
HTTP/HTTPS:You can set HTTP or HTTPS access on or off and port number;
RTSP setting: RTSP on/off, port number, and base64 or Digest authentication mode can be set.

4.14 RTMP Settings
Basic settings: set whether RTMP is enabled or not and the port number;
RTMP Push: set whether to display the set rules and detection results in the preview
interface.
No Disturb Time: set the no push time period in weeks.
No Disturbance Setting: set the no push client.
4.15 Management Platform
Equipment parameters: set GB28181 related parameters, including equipment
number, code stream type, local port, registration validity period, heartbeat cycle.

maximum heartbeat timeout, signaling transmission mode, and stream transmission mode.
SIP server 1: Set the SIP 1 server number, IP, domain, port, and registration password.
SIP server 2: Set the SIP 2 server number, IP, domain, port, and registration password.
Multicast settings: set multicast ports and multicast addresses.
Channel/alarm: set channel number, alarm level, alarm number and alarm level.
4.16 Multicast Config
Multicast is disabled by default. After enabling, you can set the IP address, port, and
TTL of the multicast main code stream, sub code stream, and audio.

4.17 Email Settings
Sending Email: fill in the email address of the sending box.
Password: fill in the email password of the outbox.
confirm Password: Confirm the email password.
SMTP Server: Set the SMTP server address of the outgoing mailbox.
SMTP Port: Set the SMTP server port of the outgoing mailbox.
Receiving mailbox: fill in the address of the receiving mailbox.
4.18 FTP Settings
Basic settings: fill in the server address, port number, user name, password, linkage mode
and file path to upload.
Timing capture: timing capture interval, code stream type and deployment time can be set.

4.19 Alarm Input
Parameter configuration: select whether to open alarm input, alarm input terminal,
name and trigger level.
Deployment Time: You can set the deployment time period from Monday to Sunday;
Linkage setting: you can set the linkage to upload email, video, FTP, alarm light, alarm
output, capture, and voice broadcast.
4.20 Alarm Output
Alarm output: set alarm output terminal;
Output relay status: it can be set to normally open and normally closed.
Output alarm delay: select the delay time of the output alarm (when the alarm
triggering ends, the corresponding time of the alarm output delay)
Table of contents
Other XONTEL Speakers manuals
Popular Speakers manuals by other brands

Valcom
Valcom V-764 Technical specifications

ENERGY SISTEM
ENERGY SISTEM studio monitor 4 manual

Aaron
Aaron SAT-60 Specifications

Advanced Visual Solutions
Advanced Visual Solutions CSGAMKIT01 Installation and operating instructions

Digihertz Audio
Digihertz Audio DAE428 user manual

Eagle
Eagle ET-AR508LR-BK user manual