XPower ELR50 User manual

TRAINELECTRIQUEELR50/ELR50ELECTRICRETRACTS
OrderN°099ELR50(trainprincipal/maingear)
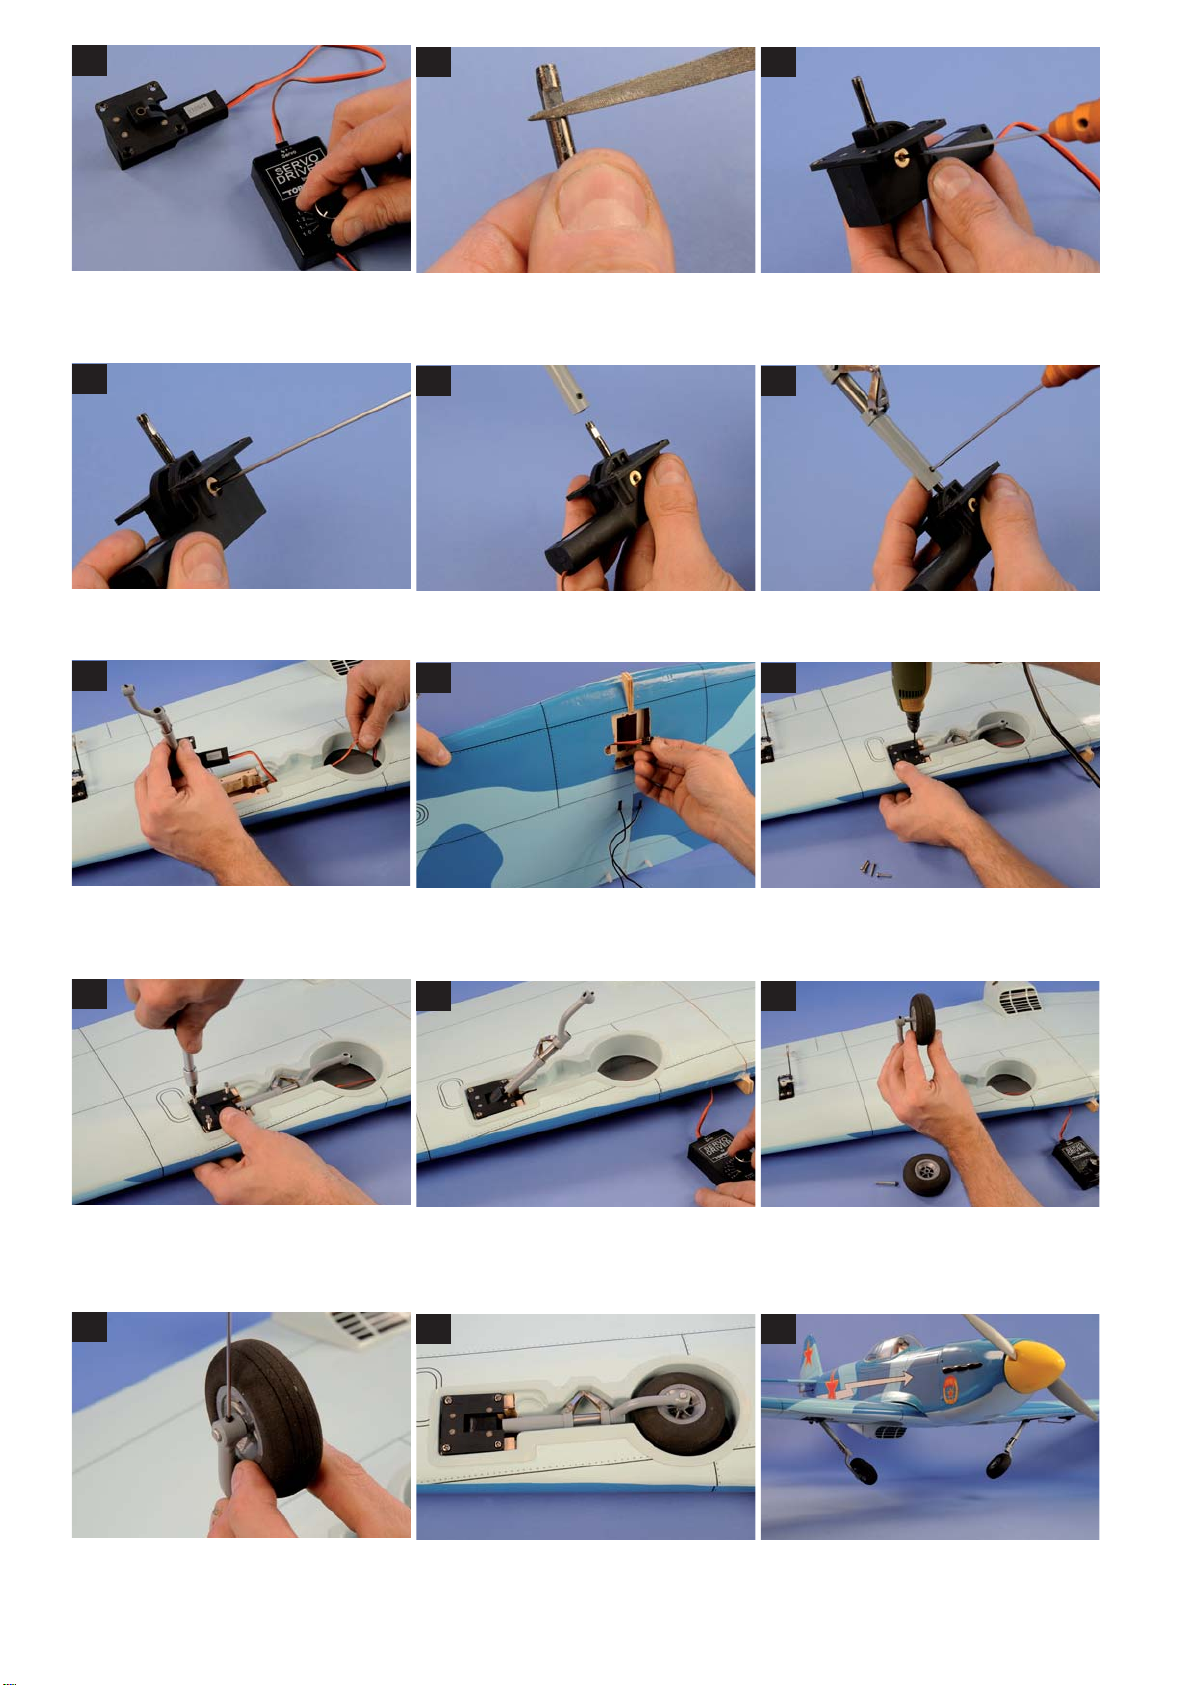
Plus besoin d’être un constructeur chevronné pour profiter du réalisme d’un train rentrant sur votre avion!
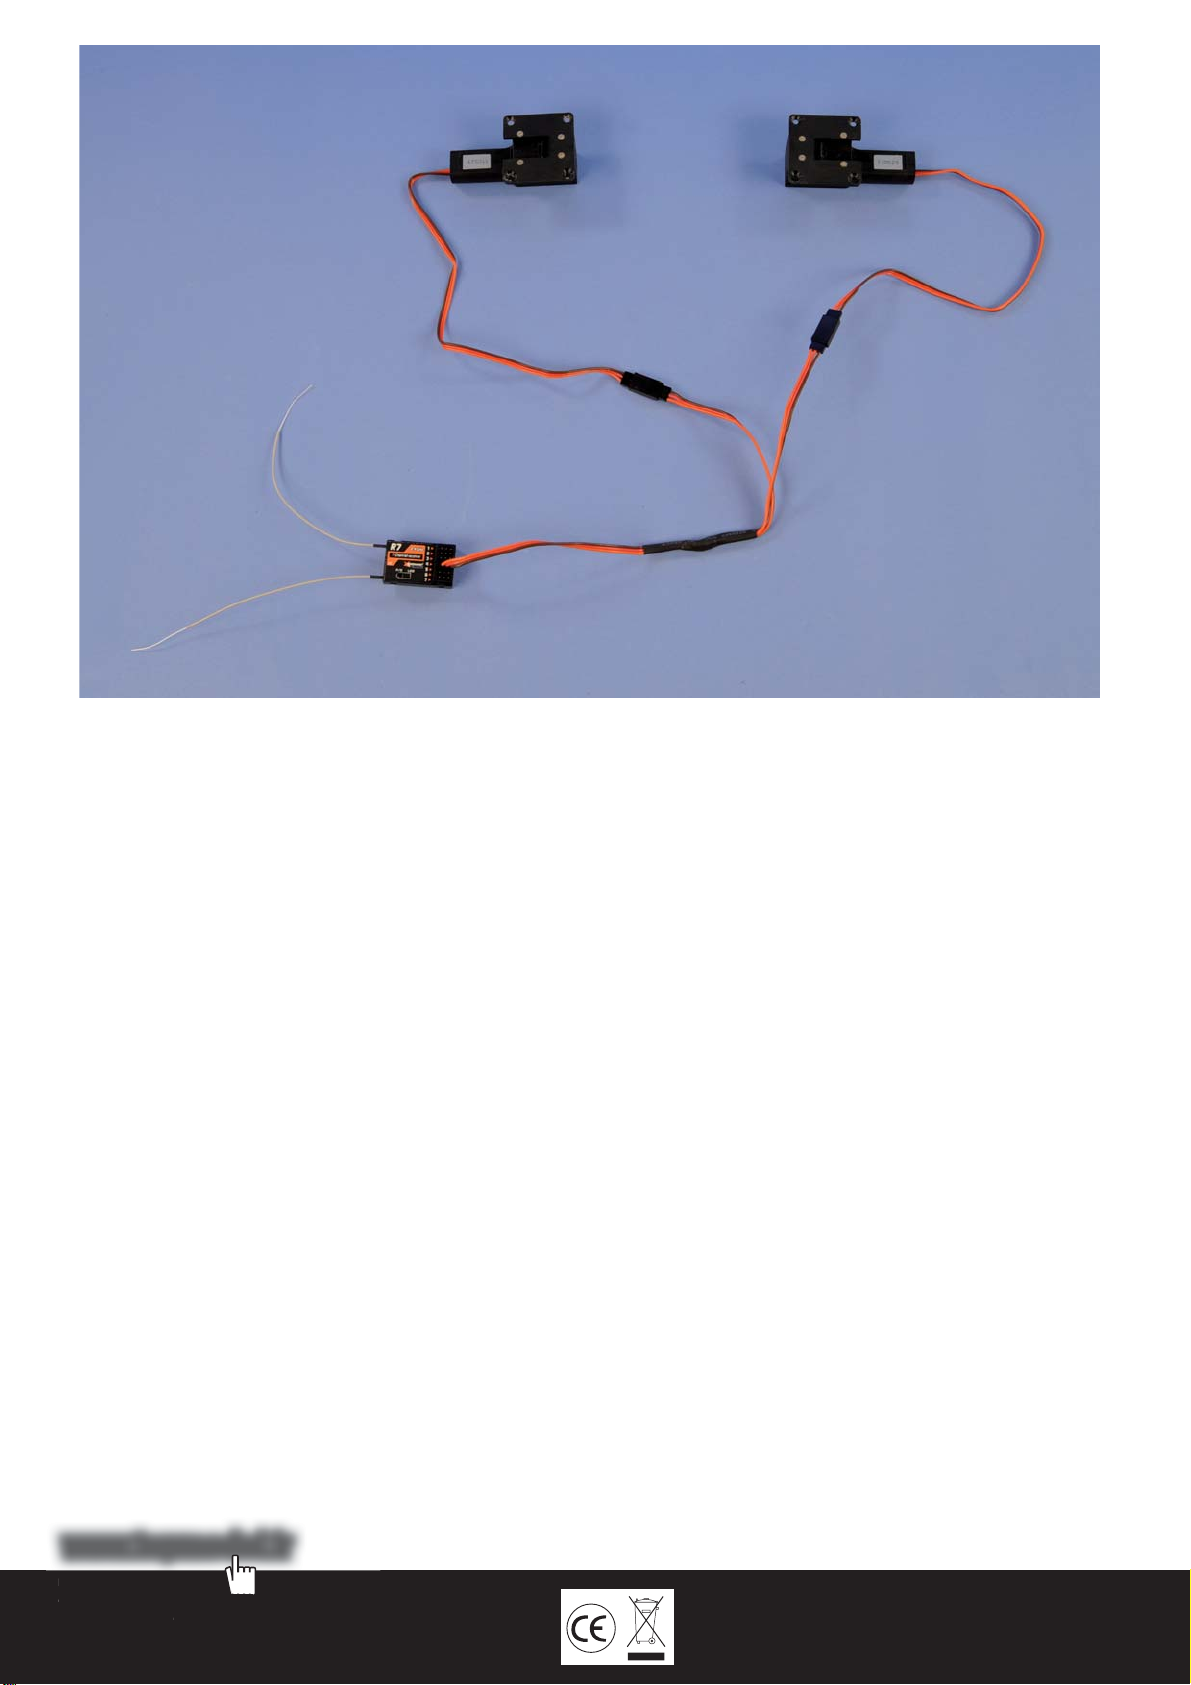
Le système XPower ELR est complètement autonome et n’a pas besoin de réservoir d’air, de tringleries complexes, ni même d’un servo supplémen-
taire. Il suffit simplement de le visser en place et de le connecter au récepteur. Un cordon Y spécial est inclus et permet de n’utiliser qu’une seule voie
sur le récepteur pour contrôler toute l’unité.
Points clés:
● Pignons d’entrainement en métal
● Support robuste en plastique chargé fibre de verre
● Moteur électrique intégré avec micro circuit-imprimé
● Protection intégrée sur-intensité.
Caractéristiques techniques:
● Alimentation: 4,8-6,0V
● Couple:
-Sous 4,8V, 2,7kgxcm
-Sous 6,0V, 3,0kgxcm
● Temps séquence et consommation:
-Sous 4,8V, séquence 0,8’’, conso 350mA (1 unité)
-Sous 6,0V, séquence 0,6’’, conso 300mA (1 unité)
● Enclenchement fonction protection sur-intensité: à partir de 2’’ et plus
● Température de fonctionnement: 0°~ 50°C (cependant en-dessous
de 10°C, la vitesse de fonctionnement diminue)
● Poids: train principal 54g (x2)
● Pour avions classe 40-50 GP ou EP d’une masse inférieure à 3kg.
You don’t need to be an experienced builder to enjoy a realistic retractable landing gear on your plane!
XPower ELR system is completely autonomous and does not need an air tank, complex linkages or even an additional servo. Simply bolt it to the plane
and connect to the receiver.
Key points:
● Heavy duty fiberglass filled polyamid case
● Metal drive gear set
● Electric motor with integrated PC board circuit
●Integrated overcurrent protection
Specifications:
● Power supply: 4.8 to 6.0 V
●Torque:
-4.8-V, 2.7 kgxcm
-6.0-V, 3.0 kgx’cm
●Time sequence and consumption:
-4.8-V, sequence 0.8», current draw 350mA (1 unit)
-6,0-V, sequence 0.6», current draw 300mA (1 unit)
● Switching over-current protection function: from 2 «and more
● Operating temperature: 0° ~ 50°C (but below 10 ° C
the operating speed decreases)
● Weight: 54g main gear (x2)
●GP or EP Aircraft 40-50 class with a flying weight less than 3kg
Dimensions en mm
#099ELR50
33
41
36
44
74
Ø3
19.2
2.5
21
28.3
#099ELR50
TRAIN ELECTRIQUE ELR50 XPower
XPower ELR50 ELECTRIC RETRACTS
Contenu du set / Set content
141AS4060
Option/Optional
SET JAMBE DE TRAIN MAQUETTE CLASSE 40-60
40-60 CLASS SCALE OLEO STRUT SET

1
Sortir le train à l’aide d’un SERVO DRIVER (020SD).
Extend retract with the SERVO DRIVER
(#020SD).
3
Visser la CAP dans le train...
Fix the adapter in the retract...
2
Faire des méplats sur la CAP des jambes de train
141AS4060.
Make a key area with a file on music wire
adapter.
Utilisation
Utilisation
7
Passer le cordon d’alimentation du train dans l’aile...
Route the retract power cord through the
wing...
9
Percer des trous de taille adéquate pour les vis de
fixation que vous allez utiliser (non fournies).
Drill appropriately sized holes for the hard-
ware you intend to use (not supplied).
8
...faire ressortir à l’endroit adéquat pour branchement
vers le récepteur.
...pull the cable out of the wing towards the
receiver.
Utilisation
Utilisation
10
Visser le train en place (nous recomandons des vis
auto-taraudantes 2,9x16mm 1310516).
Attach the retract in place (we recom-
mend to use self tapping screws 2,9x16mm
#1310516).
12
Passer la roue dans l’axe, circlip côté extérieur...
Slip the wheel on the axle with the circlip
pointing away from the strut...
11
Ressortir le train avec le SERVO DRIVER.
Extend retract with the SERVO DRIVER.
Utilisation
Utilisation
13
...puis visser l’axe dans le train (utilisez chaque fois du
frein filet style LOCTITE)
...then attach the axle to the gear and
tighten teh locking bolt (use LOCTITE
threadlocker on every bolt)
15
Faire plusieurs séquences sortie-rentrée. Ajuster les
réglages, si nécessaire.
Perform several sequences UP-DOWN to see
if all is fine. Adjust if necessary.
14
Ajuster les réglages pour que le train et la roue rentrent
parfaitement dans leur logement.
Adjust the fixtures for the leg and the wheel
to fit perfectly into the gear well.
Utilisation
4
...avec les vis Chc sans tête fournies avec les jambes.
...with hexagon socket set screws supplied
with scale oleo strut.
6
..puis visser.
...then tighten the locking bolt.
5
Présenter le fût sur la CAP...
Fit the strut on the adapter...

Distribué par / Distributed by:
TOPMODELS.A.S.
Le jardin d’entreprises de SOLOGNE - F-41300 SELLES SAINT DENIS
©TOPMODEL 2011 V1-0 NOV 2011
Bonsvols…
Goodflights...
D
istribué par / Distributed by:
TO
PM
O
DE
L
S
.A.
S
.
www.topmodel.fr
www.topmodel.fr
Connection radio
1- Connecter le connecteur en provenance de chaque unité de train dans le cordon Y (non fourni).
2- Connecter le cordon Y sur la voie train rentrant de votre récepteur. Si la voie train rentrant est occupée, une voie auxilliaire peut être utilisée.
Radio connection
1-Plug the connector from each of the retract units into the 2 in 1 wire harness (not supplied).
2- Plug the single lead from the wire harness into the gear channel of your receiver. An auxilliary channel can be used if the gear channel
is occupied.
Utilisation
Avant d’utiliser le train rentrant dans le modèle la première fois, contrôler qu’il n’y a pas d’obstacles dans les puits de roue qui pourraient empêcher le fonctionnement du
train.
Mettre sous tension l’émetteur puis le récepteur. Utiliser l’inter du train ou un autre inter assigné à la rétraction du train et contrôler qu’il fonctionne correctement.
Si le sens de l’inter est opposé à la direction désirée, utiliser la fonction REVERSE de l’émetteur pour changer le sens de rétraction.
Si vous utilisez un système 2,4GHz, une fois que vous avez correctement réglé le sens de rétraction, soyez sûr d’appairer la radio avant le premier vol.
Operation
Before operating the retracts in the model for the first time, check that there are no obstructions in the wheel wells that could impede
operation of the gear.
Turn on transmitter and then receiver. Use the gear or other assigned switch to activate the landing gear and check that it operates cor-
rectly.
If the switch direction is opposite of that desired, use the reversing function in the transmitter to change the retraction direction.
If using a 2.4GHz radio, once you have set the correct servo direction, be sure to rebind the system before flight.
Mesures de sécurité
C’est un produit sophistiqué pour le modélisme et pas un jouet !
Il doit être utilisé avec prudence et bon sens et demande des connaissances de base en mécanique. Le manquement à utiliser ce produit
d’une façon sûre et responsable peut avoir pour conséquence des dommages au produit lui-même ou à toute autre propriété. Ce produit
n’est pas prévu à l’usage des enfants sans surveillance d’un adulte. Le manuel du produit contient des instructions pour la sûreté,
l’utilisation et l’entretien. Il est essentiel de le lire et de suivre toutes les instructions et avertissements du manuel avant l’assemblage,
l’installation ou l’utilisation, afin de le faire fonctionner correctement et ainsi d’éviter les dommages ou blessures.
Période de garantie
La garantie exclusive TOPMODEL SAS garanti que le produit acheté est exempt de défauts dans le materiel et dans son exécution pen-
dant une période d’un an à compter de la date d’achat par l’acheteur.
Safety precautions
This is a sophisticated hobby product and not a toy!
It must be operated with caution and common sense and requires some basic mechanical ability. Failure to operate this product in a
safe and responsible manner could result in injury or damage to the product or other property. This product is not intended for use by
children without direct adult supervision. The product manual contains instructions for safety, operation and maintenance. It is essential
to read and follow all the instructions and warnings in the manual prior to assembly, setup or use, in order to operate correctly and avoid
damage or injury.
Warranty period
Exclusive warranty TOPMODEL SAS warranties that the product purchased will be free from defects in material and workmanship for a
period of one year from the date of purchase by the purchaser.
099ELR50
Cordon Y
Y cord
Récepteur
Receiver
This manual suits for next models
1
Other XPower Toy manuals