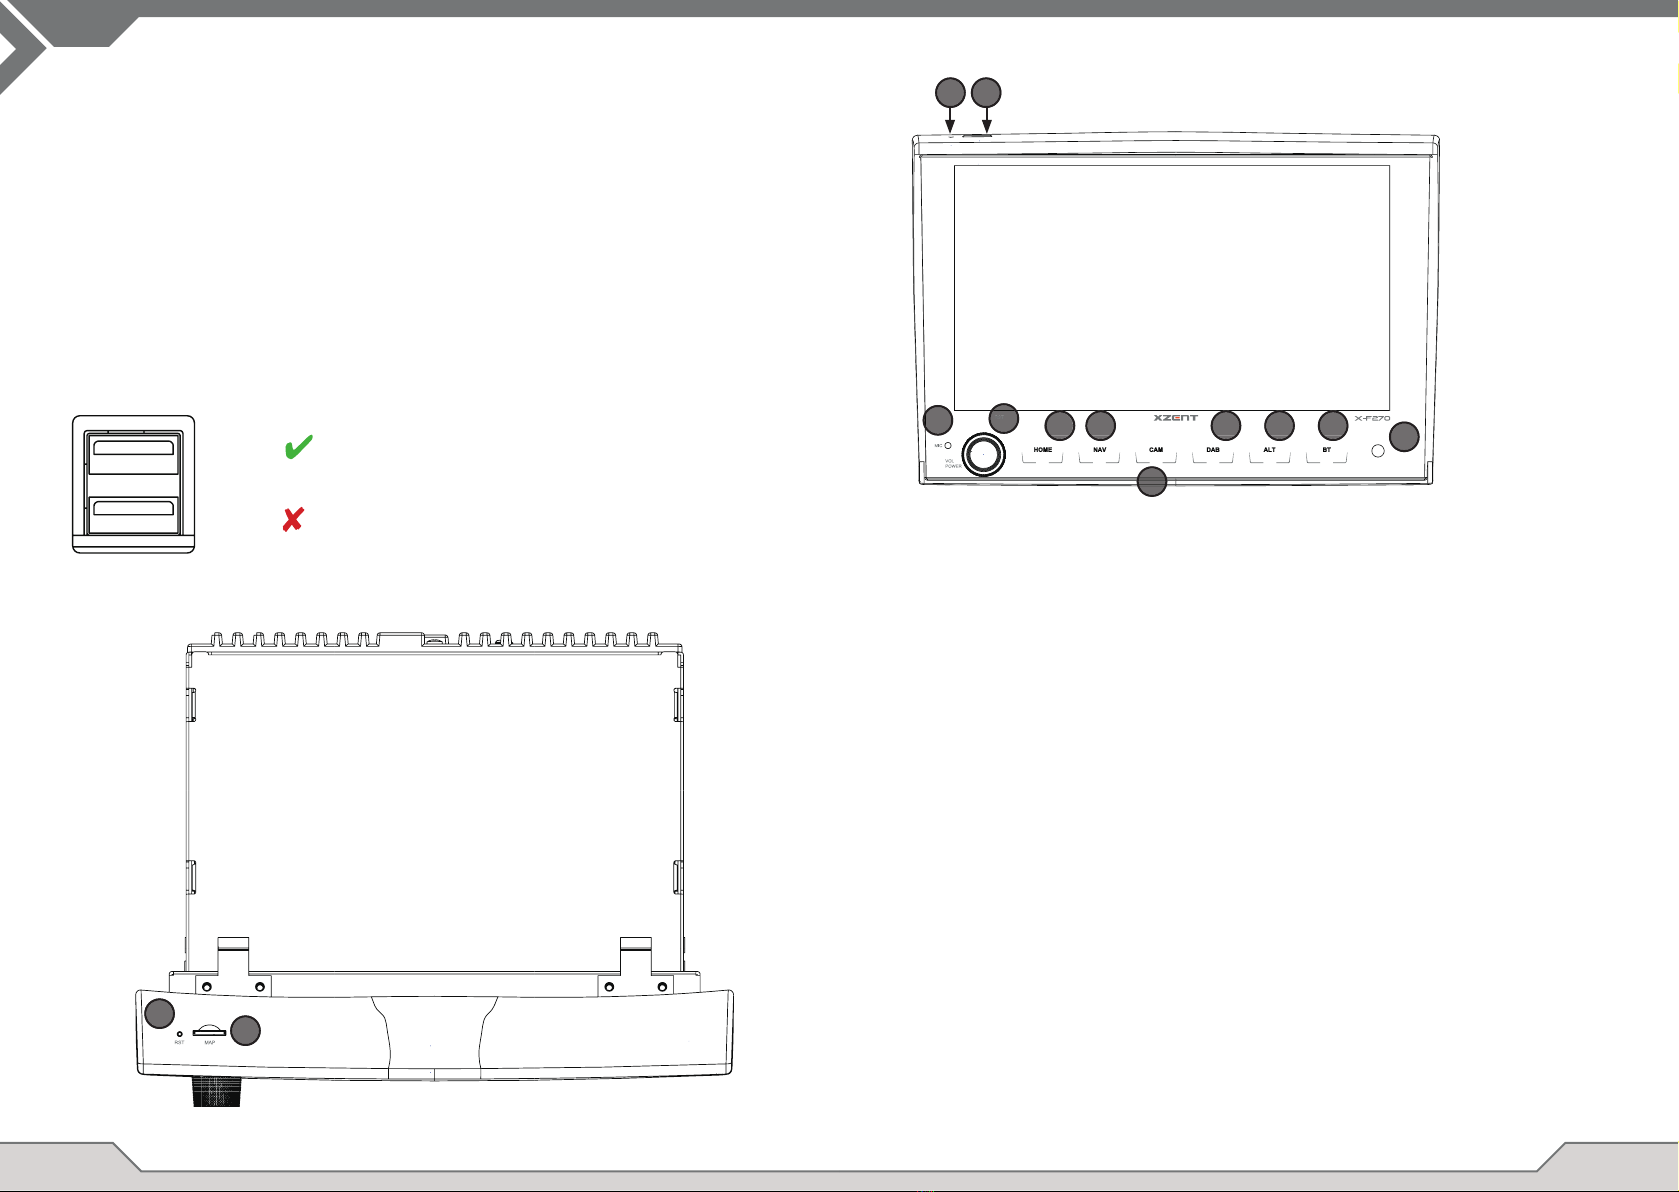
XZENT ARGO Series User manual

Car-Specific Infotainer X-F270
ARGO Series
XZENT by ACR AG · Bohrturmweg 1 · Bad Zurzach · Switzerland
www.xzent.com
X-F270
USER MANUAL

2 3
ABOUT THIS MANUAL
This manual contains important information and warnings about the operation of this XZENT unit.
Please store it in a place where you have access later on.
SAFETY INFORMATION 3
DEVICE SUPPORT, SOFTWARE UPDATES AND MAINTENANCE 4
FRONT PANEL 5
MAIN MENU 6
STEERING WHEEL CONTROL (OE mode, IR-Stalk-interface) 7
DEVICE SETTINGS 8-9
DAB RADIO SOURCE 10
FM RADIO SOURCE 11
USB/IPod/BT MUSIC (A/V) SOURCE 12-13
BLUETOOTH PAIR, CONNECT, CALL, MUSIC 14-15
NAVIGATION SOURCE 16
WEBLINK SOURCE 16
ANDROID LINK 17
A / V IN SOURCE 17
General
1. The descriptions and other content shown in this manual may deviate from the real device.
2. Pictures shown in this manual and some HMI screenshots may deviate from the real unit.
3. Specicationsandtechnicaldesignofthisdevicemodelarenecessarilysubjecttochange
without notice.
■Read the instructions entirely. Heed all warnings. Follow the instructions.
■Retain this manual. Whoever will use the unit should have access to this manual.
■This unit is designed to be functional in vehicles with 12 V DC battery and negative ground.
■Do not operate the unit in any other way than described in this manual. Failure to follow the
instructions as provided may void your warranty.
■Do not disassemble or alter the unit in any way because this will void your warranty. Do not
attempt to repair or to service the unit yourself, but contact an authorized XZENT dealer instead.
■Use only original accessories which are designed and manufactured for the unit, otherwise you
will risk damage. Install the unit according to the mounting instructions by using the supplied
mounting accessories. Acceleration forces during accidents can be huge. Incorrectly mounted
devices pose a serious risk for the driver and passengers during an accident.
■Protect the unit from water and other liquids that could enter the housing. A short circuit or even
arecouldresult.
■ Topreventashortcircuit,neverinsertanymetallicobject(suchascoinsormetaltools)intotheunit.
■ Beforeyoureplaceadefectivefusetrytondthecausefortheshortcircuit.Payattentionto
the cables of the power supply! If the short circuit does not result from a failure of the power
supply or wiring, you can replace the defective fuse with a new one (of identical value). If the
shortcircuit persists, contact an authorized XZENT dealer.
■When connecting to any other device, read the user‘s guide for compatibility and notes on
electrical connections. Do not try to connect incompatible products.
■Be careful not to drain the car battery while using the unit when the car engine is turned off.
Because the unit consumes a considerable amount of energy and the battery will be charged
only while the engine is running, it might happen that the battery will discharge to a point where
it is not possible to start the engine anymore.
■According to the law in different European countries, driving with monitors showing movies in
the viewing range of the driver is not allowed, because the driver might get distracted from
trafc.Pleaserespectthetrafcregulationsofyourcountryoryoumayfacelegalpenalties
in case of accidents or even lose your insurance coverage. Pay attention to the playback volume
inside your vehicle since you are required to notice exterior warning sounds like police sirens etc..
■Don‘t expose the unit to hard impacts. A mechanical or electrical malfunction of the unit could be
the result.
■Should any problems or questions occur during the installation, please consult your
XZENT dealer/importer.
CONTENT SAFTY INFORMATION

4 5
Operation buttons:
1. VOL/POWER: Press and hold for standby mode (Screen OFF, Audio OFF).
If powered on, press to mute.
If powered off, press to power on.
Rotate clockwise to increase audio volume.
Rotate anti-clockwise to decrease volume.
2. Home Press to return to home screen.
Press in home screen to go to last source (if available).
Press and hold to open EQ.
3. NAV: Press to open navigation mode.
4. CAM: Press to show default camera, press again to close the camera view.
5. DAB Press to open DAB source. In DAB source press again to switch to FM.
6. ALT Press to execute assigned ALT shortpress function from device
settings (see chapter device settings).
Press and hold to execute assigned ALT longpress function from
device settings (see chapter device settings).
7. BT Press to open Bluetooth source.
A. RESET Press to perform a power reset.
B. MAP MicroSD slot for navigationssoftware (optional, not included in this set).
C. MIC internal microphone for handsfree functions.
D. IR IR lense for remote control.
DEVICE SUPPOT, SOFTWARE UPDATES AND
MAINTENANCE
FRONT PANEL
USB1
USB2
Can be used for SW Updates
NOT for software updates
Software updates and improvements are provided via USB updates which can be downloaded from
our website www.xzentcom Also customer care, FAQs and other helpful information can be found
there.
ATTENTION:thisdevicehasspecicUSBportswithspecialfunctions(USB-1/topportatdevice
backside) and (USB-2 / bottom port at device backside). The extension cables are distinguishable thru
text-labeltoensureproperidentication.
Software updates provided via XZENT MUST be installed on “USB-1” (USE FOR SW UPDATE). If the
installationhasbeendoneby3rdpartywithoutpropermarking/identicationoftheextensionwire–do
try the other port in case of update-failure.
A
B
123
4
5 6 7
A B
C
D

6 7
MAIN MENU operation buttons and display
A Time and date.
B Page indicator.
1. Source Icon Press to open selected source.
To browse the different source icons, swipe left or right. Alternatively you can press the arrow keys
to browse the different pages.
To return to this screen you can press the HOME front sensor key or the return arrow button in top
left corner of every source.
A1 B TheXZENTdeviceispre-conguredtoworkwithanIR-Stalk-InterfacewhichisNOT included in the set.
Alternativly an existing steering wheel control can be directly connected if a mini-ISO connector at
the car side is present to the XZENT Analogue Key interface.
BoththeIR-modeandtheAnlogue-ModearepreconguretofunctionallymimicthestandardSWC
functions.FortheIR-modethefunctionalityisxsetbycodeandcannotbechangedwhilethe
Analogue-modeisalsopreconguredwiththestandardSWCfunctionbutallowsyoutochangeor
reassign the functionality to your liking.
NonstandardistheCAMfunctionwhichissettotheleftbottomSWCkey–thisisXZENTspecic.
Operation Buttons
1. Skip These are supported buttons and trigger the same functionality as the UI
button of the corresponding active source.
It can also be short and long-pressed for different function.
For example in DAB source, the short press result in a station change,
while a long press will change the active DAB ensemble.
Duringcallhandling–thebuttonsfunctionalitywillchangeto
<<Phone buttons>>
2. Phone These buttons are sharing the pickup and hang-up buttons with the
SKIP buttons depending on the situation. In case of an incoming call or active
call, the phone functionality of the button comes into effect.
3. Volume These buttons are supported and allow to change the volume level of current
active audio channel.
4. Camera/Voice If present in your compatible vehicle the <<VOICE>> button will invoke or
close CAMERA view (if cam is connected to device).
SWC (re)Assignment
Incaseofusingtheexistingmini-ISOconnectoratyourcompatiblevehicle–youcanre-assignthebuttons
on your SWC. Please note that this mode is NOT for the IR-stalk interface mode.
Press on the “Change” button to start re-assiging the functions to your liking. The UI will highlight the button
visually and you can choose one function in the middle to set/save the function to the highlighted button.
If the assignment was successful, the function-icon receives a green check, and the software will highlight
the next free button that needs to be assigned until all buttons are completed.
To restore back to default values press the “Default” button the functions will then restore to standard values.
Board/Trip-Computer:
The SWC buttons for trip-, board computer and cruise control operation are directly assigned to
the related vehicle functions, e.g. the function of these buttons on the steering wheel is completely
independent of the device mounted in the vehicle.
Note:
The SWC related functions are only available if the device is connected with a compatible stalk-interface
via IR in wire to a compatible vehicle model or via mini-ISO (Analog Key) if existing in the vehicle.
MAIN MENU STEERING WHEEL CONTROL (OE MODE, IR-STALK-INTERFACE)

8 9
Operation Buttons:
1. Return Press to return to the home screen.
2. List area The shown list area is depending on the currently selected category.
To see other settings you can scroll/swipe the list up and down or select
different category from the lower area.
3. General Contains general settings like language, date&time, ALT key assignment.
3(a) Press date to manually set a date (only possible if the sync modus is set to OFF).
3(b) Press time to manually set time (only possible if the sync modus is set to OFF).
3(c) 12/24: Press arrow keys to change 12/24h format.
3(d) Time zone: Press arrow keys to set a time zone (only possible if the sync
modus is set to OFF).
3(e) DAB+ Time sync mode: Press switch to ON/OFF setting.
3(f) ALT short press: Press arrow keys to assign a different function.
3(g) ALT long press: Press arrow keys to assign a different function.
3(h) Beep: Press switch to ON/OFF setting (Enable/Disable key press beeps).
3(i) Android Link: Press switch to ON/OFF setting*
3(j)WebLink:PressswitchtoON/OFFsetting*
3(k) Language: Press arrow keys to select language.
3(l) Microphone: Press arrow key to change selected microphone.
3(m) Background: Press to select a different background.
DEVICE SETTINGS
4. Audio Containssettingforaudioandsoundadjustments.
4(a) Balance: Press arrow keys to shift the center to left or right position.
4(b) Fader: Press arrow keys to shift the center to front or rear position.
4(c) Equalizer:
Press to open EQ. You can select different EQ-Presets or manually
change the frequency bands to your liking.
BalanceandFadercanalsobeopticallyadjustedorLPF,Subwoofer
levelandLoudnesscanbeadjusted.
4(d) Navi Mixer: Press switch to activate or deactivate mixing of navigation
voice and background audio.
4(e) Startup volume: Press more key. Here you can change individually all
available sources in regard of startup volume.
Youcanchoosetoapplythelastusedvolume,orsetaxvolumeonstartup.
5. TFT Hereyoucanadjustsettingsinregardofthescreenforexamplebrightness
mode or brightness values.
5(a) TFT brightness day: Press arrow keys to set value for day mode.
5(b) TFT brightness night: Press arrow keys to set value for night mode.
5(c) Dim mode: Press arrow keys to set value.
Auto:thebrightnessisadjustedautomaticallywithswitchingonthefront
headlights of the vehicle (Night).
Day: the brightness is permanently at day value.
Night: the brightness is permanently at night value.
5(d) Touchscreen Auto Standby: On set idle time, the screen will be powered
off when not operated (audio will continue in background).
6. Camera Enablesyoutoadjustsettingsontheconnectedrearviewcamera.
6(a)Rearviewcamera:Pressarrowkeystoadjustvalue.
6(b) Reverse Mute: Press to change value (Volume 50%, Mute 0% or 100% no muting)
6(d) Reverse delay: Press arrow keys to change the delay time until the cam
view auto closes after leaving reverse gear. 6(e) Camera picture: Press
arrowkeystoadjustvalue(normalorhorizontalmirrowed).
7. Miscellaneous Hereyoucanndinformationonthesoftwaredeviceversion,loadfactory
defaultsoradjustthesteeringwheelcontrols(onlyifthevehicleisconnectedto
via Key1/Key2 [miniISO] but not via an IR stalkinterface).
7(a)Factorydefault:Pressmorekeyandconrmtoperformafactoryreset.
7(b) Software version: Press more key to show the device system software version.
7(c) SWC assignment: Press to open the SWC assignment screen for Analogue-Key
mode (not for IR-Stalkinterface mode)
Note:
* This feature will become available via future software update, if not present on device upon market
launch
1
2
3 4 5 6 7

10 11
DAB RADIO SOURCE
You can enter the DAB source among other ways via the front panel DAB sensor key or via the
Home Screen Source Icon. You can also directly switch from the FM source to DAB source via the
DAB key in lower right corner of the FM source.
WiththeDABsourceyoucanenjoytheenricheddigitalradioserviceswhicharepossibleviathe
new DAB+ standard. In the lower section you can change the category which will update the main
area of the source accordingly.
Operation buttons
1. Return Press to return to the home screen.
2. Settings 2(a) DAB-DAB Service Following: Press to switch function ON/OFF.
2(b) Antenna supply: Press switch to activate/deactivate 12V power supply for your
DAB antenna.
2(c)DABFirmware:ShowscurrentDABrmwareversion.
3. Info This view allows you to see current played station logos, slideshow pictures and
text which is aired from the station.
Press the arrow keys to change the station of current selected ensemble.
Pressandholdthearrowkeystochangetonextpossibleensemble–therststation
of new ensemble will be auto played.
4. List The list view allows you to see all received ensembles and will be periodically
refreshed.
You can select an ensemble by tapping on it and it will show the containing stations
which you also can directly tap to play.
5. Preset This view show the preset buttons that work like a quick select or favorite button.
To save the current station to a preset button, press and hold it until the button is
updated with the station information.
6. FM Press the button to change directly to FM radio source.
Notes:
Please remark that some features depend on the aired station or the reception.
You can enter the FM source among other ways via the front panel via the Home Screen Source Icon. You can
also directly switch from the DAB source to FM source via the FM key in lower right corner of the DAB source.
In the lower section you can change the category which will also update the main area of the source accordingly.
Operation buttons
1. Return Press to return to the home screen.
2. Settings With the settings menu, you can initiate an auto search&store for the presets, change AF
behaviour or the reception mode.
2(a) Auto Save: Press the key arrows to initiate auto search&store for the presets.
2(b) Mode: Press the key arrows to change DX/LOC mode.
2(c) AF: Press switch to ON/OFF AF-function (Alternative Frequencies).
3. Scale This view will display a frequency scale band with a marker of the current tuned frequency.
Between the up and down seek buttons (arrow keys) the frequency is additionally displayed.
Press the arrow keys to initiate up/down seek to the next receivable station.
4. Info This view will show you the station name and the received radio text.
Between the up and down seek buttons (arrow keys) the frequency is additionally displayed.
Press the arrow keys to initiate up/down seek to the next receivable station.
5. Preset This view show the preset buttons that work like a quick select or favorite button.
To save the current station to a preset button, press and hold it until the button is updated
with the station information.
6. TA PressbuttontoON/OFFTA(TrafcAnnouncement).
7. DAB Press button to directly switch to DAB radio source.
Note:
This unit features an RDS tuner. RDS is a system which transmits data on top of the FM radio signal. Availability
and content of the RDS data depend on the respective broadcast station and its signal strength. RDS does, for
example, transmit alternative frequencies, which allow for frequency changes without user interaction.
You need to have the AF function activated in order to use the RDS functionality and features.
W
FM RADIO SOURCE
1
2
3
1
2 3 4 5 6
4 5 6 7

12 13
Atthelistviewmode(notavailableinBluetoothmusic)youcanbrowseyourmedialessimilarlike
afolder-lelist.Toopenfoldersjustsimplytaponthemtoshowtheircontentwhichyoualsocan
directly tap to start playback. It will be shown with a play icon and also at the bottom line. To go back
one level use the back (A) button or you can change to the video media type (only USB mode) by
pressing (B) theltericon.
Additional notes on Video playback:
The video playback is only possible if the handbrake is engaged.
Theplaybackwillbeinfullscreenmode–toleavethefullscreenmodepresssimplythetouch
screen area of your device.
The sources USB and iPod can be accessed among other ways thru their home screen icon and BT
music with a connected phone via the Bluetooth source to play audio (BT, USB, iPod) or video (USB only).
PlayinglesissimilarforallsourcesandcanbecontrolledviathemediaplayerUI.Toplayvideosin
USBmodeyouneedchangethestandardlterinlistview(4)tothevideoletype(B).
In this main view the mediaplayer controls are displayed. As usual you can use the pause/resume/play
orskipbuttonstoplaythenexttrack.Youcanalsoactivatethespecialfunctionslikerepeatandshuffle.
Operation buttons:
1. Return Press to return to the home screen.
2. EQ Press to open equalizer settings (see chapter device settings).
3. Search Press to open search (not available in Bluetooth music).
4. List Press to open the list view (not available in Bluetooth music).
USB/IPOD/BT MUSIC (A/V) SOURCE
132 4
A
B

14 15
On incoming/outgoing or active call, the device will automatically switch to a full screen mode and
shows you the contact name or number (if available) or unknown in case of a suppressed callerID.
Dependingonthecallstatus(initiate,ringing,dialling,active)youcanhang-up,reject,accept/
pick-up a call (1), on active call you can switch to private mode (2) or to car loudspeakers, mute the
XZENT microphone (3) or open the keypad for call options (4).
BLUETOOTH PAIR, CONNECT, CALL, MUSIC
On initial use the category (2) is active and you can pair your compatible phone via scan/search. Plea-
se ensure your phone is visible until it appears in the search result list. To pair tap the line with your
phonefromthelistandconrmthepasskey.Pleasealsoensurethatpermissionsuchastocontacts
are granted/accepted. Active or auto connected phones are shown in status area (A) with an active
Bluetooth icon, battery and signal strength icon (if supported).
In the lower section you can choose a different category which will update the main view area.
Operation buttons
1. Return Press to return to the home screen.
2. Devices Here you can manage your paired phones (manual connect/disconnect, delete) or
add new phones via search.
Tap the connect/disconnect button to disconnect manually and connect a different
other phone.
Tap the waste bin icon button to delete a paired phone
Note: it is only possible to connect a single phone at the same time.
3. Keypad Press to open the dial keypad with the active phone.
4. contacts Press to open the contact list of the active phone.
Y ou can manually re-sync in case if not all contacts are shown or new contacts have
been added to the phone.
You can slide the list or use the search function to look up a contact.
A contact can be operated like a folder and be tapped to open its containing numbers.
Tap on the line number to initiate a call attempt.
Use the orange back button on top left position of the list view to browse one level up.
5. Call log Here you have a separate list view for outgoing, received/incoming or missed calls.
You can tap a line to initiate a call attempt.
6. Music Press to initiate the Bluetooth music playback via A2DP.
Note:Somesmartphonesneedtostartthemusicapponthesmartphonerst.
The usage of Bluetooth music player is described in chapter „USB/IPod/BT Music
(A/V) Source“
7. Settings Press to open the Bluetooth settings for extended options like auto connect, auto
answercontactlistsettingsandmicrophoneadjustments.
6(a) Auto Connect: Press switch to ON/OFF Auto Connect.
6(b) Auto Answer: Press switch to ON/OFF Auto Answer.
6(c) Microphone Gain: Press arrow keys to change values.
6(d) Contact Order: Press arrow keys to change value.
1
32 4 32 4
1 32 4

16 17
ANDROID LINKNAVIGATION SOURCE
WithAndroidLinkyoucanconnectyourcompatibleAndroidPhonetotheXZENTdeviceandenjoy
compatible smartphone apps in your car. Make sure that you enabled the Android Link function in
the system settings of your XZENT device.
Warning!
Please keep in mind that in certain countries it is illegal to operate a smartphone while driving.
XZENT is not liable for any problems or incorrect use of app-based content. Using connected cont-
ent should respect your phones data plan to avoid additional costs.
1. TousethisfunctionalityyouneedrstdownloadtheAutoLinkHostAppfromyourApp-Store.
2. Launch the AutoLink Host App on your phone
3. Unlock your Phone and connect it via USB-1 (usually this port is connected to the vehicles
OE-USBportatyourvehicle)toyourXZENT–makesureyourXZENTSettingswitchedoff
WebLink.
4. Press the AndroidLink home screen icon on your XZENT
5. On initial connection allow/accept requested access and accept and Bluetooth pairing request.
A/V-IN SOURCE
The A/V-IN can be entered among other ways via the home screen icon. Here you have the
possibility to listen to audio from an external device connected via audio line in with your XZENT
via vehicle loudspeaker.
Operation Buttons
1. Return Press to return to the home screen.
The Navigation source can be entered among other ways via the home screen icon or the sensor
NAV front key.
Please insert the microSD card to the NAV slot on found on upper left side of the device (see Front
View Chapter).
For the Navigation source UI operation a quick start guide is provided, you can also download a
navigation manual (PDF) from our web site.
Navigation Software and map updates:
The navigation software and maps on your microSD card is maintained and updated via
www.naviextras.com
Youcanndadditionalinformation,helpandinstructionshowtoinstallthetoolboxandperformingthe
desired action.
WEBLINK SOURCE
This feature will become available via future software update, if not present on device upon market
launch.
WithWebLinkyoucanconnectyourcompatiblePhone*totheXZENTdeviceandenjoycompatible
smartphone apps in your car.
Warning!
Please keep in mind that in certain countries it is not legal to operate a smartphone while driving.
XZENT is not liable for any problems or incorrect use of app-based content. Using connected content
should respect your phones data plan to avoid additional costs.
1. TousethisfunctionalityyouneedrstdownloadtheWebLinkHostAppfromyourApp-Store.
2. Launch the WebLink Host App on your phone
3. Unlock your Phone and connect it via USB-1 (usually this port is connected to the vehicles
OE-USB port at your vehicle) to your XZENT
4. Press the WebLink home screen icon on your XZENT
5. Touch the phone icon on the XZENT screen and select the desired compatible WebLink App to
be launched
Note
To see if your iPhone or Android Phone is compatible, please check if the phone App store offers the
ofcialWeblinkHostapp.YoucanndadditionalinformationontheofcialwebsitesofWebLink(by
Abalta) or XZENT.
1

18 19
NOTES
9 10R-05 16980
Hereby, ACR Brändli + Vögeli AG declares that the type of radio equipment X-F270 complies with the
2014/53/EU Directive. The full text of the EU Declaration of Conformity is available at the following
Internet address: www.xzent.com (see link „Product Conformity Documents“ in the footer of the page).

Bedienungsanleitung
2-DIN Naviceiver X-402
XZENT by ACR AG · Bohrturmweg 1 · Bad Zurzach · Switzerland
www.xzent.com
USER MANUAL
X-402
Other manuals for ARGO Series
9
This manual suits for next models
1
Table of contents
Other XZENT Car Video System manuals

XZENT
XZENT ARGO X-F275 User guide

XZENT
XZENT X-522 User manual

XZENT
XZENT ARGO Series User manual

XZENT
XZENT ARGO Series User guide

XZENT
XZENT ARGO Series User manual

XZENT
XZENT ARGO Series User guide

XZENT
XZENT ARGO Series User guide

XZENT
XZENT X-422 User manual

XZENT
XZENT ARGO X-F270 User manual

XZENT
XZENT X-527 User manual