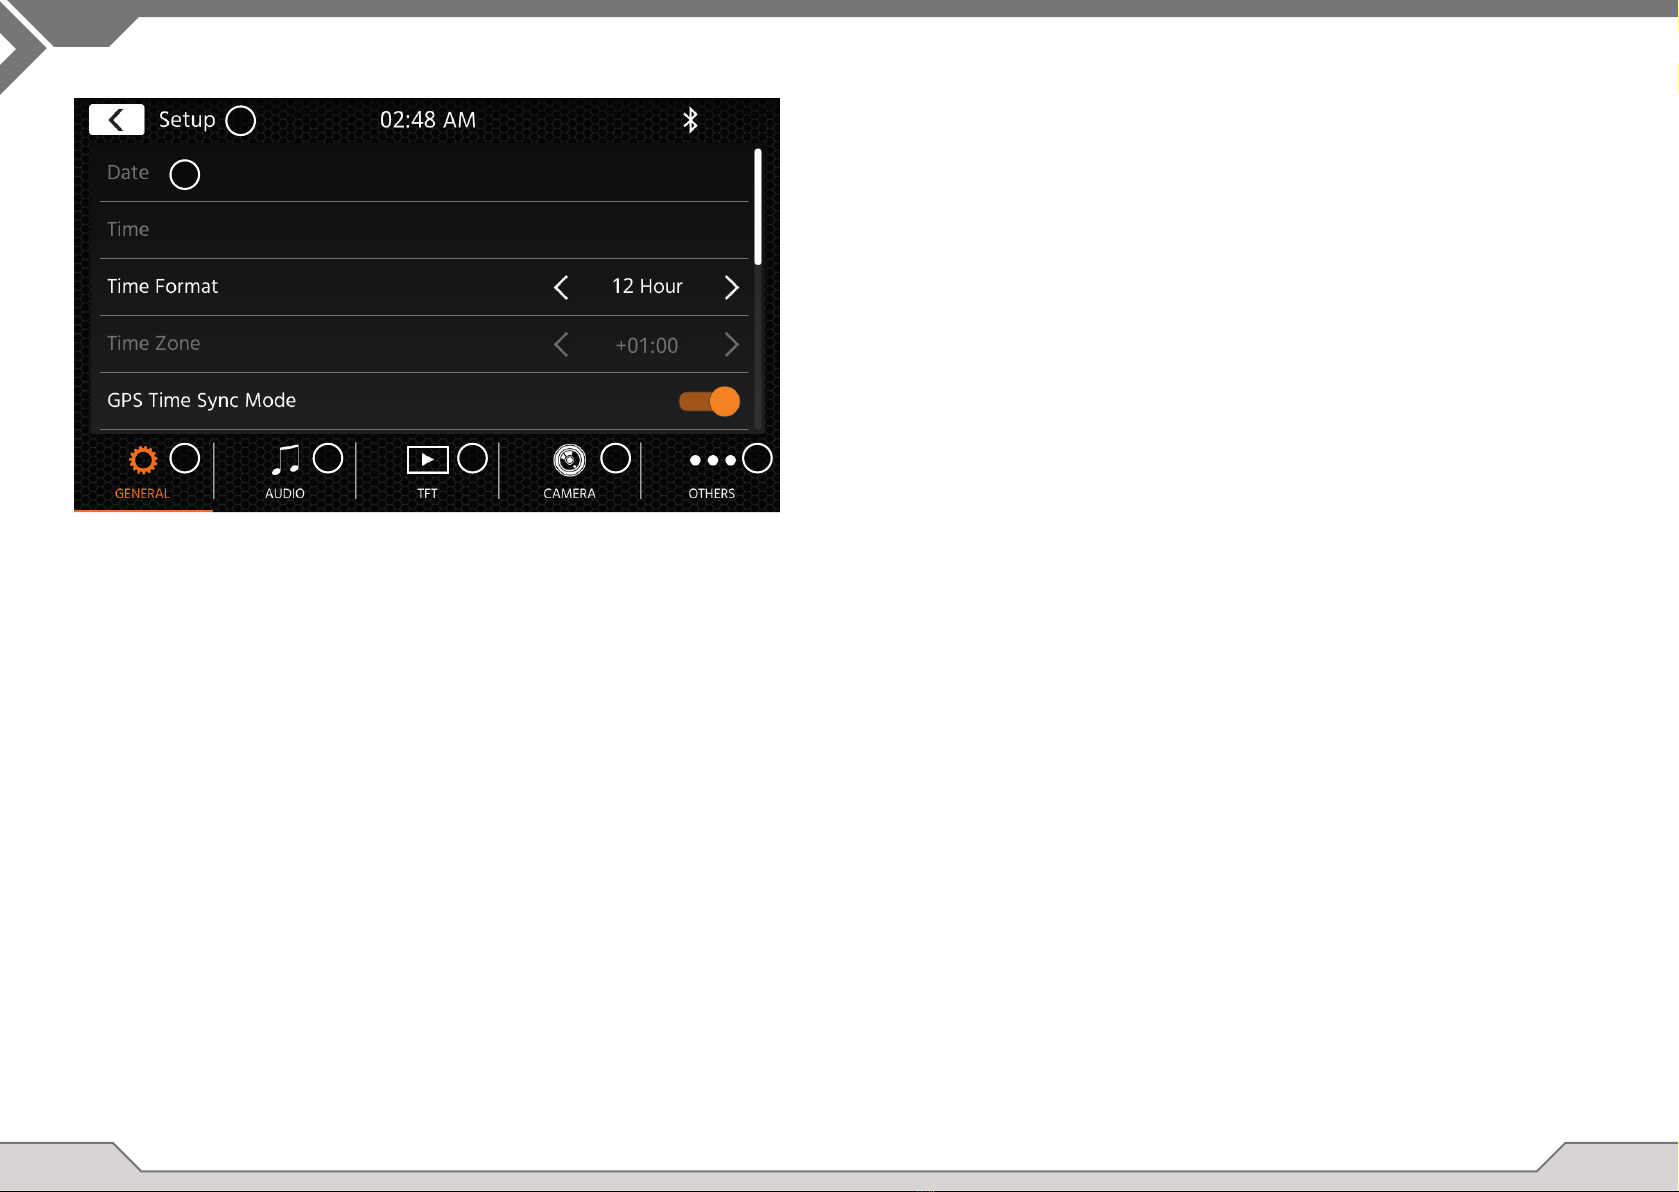
XZENT X-127 User manual

1-DIN DAB+ Infotainer with adjustable 9-inch display
1-DIN DAB+ Infotainer mit einstellbarem 9 Zoll Display
Infotainer 1-DIN DAB+ con display da 9 pollici regolabile
Infotainer 1-DIN DAB+ avec écran réglable de 9 pouces
XZENT by ACR AG · Bohrturmweg 1 · Bad Zurzach · Switzerland
www.xzent.com
X-127
USER MANUAL
MANUALE D'USO
User Manual
BENUTZERHANDBUCH
MANUEL DE L’UTILISATEUR

2 3
General
1. The descriptions and other content shown in this manual may deviate from the real device.
2. Pictures shown in this manual and some HMI screenshots may deviate from the real unit.
3. Specicationsandtechnicaldesignofthisdevicemodelarenecessarilysubjecttochange
without notice.
■ Readtheinstructionsentirely.Heedallwarnings.Followtheinstructions.
■Retain this manual. Whoever will use the unit should have access to this manual.
■ Thisunitisdesignedtobefunctionalinvehicleswith12VDCbatteryandnegativeground.
■ Donotoperatetheunitinanyotherwaythandescribedinthismanual.Failuretofollowthe
instructions as provided may void your warranty.
■ Donotdisassembleoraltertheunitinanywaybecausethiswillvoidyourwarranty.Donot
attempttorepairortoservicetheunityourself,butcontactanauthorizedXZENTdealerinstead.
■ Useonlyoriginalaccessorieswhicharedesignedandmanufacturedfortheunit,otherwiseyou
willriskdamage.Installtheunitaccordingtothemountinginstructionsbyusingthesupplied
mountingaccessories.Accelerationforcesduringaccidentscanbehuge.Incorrectlymounted
devicesposeaseriousriskforthedriverandpassengersduringanaccident.
■ Protecttheunitfromwaterandotherliquidsthatcouldenterthehousing.Ashortcircuitoreven
arecouldresult.
■ Topreventashortcircuit,neverinsertanymetallicobject(suchascoinsormetaltools)intotheunit.
■ Beforeyoureplaceadefectivefusetrytondthecausefortheshortcircuit.Payattentionto
thecablesofthepowersupply!Iftheshortcircuitdoesnotresultfromafailureofthepower
supplyorwiring,youcanreplacethedefectivefusewithanewone(ofidenticalvalue).Ifthe
shortcircuitpersists,contactanauthorizedXZENTdealer.
■ Whenconnectingtoanyotherdevice,readtheuser‘sguideforcompatibilityandnoteson
electricalconnections.Donottrytoconnectincompatibleproducts.
■ Becarefulnottodrainthecarbatterywhileusingtheunitwhenthecarengineisturnedoff.
Becausetheunitconsumesaconsiderableamountofenergyandthebatterywillbecharged
onlywhiletheengineisrunning,itmighthappenthatthebatterywilldischargetoapointwhere
itisnotpossibletostarttheengineanymore.
■ AccordingtothelawindifferentEuropeancountries,drivingwithmonitorsshowingmoviesin
theviewingrangeofthedriverisnotallowed,becausethedrivermightgetdistractedfrom
trafc.Pleaserespectthetrafcregulationsofyourcountryoryoumayfacelegalpenalties
incaseofaccidentsorevenloseyourinsurancecoverage.Payattentiontotheplaybackvolume
insideyourvehiclesinceyouarerequiredtonoticeexteriorwarningsoundslikepolicesirensetc..
■ Don‘texposetheunittohardimpacts.Amechanicalorelectricalmalfunctionoftheunitcouldbe
the result.
■ Shouldanyproblemsorquestionsoccurduringtheinstallation,pleaseconsultyourXZENT
dealer/importer.
ABOUTTHISMANUAL
ThismanualcontainsimportantinformationandwarningsabouttheoperationofthisXZENTunit.
Please store it in a place where you have access later on.
SAFETYINFORMATION 3
DEVICESUPPORT,SOFTWAREUPDATESANDMAINTENANCE 4
FRONTPANEL 5
ADJUSTMENTOFTHEDISPLAYPOSITION 6-7
MAINMENU 8
STEERINGWHEELCONTROL(OEmode,IR-Stalk-interface) 9-11
DEVICESETTINGS 12-13
DABRADIOSOURCE 14
FMRADIOSOURCE 15
USB/IPod/BTMUSIC(A/V)SOURCE 16-17
BLUETOOTHPAIRING,CONNECTING,CALLING,MUSIC 18-19
APPLECARPLAYSOURCE 20
GOOGLEANDROIDAUTOSOURCE 21
CAMERASOURCE 22
A/V-IN,HDMISOURCE 23
TERMSOFWARRANTY 24-25
ADDITIONALINFORMATION,TECHNICALSPECIFICATION 26
CONTENT SAFTY INFORMATIONCONTENT INHALT
Seite28
SOMMAIRE
Page54
SOMMARIO
Pagina80

45
SoftwareupdatesandimprovementsareprovidedviaUSBupdateswhichcanbedownloadedfrom
ourwebsitewww.xzent.comAlsocustomercare,FAQsandotherhelpfulinformationcanbefound
there.
ATTENTION:thisdevicehasspecicUSBportswithspecialfunctions(USB-1,gray)and(USB-2,
black).Theextensioncablesaredistinguishablethrutext-labeltoensureproperidentication.
SoftwareupdatesprovidedviaXZENTMUSTbeinstalledon“USB-1”(USEFORSWUPDATE).Ifthe
installationhasbeendoneby3rdpartywithoutpropermarking/identicationoftheextensionwire–do
try the other port in case of update-failure.
USB1(gray): ForSmartphoneConnectivity:
•AppleCarPlay,
•GoogleAndroidAuto,
• Software Updates
USB2(black): ForchargingphonesorUBSmediaplayback.
Operation buttons:
1. VOL/POWER: Pressandholdforstandbymode(ScreenOFF,AudioOFF).
If powered on, press to mute.
If powered off, press to power on.
Rotate clockwise to increase audio volume.
Rotate anti-clockwise to decrease volume.
2. Home Press to return to home screen.
Pressinhomescreentogotolastsource(ifavailable).
3. VOICE: Presstostartvoicerecognition(inusewithCarPlayorGoogle
AndroidAuto)
4. CAM: Presstoshowdefaultcamera,pressagaintoclosethecameraview.
5. FAV: PresstoexecuteassignedFAVshortpressfunctionfromdevice
settings(seechapterdevicesettings).
PressandholdtoexecuteassignedFAVlongpressfunctionfrom
devicesettings(seechapterdevicesettings).
A. MIC internalmicrophoneforhandsfreefunctions.
B. RESET Presstoperformapowerreset.
DEVICE SUPPORT, SOFTWARE UPDATES AND
MAINTENANCE
FRONT PANEL
1
23 4 5
A B

6 7
Adjustment of the display position (vertical height, horizontal viewing angle and tilt).
ThedisplayoftheX-127canbeadjustedverticallyinheightaswellasinviewingangleandtilt.
Note:
•Adjustmentstothedisplayshouldnotbemadewhiledriving.
•Observethesafetyinstructionsofthevehicle.Alsopayattentiontotheaccessibilityofbuttonssuch
aswarninglightsorairoutlets.
•Thedisplayshouldalwaysbeheldwithbothhands„parallel“(leftandrightcentered)toadjustit.
•TheX-127shouldbermlymounted.
Viewing angle adjustment and tilt:
Graspthedisplayatthecenteroftheleftandrightedgesandpushwithonehandandpullwiththe
othertoadjusttheviewingangle.Forthetiltangle,performatiltingmotionawayfromortowardyour-
selfwithbothhands.
Heightadjustment:
Graspthecenterofthedisplayattheleftandrightedgesandslidethedisplayupordown.
Depthadjustmentrequirespartialdisassemblyandadjustmentofthestandardmounting.Payattenti-
ontotheseparatesectionexplainingthis.
CUSTOMIZING DISPLAY DEPTH ADJUSTMENT
Thedepthadjustmentofthedisplaycanbechangedfromdefault0”setup(0mm)to1/2“(12.5mm)
or1”(25mm).
ADJUSTMENT OF THE DISPLAY POSITION
A
CUSTOMIZING AND DISPLAY DEPTH ADJUSTMENT
Note:
Do not remove
the center
screw
1" (25 mm) 1/2" (12.5 mm) Flush (default 0 mm)
1
2
3
1" (25 mm)
1/2" (12.5 mm)
Flush (default 0 mm)
Step 1:
RemovethecoverNo.14oftheadjustment
mechanism
Step 2:
Removethe4outertopscrewsandleavethecenter
screwfastened.Gentlypullthedisplay-mounting-
bracketbypullingonthedisplaypanelfromthe
chassistothedesired1/2"or1“position.Tolockitin
place,fastenthe4outertopscrews(seefigure).
OndemopicturestheDisplaypanelgroupisnot
visibletoallowbettervisibilityofthetopscrews.
Step 3:
ReinstallorinstalltheX-127to1DINdashboard
(seeseparatechapter).Installationprocessissame
asdefaultbutothercoversNo.14fortheadjustment
mechanism is required at the end.
A
Prerequisite:X-127isdisengagedfrom1DINdashboardand
nomountingcageisfitted.
Tounlockthedevicefrom1DINdashboard,rotatethedisplay
grouptoa90°positionbyholdingthepanelgroupwithboth
handsandrotatingitclockwiseoranti-clockwisefor90°.
Loosenthetrimbracketfrommainbodyandinsertthedevice
releasekeysNo.3atcorrespondinggaponleftandrightside
(centre,betweenthemainbodyandthe1-DINmounting
bracket–seepicture).Thereleasekeysneedtobeinserted
deepenoughtodisengagetheclampofthemountingbracket.
PulltheX-127outoncethemountingbracketclampsarefully
disengaged.
No.3

8 9
MAIN MENU operation buttons and display
A Timeanddate.
B Pageindicator.
1. Source Icon Press to open selected source.
Tobrowsethedifferentsourceicons,swipeleftorright.Alternativelyyoucanpressthearrowkeys
tobrowsethedifferentpages.
ToreturntothisscreenyoucanpresstheHOMEfrontsensorkeyorthereturnarrowbuttonintop
left corner of every source.
TheXZENTdeviceispre-conguredtoworkwithanIR-Stalk-InterfacewhichisNOTincludedintheset.
AlternativelyanexistinganaloguesteeringwheelcontrolcanbeconnectedtoXZENTAnalogueKey
interface(Key1/Key2/GND).
X-127has2differentmodes,MODE-2(defaultforhighohmsvalues)orMODE-1(forlowohmsvalues)
tosupportdifferentohmsranges.TheohmsrangesofeachmodecannotbemixedtosupportSWCthat
havebothmixedlowandhighohmsvalues.
MODE 2 (HIGH OHM BASED):
Operation buttons:
1.Skipnext: thisbuttonfollowstheGraphicalUserInterface(GUI)functionof
the active audio source.
2.CAM/voice: presstoactivateCAMsource.PressagaintocloseCAMsource.
Press&holdtoactivateCarPlayorGoogleAndoridAutovoicecontrol.
3.Skiplast: thisbuttonfollowstheGraphicalUserInterface(GUI)functionof
the active audio source.
4.Vol+: presstoincreaseactiveaudiovolumelevel.
5.Mute/Pickup/hangup: Whilenoactivecall,presstoMUTEorunmuteallaudio.Duringincoming
call(ringing),presstopickupcall.Whileactivecall,presstoendcall.
6.Vol-: presstodecreaseactiveaudiovolumelevel.
A:YoucancustomizethebuttonsofyourSWCtoyourpreferencebyplacingstandardoralternative
buttonstoyourSWC.Theprocessisexplainedattheendofthischapter.
Alternative buttons:
Eachmodehasdifferentalternativebuttonsforassignment.
A1. AlternativefunctionSRCorSRC/Voice:PresstoselectadifferentSourceviaMainMenuhighlighting.
orpressandholdtoactivateCarPlayorGoogleAndoridAutovoicecontrol.
A2. AlternativefunctionFAVorNAV/voice:PresstoinvoketheassignedFAVfunctionfromSetupor
presstostartnativenavigation(notforX-127),pressandholdtoactivateCarPlayorGoogleAndorid
Autovoicecontrol.
B:ThisbuttonwillresetanycustomcongurationontheSWCbacktofactorysettings.
A
1
B
MAIN MENU STEERING WHEEL CONTROL (OEMODE,IR-STALK-INTERFACE)
1
2
4
5
6
3A
A1 A2
B

10 11
MODE 1 (LOW OHMS BASED):
Mögliche Tastenfunktionen und Bedientasten
1.MUTE: shortpresstomutetheXZENTaudiooutput.Pressagaintoundothemutefunction.
2.Vol- shortpresstoreducethevolumeofthecurrentactiveaudiochannel(mediavol,
voice,etc.).
3.Vol+ shortpresstoincreasethevolumeofthecurrentactiveaudiochannel(mediavol,
voice,etc.).
4.Skipback shortpresstowhilemediasourceDAB,USB,FM,etc.isactivetodothesame
touchscreenbuttonoperation.
5.Skipnext shortpresstowhilemediasourceDAB,USB,FM,etc.isactivetodothesame
touchscreenbuttonoperation.
6.Pickup shortpresstoacceptincomingcall.
7.HangUp shortpresstoendongoingcall.
8.SRC: PresstoselectadifferentSourceviaMainMenuhighlighting.
9.FAV shortpresstoexecuteassignedFAVfunctionfromdevicesettings(seechapter
devicesettings).
10.CAM shortpresstoopencamerasource.Pressagaintoclose.
11.Change shortpresstoremovecurrentsteeringwheelbuttonassigmentsandreassignthem
(seenextChapter).
12.Default wshortpresstoloaddefaultvaluesofmode1.
SWC (re)Assignment process:
TheprocessissimilartobothSWCmodesandonlydiffersbyotherstandardandalternativebuttons.
Thestandardandalternativebuttonsfunctionareexplainedatthebeginningofthischapterforeach
mode.Youcanre-assignthebuttonsofyourSWC.PleasenotethatthismodeisNOTfortheIR-stalkin-
terfacemode.Pressthe“Change”buttontostartre-assigingthefunctionstoyourliking.Thesystemwill
clearallbuttonsfromthesteeringwheelandmarksthetopleftSWCbuttonwhichshallbeassignedrst.
Youneedtoassignallclearedbuttonsonebyonefromtoplefttobottomandthentherightsidefromtop
tobottom.Thecurrentbuttonwhichistobeassignedwithafunctionwillbehi-lightedforyou.Example:
Toassignafunction,selectafunctioniconviatouchfromthemiddle(forexampleSRC/voice).Afterthe
desiredfunction(inthisexampleSRC/voice)ismarked,pressthecorrespondingSWC-Button(inthis
exampletopleft).Thesystemwillnowgray-outtheSRC/voicebuttoninthemiddleandputtheSRC/
voicefunctiontothetopleftSWCbutton.LateryoucantriggerSRC/voicebypressingthetopleftSWC
icon(insteadofdefaultMUTE).Aftertherstbuttonisassigned,thesystemwillhi-lightthenextbuttonto
beassignedbyastillavailable(non-grayed-out)functionfromthemiddle.AfterallbuttonsontheSWC
aredened–youcanclosetheSWCassignmentandusethenewcongurationfromnowon.Toresto-
rebacktodefaultvaluespressthe“Default”button.Thefunctionswillthenrestoretostandardvalues.
Board/Trip-Computer:
TheSWCbuttonsfortrip-,boardcomputerandcruisecontroloperationaredirectlyassignedtotherela-
tedvehiclefunctions,e.g.thefunctionofthesebuttonsonthesteeringwheeliscompletelyindependent
of the device mounted in the vehicle.
Note:
TheSWCrelatedfunctionsareonlyavailableifthedeviceisconnectedwithacompatiblestalk-interface
viaIRinwiretoacompatiblevehiclemodelorvia(AnalogKey)ifexistinginthevehicle.
CANIRstalkinterfacemodulesarebeingdevelopedbyvariousprovidersand,assoonastheseare
available,detailsonsupportcanfollow.
Thechangefrommode1tomode2mustbecompletedbyrestartingthedevice.
1 2 3 4 5
6 7 8 9 10
11 12

12 13
Operation Buttons:
1. Return Press to return to the home screen.
2. Listarea Theshownlistareaisdependingonthecurrentlyselectedcategory.
Toseeothersettingsyoucanscroll/swipethelistupanddownorselect
differentcategoryfromthelowerarea.
3. General Containsgeneralsettingslikelanguage,date&time,FAVkeyassignment.
3(a)SystemLanguage:Pressarrowkeystoselectlanguage.
3(b)Timesyncmode(DAB+):PressswitchtoON/OFFsetting.
3(c)FAVshortpress:Pressarrowkeystoassignadifferentfunction.
3(d)FAVlongpress:Pressarrowkeystoassignadifferentfunction.
3(e)Beep:PressswitchtoON/OFFsetting(Enable/Disablekeypressbeeps).
3(f)Microphone:Pressarrowkeytochangeselectedmicrophone.
3(g)Wallpaper:Presstoselectdifferentbackground.
3(h)KeyIllumination:presstochangekeycolorillumination
3(i)Date:Pressmanuallysetadate(onlypossibleifthesyncmodusissettoOFF).
3(j)Time:Presstomanuallysettime(onlypossibleifthesyncmodusissettoOFF).
3(k)TimeZone:Presstomanuallysettimezone.
3(L)TimeFormat:Pressarrowkeystochange12/24hformat.
3(M)Appleconnectivity:presstochangemode
4. Audio Containssettingforaudioandsoundadjustments.
4(a)Balance:Pressarrowkeystoshiftthecentertoleftorrightposition.
4(b)Fader:Pressarrowkeystoshiftthecentertofrontorrearposition.
4(c)Equalizer:PresstoopenEQ.YoucanselectdifferentEQ-Presetsormanually
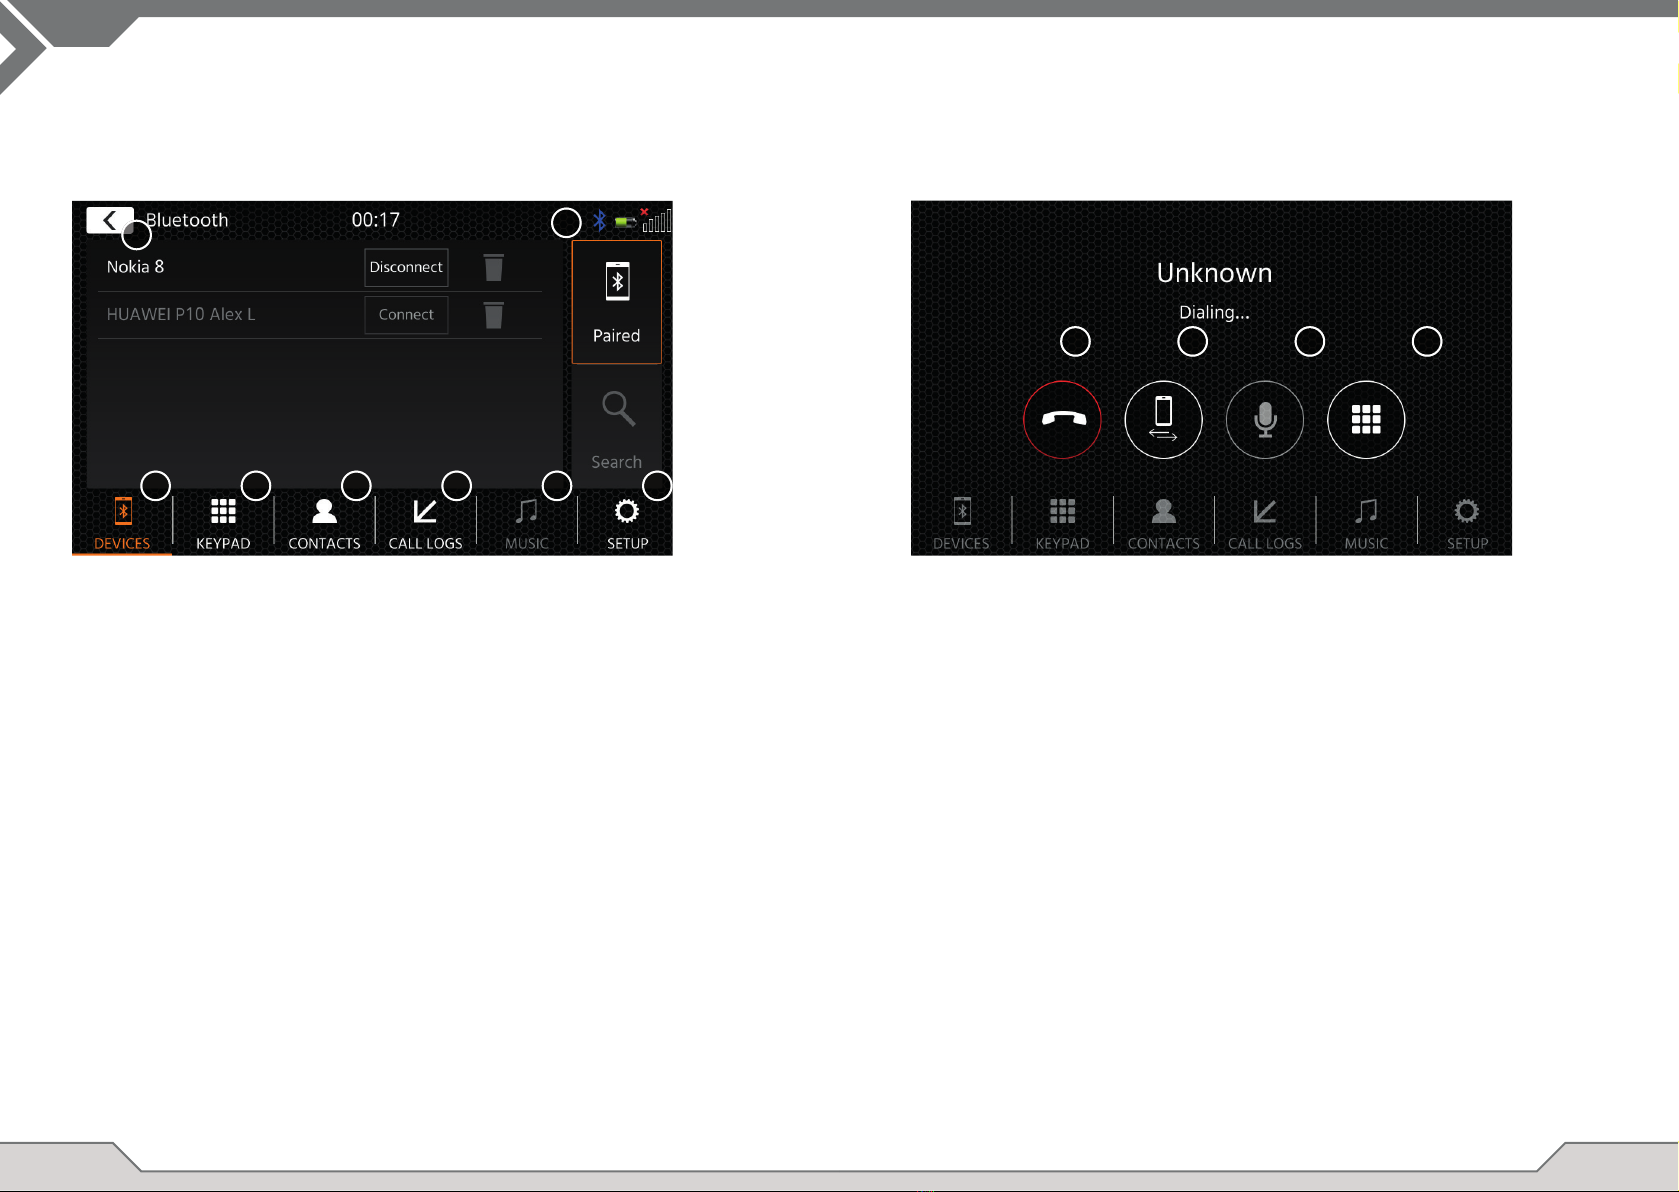
DEVICE SETTINGS
changethefrequencybandstoyourliking.
BalanceandFadercanalsobeopticallyadjustedorLPF,Subwoofer
levelandLoudnesscanbeadjusted.
4(d)Loudness:PresstoON/OFFloudness.
4(e)SubwooferPower:PresstoON/OFFsubwooferpower.
4(f)SubwooferGain:PressarrowkeytochangesubwoofergainifSubwoofer
PowerissettoON.
4(g)Startupvolume:Pressmorekey.Hereyoucanchangeindividuallyall
availablesourcesinregardofstartupvolume.
Youcanchoosetoapplythelastusedvolume,orsetaxvolumeonstartup.
5. TFT Hereyoucanadjustsettingsinregardofthescreenforexamplebrightness
modeorbrightnessvalues.
5(a)TFTbrightnessday:Pressarrowkeystosetvaluefordaymode.
5(b)TFTbrightnessnight:Pressarrowkeystosetvaluefornightmode.
5(c)Dimmode:Pressarrowkeystosetvalue.
Auto:thebrightnessisadjustedautomaticallywithswitchingonthefront
headlightsofthevehicle(Night).
Day:thebrightnessispermanentlyatdayvalue.
Night:thebrightnessispermanentlyatnightvalue.
5(d)TouchscreenAutoStandby:Onsetidletime,thescreenwillbepowered
offwhennotoperated(audiowillcontinueinbackground).
6. Camera Enablesyoutoadjustsettingsontheconnectedrearviewcamera.
6(a)ReverseCamera:Pressarrowkeystoadjustvalue.
Cam1:WillusetheVideoCam1input
Cam2:WillusetheVideoCam2input
Cam1+Cam2:WillusetheVideoCam1onreversegear,andwillswitch
automaticallyafteradelaytoCam2whenreversegearisreleased.
6(b)ReverseCameraMute:Presstochangevalue(Mute,Reduce,Off)
6(c)R-Camswitchoffdelay:Pressarrowkeystochangethedelaytimeuntil
thecamviewautoclosesafterleavingreversegear.
6(d)Camerapicture:Pressarrowkeystoadjustvalue(normalorhor.mirrored).
6(e)Camera1GridLines:Presstoturncamera1gridlinesoffandon.Atthe
camerasource,youcanadjustthepositionofthelinesifthefunctionissetON.
6(f)Camera2GridLines:Presstoturncamera2gridlinesoffandon.Atthe
camerasource,youcanadjustthepositionofthelinesifthefunctionissetON
7. Miscellaneous Hereyoucanndinformationonthesoftwaredeviceversionandloadfactory.
7(a)Softwareversion:Pressmorekeytoshowthedevicesystemsoftwareversion.
7(b)InstallSoftware:PressmorekeytostartsoftwareinstallationfromUSB-1port.
Ifthelesarenotfound,thebuttonstoproceedwillnotenable.
7(c)Factorydefault:Pressmorekeyandconrmtoperformafactoryreset.
7(d)SWCassignment:PresstoopentheSWCassignmentscreenforAnalogue-
Keymode(notforIR-Stalkinterfacemode)
7(e)OpenSourceLicense:presstoseethelicensetext.
7(f)Legal:presstoseelegalentries.
1
2
3 4 5 6 7

14 15
DAB RADIO SOURCE FM RADIO SOURCE
YoucanentertheDABsourceamongotherwaysviathefrontpanelDABsensorkeyorviathe
HomeScreenSourceIcon.YoucanalsodirectlyswitchfromtheFMsourcetoDABsourceviathe
DABkeyinlowerrightcorneroftheFMsource.
WiththeDABsourceyoucanenjoytheenricheddigitalradioserviceswhicharepossibleviathe
newDAB+standard.Inthelowersectionyoucanchangethecategorywhichwillupdatethemain
areaofthesourceaccordingly.
Operation buttons
1. Return Press to return to the home screen.
2. Settings 2(a)Reset:presstoushlistandstartnewscan.
2(b)ComfortScan:presstoswitchComfortscanON/OFF
2(c)DAB-DABServiceFollowing:PresstoswitchfunctionON/OFF.
2(d)Antennasupply:Pressswitchtoactivate/deactivate12Vpowersupplyforyour
DABAntenna
2(e)DABFirmware:ShowscurrentDABrmwareversion.
3. Info Thisviewallowsyoutoseecurrentplayedstationlogos,slideshowpicturesand
text which is aired from the station.
3.1Pressthearrowkeystochangethestationofcurrentselectedensemble.
Pressandholdthearrowkeystochangetonextpossibleensemble–therststation
ofnewensemblewillbeautoplayed.
3(A)SlideshowplaceholderorreceivedMOTSlideshowpicturesairedbytheselected
station.
3(B)DLStext;3(C)ServiceLabel/Stationname;3(D)EnsembleLabel
3(E)Signalqualityoftheselectedstation.
3(F)Stationlistcount/maxstations
4. List Thelistviewallowsyoutoseeallreceivedensemblesandwillbeperiodically
refreshed.
Youcanselectanensemblebytappingonitanditwillshowthecontainedstations
which you also can directly tap to play.
5. Preset Thisviewshowsthepresetbuttonsthatworklikeaquickselectorfavoritebutton.
Tosavethecurrentstationtoapresetbutton,pressandholdituntilthebuttonis
updated with the station information.
6. FM PressthebuttontochangedirectlytoFMradiosource.
7.SCAN Presstosearchfornewstationsandupdatethestationlist.
Notes:
Please remark that some features depend on the aired station or the reception quality.
YoucanentertheFMsourceamongotherwaysviathefrontpanelviatheHomeScreenSourceIcon.Youcan
alsodirectlyswitchfromtheDABsourcetoFMsourceviatheFMkeyinlowerrightcorneroftheDABsource.
Inthelowersectionyoucanchangethecategorywhichwillalsoupdatethemainareaofthesourceaccordingly.
Operation buttons
1. Return:Presstoreturntothehomescreen.
2. Settings:OpensadditionalsettingsfortheFMsource.
2(a)AutoSave:PressStarttoinitiateautosearch&storeforthepresets.
2(b)Mode:PressthekeyarrowstochangeDX/LOCmodeshownnexttothefrequency.
2(c)AF:PressswitchtoON/OFFAF-function(AlternativeFrequencies).
2(d)TA:PressswitchtoON/OFFTAfunction(FMTrafcAnnouncements)
3. Info This view will show you the station name and the received radio text.
Betweentheupanddownseekbuttons(arrowkeys)thefrequencyisadditionallydisplayed.
Pressthearrowkeystoinitiateup/downseektothenextreceivablestation.
4. Scale
(A)FMFrequencyscalebandwithamarkerofthecurrenttunedfrequency.
(B)Currentsetfrequency.
(C)CurrentFMMode.CanbechangedinFMSettings.
4.1Pressthearrowkeystosinglestep0.1MHzup/down.
4.2Pressthearrowkeystoinitiateup/downseektothenextreceivablestation.
5. PresetThisviewshowthepresetbuttonsthatworklikeaquickselectorfavoritebutton.Tosavethe
currentstationtoapresetbutton,pressandholdituntilthebuttonisupdatedwiththestationinformation.
6. DABPressbuttontodirectlyswitchtoDABradiosource.
Note:
ThisunitfeaturesanRDStuner.RDSisasystemthattransmitsdataontopoftheFMradiosignal.Availability
andcontentoftheRDSdatadependontherespectivebroadcaststationanditssignalstrength.RDSdoes,for
example,transmitalternativefrequencies,whichallowforfrequencychangeswithoutuserinteraction.
YouneedtohavetheAFfunctionactivatedinordertousetheRDSfunctionalityandfeatures.
1
2 3 4 5
6
1
2 3 4 5 6
4.¹
4.²
4.¹
4.²
A
B C
3.¹ 3.¹
AB
C
D
F
E
7

16 17
Atthelistviewmode(notavailableinBluetoothmusic)youcanbrowseyourmedialessimilarlike
afolder-lelist.Toopenfoldersjustsimplytaponthemtoshowtheircontentwhichyoualsocan
directlytaptostartplayback.Itwillbeshownwithaplayiconandalsoatthebottomline.Togoback
onelevelusetheback(A) buttonoryoucanchangetothevideomediatype(onlyUSBmode)by
pressing(B) theltericon.
Additional notes on Video playback:
Thevideoplaybackisonlypossibleifthehandbrakeisengaged.
Theplaybackwillbeinfullscreenmode–toleavethefullscreenmodepresssimplythetouch
screen area of your device.
ThesourcesUSBandiPodcanbeaccessedamongotherwaysthrutheirhomescreeniconandBT
musicwithaconnectedphoneviatheBluetoothsourcetoplayaudio(BT,USB,iPod)orvideo(USBonly).
PlayinglesissimilarforallsourcesandcanbecontrolledviathemediaplayerUI.Toplayvideosin
USBmodeyouneedchangethestandardlterinlistview(4)tothevideoletype(B).
Inthismainviewthemediaplayercontrolsaredisplayed.Asusualyoucanusethepause/resume/play
orskipbuttonstoplaythenexttrack.Youcanalsoactivatethespecialfunctionslikerepeatandshufe.
Operation buttons:
1. Return Press to return to the home screen.
2. EQ Presstoopenequalizersettings(seechapterdevicesettings).
3. Search Presstoopensearch(notavailableinBluetoothmusic).
4. List Presstoopenthelistview(notavailableinBluetoothmusic).
USB/IPOD/BT MUSIC (A/V) SOURCE
132 4
AB

18 19
BLUETOOTH PAIR, CONNECT, CALL, MUSIC
Oninitialusethecategory(2)isactiveandyoucanpairyourcompatiblephoneviascan/search.Plea-
seensureyourphoneisvisibleuntilitappearsinthesearchresultlist.Topairtapthelinewithyour
phonefromthelistandconrmthepasskey.Pleasealsoensurethatpermissionsuchastocontacts
aregranted/accepted.Activeorautoconnectedphonesareshowninstatusarea(A)withanactive
Bluetoothicon,batteryandsignalstrengthicon(ifsupported).
Inthelowersectionyoucanchooseadifferentcategorywhichwillupdatethemainviewarea.
Operation buttons
1. Return Press to return to the home screen.
2. Devices Hereyoucanmanageyourpairedphones(manualconnect/disconnect,delete)or
add new phones via search.
Taptheconnect/disconnectbuttontodisconnectmanuallyandconnectadifferent
other phone.
Tapthewastebiniconbuttontodeleteapairedphone
Note:itisonlypossibletoconnectasinglephoneatthesametime.
3. Keypad Presstoopenthedialkeypadwiththeactivephone.
4. contacts Presstoopenthecontactlistoftheactivephone.
Youcanmanuallyre-syncincaseifnotallcontactsareshownornewcontactshave
beenaddedtothephone.
Youcanslidethelistorusethesearchfunctiontolookupacontact.
Acontactcanbeoperatedlikeafolderandbetappedtoopenitscontainingnumbers.
Taponthelinenumbertoinitiateacallattempt.
Usetheorangebackbuttonontopleftpositionofthelistviewtobrowseonelevelup.
5. Calllog Hereyouhaveaseparatelistviewforoutgoing,received/incomingormissedcalls.
Youcantapalinetoinitiateacallattempt.
6. Music PresstoinitiatetheBluetoothmusicplaybackviaA2DP.
Note:Somesmartphonesneedtostartthemusicapponthesmartphonerst.
TheusageofBluetoothmusicplayerisdescribedinchapter„USB/IPod/BTMusic
(A/V)Source“
7. Setup PresstoopentheBluetoothsettingsforextendedoptionslikeautoconnect,auto
answercontactlistsettingsandmicrophoneadjustments.
6(a)AutoConnect:PressswitchtoON/OFFAutoConnect.
6(b)AutoAnswer:PressswitchtoON/OFFAutoAnswer.
6(c)MicrophoneGain:Pressarrowkeystochangevalues.
6(d)ContactOrder:Pressarrowkeystochangevalue.
1
32 4 65 7
Onincoming/outgoingoractivecall,thedevicewillautomaticallyswitchtoafullscreenmodeand
showsyouthecontactnameornumber(ifavailable)orunknownincaseofasuppressedcallerID.
Dependingonthecallstatus(initiate,ringing,dialling,active)youcanhang-up,reject,accept/
pick-up a call (1), on active call you can switch to private mode (2) or to car loudspeakers, mute the
XZENTmicrophone(3) or open the keypad for call options (4).
A
1 32 4

20 21
GOOGLE ANDROID AUTOAPPLE CARPLAY
WithAppleCarPlay,youarebeabletoaccesscompatibleappsandonlineservicesofyour
iPhoneinyourcarandoperatethemintuitivelywiththedisplayofyourXZENTdeviceorthevoice
assistantfromApple.
PREPARATION:
■ConnectthecompatibleiPhonewiththeUSB-1portoftheXZENTdevice.
■In case Bluetooth is not paired automatically, connect manually.
■Unlock your iPhone.
INITIAL OPERATION:
1. Fortheinitialoperation,thevehiclemustnotbeinmotionandthehandbrakemustbeengaged.
2. TaptotheCarPlayiconinthemainmenuoftheXZENTdevicetochoosetheCarPlaysource.
Aftertheinitialoperationhasbeencompletedsuccessfully,theCarPlayuserinterfaceappearson
thescreenoftheXZENTdevice.
1. TaptodisplaythehomescreenofCarPlay.
2. TaptoopenXZENTmainmenu.
3. TapanyoftheAPPicontostarttheapplication.
Note:Youcanonlyhaveoneactiverouteguidance.IfarouteguidanceisstartedwithCarPlay,the
natvienavigationsourceisterminatedinordertoavoidthespokenmessagesof2systemsforroute
guidance.Thenavigationsourceisnolongerstartedautomaticallyandmustbestartedmanuallythe
next time it is used.
1
2
3
WithGoogleAndroidAuto,youarebeabletoaccesscompatibleappsandonlineservicesofyour
AndroidsmartphoneinyourcarandoperatethemintuitivelywiththedisplayofyourXZENTdevice
orthevoiceassistantfromGoogle.
PREPARATION:
■DownloadtheAndroidAutoappfromtheGooglePlayStore.
■ConnecttheAndroidsmartphonewiththeFRONTUSBconnectoroftheXZENTdevice.
■BluetoothwillbeautomaticallyestablishonFRONTUSBrsttimeconnection.
INITIAL OPERATION:
1. Fortheinitialoperation,thevehiclemustnotbeinmotionandthehandbrakemustbeputon.
2. TaptotheAndroidAutoiconinthemainmenuoftheXZENTdevicetochoosetheAndroidAutosource.
3. FollowthedialogueonthedisplayofyoursmartphonetoinstallAndroidAutoandtocongurethe
startbehaviour.Itispossibletochangetheselectedstartbehaviourinthesetupoperations
anytime later.
4. Aftertheinitialoperationhasbeencompletedsuccessfully,theAndroidAutouserinterface
appearsonthescreenoftheXZENTdevice.
1. AndroidAutoUserInterface.
2. Navigation.
3. Telephony.
4. OpenAndroidAutouserinterface.
5. Mediaplayback.
6. OpenXZENTmainmenu.
7. ActivateAndroidAutovoicecontrol.
Note:
■AndroidAutomaynotbeavailableonalldevicesandisnotavailableinallcountriesandregions.
■TouseAndroidAutowithyourAndroidSmartphone,atleastAndroid5.0(Lollipop)orahigher
versionoftheAndroidoperationsystemmustbeinstalledonyoursmartphone.
■FormoredetailedinformationaboutAndroidAuto,pleasevisithttps://www.android.com/auto/
andhttps://support.google.com/androidauto#topic=6348027
1
2 3 4 5 6
7

22 23
A/V-IN, HDMI SOURCECAMERA SOURCE
TheA/V-INandHDMIsourcecanbeenteredamongotherwaysviathehomescreenicon.
ThesourcewillprovideyoutheA/V-INorHDMIsignalinputtoyourXZENTdevice.Thereisno
specictouchoperationherebesidesthebacktohomescreenbutton.
Operation Buttons
1. Return Press to return to the home screen.
1
X-127features2individualcamerainputs.CAM1andCAM2AVINarefoundonthe24-PINAV
cable(connectorB).
Thedevicewillactivatethecamerapowervia12VDC(PWRCam112VDCorPWRCam2
12VDCatthe24-PINAVwire)toallowpictureinputofonecamerapictureatatime.Donot
connectthecamerapowertoapermanentpowertoavoidoverlayingofCAM1andCAM2pic-
ture and continious duty.
IftheXZENTSettingissettoCAMERA>CAM1+CAM2,thecamerasourceisindualmodeand
youcanpresstheCAMSwitchbuttontochangethepicturefromCAM1toCAM2.Bydefault
theXZENTissettoCAMERA>CAM1.
Eachcamerasourcehasadifferentcolorofcameralines,thecanbeturnedoffandonin
XZENTmainsettings.
Toadjustthecameralinestoyourrequirements,activatethecorrespondingCAMsourceby
pressingtheCAMIconinmainmenuorenterreversegear(CAM1).Whenthecamerapicture
isvisible,pressthegearwheeltoenterthecamerasettings.Eachcamerasourcecansavean
individualcameralineadjustment.

24 25
What products are covered by XZENT’s limited Warranty?
ThelimitedWarranty(the“Warranty”)appliestoXZENTproductspurchasedfromanauthorizeddealerby
endcustomersintheEuropeanEconomicAreaorSwitzerland(“TerritorialScope”).
What is the validity period of XZENT’s Warranty?
UnderthisWarranty,XZENTwarrants,foraperiodof2years,thattheproductisfreefromdefectsinmaterial
and/orworkmanshipatthetimeoftheoriginalpurchase.This2-yearperiodcommencesonthedateofthe
originalpurchaseaspertheoriginalinvoiceoruntilreceipt.Ifyouhavepurchasedtheproductasaconsumer,
andthedefectisidentiedwithintherstsixmonthsaftertheoriginalpurchase(seeabove),wewillassume
that the defect already existed at the time of purchase.
Who can claim under the Warranty?
XZENTgrantsthelimitedWarrantytonatural persons only, who purchased the relevant product primarily for
personal use.
What is covered by the Warranty?
XZENTwarrantsthattheproductisfreefromdefectsinmaterialand/orworkmanshipatthetimeoftheoriginal
purchase.XZENTdoesnot,however,provideawarrantycoveringeverydefectanddamagethatmayoccur.
It only covers the hardware components of the device, and in no event the software used with the device,
regardlessifthiswasprovidedbyXZENTorthethird-partyvendor.TheWarrantythereforedoesnotcover
thefollowingcases,inparticular:
■ normalwearandtear(suchastosurfacesandprotectivecoverings);
■ supercial damage, such as scratches, dents, and damaged plastic, worn or mechanically defective
connections;
■ misuse,includinganytreatmentresultinginphysicalorsupercialdamage,suchasacosmeticdefect,
totheproduct;
■ damagecausedbyconnecting or usingtheproductforapurpose other thanthosespecied,ora
failuretoobservetheoperatingand/orinstallationinstructionsfortheparticularmodel;
■ installationoruseoftheproductcontrarytotheapplicabletechnicalstandards,orthesafetyregulations
inthecountryinwhichtheproductisinstalledorused;
■ damagecausedthroughanunauthorized attemptedrepair,oranattemptedrepairbysomeoneother
thanaXZENTauthorizedservicepartner;
■ damagecausedbymodicationstotheproductnotexpresslyauthorizedbythemanufacturer;
■ damage caused by malicious code (“Software Viruses”) or by using software not supplied with the
productorwhichwasincorrectlyinstalled;
■ use of third party vendor software programs for editing, modifying, adapting, or extending XZENT’s
authorizedsoftwarecomponentsasarerunontheproduct;
■ useofthird-partyvendorrmware/operatingsystemsoftware
■ damage caused by liquids or chemicals of whatever type, and/or excessive temperatures, moisture,
ordamp;
■ accidents,dropsorothersucheffectsofextremeacceleratingforces;
■ damagecausedbylightningstrikes,electrostaticcharge,incorrectoperatingvoltage,water,re,force
majeure,inadequateventilationforotherreasonsforwhichXZENTisnotresponsible;
■ damagecausedbyusingthedeviceoutsideofthedenedspecications;
■ damagecausedbyusingtheproductwithothersystemsordevices,whicharenotdesignedtobeused
withthisproduct;
■ adjustments or modications without XZENT‘s prior written approval, including product upgrades
extendingbeyondthespecicationsorcharacteristicsdescribedintheoperatingmanual;
■ modicationsoftheproductforthepurposeofadaptingittonationalorlocaltechnicalnormsorsafety
standardsofcountriesforwhichtheproductwasnotexpresslydesignedormanufactured;
■ usingserviceorsparepartsnotproducedordistributedbyXZENT;
■ usingtheproductinconnectionwithaccessoriesnotapprovedforusewiththisproduct;
XZENT, moreover,doesnot warrant(expressly,implicitly, statutorily,or otherwise)thequality,performance,
reliabilityorsuitabilityoftheproductforaparticularpurposeexceptasdescribed,northesoftware/rmware
installed on the device ex works.
Nowarrantyservicewillbeprovided,moreover,ifthemodelnumber
/serialnumber/UUID/productnumberontheproductischanged,erased,madeillegibleorremoved.The
sameappliesifthereceiptorinvoiceisincompleteand/orillegiblewhenpresented.
Is XZENT liable for other defects or damage?
XZENTwillrepairorreplaceproducts,onlyiftheyarecoveredbythetermsofthisWarranty.XZENTisnot
liableforanymaterialorintangiblelossordamagesuchasthepricepaidfortheproduct,lossofprots,
revenue,data,orrelatingtotheenjoymentoftheproductorcomponentsassociatedwithit,arisingdirectly
or indirectly under this Warranty or otherwise in relation to products or services. This likewise applies to
lossordamagerelatingtotheimpairmentoroperationalfailureoftheproduct,ordevicesassociatedwith
it,causedbydefectsorthenon-availabilityoftheproductduringthetimeitiswithXZENTorXZENT’s
servicepartner,aswellastoperiodsofdowntimeandbusinessinterruptions.Inaddition,XZENTdoesnot
acceptanyliabilityforshipment-relatedrisks-suchasthelossordestructionoftheproduct-inconnection
withthefullmentoftheWarranty.
Thisdisclaimerappliestolossesofdamageirrespectiveofthelegalbasis,especiallyonthegroundsof
negligence,otherwrongfulconduct(torts),breachofcontract,expressorimpliedguarantees,andstrict
liability(evenifXZENToritsservicepartnerhasbeenadvisedofthepossibilityofsuchdamageoccurring).
Ifthesedisclaimersareprohibitedorlimitedundertheapplicablelaw,XZENTwilllimititsWarrantyand
liability to the extent permissible under the applicable regulations. For example, some national laws prohibit
the exclusion or limiting of damages payable in connection with negligence, gross negligence, willful
wrongdoing, deceitful conduct, and other such acts. For the duration of this Warranty, all liability that
cannotbeexcludedcompletelywillbelimitedtotheextentpermissibleundertheapplicablelaw.Liability
underthisWarrantyislimitedtothepricepaidfortheproduct.Iftheapplicablelawonlypermitshigher
limitsonanyliability,thishigherlimitationwillapply.
How do I exercise my Warranty rights?
IfyouwanttoexerciseyourentitlementsunderthisWarranty,pleasecontacttheauthorizeddealerwhere
theproductwaspurchased,andpresentitwiththeoriginalcopyofthetillreceiptorinvoice.Donotreturn
anyproductstoXZENTdirectly,otherwiseourWarrantyobligationscannotbefullled.Youwillndthe
name of the relevant dealer or reseller on your proof of purchase.
Defective devices sent by the authorized dealer to the service center, must also be accompanied by
anyaccessorieswithalogicalconnectiontotheobservedfault.Thismeans,forexample,thenavigation
packageonanSDormicroSDcardsuppliedorpurchasedwiththedevice,ifproblemsorfunctionalerrors
wereobservedinconnectionwiththenavigationfunction.
How will XZENT full its Warranty?
XZENToritsservicepartnerwillchoosetoeitherrepairorreplacetheproductoritsdefectivepartscovered
bytheWarranty,andassumethecostsofmaterialandlaborindoingso.
RepairsundertheWarrantymustbecarriedoutbyXZENToritsauthorizedservicepartner.Productsthat
arerepairedorreplacedmaycontainnewand/orrefurbishedcomponentsanddevices.Componentsthat
areswappedoutwillbecomethepropertyofXZENT.
Will I incur any costs in connection with the Warranty service?
XZENTassumesthecostsofmaterialandlaborinconnectionwithitsWarrantyservice.TheWarranty
holderisresponsibleforthecostsofshipmentandbearstherisks connected with the shipment (see
above).Iftheproductisfoundtobeoperatingfaultlessly,orthereisnowarrantyentitlementbecausethe
warrantperiodhasexpiredorforanyotherreason,XZENToritsauthorizedservicepartnerwillbeentitled
tochargeaat-rateinvestigationfeeof€30.00.
Do this Warranty affect my statutory or contractual rights?
ThisWarrantyismadevoluntarilybyXZENT,anditwill,inanycase,extendyourstatutoryrights.Asa
consumer,youremainfullyentitledtoyourstatutoryrights,suchasthestatutoryguarantee.ThisWarranty
alsohasnoeffectwhatsoeveronyourcontractualrightsagainstthereseller.Youmaycontinuetoexercise
theserightsinfull.
TERMS OF WARRANTY

26 27
Hereby,ACRBrändli+VögeliAGdeclaresthatthetypeofradioequipmentX-127complieswiththe2014/53/EU
Directive.ThefulltextoftheEUDeclarationofConformityisavailableatthefollowingInternetaddress:
www.xzent.com(seelink„ProductConformityDocuments“inthefooterofthepage).
HiermiterklärtACRBrändli+VögeliAG,dassderFunkanlagentypX-127derRichtlinie2014/53/EUentspricht.
DervollständigeTextderEU-KonformitätserklärungistunterderfolgendenInternetadresseverfügbar:
www.xzent.com(sieheLink„DokumentezurProduktkonformität“imFussbereich).
ACRBrändli+VögeliAGdéclareparlaprésentequeletyped‘équipementradioX-127estconformeàla
directive2014/53/UE.LetextecompletdeladéclarationdeconformitéUEestdisponibleàl‘adresseInternet
suivante:www.xzent.com(voirlelien„Documentsdeconformitéduproduit“danslepieddepageàlapage).
ConlapresenteACRBrändli+VögeliAGdichiaracheiltipodiapparecchioradioX-127èconformeallaDirettiva
2014/53/UE.IltestocompletodellaDichiarazionediconformitàUEèdisponibilealseguenteindirizzoInternet:
www.xzent.com(vedereilcollegamento„Documentidiconformitàdelprodotto“nellaparteinferioredellapagina).
2410R-06369
8
ADDITIONAL INFORMATION TECNICAL SPECIFICATION
CONNECTION DIAGRAM
TECNICAL SPECIFICATION
Electrical characteristics
Powersupply:+12VDCagainstvehicleground
Externalprotectionagainstinternalshort-circuit:15AMini-ANLfuse
Operating currents*
ACCoffidlestatus: <5.0mA
Audio/videoplayback(VOL20): ~1.40A
GPSmodewithactiverouteguidance ~1.55A,(VOL20,nochargingmode)
withCarPlayorGoogleAndroidAuto ~2.0A(withcharging)
GPSmodewithactiverouteguidance ~1.55A,(VOL40,nochargingmode),
withCarPlayorGoogleAndroidAuto ~4.1A(withcharging)
*@13.8Voperatingvoltagewithfrontandrear4ohmloudspeakerconnected
to device
A
PIN1-10
B
PIN11-20

28 29
Allgemein
1. DieindiesemHandbuchenthaltenenBeschreibungenundsonstigenInhaltekönnenvomtatsächlichen
Gerätabweichen.
2. DieindiesemHandbuchundeinigenHMI-ScreenshotsgezeigtenBilderkönnenvomrealenGerätabweichen.
3. DietechnischenDatenunddastechnischeDesigndiesesGerätemodellskönnenohneVorankündigung
geändertwerden.
■ LesenSiedieAnleitungvollständigdurch.BeachtenSiealleWarnhinweise.BefolgenSiedieAnweisungen.
■ BewahrenSiediesesHandbuchauf.Jeder,derdasGerätbenutzenwill,sollteZugangzudiesemHand-
buchhaben.
■ DiesesGerätistfürdenEinsatzinFahrzeugenmit12-V-GleichstrombatterieundnegativerMasseausgelegt.
■ DasGerätdarfnichtandersbetriebenwerden,alsindieserAnleitungbeschrieben.BeiNichtbeachtungder
AnweisungenkanndieGarantieerlöschen.
■ NehmenSiedasGerätnichtauseinanderundverändernSieesinkeinerWeise,dasonstIhreGarantie
erlischt.VersuchenSienicht,dasGerätselbstzureparierenoderzuwarten,sondernwendenSiesich
stattdessenaneinenautorisiertenXZENT-Händler.
■ VerwendenSienurOriginalzubehör,dasfürdasGerätkonzipiertundhergestelltwurde,dasonstSchäden
auftretenkönnen.MontierenSiedasGerätgemäßderMontageanleitungmitdemmitgeliefertenMontage-
zubehör.DieBeschleunigungskräftebeiUnfällenkönnenenormsein.FehlerhaftmontierteGerätestellen
beieinemUnfalleinernsthaftesRisikofürFahrerundBeifahrerdar.
■ SchützenSiedasGerätvorWasserundanderenFlüssigkeiten,dieindasGehäusegelangenkönnten.Ein
KurzschlussodersogareinBrandkönntedieFolgesein.
■ UmeinenKurzschlusszuvermeiden,steckenSieniemalsmetallischeGegenstände(z.B.MünzenoderMetall-
werkzeuge)indasGerät.
■ BevorSieeinedefekteSicherungaustauschen,versuchenSie,dieUrsachefürdenKurzschlusszunden.
AchtenSieaufdieKabeldesNetzteils!WennderKurzschlussnichtaufeinenFehlerinderStromversor-
gungoderVerkabelungzurückzuführenist,könnenSiediedefekteSicherungdurcheineneue(mitdem-
selbenWert)ersetzen.WennderKurzschlussweiterhinbesteht,wendenSiesichaneinenautorisierten
XZENT-Händler.
■ WennSieeinanderesGerätanschließen,lesenSiedieBedienungsanleitungbezüglichderKompatibilitätund
derHinweisezudenelektrischenAnschlüssen.VersuchenSienicht,inkompatibleProdukteanzuschließen.
■ AchtenSiedarauf,dassSiedieAutobatteriewährendderBenutzungdesGerätsnichtentleeren,wenn
derFahrzeugmotorabgestelltist.DadasGerätvielEnergieverbrauchtunddieBatterienurbeilaufendem
Motorgeladenwird,kannesvorkommen,dasssichdieBatteriesoweitentlädt,dassesnichtmehrmöglich
ist,denMotorzustarten.
■ NachgeltendenRechtinverschiedeneneuropäischenLändernistdasFahrenmitMonitoren,dieFilmeim
SichtbereichdesFahrerszeigen,nichterlaubt,daderFahrervomVerkehrabgelenktwerdenkann.Bitte
beachtenSiedieVerkehrsvorschriftenIhresLandesoderSiekönnenbeiUnfällen,sonstmüssenSiebeiUn-
fällenmitStrafenodersogarVerlustIhresVersicherungsschutzesrechnen.AchtenSieaufdieWiedergabe-
lautstärkeinIhremFahrzeug,daSieäußereWarntönewiePolizeisirenenusw.wahrnehmenkönnenmüssen.
■ SetzenSiedasGerätkeinenhartenStößenaus.EinemechanischeoderelektrischeFehlfunktiondes
GeräteskanndieFolgesein.
■ SolltenwährendderMontageProblemeoderFragenauftreten,wendenSiesichbitteanIhren
XZENT-Händlerbzw.-Importeur.
ÜBERDIESESHANDBUCH
DiesesHandbuchenthältwichtigeInformationenundWarnungenzumBetriebdiesesXZENT-Gerätes.
BittebewahrenSieesaneinemOrtauf,zudemSiespäterZugriffhaben.
SICHERHEITSINFORMATIONEN 29
GERÄTESUPPORT,SOFTWARE-UPDATESUNDWARTUNG 30
GERÄTEFRONT 31
EINSTELLUNGDERDISPLAYPOSITION 23-33
HAUPTMENÜ 34
LENKRADTASTEN(OE-Modus,IR-Stalk-Schnittstelle) 35-37
GERÄTEEINSTELLUNGEN 38–39
DAB-RADIO-QUELLE 40
UKW-RADIO-QUELLE 41
USB-/iPod-/BT-/MUSIK(A/V)-QUELLE 42–43
BLUETOOTH-KOPPELN,VERBINDUNG,ANRUF,MUSIK 44–45
APPLECARPLAY-QUELLE 46
GOOGLEANDROIDAUTO-QUELLE 47
CAMERA-QUELLE 48
A/V-IN,HDMI-QUELLE 49
GARANTIEBEDINGUNGEN 50-51
ZUSÄTZLICHEINFORMATIONEN,TECHNISCHEDATEN 52
INHALT SICHERHEITSINFORMATIONEN

30 31
Bedientasten:
1. VOL/POWER: HaltenSiedieseTastegedrückt,umdenStandby-Moduszuaktivieren(BildschirmAUS,
AudioAUS).
WenndasGeräteingeschaltetist,drückenSie,umesstummzuschalten.
WenndasGerätausgeschaltetist,drückenSiezumEinschalten.
DrehenSieimUhrzeigersinn,umdieLautstärkezuerhöhen.
DrehenSiegegendenUhrzeigersinn,umdieLautstärkezuverringern.
2. HOME DrückenSie,umzumStartbildschirmzurückzukehren.
DrückenSieaufdemStartbildschirm,umzurletztenQuellezugelangen(fallsvorhanden).
3. VOICE Presstostartvoicerecognition(inusewithCarPlayorGoogleAndroidAuto)
4. CAM: DrückenSie,umdieStandardkameraanzuzeigen,unddrückenSieerneut,umdieKame-
raansichtzuschließen.
5. VOICE: Drücken,umdieSpracherkennungzustarten(inVerbindungmitCarPlay)
6. DAB: DrückenSie,umdieDAB-Quellezuöffnen.InderDAB-QuelledrückenSieerneut,um
aufUKWumzuschalten.
7. FAV: DrückenSie,umdiezugewieseneFAV-KurzdrückfunktionausdenGeräteeinstellungen
auszuführen(sieheKapitelGeräteeinstellungen).
HaltenSiegedrückt,umdiezugewieseneFAV-LangdrückfunktionausdenGeräteeinstel-
lungenauszuführen(sieheKapitelGeräteeinstellungen).
A. MIC internesMikrofonfürFreisprechfunktionen
B. RESET DrückenSie,umeinenPower-Resetdurchzuführen.
GERÄTESUPPORT, SOFTWARE-UPDATES UND WARTUNG
GERÄTEFRONT
Software-Updatesund-VerbesserungenwerdenüberUSB-Updatesbereitgestellt,dievonunsererWebsitewww.
xzent.comheruntergeladenwerdenkönnen.DortndenSieauchKundenbetreuung,FAQsundanderenützliche
Informationen.
ACHTUNG: Dieses Gerät verfügt über spezielle USB-Ports mit speziellen Funktionen ((USB-1, grau) und
(USB-2,schwarz).DieVerlängerungskabelsinddurcheinTextetikettunterscheidbar,umeinekorrekteZuordnung
zugewährleisten.
ÜberXZENTbereitgestellteSoftware-UpdatesMÜSSENauf„USB-1“(USEFORSWUPDATE)installiertwerden.
Wenn die Installation durch Dritte ohne ordnungsgemäße Markierung/Identikation des Verlängerungskabels
durchgeführtwurde,versuchenSieesamanderenPort,fallsdasUpdatefehlschlägt.
1
23 4 5
A B

32 33
EINSTELLUNG DER DISPLAY POSITION (VERTIKALE HÖHE, HORIZONTALER
BLICKWINKEL UND NEIGUNG).
DasDisplaydesX-127lässtsichvertikalinderHöhesowieimBlickwinkelundderNeigungeinstellen.
Hinweis:
• EinstellungenamDisplaysolltennichtwährendderFahrtvorgenommenwerden.
• BeachtenSiedieSicherheitsrelevantenHinweisedesFahrzeuges.AchtenSieauchauf
ZugänglichkeitvonTastenwieWarnblinkeroderLuftauslässen.
• DasDisplaysollteimmermitbeidenHänden„parallel“(linksundrechtsmittig)angefasst
werdenumeszuverstellen.
• DasX-127solltefestmontiertsein.
Blickwinkelanpassung und Neigung:
FassenSiedasDisplayamlinkenundrechtenRandmittiganunddrückenmitdereinenHand
undziehenmitderanderenHandumdenBlickwinkeleinzustellen.FürdenNeigungswinkel
führenSiemitbeidenHändeneineKippbewegungvonsichwegoderzusichhinaus.
Höhenverstellung
FassenSiedasDisplayamlinkenundrechtenRandmittiganundschiebenSiedasDisplay
nachobenoderunten.
DieTiefeneinstellungbenötigteineTeildemontageundAnpassungderStandardbefestigung.
BeachtenSiehierzudengesondertenAbschnitt.
ANPASSEN DER TIEFENEINSTELLUNG DES DISPLAYS
DieTiefeneinstellungdesDisplayskannvonderStandardeinstellung0“(0mm)auf1/2“
(12,5mm)oder1“(25mm)geändertwerden.
EINSTELLUNG DER DISPLAY POSITION
A
CUSTOMIZING AND DISPLAY DEPTH ADJUSTMENT
Note:
Do not remove
the center
screw
1" (25 mm) 1/2" (12.5 mm) Flush (default 0 mm)
1
2
3
1" (25 mm)
1/2" (12.5 mm)
Flush (default 0 mm)
Schritt 1:
EntfernenSiedieAbdeckungNr.14des
Verstellmechanismus
Schritt 2:
EntfernenSiedie4äußerenoberenSchrauben
undlassenSiediemittlereSchraubeangezogen.
ZiehenSiedieDisplay-Montagehalterungdurch
ZiehenanderDisplaygruppevorsichtigausdem
Gehäuseindiegewünschte1/2“-oder1“-Position.
ZiehenSiedie4äußerenoberenSchraubenan,um
dieHalterungzufixieren(sieheAbbildung).
AufdenDemobildernistdieDisplaygruppenicht
sichtbar,damitdieoberenSchraubenbesserzu
sehen sind.
Schritt 3:
InstallierenSiedasX-127aufdem1-DIN
Armaturenbrett(sieheseparatesKapitel).Der
Installationsprozessistderselbewiebeider
Standardinstallation,aberamEndewerdenandere
AbdeckungenfürdenEinstellmechanismus
benötigt.
A
Vorausgesetzt:DerX-127istvom1-DINArmaturenbrett
gelöstundesistkeinMontagekäfigmontiert.UmdasGerät
vom1DIN-Armaturenbrettzuentriegeln,drehenSiedie
Anzeigegruppeineine90°-Position,indemSiesiemitbeiden
Händenhaltenundum90°imodergegendenUhrzeigersinn
drehen.LösenSiedieVerkleidungshalterungvom
HauptgehäuseundsteckenSiedieEntriegelungsschlüsselNr.
3 in den entsprechenden Spalt auf der linken und rechten Seite
einführen(inderMitte,zwischendemHauptgehäuseundder
1Din-Halterung-sieheAbbildung).DieEntriegelungsschlüssel
müssensoweiteingestecktwerden,bisdieKlemmeder
Montagehalterunggelöstist.ZiehenSiedenX-127heraus,
wennsichdieKlemmenderHalterunggelösthaben.
No.3

34 35
DasXZENT-GerätistfürdenBetriebmiteinemIR-Stalk-Interfacevorkonguriert,dasNICHTimSetenthaltenist.
AlternativkanneinevorhandeneanalogeLenkradsteuerungandasXZENTAnalogKeyInterface(Key1/Key2/GND)angeschlossen
werden.X-127hat2verschiedeneModi,MODE-2(StandardfürhoheOhm-Werte)oderMODE-1(fürniedrigeOhm-Werte),um
verschiedeneOhm-Bereichezuunterstützen.DieOhmBereichekönnennichtgemischtwerdenumLenkradtastenausbeiden
Bereichenzuuntertützen.
MODE 2 (HOHE OHM-WERTE):
1
2
4
5
6
3A
A1 A2
B
Bedientasten:
1.Vorwärtsüberspringen: dieseSchaltächefolgtderFunktiondergraschenBenutzeroberäche
(GUI)deraktivenAudioquelle.
2.CAM/voice: Drücken,umdieCAM-Quellezuaktivieren.DrückenSieerneut,um
dieCAM-Quellezuschließen.
DrückenundhaltenSiedieTaste,umdieCarPlay-Sprachsteuerung
zuaktivieren.
3.Zurücküberspringen: DieseSchaltächefolgtderFunktiondergraschenBenutzeroberäche
(GUI)deraktivenAudioquelle.
4.Vol+: Drücken,umdieaktiveLautstärkezuerhöhen.
5.Stummschaltung/Annahme/Auegen: WenneskeinenaktivenAnrufgibt,drückenSieaufMUTEumstumm
zuschaltenoderdieStummschaltungallerAudioquellenaufzuheben.
DrückenSiewährendeineseingehendenAnrufs(Klingeln),umden
Anrufanzunehmen.DrückenSiebeieinemaktivenAnrufauf,umden
Anrufzubeenden.
6.Vol-: drücken,umdieaktiveLautstärkezuverringern.
A:SiekönnendieTastenIhresSWCdurchPlatzierenvonStandard-oderalternativenTastenaufIhremSWC
nachIhrenWünschenanpassen.DerVorgangwirdamEndediesesKapitelserläutert.
Alternative Tasten:
A1.AlternativeFunktionSRC/voice: DrückenSie,umeineadnereQuelleüberdasHervorhebenimHaupt-
menüauszuwählen.DrückenundhaltenumCarPlay/GoogleAndroid
AutoSprachassistentauftzrufen.
A2.AlternativeFunktionNAV/voice: DrückenundhaltenSiedieseTaste,umdiezugeordneteNAV-Funktion
aufzurufen(nichtfürX-127verfügbar).
DrückenundhaltenSiedieTaste,umdieCarPlay/GoogleAndroid
Auto-Sprachsteuerungzuaktivieren.
B:MitdieserTastewirdjedebenutzerdenierteKongurationdesSWCaufdieWerkseinstellungenzurückgesetzt.
Tasten und Display für die Bedienung des HAUPTMENÜS
A UhrzeitundDatum
B Seitenanzeige
1. Quellen-Symbol DrückenSie,umdieausgewählteQuellezuöffnen.
UmdurchdieverschiedenenQuellen-Symbolezublättern,streichenSienachlinksoderrechts.Alternativkönnen
SieauchdiePfeiltastendrücken,umdurchdieverschiedenenSeitenzublättern.
UmzudiesemBildschirmzurückzukehren,könnenSiedieFront-SensortasteHOMEoderdiePfeiltasteZurück
inderlinkenoberenEckejederQuelledrücken.
HAUPTMENÜ LENKRADTASTEN (OE-MODUS,IR-STALK-SCHNITTSTELLE)
A
1
B

36 37
SWC-(Neu-)Zuweisungsprozess:
DerProzessistbeibeidenSWC-ModiähnlichundunterscheidetsichnurdurchandereStandard-undAlternativ-
tasten.DieFunktionderStandard-undAlternativtastenwirdamAnfangdiesesKapitelsfürjedenModuserklärt.
BittebeachtenSie,dassdieserModusNICHTfürdenIR-Stalk-Interface-Modusgeeignetist.DrückenSieauf
die„Ändern“,umdieFunktionennachIhrenWünschenneuzuzuordnen.DasSystemlöschtalleTastendes
LenkradsundmarkiertdielinkeobereSWC-Taste,diezuerstzugewiesenwerdensoll.SiemüssenalleSie
müssenallegelöschtenTastenderReihenachvonlinksobennachuntenunddanndierechteSeitevonoben
nachuntenzuweisen.DieaktuelleTaste,diemiteinerFunktionbelegtwerdensoll,wirdfürSiehervorgehoben.
Beispiel:UmeineFunktionzuzuweisen,wählenSieeinFunktionssymboldurchAntippenausderMitte(z.B.
SRC/Stimme).NachdemdiegewünschteFunktion(indiesemBeispielSRC/Stimme)markiertist,drücken
SiedieentsprechendeSWC-Taste(indiesemBeispielobenlinks).DasSystemwirdnundieSRC/Voice-Taste
inderMitteausgrauenunddieSRC/Voice-FunktionaufdielinkeobereSWC-Tastelegen.SpäterkönnenSie
dieSRC-/SprachfunktiondurchDrückenderlinkenoberenSWC-Tasteauslösen(anstellederstandardmäßigen
MUTE-Taste).NachdemdieersteTastezugewiesenwurde,beleuchtetdasSystemdienächsteTaste,diemit
einernochverfügbaren(nichtausgegrauten)FunktionausderMittezugewiesenwird.NachdemalleTasten
aufderSWCdeniertsind,könnenSiedieSWC-ZuweisungschließenunddieneueKongurationvonnunan
verwenden.UmdieStandardwertewiederherzustellen,drückenSiedieSchaltäche„Standard“.DieFunktionen
werdendannaufdieStandardwertezurückgesetzt.
Anmerkung:
DiebeidenModifürnieder-oderhochohmigeSWCkönnennurineinembestimmtenBereichfunktionieren.
WenneinFahrzeugeineKombinationvonTastenausbeidenModihat,könnennichtalleSWC-Tastenunter-
stütztwerden
MODUS 1 (NIEDEROHMIG):
Mögliche Tastenfunktionen und Bedientasten
1.Stumm/mute kurzdrückenumdasXZENTGerätstummzuschalten.ErneutdrückenumStumm-
Schaltungaufzuheben.
2.Vol- kurzdrückenumaktivenLautstärkekanal(Medienquelle,usw.)zureduzieren.
3.Vol+ kurzdrückenumaktivenLautstärkekanal(Medienquelle,usw.)zuerhöhen.
4.Sprungzurück kurzdrückenumgleicheQuellfunktion(DAB,USB,FM,usw.)wiedieTouchbedienung
derQuelleauszuführen.
5.Sprungvorwärts kurzdrückenumgleicheQuellfunktion(DAB,USB,FM,usw.)wiedieTouchbedienung
derQuelleauszuführen.
6.Abheben kurzdrückenumeingehendenAnrufanzunehmen.
7.Auegen kurzdrückenumaktivesGesprächzubeenden.
8.SRC DrückenSie,umeineadnereQuelleüberdasHervorhebenim
Hauptmenüauszuwählen.
9.FAV kurzdrückenumdiezugewieseneFAV-FunktionausdenGeräteeinstellungen
auszuführen(sieheKapitelGeräteeinstellung)
10.CAM DrückenSie,umdieStandardkameraanzuzeigen,unddrückenSieerneut,umdie
Kameraansichtzuschließen.
11.Ändern kurzdrückenumLenkrad-Tastenbelegungzulöschenundneuzuzuweisen(siehe
KapitelLFB(neu)Zwueisung).
12.Standard kurzdrückenumdieStandardeinstellungfürFiatDucatoX290wiederherzustellen.
1 2 3 4 5
6 7 8 9 10
11 12

38 39
1
2
3 4 5 6 7
Bedientasten:
1. Zurück DrückenSie,umzumStartbildschirmzurückzukehren.
2. Listenbereich DerangezeigteListenbereichistabhängigvonderaktuellausgewähltenKategorie.
UmandereEinstellungenzusehen,könnenSiedieListenachobenunduntenscrollen/strei-
chenodereineandereKategorieimunterenBereichauswählen.
3. Allgemein EnthältallgemeineEinstellungenwieSprache,DatumundUhrzeit,FAV-Tastenbelegung.
3(a)Systemsprache:DrückenSiediePfeiltasten,umdieSpracheauszuwählen.
3(b)Uhrzeit-Zeitsynchronisationsmodus(DAB+):DrückenSiedenSchalteraufEIN/AUS.
3(c)KurzesDrückenvonFAV:DrückenSiediePfeiltasten,umeineandereFunktionzuzuweisen.
3(d)LangesDrückenvonFAV:DrückenSiediePfeiltasten,umeineandereFunktionzuzuweisen.
3(e)Signalton:DrückenSiedenSchalteraufEIN/AUS(Aktivieren/DeaktivierenderTasten-Pieptöne).
3(f)Mikrofon:DrückenSiediePfeiltaste,umdasausgewählteMikrofonzuwechseln.
3(g)Hintergrundbild:DrückenSie,umeinenanderenHintergrundauszuwählen.
3(h)TastenBeleuchtung:drückenumFarbederTastenbeleuchtungzuändern.
3(i)Datum:DrückenSie,umeinDatummanuelleinzustellen(nurmöglich,wennderSynchroni-
sationsmodusaufAUSgesetztist).
3(j)Uhrzeit:DrückenSie,umdieUhrzeitmanuelleinzustellen(nurmöglich,wennderSynchro-
nisationsmodusaufAUSgesetztist).
3(k)Zeitzone:DrückenSiediesePfeiltasten,umdieZeitzonemanuelleinzustellen.
3(l)Zeitformat:DrückenSiediePfeiltasten,umdas12/24h-Formatzuändern.
3(m)Apple-Konnektivität:drücken,umdenModuszuwechseln
4. Audio EnthältdieEinstellungfürAudio-undSound.
4(a)Balance:DrückenSiediePfeiltasten,umdieMittenachlinksoderrechtszuverschieben.
4(b)Fader:DrückenSiediePfeiltasten,umdieMittenachvorneoderhintenzuverschieben.
4(c)Equalizer:DrückenSie,umdenEQzuöffnen.SiekönnenverschiedeneEQ-Voreinstel-
lungenauswählenoderdieFrequenzbändermanuellnachIhrenWünschenändern.
BalanceundFaderkönnenauchoptischangepasstwerdenoderLPF,Subwoofer-Pegel
undLoudnesskönneneingestelltwerden.
4(d)Loudness:DrückenSiedieseTaste,umdieLautstärkeein-/auszuschalten.
4(e)Ein-/AusschaltendesSubwoofers:DrückenSiedieseTaste,umdenSubwooferein-
undauszuschalten.
GERÄTEEINSTELLUNGEN
4(f)Subwoofer-Verstärkung:DrückenSiediePfeiltaste,umdieSubwoofer-Verstärkungzu
ändern,wennSubwooferanist.
4(g)Startlautstärke:DrückenSiedieTaste„٭٭٭“.HierkönnenSiealleverfügbarenQuellen
inBezugaufdieStartlautstärkeindividuellanpassen.
Siekönnenwählen,obSiediezuletztverwendeteLautstärkeverwendenoderbeim
StarteinefesteingestellteLautstärkehabenmöchten.
5. TFT HierkönnenSieEinstellungeninBezugaufdenBildschirmvornehmen,z.B.Helligkeitsmo-
dus und -werte.
5(a)TFT-HelligkeitamTag:DrückenSiediePfeiltasten,umdenWertfürdenTag-Modus
einzustellen.
5(b)TFT-HelligkeitinderNacht:DrückenSiediePfeiltasten,umdenWertfürdenNacht-Mo-
duseinzustellen.
5(c)Dimm-Modus:DrückenSiediePfeiltasten,umdenWerteinzustellen.
Auto:DieHelligkeitwirdbeimEinschaltenderFrontscheinwerferdesFahrzeugs(Nacht)
automatischangepasst.
Tag:DieHelligkeitistdauerhaftaufdemTageswert.
Nacht:DieHelligkeitistdauerhaftaufdemNachtwert.
5(d)TouchscreenAuto-Standby:BeieingestellterLeerlaufzeitwirdderBildschirmausgeschal-
tet,wennernichtbedientwird(derTonwirdimHintergrundweiterhinwiedergegeben).
6. Kamera ErmöglichtesIhnen,dieEinstellungenderangeschlossenenRückfahrkameraanzupassen.
6(a)Rückfahrkamera:DrückenSiediePfeiltasten,umdenWerteinzustellen.
Cam1:VerwendetdenEingangderCam1
Cam2:VerwendetdenEingangderCam2
Cam1+Cam2:VerwendetdieCam1imRückwärtsgangundschaltetnacheinerVerzö-
gerungautomatischaufCam2um,nachdemderRückwärtsgangverlassenwurde.
6(b)StummschaltungderRückfahrkamera:Drücken,umdenWertzuwechseln
(Stummschalten,Reduzieren,Aus)
6(c)R-CamAusschaltverzögerung:DrückenSiediePfeiltasten,umdieVerzögerungszeitzu
ändern,bissichdieKameraansichtnachVerlassendesRückwärtsgangsautomatisch
schließt.
6(d)Kamerabild:DrückenSiediePfeiltasten,umdenWerteinzustellen(normaloderhori-
zontalgespiegelt).
6(e)Kamera1Rasterlinien:DrückenSiedieseTaste,umdieRasterlinienderKamera1aus-
undeinzuschalten.BeiderKameraquellekönnenSiediePositionderLinienanpassen,
wenndieFunktionanist.
6(f)Kamera2Rasterlinien:DrückenSiedieseTaste,umdieRasterlinienderKamera2aus-
undeinzuschalten.BeiderKameraquellekönnenSiediePositionderLinienanpassen,
wenndieFunktionanist
7. Sonstiges HierndenSieInformationenüberdieSoftware-VersiondesGerätsunddieWerkseinstellung.
7(a)Software-Version:DrückenSiedieTaste„٭٭٭“,umdieSoftwareversiondesGerä-
tesystemsanzuzeigen.
7(b)Softwareinstallieren:DrückenSiedieTaste„٭٭٭“,umdieSoftware-Installationüber
denUSB-1-Anschlusszustarten.
WenndieDateiennichtgefundenwerden,werdendieSchaltächenzumFortfahren
nicht aktiviert.
7(c)Werkseinstellungen:DrückenSiedieTaste„٭٭٭“undbestätigenSie,umeinenWerks-
resetdurchzuführen.
7(d)LFB-Zuweisung:DrückenSiedieseTaste,umdenLFB-Zuweisungsbildschirmfürden
Analog-Tasten-Moduszuöffnen(nichtfürdenIR-Stalk-Schaltächen-Modus)
7(e)Open-Source-Lizenz:DrückenSie,umdenLizenztextanzuzeigen.
7(f)Legal:Drückenumhinweisezusehen.
Table of contents
Languages:
Other XZENT Car Video System manuals

XZENT
XZENT X-302MH User manual

XZENT
XZENT ARGO X-F270 User manual

XZENT
XZENT ARGO Series User guide

XZENT
XZENT ARGO Series User guide

XZENT
XZENT X-422 User manual

XZENT
XZENT X-522 User manual

XZENT
XZENT ARGO Series User manual

XZENT
XZENT X-527 User manual

XZENT
XZENT ARGO X-F270 User manual

XZENT
XZENT ARGO Series User manual
Popular Car Video System manuals by other brands

Kenwood
Kenwood DMX7018DABS instruction manual

Rosen
Rosen Dual Mutimedia Headrest Replacement Entertainment... owner's manual

Clarion
Clarion VRX878RVD Owner's manual & installation manual

Yaesu
Yaesu FT-891 Quick manual

Jensen
Jensen VM9022HDN - Touch Screen Double Din MultiMedia... Installation and operation manual

Macrom
Macrom M-OF7060 Update Procedure