Yamaha MU10 Operating and safety instructions

2
○○○○○○○○○○○○○○○○○○○○○○○○○○○○○○○○○○○○○○○○○○○○○○○
Congratulations and thank you for purchasing the Yamaha MU10
Tone Generator!
Welcome to the MU10
The MU10 is a sophisticated, yet highly compact MIDI tone
generator, specially designed for use with computers and MIDI music
systems.
With the built-in host computer interface and MIDI terminals,
the MU10 is ideal for any computer music system — from connection
to a simple laptop to integration in a complete MIDI studio. The host
computer interface is especially convenient, allowing you to directly
connect it to your computer without the need for a special MIDI
interface.
Featuring Yamaha’s high quality AWM2 tone generation technol-
ogy, the MU10 has 676 Normal Voices and 21 Drum Voices (percus-
sion sets), with full General MIDI compatibility — including
Yamaha’s new XG-MIDI. It provides 16-Part multi-timbral capac-
ity and full 32-note polyphony for playback of even the most sophis-
ticated song data. Three independent digital effect sections — with
11 types of Reverb, 11 types of Chorus, and 43 different Variation
effects — can be used simultaneously and give you enormous versatil-
ity in “sweetening” the sound. Plus, the MU10 has two convenient A/
D INPUT jacks, allowing you to connect external audio sources
(such as a microphone, guitar, or CD player), and mix those sources
with the AWM2 Voices of the MU10.
Because of all the above, as well as its exceptionally portable size
and convenient battery/AC adaptor power supply, the MU10 is an
invaluable tool for all MIDI musicians and performers.

4
○○○○○○○○○○○○○○○○○○○○○○○○○○○○○○○○○○○○○○○○○○○○○○○
Welcome to the MU10.............................................................. 2
Unpacking.................................................................................... 3
How to Use This Manual ......................................................... 5
Precautions ................................................................................. 6
Panel Controls and Terminals................................................ 8
The MU10 — What It Is and What It Can Do ............................. 10
Setting Up Your MU10 ........................................................... 12
Power Supply .......................................................................... 12
Connections............................................................................. 14
●Connecting With a Computer ......................................... 14
Direct Connection.......................................................... 14
Connecting to a Computer With a MIDI Interface........ 16
●Connecting With a MIDI Device ..................................... 16
●Connecting to Audio Equipment ..................................... 17
Using the A/D INPUT Function............................................ 18
MU10 Overview and Features.............................................. 21
About MIDI ................................................................................ 24
Appendix
MIDI Data Format.................................................................... 25
XG Normal Voice List.............................................................. 42
TG300B Normal Voice List...................................................... 44
XG Drum Voice List................................................................. 46
TG300B Drum Voice List ........................................................ 48
Effect Type List........................................................................ 50
Effect Parameter List............................................................... 51
Effect Data Assign Table ......................................................... 54
Specifications........................................................................... 55
Troubleshooting ....................................................................... 56
MIDI Implementation Chart ..................................................... 58
Table of Contents

8
○○○○○○○○○○○○○○○○○○○○○○○○○○○○○○○○○○○○○○○○○○○○○○○
MIN MAXVOLUME LINE OUT/
PHONES
POWER
A/D INPUT
VOLUME
TONE GENERATOR
GENERAL
Panel Controls and Terminals
qPOWER lamp
Lights when power is turned on. Also, flashes to indicate reception of MIDI Note On
messages and System Exclusive data. Also, flashes slowly when battery power be-
comes too low for proper operation.
wA/D INPUT VOLUME controls (1, 2)
For control of the A/D INPUT audio level.
eLINE OUT/PHONES jack
For connection to a set of stereo headphones, or an external amplifier/speaker system
(stereo mini plug). (See page 17.)
rVOLUME control
Adjusts the overall volume of the MU10.
qw
e
r
Top Panel Side Panel

9
○○○○○○○○○○○○○○○○○○○○○○○○○○○○○○○○○○○○○○○○○○○○○○○
MIDI
POWER
DC IN
TO HOST
OUT IN
ON OFF
HOST SELECT
MIDI Mac
PC-2 PC-1
A/D INPUT
Panel Controls and Terminals
tA/D INPUT jacks (1, 2)
For connection of external audio sources, such as microphone, guitar, or CD player
(mono 1/4” plug). When using only one input source, be sure to connect it to the A/D
INPUT 1 jack. (See page 18.)
yMIDI OUT terminal
For connection to other MIDI devices, such as a MIDI keyboard or tone generator.
Used to relay data received via the TO HOST terminal.
uMIDI IN terminal
For connection to other MIDI devices, such as a MIDI keyboard, sequencer, or to a
computer via MIDI interface. When the HOST SELECT switch is set to MIDI, the
received data is sent to the internal tone generator. When the HOST SELECT switch is
set to PC-1, PC-2, or Mac, the received data is directly sent to the TO HOST terminal,
bypassing the internal tone generator. (See page 14 – 16.)
iHOST SELECT switch
For selecting the type of host computer, or (when set to MIDI) normal MIDI operation.
Available settings are: MIDI, PC-2 (IBM PC/AT and compatible computers), PC-1
(NEC PC 98 computers; for use in Japan), and Mac (Macintosh). (See page 15 – 16.)
oTO HOST terminal
For connection to a host compter. Use an appropriate serial interface cable according
to the type of host computer. (See page 15.)
!0 DC IN jack
For connection to a PA-3B, PA-1207 or equivalent AC power adaptor.
!1 POWER switch
For turning the power on and off. Turning the power on automatically sets the MU10
to the XG mode and initializes all settings and parameter values.
tyuio!0!1
Rear Panel

10
○○○○○○○○○○○○○○○○○○○○○○○○○○○○○○○○○○○○○○○○○○○○○○○
The MU10 — What It Is and What It Can Do
What It Is
The MU10 is a compact, highly portable MIDI tone generator, designed
especially for use with computers and MIDI music systems. Specifically, it
is a high-quality XG- and GM-compatible tone generator, with 676 Voices
and 21 drum Voices (percussion sets). The tone generator can be played
either from an external MIDI device (such as a keyboard or a sequencer) or a
computer. The MU10 also includes three independent digital effect sections
— with 11 types of Reverb, 11 types of Chorus, and 43 different Variation
effects — for enhancing the sound of the Voices.
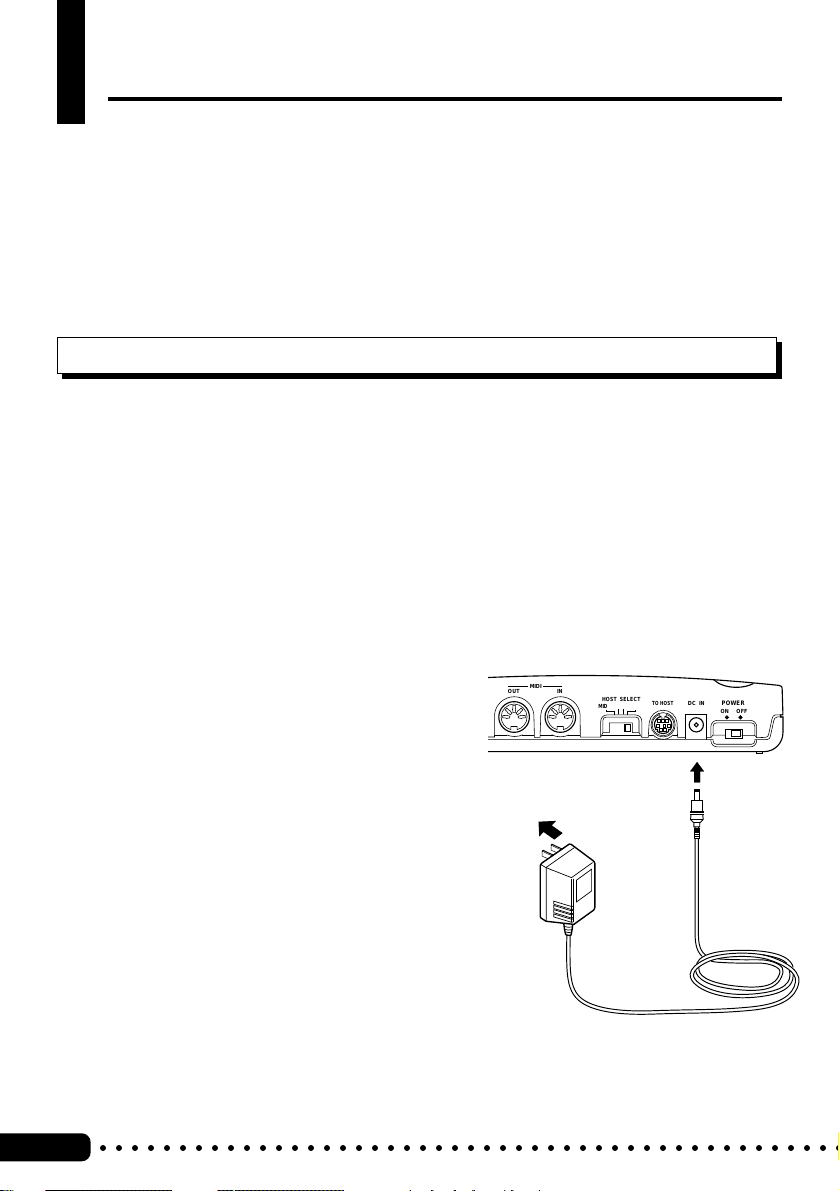
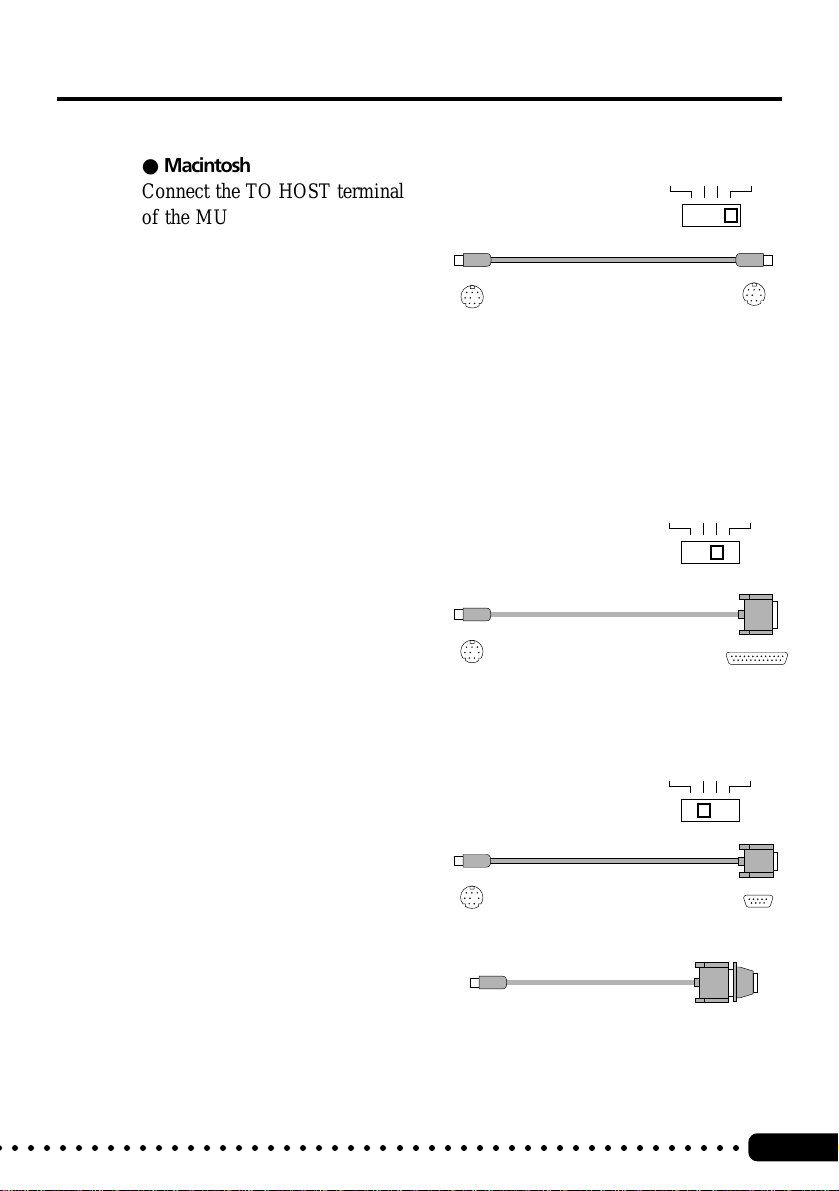
The MU10 features a built-in host computer interface, allowing you to
directly connect it to your Macintosh or IBM PC/AT (and compatible)
computer—eliminating the need of installing a special MIDI interface to your
computer. With the proper sequencing software on the computer, the MU10
can be used for both recording and playing back of sequencer data. The
internal tone generator also allows for comprehensive control over all Voice
and effect parameters — via incoming system exclusive messages, transmit-
ted from a sequencer or other MIDI device. (Refer to the MIDI Data Format
section on page 25 for details on controlling various MU10 parameters.)
The MU10 also features two convenient A/D INPUT jacks, allowing you to
connect external audio sources and mix those sources with the Voices.
Moreover, the built-in effects can be applied to the external sources as well
as the internal AWM2 Voices.
The MU10 is also the latest instrument in the Yamaha line to support the XG
format, a new addition to the General MIDI standard. In short, XG provides
for more instrument sounds and variations, and greater expressive control
over voices and effects.

11
○○○○○○○○○○○○○○○○○○○○○○○○○○○○○○○○○○○○○○○○○○○○○○○
The MU10 — What It Is and What It Can Do
What It Can Do
Here are a few application ideas on how you can use the MU10. The list
below is not comprehensive, but is meant to be a general guide to the
possibilities and provide a starting point or springboard for your own creative
ideas and explorations.
■Using in a MIDI Music System
Connect the MU10 to a computer with MIDI sequencing software, and
you’ve got comprehensive music making power—for recording, composing,
arranging, practicing, and editing. Combine it with a laptop computer, and
you’ve got a complete and portable music production system that’s ready to
go wherever you go. The built-in A/D Inputs let you connect an external
audio source (such as a microphone or guitar), allowing you to play along
with the MIDI tracks.
The MU10 is an ideal addition to larger MIDI studios as well, since it gives
you a high-quality 16-Part multi-timbral tone generator.
■Multimedia
Since it’s portable and compatible with the XG and General MIDI formats,
the MU10 is a natural for multimedia applications. Because of its portability
and great sound, it’s the only tone generator you’ll need for recording,
editing and playing back MIDI data on your multimedia creations.
■Using With a MIDI Keyboard in Live Performance
Simply connect the MU10 to a MIDI keyboard and play the dynamic Voices
in live performance situations. With the built-in A/D Inputs, you can even
use the MU10 as a simple 2-channel mixer. Bring a computer or MIDI data
player to your gig, and you can even mix another instrument (such as guitar
or bass) with the MIDI-driven Voices of the MU10.

12
○○○○○○○○○○○○○○○○○○○○○○○○○○○○○○○○○○○○○○○○○○○○○○○
MIDI
POWER
DC IN
TO HOST
OUT IN
ON OFF
HOST SELECT
MIDI Mac
PC-2 PC-1
Setting Up the MU10 in Your Music System
Whatever your system, you should follow the basic instructions in this section when
setting up your MU10. Use the example illustrations as a general guide when making
the connections with your own system.
Setting Up Your MU10
Power Supply
■Using a Power Adaptor
Connect one end of the power adaptor
(optional Yamaha PA-3B, PA-1207, or
equivalent) to the DC IN jack on the
rear panel, and the other end to a
suitable electrical outlet.
Your MU10 will run either from an optional AC adaptor or batteries. When-
ever possible, you should use the AC adaptor, since the MU10 runs only for
a short time on battery power (approximately two hours and twenty minutes
on alkaline batteries).
■
NOTE
●Before making any connections, make
sure that all equipment to be con-
nected is turned off.
■
CAUTION
●Do not attempt to use an AC adaptor
other than the PA-3B, PA-1207, or
equivalent. The use of an incompatible
adaptor may result in irreparable
damage to the MU10, and even pose a
serious shock hazard. (The recom-
mended power adaptor may vary,
depending on your location. Please
consult your nearest Yamaha dealer for
details.)
●Be sure to disconnect the power adaptor
from the outlet when the MU10 is not in
use for an extended period of time or
during electrical storms.
DC IN
Power
Adaptor

13
○○○○○○○○○○○○○○○○○○○○○○○○○○○○○○○○○○○○○○○○○○○○○○○
Setting Up Your MU10
■Using Batteries
To use the MU10 on battery power,
remove the battery compartment cover
(as shown at the right) and insert six
1.5V AA size (SUM-3, R-6 or equiva-
lent) manganese or alkaline batteries
in the battery compartment. Make
sure to follow the polarity indications
on the bottom case.
Securely replace the battery compart-
ment cover when finished installing
the batteries.
■When to Replace the Batteries
When the battery power runs too low to properly operate the MU10, the
POWER lamp will flash slowly. When this happens, replace all batteries
with a complete set of six new batteries of the same type.
■
CAUTION
●NEVER mix old and new batteries or different types of batteries! Also, to
prevent possible damage due to battery leakage, remove the batteries from the
instrument if it is not to be used for an extended period of time.
●The MU10 has no memory backup function. Turning the power off will auto-
matically initialize all settings and parameter values.

14
○○○○○○○○○○○○○○○○○○○○○○○○○○○○○○○○○○○○○○○○○○○○○○○
Setting Up Your MU10
Connections
In this section you’ll learn how to set up your MU10 with a computer or with
another MIDI device. You’ll also learn how to connect the MU10 with audio
equipment.
■Direct Connection
Whatever computer you use, the connections are basically the same. How-
ever, the cable you use and the HOST SELECT switch setting differ accord-
ing to the computer type. Other settings on the connected computer may be
required as well. (Refer to the owner’s manuals of your particular computer
and music software for more information.)
Connecting With a Computer
You can connect the MU10 with your computer in one of two ways: 1) direct
(computer port — TO HOST terminal), or 2) via MIDI interface.
■
CAUTION
●Turn off all devices before making connections.
MIDI OUT
MIDI Thru
(Echo back)
ON
Computer
(Sequencer software)
Since data received
via the TO HOST
terminal is relayed
to the MIDI OUT
terminal, you can
connect an external
tone generator to
the MIDI OUT
terminal like this.
External tone
generator
MIDI IN
MIDI OUTMIDI IN
MIDI Keyboard
Tone generator
TO HOST
Serial port
MU10

15
○○○○○○○○○○○○○○○○○○○○○○○○○○○○○○○○○○○○○○○○○○○○○○○
●Macintosh
Connect the TO HOST terminal
of the MU10 to the Modem (or
Printer) port of the computer
with an optional Apple Macin-
tosh peripheral cable (M0197),
then set the HOST SELECT
switch to Mac. Also, set the
MIDI interface clock to 1 MHz.
Setting Up Your MU10
●PC98
Connect the TO HOST terminal
of the MU10 to the serial port of
the PC98 computer with an
optional 8-pin MINI DIN to 25-
pin D-SUB cable, then set the
HOST SELECT switch to PC-1.
●IBM PC/AT and Compatibles
Connect the TO HOST terminal
of the MU10 to the serial port of
the IBM PC/AT (or compatible)
computer with an optional 8-pin
MINI DIN to 9-pin D-SUB
cable, then set the HOST
SELECT switch to PC-2.
If you use an 8-pin MINI DIN
to 25-pin D-SUB cable, connect
a 25-pin to 9-pin plug adaptor to
the D-SUB end of the cable.
Mac
mini DIN 8-pin mini DIN 8-pin
PC-1
D-SUB 25-pin
mini DIN 8-pin
PC-2
mini DIN 8-pin D-SUB 9-pin
mini DIN 8-pin
D-SUB 25-pin D-SUB 9-pin

16
○○○○○○○○○○○○○○○○○○○○○○○○○○○○○○○○○○○○○○○○○○○○○○○
MIDI
Setting Up Your MU10
■Connecting to a Computer With a MIDI Interface
Connect the MIDI IN terminal of the
MU10 with the MIDI OUT terminal
on the MIDI interface as shown at the
right, then set the HOST SELECT
switch to MIDI.
■
NOTE
●If you are using a Macintosh computer,
you may need to set the MIDI interface
clock to an appropriate value. (Refer to
the owner’s manual of your particular
music software.)
●When the HOST SELECT switch is set to
MIDI, data received via the TO HOST
terminal is ignored.
Connecting With a MIDI Device
■
NOTE
●MIDI channel 10 on the MU10 is
automatically set to play the drum
Voices.
MIDI
STOP CONTINUE START GM
ON SOUND
OFF XG
ON MERGE
ON/OFF 1 2 3 4 5 6 7 8 9 A B C D E F 0
TRANSPOSE
HEXA
DECIMAL DECIMAL
DCIN
OCTAVE
OCTAVESHIFT
OCTAVE
RESET
PITCH
ASSIGNABLE
IN MIDI OUT
ENTER
DRUM
NUMBER
NRPN
CONTROLLER
RPN
FIXED
VELOCITY
MIDI
CH
PROGRAM
CHANGE
BANK
SELECT
TEMPO
PROGRAM RESET SYSTEM WHEEL ASSIGNSEQUENCER
POWERON OFF
MIDI KEYBOARD CBX-K1
CONTROLLER NUMBER LIST
64 HOLD1(DAMPER)
65 PORTAMENTO
66 SOSTENUTO(CHORD HOLD)
67 SOFT PEDAL
69 HOLD2
71 HARMONIC CONTENT
72 RELEASE TIME
73 ATTACKTIME
74 BRIGHTNESS
84 PORTAMENTO CONTROL
91 REVERB DEPTH
92 TREMOLO DEPTH
93 CHORUS DEPTH
94 VARIATION DEPTH
95 PHASER DEPTH
122 COARSE TUNING
(NRPN)
(RPN)
120 PITCH BEND SENSITIVITY
121 FINE TUNING
123 VIBRATO RATE
124 VIBRATO DEPTH
125 VIBRATO DELAY
126 FILTER CUTOFF FREQUENCY
127 FILTER RESONANCE
128 EG ATTACK TIME
129 EG DECAY TIME
130 EG RELEASE TIME
131 DRUM FILTER CUTOFF FREQUENCY
132 DRUM FILTER RESONANCE
133 DRUM EG ATTACKTIME
134 DRUM EG DECAY TIME
135 DRUM PITCH COARSE
136 DRUM PITCH FINE
137 DRUM LEVEL
138 DRUM PAN
139 DRUM REVERB DEPTH
140 DRUM CHORUS DEPTH
141 DRUM VARIATION DEPTH
1 MODULATION DEPTH
5 PORTAMENTO TIME
6 DATA ENTRY
7 MAIN VOLUME
8 BALANCE CONTROL
10 PANPOT
11 EXPRESSION
CONTROL CHANGE 142 CHANNEL PRESSURE
143 KEY PRESSURE
144 MASTER VOLUME
145 MASTER BALANCE
146 MASTER TUNING
147 VELOCITY
148 TEMPO
OTHERS
SHIFT
HOST SELECT
Computer
(Sequencer
software)
MIDI
OUT MIDI
IN
MIDI
OUT
MIDI
IN
MU10
Tone generator
MIDI Keyboard
MIDI
Inter-
face
MIDI Thru
(Echo back)
ON
MIDI Keyboard
MIDI OUT
MIDI IN
HOST SELECT
MU10
Tone generator
Serial
port
The MU10 can be integrated into any
MIDI system in a variety of ways. In
the example connection shown at the
right, the MU10 is being played from a
MIDI keyboard. Connect the MIDI IN
terminal of the MU10 with the MIDI
OUT terminal on the MIDI keyboard,
set the HOST SELECT switch to
MIDI, and set the MIDI transmit
channel on the keyboard to the desired
value. (Refer to the owner’s manual of
that device for details.)

17
○○○○○○○○○○○○○○○○○○○○○○○○○○○○○○○○○○○○○○○○○○○○○○○
Setting Up Your MU10
Connecting to Audio Equipment
In order to hear the sounds of the MU10, you must connect it to a set of
stereo headphones or an amplifier/speaker system. Connect the headphones
or audio cable to the stereo mini jack on the side panel. The particular cable
that you use depends on your audio equipment. (In most cases this would be
a stereo mini/dual RCA-pin cable or a stereo mini/stereo mini cable.)
MIN MAXVOLUME LINE OUT/
PHONES
TONE VOLUME
LOW HIGH
POWER
ON/ OFF
TONE VOLUME
LOW HIGH
POWER
ON/ OFF
INPUT
Stereo mini
INPUT
Audio equipment
MIN MAXVOLUME LINE OUT/
PHONES
Stereo
mini
■
CAUTION
●After making connections, turn down the volume controls on all devices,
then turn on the power of each device in the following order:
1) External MIDI device or computer
2) MU10
3) Audio equipment
When turning off the power, simply reverse the order. This is done to
avoid damaging any of the equipment and connected speakers (as well as
your ears!).
Other manuals for MU10
2
Table of contents
Other Yamaha Recording Equipment manuals

Yamaha
Yamaha QY 300 User manual

Yamaha
Yamaha QX 21 User manual

Yamaha
Yamaha MW12 User manual

Yamaha
Yamaha VCJ5740 User manual

Yamaha
Yamaha TG300 User manual

Yamaha
Yamaha TX-7 Quick start guide

Yamaha
Yamaha CDR1000 User manual

Yamaha
Yamaha Audiogram 3 User manual

Yamaha
Yamaha QY10 User manual

Yamaha
Yamaha MW8cx User manual

Yamaha
Yamaha D5000 User manual

Yamaha
Yamaha CDR-D651 User manual

Yamaha
Yamaha EMP700 User manual

Yamaha
Yamaha DEQ5E User manual

Yamaha
Yamaha MDF1 User manual

Yamaha
Yamaha S Rev1 User manual

Yamaha
Yamaha TG-33 User manual

Yamaha
Yamaha QY 300 Instruction Manual

Yamaha
Yamaha DME24N Configuration guide

Yamaha
Yamaha NAI48-ES User manual