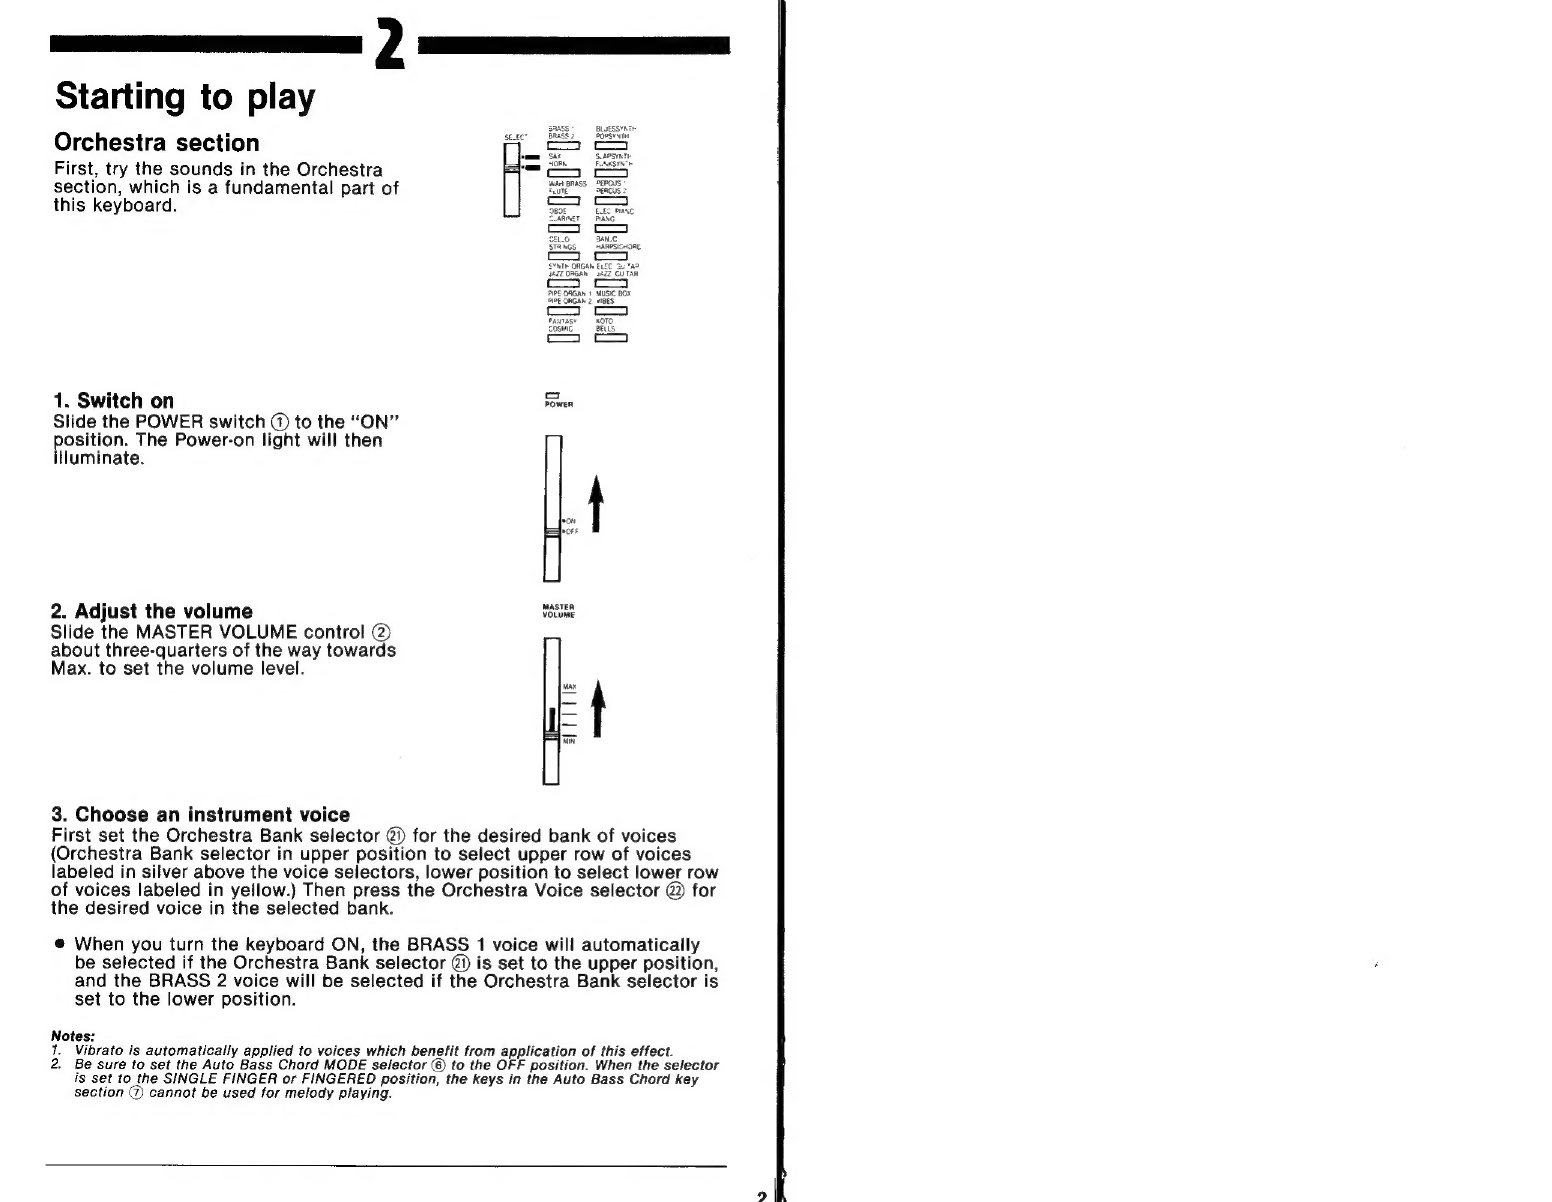
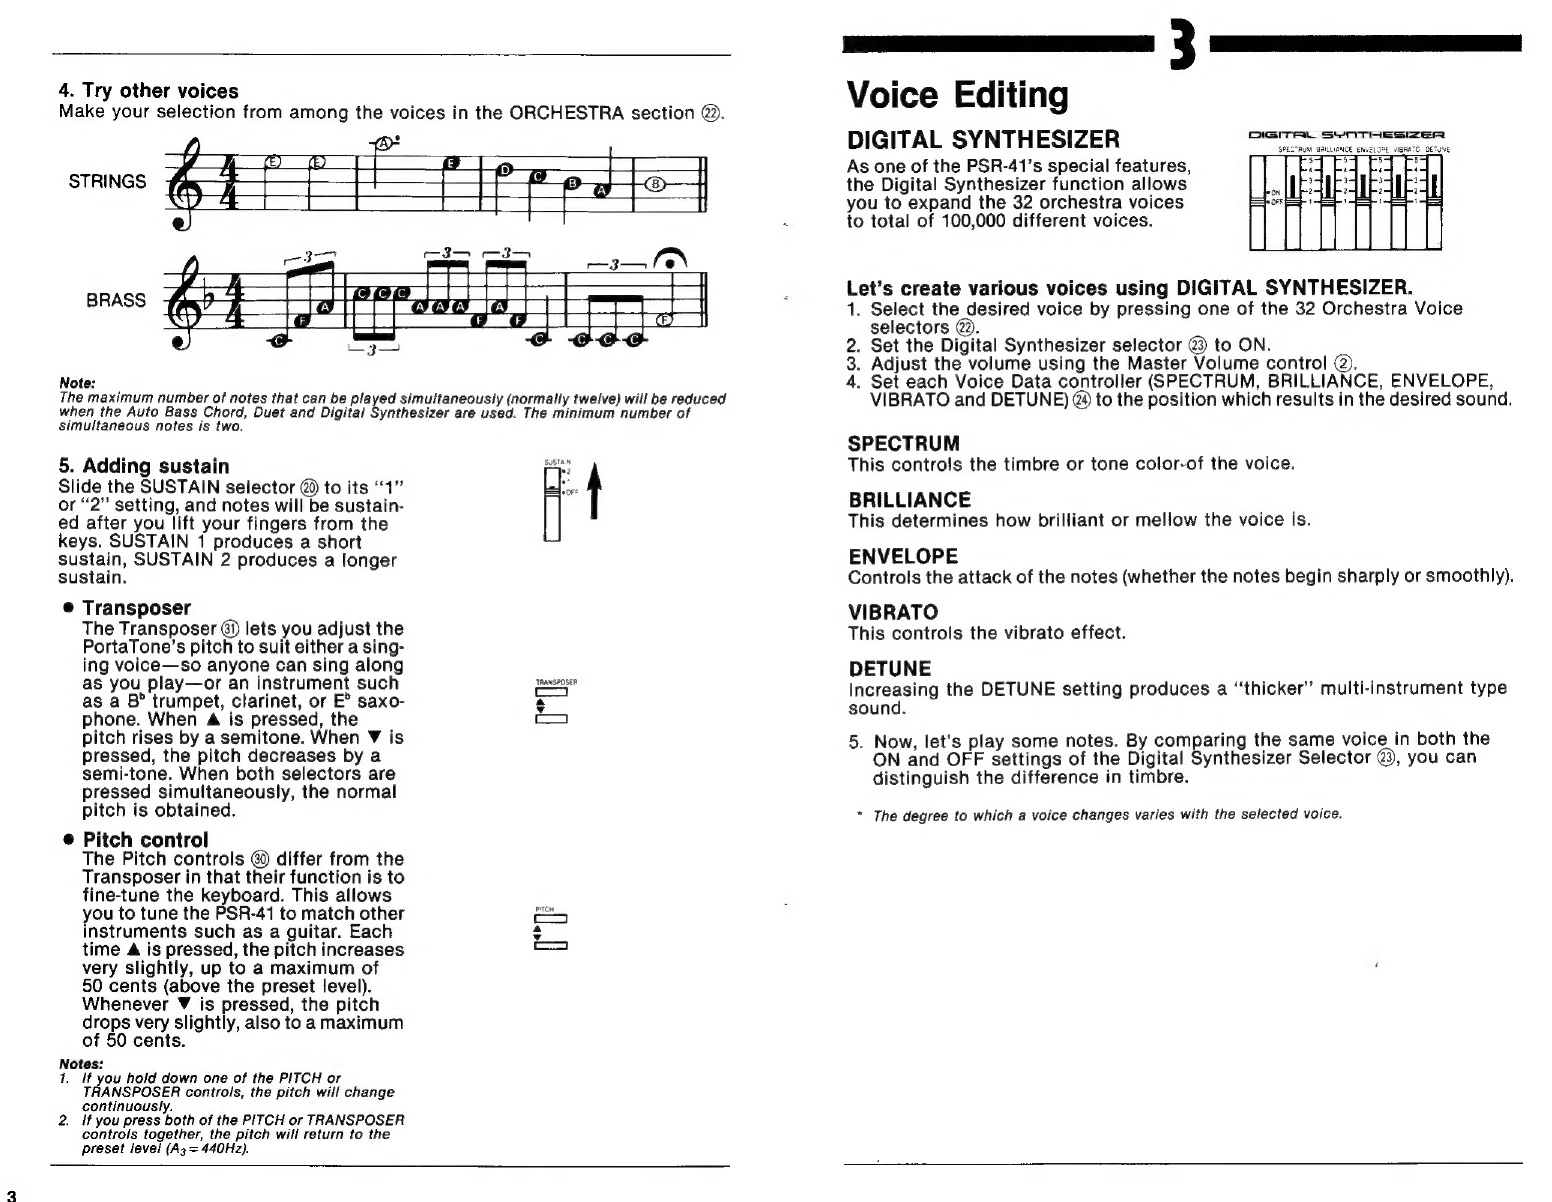
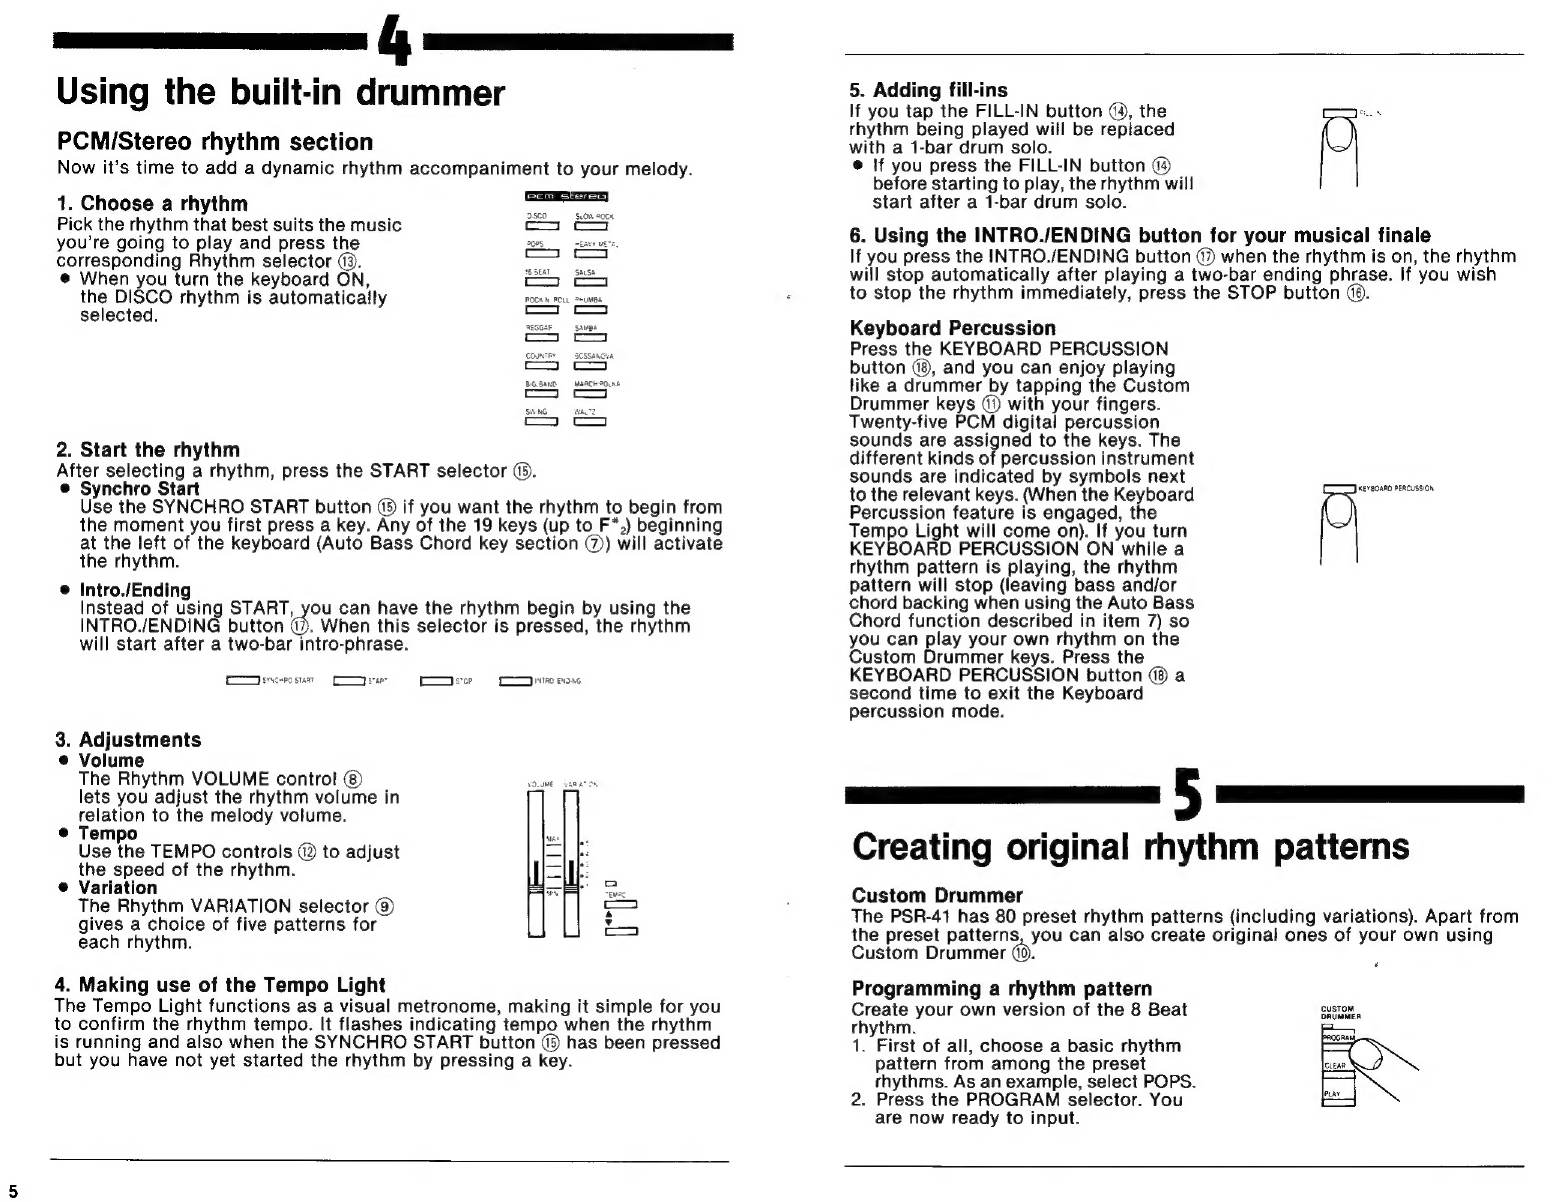
Yamaha PortaTone PSR-41 User manual

Congratulations!
Thank
you
for
purchasing
а
Yamaha
PortaTone
PSR-41.
This
PortaTone
is
an
ultra-modern
keyboard
with
a
design
based
on
the
|
latest
digital
electronics
technology
|
To
be
sure
you
get
maximum
satisfaction,
we
suggest
you
follow
the
|
steps
in
this
manual
carefully
while
actually
playing
the
instrument
YAMAHA
PORTATONE
Owner’s
Guide
Contents
Before
playing
1
1.
Nomenclature
—
zx
-
2.
Starting
to
Play
(Orchestra
Section)
2
3.
Voice
Editing
........
=
.
.
4
4.
Using
the
Built-in
Drummer
(PCM/Stereo
Rhythm
Section)
5
5.
Creating
Original
Rhythm
Patterns
(Custom
Drummer
A
6.
Adding
Accompaniment
(Auto
Bass
Chord
Section)
8
7.
2-Track
Recording
System
(Music
Programmer)
" :
11
8.
External
Jacks
т
3
9.
Optional
Accessories
4
10.
About
MID
5
11
Taking
Care
of
Your
PortaTone
:
»
á :
:
v"
...
16
12.
Specifications
17
YAMAHA

Before
playing
Inserting
Batteries
Optional
power
adaptors
Remove
the
battery
compartment
cover
on
the
bottom
of
the
instrument
and
Household
current:
Power
Adaptor
PA-4/PA-40
is
available
for
household
insert
six
1.5V
SUM-1,
"D"
size,
R-20,
or
equivalent
a/kaline
batteries
(sold
current.
No
other
adaptor
is
usable,
so
when
you
purchase
a
power
adaptor
separately),
making
sure
that
the
polarities
are
placed
as
directed
inside
please
ensure
that
it
is
model
PA-4/PA-40.
the
compartment.
Replace
the
cover,
ensuring
that
it
locks
securely
in
place.
Car
Battery:
Car
Battery
Adaptor
CA-1
plugs
into
a
car
cigarette
lighter
socket.
CIENCIA
sn
WE
]
|а
i
OE
аа
ee
Rd
Nomenclature
T
==
к.
==
+
|
|
|
|
|
|
|
@)
Power
Switch
(9)
Rhythm
Variation
Selector
(3
Intro./Ending
Button
Q9
Melody
Record
Button
(2)
Master
Volume
Control
(9
Custom
Drummer
Function
Selectors
(8
Keyboard
Percussion
Button
Q6
Melody
Play
Button
(3)
Auto
Bass
Chord
Volume
Control
(i)
Custom
Drummer
Key
Section
19
Duet
On/Off
Switch
@)
Chord
Record
Button
(4)
Bass
&
Chord
Variation
Selectors
(2
Tempo
Controls
$9
Sustain
Selector
@8)
Chord
Play
Button
(5)
Bass
&
Chord
Voice
Selectors
(3
Rhythm
Selectors
@)
Orchestra
Bank
Selector
09
MIDI
Button
(6)
Auto
Bass
Chord
Mode
Selector
(9
Fill-in
Button
$9
Orchestra
Voice
Selectors
Q9
Pitch
Controls
(7)
Auto
Bass
Chord
Key
Section
(9
Synchro
Start
and
Start
Buttons
$3
Digital
Synthesizer
Selector
7)
Transposer
(8)
Rhythm
Volume
Control
(9
Stop
Button
@)
Voice
Data
Controllers

a
RR
ree
ete
2
See
eee
eee)
Starting
to
play
Orchestra
section
First,
try
the
sounds
in
the
Orchestra
section,
which
is
a
fundamental
part
of
this
keyboard.
BLUESSNT+
OES
NTH
тузт.
ORGAN
JAZZ
ORGAN
PIPE
ORGAN
1
MUSIC
BOX
PIPE
ORGAN
2
vIBES
Fantasy
KOTO
COSMIC
BELLS
1.
Switch
on
Fowen
Slide
the
POWER
switch
(1)
to
the
“ON”
position.
The
Power-on
light
will
then
illuminate.
2.
Adjust
the
volume
pond
Slide
the
MASTER
VOLUME
control
(2)
about
three-quarters
of
the
way
towards
Max.
to
set
the
volume
level.
3.
Choose
an
instrument
voice
First
set
the
Orchestra
Bank
selector
@)
for
the
desired
bank
of
voices
(Orchestra
Bank
selector
in
upper
position
to
select
upper
row
of
voices
labeled
in
silver
above
the
voice
selectors,
lower
position
to
select
lower
row
of
voices
labeled
in
yellow.)
Then
press
the
Orchestra
Voice
selector
@2
for
the
desired
voice
in
the
selected
bank.
*
When
you
turn
the
keyboard
ON,
the
BRASS
1
voice
will
automaticaily
be
selected
if
the
Orchestra
Bank
selector
@i)
is
set
to
the
upper
position,
and
the
BRASS
2
voice
will
be
selected
if
the
Orchestra
Bank
selector
is
set
to
the
lower
position.
Notes:
1.
Vibrato
is
automatically
applied
to
voices
which
benefit
from
application
of
this
effect.
2.
Be
sure
to
set
the
Auto
Bass
Chord
MODE
selector
(6)
to
the
OFF
position.
When
the
selector
is
set
to
the
SINGLE
FINGER
or
FINGERED
position,
the
keys
in
the
Auto
Bass
Chord
key
section
@
cannot
be
used
for
melody
playing.

4.
Try
other
voices
Make
your
selection
from
among
the
voices
in
the
ORCHESTRA
section
G2.
me
GERE
Ia
8
—2—
ar
aa
fen
Note:
The
maximum
number
of
notes
that
can
be
played
simultaneously
(normally
twelve)
will
be
reduced
when
the
Auto
Bass
Chord,
Duet
and
Digital
Synthesizer
are
used.
The
minimum
number
of
simultaneous
notes
is
two.
Slide
the
SUSTAIN
selector
@
to
its
“1”
n
or
"2"
setting,
and
notes
will
be
sustain-
ed
after
you
lift
your
fingers
from
the
keys.
SUSTAIN
1
produces
a
short
sustain,
SUSTAIN
2
produces
a
longer
sustain.
е
Transposer
The
Transposer
6)
lets
you
adjust
the
PortaTone's
pitch
to
suit
either
a
sing-
ing
voice—so
anyone
can
sing
along
as
you
play—or
an
instrument
such
Хандан
as
a
B^
trumpet,
clarinet,
or
E^
saxo-
phone.
When
A
is
pressed,
the
pitch
rises
by
a
semitone.
When
Y
is
pressed,
the
pitch
decreases
by
a
semi-tone.
When
both
selectors
are
pressed
simultaneously,
the
normal
pitch
is
obtained.
*
Pitch
control
The
Pitch
controls
@
differ
from
the
Transposer
in
that
their
function
is
to
fine-tune
the
keyboard.
This
allows
you
to
tune
the
PSR-41
to
match
other
instruments
such
as
a
guitar.
Each
time
A
is
pressed,
the
pitch
increases
very
slightly,
up
to
a
maximum
of
50
cents
(above
the
preset
level).
Whenever
V
is
pressed,
the
pitch
drops
very
slightly,
also
to
a
maximum
of
50
cents.
Notes:
7.
If
you
hold
down
one
of
the
PITCH
or
TRANSPOSER
controls,
the
pitch
will
change
continuously.
2.
If
you
press
both
of
the
PITCH
or
TRANSPOSER
controls
together,
the
pitch
will
return
to
the
preset
level
(Аз
=
440Hz).
5.
Adding
sustain
p
|
Il
re
[ае
SSS
ere
3
Pier
ae
Уу
=
олыга
Ben
ee
сс
Voice
Editing
DIGITAL
SYNTHESIZER
As
one
of
the
PSR-41’s
special
features,
the
Digital
Synthesizer
function
allows
you
to
expand
the
32
orchestra
voices
to
total
of
100,000
different
voices.
OIGITAL
SYNTHESIZER
SPESTRUM
BALANCE
ENVELOPE
VIBRATC
OETUNE
$
Let's
create
various
voices
using
DIGITAL
SYNTHESIZER.
1.
Select
the
desired
voice
by
pressing
one
of
the
32
Orchestra
Voice
selectors
Q3.
.
Set the
Digital
Synthesizer
selector
@
to
ON.
.
Adjust
the
volume
using
the
Master
Volume
control
(2).
.
Set
each
Voice
Data
controller
(SPECTRUM,
BRILLIANCE,
ENVELOPE,
VIBRATO
and
DETUNE)
69
to
the
position
which
results
in
the
desired
sound.
PON
SPECTRUM
This
controls
the
timbre
or
tone
color-of
the
voice.
BRILLIANCE
This
determines
how
brilliant
or
mellow
the
voice
is.
ENVELOPE
Controls
the
attack
of
the
notes
(whether
the
notes
begin
sharply
or
smoothly).
VIBRATO
This
controls
the
vibrato
effect.
DETUNE
Increasing
the
DETUNE
setting
produces
a
“thicker”
multi-instrument
type
sound.
5.
Now,
let's
play
some
notes.
By
comparing
the
same
voice
in
both
the
ON
and
OFF
settings
of
the
Digital
Synthesizer
Selector
@,
you
can
distinguish
the
difference
in
timbre.
*
The
degree
to
which
a
voice
changes
varies
with
the
selected
voice.

кез»
a
DUREE
4
ee
Be
ETE
Using
the
built-in
drummer
PCM/Stereo
rhythm
section
Now
it’s
time
to
add
a
dynamic
rhythm
accompaniment
to
your
melody.
1.
Choose
a
rhythm
eee
nene
Pick
the
rhythm
that
best
suits
the
music
i176
you're
going
to
play
and
press
the
aps
corresponding
Rhythm
selector
(3.
=a
€
When
you
turn
the
keyboard
ON,
ER.
РЕ
the
DISCO
rhythm
is
automatically
кос
яси.
зрив
selected.
mE
—з
poo
GORGE
ардон
LJ.
Sa
БЕРТ.
watches
iio
qu
=
2.
Start
the
rhythm
After
selecting
a
rhythm,
press
the
START
selector
(19.
*
Synchro
Start
Use
the
SYNCHRO
START
button
(
if
you
want
the
rhythm
to
begin
from
the
moment
you
first
press
a
key.
Any
of
the
19
keys
(up
to
F*,)
beginning
al
tne
lent
of
the
keyboard
(Auto
Bass
Chord
key
section
(2)
will
activate
the
rhythm.
*
Intro./Ending
Instead
of
using
START,
you
can
have
the
rhythm
begin
by
using
the
INTRO./ENDING
button
@7.
When
this
selector
is
pressed,
the
rhythm
will
start
after
a
two-bar
intro-phrase.
Кнм
see
Ся
tees
3.
Adjustments
*
Volume
The
Rhythm
VOLUME
control
ана
а
lets
you
adjust
the
rhythm
volume
in
relation
to
the
melody
volume.
*
Tempo
ve
Use
the
TEMPO
controls
(2
to
adjust
=
the
speed
of
the
rhythm.
=
*
Variation
E
©
The
Rhythm
VARIATION
selector
@
>
gives
a
choice
of
five
patterns
for
Lt
each
rhythm.
4.
Making
use
of
the
Tempo
Light
The
Tempo
Light
functions
as
a
visual
metronome,
making
it
simple
for
you
to
confirm
the
rhythm
tempo.
It
flashes
indicating
tempo
when
the
rhythm
is
running
and
also
when
the
SYNCHRO
START
button
(9
has
been
pressed
but
you
have
not
yet
started
the
rhythm
by
pressing
a
key.
5.
Adding
fill-ins
If
you
tap
the
FILL-IN
button
(2,
the
ENDS
rhythm
being
played
will
be
replaced
with
a
1-bar
drum
solo.
€
if
you
press
the
FILL-IN
button
before
starting
to
play,
the
rhythm
will
start
after
a
1-bar
drum
solo.
6.
Using
the
INTRO./ENDING
button
for
your
musical
finale
If
you
press
the
INTRO./ENDING
button
@
when
the
rhythm
is
on,
the
rhythm
will
stop
automatically
after
playing
а
two-bar
ending
phrase.
If
you
wish
to
stop
the
rhythm
immediately,
press
the
STOP
button
11.
Keyboard
Percussion
Press
the
KEYBOARD
PERCUSSION
button
(à,
and
you
can
enjoy
playing
like
a
drummer
by
tapping
the
Custom
Drummer
keys
(17)
with
your
fingers.
Twenty-five
PCM
digital
percussion
sounds
are
assigned
to
the
keys.
The
different
kinds
of
percussion
instrument
sounds
are
indicated
by
symbols
next
to
the
relevant
keys.
(When
the
Keyboard
Percussion
feature
is
engaged,
the
Tempo
Light
will
come
on).
If
you
turn
KEYBOARD
PERCUSSION
ON
while
a
rhythm
pattern
is
playing,
the
rhythm
pattern
will
stop
(leaving
bass
and/or
chord
backing
when
using
the
Auto
Bass
Chord
function
described
in
item
7)
so
you
can
play
your
own
rhythm
on the
Custom
Drummer
keys.
Press
the
KEYBOARD
PERCUSSION
button
(8)
a
second
time
to
exit
the
Keyboard
percussion
mode.
KEYBOARD
PERCUSSION
[а=
узе
улы
ne
|
5
аа
Creating
original
rhythm
patterns
Custom
Drummer
The
PSR-41
has
80
preset
rhythm
patterns
(including
variations).
Apart
from
the
preset
patterns,
you
can
also
create
original
ones
of
your
own
using
Custom
Drummer
10.
\
Programming
a
rhythm
pattern
Create
your
own
version
of
the
8
Beat
custom
rhythm.
E
1.
First
of
all,
choose
a
basic
rhythm
pattern
from
among
the
preset
rhythms.
As
an
example,
select
POPS.
2.
Press
the
PROGRAM
selector.
You
are
now
ready
to
input.

Try
writing
the
following
rhythm
patterns:
BASS
DRUM
4»4—
DO
ww?
Qe
|
SNARE
DRUM
g
J
tlo
J»
fie,
CLOSED
HI-HAT
ВЕНЕ,
ОРЕМ
HI-HAT
=
UT
44
ACCENT
Б
м$:
Е
Е
ЗШЕ
Е
CD
>
3.
Press
the
CLEAR
selector
and
the
BRUMMER
preset
POPS
is
cancelled,
leaving
only
the
sound
of
the
beat
count.
4.
Input
the
bass
drum
pattern
by
tapping
the
key
indicated
by
the
9
figure.
5.
The
same
procedure
is
required
for
inputting
snare
drum,
closed
hi-hat,
and
open
hi-hat.
You
can
add
an
accent
(slightly
higher
volume
level)
to
the
timing
you
want
by
tapping
the
>
key
(В.).
6.
If
you
make
an
error,
cancel
it
by
pressing
the
relevant
percussion
key
together
with
the
CANCEL
key
(C;).
The
input
that
percussion
instrument
again.
CANCEL
Key
7.
When
your
original
pattern
is
completed,
press
the
STOP
button
(6
or
PROGRAM
button
again.
*
In
procedure
3,
if
you
do
not
want
to
erase
all
of
the
percussion
sounds,
you
can
use
the
CANCEL
key
(C,)
and
individual
percussion
keys
to
Selectively
erase.
8.
Now,
playback
what
you
have
programmed
by
pressing
the
PLAY
selector.
Try
other
rhythm
patterns
as
shown
below:
MARCHING
DRUM
(set
to
MARCH/POLKA)
SNARE
DRUM
ГЭД
2,7
FRO
OPEN
HI-HAT
==
=
=
fe
hy
Notes:
1.
When
you
play
back
a
customized
rhythm,
the
Auto
Bass
Chord
feature
can
be
used
in
the
same
way
as
with
a
preset
rhythm.
2.
The
total
number
of
percussion
voices
that
can
be
used
for
one
pattern
amounts
to
8.
3.
When
the
power
is
OFF,
the
data
that
you
input
will
be
erased
automatically.
6
aC
ms
SEMEN
Adding
accompaniment
AUTO
BASS
CHORD
Auto
Bass
Chord
section
MP
ы
coi
оч
HUME
BASS
070406
SASS
CHORD
чо
t
k:
onma
|
Bee:
TN
sen
music
e
STRINGS
=
тв
T
QA
еси
Tak
|
|е
Мамо.
l.c
265s
+f (е
оесач
|e
FINGERED
84552
ee
eano
PESSE
mass
>
|
siano
з
6
n
мах
'
[zy
The
Auto
Bass
Chord
section
is
an
automatic
accompaniment
feature.
it
the
MODE
selector
©
is
set
to
OFF,
the
Auto
Bass
Chord
system
does
not
unction.
With
the
SINGLE
FINGER
position
selected,
you
can
play
chords
plus
bass
notes
with
just
one
finger
when
you
press
any
of
the
keys
in
the
Auto
Bass
Chord
key
section
(2).
The
FINGERED
position
is
suitable
for
you
if
you
already
know
how
to
play
chords
since
it
lets
you
play
your
own
chords
and
still
get
the
bass
accompaniment.
For
one-fingered
accompaniment
1.
Slide
the
selector
to
the
SINGLE
FINGER
position.
2.
Select
a
rhythm
Choose
the
rhythm
you
want
then
press
the
SYNCHRO
START
or
START
button
@®.
(Don't
forget
to
do
this
whenever
you
use
the
Auto
Bass
Chord
feature).
3.
Press
a
key
Press
one
of
the
19
keys
in
the
Auto
Bass
Chord
key
section
(7)
on
the
left
side
of
the
keyboard.
C|D|EÍIFIGIA|B|C|D|
E|F
с!
E
Auto
Bass
Chord
key
section

You
will
hear
the
corresponding
chord
with
bass
and
rhythm
accompaniment.
For
instance,
when
you
press
“С,”
you'll
obtain
a
C
major
chord
that
plays
along
with
the
bass
and
rhythm.
C
G
F
|
|
i
|
!
4.
Set
the
volume
Adjust
the
volume
to
suit
the
overall
level
using
the
Auto
Bass
Chord
VOLUME
control
(3).
5.
Set
the
tempo
Set
the
tempo
you
want
using
the
TEMPO
controls
(2
in
the
Rhythm
section.
6.
Select
a
variation
combination
Using
the
BASS
and
CHORD
VARIATION
selectors
(2),
choose
the
bass
and
chord
pattern
combination
most
suitable
for
the
kind
of
music
you
want
to
play.
e
Moving
the
CHORD
VARIATION
selector
to
position
No.
8
cancels
the
chord
accompaniment,
leaving
only
the
bass
line
and
percussion.
You
can
then
play
your
own
chords
in
the
normal
way.
111}
7.
Select
the
bass
and
chord
voices
Enjoy
selecting
different
bass
and
chord
voices
using
the
BASS
and
CHORD
VOICE
selectors
©)
to
suit
the
music.
8.
To
stop
the
Auto
Bass
Chord
accompaniment
Press
the
STOP
button
in
the
Rhythm
section.
Obtaining
minor,
seventh,
and
minor
seventh
chords
in
Single
Finger
mode.
*
To
get
e
minor
chord
depress
the
C
key
together
with
the
next
black
key
to
the
left.
©
To
get
a
C
seventh
chord
depress
the
C
key
together
with
the
next
white
key
to
the
left.
*
To
get
a
C
minor
seventh
chord,
simply
press
the
C
key
together
with
the
black
key
and
white
key
to
the
left.
Cm
C,
Cm,
(
For
automatic
accompaniment
based
on
three-note
or
four-note
chords
1.
Slide
the
selector
to
the
FINGERED
position.
2.
When
a
combination
of
keys
located
in
the
Auto
Bass
Chord
key
section
(7)
is
pressed,
the
resulting
chord
will
be
played
together
with
the
automatic
accompaniment
consisting
of
the
bass
line
and
the
selected
rhythm.
———AUTO
BASS
CHORD
—á4
.
|
——
AUTO
BASS
CHORD
—,
m
AUTO
BASS
CHORD
——
A
MEI
ТЇШ
C
chord
G
chord
F
chord
Note:
The
chord
accompaniment
selected
by
chord
variation
selectors
6
and
7
include
arpeggio
patterns.
The
arpeggio
patterns
are
only
produced,
however,
when
major,
minor,
dominant
seventh
or
minor
seventh
chords
are
played.
*
Adding
harmony
to
the
melody
(DUET)
This
function
works
together
with
the
SINGLE
FINGER
or
FINGERED
г
feature
in
the
Auto
Bass
Chord
ВМ
section.
Slide
the
DUET
on/off
switch
to
ON,
and
a
harmonizing
note
(taken
from
your
left
hand
chord)
will
be
added
to
each
melody
note
you
play.
Advanced
course
1:
Manual
Bass
accompaniment
1.
Slide
the
MODE
selector
©
to
the
MANUAL
BASS
position.
2.
Play
your
own
bass
line
using
the
keys
in
the
Auto
Bass
Chord
key
section
(7).
Note:
You
can
play
only
one
note
at
a
time
in
the
Auto
Bass
Chord
key
section
when
using
this
function.
Advanced
course
2:
Keyboard
split
If
you
set
the
Auto
Bass
Chord
MODE
selector
(6)
to
the
KEYBOARD
SPLIT
position,
the
auto
accompaniment
will
be
cancelled,
enabling
you
to
play
the
19
keys
in
the
Auto
Bass
Chord
key
section
using
any
of
the
CHORD
voices.
This
means
that
you
can
play
with
different
voices
for
your
left
and
right
hands.
Choose
the
left-hand
voice
by
means
of
the
CHORD
VOICE
selector
(5).
Note:
You
can
play
up
to
four
notes
at
the
same
time
in
the
Auto
Bass
Chord
key
section
when
using
this
function.

Rae
GONE
E
EI
7
ieee
2-track
Recording
System
MUSIC
PROGRAMMER
E
MELODY
RECORD
лт
са
снов
RECORD
Ри"
Миѕіс
Ргодгаттег
About
the
Music
Programmer
With
this
feature
you
can
have
the
keyboard
store
the
chords
and
melody
that
you
play
in
its
memory.
Then
you
can
have
them
played
back
in
any
tempo
you
like.
The
main
advantages
are:
1.
After
storing
the
chord
progression
and
rhythm
pattern
in
the
memory,
you
can
have
them
played
back
automatically
to
accompany
you
while
you
concentrate
on
practicing
your
melody
performances
or
improvisations.
2.
Besides
having
the
above
benefit,
the
PSR-41
lets
you
store
a
melody
line
independently
as
in
a
2-track
recording
studio.
The
two
tracks
can
then
be
played
back
together,
making
possible
a
truly
professional
sound.
€
Memorized
data
is
automatically
cleared
and
replaced
by
new
data
when
music
is
played
with
the
Record
mode
selected.
e
The
following
data
are
not
memorized:
Volume,
Tempo,
Transposer,
Pitch,
MIDI
Mode,
Custom
Drummer,
Keyboard
Percussion
and
Expression
Pedal.
Note:
When
the
power
is
OFF,
the
data
that
you
input
will
be
erased
automatically.
This
owner's
guide
shows
how
to
use
the
memory
system
using
“Greensleeves”
as
an
example.
Step
1
Chord
Programming
A.
Chord
recording
1.
Depress
the
CHORD
RECORD
button
@
in
the
Music
Programmer
section.
RUE
par
2.
Try
storing
the
accompaniment
for
“Greensleeves”.
First,
select
WALTZ
in
the
Rhythm
section,
and
then
play
the
following
chord
sequence
together
with
the
rhythm:
(using
the
Auto
Bass
Chord
key
section
(7)
Am
—
D
—
G
—
Em
—
Am
—
E;
—
Am
—
Am
D
G
Em
E
Am
Single
Finger
4
Н
О
Chord
i
Fingered
|
|
|
|
Chord
Н
imm
ии
ш
Note:
The
accompaniment
can
be
played
using
either
the
Single
Finger
or
Fingered
mode
of
the
Auto
Bass
Chord
section.
However,
the
Single
Finger
mode
is
automatically
engaged
when
you
press
the
CHORD
RECORD
button
@
except
when
using
the
Fingered
mode
beforehand
(see
page
9
for
instructions
on
Single
Finger
and
for
Fingered).
3.
When
all
of
the
chords
have
been
programmed,
press
the
STOP
button
or
CHORD
RECORD
button
@)
again.
The
accompaniment
has
now
been
stored
in
the
memory.
B.
Chord
playback
The
memorized
accompaniment
can
be
played
back,
unless
you
cancel
the
memory
contents
by
inputting
a
different
chord
sequence.
mST
р
1.
Press
the
CHORD
PLAY
button
@.
кез
кч
MUSIC
PROGRAMMER
сос
ЭПР)
р
2.
То
start
playback,
press
the
START
botton
@
or
any
key
on
the
keyboard.
Costar
3.
Try
playing
the
melody
of
“Greensleeves”
to
the
accompaniment
playback
(see
below).
4.
Playback
can
be
stopped
at
any
time
by
pressing
the
STOP
button
11.
Step
2
Programming
of
melody
A.
Melody
recording
Music
PROGRAMMER
With
the
accompaniment
of
“Огееп-
само,
sleeves"
stored
in
the
memory,
you
сап
Е
now
record
the
melody.
1.
Press
the
MELODY
RECORD
button
О.
pay
Q5
келел
.
If
you
want
to
listen
to
the
stored
accompaniment
while
you
play
the
melody,
also
press
the
CHORD
PLAY
button
@.
2.
Select
the
voice
you
want
using
the
Orchestra
voice
selectors.
As
an
example,
select
the
FLUTE
voice.
3.
Play
the
melody.
Since
recording
begins
as
soon
as
the
melody
is
started,
you
are
free
to
commence
playing
when
the
timing
feels
right
for
you.
Melody
ааа
Argi
НЫ
Н
4.
When
you
have
finished
playing
the
melody,
Press
the
STOP
button
48
or
MELODY
RECORD
button
@)
again.
Note:
When
the
Music
Programmer
is
used,
the
Orchestra
becomes
four-note
polyphonic
at
maximum.
However
if
you
use
DUET
or
the
DIGITAL
SYNTHESIZER,
the
number
of
notes
audible
at
one
ime
decreases.

42
B.
Music
playback
MUSIC
PROGRAMMER
Now
you
can
simultaneously
play
back
mue
the
memorized
accompaniment
and
oe
аан
melody
for
“Greensleeves”.
1.
Press
the
MELODY
PLAY
button
зе
and
CHORD
PLAY
button
@.
ER,
Сз
а
2.
Tap
the
START
button
@®,
any
key
on
the
keyboard
or
the
INTRO./ENDING
button
@
to
start
playback.
The
music
you
can
hear
would
have
been
impossible
without
the
aid
of
the
Music
Programmer.
START
Notes:
1.
The
voices
and
rhythm
can
be
changed
if
desired.
However,
it
is
not
recommended
to
change
from
the
Waltz
rhythm
which
has
a
3/4
measure
to
a
rhythm
with
a
4/4
measure.
2.
Playback
can
be
stopped
at
any
time
by
pressing
the
STOP
button
®©.
Capacity
of
Music
Programmer
ө
About
100
chord
changes
and
240
melody
notes
can
be
recorded.
*
If
complicated
chords
are
recorded
by
using
Fingered
Chord,
the
chord
recording
capacity
will
be
reduced.
ө
If
the
number
of
chords
or
melody
notes
exceeds
the
memory
capacity,
recording
will
stop
automatically.
External
jacks
Several
jacks
are
provided
at
the
back
of
the
keyboard
for
connecting
a
variety
of
optional
accessories.
There
is
also
a
—$9—-
headphone
jack
at
the
front.
5
R
+
EXP.
PEDAL
AUX.
Ойт
ОС
(9-12V)
IN
A.
External
power
source
jack
(DC
9-12V
IN)
*
AC
power
Connect
the
optional
AC
Power
Adaptor
PA-4/PA-40
to
the
DC
9-12V
IN
jack.
*
Car
battery
The
Car
Battery
Adaptor
CA-1
plugs
into
the
DC
9-12V
IN
jack
and
a
cigarette
lighter
socket.
B.
Aux
Out
jacks
(L
&
R)
You
can
channel
sound
through
your
stereo
system
using
these
jacks.
Use
the
optional
connecting
cord
PSC-3.
*
Impedance:
6000
e
Output
level:
—7+3dBm
(7
notes
sounding
simultaneously
at
maximum
volume
with
Jazz
Organ
voice)
Note:
These
jacks
were
designed
to
accommodate
the
most
commonly
used
impedances.
Significant
deviation
from
these
specifications
will
result
in
inadequate
drive,
distortion,
noise,
and
poor
performance
in
general.
C.
Expression
pedal
jack
The
EXP.PEDAL
jack
is
for
connecting
the
Expression
Pedal
EP-1,
which
lets
you
control
the
overall
volume
level
using
your
foot.
D.
Headphone
Jack
(Below
left
end
of
keyboard.)
Connect
a
set
of
headphones
to
this
jack
and
you
can
practice
without
disturbing
others.
чоюш
ол
E.
MIDI
Jacks
(IN
&
OUT)
Refer
to
page
15
for
details
concerning
MIDI.
n
()
Optional
accessories
*
AC
Power
Adaptor
(PA-4/PA-40)
Transforms
AC
voltage
to
DC
voltage.
*
Car
Battery
Adaptor
(CA-1)
Enables
you
to
provide
power
to
the
instrument
from
a
car
battery
using
the
cigarette
lighter
socket.
€
Soft
Carrying
Case
(SCC-12)
For
convenient
transportation.
*
Headphones
(HPE-3/5)
Specially
designed
lightweight
dynamic
headphones
with
extra-soft
ear
pads.
*
Connecting
Cable
(PSC-3)
For
connecting
the
keyboard
to
a
stereo
hi-fi
system
or
cassette
tape
deck.
*
Keyboard
Stand
(L-2/4)
*
Expression
Pedal
(EP-1)
Lets
you
add
more
feeling
to
music
by
enabling
subtle
control
of
the
overall
volume
level.
е
Bench
(BC-6)
Some
optional
accessories
may
not
be
available
in
every
region.
4

15
About
MIDI
MIDI
is
an
acronym
standing
for
Musical
Instrument
Digital
Interface,
which
is
a
standard
interface
for
communication
between
keyboards
and
other
music
devices.
The
PortaTone
PSR-41
is
equipped
with
MIDI
jacks
(IN
and
OUT),
enabling
connection
of
the
PortaTone
to
another
keyboard
equipped
with
MIDI
jacks
or
an
expander
module,
for
synchronized
performances.
(Example)
l
MIDI
OUT
Y
MIDI
IN
PSR-41
Another
keyboard
equipped
with
MIDI
jacks
*
When
the
power
is
turned
on,
the
mode
is:
LOCAL
ON,
OMNI
ON,
POLY.
*
Data
to
be
sent/received
in
normal
mode
e
Key
ON/OFF
•
Orchestra
voice
change
e
Orchestra
sustain
*
MIDI
Functions
The
PSR-41
is
equipped
with
6
MIDI
functions.
These
functions
are
selected
by
pressing
the
Orchestra
Voice
Selector
shown
in
the
table
below
while
pressing
the
MIDI
button
Q3.
Table
of
MIDI
Functions
To
select
MIDI
functions,
press
the
appropriate
Orchestra.
Voice
selector
(as
shown
below)
while
holding
the
MIDI
button.
кк
Se
2
тҗ
:
Send
CH
Select
[|
:
SAX
i
SLAPSYNTH
HORN
і
FUNKSYNTH
Receive
CH
Select
|
WAH
BRASS
PERCUS
1
Li
Split
Send
Mode
Program
Change
[
OFF
)
Clock
Select
MIDI
ыт
ro
эт
э
Nm
BE
Em
9
RS
|x|
zz
zo
3
35
$
8
eo
12125
S
5
se
[чс
E
ө
zx
$
$
= 8
Local
ON/OFF
PIPE
ORGAN
1
MUSIC
BOX
Е
АМ
2
VIBES
І
|
FANTASY
кото
o
fey
a
=
©
|
т
т =
o
1&2.
Selecting
MIDI
Channels
While
holding
the
MIDI
button
@,
press
BRASS
1/BRASS
2
(send
channel)
or
SAXIHORN
(receive
channel)
and
then
press
one
of
the
black
or
white
keys
on
the
left
of
the
keyboard
to
designate
the
channel
(CH1
through
CH16
from
left).
сн CH сн
CM
CM CH CH
2
4
7
9
т
1
16
Er
key
from
the
left
Note:
The
OMNI
ON
Mode
is
selected
by
pressing
the
17th
key
from
the
left
while
pressing
the
MIDI
button
G3.
3.
Split
Send
Mode
When
this
mode
is
selected,
only
the
Key
On
data
for
keys
to
the
left
of
the
split
point
(w)
is
sent
on
the
designated
channel
(fixed
at
CH2)
when
SINGLE
FINGER,
FINGERED,
MANUAL
BASS,
or
KEYBOARD
SPLIT
mode
is
selected.
4.
Program
Change
Off
This
is
used
to
cancel
the
sending
and
reception
of
voice
select
and
rhythm
select
information
(program
changes)
from
an
external
device.
5.
MIDI
Clock
Select
This
is
used
for
synchronization
with
the
timing
clock
of
an
external
device.
6.
Local
Off
This
is
used
to
cancel
the
melody
sounds
of
the
PSR-41.
(Rhythm
and
Auto
Bass
Chord
cannot
be
turned
off.
The
Rhythm
and
Auto
Bass
Chord
sounds
can
be
eliminated
by
setting
their
volumes
to
MIN.)
Taking
care
of
your
PortaTone
Your
PortaTone
will
remain
in
excellent
playing
condition
if
care
is
taken
concerning
the
following.
1.
When
you
use
AC
power,
be
sure
to
use
the
optional
AC
Power
PA-4/
PA-40
adaptor.
Before
use,
read
the
adaptor
instructions
carefully.
In
particular,
please
note
that
in
some
cases
the
PA-4/PA-40
is
provided
with
a
voltage
selector,
so
confirm
that
this
selector
is
correctly
set.
2.
The
optional
car
battery
adaptor
CA-1
is
only
for
use
with
a
negative
ground
12V
battery.
Ensure
that
this
is
the
case
before
connecting
the
adaptor.
3.
Connections
made
between
the
PortaTone
and
any
other
device
should
be
made
with
both
units
turned
off.
4.
Do
not
set
the
MASTER
VOLUME
at
MAX
when
you
connect
the
PortaTone
to
a
stereo
system.
Use
the
stereo
system's
volume
control
to
adjust
the
sound
level.

on
it.
ON
oco
.
Avoid
placing
the
instrument
in
excessively
humid
areas.
.
ро
пої
subject
the
unit
to
physical
shock,
and
avoid
placing
anything
heavy
-
The
PortaTone
should
not
be
placed
in
direct
sunlight
for
a
long
time.
.
Do
not
place
the
instrument
near
any
heating
appliance,
or
leave
it
inside
acar
in
direct
sunlight
for
any
length
of
time.
Direct
sunshine
can
raise
the
interior
temperature
of
a
car
with
closed
doors
and
windows
to
as
high
as
80°С.
Temperatures
in
excess
of
60°С
can
cause
physical
and/or
electrical
damage
not
covered
by
warranty.
9.
Use
a
dry
or
damp
cloth
for
cleaning.
10.
When
you
aren't
using
the
PortaTone,
we
recommend
keeping
it
in
the
case
to
protect
it.
Specifications
Keyboard
61
keys
(C,—C,)
Orchestra
Voices
(Upper
Bank/Lower
Bank)
Brass
1/Brass
2,
Sax/Horn,
Wah
Brass/
Flute,
Oboe/Clarinet,
Cello/Strings,
Synth
Organ/Jazz
Organ,
Pipe
Organ
1/Pipe
Organ
2,
Fantasy/Cosmic,
Bluessynth/
Popsynth,
Slapsynth/Funksynth,
Percus
1/
Percus
2,
Elec.
Piano/Piano,
Banjo/
Harpsichord,
Elec.
Guitar/Jazz
Guitar,
Music
Box/Vibes,
Koto/Bells
Effects
Duet,
Sustain
(1,
2)
Digital
Synthsizer
Section
Spectrum
(1—5),
Brilliance
(1—5),
Envelope
(1—5),
Vibrato
(1—5),
Detune
(1—5),
On/Off
Rhythm
Section
Disco,
Pops,
16
Beat,
Rock'n'
Roll,
Reggae,
Country,
Big
Band,
Swing,
S'ow
Rock,
Heavy
Metal,
Salsa,
Rhumba,
Samba,
Bossanova,
March/Polka,
Waltz
Controls:
Tempo,
Volume,
Variation
(1—8),
Synchro
Start,
Start,
Stop,
Intro./Ending,
Fill-In,
Tempo
Light
Custom
Drummer:
Program,
Clear,
Play
Keyboard
Percussion:
11
Latin
Percussions,
13
Drum
Percussions,
Hand
Clap,
Accent,
Cancel
Auto
Bass
Cord
Section
Mode
Selector:
Single
Finger,
Fingered,
Manual
Bass,
Keyboard
Split,
Off
Chord
Voices:
Piano,
E.
Piano,
Organ,
Guitar,
Brass,
Strings,
Synth
1,
Synth
2
Bass
Voices:
Bass
1,
Bass
2,
E.
Bass
1,
E.
Bass
2,
Tuba,
Music
Box,
Synth
1,
Synth
2
Chord
Variation:
1,
2, 3,
4,
5,
6,
7,
8
Bass
Variation:
1,
2, 3,
4, 5,
6,
7,
8
Control:
Volume
Music
Programmer
Section
Melody
Record,
Melody
Play,
Chord
Record,
Chord
Play,
Melody
Light,
Chord
Light
Transposer
1/2
octave
up
and
down
Pitch
Control
+50
cents
Other
Controls
and
Indicators
Power
Switch,
Power-on
Light,
Master
Volume,
MIDI
Auxiliary
Jacks
Headphones,
Expression
Pedal,
MIDI
IN,
MID!
OUT,
Aux
Out
(L/R),
DC9—
12V
IN
Main
Amplifier
5W
x
2
(RMS)
Speaker
12cm
(4-3/4")
x
2
Rated
Voltage
DC9V
(Six
SUM-1,
"D"
size,
R-20
or
equivalent
batteries),
AC
Power
Adaptor
(PA-4/PA-40)
or
Car
Battery
Adaptor
(CA-1)
Dimensions
(М
x
Dx
Н)
913mm
x
331mm
x
96mm
(36"
x
13"
x
3-3/4")
Weight
6.6kg
(14.6
Ibs.)
Specifications
are
subject
to
change
without
notice.

[
Portatone
]
Date
:
12/09
1987
Model
PSR-4t
MIDI
Implementation
Chart
Version
:
1.0
+
-
—
—
—
—
—
—
———————
oo
o———————————————————————————————————————
=
чт
сєз
чт
тш
шт
сш
==
сез
шт
ew
шт
=
:
Transmitted
:
Recongnized
Remarks
Function
:
{-------------------
+---------------- +----------------
+----------------
:Basic
Default
SN
:
1
:Channel
Changed
:
1-16
:
1-16
:=------------------
+---------------- +----------------
+----------------
:
Default
3
&
:
Mode
Messages
:
X
:
OMNion.-
OMNI
off
:
;
:
POLY-MONO(M=1)
:=------------------
*$----------------
+----------------
+----------------
:
Note
:
30-102
:
36-96
Number
True
voice:
ЖЖЖЖЖЖЖЖЖЖЖЖЖЖ
:
36-96
1{-------------------
+----------------
+----------------
+----------------
:Velocity
Note
on
:
X
9nH,v264
:
X
:
Note
off
:
X
QnH,v=0
DX
-------------------
+----------------+----------------+----------------
After
Key's
X
EX
Touch
Ch's
x
Хх
-------------------
+ж----------------+----------------+----------------
Pitch
Bender
X
DOX
-------------------
ж----------------+----------------+----------------
:
Control
:
i
В
:
64
:
0
:
0
:Sustain
:Change
:
:
:
1{-------------------
+---------------- +---------------- R----------------
:Program
:
0
0-31
:
0
0-127
Change
True
#
:
XKKKKKKKKKKKK
:
0-31
-------------------
4R----------2-2222224---222222-22-----4-------222-2-2-2---
System
Exclusive
X
DX
1-------------------
+---------------- +----------------
+----------------
:System
:
Song
Pos
:
X
:
X
:
Song
Sel
:
X
:
X
:Common
:
Tune
:
X
:
xX
{-------------------
+----------------
+----------------
+----------------
:System
:Clock
о
220
Real
Time:Commands
О
:
0
{-------------------
R----------------
R----------------
4R----------------
:Aux
:Local
ON/OFF
X
:
0
Н
:А11
Notes
OFF:
X
:
0
(122-127)
:Mes-
:Active
Sense
о
EE]
:sages:Reset
X
:
0
{-------------------
+---------------- +----------------
4R---2222222224----
:
Notes
+
——————
л
Mode
1
:
OMNI
ON,
POLY
Mode
2
:
OMNI
ON,
MONO
O
:
Yes
Mode
3
:
OMNI
OFF,
POLY
Mode
4
:
OMNI
OFF,
MONO
X
:
No

FCC
INFORMATION
Attention
users
in
the
U.S.A.
PortaTone
PSR-41
prepared
in
accordance
with
FCC
rules.
The
PortaTone
PSR-41
uses
frequencies
that
appear
in
the
radio
frequency
range,
and
if
installed
in
the
immediate
proximity
(within
three
meters)
of
some
types
of
audio
or
video
devices
interference
may
occur.
The
PortaTone
PSR-41
has
been
type
tested
and
found
to
comply
with
the
specifications
set
for
a
Class
B
computing
device
in
accordance
with
those
specifications
listed
in
Subpart
J
of
Part
15
of
the
FCC
rules.
These
rules
are
designed
to
provide
a
reasonable
measure
of
protection
against
such
interference.
However,
this
does
not
guarantee
that
interference
will
not
occur.
If
your
PortaTone
PSR-41
should
be
suspected
of
causing
interference
with
other
electronic
devices,
verification
can
be
made
by
turning
your
PortaTone
PSR-41
off
and
on.
If
the
interference
continues
when
your
PortaTone
PSR-41
is
off,
PortaTone
PSR-41
is
not
the
source
of
the
interference.
If
your
PortaTone
PSR-41
does
appear
to
be
the
source
of
the
interference,
you
should
try
to
correct
the
situation
by
using
one
or
more
of
the
following
measures:
Relocate
either
the
PortaTone
PSR-41
or
the
electronic
device
that
is
being
affected
by
the
interference.
Utilize
power
outlets
for
the
PortaTone
PSR-41
and
the
device
being
affected
that
are
on
different
branch
(circuit
breaker
of
fuse)
circuits,
or
install
A/C
line
filters.
In
the
case
of
radio-TV
interference,
relocate
the
antenna
or,
if
the
antenna
lead-in
is
a
300
ohm
ribbon
lead,
change
the
lead-in
to
a
co-axial
type
cable.
If
these
corrective
measures
do
not
produce
satisfactory
results,
please
contact
your
Authorized
Yamaha
dealer
for
suggestions
and/or
corrective
measures.
If
you
cannot
locate
an
Authorized
Yamaha
dealer
in
your
general
area,
contact
the
Service
Division,
Yamaha
Music
Corporation
U.S.A.,
6600
Orangethorpe
Ave,
Buena
Park,
СА
90620.
If
for
any
reason
you
should
need
additional
information
relating
to
radio
or
TV
interference,
you
may
find
a
booklet
prepared
by
the
Federal
Communications
Commission
helpful:
“How
to
identify
and
Resolve
Radio-TV
Interference
Problems".
This
booklet
is
available
from
the
U.S.
Government
Printing
Office,
Washington
D.C.
20402—Stock
3€
004-000-345-4.
*
This
applies
only
to
products
distributed
by
Yamaha
Music
Corp.
U.S.A.
YAMAHA
YAMAHA
CORPORATION
PO
Box
1,
Hamamatsu,
Japan
The
serial
number
of
this
product
may
be
found
on
the
bottom
of
the
unit.
You
should
note
this
serial
number
in
the
space
provided
below
and
retain
this
manual
as
a
permanent
record
of
your
purchase
to
aid
identification
in
the
event
of
theft.
Model
No.
PSR-41
Serial
No.
Concerning
Warranty
This
product
was
made
for
international
distribution,
and
since
the
warranty
for
this
type
of
product
varies
from
marketing
area
to
marketing
area,
please
contact
the
selling
agency
for
information
concerning
the
applicable
warranty
and/or
service
policies.
T
@ж802
Printed
in
Japan
Other manuals for PortaTone PSR-41
2
Table of contents
Other Yamaha Synthesizer manuals

Yamaha
Yamaha YM3806 Manual

Yamaha
Yamaha SY55 User manual

Yamaha
Yamaha PF-1500 User manual

Yamaha
Yamaha DX9 User manual

Yamaha
Yamaha Electone D-3 User manual

Yamaha
Yamaha CP-20 User manual

Yamaha
Yamaha PSR-S550 User manual

Yamaha
Yamaha DX27 User manual

Yamaha
Yamaha MOX8 Instruction Manual

Yamaha
Yamaha MOX6 User manual

Yamaha
Yamaha SY99 User manual

Yamaha
Yamaha PortaTone PSR-740 User manual

Yamaha
Yamaha MR-1 User manual

Yamaha
Yamaha V50 User manual

Yamaha
Yamaha ARIUS YDP-181 User manual

Yamaha
Yamaha JOGR JOGRR CS50 User manual

Yamaha
Yamaha DX9 User manual

Yamaha
Yamaha Portatone PSR-9000 User manual

Yamaha
Yamaha MOTIF6 Voice Editor User manual

Yamaha
Yamaha V50 User manual