Yazaki AROACE Service manual

WATER-FIRED SINGLE-EFFECT
ABSORPTION CHILLER
This product is a water-fired single-effect absorption unit which provides chilled water
for cooling in central plant type air conditioning systems. It is a cooling-only design and
has no innate heating capability. The unit’s nominal refrigeration capacity is 5 tons and
is complete with operating and safety controls. The chiller is energized by a heat
medium (hot water) from a process, cogeneration, solar, or other waste heat source
capable of providing a temperature range of 158 –203°F (70 –95°C).
CONTENTS
GENERAL Page
GENERAL 2
MODEL DESIGNATION 2
STANDARD SPECIFICATIONS 3
EQUIPMENT DIMENSIONS 4
INTERNAL WIRING DIAGRAM 5
INSTALLATION
RECEIVING 6
RIGGING AND MOVING 7
LOCATION AND CLEARANCES 8
FOUNDATION 9
Page
LEVELING 9
PIPING 10
CHILLED WATER PIPING 10
COOLING WATER PIPING 11
HEAT MEDIUM PIPING 11
FREEZE PROTECTION 12
ELECTRICAL 13
TYPICAL FIELD WIRING DIAGRAM 13
WATER QUALITY 14
INSTALLATION CHECK &
REQUEST FOR STARTUP 14
INSTALLATION INSTRUCTIONS
WFC-SC5

2
GENERAL
This equipment should only be
installed by trained and qualified
personnel who are familiar with
absorption chillers. All precautions in
these instructions as well as on tags and
labels attached to the unit must be
observed to ensure the safety of
personnel and to maintain warranty
validation.
Each Yazaki absorption chiller has
been evacuated, charged with lithium
bromide and water solution, and run
tested prior to leaving the factory.
Piping connections are all located at
the rear of the unit.
After the equipment has been
installed, a Yazaki Authorized Service
Provider (ASP) must check the
installation and supervise or conduct the
initial startup and operation of the unit.
CAUTION
THE YAZAKI WARRANTY WILL BE
VOIDED IF THE FOLLOWING
RESTRICTIONS ARE NOT OBSERVED:
1. DO NOT OPEN ANY SERVICE VALVES
WITHOUT A PROPER EVACUATION
ASSEMBLY ATTACHED TO THEM AS SUCH
ACTION WILL RESULT IN LOSS OF
VACUUM AND INTRODUCTION OF GASES
TO THE INTERIOR OF THE MACHINE
WHICH COULD CAUSE CORROSION.
2. ALWAYS HANDLE THE EQUIPMENT WITH
CARE AND MAINTAIN IN A NEAR-
VERTICAL POSITION DURING RIGGING. IF
THE EQUIPMENT MUST BE TILTED,
CAREFULLY FOLLOW INSTRUCTIONS
PROVIDED WITHIN THIS DOCUMENT.
3. DO NOT ATTEMPT TO START THE
SYSTEM WITHOUT SUPERVISION FROM A
YAZAKI AUTHORIZED SERVICE PROVIDER
(ASP).
MODEL DESIGNATION
WFC-S C 5
Water-Fired Chiller
Cooling Only Design
Cooling Capacity: 5 rated tons

3
STANDARD SPECIFICATIONS
Specifications
English (Metric)
WFC-SC5
Cooling Capacity
Mbtu/hr (kW/hr)
60.0 (17.6)
Chilled Water
Temperature
Inlet
°F (°C)
54.5 (12.5)
Outlet
°F (°C)
44.6 (7)
Evaporator Pressure Loss
PSI (kPa)
7.6 (52.6)
Maximum Operating Pressure
PSI (kPa)
85.3 (588)
Flow Rate
GPM (l/s)
12.1 (0.76)
Water Retention Volume
Gal (liters)
2.1 (8)
Cooling Water
Heat Rejection
Mbtu/hr (kW/hr)
145.7 (42.7)
Temperature
Inlet
°F (°C)
87.8(31)
Outlet
°F (°C)
95 (35)
Cond/Abs Pressure Loss
PSI (kPa)
5.6(38.6)
Maximum Operating Pressure
PSI (kPa)
85.3 (588)
Flow Rate
GPM (l/s)
40.4 (2.55)
Water Retention Volume
Gal (liters)
9.8 (37)
Heat Medium
Heat Input
Mbtu/hr (kW/hr)
85.7 (25.1)
Temperature
Inlet
°F (°C)
190.4 (88)
Outlet
°F (°C)
181.4 (83)
Range
°F (°C)
158-203 (70-95)
Generator Pressure Loss
PSI (kPa)
11.2(77.0)
Maximum Operating Pressure
PSI (kPa)
85.3 (588)
Flow Rate
GPM (l/s)
19.0 (1.2)
Water Retention Volume
Gal (liters)
2.6 (10)
Electrical
Voltage
Volts
115/208/230
Frequency
Hz
60
Phase
Phase
1
MCA
Amps
0.89
MOCP
Amps
15
Consumption
Watts
48
Capacity Control
On - Off
Noise Level
dB(A)
38
Piping
Chilled Water
Inches
1-1/4 NPT
Cooling Water
Inches
1-1/2 NPT
Heat Medium
Inches
1-1/2 NPT
Dimensions
Width
Inches (mm)
23.4 (594)
Depth
Inches (mm)
29.3 (744)
Height
Inches (mm)
71.5 (1815)
Height with Lifting Lugs Removed
Inches (mm)
69.1 (1755)
Weight
Dry
lbs (kg)
805 (365)
Operating
lbs (kg)
926 (420)
Table 1 - Specifications

4
EQUIPMENT DIMENSIONS
Figure 1 –Equipment Dimensions

5
INTERNAL WIRING DIAGRAM
Figure 2 –Internal Wiring Diagram

6
WFC-SC5 Wiring Diagram Legend, Rev 1B
AUX1
Auxiliary Contact Set #1 - Not Used
AUX2
Auxiliary Contact Set #2 - Not Used
CHD
Operation indicator. Closes/Illuminates when chiller is Enabled.
CHE
Error indicator. Closes/Illuminates when error condition exists.
CLS
Cooling Interlock Switch. Cooling tower sump level switch or cooling water flow switch.
CTI
Cooling Water Inlet Temperature
CTF
Cooling Tower Fan
FD
Cooling Tower Fan Operation Indicator. Closes when fan is on.
FS1
Chilled Water Flow Switch
FU1
Fuse. Fuji model FGAO-2 (2A)
FU2
Fuse. Fuji model FGAO-2 (4A)
HWT
Heat Medium Temperature
IF
Freeze Protection Enable/Disable. If open, Freeze Protection Logic will not be used.
IRS
Enable/Disable contacts
LT
Evaporator Temperature
NFB
Non-Fused Breaker
OUT1
Output contact tied to AUX1. Closes when AUX1 is closed - Not Used
OUT2
Output contact tied to AUX2. Closes when AUX2 is closed - Not Used
P1
Chilled Water Pump ON signal. Supplied by the chiller.
P1D
Chilled Water Pump Operation Input. Pump overloads.
P2
Cooling Water Pump ON signal. Supplied by the chiller.
P2D
Cooling Water Pump Operation Input. Pump overloads.
P3
Heat Medium Pump ON signal. Supplied by the chiller.
P3D
Heat Medium Pump Operation Input. Pump overloads.
PL
Power Light. Illuminates when power is on.
RBV
Refrigerant Blow-down Valve
SP
Solution Pump
SV1
Solenoid Valve #1
SV9
Solenoid Valve #9
WTO
Chilled Water Outlet Temperature
ZR1
Power Surge Protection Module
Table 2 –Internal Wiring Diagram Legend
INSTALLATION
RECEIVING
When the absorption chiller is
delivered, inspect it for transit damage.
Should any damage have occurred, do
not proceed with installation until the
Yazaki distributor has been notified and
any required remedial actions have been
completed.
Remember to properly plan the route
to the installation site. Also, keep in mind
when choosing the site, the unit will
someday have to be replaced, so be
mindful of permanent and semi-
permanent barriers.

7
RIGGING AND MOVING
The Yazaki chiller is designed for
overhead rigging with lifting lugs provided
from the factory.
When rigging for overhead lift, attach
shackle bolts to the lifting lugs. Bring the
four individual rigging cables (each 40” or
1m minimum) together at a point high
enough that the angle between the
rigging line and the top of the unit is no
less than 60°, as shown in the drawing
below.
Figure 4 –Rigging
Clearance
Inches(mm)
A - Vertical
88 (2235)
B - Passageway
55 (1400)
C - Into Corner
55 (1400)
D - Out of Corner
55 (1400)
Table 3 –Hallway Clearances
There are times when the unit simply
cannot be moved to the final installation
site while remaining in the vertical
position. It is be permissible to lay the
unit on its side, so long as the proper
precautions and guidelines are followed.
1. Transport by vehicle ONLY with the
unit in vertical configuration.
THERE IS NO ALTERNATIVE.
Transport by vehicle over roadway
while the unit is not in the vertical
configuration will void the warranty.
2. The unit may ONLY lay over onto its
back - the side with the water
connections. It may NOT lay over on
any other side!
a. While on its back, the water piping acts
as legs to support the internal tubing
bundles. On any other side, the tubing
bundles will not be properly supported
and may shift or become severely
damaged, rendering the machine
inoperable.
3. Do not simply tip the unit over onto its
back. It should be lifted and turned to
the horizontal configuration while fully
supported and suspended, though it
only need be 1” (25mm) or so off the
ground while turning.
4. DO NOT lay the unit directly onto the
ground in a manner in which the water
connections support the weight of the
unit. Attach 4x4 blocks or timbers to
the frame for support in the horizontal
configuration.
5. DO NOT USE SINGLE POINT
LIFTING when laying the unit onto its
side. At least THREE lifting points will
be necessary.

8
Figure 5 –Laying the Unit Sideways
To properly lay the unit onto its side:
1. Remove all cabinet panels in order to
prevent damage to them during the
turning process.
2. Attach 4x4 blocks or timbers to the rear
frame to act as support feet while the unit
is in the horizontal configuration.
3. Attach two rigging cables to the unit feet
across the front of the unit. Bring these
cables to a single point, maintaining a
minimum of 60° between the unit and the
cable.
4. Attach two rigging cables to the left side
lifting lugs. Bring these cables to a single
point.
5. Attach two rigging cables to the right side
lifting lugs. Bring these cables to a single
point.
6. Using these three points, lift the unit
slightly off the ground, using the lifting
cables on the feet to rotate the unit onto
its back. Use the right and left side lifting
cables to control the sideways rotation.
7. Once the unit is in the horizontal
configuration, let it gently rest on the
blocks that were attached during step 2.
8. Once the unit is to be turned back to the
vertical configuration, it is preferable that
the unit again be lifted and rotated in the
same manner as described above.
However, in cases where mechanical
lifting is not available at the installation
site, the unit CAN be lifted up and tilted
over onto its feet.
Do not let the unit fall hard onto its feet.
Do not allow the feet to become deformed.
Be mindful of the 1000 pound mass of
the unit. Human power alone is not
advised as it could cause this to become
a very dangerous and potentially deadly
procedure.
LOCATION AND CLEARANCES
Particular care must be taken when
placing the machine so as to provide
adequate clearance for access to each
side of the machine. Maintenance is
mostly done through the front of the unit,
but in a repair scenario, any panel on any
side may need to be removed to access
components behind them.
Clearance
Inches(mm)
Front
40 (1000)
Rear
40 (1000)
Right
20 (500)
Left
20 (500)
Top
6 (150)
Table 4 –Installation & Service
Clearances

9
FOUNDATION
All aspects of foundation and support
computations must be in accordance with
national and local codes.
The chiller must be mounted on a
level, non-combustible foundation
capable of supporting the considerable
weight of the machinery. This is
particularly important for rooftop
installations. Always make certain the
structure can support not only the chiller,
but also the pumps, piping, cooling
towers, etc. as may be required. The
rooftop area should be well-drained and
be at least 7 feet (2 meters) from the edge
of the roof. Anti-fall measures should
always be taken if the chiller is installed
within 12 feet (4 meters) of the roof edge.
Additionally, for protection of the
roofing material, it is recommended a
suitable platform or walkway be provided
around all sides of the unit.
If the chiller is to be installed outside,
but at ground level, make certain the
concrete base and the soil beneath are
sufficient for the task. Settling over time
could cause the unit to become unlevel,
which could have a negative impact on
the performance and lifespan of the unit.
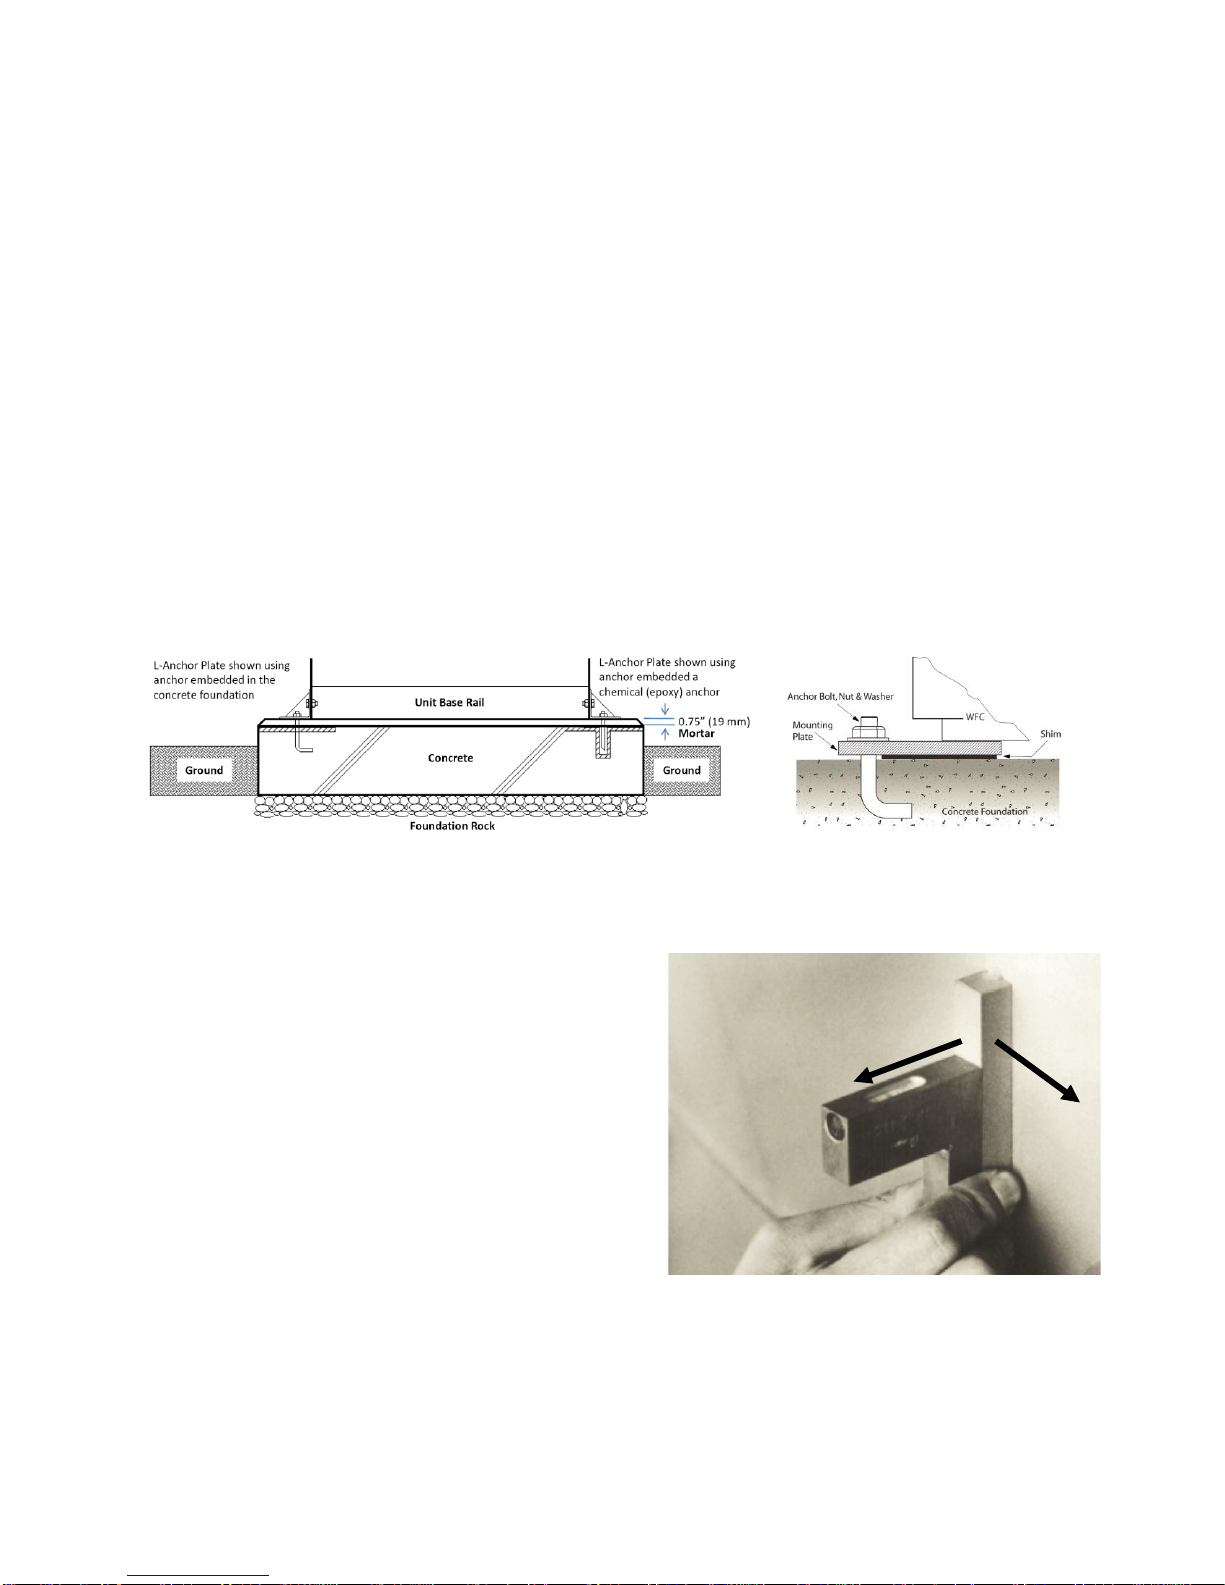
Concrete foundations are recommended
to be sized so that it extends at least 12”
(300 mm) beyond the unit in all directions
in order to accommodate potential
mounting and anchoring hardware.
Figure 6 –Foundation Detail
LEVELING
WFC-S Series units must be level in
order for the fluids to be distributed
properly over their respective tube
bundles. There is a level bar mounted
on the front of the main vessel of the
machine, right above the control box.
The unit must be level to both the
longitudinal and transverse alignments.
It is essential that all leveling be
completed before any piping connections
are attempted.
Leveling of the unit is typically
accomplished by use of field-supplied
metal shims. In cases where the unit is
required to be secured to the pad, anchor
bolts, nuts, and washers must be field-
supplied.
Figure 7 –Level Bar

10
PIPING
After the chiller has been leveled
properly, the piping for the chilled water
cooling water, and heat medium circuits
may be installed. Piping arrangements
should be made with care so that there is
no interference with service access or
panel removal. Piping should be
adequately supported and braced
independently of the unit so as to avoid
undue strain on the unit piping
connections. Maximum allowable
pressure in any fluid circuit is 85.3 PSI
(588 kPa).
Piping rules and conventions used
with Yazaki chiller are exactly the same
as used with any other type of chiller;
therefore, this installation manual will not
delve deeply into piping design.
Thermo-wells, pressure gauges,
Pete’s Plugs, etc. may be installed at the
inlet and/or outlet of each fluid circuit
connection to facilitate startup, future
service, and routine maintenance.
Strainers in each circuit, particularly the
cooling water circuit, are recommended
as well. These should be placed before
the inlet connection of the chiller.
CHILLED WATER PIPING
A balance valve should be installed at
the chilled water outlet and a stop valve
should be installed at the chilled water
inlet. Both valves should be placed in
close proximity to the chiller.
After thoroughly testing for leaks,
insulate the piping circuit, ensuring an
adequate vapor barrier is obtained. Be
sure to allow access to any valves, wells,
and ports that may be present. Also,
ensure the chiller panels are not
restricted by the pipe insulation.
CAUTION
1. DO NOT EXCEED 80 –120% OF
STANDARD CHILLED WATER
FLOW.
2. DO NOT EXCEED 85.3 PSI (588 kPa)
IN THE CHILLED WATER CIRCUIT
AT THE ABSORPTION CHILLER.
3. DO NOT INSTALL ANY VALVES IN
THE EXPANSION LINE.
Figure 8 –Chilled Water Piping

11
COOLING WATER PIPING
If possible, the cooling tower should
be installed at the same level or above
the level of the chiller. If this is not
possible, give careful consideration to the
prevention of drain-back and loss of
cooling water due to overflow of the
tower. Such matters must be given prior
consideration by the design engineer.
As with the chilled water connections,
a balance valve should be installed on
the cooling water inlet and a stop valve
installed on the cooling water outlet.
Both valves should be in close proximity
to the chiller. After thoroughly testing for
leaks, insulate the piping circuit, ensuring
an adequate vapor barrier is obtained.
Be sure to allow access to any valves,
wells, and ports that may be present.
Also, ensure the chiller panels are not
restricted by the insulation.
Additionally, there should be flush and
drain valves installed between the
machine and the balance/stop valves so
as to allow for flushing of the absorber-
condenser coils should it ever become
necessary.
CAUTION
1. DO NOT EXCEED 100 –120% OF
STANDARD COOLING WATER
FLOW.
2. DO NOT EXCEED 85.3 PSI (588 kPa)
IN THE COOLING WATER CIRCUITS
AT THE ABSORPTION CHILLER.
3. DO NOT INSTALL ANY VALVES IN
EXPANSION LINES, WHEN USED.
Figure 9 –Cooling Water Piping
HEAT MEDIUM PIPING
The Heat Medium Piping contains the
hot water to drive the absorption system.
As long as this water remains between
158-203°F (70-95°C), refrigerant vapor
can be liberated in a usable quantity. If a
mixing valve is to be used to control this
temperature, IT MUST NOT BE
COMBINED WITH THE HEAT MEDIUM
BYPASS VALVE. It MUST be a
separate and distinct control.
The key device required for the proper
operation of the unit is a Heat Medium
Bypass Valve. When the unit requires
heat medium, it will send a signal to this
valve to open. When the unit does not
require heat medium, for whatever
reason, this valve will be commanded to
move into bypass position.

12
A balancing valve should be installed
adjacent to the heat medium outlet to
facilitate flow rate adjustments. A stop
valve should be installed adjacent to the
heat medium inlet and must remain fully
open at all times when the unit is
intended to operate.
Insulate the piping AFTER LEAK
TESTING to help prevent heat loss and
ensure that all stop valves, balancing
valves, and thermowells are accessible.
CAUTION
1. DO NOT EXCEED 30 –120% OF
STANDARD HEAT MEDIUM FLOW.
2. DO NOT EXCEED 85.3 PSI (588 kPa)
IN THE HEAT MEDIUM CIRCUIT AT
THE ABSORPTION CHILLER.
3. DO NOT INSTALL ANY VALVES IN
THE EXPANSION LINE.
Figure 10 –Heat Medium Piping
FREEZE PROTECTION
When the chiller and/or associated
piping are installed in a location that is
subject to freezing conditions,
appropriate anti-freeze steps must be
taken. Many anti-freeze methods are
available including heat tape, but the
most common method in the USA is the
use of glycol in the fluid loop.
Glycol may be permitted for use in
Yazaki chiller with certain restrictions and
observations.
1. Do not use automotive glycol (Antifreeze)
since it contains chemical additives that are
inappropriate and potentially damaging to the
Yazaki chiller. Use only glycol appropriate for
use with copper tubing. Exception: The heat
medium circuit also includes stainless steel
tubing, so the glycol must not corrode that
material either.
2. Do not exceed a mixture of 50% by weight.
3. Be aware that loss of performance will result
when glycol is used. In higher concentrations,
the impact can be very significant.
4. Propylene Glycol is preferred wherever
possible. It has very similar anti-freeze
characteristics to Ethylene Glycol, but is non-
toxic. It is also less viscous than Ethylene
Glycol, which reduces the required pump
power.
5. Use of glycol can cause the unit to operate at
a slightly higher internal temperature since
heat transfer is dampened. This may result in
depletion of inhibitor at a faster rate than what
may be perceived as normal.

13
ELECTRICAL
The high voltage wiring for each unit
should be connected to the top of the
disconnect breaker located at the top left
in the Control Box.
The electrical supply for the WFC-SC5
can be anything between 86 and 265
volts AC. There are two power supply
boards in the Control Box that will take
voltage within this range and supply
proper output voltage. One power supply
generates 24vdc to power the Solution
Pump and provide 24 volt power to other
components that require it. The other
power supply provides 5vdc to power the
circuit boards and touch screen display
module.
Figure 11 –Disconnect Breaker
TYPICAL FIELD WIRING DIAGRAM
Figure 12 –Typical Field Wiring Diagram

14
WATER QUALITY
Water used in the chilled water,
cooling water, and heat medium circuits
may cause scaling and/or corrosion if not
correctly maintained within specific limits.
In some areas, the water supply may
contain minerals that cause scaling or
may be extremely soft and corrosive.
Where these conditions exist, a water
treatment company should be consulted.
If the absorption chiller is damaged as a
result of scaling, corrosion, or erosion
caused by poor water quality control, the
equipment warranty may be void. Water
quality should not exceed the following
limits:
ITEM
CHILLED
WATER
COOLING
WATER
HEAT
MEDIUM
MAKE-UP
WATER
Standard
pH (at 77°F)
6.8 - 8.0
6.5 - 8.2
7.0 –8.0
6.8 - 8.0
Conductivity (S/cm at 77°F)
400
800
300
300
Chloride ion (Cl-ppm)
50
200
30
50
Sulfate ion (SO42- ppm)
50
200
30
50
M-alkalinity (CaCO3ppm)
50
100
50
50
Total hardness (CaCO3ppm)
70
200*
70
70*
Calcium hardness (CaCO3ppm)
50
150
50
50
Ionic silica (SiO2ppm)
30
50
30
30
Reference
Total iron (Fe ppm)
1.0
1.0
1.0
0.3
Copper (Cu ppm)
1.0
0.3
1.0
0.1
Sulfide ion (S2- ppm)
ND
ND
ND
ND
Ammonium ion (NH4+ppm)
1.0
1.0
0.1
0.1
Residual chlorine (Cl ppm)
0.3
0.3
0.1
0.3
Free carbon dioxide (CO2ppm)
4.0
4.0
0.4
4.0
Ryzner stability index
-
6.0 - 7.0
-
-
NOTES:
1. ND (Not Detectable)
2. *Maximum total hardness of make-up water shall not exceed 70 ppm when bleed off is the only method used to control water
quality. Table 5 –Water Quality
INSTALLATION CHECK & REQUEST FOR STARTUP
After the absorption chiller has been
installed, piped, and wired as described
in these instructions, but before any
attempt is made to start the unit, the
Yazaki Authorized Service Provider
should be advised so that the startup can
be scheduled. Complete the REQUEST
FOR STARTUP form and send it to the
ASP or to Yazaki Energy Systems, Inc.,
at least 3 weeks prior to the required
startup date.
The contractor is expected to provide
personnel to assist the ASP with final
adjustments to the system controls and
fluid flow rates as may be necessary.

15
YAZAKI WFC-SC5 SERIES CHILLER
INSTALLATION CHECK AND REQUEST FOR START-UP
Yazaki Authorized Service Provider:
Address:
Project Name:
Project Address:
A. CHILLER
1. Unit placed properly on foundation □
2. Unit leveled properly □
3. Service clearance provided on all sides
and top (40 in. front) □
4. Chilled water flow switch piping
connected □
B. WATER PIPING
1. Chilled water piping installed between
chiller, pumps, and air handling unit(s) □
2. Cooling water piping installed between
chiller, pumps, and cooling tower □
3. Heat medium piping installed between
chiller, pumps, and heat source □
4. Water piping leak tested and flushed …□
5. Fluid circuits filled with water and glycol
(if required) and trapped air vented □
6. Flow setters installed in water piping .. □
7. Test plugs (Pete’s plugs) and/or
thermowells installed in the inlet and
outlet piping of each chiller □
8. Valves installed at each chiller for
flow balancing and isolation □
9. Air vent valves installed on piping □
10.Strainers present and clean □
11.Expansion tank (properly charged) and
water make-up piping installed to
chilled water system □
12.Expansion tank (properly charged)
installed on heat medium piping □
13.Water make-up and fill lines installed
to the cooling tower □
14.Pressure relief valves, set to maximum
of 85.3 psig (588 kPa), installed on
piping adjacent to each chiller
(if required) □
C. POWER WIRING
1.Power supply, as indicated on the UNIT
NAMEPLATE, is connected □
2.Wiring completed between the chiller,
motor contactors and/or starters for the
following : Chilled/hot water pump,
cooling water pump, heat medium
pump, and cooling tower fan □
3.Rotation of each external pump and fan
motor checked □
4.Power supply wiring connected between
a fused disconnect and each chiller. (DO
NOT operate the chiller) □
5.Power supply available near the chiller
for a vacuum pump □
D. CONTROL WIRING
1.Motor contactors, starters, and/or
manual controllers installed for all
external motors □
2.Control wiring (24vac max) installed
between chiller and pump/motor
contactors □
3.Interlock wiring installed between chiller
and thermal overloads on the following
motors: Chilled water pump, cooling
water pump, heat medium pump, and
cooling tower fan □
E. CONDITIONS
1.Personnel available to assist with
start-up who are familiar with the
system and have appropriate tools
(adequate vacuum pump, vacuum
gauge, proper hoses, etc.) □
Model No: Serial No:
Anticipated Startup Date:

16
YAZAKI AUTHORIZED SERVICE PROVIDER
For information concerning service, operation
or technical assistance, please contact your
Yazaki Authorized Service Provider or the following:
YAZAKI ENERGY SYSTEMS, INC.
701 E PLANO PKWY, SUITE 305
PLANO, TEXAS
75074-6700
Phone: 469-229-5443
Fax: 469-229-5448
Email: yazaki@yazakienergy.com
Web: www.yazakienergy.com
This symbol on the product’s nameplate means it is listed by
UNDERWRITERS LABORATORIES, INC.
Yazaki reserves the right to discontinue, or change at any time,
specifications or designs without notice and without incurring obligations.
WFC5UL-II-1A1-0611
Other manuals for AROACE
1
This manual suits for next models
1
Table of contents
Other Yazaki Chiller manuals
Popular Chiller manuals by other brands

Diamond
Diamond Diverso WR-5G5P-EC INSTRUCTIONS FOR THE INSTALLATION, USE AND MAINTENANCE

York
York YCIV manual

AERMEC
AERMEC Variable Multi Flow ANL Series Installation and maintenance manual

Beretta
Beretta HYDRONIC UNIT B HE 5 Installer manual

York
York YCAS0685 manual

KKT
KKT KPC 108-L-U/S Operating instruction

CLIVET
CLIVET WSAT-XSC3 FC 90.4 Installation and operating manual

Parker
Parker Hyperchill Plus user manual

AAON
AAON LN Series Installation operation & maintenance

Johnson Controls
Johnson Controls York YCAL0012-0032 Start-Up Checklist

Carrier
Carrier AQUASNAP 30RB060-390 installation instructions

Sammic
Sammic SmartVide 5 instruction manual