YBIKE Pewi User manual

OWNER’S MANUAL
Pewi

IMPORTANT SAFETY NOTICE
WARNING
SAFETY PRECAUTIONS:
The use of a ride-on can be a hazardous activity and precautions should be taken to avoid
dangerous situations. Be sure to read the entire manual before riding. Please pay close attention to
the following notices in particular:
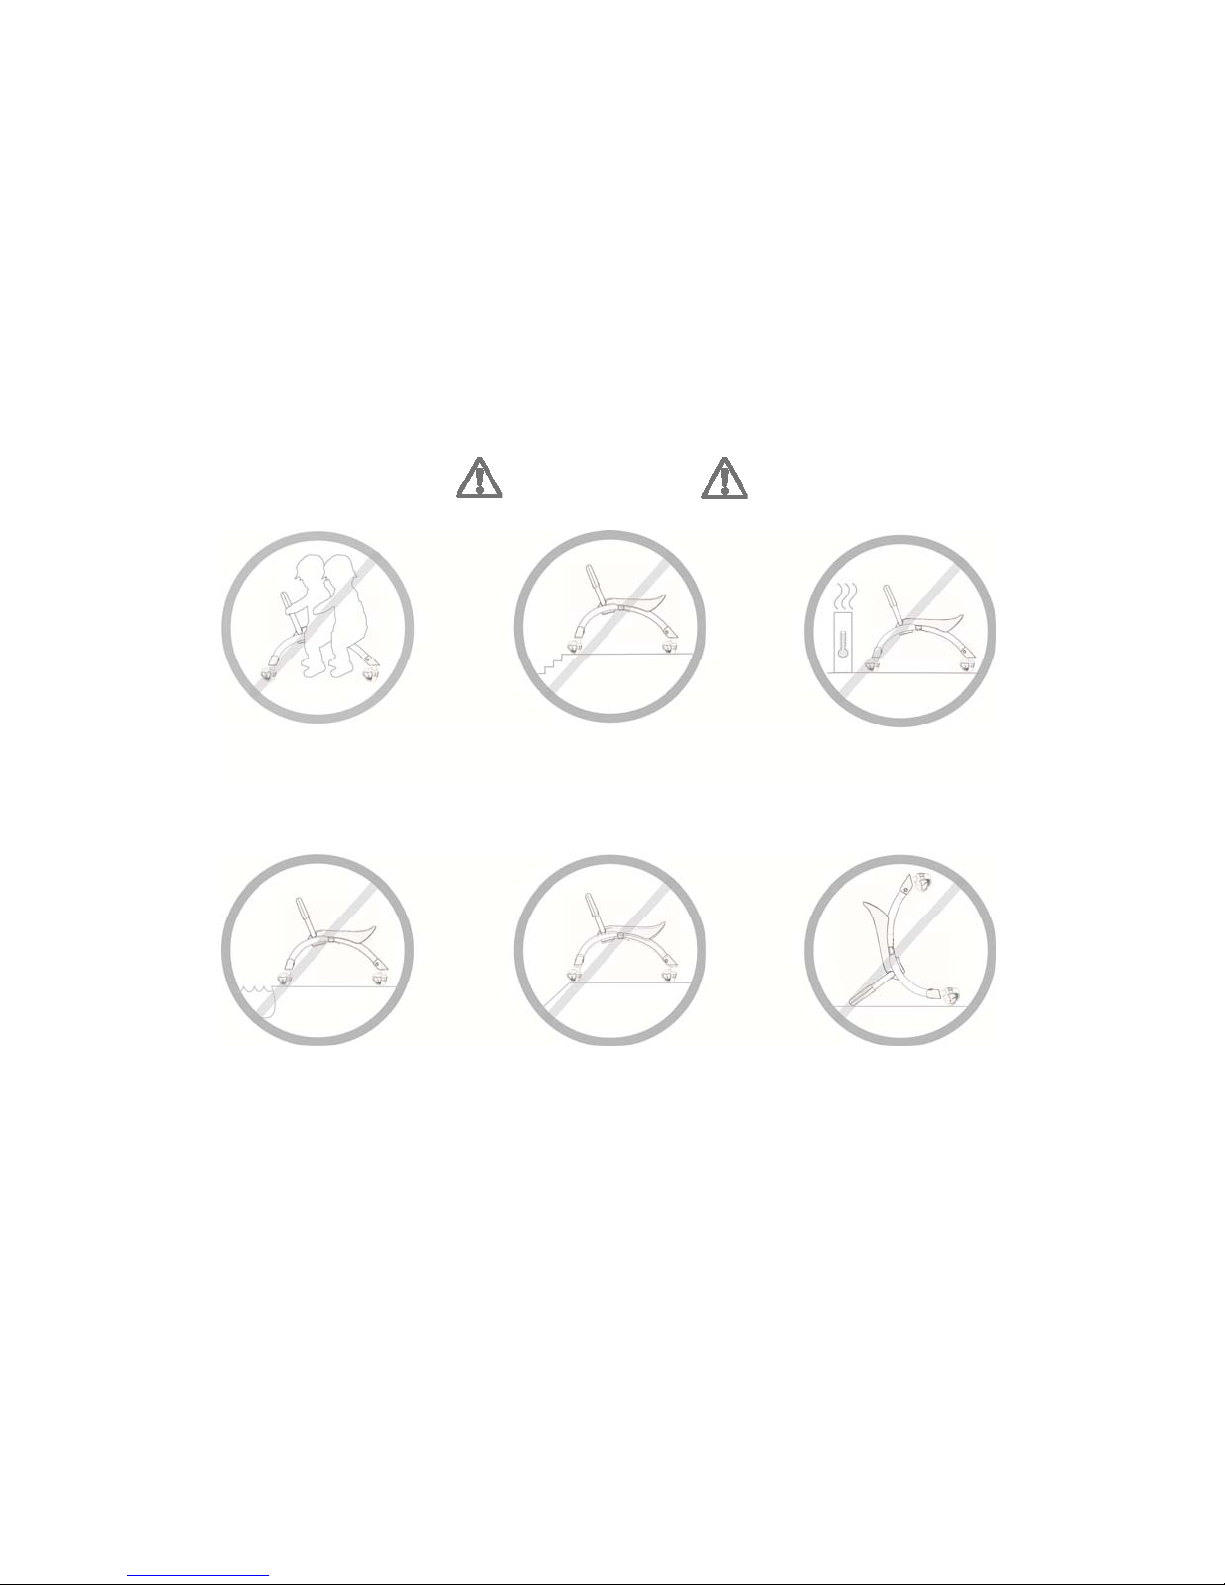
WARNING! This ride-on is for ages 12-36 months, can also serve as a walking aid for ages 9-12months.
PEWI MUST NOT BE USED AS A WALKING RING.
This ride-on is intended to be assembled by an adult.
Children riding Pewi should have constant adult supervision. A responsible adult must inspect
Pewi prior to use, to ensure that all parts are fully assembled and tightened to prevent
accidents.
Always wear proper protective gear such as a helmet, elbow and kneepads as well as
appropriate clothing such as a long sleeve shirt, gloves, long pants and trainers or closed
footwear. Do not ride barefoot or in sandals.
DO NOT use the PEWI on slippery, wet or uneven ground with gravel.
DO NOT ride the PEWI with one or no hands. Hold the handlebars tightly with two hands.
Ride PEWI only on flat and level ground. DO NOT ride Pewi on slopes. DO NOT go down a long
1

descending slope or hill. Please be careful when passing these areas.
Keep your child away from doors, windows and furniture to avoid collision with glass. Block
stairs/steps securely to avoid injury.
Keep the child away from hot places, radiators, space heaters and fireplaces to avoid burns.
Ensure that the handlebar is securely fixed and that the wheels move smoothly by turning it left
and right before riding PEWI.
DO NOT use attachments not included in packaging or attempt to do any modifications your
self as this may compromise the safety of the ride-on.
Make sure all components are assembled correctly and secured properly before riding.
Never allow more than one child to ride on Pewi at any time. Not to be used by children older
than 3 years or weighing more than 20kgs due to insufficient strength.
WARNING
Injury may occur if these precautions are not observed.
NOTE: Any photos of the YBIKE Pewi or decals in the owner’s manual are Intended to be used
as a reference only, and there may be some differences to the unit you purchased.
2

3
WARNING
DO NOT Allow more
than 1 rider at a time.
DO NOT ride close to
steps. Block stairs.
DO NOT ride close to
hot places or heaters.
DO NOT ride on
slopes.
Only play on Pewi as
intended for as a ride
on.
DO NOT ride close to
water or swimming
pools.

YBIKE PEWI PARTS LIST & COMPONENTS
Open the box, and take out the four legs, seat, handlebar, x-bracket, cover cap, wave
bracket and toolkit. Please check whether all
No. NAME
1 FRONT LEG (1)
2 BACK LEG (2)
3 FRONT LEG (3)
4 BACK LEG (4)
5 SEAT
6 HANDLE BAR
7 COVER CAP
8 X-BRACKET
9 1 LONG SCREW & 2 SHORT SCREWS
10 LEG SCREWS x 4
11 WAVE BRACKET
12 2 SETS OF ALLEN KEYS
5
6
3
7
8
1
9 10 11
4
2
4
12

ASSEMBLY INSTRUCTION
1. Leg Assembly
Assemble the four legs (No.1,2,3,4) onto the x-bracket (No. 8) according to the matching
number references (1,2,3,4) marked on the x-bracket. Insert the first leg (No.1) into the
x-bracket marked (1) as in picture A. Insert the leg screws (No.10) into position as in picture
B and secure with the set of smaller Allen keys (No.12). Continue assembling the other three
legs as in picture C.
(WARNING: Make sure screw sets are tightened and not loose)
5
A
O
1
B C
O
2

2. Seat Assembly
Assemble the seat (No.5) onto the x-bracket (No.8). Ensure that the front of the seat is over
front legs 1& 3, and that the back of the seat is over back legs 2 & 4 (as in picture D).
Securely fasten the seat onto the x-bracket with the long screw (No. 9) using the set of
larger Allen keys (No. 12) as in picture E.
(WARNING: Make sure screw sets are tightened and not loose)
6
O
1
O
3
O
4
O
2
D E
front back

3. Handlebar Assembly A
Insert the handlebar (No. 6) into the t cut-out on the seat (No. 5) as in picture F. Place the
wave bracket (No.11) into position underneath the seat as in picture G.
7
F G

3. Handlebar Assembly B
8
3. Handlebar Assembly B
Securely fasten the wave bracket, seat and handlebar into place with the two short screws
(No. 9) using the set of larger Allen keys (No. 12) as in picture H.
NOTE there are 3 holes, only insert the two short screws into the 1st and 3rd holes. The
middle hole remains open and can be used to unassembled Pewi (as seen in step 4).
Insert the cover cap (No. 7) into the handlebar (No. 6) into the t-hole on the handlebar as in
picture I.
(WARNING: Make sure screw sets are tightened and not loose)
I
Insert
Screw
Insert
Screw
H

4. To Unassemble
If you would like to unassembled Pewi, then use the small set of Allen keys (No. 12) as in
picture J, to push the cover cap (No. 7) from underneath the wave-bracket at bottom out of
the handlebar (No. 6) at the top.
Then un-assemble by working the assembly instructions in reverse.
9
J
K

5. Caring for your Pewi
1. Please clean the wheels regularly after playing .
Use soap water to wipe the wheels. Dry the
wheels thoroughly after cleaning.
2. Clean handle regularly.
3. Regularly check to see if all parts are securely
…...fastened.
4. Check that all parts work and are in good
…..condition.
10

CHECK BEFORE RIDING
1. Check that all the screw sets are tightened.
2. Check that the handlebar is securely fastened.
3. Check that the wheels can spin smoothly and each part
is securely fixed.
4. Finally after checking the above points, you can now start
to ride.
WARNING! This product must be assembled by an adult. Read the
manufacturer’s instructions before using. Keep the instructions safe
for future reference.
Download FUN and Educational GAMES for your Pewi!
Visit
WWW.YBIKEWORLD.COM
11
Table of contents