Note: Adding successfully, you must tell the name and permission to the person you add, in order to avoid
the blind spots and cause any error when fill in information, then lead to the person who to be added is fail to
approve during the process of using.
Adding means add successful and you can see there is an addition on the list, this is the user we added.
5-3:Delete user
IOS delete user: Swipe left to delete
Android delete user: Long press delete, and re-confirm the information of the user you delete, click OK to start
to delete, click cancel will stop to delete, if delete successfully, you can see the list without this item.
The below is the special function of primary administrator:
This is the [MORE] interface of Primary administrator system, you c an s ee
[Regi st ratio n] ,[modify name of Bluetooth], [modify password], those functions
of primary administrator system, click [modify password] (means modify the
password of primary administrator),input password, click OK; if the password is
correct, will remind you verify successfully, and will enter into the modify password
interface, otherwise will remind you to verify fail and there is nothing happen. the interface of modify
password,you can find it need to fil l in ne w pas sw ord and con fi rm new password, when you complete
it please click OK to complete the modification.
If the new password you fill in is different with the password you confirm, the system will remind you the new password
is different with what you confirm, if the new password is same as old one ,it’ll also remind you the new password
is same as old password, it isn’t necessary to change, if all the step is correct, i t wil l rem in d you please wait,
and wait for several minutes will display modify successfully, and return to [MORE] interface.
Step 6: Modify the password of primary administrator
The entrance of modify bluetooth name is same as modify password of primary administrator, all need to verify
the primary administrator password, you can modify the bluetooth name after the password verify successfully,
when you complete to fill in please click OK yo modify the name of bluetooth.
Step 7: Modify name of bluetooth
Note: Bluetooth name up to six characters or 18 letters.
Register
Modify Bluetooth name
Modify password
Administrator system
About software
If new name same as old one, will remind the new name is same as old name, it isn’t necessary to change ,if new
name meet with the specifications and requirements will display a dialog box for confirmatio n, cli ck O K to sta rt
mo dif icat ion, Cli ck ing Ca ncel wil l ca ncel , that is modify successfully.
Open the administrator system,it will search automatically, that is administrator system, the entrance is
[MORE] [Administrator system], the initial entering may be without any data, as haven’t added any user,
this moment you can add a user.
5-2:Add Users
Click the “+” on the top right corner, it’ll pop up a dialog box, chose the permission of users which to be added
administrator or normal users, the primary administrator can only have one, administrator an d normal user
can be multiple, when your selection is done, you can move on to the next step. you will be asked to input the
name of the user which you add, there will be a permission, that is the name up to three characters, or ten letters.
you can see a reminder [Same name conflicts detected], this moment, you should check ,if it conflict with the
name of the administrator system, if not, maybe conflict with the name of primary administrator, when this issue
caused, you can add a special label to confirm the information of the user you add, if confirm it is correct please
click “OK” to start to add, if find anything wrong , click” cancel”, it’ll not tart to add.
The entrance of backup and recovery is same as modify master administrator, both are necessary to verify the
pass wor d of master administrator, the “backup and recovery “operation is based on the verification's success.
You can find the number of people who has backed up and the time of backup last time ,click backup to make a
back up ,there is a preparation process, please wait a moment. Click “recovery”,there is select box, there are
two optional modes, please choose carefully.
Step 8: Backup and recovery(please operate carefully)
Note: The merge operation is, add the person into lock terminal (who is exiting
in mobile terminal but isn’t exiting in lock terminal), clear all data in lock terminal,
then add all data in mobile terminal into lock terminal.
Onekey Backup
Onekey Recovery
Data recovery and
data recovery
Backup No.
0
Cl ic k merge mode, there is a di al og bo x for confirmation.
Click coverage mode, there is a dialog box for confirmation.
Note: Pl ea se op er ate c ar efull y, co verage mode means clear all data in lock terminal add all data in
mobile terminal in to lock terminal, it’ll delete the data in lock terminal.
After determination, please according to the mode you choose to recover, there is a preparation process,
please wait a moment.
Note: If mo bile t er mi nal data is comp le te d same as lock terminal data, the system w il l remind you
that local d ate s am e a s l oc k t er min al data , it do es n’t n eed t o b e r eco ve red.
Note: Please operate carefully, merge mode means add the person into lock
terminal (who is exist in mobile terminal but isn’t exist in Lock terminal), it’ll not
delete lock terminal data.
Wiring
-PNC GND NO
+
Power Supply
LOCK(Fail safe)
+
-
BlackRed White YellowBlue
NO COMNC
+
-
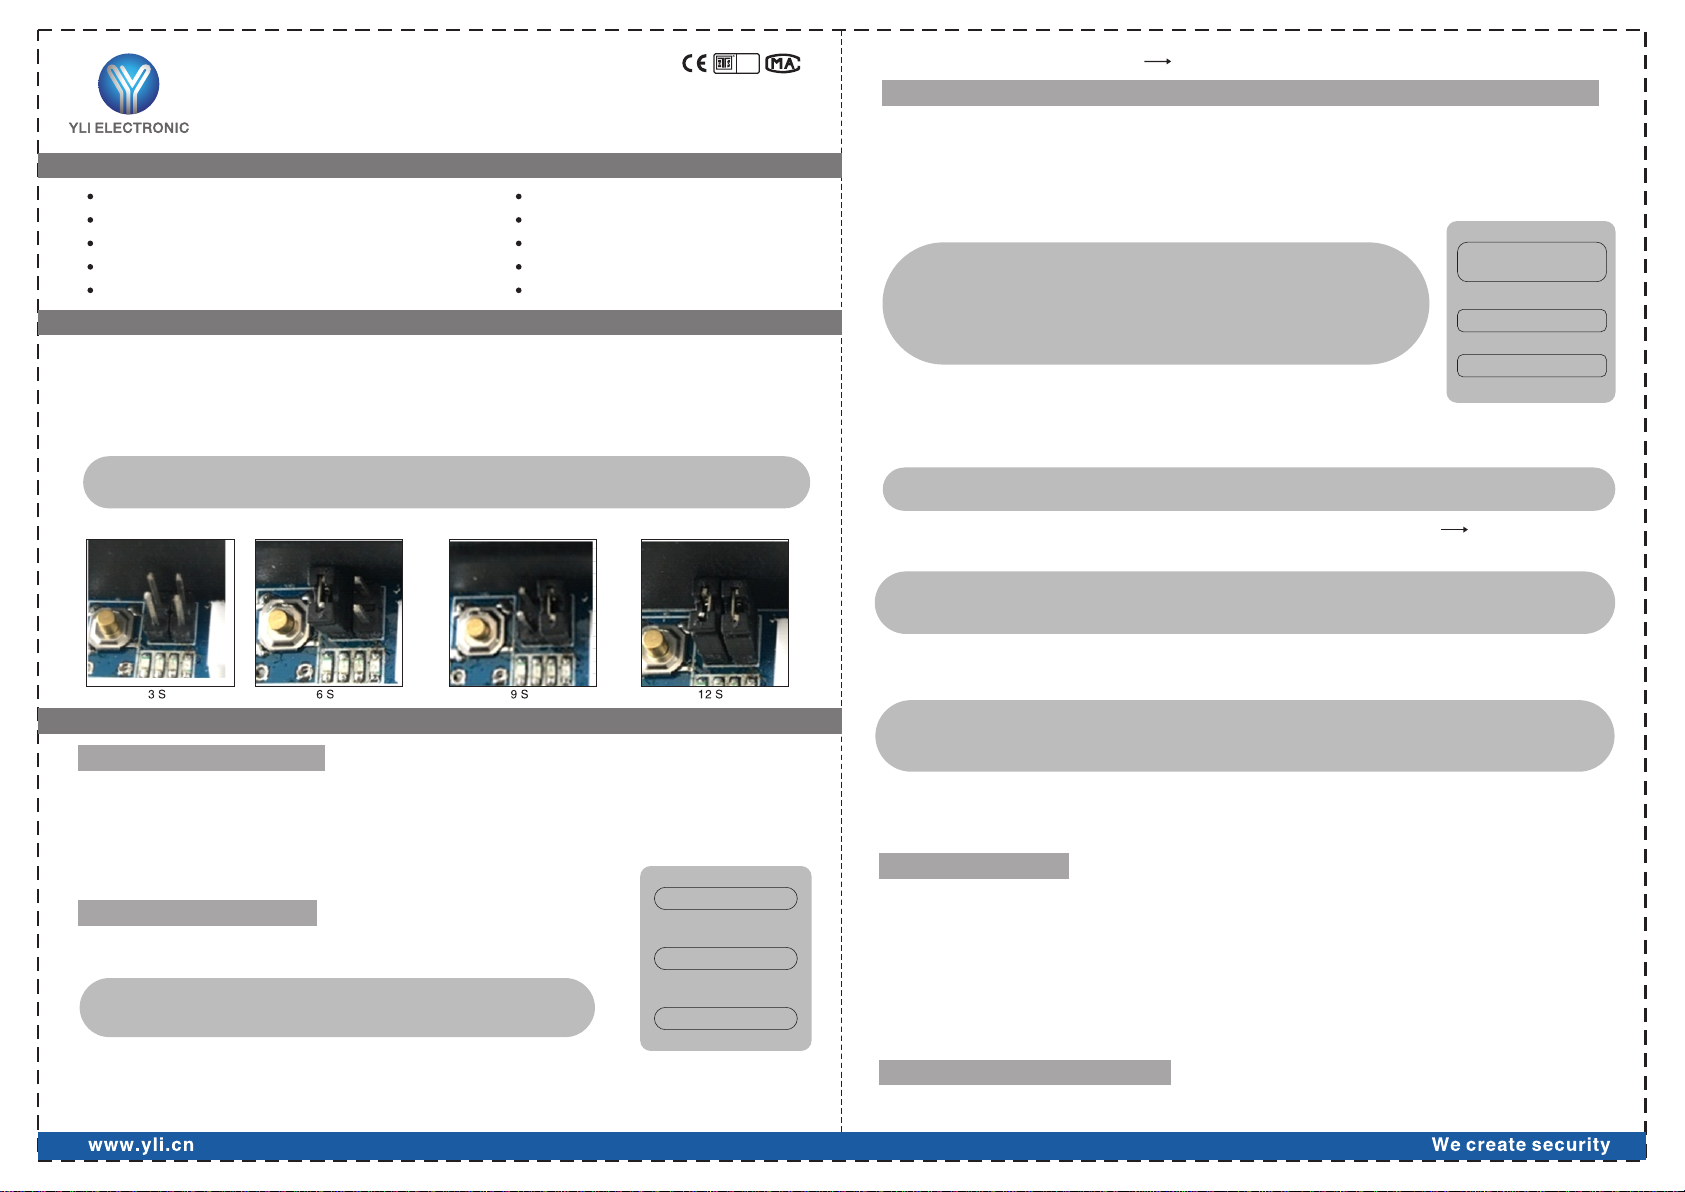
Time Delay
6 SEC3 SEC 9 SEC 12 SEC
Delete data
NO COM NC
Plunger pin
Blue
Yellow
Black
Active indicator
(Green light)
Clear indicator
( )Red light
Black
Red
Apple users and Android users can download and install in AppleStore and GooglePlay respectively.
“YLI Bluetooth Lock”