Youngman Richardson & Co JIBBI 1250-EVO User manual

JIBBI 1250-EVO
User Manual

1 Mobile command push-button panel (with cable)
The platform is equipped with a mobile control push-button panel (console) which allows for normal
operation on the platform.
The console can be located in the dedicated metal support attached to the railing of the platform or
removed and held by the operator.
The metal support can also be removed by unscrewing the relevant rear knob.

Attention: If the platform is transported on vehicles, always secure the support by means of the
threaded knob.
Attention: The metal support is only removable in the cable version. In the version with radio
control it is fixed and cannot be removed.
The push-button panel can also be disconnected from the spiral cable by unscrewing the ferrule
indicated with (A).
Attention: Do not touch ferrule (B); if ferrule B is turned, the wires inside the connector will be
damaged.
Attention: For all operations that require lifting of the basket above the transport height, the console
and the operator must be inside the platform itself.


No
.
Identification Function and Status Description of the function
1 LH joystick
Orange “DRIVE”
button
- Left track translation control;
-
Left track opening/closing.
Blue “LIFT” button - Boom lifting/lowering;
-
Tower rotation.
Blue “LIFT” button
+ Green
“MANUAL” button
(14)
- Side manual levelling;
- Longitudinal manual levelling.
2 RH joystick
Orange “DRIVE”
button
- Right track translation control;
-
Right track opening/closing.
Orange “DRIVE”
button ” + Purple
“FAST DRIVE”
button (11)
- Booster Activation;
- Optional mode: translation control
command with the right Joystick
only.
Blue “LIFT” button
- Outreach extension/retraction;
-
Basket rotation.
3 Emergency
Button
EMERGENCY STOP
4 Selector
Ignition - Switching
off the
combustion/electric
engine
To switch on the combustion/electric
engine select ON;
To switch off the combustion/electric
engine select OFF;
Selecting OFF and holding down the
control for 10 seconds the glow plugs of the
internal combustion engine are activated;
NOTE: When the machine is powered by
an electric motor, if no signal is received
after 5 minutes, the electric motor switches
off.
5 Selector
Activation -
Deactivation of
Dynamic Levelling
and Proactive
Levelling
To activate Dynamic Levelling, turn the
selector to ON;
To deactivate the Dynamic Levelling, turn
the selector to OFF;
To activate Proactive Levelling, turn the
selector to ON;
To deactivate Proactive Levelling, turn the
selector to OFF.
(With the selector ON, the automatic boom
ascent between 0 and 5° is also activated)
6 Selector
Selection of ground
movements and
aerial part
movements
For the movements of the aerial part, turn
the selector upwards (6A Blue “LIFT”
selector);
To activate the ground movements, move
the selector downwards (6B Orange
“DRIVE” selector).
7 Potentiometer
Selection of
revolutions of the
internal combustion
engine
Turning the device clockwise (+) increases
the currents to the proportional valves.
Moreover, with the selector over 50% the

No
.
Identification Function and Status Description of the function
endothermic engine accelerator is
activated;
Turning the device anti-clockwise (-)
decreases the currents to the proportional
valves. Moreover, with the selector below
50% the accelerator of the internal
combustion engine is deactivated and the
movements can only be carried out
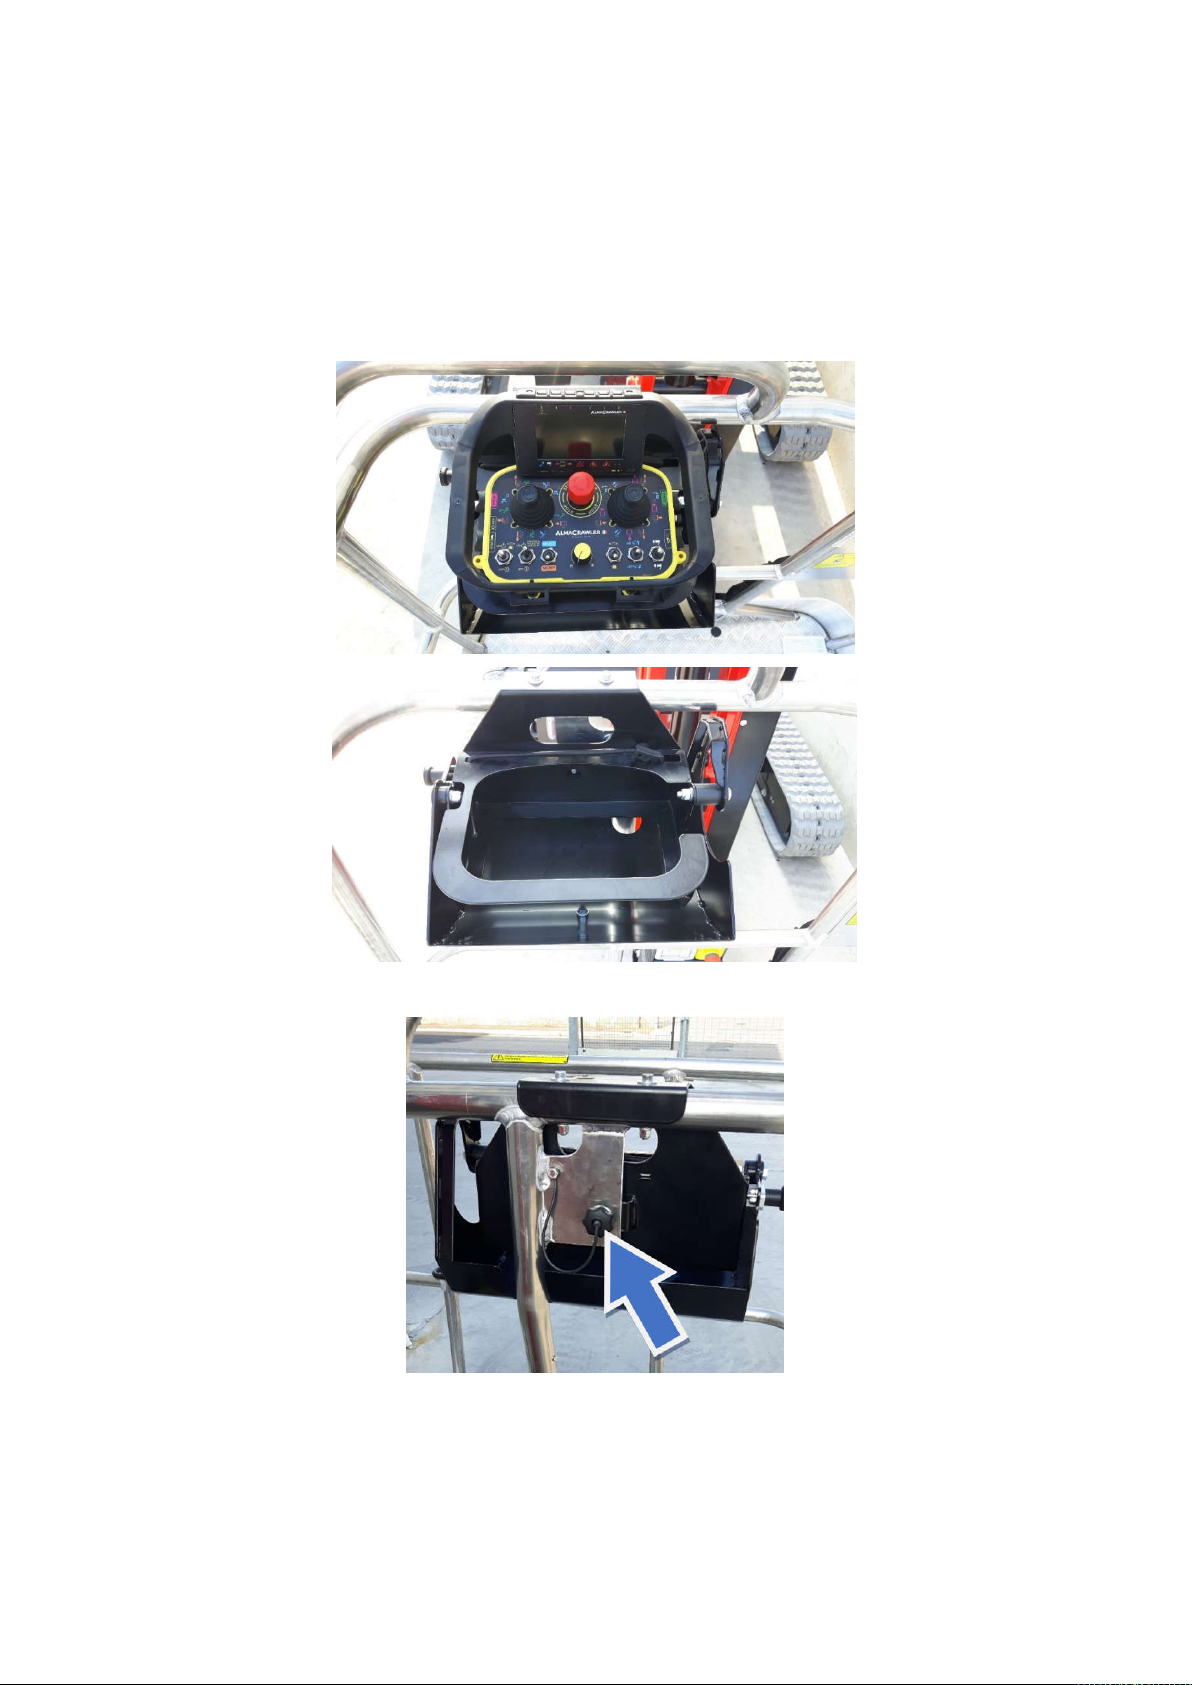
individually.
8 Selector
Selection of
endothermic engine
or electric motor
To select the combustion engine, turn the
selector upwards;
To select the electric motor, move the
selector downwards.
9 Selector Antenna movement
control (JIB)
To raise the antenna (JIB), move the
selector upwards keeping it in position;
To lower the antenna (JIB) move the
selector downwards keeping it in position;
Note: This command only works after
having previously activated the aerial part
using the selector 6 (Blue “LIFT” selector).
10 Selector Winch movement
control (if present)
To lower the hook of the winch, move the
selector downwards keeping it in position;
To raise the hook of the winch, move the
selector upwards keeping it in position.
11 Purple (FAST
DRIVE) button Fast drive activation
-
Press and release to activate the
Booster.
- Optional mode: translation control
command with the right Joystick
only.
12 Safety key
(KEY)
Safety key for
console activation
Insert the supplied key to activate the
console;
If the key is not inserted, the console cannot
be activated;
The key is encrypted so use only the key
provided, otherwise the console cannot be
used.
13 Button
(START)
Ignition of the
console
Press and release to turn on the console.
14
Green
(MANUAL)
Button
Activation of the
manual levelling
controls
Press to activate the manual levelling
controls using the left joystick.
15
Button
(Warning
Buzzer)
Warning Buzzer
Activation Press to activate the warning buzzer.
16 Connector Connector for coiled control cable.

Note: The machine can perform two simultaneous movements only if the potentiometer (7) exceeds
50%; conversely, the platform will only allow one movement at a time.
Messages and screens on the Display
On the mobile keypad is the display (14), where all the parameters, the indications to the operator and
any machine alarms are signalled (see photo below).
Machine status screens
Fuel level indicator
-
Green indicator: “Fuel OK” Diesel
level sufficient;
- Red indicator: “Fuel reserve” Low
diesel level.
BOOSTER
indicator
- Green indicator: “BOOSTER ON”
Booster active;
- Red indicator: “BOOSTER OFF”
Booster not active.
Fuel Level
Booster
Home Errors List Diagnostic
Fuel Level OK Booster ON Anti-collision ON Work Status RPM 0
0°
Long. Level.
0°
Lat. Level.
Max Outreach
Basket Load Kg
Work
height m
Messages
L
0
12.0
100%
100%
ALARMS
INDICATIONS
-84°
0°
0°
0°
Services Languages
3.7
6.8
0°
0°
6.4

Anti-collision
Indicator
- Green indicator: “ANTI-COLLISION
ON” Anti-collision sensors active;
- Red indicator: “ANTI-COLLISION
OFF” Anti-collision sensors
deactivated;
Machine status
indicator
-
Green indicator: “Machine Status”
Machine enabled for work;
- Red indicator: “Errors Status”
Presence of errors in memory.
Motor indicator
- Machine off the value is 0;
- Machine at minimum rpm 1500;
- Machine at maximum rpm 2850;
Longitudinal
levelling indicator
The inclination of the frame on the
longitudinal level is shown in real time.
Lateral levelling
indicator
The inclination of the frame on the side
level is shown in real time.
Visual level
-
If the central light is green the
levelling of the boom column is
within the correct limits;
- If the machine is longitudinally
unlevelled, the red light will
switch on according to the position
of the unlevelling (front/rear);
- If the machine is laterally
unlevelled, the red light will
switch on according to the position
of the unlevelling (right/left);
- If the machine is unlevelled both
laterally and longitudinally two red
lights will come on.
Note: These conditions, if they limit the
movements, will also be highlighted in
the alarms box.
Limit outreach
indicator
It updates in real time the maximum
distance that the operator can reach with
respect to the centre of the slewing ring,
according to the diagram and to the actual
value of the angle of the boom. This value
in the example shown to the left is 6.8m
(22.3ft).
Anti-collision
Work Status
RPM
0°
Long. Level.
0°
Lat. Level.
Max Outreach
3.7
6.8
0°
0°

The value of 3.7m (12.13ft) represents the
distance reached by the operator.
Indicator of weight
in basket and of the
work being
performed
- It indicates in real time the weight
present in the basket;
- The letter indicates the active work
diagram.
Maximum work
height indicator
It updates in real time the maximum
height that the operator can reach with
respect to the ground, according to the
machine configuration. This value in the
example shown to the left is 12m
(39.37ft).
The value of 6.4 m (20.99ft) represents
the height reached by the operator.
Track configuration
-
Update in real time of the
maximum extension of the two
tracks (R = Right, L = Left).
- If the arrow is blue, the operator
can perform the movement;
- If the arrow is not present, the
movement is not enabled.
- In the transport condition it is
possible to extend the tracks.
- In the transport condition and with
column centred it is possible to
retract the tracks.
Movements of the
aerial part of the
machine
- If the arrow is blue the movement
is enabled;
- If the arrow is not present, the
movement is not enabled;
- If the arrow is red, it indicates the
first movement to be performed to
reset the machine from a stop
condition.
Basket Load Kg
L
0
Work height
m
100%
100%
6.4
12.0

Movements of the
aerial part of the
machine
With movements of
the carriage selected
- The blue arrows indicate the aerial
movements necessary to bring the
machine to the condition in which
translation is enabled

Ground controls
The platform has a control panel located on the carriage, on the front-left side of the machine. These
commands are for the operator on the ground in case of maintenance of the platform, or for emergency
situations.
Attention: The key must always be available to the recovery operator or the person in charge of the
operations from the ground.
Unintentional operation of the ground controls is prevented by automatic selection made via the key
(1): Turning the latter to the position (RIGHT-1B) "basket controls" automatically disables the ground
control console, selecting the opposite side (LEFT-1A) "ground controls" automatically disables the
control console in the basket.

N
o.
Identification Function and
Status
Description of the function
1 Key selector
Selector for
machine on/off
and control station
selection
Selector in central position (0) machine off;
Selector in position 1A machine on with
ground control station;
Selector in position 1B machine on with
platform control station.
2 Selector Engine Power On
– Off
To switch on the combustion/electric engine
select ON;
To switch off the combustion/electric engine
select OFF;
Selecting OFF and holding down the control
for 10 seconds the glow plugs of the internal
combustion engine are .
NOTE: When the machine is powered by an
electric motor, if no signal is received after 5
minutes, the electric motor switches off.
3 Emergency
Button
EMERGENCY STOP.
4
Button with
cover prepared
for leaded seal
Button for
emergency
handling
To activate the button, open the cover and
press it.
Attention: This button disables all the safety
devices and must only be used in an
emergency; example operator incapacitated
and machine in block condition due to
overload.
The button must be kept pressed together with
the desired movement which remains active
for only 5 seconds. At the end it is necessary to
release and press the button again.
5 LED light Basket LED light
installed
If turned on it means that the basket is installed
and the machine can only be used for lifting
persons and equipment.
If it flashes it means that the platform is not
installed nor the winch.
6 Connector Push-button panel
cable connector
Connecting the cable of the push-button panel
it is possible to control translation by means of
the Joysticks. The translation in addition to the
transport condition is only permitted if there is
no load in the basket.
Connector for radio power supply (only if the
machine is equipped with radio control).
7 LED light Winch LED light
installed
If turned on it means that the winch is installed
and the machine can only be used for lifting
material.
If it flashes it means that the platform is not
installed nor the winch.
8 Selector Winch movement
control (if present)
To lower the hook of the winch, move the
selector downwards keeping it in position;
To raise the hook of the winch, move the
selector upwards keeping it in position.

N
o.
Identification Function and
Status
Description of the function
9 Selector Tower rotation
By moving the selector upwards and keeping it
in position, the tower is rotated to the right;
By moving the selector down and holding it in
position, the tower is rotated to the left.
10 Selector
Outreach
extension/retractio
n
By moving the selector to the left and keeping
it in position, the extension is retracted;
By moving the selector to the right and keeping
it in position, outreach extension takes place.
11 Selector Boom movement
By moving the selector upwards and keeping it
in position, the boom is raised;
By moving the selector down and holding it in
position, the boom is lowered.
12 Selector Antenna
movement (JIB)
By moving the selector upwards and keeping it
in position, the antenna lift (JIB) is performed;
By moving the selector downwards and
keeping it in position, the antenna descent
(JIB) is performed.
13 Selector Basket rotation
By moving the selector upwards and keeping it
in position, the basket is rotated to the right;
By moving the selector down and holding it in
position, the basket is rotated to the left.
14 Selector Basket balancing
By moving the selector upwards and keeping it
in position, the basket is manually balanced;
By moving the selector downwards and
keeping it in position, the basket is manually
balanced.
15 Display Display
Electronic hour meter which displays the
operating hours of the internal combustion
engine.
Attention: The use of ground controls is reserved for personnel who are adequately trained on the
use of these commands.
IT IS FORBIDDEN to remain inside the basket while a second operator is performing manoeuvres
with the controls on the ground.

2 Machine start-up with the ground control panel
To start the machine via the ground control panel, it is necessary to turn the key selector (1) on the Left
side ("1A" Purple).
Then the control unit will begin to check the safety systems:
An intermittent acoustic signal will be activated;
Once the check is finished, turn the selector (2) to the right (OFF) keeping it in position for 10 seconds.
In this way the glow plugs are activated;
When the 10 seconds have elapsed, an acoustic signal will sound, at this point turn the selector to the
left (ON);
If the machine is connected to an external power supply by means of an appropriate socket, selecting
ON will activate the electric motor (if present).
Attention: The controls located on the ground are for EMERGENCY or MAINTENANCE use and
can only be used by qualified personnel.

Starting the electrical engine (if any)
To start the electric motor, and therefore the relative hydraulic pumps, it is necessary to connect a
sufficiently long cable with relative three-pin socket that complies with the European IEC 309
standard (see photo below) to the appropriate socket located near the petrol engine.
The power supply characteristics of the electrical network must be compared with the characteristics
of the electrical engine installed.
Characteristics of the electrical power supply network:
Voltage: 230 v ± 10% or 110 v ± 10%;
Frequency: 50 Hz or 60 Hz;
Grounding line working and equipped with a differential circuit breaker;
Use an extension power cord with an appropriate section depending on its length.
Attention: The connection to a network that does not meet the requirements of the electrical engine
may cause serious damage to some of the components of the machine.

To start the electric motor through the mobile console in the basket, and therefore the hydraulic
pumps, it is necessary to act on the ignition key located on the ground controls (this part is the same
as that described in the paragraph "Starting the combustion engine").
Once this phase is completed, turn the selector (8) on the control panel and move it downwards. In
this way the electric motor is enabled.
To start or stop the electric motor, choose the selector (4) on the mobile console.
To start the electric motor via the control panel on the ground, and therefore the hydraulic pumps, it
is necessary to act on the ignition key located on the ground controls (this part is the same as that
described in the paragraph "Starting the combustion engine").
Once this phase is completed, it is necessary to act only on the selector (2). Doing so will turn on the
electric motor.
Selection of carriage movements (translation and extension of the carriage)
By moving the selector (6) "Orange” DRIVE downwards, the following movements can be enabled:
1) Translation;
2) Widening and narrowing of the tracked undercarriage.

Translation
Attention: If selector 5 is positioned on (ON) and the translation is controlled, the telescopic boom
will automatically rise up to a value of 5°!!
2.1.2.1 Translation in standard mode
When the machine is switched on, the translation is automatically set in standard translation.
In this mode the operation is as follows:
The controls used to move and steer the platform are represented by 2 joysticks (1-2) located on the
control push-button panel (see photo below).
Each lever commands the respective track (Right Lever→Right Lever, Left Lever→Left Lever).
Move the lever forwards to drive the platform forwards. Move the lever backwards to drive in reverse.
You can work with one track at a time, depending on the movement required at that particular
moment.
The translation comply with the maximum safety speed allowed by the technical regulations in force
(point 5.3.1.11, UNI EN280:2015).
The platform is fitted with a tracked undercarriage with dual speed gear motors equipped with a
negative brake, therefore the machine will remain blocked whenever the forward or backward
movement is interrupted.
To turn the platform, move the levers as indicated in the following illustrations.

Right turn
Left turn
Rotation on itself towards
the right (Counter-
Rotation)
Rotation on itself towards
the left (Counter-
Rotation)
The indication of the translation enabling is indicated by the status of the consent warning light
located on the display on the control panel.
Attention: If you must drive up a slope, do not change direction when the ground changes from flat
to sloping. If this is absolutely necessary, perform the manoeuvre gradually.

Adjusting the speed:
It is possible by using the potentiometer (7) in the console to activate the throttle of the internal
combustion engine.
Turning the potentiometer clockwise (+) and exceeding 50% of the stroke activates the accelerator.
Turning the potentiometer anti-clockwise (-) and dropping below 50% of the stroke will deactivate
the accelerator.
After a time of 35 minutes without selecting any command the accelerator is automatically
deactivated.
2.1.2.2 Fast drive
Pressing button 11 (Violet "FAST DRIVE”) activates Booster mode (the display will show “FAST
DRIVE"); in this way it is possible to move the platform in a straight line simply by operating only
the Joystick (2), with the engine at maximum rpm.
This condition is activated regardless of the position of the Dynamic Levelling selector (5) and the
position of the potentiometer.
Attention: During this function, automatic levelling is deactivated.
The mode remains active until the button 11 is pressed again or until the machine is switched off by
means of an emergency key or mushroom button.

The function is only activated if the longitudinal inclination of the carriage is less than 5°.
With this function active, the hydraulic motors are put in series and engine displacement of the same
is activated.
In this way it is possible to move only in a straight line (it is not possible to steer) but at twice the
speed of the standard mode.
Attention: With the Booster function active, when the joystick is released the machine does not stop
immediately but there is a deceleration ramp. The space travelled before it stops can even be of 50
cm.
2.1.2.3 Optional mode: translation control command with the right Joystick
Pressing button 11 (Violet "FAST DRIVE”) and positioning the potentiometer (7) at a value below
90% activates the driving mode with joystick (the display will show "FAST DRIVE”)
With this function enabled, it is possible to control the machine translation in a straight direction and
in steering simply by operating the Joystick (2) only.
The mode remains active until the button 11 is pressed again or until the machine is switched off by
means of an emergency key or mushroom button.
Table of contents
Other Youngman Richardson & Co Industrial Equipment manuals
Popular Industrial Equipment manuals by other brands

nvent
nvent He15 instruction manual

Yoshitake
Yoshitake TRAP STAR TSF-11AT product manual

ESCO Technologies
ESCO Technologies ETS-Lindgren 5247 quick start guide

ETC
ETC M-138 Operation and maintenance manual

Interactive Instruments
Interactive Instruments Jet Stream 500 instruction manual

environmental potentials
environmental potentials EP-2820 Installation and application manual