Youshiko YC9418 User manual

Youshiko YC9418 RC Projection clock
One Step Automatic Set Up:
Connect Clock with power supply and insert required battery or
activate the backup battery, and then insert batteries in outdoor sensor
and make sure it’s on CH1, and press reset button , then wait and don’t
do anything , for Projection Clock to self set automatically by MSF
Radio control system, within few minutes to few hours or maximum by
05:00 am, depending on the signal or your location. (After this you
never have to do anything, In some cases it may take up to 24H to self
set everything.
Automatic time change for Spring & Autumn and automatic time
checks, This also can take up to 24H to self set the time.
Keep the Clock display unit well away from TV / Computer / Wi-Fi Hub
/Mobile phones etc to avoid any interference .
Please Note Before Using:
Every time Clock look for Radio control signal projection clock screen &projection time turns off for few minutes.
1. If the projection clock screen & projection time turns off when you turn the projection clock on, it's because it begins to
calibrate time automatically based on local radio-controlled time, not because it's faulty. The screen will light up after it
finish the auto time-calibration.
2. Theloudness of alarm sound or ringtone cannot be adjusted.

Features:
MSF Radio controlled clock function
Radio control function can be set on and off
Time in optional 12/24 hour format
Perpetual Calendar Up to Year 2099
Day of week in ENGLISH
Dual alarms that can be set on weekdays / weekends and daily
Snooze time setting (1~30Minute or OFF)
Remote sensor low battery indicate
Comfort indictor
Changetrend display
Weatherforecasting and barometer function
Ice alert
Remote sensor temperature alert range set
Time andtemperature projection function
Projection display 180 degree rotation function
Humidity measurable range: 20%RH ~ 95%RH
Temperature:
— Indoor temperature measurement ranges: -9.9°C (14.2°F) ~ 50°C (122°F)
— Outdoor temperature measurement ranges: -40°C (-40°F) ~ 70°C (158°F)
— Temperature alternatively in °C or °F
Maximum /minimum value record of temperature and humidity
Wireless Outdoor Sensor:
— 433.92MHz RF transmitting frequency
— 60 meters transmission range in an open area
Power Supply:
Main unit:
Battery: CR2032 ( keep the time , can go on after the external power supply is disconnected )
Adapter: DC5V1.2A
Remote Sensor:
Battery:2 x LR06 AA ( not Included )
Appearance description:
B C
N
A
O P Q R TS
E F G HD I J K L
U
M
M
D
VA
21 3 4 5 6 7 8 9
10 11

RX------
A:Backlight brightness manual adjustment knob
B:Indoor temperature and humidity
C:Indoor temperature change trend
D:Snooze/ Light button
E:Barometric pressure change trend
F:Weather forecast pattern
G:Barometric pressure value
H:Ice alert
I:Remote sensor channel number
J: Remote sensor low battery indicator
K:Remote sensor temperature alert status symbol
L:Remote sensor temperature and humidity
M:Projection window
N:Indoor comfort indictor
O:Day of week
P:Alarm clock ON symbol
Q:Radio controlled status symbol
R:Time
S:Automatic backlight brightness symbol
T:Date
U:Remote sensor comfort indictor
V:Light sensor
1:Battery cover
2:Projection rotation/ON/OFF button
3:Remote sensor temperature alert setting button
4:Channel button
5:MEMORY button
6:+/°C /°F button
7:-/Alarm ON or OFF button
8:ALARM setting button
9:General setting button
10:Power input jack
11:USB charging interface (MAX. 5V1A)
TX------
A1: Remote sensor temperature
A2: Emission symbols
A3: Channel number
A4: Remote sensor humidity
A5: Remote sensor low battery indicate
B1: °C /°F unit transfer button
B2: Manual transmitter button
B3: Channel switch
C1: Transmit indicating lamp
C2: Battery compartment cover
C3: Wall mounting hole
C4: Stand cover
C5: Battery compartment
Initial operation
Open the main unit battery compartment cover
Insert CR2032 battery observing polarity (“+” and “ –“ marks), If there is battery insulating sheet, just pull out the insulating sheet.
Insert the output terminal of the adapter into the DC power socket on the back of the product, then insert the adapter into the AC socket (100~240V), the
backlight of the product will always be lit.
The Weather Station will now start to make a connection to the outdoor remote sensor. This process lasts for a maximum of 3 minutes and will displayed by a flashing
reception antenna symbol in the “OUTDOOR” display area on the receiver.
This now, Open the remote Sensor battery compartment cover, push the channel switch tothe “1” position, Insert 2 x AA batteries observing polarity (“+” and “–” marks),
close the battery cover.
If there are multiple outdoor sensor remote controls, according to the same method, push the channel switch to the “2” or “3” position, establish another 2 remote
sensor connections.
After about 3 minutes, it will enter the Radio control receive mode.
The backlight and projection will be temporarily turned off when entering the radio control mode, and will be restored after the reception mode.
Receptionof the Radio signal
When entering MSF signal receiving mode,the icon starts to flash. When a valid signal is identified, the symbol will not flash, and the symbol will
flash.
At 1:00 / 2:00 / 3:00, the clock automatically carries out the synchronization procedure with the MSF signal to correct any deviations to the exact time. If this
synchronization attempt is unsuccessful (the icon disappears from the display), the system will automatically attempt another synchronization at the next full one
hour. This procedure is repeated automatically up to total 5 times.
To start manual MSF signal reception, press and hold the “-” button for 2 seconds. If no signals received within 7 minutes, then the MSF signal search stops and start
again at the next full one hour.
During RC reception,to stop searching radio signal, press the “-” button once.
:Received successfully
:The previous reception was successful, butthe last reception failed
:RCC function is set to OFF
F.Y.I.:
RCC = Radio Controlled Clock.
We recommend the product be placed at a minimum distance of 2.5 meters (8.2Feet) to all sources of interference, such as televisions or computer monitors or
switching power adapter.
When receiving the MSF radio wave, it will automatically turn off the backlight.
Radio reception is weaker in rooms with concrete walls (e.g.: in cellars) and in offices. In such extreme circumstances, place the system close to the window.
During the RC receive mode, only the " " and “-”buttons have a function, other buttons are not functional, If you want to carry out other functions of
operation, please press “-”button to exit the RC receiving mode.
Manual time setting
Press the button “ ”to set the clock 12/24Hr format.

Press and hold the button “ ”for 2 seconds, the “ ON/OFF ” starts toflash, and press the “+” or “-” buttonsto set the RCC function is ON or OFF.
Press the “ ”button to confirm the item has been set and go tothe next one, the sequence of setting items is as follows:
RCC ON/OFF DST ON/OFF HOUR MINUTE Format of DATE (D/M or M/D) YEAR MONTH DATE Pressure unit Pressure type(Relative/Absolute)
Relative pressure Weather forecast
When adjusting the value, press and hold the “+” or “-” button to adjust quickly.
Press “ ”button to confirm the last item to end the setting procedures, then it will return to the normal mode.
The relative air pressure value can only be set when the air pressure type is selected as relative air pressure.
When choosing the 12Hr format, if “AM” is displayed before the hours,it means that the hour is ante meridiem, if “PM” is displayed before the hours,it means that the
hour is post meridiem.
F.Y.I.:
If there is no valid operation within 20 seconds, it will automatically return to normal time mode from the set mode.
Setting the alarms
Press button , you can set Alarm1 and Alarm2 ON or OFF, symbol appear means that ALARM1 is ON, symbol appear means that ALARM2 is ON,
symbol or disappear means that Corresponding ALARM is OFF.
Press once button , LCD display Alarm1 time (5 seconds), press button again when Alarm1 time is displayed, LCD display Alarm2 time (5 seconds), press
button again when Alarm2 time is displayed, return to current time display.
When Alarm1 time is displayed, press and hold button for 2 seconds until Hour of the Alarm1 time starts to flash, press the or buttons to set the
required Hour.
Press button to confirm the item has been set and go to the next one, the sequence of setting items is as follows:
Hour of Alarm1 Minute of Alarm1 repeat period of Alarm1 Snooze time of Alarm1
When setting the repeat period, comply with the following rules:
M-F : From Monday to Friday
S-S : From Saturday to Sunday
:From Monday to Sunday
The snooze time can be set to 1-30 minutes or OFF, if “OFF” is selected, it means that the snooze function is turned off.
The Alarm2 time can be set according tothe same method above.
F.Y.I.:
If there is no valid operation within 20 seconds, it will automatically return to normal time mode from the alarm time set mode.
When adjusting the value, press and hold the or button to adjust continuously and quickly
The Alarm will sound for 2 minutes if you do not deactivate it by pressing any button.
Switching off the alarm signal
When it's ringing, press any button except the SNOOZE button to stop the Alarm sound.
When it's ringing, press and hold the SNOOZE button for 2 seconds to stop the Alarm sound.
Snooze function
When it's ringing, press the SNOOZE button once the alarm sounds to get to snooze mode, when the set snooze time is over, it will ring again.
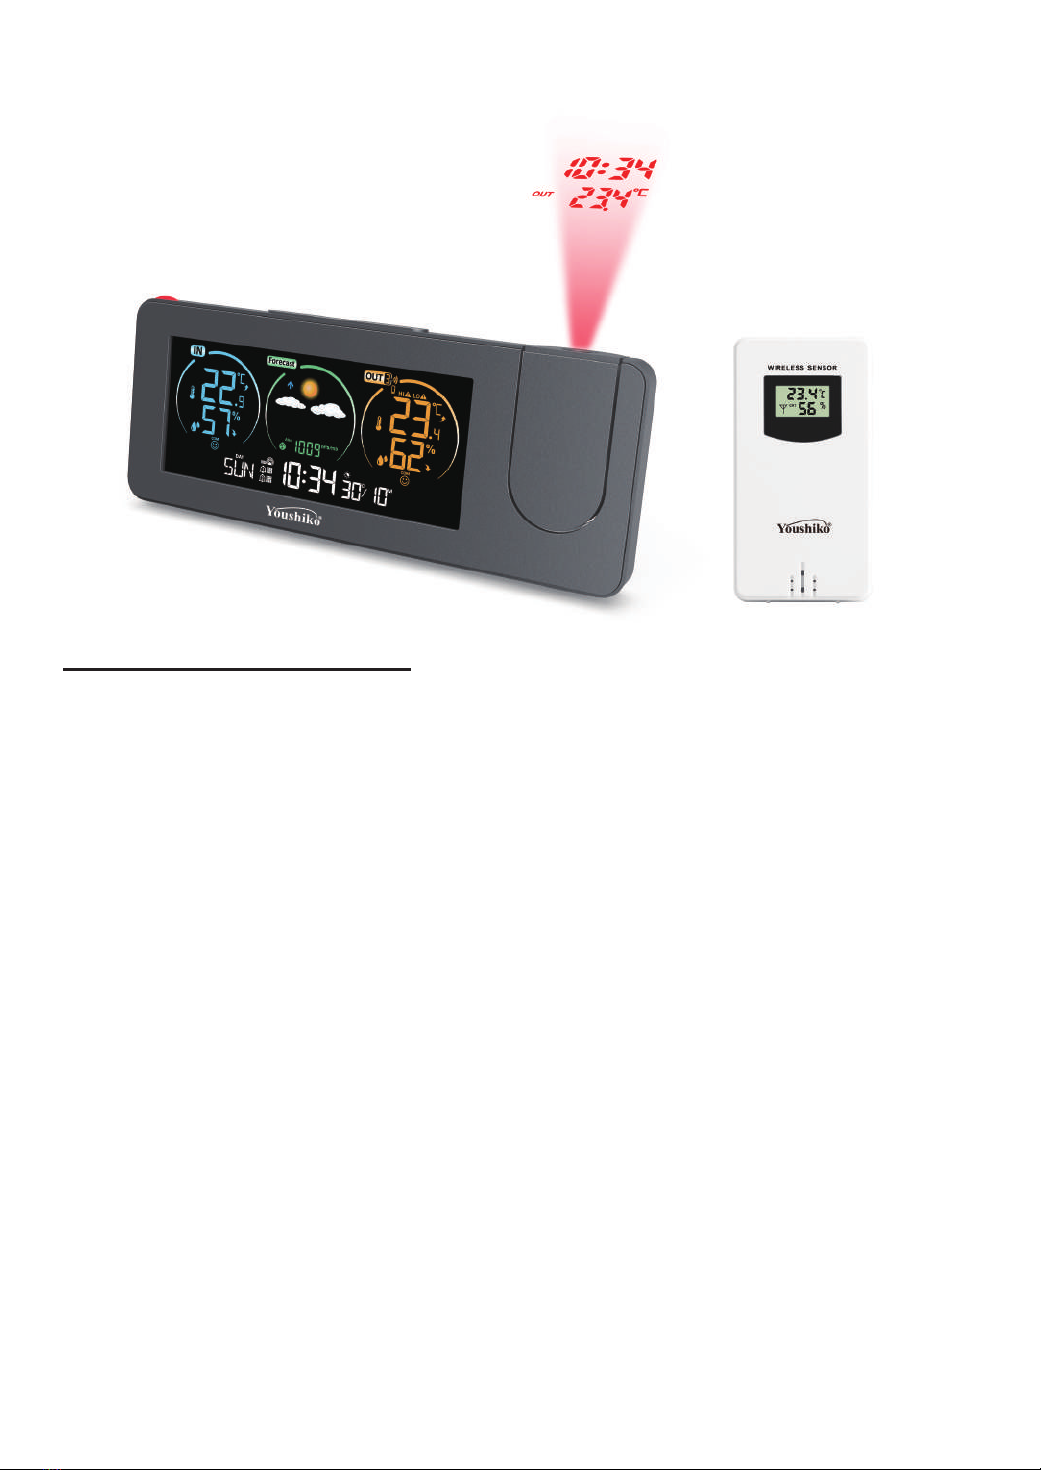
RF Transmission Procedure
The main unit automatically starts receiving transmission from remote sensor for outdoor temperature & humidity after batteries inserted.
The remote sensor will automatically transmit temperature and humidity data to the main unit after batteries inserted.
If the main unit failed to receivetransmission from remote sensor (“- -.-”and “- -”appears at the remote sensor temperature and humidity display position ), press and
hold the CH button for 2 seconds, RF icon will be flashing,the main unit will rescan the launch signal of the channel.
°C /°F unit conversion
Press the ℃/℉button to select ℃or ℉units.
Query Maximum/minimum numerical value
When the temperature and humidity are shown in the LCD, The main unit beganto record temperature and humidity maximum and minimum numerical value.
Press once “MEM”button, the LCD will display maximum value of temperature and humidity, The LCD will display the minimum value of temperature and humidity if
press once “MEM” button again when the maximum value is displayed.
at the same time, there are “MAX” or “MIN” displayed on the LCD.
The temperature and humidity maximum/minimum value will RE records after press and hold “MEM” button 2 seconds.
The memory value of the day will be automatically cleared at AM12:00 every night.
F.Y.I.:
If the temperature reading is below ranges, the LL.L will be displayed. If the temperature reading is above ranges, the HH.H will be displayed.
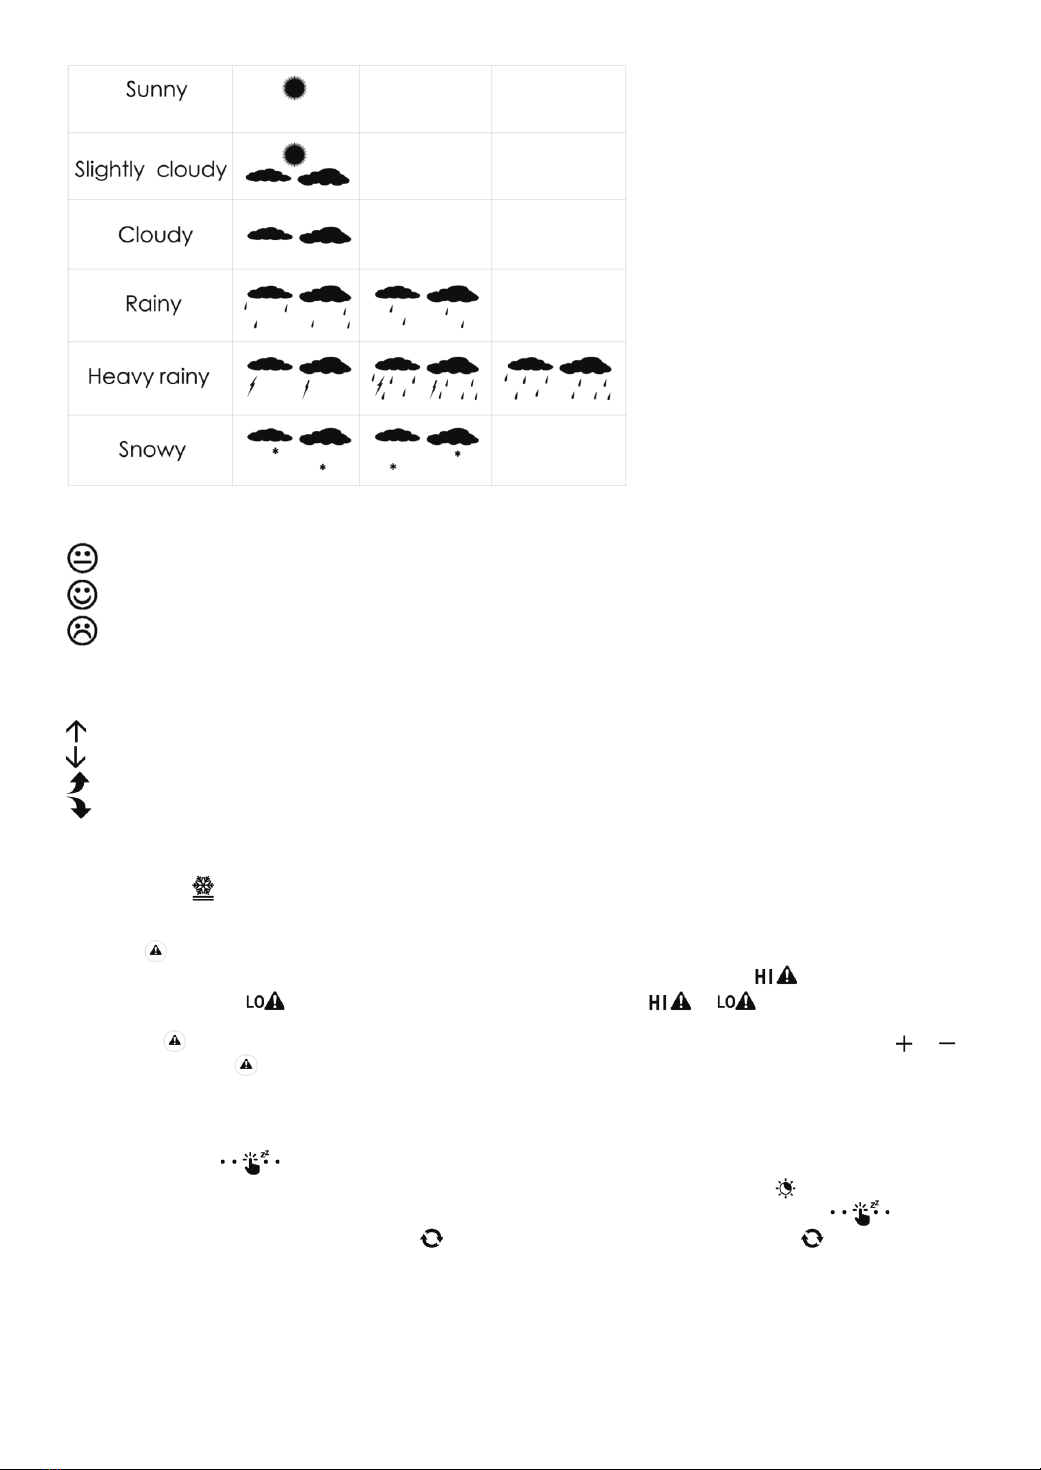
Weather forecasting function
Please take the weather forecast from your local weather forecasting service into account as well as the forecast from your weather station. If there are discrepancies
between the information from your device and from the local weather forecasting service, please take the advice of the latter as authoritative.
The weather forecast is calculated from evaluation of fluctuations in the barometric pressure and may deviate from the actual weather conditions.
The weather station displays the following weather symbols:

The weather symbols indicate the weather fluctuation over the next 8 hours and not the current weather.
Comfort level
The temperature and humidity is dry (When the humidity is below 40%.)
The temperature and humidity is comfort (When the temperature in 20~28℃and the humidity in 40~70%)
The temperature and humidity is wet (When the humidity is above 70%)
F.Y.I.:
When the humidity in 40~70% and the temperature is not in 20~28℃,The comfort level icon will no display.
Trend display
The barometric pressure is rising.
The barometric pressure is falling.
The temperature or humidity is rising.
The temperature or humidity is falling.
If there is no arrow trend, it means the barometric pressure / temperature / humidity is steadying.
Ice alert
The ice Alert symbolappears and flashing when the remote sensor temperature at –1.0 ~ 2.9℃(30.2~37.3℉).
Outdoor temperature Alert
Press button , you can set the Outdoor temperature alert function ON or OFF, this operation is only valid for the currently displayed channel.
If you want to set other channels, press the【CH】button to switch to the channel display you want to set. When the symbol appear means that above upper
limit alert function is ON, symbol appear means that below lower limit alert function is ON, symbol or disappear means that Outdoor
temperature alert function is OFF.
Press and hold button for 2 seconds, enter the outdoor temperature upper limit or lower limit value setting mode, the set item will flash, press the or
buttonsto set the value, press button to confirm the item has been set and go tothe next one, press the【CH】button to set the value of other channels.
When the outdoor temperature exceeds the limit set by the channel,the temperature value and corresponding icon will be flash, and whenthe temperature is
refreshed, as long as the temperature still exceeds the set limit, there will be a beep reminder.
Backlight and Projection function
Press and hold the button for 2 seconds to switch between manual or automatic backlight adjustment modes.
Default manual adjustment of backlight brightness after power on, When the automatic adjustment mode is switched, the symbol is displayed.
In the manual adjustment mode, turn the knob ○
Ato manually adjust the backlight brightness, after the backlight is dimmed, press the button once to
jump tothe brightest backlight for 10 seconds. Press the button to set the angle of the projection, press and hold the button for 2 seconds to ON/OFF
the projection.
In the automatic adjustment mode, the product will detect the ambient brightness through the light sensor. When the environment is very bright, the backlight
brightness is also bright. Because the ambient light is too strong, the projection will be automatically turned off. When the ambient brightness is dark, the
backlight brightness will also be automatically dimmed, and the projection function will be automatically turned on.
USB charging interface: (MAX. 5V1A)
You can charge your mobile phone and other devices with the USB port , but keep your phone and other charging devices near the clock only when charging , as during
charging time , mobile phones or other devices can block the RC signal.

Keep this unit well away from heaters , Direct sun or water and cold walls.
Declaration of Conformity:
Youshiko Ltd hereby declares that the product fully complied to applicable guidelines and corresponding standards and
requirements of UKCA and other relevant provisions of Directive 1999/5/EC. LIABILITY
DISCLAIMER:
Electrical and electronic waste contains hazardous substances. Disposal of electronic waste in open countryside and/or in other
unauthorized places greatly damages the environment. • Please contact your local and/or regional authorizes to find the addresses
of legal dumping grounds with appropriate facilities. • All electronic instruments must now be recycled. Users shall take an active part
in the recycling and recovery of electrical and electronic waste. The unrestricted disposal of electronic waste may do harm to public
health and the quality of environment. • Reading the “User Manual” is highly recommended for the benefit of the user. This product
must not be disposed of in general rubbish collection on facilities. • The manufacturer or supplier cannot accept any responsibility for
any incorrect readings and any consequences that occur should an inaccurate reading take place. • This product is designed for use
in the home or simple office only for the temperature and humidity etc. • This product is not to be used for medical purposes or for
public information. • The specifications of this product may change without prior notice. • This product is not a toy, keep out of the
reach of children. • No part of this manual may be reproduced without written authorization of the manufacturer.
Supplied in Box:
1 x Youshiko YC9418 Projection Clock main unit
1 x instruction manual
1 x CR2035 battery
1 x Power supply
1 x Outdoor Sensor ( YC9312 )
All enquiries: service@youshiko.co.uk
Table of contents
Other Youshiko Clock manuals