Youshiko YC9080 User manual

1
YOUSHIKO YC9080 WIRELESS THERMOMETER & HYGROMETER
USER MANUAL
1. Features
Indoor & Outdoor Temperature
Indoor & Outdoor Humidity
Past 24 Hours Max/Min. Record
Comfort Icons (according to both temp & humidity)
Indoor & Outdoor Temperature and Humidity Alert
2. Main Unit Appearance
2.1 Part A- LCD
A1: Indoor/Outdoor Temperature
A2: Past 24 hrs Minimum Temperature Record
A3: Past 24 hrs Minimum Temperature Record
A4: Indoor/Outdoor Humidity
A5: Past 24 hrs Minimum Humidity Record
A6: Past 24 hrs Minimum Humidity Record

2
2.2 Part B- Buttons
IN/OUT/SEARCHbutton
▲
B3: RESETbutton
B4▼/C/F
B5ALERT
2.3 Part C- Structure
C1: Wall Mount Hole C3: Battery Cover
C2: Stand
3. Outdoor Thermo Sensor
D1: Transmission Indication LED
D2: Outdoor Temperature display
D3: Outdoor Humidity display
D4: Battery Compartment
D5: Wall Mount Hole
D8: Temperature Probe Plug & Jack
D9: Stand
2.3 Part C- Structure
C1: Wall Mount Hole C2: Battery Cover
C3: Stand
4.Getting Started:
4.1 Main Unit:
Slide open main unit battery compartment cover [C3]
Insert 2 x A
Replace main unit battery compartment cover [C3]
Use a pin to press the RESET [B3] button on the rear of the main unit, the main unit is
now ready for use

3
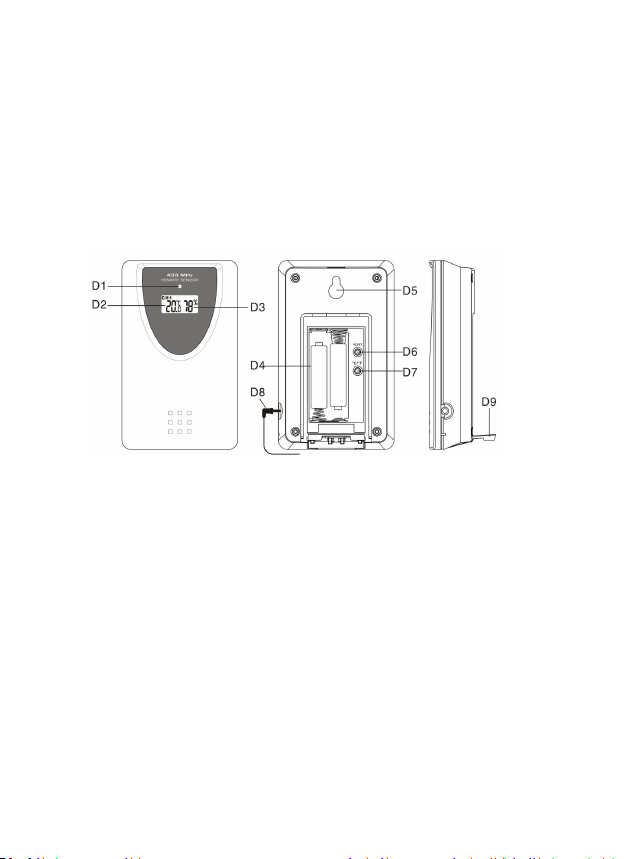
4.2 Outdoor Thermo Sensor
Batteries compartment (D4) of thermo sensor is locating behind the back cover,
unscrews the batteries cover to open.
Insert 2 x AAA
5. Installation
5.1 Main Unit
The main unit can be placed onto any flat surface (C2), or wall mounted by the
hanging hole (C1) at the back of the unit.
5.2 Outdoor Sensor
The remote sensor should be securely mounted onto a horizontal surface.
Note: Transmissions between receiver and transmitter can reach up to 30m in
open area. Open Area: there are no interfering obstacles such as buildings, trees,
vehicles, high voltage lines, etc.
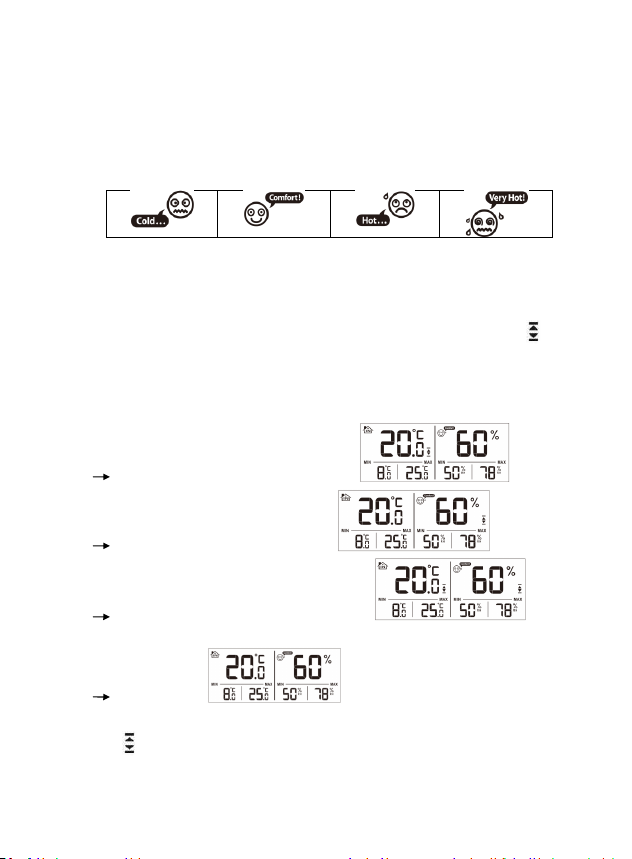
6. Temperature & Humidity
6.1 RF Transmission Procedure:
The outdoor sensor will automatically transmit temperature and humidity signal to
the main unit after batteries inserted.
If main unit failed to receive transmission from outdoor thermo sensor in first 3
minutes after the batteries inserted - - . –display on the LCD), SEARCH
button (B1) for 3 seconds to receive transmission manually. flashes on
the LCD
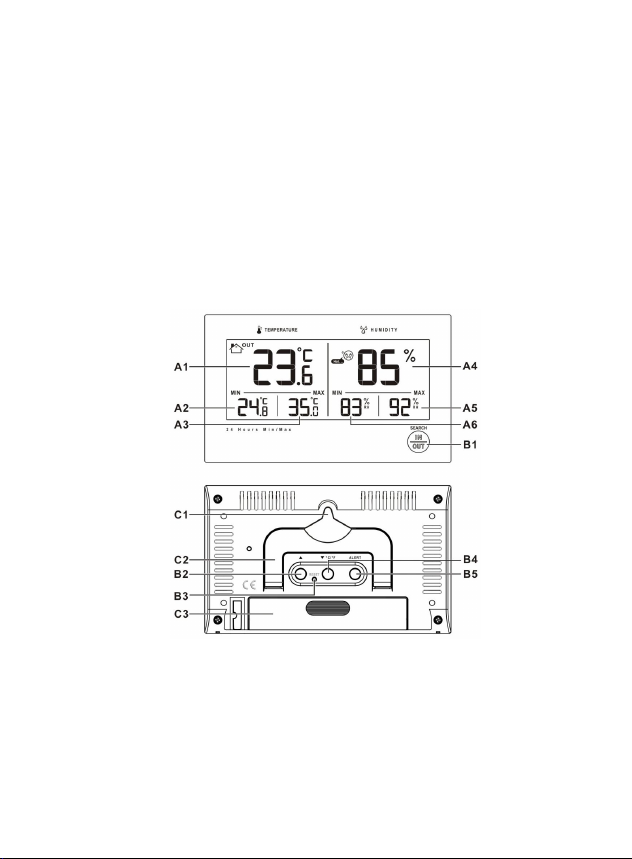
6.2 Temperature& Humidity
After start-up, the unit would display indoor Temperature, Indoor humidity and Past
24 Hours Indoor Maximum and Minimum Temperature and Humidity Record.
Press IN/OUT 1) to view the outdoor Channels data, including outdoor
temperature, outdoor humidity and past 24 Hours outdoor Max. & Min Temperature
and Humidity Record.
Press IN/OUTbutton (B1) select to view indoor/outdoor Channels data, the
sequence is shown as follow:
In/Out
Display the Indoor & Outdoor channels alternatively
HSEARCH1) for 3 seconds to clear the record on outdoor channel
manually, and receive the transmission from outdoor automatically again.
6.3 Celsius / Fahrenheit
P (B4) to select Indoor/Outdoor Temperature in Celsius mode or

4
Fahrenheit mode.
If the temperature is out of the measurable range, LL.L (beyond the minimum
temperature) or HH.H (beyond the maximum temperature) will be shown on the LCD.
6.4 Comfort Indicator Icon
There are four different icons would be display according to the temperature and
humidity condition:
6.5 Temperature & Humidity Alert function:
When viewing indoor or outdoor channel, press “ALERT”button to select to activate
the alert function for this channel. Once ALERT function is activated, the icon “ ”
appears on the LCD.
When viewing Indoor Channel, press ALERT button select to:
Activate Indoor Temperature Alert function
Activate Indoor Humidity Alert function
Activate Indoor temp. & Humidity Alert function
Deactivate Alert function for Indoor
Temp & Humidity
Hold “ALERT”button for 3 seconds to enter Temperature & Humidity Alert setting.
Icon “ ” beside Temperature’s digits flash. Press “▲”or “▼“button to select alert
setting for Indoor or Outdoor Temperature & Humidity, Press “ALERT”button to
confirm the setting.

5
Setting Sequence as follow: Upper limit of temperature, Lower limit of Temperature,
Upper limit of Humidity, Lower limit of Humidity.
Press “▲” (B2) or “▼“ (B4) button to set the upper ” ” and lower “ ” limit of the
temperature. Press “ALERT“ button (B5) to confirm the setting, and move to the
Humidity alert setting. Press “▲” (B2) or “▼“ (B4) button to set the upper ” ” and
lower “ ” limit of the Humidity, press “ALERT”button to confirm and quit the
setting.
When it’s alert, the corresponding icon “ ” or “ ” would flash on the LCD. Press
any buttons to stop the alert sound, otherwise, it will sound for 2 minutes, and stop
automatically.
Note: The Setting Mode will automatically exit in 15 seconds without any adjustment.
6.6 Frost Alert
” is shown if the outdoor temperature (any channel) is between -2°C ~ +3 °C
7. Low battery
The low battery icon “ ”will appear at particular channel indicating that thermo
sensor unit of the channel is in low battery status. The batteries should be replaced.
8. Precautions
Use a pin to press the reset button (B3) if the unit does not work properly.
Avoid placing the clock near interference sources/metal frames such as computer or
TV sets.
Do not expose it to direct sunlight, heavy heat, cold, high humidity or wet areas
The outdoor sensor must not be set up and installed under water. Set it up in away
direct sunlight and Rain
Never clean the device using abrasive or corrosive materials or products. Abrasive
cleaning agents may scratch plastic parts and corrode electronic circuits
9. Specifications

6
Indoor Data:
Temperature range: -9.9 to 50°C [+14.2 to +122°F]
Temperature Units Measured: °C or °F [switch able]
Humidity Range: 20% to 95%
Outdoor Data:
Transmission distance:
(open area) 30m @ 433MHz
Temperature range: -20 ~ 50°C [-4 ~ +122°F]
Humidity Range: 20% to 99%
Mount: wall / table
Main Unit Dimensions: W136x h82x d17 mm
Thermo Sensor Dimensions: w62 x h101 x d24 mm
Battery Requirements:
Base Station [indoor]: 2 x AAA batteries
Sensors [outdoor]: 2 x AAA batteries
Please note: Batteries are not including
11. Products and batteries:
Products and batteries should not be disposed of with normal household waste.
According to Directive 2012/19/EU, the device is to be supplied at the end of its useful
life to a proper disposal. The valuable materials contained in the device are supplied to
recycling and avoid the burden of the environment. Please take this device to a
collection point for electronic waste or a recycling center.
Remove the batteries from the unit before disposing of it and dispose of them separately.
Consumer is legally obliged to dispose of used batteries at a collection point for used
batteries, at a local recycling center or at the battery point of sale, for further information,
contact your local waste disposal company or local government.
12: LIABILITY DISCLAIMER:
• The electrical and electronic wastes contain hazardous substances; Disposal of
electronic waste in wild country and/or in unauthorized grounds strongly damages
the environment.
• Please contact your local and/or regional authorities to retrieve the addresses of
legal dumping grounds with selective collection.

7
• All electronic instruments must from now on be recycled. User shall take an
active part in the re-use, recycling and recovery of the electrical and electronic
waste.
•The unrestricted disposal of electronic waste may do harm on public health and
the quality of environment.
•As stated on the gift box and labelled on the product, reading the “User manual”
is highly recommended for the benefit of the user. This product must not be
thrown in general rubbish collection points.
•The manufacturer or supplier cannot accept any responsibility for any incorrect
readings and any consequences that occur should an inaccurate reading take
place.
• This product is designed for use in the home only as indication of the
temperature / Humidity etc
•This product is not to be used for medical purposes or for public information.
• The specifications of this product may change without prior notice.
• This product is not a toy, Keep out of the reach of children.
• No part of this manual may be reproduced without written authorization of the
manufacturer.
R&TTE Directive 1999/5/EC
Summary of the Declaration of Conformity: We hereby declare that this wireless
transmission device
Table of contents
Other Youshiko Thermometer manuals