Yujin Robot YCR-M05 User manual

YCR-M05
User Guide
Robotic Vacuum Cleaner eX500
■Please be sure to read the Safety Precautions before use. www.yujinrobotusa.com

1
Tips for eective cleaning
Operating principles of eX500
pre-operation check list
• Assemble side-brushes
• Insert remote control baeries
• Assemble Ultra Microber Mop
Pre-cleaning check list
• Install Base(Charging) Station
• Charging
• Set Current Time
• Install boundary area tape
Using eX500
• Power On/Off
• Start / Stop cleaning
• Using the move and charge functions
Cleaning mode
Set cleaning time
Emptying the Dust Bin and cleaning the Antibacterial Filter
Cleaning the Side Brushes
Cleaning the Sensors
Cleaning the Main Brush
Cleaning the Front Wheel
2
5
7
8
9
10
12
13
16
15
17
●contents
Safety precautions
Components
Reference
Installing eX500
Using eX500
eX500 care & maintenance
Storage
Troubleshooting
Error codes

Please read this manual carefully and follow all warnings and instructions.
- Do not wrap the power cord tightly or place heavy objects on it.
→ is may cause electric shock or re.
- Keep the pin and interface of the power plug clean from dust or water.
→ is may cause malfunction or electric shock.
- Do not pull the power cord or touch the power plug with wet hands.
→ is may cause electric shock or re.
- Do not use a damaged power plug or power cord, or insert the power plug into a
loose outlet.
→ is may cause electric shock or re.
- In the event water enters the internal part of the cleaner, the product should be sent
for service even though the product was dried.
- Do not repeatedly plug and unplug the product.
→ is may cause electric shock or re.
- Caution should be taken when plugging the adapter directly into the charging socket.
→ is may cause electric shock or re.
Users must be aware of operations prohibited by
this product.
Users must follow the instructions to avoid serious
injury or death.
Users must follow the instructions to avoid injury
or product damage.
Prohibited
Warning
Warning
Caution
Electric and power cord precautions
2
●Safety precautions

- Do not touch the charger's power cord with wet hands.
→ is may cause electric shock.
- Arrange cables or wires in the cleaning area before use to avoid entangling
with the robot.
→ is may cause re or electric shock due to damaged cable.
- Remove light objects or clothing from the cleaning area before use.
→ is may damage the object or clothing while robot is in use.
- Remove small or fragile objects from the cleaning area before use.
→ Fragile objects may be damaged.
→ Remove coins or expensive jewelries before cleaning.
- Clear the oor of objects that may get in the way.
→ in towels, pads, power cords, table clothes, etc., may get tangled with the wheels.
Also objects on a table may fall o if the robot bumps a table.
- Empty the dust bin before operating eX500.
→ Suction function may not perform well if dust bin is full.
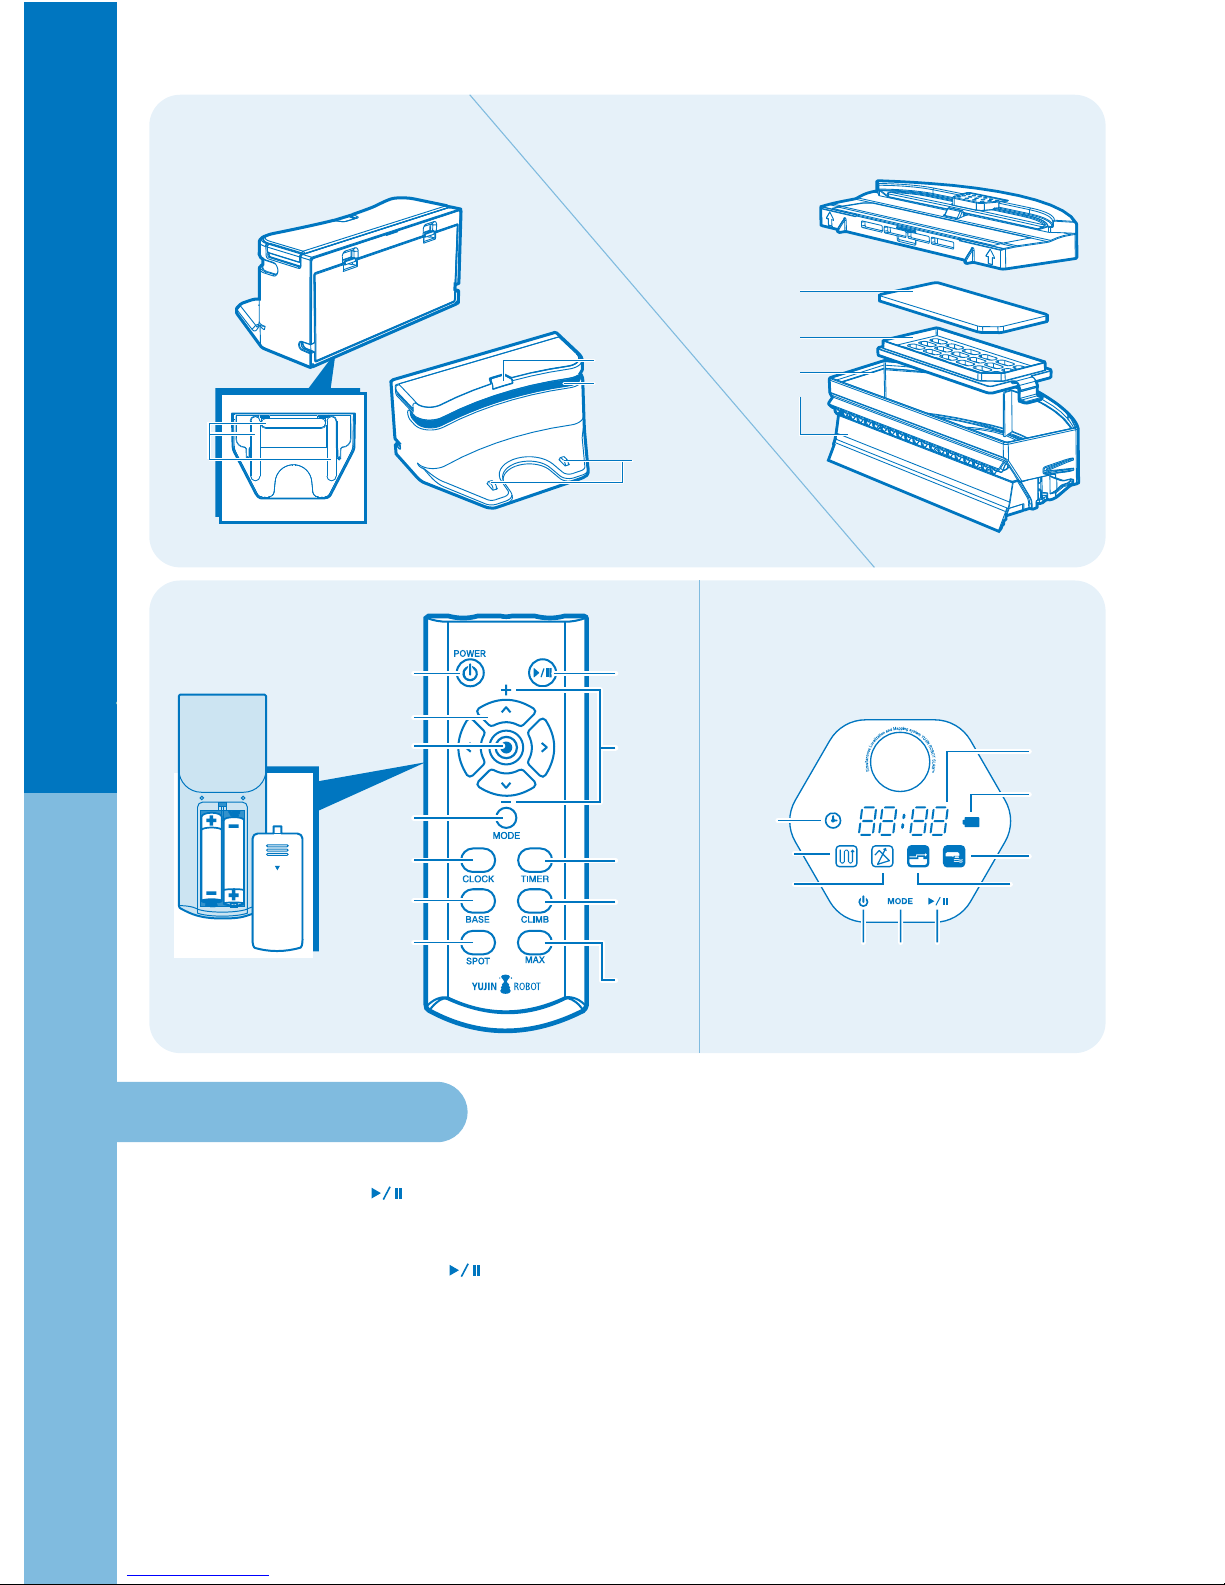
- Check that the main components such as antibacterial lter, brush
and dust bin are assembled properly before cleaning.
→ In the event you use eX500 without the main components, such as the
antibacterial lter or brush, the product will not clean properly, and such operation
may damage the product. Also, children and pets may be deemed as a barrier by
the eX500 resulting in certain areas not being cleaned.
- Do not operate eX500 when children or pets are present and le alone.
→ e children or pets may be aracted to eX500 and may hurt themselves aempting
to play with the product.
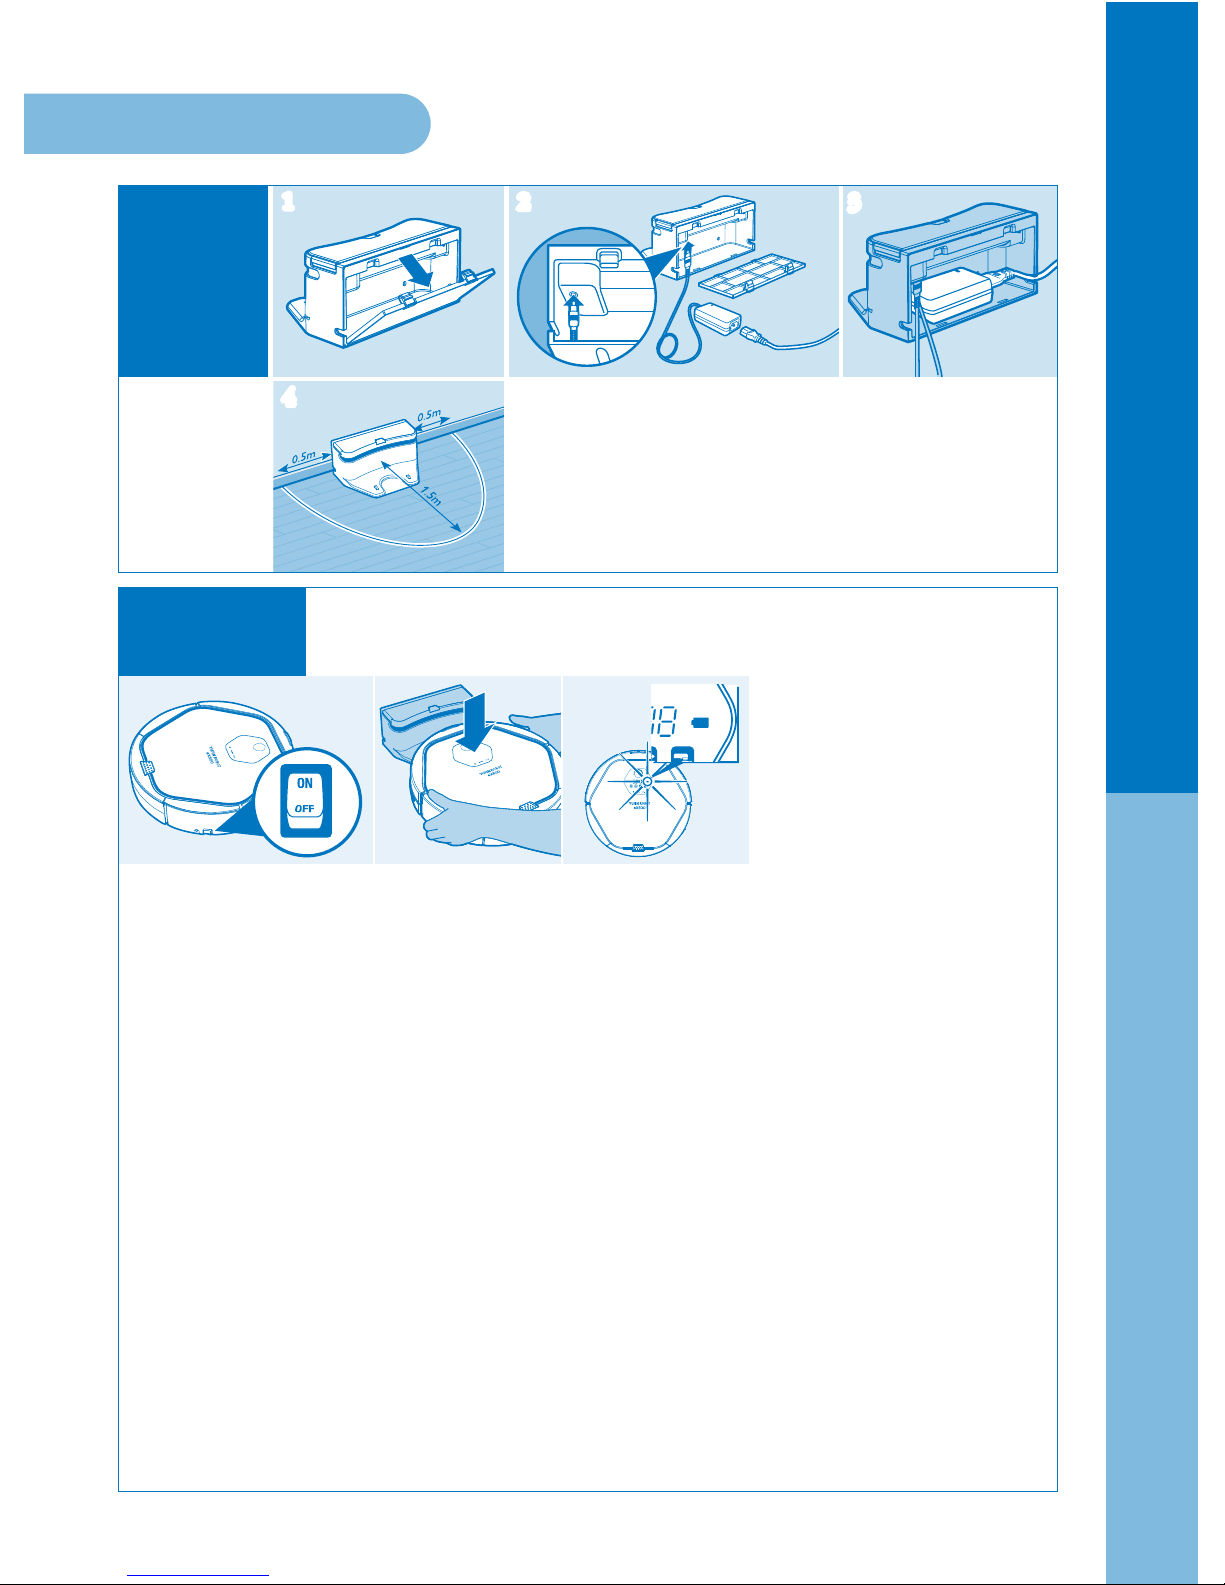
- Do not place the power cord on the oor when installing a charging station.
→ eX500 may drag the power line while auto-charge or cleaning.
- Keep the charging station away from water.
→ is may cause electric shock or re.
Warning
Warning
Warning
Prohibited
Caution
Caution
Caution
Caution
Caution
Caution
Precautions before using
3
●Safety precautions

- In the event of an unusual sound, smell or smoke emanating from the product, immediately
turn o eX500 and place it in a safe distance away from anything ammable.
→ is may cause electric shock or re.
- Do not use eX500 on a table or any high surface.
→ is may damage the product.
- In rare instances eX500 cleaner may scratch or otherwise damage particular ooring.
In this event, discontinue use.
- In the event a large piece of plastic or other substance is vacuumed up, remove it immediately.
→ Serious damage to the eX500 can occur when it is used for a period of time with its suction
duct clogged.
- Tranport eX500 to another area when it is blocked by a threshold of the entrance
or ledge .
- Prevent eX500 from vacuuming liquid materials.
- Donot use eX500 nearammables suchascigarees,hot materials orgasoline.
→ is may cause re.
- Do not use use eX500 outdoors.
-In theevent a foreignsubstance isstuckto the sensor,eX500may malfuction.
-
Prior to cleaning oforeignsubstances, turnOFF the powerswitchandthen usethe provided cleaning
brushtoremove.
→If eX500operatesallofthesudden,itmaycauseseriousdamagetotheproduct.
-In theevent eX500or componentsaredestroyed,contact themanufacturer or service
center for repair.
→ismaycauseelectricshockorre.
- Prior to cleaning thechargingstation,rstpullout thepower plug forsafetyreasons.
- Mishandling ofthebaerymaycause an explosionorre.Attheendof thebaery's service
life,dispose thebaeryina lawfulmanner.
→ismaycausere.
-Donot spraywater directly on the productorwipeeX500with volatile materials suchas
benzene,thinneroralcohol when cleaning the product.
-Donot applyunduepressuretothe bumper.
→Incasethebumpersensorisdamaged,thismaycrashonthewallorwithfurniture.
-Donot disassemble, repair oralterthe productexcept anauthorizedserviceprovider.
→ismaydamagetheproduct.
Precautions while using
Warning
Warning
Warning
Warning
Warning
Warning
Caution
Caution
Caution
Caution
Caution
Caution
Caution
Caution
Caution
Precautions after using
4
●Safety precautions

5
Side-Brush
Dust Bin Mop plate
●Components●Components
Components
Robot Cleaner Charging
Station
Remote Control
(Batteries included)
Side-Brush(R) Side-Brush(L)
Antibacterial Filter
Cleaning Brush
(Cleaning Brush is inside
of the charging station)
Boundary Area
Tape
(Virtual Wall)
Adapter Mop Plate
Ultra Microfiber
Wet Mop
Part Listing
● Top ● Bottom
Power Button
Camera
Mode Button
Start/Stop Button
Bumper
Barrier
Sensor
Manual Charging Jack
Main Brush
Fixing Clip
Wheel
Main
Brush
Cover
Front Wheel
Position
Front Wheel
Lithium Ion Battery
Charging
Terminal
Fixed Pin for
Side-Brush
On/Off Switch
Front Wheel
Cover
MODE
CLOCK TIMER
MAX
Quick Guide
UserGuide
YCR-M05
Quick Start Guide
Robotic Vacuum Cleaner eX500
※The complete user manual is also available to download on our website www.yujinrobotusa.com
YCR-M05
User Guide
Robotic Vacuum Cleaner eX500
■Please be sure to read the Safety Precautions before use. www.yujinrobotusa.com
Main
Brush

Remote Control
1. Press the Power on the Remote Control.
2. Press the Start/Stop ( ) Buon on the Remote Control.
3. Press the Power Buon to stop the operation.
4. To change modes, press the Power Buon, and use the Mode Buon to select the desired cleaning method,
and then press the Start/Stop ( ) buon.
5. e default mode is Auto + Climb.
6. Max Mode & Spot Mode
e Max Mode allows eX500 to clean until its baery is depleted. In Max Mode, eX500
starts in Auto(Mapping) mode to perform overall cleaning. When nished cleaning, it changes to Random
Mode for additional cleaning. (Cleaning will last approximately 120 minutes.)
※On the oors like carpet, rug, paerned tiles and marble, set the iClebo to Climb Mode for cleaning.
6
Dust Bin
Blade
Antibacterial
/Blackout Filter
Filter Case
Power Mode
Button
Non-Slip
Pad
Infrared Generator
Charging Display
Charging Terminal
●Components
● Charging Station ● Dust Bin
● Remote Control ● Display Screen
Start/Stop
Button
Random
Mode Climb Mode
Mopping
Mode
Mode Button
Time Setting
Button Timer
Button
Direction Button
OPEN
Enter Button
Charge Button
Power Button
Change
Climbing
Height
Cleaning
Mode
Button
Start/Stop
Button
Increase/
Decrease
Buttons
Cleaning
Mode Button
Time-set
Indicator
Battery
Status
Clock/
Cleaning
Time
Auto
(Navigation)
Mode

7
Operating principles of eX500
Principles of the Robotic Vacuum Cleaner
is product recognizes the ceiling and obstacles with the camera and various sensors, and cleans by making a virtual
map in the CPU installed in the main body. It operates by drawing the most ecient map by determining the area that
has been cleaned and the area to clean. (Camera navigation is disabled in random mode.) With about 20 detection
sensors, eX500 can avoid wall or objects. (chair, vase, etc)
It climbs over an obsticle up to 0.79 inches in height, and oor sensors help it to avoid falling down stairs.
Be careful that pets or children do not force the robot to fall by playing with it.
How it works
is product has one main brush, two side brushes and vacuum motor. Debris on the oor is gathered by the
rotating side brushes, and is swept into the dust bin by the rotating main brush.
Tips for effective cleaning
Please follow the instructions below for high cleaning eciency.
- Remove and empty eX500's dust bin aer each use.
- Use the Area Boundary Tape to conne eX500 to a particular room or area, and prevent it from geing too
close to electrical cords, computer cords, or delicate objects on the oor, etc.
(Refer to P.10 Install Boundary Area Tape)
- Remove all the non-xed objects such as toys, magazines or shoes from the cleaning area before cleaning.
- Do not li up or move eX500 manually while operating.
( If you do this, the robot loses its way and skips areas.)
- Make sure to charge for at least 1 hour before using eX500 for the rst time. (Refer to P.9 Charging)
●Reference

OPEN
8
1. Aer turning over eX500, identify the position of
the le and right side brushes.
2. Match the L side brush to the L marked on the boom of
eX500. en match the groove on the xed pin and the
side brush and press on rmly.
3. Match the R side brush to the R marked on the boom of
eX500. en match the groove on the xed pin and the
side brush and press on rmly.
1 2
Mop Plate
Install 2 x AAA baeries before using the Remote Contol.
1. Push the cover of the backside of the Remote Control downward to open.
2. Check (+)(-) of the baeries and install.
3. Match the cover to the groove, and close until “click” sounds.
1. Turnover eX500,andinstall theMopPlate by aaching ittothe boomof eX500 over theDustBin.
2. If Mopping mode is not used, keep the Mop Plate saperate from eX500.
※In Mopping mode with mop plate aached, there may be cases that it is blocked by carpet, rug, or doorsill, and
cannot go forward normally. In such cases, moving the rug or carpet to one side and using Mopping
mode is recommended.
※In some oor environments, there may be cases of not being able to go forward normally. If it cannot go forward
normally in the oor environment of marble oor or certain paerns, then also set Climb mode for cleaning.
Ultra Microfiber Mop
●Installing eX500
Pre-operation check list
Assemble side-brushes
Insert remote control batteries
Assemble Ultra Microfiber Mop
Fit the side brush into the xed pin of the robotic
vacuum cleaner matching the same shape.
CAUTION

2 3
9
1. Openthebackcoverof theChargingStation,andinstall
theadapterwithconnectedpowerplugasshowninthegure2above.
2. Completely connect the charging jack of the adapter to the
jack inside the charging station.
1. Turn on the Power Switch on the side of the product.
2. Correctly match the Charging Pin on the boom of the Main Body to the socket of the Charging Station,
and start the charging.
>> e baery status in the display window blinks and charging starts.
If baery is completely discharged, “Lo” is displayed in the display window.
3. Red, Yellow and Green light will be blinking in order on the display window according to the baery's
charge while the robot is charging and the baery indicator will become steady green when the baery is full.
※Baery Indicator Color
- Green: Baery is fully charged
- Yellow: Remaining baery is
50% or less
- Red: Remaining baery is
20% or less
[Auto-charge during use]
※Whenthebaeryislowduringanoperation,thisproductmovestothechargingstationandperformsautocharging.
Aer the charging is completed, it nishes cleaning the remaining space, and returns to the charging station.
※When the baery is low, this product is set to return to the starting place of the cleaning.
So if it started from a place other than the charging station, it returns to the place near
the starting place of the cleaning.
※Charging indicator color on Charging Station
- Red: changetoeX500isinoperationawayfromthechargingstation,ortheconnectionbetweeneX500andthe
chargingstationisimproperlyconnected.
- GreenBlinking:Recharging
- Green:Rechargecompleted
e baery is not charged at the time of product purchase.
so it must be fully charged before rst use.
1
4
1 2 3
●Installing eX500
Pre-cleaning check list
Install Base
(Charging)
Station
Charging

1 2 31 2 3
Using eX500
10
※Make sure to set the current time for the set cleaning time.
1.Press the Clock buon on the remote
control. e time on the display
screen will ash.
3. Set the "minute" with the (+)(-) buons on the remote control, and press the Enter buon.
4. When the time is set, it conrms the seing with beep sound.
2. Set the "hour" with the (+)(-) buons
on the remote control, and press the
Enter buon.
Aach the tape at the top of stairs where there is a danger of falling.
→ If dust accumulates on the fall prevention sensors they may not “see downwards” and the robot may fall.
※Place the tape on the oor to prevent the robot from
entering an undesired area.
Install boundary area tape
Bottom
side
Bottom
side
●Installing eX500
Set Current Time
●Using eX500
Press the Power Buon ( ).
If you press it one more time,
it is turned o.
Intelligent Cleaning
: AUTO+ CLIMB
1. Press the Power Buon ( ).
※Make sure the AUTO and
CLIMB icons light up on
the display window.
2. Press the Start Buon ( ).
※You can press the Climb Buon on the remote
control to cancel Climb Mode. (If CLIMB
mode is o, the robot does not go over doorsills or
climb onto the carpet or rugs over 0.2 in. in height.)
Start / Stop cleaning
Power On / Off

3
1
2
1 3
2
3
1
2
1 3
2
11
1. Use the direction buons
of remote control to send
eX500 to specic area.
3. If the charging ( )
buon of the remote
control is pressed, it nds
and moves to the charging
station and starts charging.
2. Aer eX500 has
started cleaning , if a
direction buon is
pressed, it will move in
the desired direction
while cleaning.
- When the backward buonispressed, eX500 will
turn180degreestochangedirections.
- If the direction buon is pressed right aer pressing
powerbuon,itmoveswithoutcleaning(suction).
BASE will be displayed on
eX500 when the robot is
returning to the charging
station.
※During an intelligent cleaning, the robot
performs the cleaning in vision mapping method.
When the robot decides that the cleaning is
nsihed, it returns to the starting point.
Selected Cleaning
: NDOM, SPOT(blinking)
, MAX, Wet Mop
A. NDOM mode
It cleans with a random
method for the time set by
the user.
1. Press the power buon
2. Press the MODE buon to select NDOM.
3. Set the cleaning time for robot in the display
window. (Default is 60 min. Adjust the time
with +, - on remote control.)
4. Make sure NDOM icon lights up on the display
window.
5. Press the START buon.
B. SPOT mode
It uses AUTO mode to perform focused cleaning
within a range of 1.6 ㎡on a zigzag paern.
1. Press the POWER buon.
2. Press the SPOT buon on the remote control.
3. Make sure the AUTO icon is blinking on the
display window.
4. Press the START buon.
- When the robot has completed SPOT cleaning
mode, it will return to its starting point.
C. MAX mode
In MAX mode, eX500 will rst clean in
AUTO mode. When the AUTO cleaning is
nished, eX500 will clean in NDOM mode
until the baery is low.
1. Press the POWER buon.
2. Press the MAX buon on the remote control.
3. Make sure both the AUTO and NDOM icons
lights up on in the display window.
4. Press the START
- e robot cleans until the baery runs out, and
returns to the starting point.
D. WET MOP mode
1. Aach the mop plate with mop pad to the robot.
2. Make sure the MOP icon lights up on the display
window. Deselecting CLIMB is recommended.
3. Use the MODE buon to select AUTO or
NDOM.
※Spot mode and Max mode can only be selected
by the remote control.
※In all mode selections, CLIMB is on by default.
If you want to turn it o, press the CLIMB buon
on the remote control to turn o CLIMB mode.
(If you turn o CLIMB mode, the robot will not
go over doorsills or climb on to a carpet.)
●Using eX500
Using the move & charge functions

1 2 31 2 3
1. Press the TIMER buon on the remote control.
→ e time indicator will blink in the display window.
If the cleaning time is set, it displays the set time.
At this time, to set a new cleaning time, press the TIMER buon one more time.
2. Use (+)(-) to set the "hour" for the cleaning time and press the Enter buon.
→ e set time is displayed in the display window.
3. Use (+)(-) to set the "minute" for the cleaning time and press the Enter buon.
→ e set time is displayed in the display window, and the reservation icon ( ) appears.
4. Once the time seing completes, select the cleaning mode and press Enter buon.
※To cancel the reservation, press the timer buon on the remote control, and press the Enter buon.
※When a TIMER cleaning reservation is set in AUTO mode, the robot will start cleaning at the set time and
return to the charging station when the cleaning is complete.
※When a TIMER cleaning reservation is set in NDOM mode, the robot will start cleaning at the set time
for the set duration and then return to the charging station.
12
●Using eX500
Cleaning
mode
Set Cleaning
Time
※Refer to page 10 for setting the current time.
Cleaning
mode
Set the
mode Cleaning
mode
Explanation Explanation
Status StatusExplanation Explanation
Cleans with camera
navigated mapping
Cleans in a random pattern for a set
duration. Set the duration with the
(+)(-) buttons on the remote control
After completing an AUTO cleaning,
eX500 will change to RANDOM mode
and clean until the battery is low.
AUTO RANDOM
Door sill
adjust
Mopping
Zigzag part cleaning within
a range of 1.6㎡
The cleaning mode is
automatically changed to
Mopping mode once the
mop plate mounted
on the bottom
Enabling CLIMB mode will increase the
performance of climbing mode from 0.20 inches to
0.79 inches. However, even with climbing mode
the shape of a surface may prevent eX500 from
climbing over an obstacle less than 0.79 inches in
height.
Remote
control &
display
window
Only with
remote
control
※ Climbing mode is on by default and eX500 will climb up a height
of 0.79 inches.
※ To prevent eX500 from climbing onto taller objects press the
CLIMB button. With climbing mode disabled the robot will only climb
a height of 0.79 inches.
※ When the TIMER is set for cleaning, the robot starts the cleaning at the set time
everyday.
※ During the cleaning of carpet or marble floor & patterned tile floors usage of AUTO + CLIMB mode is
recommended.

13
Cleaning the Sensors
●eX500 care & maintenance
Cleaning the Side Brushes
1. Separate the side brush with both hands.
2. Clean dust and foreign substances using the cleaning brush.
1.Wipe the sensors on the Front Bumper of eX500 using
q-tips.
2. Wipe the sensors on the boom of eX500 using q-tips.
1. Hold the Dust Bin as in the gure and separate Antibacterial Filter Cover.
2. Clean the Filter using Cleaning Brush.
※Dust Bin can be washed with water.
However, completely dry them before assembling and using them again.
Emptying the Dust Bin and cleaning the Antibacterial Filter

Cleaning the Front Wheel
14
●eX500 care & maintenance
Cleaning the Main Brush
4. Separate the brush cover then remove the main brush.
Furrow
CLICK
CLICK
6. Aer cleaning, put the
pyramid-shaped bump on the side
of the main brush to the
pyramid-shaped recess on the boom
of the robot.(Insert rmly to ensure
there is No gap between the brush
and the cam.)
4. Put the front wheel back and lock in place with the clip.
1. Press the front-wheel x clip with both hands and li up to seperate.
2. Remove foreign substances on the front wheel using the cleaning brush.
5. Clean hair, carpet ber and other substances may get stuck on the main
brush using the cleaning brush. Over time, hairs and bers accumulate
between the main brush and the bearing. is extra friction which will causes
less ecient cleaning, more baery strain leading to shorter running time and
may ultimately stop eX500.
※Use scissors or a knife along the main brush furrow to remove the hair.
2. Turn eX500 over and
place the boom facing
upside.
2. Unlock the le/right-xed
clip of the main brush.

15
1. If eX500 is not used for a long period of time,
turn o the Power Switch on the side of the Main Body.
※Please be aware that the baery could be discharged aer an extended
period of non-use.
●Stor a ge
Storage
2. Keep eX500 away from direct sunlight.
Store eX500 in a well ventilated location.
※Please do not store any objects on top of eX500 as it may cause a malfunction

16
●Troubleshooting
Below is the explanation about the most occurred ‘breakdowns’
when using this product.
If you can’t solve the problem with information below,
please call your Customer service center.
Problem Cause Solution
▶ Dust Bin is full.
▶ Main Brush is dirty.
▶ Filter is contaminated.
▶Baery is charged but the dust
bin is full.
▶ Power switch is turned o.
▶ Remote Control baeries are dead.
▶ Infrared sensor or beam window
of the remote control are blocked
or dirty.
▶ Remote control is too close
to the Charging station or
eX500.
▶ See <Product care & maintenance> and empty
the dust bin.
▶ See <Product care & maintenance> and clean
main brush.
▶ Charge eX500.
▶ See <Product care & maintenance> and empty
the dust bin.
▶ See <Product care & maintenance> and use
main brush.
▶ See <Product care & maintenance> and clean
the dirty lter.
▶ Charging station or eX500 is not
connected properly to the plug.
▶ Move farther away from the Charging
Station and press the buon again while
pointing at eX500.
▶ Connect the power of the Charging Station
properly.
▶ Move the Charging Station. No objects should be
placed within 20 inches le/right or 5 feet in front
of the Charging Station.
is is to enable eX500 to return
to the home station automatically aer
cleaning.
▶ eX500 must start cleaning from the charging
station to return to the charging station aer
cleaning.
It is not
cleaning well.
When I press
the power buon
to turn on eX500,
it turns o
automatically.
eX500 is
not responding.
eX500
is not charging.
Aer cleaning,
eX500 is not
returning
to the
charging station.
▶ Check the power switch on the boom
of the main body.
▶ Re-charge eX500.
▶ Insert the baery of eX500 properly.
▶ Change the baery of a remote control.
▶ Wipe the infrared sensor & beam part
of the remote control with so cloth.
▶Power of the charging station
is not connected properly.
▶Infrared generator & ejector
on the Charging station and
detector of eX500 is dirty.
▶Cleaning started with auto-mode
but not from the charging station.

17
●Troubleshooting ●Error Codes
Noise of the
eX500 is
geing worse.
▶Dust bin is full or lter is
dirty.
▶Main brush is dirty.
▶Main brush is dirty or hairs
are accumulating between the
main brush and the bearing.
▶Empty and clean the dust bin.
▶See <Product care & maintenance>
(page 13) and clean the lter.
▶See <Product care & maintenance>
(page 14) and clean the main brush.
Error display
Cause Solution
Lied wheel
Move eX500 to at area in case the wheel is stuck on an
obstacle.
Cannot detect oor
Move eX500 to at area.
Dust bin error Dust bin is not properly assembled.
See<Productcare&maintenance>andinstallproperly.
Wheel motor overload
Check if a foreign material such as hair or lint exists on the wheel.
See <Product care & maintenance> and remove the foreign
material.
Brush motor overload
Check if a foreign material such as hair or lint exists on the main
brush or side-brush.
See <Product care & maintenance> and remove the foreign
material.
Suction motor overload See <Product care & maintenance>
and clean lter, empty the dust bin.
Internal system error Turn o the power switch of eX500 then turn it on again.
Error Codes
C 1
C 2
C 3
C 4
C 5
C 6
C 7
Magnetic Sensor Check that the front wheel & magnetic sensor are clean and
correctly installed.
C 8

iAMN.USA.500.V1
Model Name
Power
Stand-by Power Consumption
Main Body Energy Consumption
Battery
Diameter
Height
Weight
Speed
Filter
Sensor
Charging Time
Usage Time
Noise
Yujin Robot Customer Support : 1.855.926.1601
MADE IN KOREA
©2014 Yujin Robot Inc.
16410 Manning Way, Cerritos, CA 90703
T562.926.1601 F562.926.1629
www.yujinrobotusa.com
One-Year Limited Warranty.
Specifications and features are subjected to change without notice.
ㆍMonday-Friday 9 am to 6pm PST
ㆍSaturdays
ㆍSundays
Closed
Closed
eX500 (YCR-M05- )
100 V ~ 240 V
Below 1 W
12 W
Lithium lon Battery
13.8 inches
3.5 inches
6.17 lbs
250 mm/s
Antibacterial filter
Camera,
IR, PSD, Gyro, Encoder, Bumper
110 min.
120 min. (based on normal floor)
58 dB[A]
**
Other manuals for YCR-M05
2
This manual suits for next models
1
Table of contents
Other Yujin Robot Vacuum Cleaner manuals