INTRODUCTION
This manual contains information regarding setup and safe use of the DY5 battery charger.
The DY5 is a balancing battery charger for the YUNEEC product.
SAFETY NOTES
Improper use of the DY5 Charging Station may result in damage to power supply, cause electrical
shock, or fire.
Additionally:
• Do not use the power supply near water ie; bathtub, sink, wet surface, swimming pool, or other moist
or wet area.
• Do not place the DY5 on an unstable surface when powered on. Batteries may be top heavy and affect
the stability of the DY5 Charging Station, causing a fall.
• Keep vent areas clear of obstruction and free of dust.
• Do not overload power sockets or extension cord. Doing so may generate excess heat and cause fire.
• Do not disassemble the DY5 Charging Station. There are no user-serviceable parts.
• Never push any object into the Battery Cradle. Doing so may result in electrical shock, fire, or injury
to persons.
• The power supply should be a standard AC outlet that provides 100-240V, 50/60Hz electricity.
• Disconnect DY5 from wall socket during long periods of disuse.
• Always unplug DY5 prior to cleaning sockets or clearing dust from heat vent/heat port. Never spray
liquids into the cradle or heat port; use a cloth to clean any component of the DY5.
• AC Input Voltage: 100-240V AC
• Output Voltage: 17.4
• Charge Current: 6.0A x2
• Charge Power: 70W x2
• Storage Curren : 3.0 x 2
• Battery Type: Specialized Battery
• Battery Cell Count: 4 cell
• Balance Current: 400mA/cell
• Display: TFT Screen
• USB Output: SV/2.0A
• Charge Output: Dual Independent
Output
• Dimensions: 178 x 177 x 65mm
• Weight: 790g
SPECIFICATIONS FEATURES
• Dual 6Amp Fast-Charge Circuit for rapid charging.
• Dual TFT color screen which displays charge time,
cell voltage, real-time battery capacity and capacity
percentage.
• Storage function for discharging batteries to 3.85
volts.This feature is used for long-term battery
storage.
• AC current input 100-240V for global compatibility.
No adapter is required.
• Protection against short circuit, overcurrent, and
over temperature failure.
• If at any time the DY5 does not appear to be functioning as normal, unplug and contact the seller of
this product.
• Prior to connecting the DY5 to a power outlet, please ensure that there are no batteries in the charging
slot, that the charging slots, and that the area surrounding the DY5 is dry.
OPERATING THE DY5 CHARGING STATION
1. Ensure the DY5 is free of obstructions.
2. Plug the AC power cable into the lower left connector port on the DY5 charger.
3. Plug the AC power cable into a power socket.
4. The charger is now powered on. There is no on/off power switch on the DY5 charging station; power
consumption is minimal when not charging. Unplug the DY5 charging station during long periods of
disuse.
MENUS
Using the Menu Buttons on the front of the charger, cycle through the menu settings.
There are two indicator windows.
The first indicator window displays current battery charge information (the four cell indicators will
display as blank when no battery is present).
Once a battery is inserted to the battery port, the indicator will display battery information. In the upper
left corner, the display indicates “Idle.” Additional information displays voltage per battery cell, battery
charge percentage, battery capacity, and time remaining to full charge.
Press/select the menu button and the menu will change to “CHG,” indicating that the battery is
charging. The cooling fan may engage when CHG is activated.
Press and hold the Menu Button for more than two (2) seconds to put the DY5 into storage mode. Press
the Menu button again to exit storage mode and return to Standby/Idle mode.
Depleting batteries for storage is not a fast process; exercise patience when preparing batteries for
long-term storage.
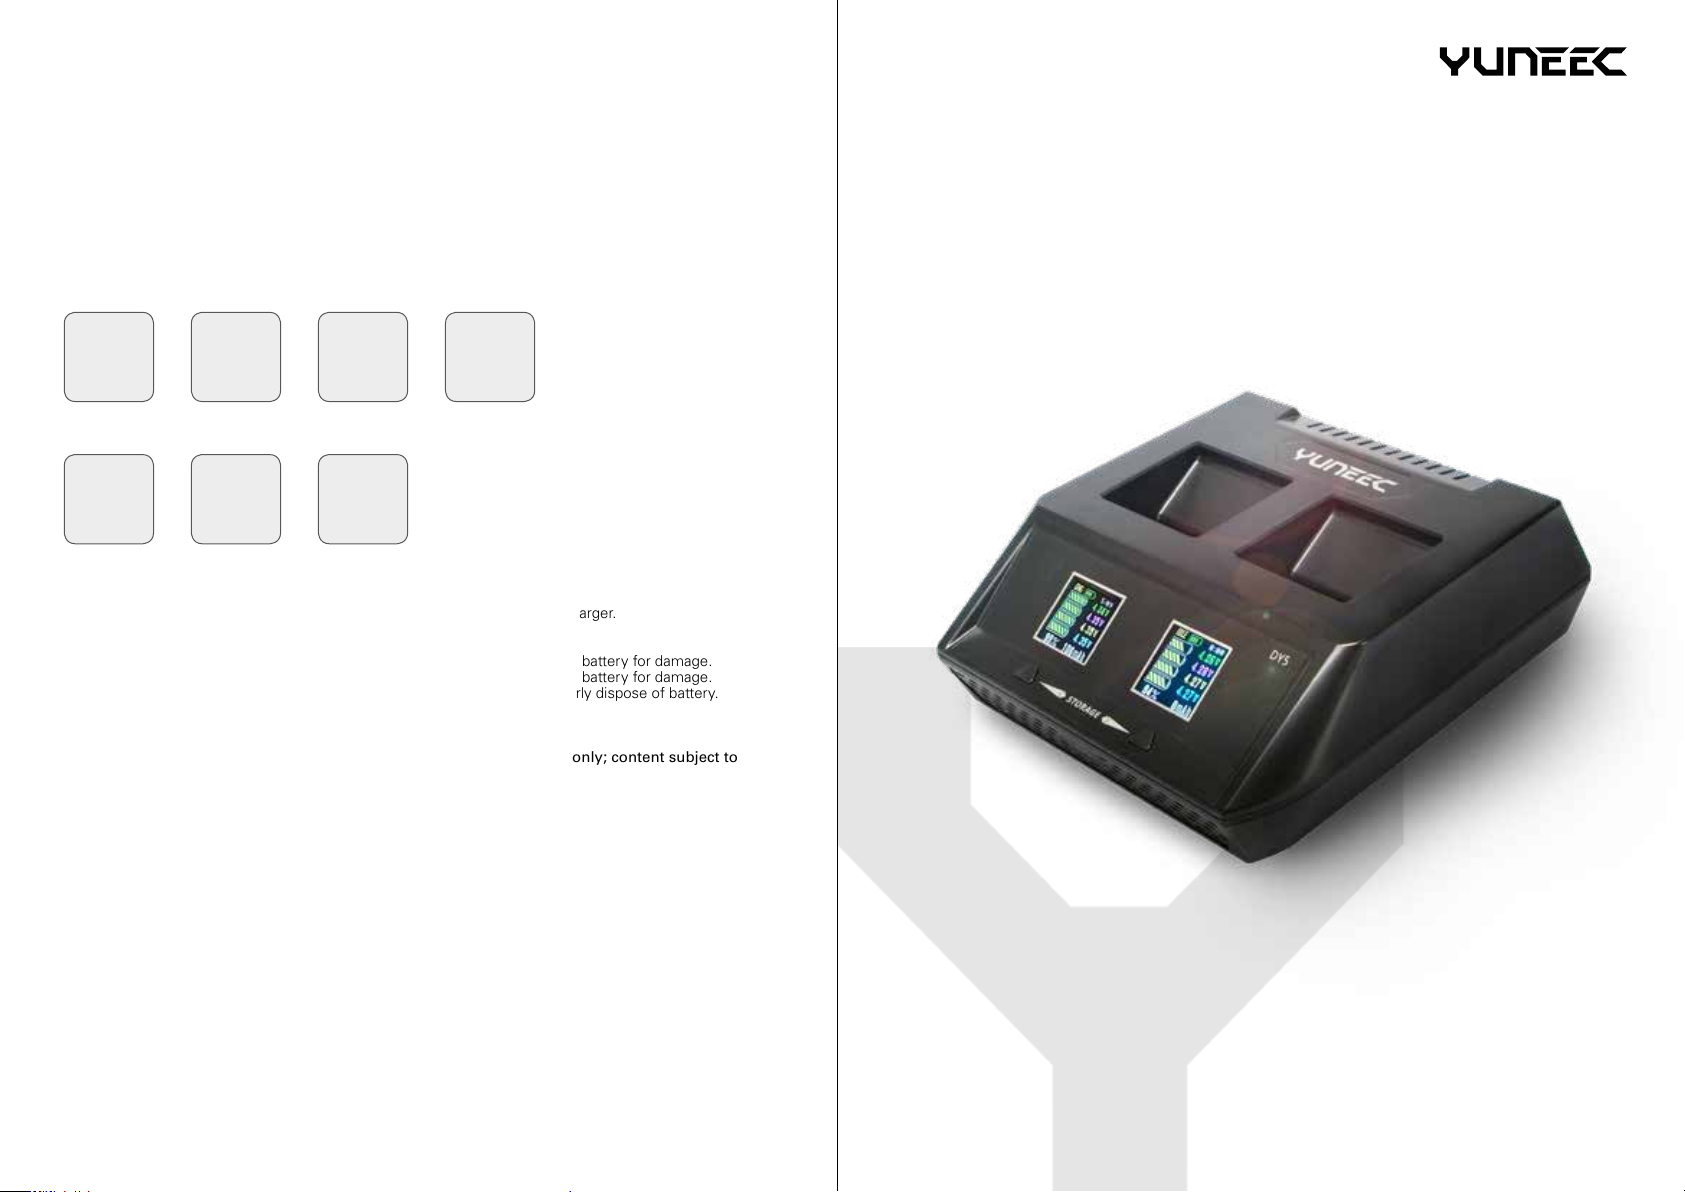
ABattery Cradle
TFT Display Screen
Menu Buttons
Heat vent /
dissipation port
AC Input Socket
5 V/2,0 A USB Port
AC Power Input
3.72V
3.77V
3.73V
3.74V
4 Cell Battery Voltage
Charging Time
50%
Capacity Percentage
Battery Capacity