Yunzhilun iMortor 3.0 User manual

www.elecycles.com

Contents
IMortor Installation................................................................................................................................................................................................................................................ 1
iMortor Packing List.............................................................................................................................................................................................................................................. 2
1. Safe Usage of iMortor.......................................................................................................................................................................................................................................3
1.1 About safe usage.................................................................................................................................................................................................................................. 3
1.2 Maximum load weight...........................................................................................................................................................................................................................3
1.3 Endurance mileage...............................................................................................................................................................................................................................4
1.4 Speed setting.........................................................................................................................................................................................................................................4
2. Installation video of iMortor............................................................................................................................................................................................................................4
3. Usage of iMortor................................................................................................................................................................................................................................................ 5
3.1 About cellphone bracket...................................................................................................................................................................................................................... 5
3.2 About the Connection of the wire....................................................................................................................................................................................................... 5
3.3 About APP..............................................................................................................................................................................................................................................5
3.4 About LCD and thumb accelerator.....................................................................................................................................................................................................6
3.5 About riding..........................................................................................................................................................................................................................................10
4. Charging............................................................................................................................................................................................................................................................ 11
5. Safety Guidance for Driving......................................................................................................................................................................................................................... 12
6. Instructions of Battery................................................................................................................................................................................................................................... 13
6.1 Insufficient battery capacity............................................................................................................................................................................................................... 13
6.2 Charging tips........................................................................................................................................................................................................................................14
6.3 Over-high or over-low temperature.................................................................................................................................................................................................. 14

6.4 Detailed parameters of battery......................................................................................................................................................................................................... 15
6.5 Precautions for transport battery...................................................................................................................................................................................................... 15
7. Warranty............................................................................................................................................................................................................................................................ 15
7.1 Warranty scope................................................................................................................................................................................................................................... 15
7.2 Service commitments.........................................................................................................................................................................................................................17

1
IMortor Installation

2
iMortor Packing List

3
1. Safe Usage of iMortor
1.1 About safe usage
Please abide by the relevant content of User Manual, then you would safely drive the iMortor. We intensely recommend you read the
User Manual before driving the iMortor at the first time. Please check whether the iMortor tire is damaged and whether the parts are
loose before driving. Please promptly contact the seller for maintenance in case there is any abnormal condition.
Please read the User Manual seriously to get the important safety information, such as the installation method, operation method,
app usage, etc.
Please don't take advantage of the iMortor for anything which endangers the body or assets.
Please don't refit the component of iMortor at will, because the behavior not only influences the performance of iMortor, but also
damages the iMortor.
1.2 Maximum load weight
The reason why the driver's weight is limited includes the following two aspects:
1.2.1 Ensure the safety of drivers;
1.2.2 Reduce the damage to iMortor due to the overloading.
Maximum weight limit of drivers: 180Kg;
Overweight Would Damage the iMortor

4
1.3 Endurance mileage
The factors which influence the endurance mileage.
1.3.1 Terrain: Driving distance would increase when driving on the smooth and flat ground;
1.3.2 Weight:The weight of drivers would influence the driving distance;
1.3.3 Environment temperature: The driving distance would be reduced under the extreme low temperature;
1.3.4 Maintenance: Reasonable charging and battery maintenance would increase the driving distance;
1.3.5 Speed and driving style: The driving distance would increase by keeping the medium speed, on the contrary, the frequent
startup, stop and acceleration would reduce the driving distance.
1.4Speed setting
1.4.1 The driving speed of iMortor at leisure gears, movement gears and topspeed gears is respectively 16km/h, 20km/h and
26Km/h.
1.4.2 Overspeed Operation is not suggested when driving the iMortor.
2. Installation video of iMortor
Before installing, please visit the official website of iMortor "video center" to watch the installation tutorial video:
https://www.youtube.com/watch?v=rHU3wjYWKG4
https://www.youtube.com/watch?v=UCH43eZs1Ds

5
3. Usage of iMortor
3.1 About cellphone bracket
The installation size of iMortor cellphone bracket is the open-type size, the installable positioning size is within 15-35.
3.2 About the Connection of the wire
Align arrows on two lines before inserting the plug.
Attention: the power must be cut off when connecting the wire. Do not connect the wire after inserting the
battery.
3.3 About APP
The feedback function of the main page of the iMortor App includes:
3.3.1 Operational data of the whole wheel: Driving speed, driving mileage and driving gear.
3.3.2 Operational data of parts Electric power and fault display of battery (including the motor fault, brake, battery under-voltage,
controller fault, gear shifters fault, etc.).
The feedback function of the auxiliary page of the iMortor App includes:
3.3.3 Operational data of complete machine: Working time, total driving mileage, measurement unit of mileage (kilometer or mile),
geographic position of driving.
5Core wire
(speed shifter)

6
3.3.4 Operational data of parts Selection of battery voltage and vehicle wheel diameter (extend from15 inch to 30 inch, please select
the wheel diameter size according to the wheel diameter size of your love car), and the selection of magnetic pole number of motor
(extend from 2 poles to 70 poles. you shall select 56 poles on the basis of the motor design).
Backstage page function of App also includes:
3.3.5 Password setting and modification of cellphone, brief introduction, special functions of app, problem solution, feedback, etc.
3.4 About LCD and thumb accelerator
3.4.1 Functional Specification
3.4.1.1 Display function:
Speed display, power display, malfunction-indication, total mileages, single mileage, real-time voltage.
3.4.1.2 Key Control ,Setting Function:
Function keys: multifunctional switch key, power
key, three speed control key
Setting function: wheel diameter setting,
magnetic series setting, idle dormant time
setting, limit speed setting, cruise
setting ,backlight brightness setting etc.
3.4.1.3.Display Interface < Fig. 39>
3.4.1.3.1 Power Display
1 lattice indicate 0-25% power, 2 lattices
indicate 25%-50% power, 3 lattices indicate
Speed
display
Multifunc
tion
power
Three speed
display
Power
display
Three speed
control key
Power
key
multifunctional
switch key
display
Fig. 39

7
50-75% power, 4 lattices indicate 75%-100% power.
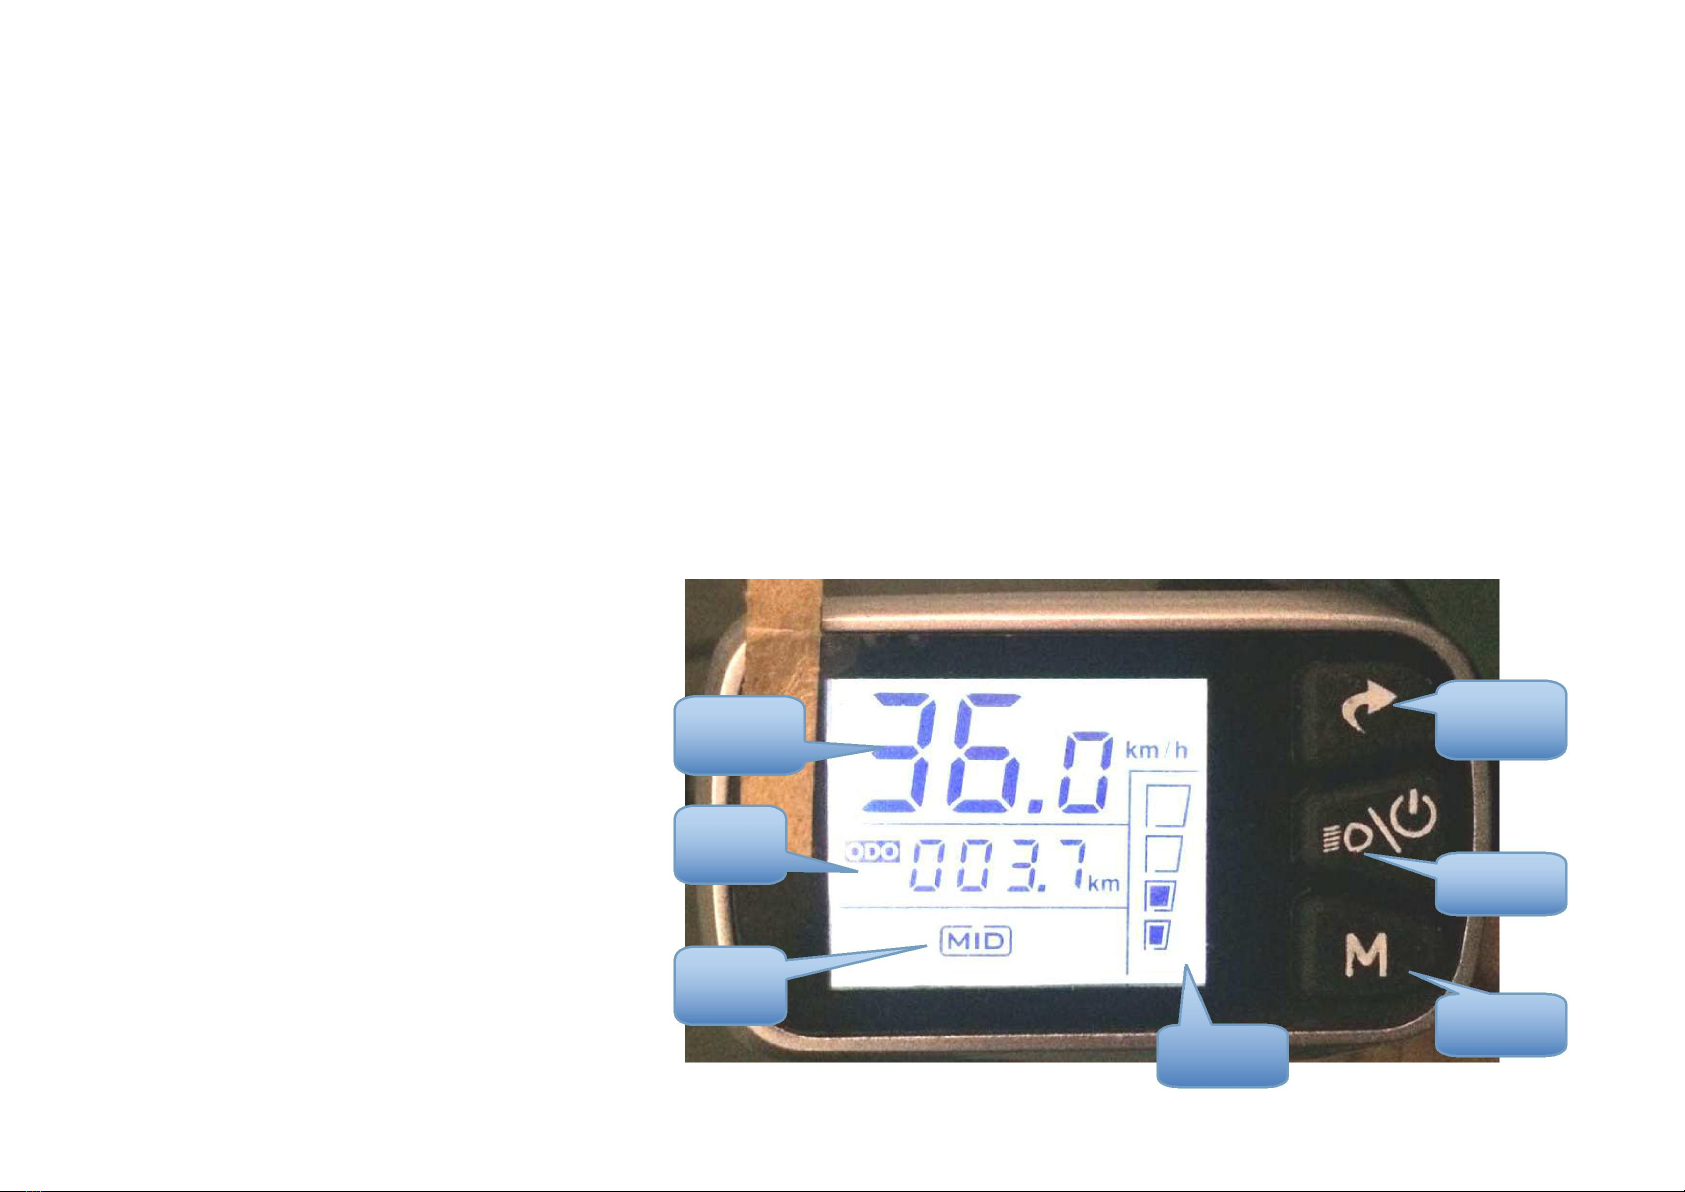
3.4.1.3.2 Speed Display
Display the speed under regular work, display setting items under setting parameter, setting items meaning as follow-
P01- backlight brightness , the darkest under 1 level, the brightest under 3 level
P02- mileage unit, 0- KM, 1- MILE.
P03- voltage level- 24V, 36V, 48V, default factory setting is 36V,
P04- dormancy time- 0, no dormancy, other numbers display dromancy time, range limit- 1-60, unit is minute, for example, 5
means the key without any operating in 5 minutes, then the screen under dormancy
P06: wheel diameter- unit, inch, precision- 0.1,
P07: velocity magnetic steel- default setting 60, range limit- 40-66.
P08- speed limit- range- 0-100km/h, 100 means no speed limit.
P10- drive model settings
0- booster drive(through booster decide the power, the speed shifter is invalid at the time); 1- speed shifter drive (the booster is
invalid at the time) ; 2- booster and speed shifter are using together. Attention- Booster is a optional accessory of the
multi-function version, please do not arbitrarily change the default factory setting.
P11- booster sensitivity setting : 1-24(1 means the weakest sensitivity, 24 means the strongest sensitivity.
P12- booster start strength setting: 0-5(0 the lowest power strength, 5 means the highest power strength.
P13- booster types setting- 5, 8, 12 , these three types represent the number of magnets in the booster < Take figure 40 as an
example, The white magnet has 12, so the setting value is 12>.
P16- zero setting, long press multifunctional switch key 5 seconds to zero.
P17- cruise setting 0- no cruise, 1- cruise, has a second speed shifter start or booster start could interrupt the cruise).

8
3.4.1.3.3 Multifunctional Display
Total mileages ODO, single mileage TRIP, real-time voltage.
Some iMortor has the function of fault code ERRO display, which represents the following meanings.
Fault code (decimal
system)
Fault state
Fault code (decimal
system)
Fault state
0
Regular state
7
Motor fault
1
Retain
8
Gear shifter fault
2
Brake
9
Controller failure
4
6KM/H cruise
10
Communication receiving fault
5
Real-time cruise
11
Communication transmitting fault
6
Low voltage of battery
12
BMS communication failure
3.4.1.3.4 Three Speed Display
Display the low gears, medium gears or high gears at present
3.4.2 Operation Manual
3.4.2.1.Motor Start & Motor Use
Open- long press power key to start digital display speed shifter. zero start motor- press the thumb throttle (accelerator)
then drive; none zero start motor- need riding first and press the thumb throttle (accelerator), then the motor works.
peed control- press the three speed control key , switch the speed in three gears low speed, medium speed, high speed,
Check traveling record- press multifunctional switch key , check mileages.

9
Shutdown- long press power key .
3.4.2.2 Initial Setup
Hold down and at the same time, enter the settings screen, press to switch the setting items, when the speed screen
display P03, Press (or )until multifunction display 036;
Press to switch setting items, when the speed screen displays P06, press (or )to adjust numerical values , according
to the range of tires to input, for example, 26 " input 26.0.
Press to switch setting items, when the speed screen displays P07, press (or )adjust to 54.
Press to switch setting items, when the speed screen displays P09, press (or ) adjust to 1.
Hold down and to escape, or wait for 5S, then escape to setting interface automatically。
After finished, we could drive;advice you to start in a low speed, use medium speed when regular riding, use high speed when
climbing.

10
3.5 About riding
3.5.1 Step 1: Check whether all components of iMortor are properly installed, and check whether there is loose condition, breakage
and other abnormal phenomena.

11
3.5.2 Step 2: Install the iMortor app only by scanning the QR code. (Android and iPhone system could install by scanning the QR
code)
3.5.3 Step 3: Open the Bluetooth function and the iMortor just installed for special development of app "iMortor".
3.5.4 Step 4: Press the power switch button on the iMortor gear shifters, and observe whether the power indicator light on the gear
shifters indicates the active electricity.
3.5.5 Step 5: Connect the complete machine of iMortor with the connection function in app, please input the connection passport
upon connection, and the initial passport is "6666".
3.5.6 Step 6: Check whether app normally operates. You could check your battery capacity and battery voltage lamp information in
your cellphone app under the static state of iMortor.
3.5.7 Step 7: When you start to drive the iMortor assistance riding product, you shall firstly drive with your leg strength to let your love
car drive at no less than 5km/h, then accelerate by stirring the speed drive pick on iMortor gear shifters with hand. (Before riding, you
could adjust the gear that you need upon driving in the iMortor APP)
3.5.8 Step 8: When you need to reduce speed for brake, you shall firstly loosen the speed drive pick on iMortor gear shifters, then
conduct the brake.
4. Charging
4.5.1 step 1: Plug the charger plug ( US or EU or UK or AU standart ) into the wall power socket, see whether the indicator light on
the charger is green or not.

12
4.5.2 step 2: Insert the charger DC2.1 connector into the iMortor battery charging DC interface, see whether the indicator light on the
charger charge from green to red color or not.
4.5.3 step 3: When charging, see whether the indicator light on the imotor battery flash green or not..
4.5.4 step 4: After charging for some time, the red light on the charger changes to green, which means fully charged.
5. Safety Guidance for Driving
The following contents include the safety knowledge and warning statement, please learn before using the iMortor. In order to
ensure that you could safely drive the iMortor, please read through the User Manual and abide by the relevant safety instructions.
These safety precautions will help improve your safety and delight of driving.
To avoid the damage, you shall read and refer to the instructions of the User Manual to ensure driving the iMortor with a good
performance.
The children shall use when the adults accompany. The old men who have the heart disease history and hypertension, lock the
self-protection awareness due to the inconvenient movement of hands or feet shall not be allowed to use as well as the pregnant
women and the disabled.
Please don't drive after drinking or using drugs, and don't drive with goods.
Please pay attention to the local traffic laws when driving the iMortor, and give precedence to the pedestrian.
Please look out the front and remote objects. It helps you drive driving iMortor safer to keep good vision.
Please wear suitable sportswear to use the iMortor, which is conductive to the emergent condition treatment for you better.

13
The weight of user and goods carried shall not exceed the maximum load indicated in the instruction. Keep the vehicle speed in the
scope that the safety of yourself and others could be ensured, and the operation of iMortor could be prepared and stopped at any
time.
When you drive with other users who drive the iMortor together, please mutually keep certain distance to avoid the crash.
Don't distract when driving the iMortor, for instance, answer the telephone, listen to music, engage in any other activities. Pay much
attention to the safety when driving the iMortor on the wet and slippery road.
Don't drive the iMortor in the place with dark or dim light.
Avoid driving on the smooth road with barrier, such as: Snowfield, ice land, wet and slippery floor.
Avoid driving in the place with narrow space or barrier.
Please use in the usage condition that the iMortor conforms to. And please gain the approval of others in case of usage with
environment demand.
The usage of iMortor in the unsafe environment isn't allowed. These unsafe environment refers to the site with fire hazard or
explosion and other dangerous events incurred due to the inflammable gas, steam, liquor, dust or fiber, etc.
6. Instructions of Battery
In order to furthest prolong the battery service life and improve the battery performance, please use the battery according to the
following operations.
6.1 Insufficient battery capacity
6.1.1 When you find that the electricity capacity indicator is low, please charge the battery.
6.1.2 Please don't use the battery when any of the following conditions occurs:
The battery has some unpleasant smell or too high heat;

14
The battery leaks any substances.
Please contact the supplier for the maintenance of battery. Don't contact any substance leaked from the battery. Don't let children
and animals contact the battery. The charger shall be pulled out before the battery installation or driving. It's dangerous to do
anything related to the iMortor under the charging condition. Since the battery contains dangerous substance, so don't open the
battery arbitrarily, and don't insert anything in the battery. Only the charging equipment in our company could charge the iMortor.
The charging to lithium battery which has excessively discharged isn't allowed, because the lithium battery has potential safety
hazard, it shall be scrapped. The usage of iMortor battery shall be allowed in the local laws.
6.2 Charging tips
Ensure the charging port is dry.
Long-time charging would influence the battery service life.
Pay attention to using the local standard plug.
Please charge and store the battery according to the regulations, otherwise the battery would be damaged, which would influence
the battery service life. The charging time of iMortor is about 4 hours, and the overlong charging time would influence the battery
service life.
The environment for charging shall keep clean and dry.
Don't charge in case the charging port is humid.
6.3 Over-high or over-low temperature
If you want to make the operation efficiency of iMortor highest, the battery temperature shall be within the temperature scope
indicated in the battery specification instructions. The temperature before the charging and in the charging process shall be within
the recommended value. The charging efficiency is the highest when the temperature is close to the recommended temperature. In
case the temperature is too-low or too-high, the charging time would lengthen or the battery couldn't be fully charged.

15
6.4 Detailed parameters of battery
Name
Parameter
Battery type
Lithium battery
Charging duration
4 hours
Voltage
36V
Initial capacity
7.2Ah
Operating temperature
-15-50℃
Charging temperature
0-40℃
Storage time (-15-50℃)
12 months
Relative humidity for storage
5%-60%
6.5 Precautions for transport battery
The lithium battery is the dangerous goods, so please read the local laws and regulations in advance upon transport.
In case you need to conduct the air transport to iMortor with lithium battery or independently transport the lithium battery of iMortor by
any other transport method.
7. Warranty
7.1 Warranty scope
7.1.1 The products in our company implement the relevant three guarantees of state. Our company provides the free maintenance,
goods exchange and goods return service for the products which conform to the warranty conditions.

16
7.1.2 The company calculates whether the product is within the warranty validity period from the delivery date by virtue of the
effective code.
7.1.3 In case the equipment performance problems occur within 7 days from the sale date and the problems are confirmed, the
users could select the maintenance, exchange goods or goods return.
7.1.4 In case the equipment performance problems occur within the warranty period and the problems are confirmed, our company
promises the free maintenance.
7.1.5 The complete machine has 1-year warranty period, the battery and charger have 6-month warranty period, and the inner and
outer tubes of wheel have 1-month warranty period.
7.1.6 Within the warranty period, the following conditions don't belong to the free maintenance scope, please pay attention to them.
7.1.6.1 Any damage due to the failure of installation or usage according to the instructions.
7.1.6.2 Disassembling and maintenance of products who aren't the authorized personnel in our company.
7.1.6.3 Natural wear which doesn't influence the product functions, such as the wear of shell, tire, etc.
7.1.6.4 Product damage incurred due to the accident or improper usage, such as mechanical disruption, breaking, impact, severe
oxidation of products, etc.
7.1.6.5 Damage incurred due to the overload, riding barrier (including but not limited to steps descending, falling, etc.) and extreme
sports, etc.
7.1.6.6 Damage incurred due to the disassembly, transport, loading and unloading on the way of customers' return for repair.
7.1.6.7 Any damage incurred due to the abnormal storage conditions such as the fire hazard, liquid soaking, freezing, earthquake,
etc. or force majeure .
7.1.6.8 Loss of packing materials, various technical data and other damageable accessories.
7.1.6.9 Faults or damages caused by reasons other than the design, technology, manufacturing and quality of the product.
7.1.7 Our company provides the paid maintenance service for the fault products exceeding the quality guarantee period.

17
7.2 Service commitments
7.2.1 ELECYCLES ensures you that the iMortor sold are the licensed quality product.
7.2.2 The company ensures that the delivery products are produced and inspected according to the relevant state standards, and
the relevant function inspections are conducted before delivery.
7.2.3 Ensure to strictly perform and achieve three guarantees of products, and to strictly implement the relevant after-sale service
regulations of national industry products.
Table of contents