Z-Saw S-265 User manual

Saw Guide, Free Angle
Instruction Sheet
(How to Use)
TFE200508A
45°
90°
※KNOB
T-SHAPE HEX WRENCH
Saw Guide Free Angle
※POSITIONING HOLDER
…for cutting square lumber
※marked parts are packed in a
Vinyl envelope.
SPARE SCREW
SPARE WASHER
DUMMY BLADE
Teeth edges should always stay
out of the saw guide plates.
Teeth edges touch inside
of saw guide plates.
These are actually made by using Z‐SAW UNIVERSAL S-265 & Saw Guide, Free Angle.
THIS SAW IS SPECIALLY DESIGNED AND PRODUCED TO BE USED WITH
SAW GUIDE-FREE ANGLE AND SAW GUIDE .
ADVANTAGES OF Z-SAW UNIVERSAL S-265
●HIGH QUALITY SAW BLADE IS DURABLE, FLEXIBLE AND RUST RESISTANT.
●SPECIAL CUTTING EDGE DESIGNED FOR RIP, CROSS & SLANT CUTS.
●EASY & QUICK BLADE REPLACEMENT STYLE (Convenient for tool box storage).
●NON-SLIP ELASTOMER COVERED GRIP HANDLE.
Cutting on the pull-stroke
prevents blade from buckling
and binding, allows blade to
be thin. The thinner blade
removes less material, makes
sawing easier, faster and
more accurate!
45°
45°
45°
90°
Features:
This innovative Adjustable angle saw guide is designed for the exclusive use by Z‐SAW universal s-265.
Quick and very easy angle adjustment for sawing at any angle between both 45°right & left direction as well
as both 45°front & back inclined direction. Rigidly and precisely constructed steel-made Adjustable angle
saw guide ensures accurate straight cuts, and it can be held in a position firmly by hand supporting with
positioning holders. Equally suited for left and right hand position. Long straight cut on a wide board is also
easily possible by using the parallel sliding holder. Special Saw Guide Gauge and Dummy Blade for exact
angle adjustment are available.
Oh, did you make these?
Vertical angle bracket
Spacing
plate
Guide plate
fixing screw
Height
adjusting
knob
Base plate
Vertical angle fixing screw
Guide Plate
Height adjusting nut
Construction of Parts
※PARALLEL SLIDING HOLDER
…for cutting wide board
CUTS ON
THE PULL
STROKE
Horizontal angle
adjusting screw
Rotating base part of angle bracket is
pre-set at factory. Do not loosen
the screw.
Okada Hardware Mfg.Co.,Ltd.
561 Omura, Miki-shi, Hyogo, Japan 673-0404
TEL: 81-794-83-1111 / FAX: 81-794-83-5111
URL: http://www.z-saw.co.jp/en E-mail: webmaster@z-saw.co.jp
Model:265
Type Medium-Fine
Overall Length 420mm(16-½”)
Blade Length 265mm(10-½”)
Blade Thickness 0.60mm(0.024”)
Kerf 0.92mm(0.037”)
Pitch 14TPI
Thank you for your purchase of Saw Guide Free Angle.
Please read this instruction carefully and keep it in good condition.
Caution
○Do not tighten screw too strong. It may damage hex screw or T-shape
hex wrench.
○Teeth should always stay out of the saw guide plate.
Otherwise teeth edge will be damaged by insides of saw guide plate.
See pictures right
→
○Do not tighten the knob too strong. It may be damaged.
○Wear safety goggles.
Notice
○Specification may change without notice to improve quality.
○The copyright belongs to Okada Hardware Manufacturing Company Limited.
SAW GUIDE GAUGE…for angle adjustment
Put the saw blade into
handle deep enough to
cover the end slit of the
blade.

How to adjust angle
90°angle adjustment
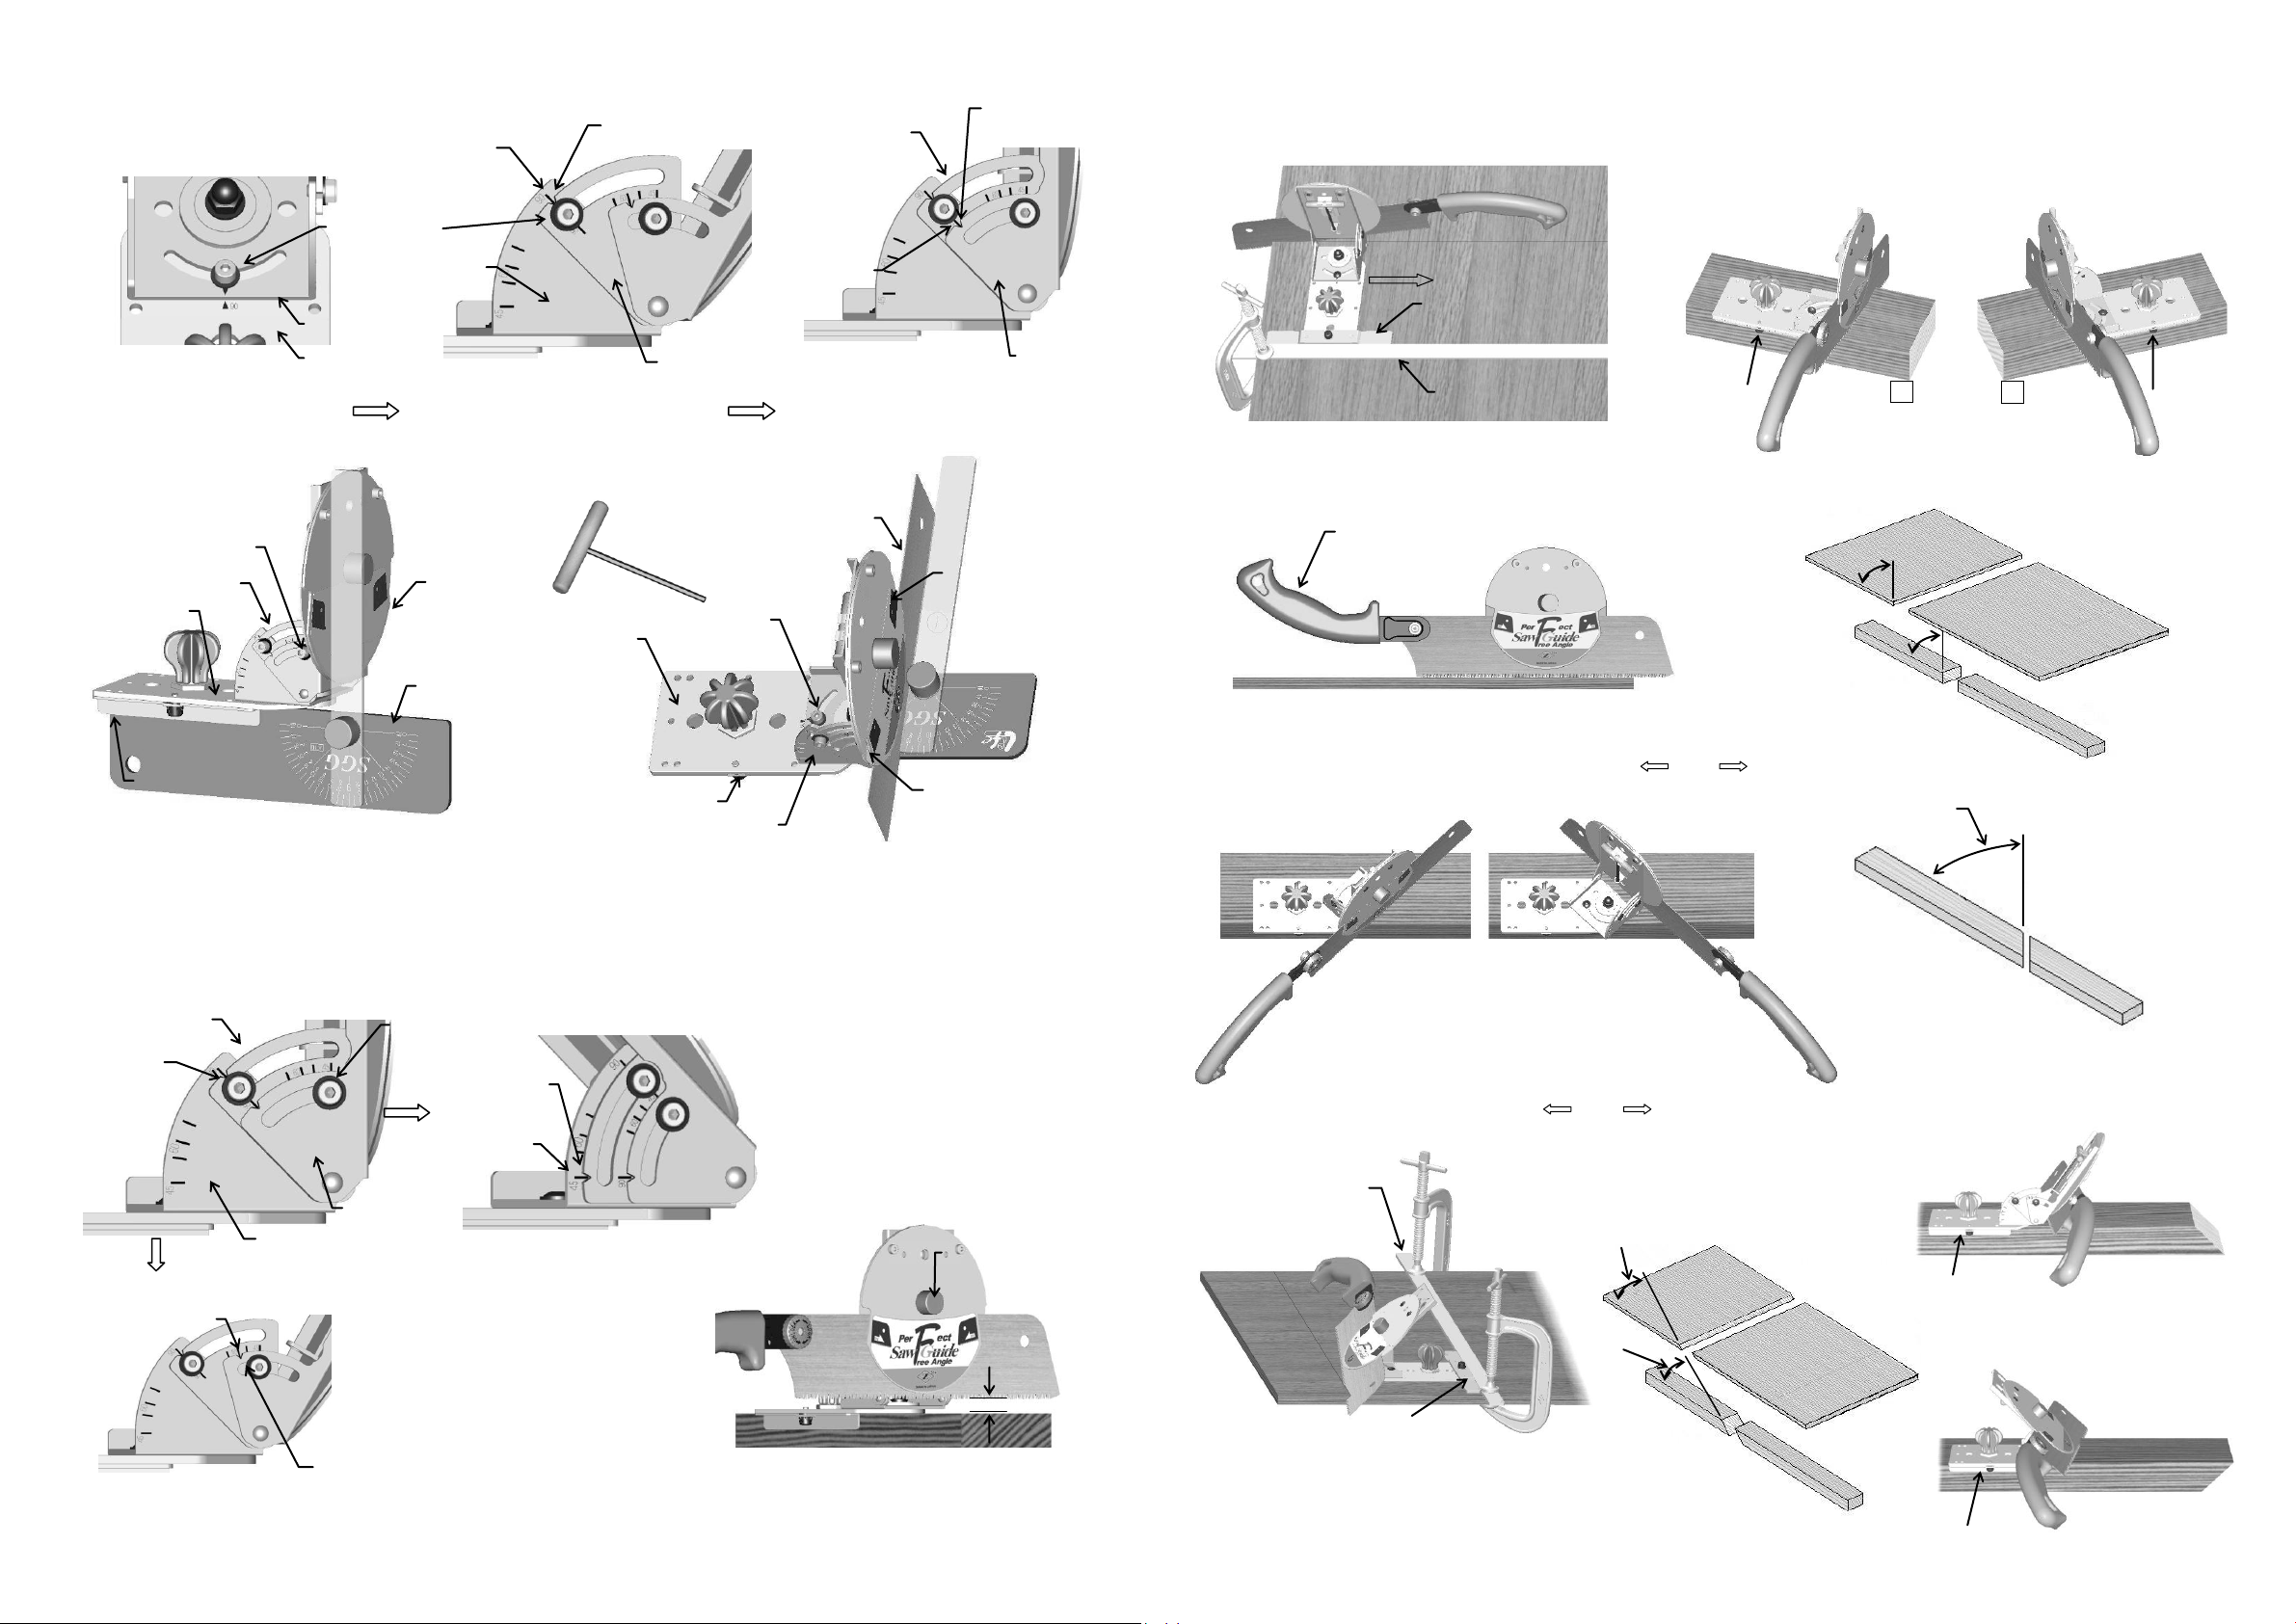
Set the positioning holder. Adjust the saw
guide gauge at 90°. Then, set it along with
base plate & saw guide plate. Make final
angle adjustment and fix with hex screw.
Set the positioning holder. Insert the
dummy plate into the saw guide plates Set
the saw guide gauge along with positioning
holder & dummy plate. Make final angle
adjustment and fix with hex screws.
Loosen screw 2. Set the matching mark of
bracket 3 on the 60°of bracket 2. Then fix
saw guide gauge at 60°and set it along with
positioning holder & saw guide plates.
Make final angle adjustment and fix firmly.
Loosen screw 1 first. Set the matching mark
of bracket 2 on the 45°angle of bracket 1 an
fix it. Set the saw guide gauge 45°and set it
along with base & saw guide plate like
illustration 1. Make final angle adjustment and
fix with hex screw.
Insert saw blade into the gap between guide
plates, then loosen height adjustment knob
slightly. Recommended clearance between the
surface of cutting object and the saw blade
teeth is approx. 6-8mm (1/4-5/16”). Then fix the
height of saw guide plates.
Bracket 3
Bracket 1
Bracket 2
Graduation
line
Matching mark
(notch)
BASE PLATE
ANGLE BRACKET
SAW GUIDE GAUGE
POSITIONING HOLDER
DUMMY PLATE
SAW GUIDE
PLATE
POSITIONING HOLDER
Angle bracket
Fixing screw
Graduation
line
SAW GUIDE
PLATE
FIXING SCREW
BASE PLATE
BLADE INSERT
POSITION
ANGLE BRACKET
Bracket 2
Matching mark
(notch)
T-SHAPE HEX WRENCH
Base plate
How to adjust angle
Bracket 3
Standard 90°
Bracket 1
Bracket 2
Screw 1
Screw 2
Graduation
line
Matching mark
(notch)
45°angle adjustment example
Compound angle adjustment
Matching mark
(notch)
Graduation
line
60°angle adjustment example
6~8mm
Height adjustment
knob
Wood
Square lumber
Wide board
Parallel sliding holder
Clamp
A
B
Positioning holder
Wide board
90°
90°
Square lumber
Square lumber
Parallel sliding holder
Clamp
Rule or straight
wood
Variation of “Saw Guide, Free Angle”
Square Cut
Compound cutting 45°90°45°
Any angle
Any angle
Any angle
Positioning holder
Positioning holder
Right & Left angle cutting 45°90°45°
Positioning holder
Rule or straight wood
Too tight hinge connection between angle bracket and base plate may
loosen by applying some lubricants on pivots.
FIXING SCREW
Z-SAW UNIVERSAL S-265
Match the triangle marks on the
angle bracket & the base plate.
Then, fix with hex screw.
Set the matching mark of Bracket 2
on thelineof90°angle of bracket1.
Then fix it.
Set the matching mark of Bracket 3 on
the line of 90°angle of bracket 2 Then
tighten slightly.
Handle can be reversed to provide hand clearance.
Illustration A shows right-handed use
and B is for left-handed.
When cutting square lumber, hold
the saw guide in a position firmly
by hand with positioning holder.
For cutting wide board, clamp rule or straight
wooden piece. Set parallel sliding holder along
the rule, then start sawing slowly by moving
the saw guide backward.
When cutting square lumber, hold
the saw guide in a position firmly
by hand with positioning holder.
For cutting wide board, clamp rule or straight
wooden piece. Set parallel sliding holder along
the rule, then start sawing slowly by moving the
saw guide backward.
When cutting square lumber, hold
the saw guide in a position firmly
by hand with positioning holder.
Other Z-Saw Saw manuals
Popular Saw manuals by other brands

HOLZMANN MASCHINEN
HOLZMANN MASCHINEN HBS245HQ operating instructions

Stow
Stow CD613H18 Operation and parts manual

HERKULES
HERKULES TK 1800 UV operating instructions

HBM Machines
HBM Machines TC180C Original instruction manual

Scheppach
Scheppach Deco-flex instruction manual

DeWalt
DeWalt DW718 instruction manual