manuals.online logo
Brands
  1. Home
  2. •
  3. Brands
  4. •
  5. ZANE ARTS
  6. •
  7. Tent
  8. •
  9. ZANE ARTS DT-002 User manual

ZANE ARTS DT-002 User manual

DT-002 / OKITOMA-2
MANUAL - Ver 2.01
EN
Fly Sheet
×1
Footprint
×1
Short Frame × 2
Bridge Frame × 2
Long Frame × 2
Carrying Case ×1 Pole Bag ×1
Peg 󱗓Rope
Case
×1
Repair
Pipe
×1
2.5m
Rope
×12
1.5m
Rope
× 4
Inner Tent
×1
■ITEMS INCLUDED
Please check the contents of the set before fully opening the
tent. If you find something missing, please contact the store
where you purchased it or us directly.
2
※Peg 󱗓Hammer is not include
3
■ABOUT THIS PRODUCT
Please take some time to understand the characteristics of
this product before using it.
Pegs not include, please prepare the following recommended
pegs and the required number of pegs in advance.
【Recommend 󱗓Required Number】
●TO-518 / GRART STAKE 18 × 20
Pegs not include
Waterproofing performance is reduced
The surface is treated with silicone water repellent, but after use,
the water repellent performance will deteriorate and rain will
eventually penetrate the fabric. Please note that the water
repellency cannot be maintained long term. Waterproof
performance of the back side is not affected, so even if water
repellency deteriorates, there is no issue using it as it is.
4
Wrinkles caused by folding are noticeable
Commonly used chemically treated fibers used in tents, shelters
and tarps are prone to creases. In particular, the fabric in this
product has noticeable wrinkles due to the color, thickness, and
surface processing of fabric. Please note that it does not affect
performance in any way.
For 3 seasons of use
This product is not designed to withstand snowfall or low
temperatures. Do not use in low temperatures where the zippers
may freezes or in snow.
Chemically treated fibers are used in the fabric of this product.
Chemically treated fibers may liquefy when burned, the liquefied
fabric may stick to skin and cause serious burns. Never bring fire
close to tents, shelters or tarps.
Use of a wood stove is absolutely prohibited.
5
Do not remove the fire prohibition tag
Do not cut or remove the fire-prohibited tag sewn into the
product. Products without a fire-prohibited tag cannot be
guaranteed or repaired.
6
■ PRECAUTIONS FOR SETUP AND USE
Be sure to read and understand the following contents
before use to prevent harm to the user and others, and
damage to property.
●Fire is not allowed in tents, shelters, and tarps. It is extremely
dangerous as there is a risk of fire, oxygen deficiency, carbon
monoxide poisoning, etc. Do not use firearms and keep fire
away from tents, shelters, and tarps.
●If the weather is bad, such as a typhoon or storm, or if you
anticipate such weather, stop camping immediately.
●Do not set up in a place that is easily affected by wind or
where there is a risk of falling rocks, avalanches, or rising
water.
INDICATES CONTENT THAT MAY RESULT
IN DEATH OR SERIOUS INJURY.
!
!
DANGER
7
●Not for permanent use. If this product is set up permanently, it
will deteriorate and be damaged in a short period of time due
to the effects of ultraviolet rays and other elements.
●Set up on a flat surface with good drainage. Moisture and
dirt can lead to deterioration, and rough terrain can lead to
damage to product.
●Remove any items that may damage the product, such as
rocks and branches, before setting up.
●When setting up the product, be sure to have two or more
people, and pay attention to surroundings.
●Do not set up when the wind is strong. The main body may
blow away or product may be damaged by the force of the
wind.
●When setting up, be prepared for wind gusts and be sure that
the main body and frame don’t fly away by keeping your
hands on the frame and main body while working.
INDICATES CONTENT THAT MAY CAUSE
INJURIES OR PROPERTY DAMAGE.
WARNING
!
8
●When extending poles or frames, make sure each section is
inserted securely. Assembling the product incorrectly can lead
to damage.
●When handling poles or frames, be careful not to hit or
damage something around you and pay attention to your
surroundings.
●After setup, secure the tent, shelter, and tarp to the ground
with pegs and ropes to prevent them from being blown away
by the wind.
●If the weather suddenly changes hold on to the product for as
long as needed to keep it down.
9
■PRECAUTIONS FOR TEARDOWN AND
AFTER USE CARE
Be sure to read and understand the following contents
before use to prevent harm to the user and others, and
damage to property.
●When taking down the product, be sure to have two or more
people.
●Please take down the product in the reverse order of the
setup. Not following the instructions properly may damage
the product.
●When removing poles or frames, be careful not to hit or
damage something around you and pay attention to your
surroundings.
INDICATES CONTENT THAT MAY CAUSE
MINOR INJURIES OR PROPERTY DAMAGE.
WARNING
!
10
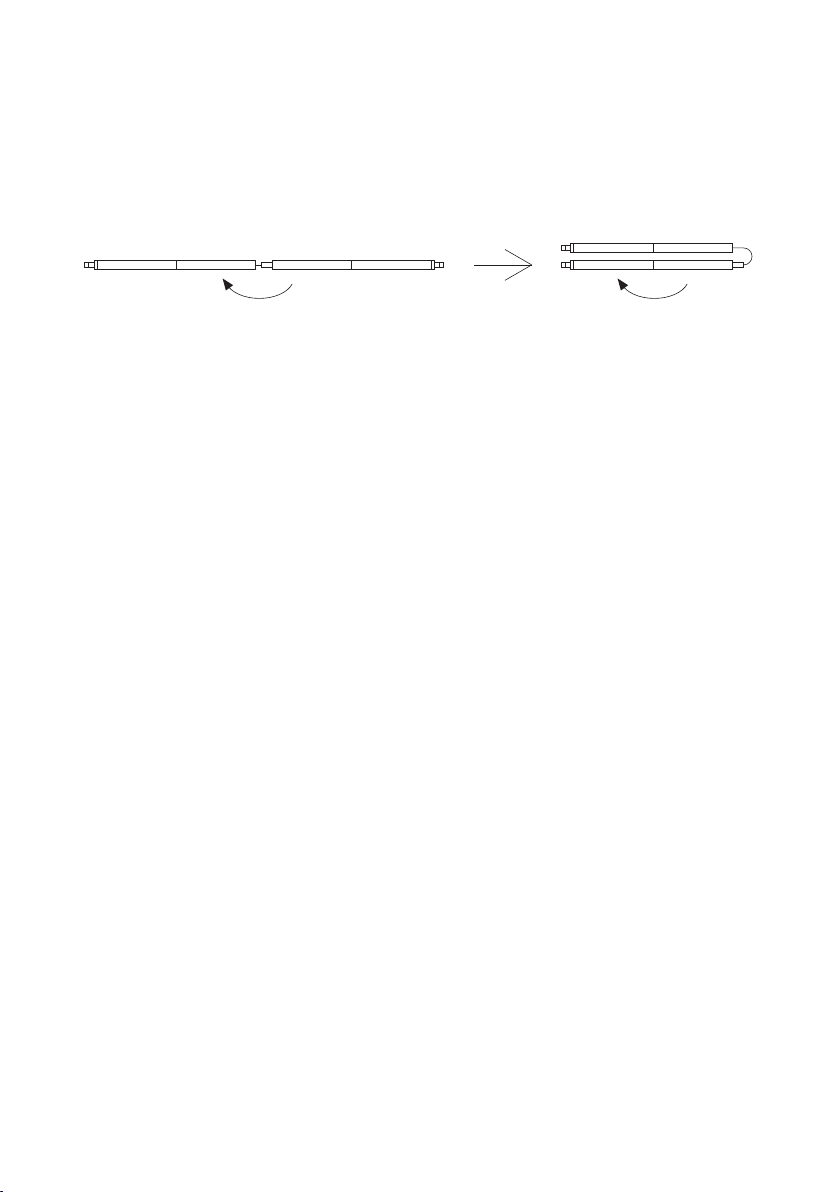
●When folding a frame or pole with a built-in cord (cord),
begin folding from the center, this will reduce the wear on the
bungee cord by not applying extra tension to the cord.
●After use, clean the fabric and allow it to dry thoroughly
before storing. If it is stored with dirt or moisture uncleaned, it
may cause colors to transfer or mold odors to form, and may
cause the seam tape to come off and diminish its
waterproofness.
●Frames, poles, and other metal parts should also be
thoroughly dried before storage. If stored while moist or
uncleaned, they may be damaged by corrosion.
●Salt can accelerate the deterioration of fabrics. If used near
the sea, rinse with fresh water and dry well before storing.
●Use a soft towel to gently clean or wipe moisture off fabrics.
Rubbing can damage the coating of the fabric.
●Do not use solvents such as paint thinners. There is a risk of
delaminating or discoloration of the water-repellent finish.
●Please do not wash. It will lead to deterioration of the fabric
and damage to other parts.
●Please keep out of reach of infants and children.
11
Setting up the Bridge Frames
Setting up the Short Frames
3
Pegging Down
the Tent
5
Installing the Inner Tent
6
Setting up the
Panel Awning
8
Attaching Supplementary
Ropes
9
Attaching the Footprint
7
Attaching
the Ropes
4
Setting up the Long Frames
Recommed pegs TO-518 / GRART STAKE 18 × 20
■ SETUP PROCEDURES
Set up according to the numerical order.
【Prepare in Advance】
※Ready Pegs and Hammer
※Close all zippers
1
2
12
Insert into the inner grommet
The outer grommet is a spare
Gray
rope A
Frame with
Gray Ends
A
B
Clips × 9
SETTING UP THE BRIDGE FRAMES
1
Assemble all frames (6 in total)
A: Take the long frame with gray ends and insert it into the grommets
in the webbing that has gray rope attached to it. (both ends)
B: Attach clips (9 locations) to first frame.
Repeat on other frame.
13
C
Clips × 2
Insert into the inner grommet
The outer grommet is a spare
Black
Rope B
Long Frame
Sleeve
A
SETTING LONG FRAME
2
A: Insert long frames into upper sleeves.
B: Insert both ends into grommets.
C: Attach clips (2 locations) to first frame.
Repeat on other frame.
Insert into the inner grommet
The outer grommet is a spare
Black
Rope
B
Wrap intersecting
frame poles together
× 2
14
C
Clips × 2
B
Short Frame
A
SETTING UP THE SHORT FRAMES
3
A: Insert remaining short frames into side sleeves.
B: Insert both ends into grommets.
C: Clip and wind the intersection (2 locations)
Repeat on both sides.
C
B
B
15
A
Attach to
the end of
the webbing
or to the ring
Tensioner
Setting rope
Webbing Loop
Upper Rings of
Long Frame Intersection of
Bridge Frame and Long Frame
Upper Webbing
of Short Frame
※The remaining four 2.5m ropes, are
supplementary ropes for setting up the awning
or stabilizing the tent in windy conditions.
ATTACHING THE ROPES
4
A: Wrap webbing loop around frame (8 locations)
B: Attach a 2.5m rope to the end of
the webbing or to the ring (8 locations).
C: Attach a 1.5m rope to the end of
the webbing (4 locations).
16
9
8
7
15 16
14 13
20 17
19 18
2
6 3
1
5 4
10
12 11
In sections 13-16,
peg down two ropes
with one peg.
AA
B
B
B
B
Drive pegs
at 45° angle
45°
DRIVE PEGS
5
Drive pegs intot the ground in numerical order
A: Peg down sections 1-4, then peg down sections 5-8
while pulling in the direction of the arrows.
B: Peg down sections 9-12 without over-tensioning. Then peg down the
tension cords in sections 13-20. Installation complete.
17
A: Determine the front and back of the inner tent.
The side with the logo is the front.
※The main tent is symmetrical, so it can be installed either way.
B: The two bottom corners on the front can either be pegged down or
hooked into place. When pegging down always unfasten the buckle
first and then peg down the corner rope.
※When using the hook to attach, be sure the buckle is fastened.
The side with the logo is the front.
A
B
When pegging down the tent unfasten the buckles.
1 INSTALLING THE INNER TENT (PREP)
6
18
D
D
C
C
E
E
F
F
2 INSTALLING THE INNER TENT
6
Adjust the tension by pulling
on the straps in sections E and F.
※The webbing in
section F, can be unhooked
and pegged down as well.
See previous section
Ring
Hook
Ring
Hook
Hook
Ring
C: Pass the ceiling toggles through the O-rings on the main body (4 locations).
Latch hooks D, E, and F, respectively, to the bottom corner O-rings
on the main tent.
19
A
B
1 INSTALLING THE FOOTPRINT (PREP)
7
The shiny side is the top.
Living SheetProtective Sheet
A: Determine the top and bottom of the footprint. The shiny side is the top.
B: When using the protective sheet as a base for the inner tent, place it under
the inner tent. When using it as a living sheet, lay it in front of the inner tent.
Ring
Hook
20
C
C
C
C
C
D
D
2 INSTALLING THE FOOTPRINT
7
Unbuckle and thread the
webbing through the elastic loop.
C: Wrap the elastic loops from each corner around the pegs holding
down the main tent.
D: When using the protective sheet as a base for the inner tent,
unfasten the buckle at the D ring, pass the webbing through
the elastic loop and refasten.

This manual suits for next models

1

Other ZANE ARTS Tent manuals

ZANE ARTS PS-011 User manual

ZANE ARTS

ZANE ARTS PS-011 User manual

ZANE ARTS PS-033 User manual

ZANE ARTS

ZANE ARTS PS-033 User manual

ZANE ARTS PS-003 User manual

ZANE ARTS

ZANE ARTS PS-003 User manual

ZANE ARTS ZEKU-M User manual

ZANE ARTS

ZANE ARTS ZEKU-M User manual

ZANE ARTS ZEKU-L User manual

ZANE ARTS

ZANE ARTS ZEKU-L User manual

ZANE ARTS ROGA-4 User manual

ZANE ARTS

ZANE ARTS ROGA-4 User manual

ZANE ARTS ZEKU-L INNER TENT User manual

ZANE ARTS

ZANE ARTS ZEKU-L INNER TENT User manual

ZANE ARTS TP-003/GEU User manual

ZANE ARTS

ZANE ARTS TP-003/GEU User manual

ZANE ARTS PS-011 User manual

ZANE ARTS

ZANE ARTS PS-011 User manual

ZANE ARTS ZEKU - M INNER TENT User manual

ZANE ARTS

ZANE ARTS ZEKU - M INNER TENT User manual

ZANE ARTS PS-111 User manual

ZANE ARTS

ZANE ARTS PS-111 User manual

ZANE ARTS PS-122 User manual

ZANE ARTS

ZANE ARTS PS-122 User manual

ZANE ARTS GIGI-2 User manual

ZANE ARTS

ZANE ARTS GIGI-2 User manual

Popular Tent manuals by other brands

skandika outdoor SATURN 8 Setup Instruction

skandika outdoor

skandika outdoor SATURN 8 Setup Instruction

Rowlinson Garden Products Tenbury Arbour manual

Rowlinson Garden Products

Rowlinson Garden Products Tenbury Arbour manual

ShelterLogic 23572 Assembly instructions

ShelterLogic

ShelterLogic 23572 Assembly instructions

Velabog Breeze GF manual

Velabog

Velabog Breeze GF manual

WFS TNT-10 instruction manual

WFS

WFS TNT-10 instruction manual

Exped LYRA II EXTREME manual

Exped

Exped LYRA II EXTREME manual

Tentsile UNA owner's manual

Tentsile

Tentsile UNA owner's manual

Clam Expedition instructions

Clam

Clam Expedition instructions

Yarden 80548 instruction manual

Yarden

Yarden 80548 instruction manual

Close Comfort Box Tent Setup instructions

Close Comfort

Close Comfort Box Tent Setup instructions

Palram CANOPIA SOPHIA 3x5 How to assemble

Palram

Palram CANOPIA SOPHIA 3x5 How to assemble

Ohenry Productions Premium 15x20 quick start guide

Ohenry Productions

Ohenry Productions Premium 15x20 quick start guide

Mec TARN 2 Assembling and maintaining

Mec

Mec TARN 2 Assembling and maintaining

ShelterLogic 26775 Assembly instructions

ShelterLogic

ShelterLogic 26775 Assembly instructions

Harbor Freight Tools 90857 Assembly and operating instructions

Harbor Freight Tools

Harbor Freight Tools 90857 Assembly and operating instructions

U-Line H-3505 Assembly instructions

U-Line

U-Line H-3505 Assembly instructions

ShelterLogic Garage-in-a-Box RoundTop 62780 Assembly instructions

ShelterLogic

ShelterLogic Garage-in-a-Box RoundTop 62780 Assembly instructions

ClearSpan R030B00000 quick guide

ClearSpan

ClearSpan R030B00000 quick guide

manuals.online logo
manuals.online logoBrands
  • About & Mission
  • Contact us
  • Privacy Policy
  • Terms and Conditions

Copyright 2025 Manuals.Online. All Rights Reserved.