ZANE ARTS PS-003 User manual

ENG/Ver 1.00
MIDDLE SIZE ONE POLE SHELTER
PS-003 / ZEKU-M
OwnersManual

Tent body
x1
Living sheet
x 1
Center pole x 1
Extension x 3
Triangle
hanger x 1
Carry bag x1 Pole case x1
Peg & rope
case x1
Y-Peg
×6
V-Peg
×15
1.5 m
rope
×3
3 m
rope
×15
2
■Items Included
Please check the contents of the set before fully
opening the tent. If you find something missing,
please contact the store where you purchased it or
us directly.
*We recommend preparing spare (commercially available) pegs
and extra rope in case of unforeseen circumstances.

3
■About this product
Apply seam sealant
Please take some time to understand the
characteristics of this product before using it.
There is a place where seam tape cannot be attached to
the joint at the tip of the indoor ceiling of PS-003 /
ZEKU-M. In the unlikely event of leakage,
you may choose to apply a
commercially available seam
sealant.
Chemically treated fibers are used in the fabric of this
product. Chemically treated fibers may liquefy when
burned, the liquefied fabric may stick to skin and cause
serious burns. Never bring fire close to tents, shelters or
tarps.
Seam on the
inside at tip
of the
ceiling.
Use of a wood stove is absolutely prohibited

4
Wrinkles caused by folding are noticeable
Commonly used chemically treated fibers used in tents,
shelters and tarps are prone to creases. In particular, the
fabric in this product has noticeable wrinkles due to the
color, thickness, and surface processing of fabric. Please
note that it does not affect performance in any way.
Waterproofing performance is reduced
The surface is treated with silicone water repellent, but
after use, the water repellent performance will deteriorate
and rain will eventually penetrate the fabric. Please note
that the water repellency cannot be maintained long term.
Waterproof performance of the back side is not affected,
so even if water repellency deteriorates, there is no issue
using it as it is.
Discoloration of seam tape
Please note that the seam tape will gradually discolor, but
this will not affect the performance of the product.

5
Thoroughly dry and store
If tent is stored while wet, the polyurethane coating on the
back of the fabric will react with the moisture and may
decompose or peel off, causing the seam tape to come off
and diminish its waterproofness. After using, dry
thoroughly and store away from hot or humid places. Be
extra careful to wipe any moisture from the seams.
For 3 seasons of use
This product is not designed to withstand snowfall or low
temperatures. Do not use in low temperatures where the
zippers may freezes or in snow.
Do not remove the fire prohibition tag
Do not cut or remove the fire-prohibited tag sewn into the
product. Products without a fire-prohibited tag cannot be
guaranteed or repaired.

6
■Precautions for setup and use
Danger
Indicates content that may result
in death or serious injury.
Be sure to read and understand the following
contents before use to prevent harm to the user and
others, and damage to property.
●Fire is not allowed in tents, shelters, and tarps. It is
extremely dangerous as there is a risk of fire, oxygen
deficiency, carbon monoxide poisoning, etc. Do not use
firearms and keep fire away from tents, shelters, and
tarps.
●If the weather is bad, such as a typhoon or storm, or if
you anticipate such weather, stop camping immediately.
●Do not set up in a place that is easily affected by wind
or where there is a risk of falling rocks, avalanches, or
rising water.
!

7
●
Not for permanent use. If this product is set up
permanently, it will deteriorate and be damaged in a
short period of time due to the effects of ultraviolet
rays and other elements.
●Set up on a flat surface with good drainage.
Moisture and dirt can lead to deterioration, and
rough terrain can lead to damage to product.
●Remove any items that may damage the product,
such as rocks and branches, before setting up.
●When setting up the product, be sure to have two or
more people, and pay attention to surroundings.
●
Do not set up when the wind is strong. The main body
may blow away or product may be damaged by the
force of the wind.
Warning
Indicates content that may cause
injuries or property damage.
!

8
●When setting up, be prepared for wind gusts and be
sure that the main body and frame don’t fly away by
keeping your hands on the frame and main body while
working.
●When extending poles or frames, make sure each
section is inserted securely. Assembling the product
incorrectly can lead to damage.
●When handling poles or frames, be careful not to hit or
damage something around you and pay attention to
your surroundings.
●After setup, secure the tent, shelter, and tarp to the
ground with pegs and ropes to prevent them from being
blown away by the wind.
●If the weather suddenly changes hold on to the product
for as long as needed to keep it down.
9
!
■
Precautions for teardown and after use care
Indicates content that may cause
minor injuries or property damage.
Be sure to read and understand the following
contents before use to prevent harm to the user and
others, and damage to property.
Warning
●When taking down the product, be sure to have two or
more people.
●Please take down the product in the reverse order of the
setup. Not following the instructions properly may
damage the product.
●
When removing poles or frames, be careful not to hit or
damage something around you and pay attention to your
surroundings.
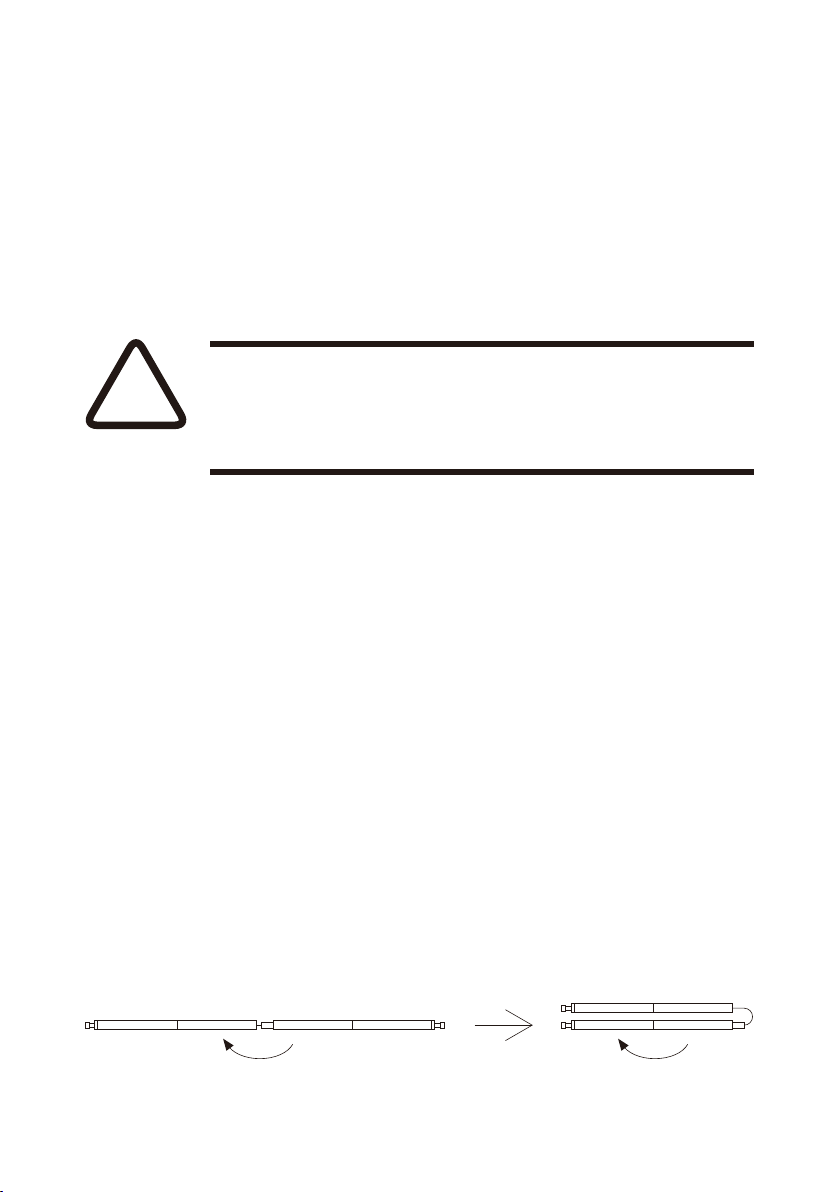
●When folding a frame or pole with a built-in cord
(cord), begin folding from the center, this will reduce the
wear on the bungee cord by not applying extra tension
to the cord.

10
●After use, clean the fabric and allow it to dry thoroughly
before storing. If it is stored with dirt or moisture
uncleaned, it may cause colors to transfer or mold odors
to form, and may cause the seam tape to come off and
diminish its waterproofness.
●Frames, poles, and other metal parts should also be
thoroughly dried before storage. If stored while moist or
uncleaned, they may be damaged by corrosion.
●Salt can accelerate the deterioration of fabrics. If used
near the sea, rinse with fresh water and dry well before
storing.
●Use a soft towel to gently clean or wipe moisture off
fabrics. Rubbing can damage the coating of the fabric.
●
Do not use solvents such as paint thinners. There is a risk
of delaminating or discoloration of the water-repellent
finish.
●Please do not wash. It will lead to deterioration of the
fabric and damage to other parts.
●
Please keep out of reach of infants and children.
This manual suits for next models
1
Other ZANE ARTS Tent manuals

ZANE ARTS
ZANE ARTS ZEKU-M User manual

ZANE ARTS
ZANE ARTS ZEKU - M INNER TENT User manual

ZANE ARTS
ZANE ARTS PS-011 User manual

ZANE ARTS
ZANE ARTS ZEKU-L User manual

ZANE ARTS
ZANE ARTS GIGI-2 User manual

ZANE ARTS
ZANE ARTS ROGA-4 User manual

ZANE ARTS
ZANE ARTS PS-122 User manual

ZANE ARTS
ZANE ARTS ZEKU-L INNER TENT User manual

ZANE ARTS
ZANE ARTS PS-033 User manual

ZANE ARTS
ZANE ARTS DT-002 User manual


