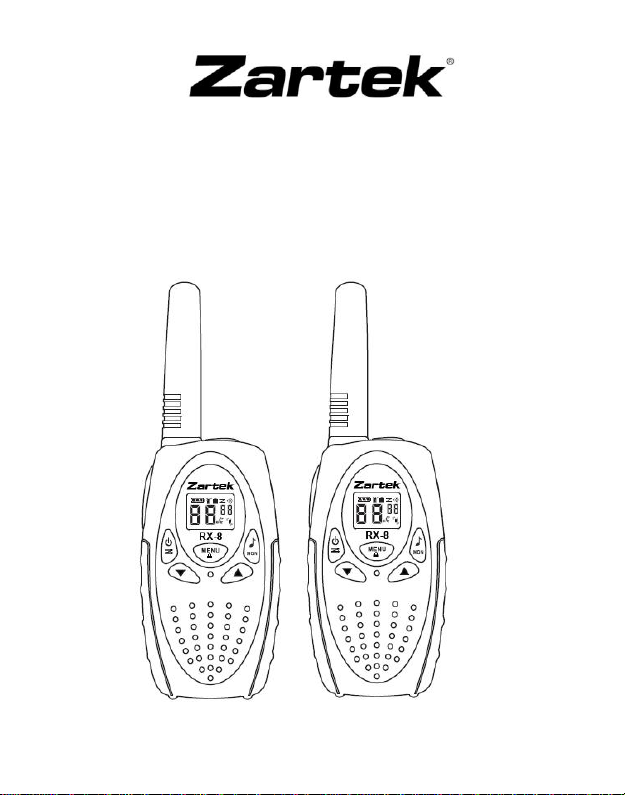
Zartek RX-8 User manual

RX-8
User’s Manual

INTRODUCTION
Congratulations! You have just purchased a new remarkable product in
communications. The
Zartek
RX-8 is a basic yet very effective two-way
radio. With this radio you can talk instantly to as large a group as required
and as often as you like without airtime charges, giving you, family, friends,
commercial and industrial colleagues many years of free quality
communications.
Legislation allows you now to own and use this relatively powerful
equipment without an operator’s annual license from ICASA. This applies
in most European countries as well as in some SADC (Southern African
Development Community) countries.
To obtain maximum performance from your personal two-way radio,
please take a few minutes to carefully read this user’s manual. The
Zartek
RX-8 is a lightweight, palm-sized wonder communication device,
so small you can carry anywhere and talk to any person who is set on the
same channel, as long as they are within range. The range of the
Zartek
RX-8 is anything from 500m indoors to 5kms outdoors, depending on
terrain and environment. The signal will bounce around and penetrate
materials at the speed of light, bearing in mind the greater the barriers the
more attenuation i.e. weakening of the signal.
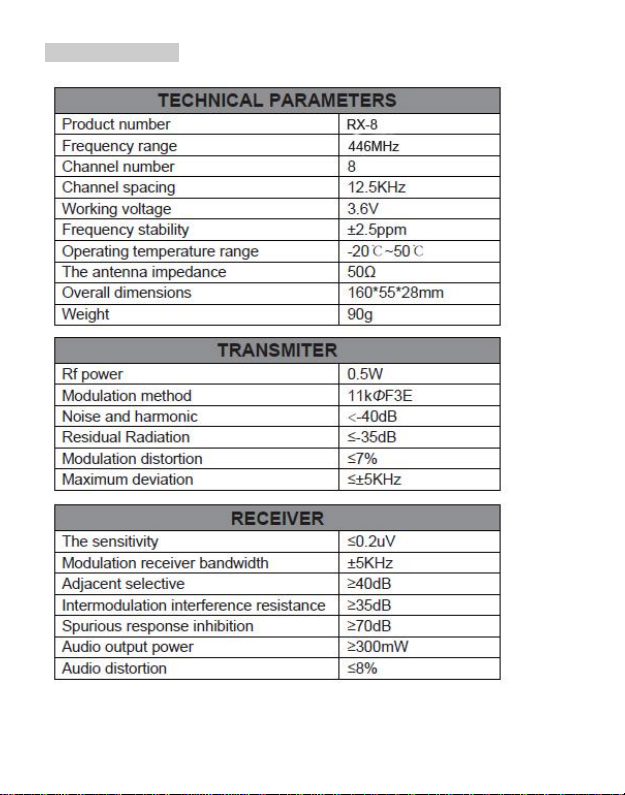
The
Zartek
RX-8 is our exciting new generation series and uses the
446MHz band of frequencies often called the PMR (Public Mobile Radio)
band. It is pre-programmed with 8 frequencies and is therefore channel
compatible to the
Zartek
PT8, COM8, Pro8, TX8, ZA-720, ZA-748, ZA-
758 and ZA-725.
website www.zartek.co.za/
WARNING & PRECAUTIONS
Read this manual before using the radio.

Avoid prolonged direct exposure to sunlight and heat.
Do not use batteries different from those specified in the instructions
manual.
Only use chargers and cables included or recommended.
Do not operate the radio in hazardous environments, explosion or fire
may result.
Turn off your radio to avoid electromagnetic interference in areas with
notices posted such as hospitals and aircrafts.
To control exposure, limit transmitting to less than 50% of the time.
Do not operate the radio near unshielded electrical blasting caps.
Under certain conditions, radio can interfere with blasting operations
and may cause an explosion. Turn your radio OFF to prevent
accidental transmission when in a “blasting area” or in areas posted
“Turn your radio off”. Construction crews often use remote controlled
RF devices to set off explosives
Do not operate the radio in high humidity, dusty or very wet
environment. If the device gets wet, immediately remove the batteries
and leave to dry fully for a few days. Water damage is usually
irreparable.
Do not attempt to modify the radio. The radio is designed to comply
with CE and R&TTE.
Do not operate the radio if the antenna is damaged.
The LCD display is made of glass and maybe damaged if dropped or
impacted.
WARRANTY
This product is warranted by Zartek against manufacturing defects in
materials and workmanship under normal use for a 12 month period from
date of purchase via our authorized appointed dealers. There is a 12
month factory warranty on the unit. Warranty does not cover speakers,
battery or accessories. The product must be used for the intended purpose
and not subject to wilful or accidental damage. If the product has been
tampered with in any way, the warranty shall be considered null and void.

CARE & SAFETY
To clean the radio, wipe with a soft cloth dampened with water. Never use
solvents or cleaners on the radio, they can harm the body and leak inside,
causing permanent damage.
Your radio is not splash proof or waterproof. If the radio gets wet, turn it
OFF and remove battery immediately. Dry the battery compartment to
minimize potential water damage. Leave cover off battery compartment
and do not use until completely dry.
When storing for longer than 1 month, remove batteries from radios.
Disposal: All electrical and electronic products including batteries should be
disposed of separately from the municipal waste stream via designated
collection facilities appointed by the government or the local authorities.
MAIN FEATURES
PMR 446MHz license-free band
Clear Loud Audio, 0.5W Transmitting Power
Small, Lightweight and Easy to Use
968 Channel Combinations:
8 Frequencies: UHF 446.00625 - 446.09375 MHz
121 tones : 38 CTCSS Codes + 83 DCS Codes
Digital Volume Control (8 levels)
Channel Scanning and Monitor
VOX (Hands-free) 3 Levels of Sensitivity
Dual Watch (Monitors 2 channels)
Call Function (10 different tones)
Adjust Squelch (1 - 6)
Key Tone, Roger Beep and Keypad Lock

Backlit LCD with Function Icons
Uses 3 x AA batteries per radio
External Mic/Headset (PTT or VOX) socket
Size incl Antenna & Belt clip 16 x 4 x 5.5cm
Weight per radio incl Batteries 150g
1 Year Limited Warranty
OVERVIEW

INSTALLING BATTERIES
This radio is designed to use 3 x AA batteries
Remove the Belt Clip
Lift up the door release clip to open the battery door
Follow the polarity + - images inside the compartment and insert
3 x AA size batteries in each radio
Close the battery door then press down to close it tightly.
Rechargeable NiMH AA batteries can also be used in the RX-8.
CAUTION: DO NOT RECHARGE ALKALINE BATTERIES
Battery Low:
When you hear a "Beep" sound, it indicates that the battery level is low
. Please replace with new Alkaline batteries or recharge if using
NiMH batteries. The radio powers off when the voltage drops below a
predetermined level to protect the battery life.
RECHARGING BATTERIES
The RX-8 twinpack radio option (not the basic pack) includes a mains USB
adaptor, dual pin USB charging cable and rechargeable NiMH AA batteries.
DC input of 5V is required to recharge AA NiMH batteries.
Plug in the mains adaptor and attach the USB charging cable
Lift the rubber cover at the top of radio to reveal the charging
socket
Insert the plug into the socket for each radio
Observe the battery level indicator on the screen filling during
charging
Battery level icon will be full once charging is complete.
Charge time is 3 hours.

Usage Time per Charge is 50 hours on average duty use (5% TX,
5% RX 90% Standby)
WARNING
Make sure the polarity of each inserted battery is correct.
When a battery is damaged or not working, dispose of it safely
according to its instructions.
Never discard a battery or place them close to fire or heat, otherwise,
they may explode.
Do not recharge or disassemble Alkaline batteries.
Do mix battery types or use old and new batteries together.
Keep away from children. Seek immediate medical attention if
swallowed.
Battery & Charger Safety Instructions
All batteries can cause property damage and/or bodily injury such as burns
if a conductive material such as jewellery, keys, or beaded chain touches
exposed terminals. The conductive material may complete an electrical
circuit (short circuit) and become quite hot. Exercise care in handling any
charged battery, particularly when placing it inside a pocket, purse, or other
container with metal objects.
1. Do not expose the charger to rain or snow.
2. Do not operate or disassemble the charger if it has received a sharp
blow, or has been dropped or damaged in any way.
3. Never alter the cord or plug provided with the unit.
4. To reduce the risk of damage to the cord or plug, pull the plug rather
than the cord when disconnecting the charger from the AC receptacle.
5. To reduce the risk of electric shock, unplug the charger from the
connector before attempting any maintenance or cleaning.

6. Use of an attachment which not recommended may result in a risk of fire,
electric shock, or personal injury.
7. Make sure the cord is located where it will not be stepped on, tripped
over, or subjected to damage or stress.
OPERATING TIME
A new set of batteries will give approximately 50 hours of average use on
duty cycle 5% transmit, 5% receive, 90% standby. Operating time is
reduced with more activity.

FREQUENCY & TONE LIST

SPECIFICATIONS

POWER ON/OFF
To power ON the radio, press key for 3 seconds until a beep is
heard and the LCD screen displays the channel and screen icons
To power OFF the radio, press for 3 seconds until LCD display
turns off.
MAKING COMMUNICATIONS
The radio has 8 main frequencies (large numbers) & 121 codes (small
numbers) effectively giving you 968 channels respectively. You can
communicate with any other user who is using the same combination,
providing they are within range.
SELECT CHANNEL
To select the main channel
Press the MENU key once, Main channel frequency number
displayed will flash.
Press UP or DOWN key to select your desired main channel number.
Press the PTT key to confirm and quit or press MENU to continue
next function setting.
You have 10 seconds to decide before auto-reverting back to the
main screen.
CODE FUNCTION
This function can help you select your group of users on the shared
frequency. Only the users with the same code can listen and talk to each
other. Using this function will improve the privacy of your communication.
In radio communication, any PMR 446 radio can listen to all
communications on the same channel when using the default standard

setting with CTCSS = 00 (OFF). There are 121 tones consisting of 38
CTCSS Codes + 83 DCS Codes
To select a code
Press the MENU key twice, the code display will flash.
Press UP or DOWN key to select your required code (01 - 121, 00 is
off).
Press the PTT key to confirm or press MENU to continue.
You have 10 seconds to decide before auto-reverting back to the
main screen.
SPEAK TO ANOTHER RADIO
Press & hold in the side PTT (Press-To-Talk) key, the LCD will show
the TX transmit icon indicating the radio is transmitting.
Hold the radio in a vertical position with the microphone (situated on
front middle of radio) 3-5 cm from your mouth and then speak.
When you finish speaking, release the PTT key and a beep tone will
be heard.
LISTEN TO ANOTHER RADIO
The radio will automatically receive audio transmissions from other
radios, within range, sending on the same channel.
Only one radio can transmit at a time so avoid pressing the PTT key
until the received signal has ended. When you press the PTT key, you
can’t listen to other radios. Make sure you do not press the PTT key
for listening.
Adjust volume control if necessary.

ADJUSTING SPEAKER VOLUME (8 LEVELS)
Press the UP key to increase the volume.
Press the DOWN key to decrease the volume.
TALK TIME-OUT FUNCTION
Time-out function can avoid transmitting by chance and prolong the
battery life.
The radio will stop transmitting and sound a warning tone when PTT
is held over 180 seconds. You then need to release PTT and press
again for further transmission.
In VOX mode, the unit will stop transmitting and sound a warning
tone after continuous talk for 180 seconds. You can re-activate VOX
after the time-out by pressing PTT key. (Please refer to VOX function
for detailed VOX operation)
TALK RANGE
The range will depend on the type of terrain that you are communicating
across.
The
Zartek
RX-8 uses the UHF (Ultra High Frequency) band and will be
subject to similar obstacle interference as cellular phones. The radio works
indoors as well as outdoors. Typical rough estimate ranges for different
terrains are:
Shopping centre 300m-500m
Building 3-15 stories,
City centre & dense bush 300m-1.5km,
Residential & over water 1-3km,

Farmland 1-4km,
Top of mountain or building (elevated line-of-sight) 5-10km.
When you press the PTT talk button a signal is transmitted and the signal
floods the area in all sideway directions. The signal travels in 3 different
ways:
1) Penetration: The signal can go through materials such as wood, plastic,
cement and fabric. The denser the material or more built up the
environment the weaker the signal will become. The signal cannot go
through solid metal or very large solid land structures such as a hill or
mountain. Metal acts like a shield and that is why the performance from the
inside of a vehicle (car or 4x4) will be less than outside.
2) Reflection: The signal cannot go through metal or very large structures
such as a hill or mountain, but it can bounce off (like a mirror), go around
and reflect in other directions as well. This happens at the speed of light.
3)Line-of-sight: Line-of-sight is when there are no obstructions in the path
between the communicating parties. The higher up you go the further you
can see, so the larger the line-of-sight distances will be. Generally you can
talk to wherever you can see, which is why the coverage in a valley is
much less than the coverage from on top of a hill.
Ensure that there is nothing blocking the antenna .The less metal in close
proximity (0-2m) the better the range. There may be external interference
from electrical equipment (power lines or factories) or natural causes
(moisture in the air or storms) that may vary depending on the location and
the weather.
SELECTING & SENDING CALL-TONES
You can use 1 of 10 different “Call Tones” to get attention of other users on
the same channel.

Press the MENU key three times until CA appears and select Call
Tone using UP or DOWN keys.
To send a Call Tone, Press the ♪MON key and the tone will sound,
LCD will display the transmit icon and your call tone will be sent.
VOX “HANDS FREE FUNCTION”
The
Zartek
RX-8 has a built-in multi-level sensitivity VOX function. You
can enjoy talking and listening without pressing PTT key as transmit is
automatically activated by sound. Setting 3 is the most sensitive to noise.
To turn on VOX function press MENU key 4 times, the LCD displays
the VOX icon and the VOX sensitivity digit display will flash.
Press UP or DOWN key to select OF, 1, 2 or 3 (OFF, low, medium &
high sensitivity).
After turning on VOX the LCD will display VOX icon. Press PTT
to confirm and quit or press MENU key once to confirm and continue
to the next menu feature.
The VOX feature works best when speaking directly into (or close to)
the microphone on the radio.
DUAL WATCH
This feature allows you to monitor 2 channels for activity. The radio will
continuously scan these 2 channels and lock on to the channel for the
duration of signal. Use the PTT key to reply back on this active channel.
Dual watch will resume 5 seconds after no activity.
Firstly, set the tones (00 –121) on the frequencies (1 –8) so the
tone is stored in the radios memory corresponding to the frequency.
Select for both channels to be watched. Then select the first channel
to be watched as the radios main channel.
Press the MENU key 5 times to enter Dual Watch feature CH. The
channel number will flash of the second channel to be monitored.

Press UP or DOWN key to select which channel (1 –8) to watch in
addition to the main channel and confirm with PTT key.
Select OF to stop dual watch.
SQUELCH
Press the MENU key 6 times until SL appears.
Press UP or DOWN key to select the receiver sensitivity level.
01 = High receive sensitivity (to received weaker and noisier signals)
02 - 05 = Medium receive sensitivity
06 = Low receive sensitivity (to only accept stronger and clearer
signals)
TX POWER
This feature (MENU item 7) is not activated on the RX-8. Both settings LO /
HI are the same transmit power 0.5W
SCANNING CHANELLS
This feature allows you to search channels for transmitting activity.
Scanning is useful to monitor different groups, if your main channel has
been changed mistakenly and other users are trying to communicate or to
contact other users in emergency situations.
Firstly, set the tones (00 –121) on the frequencies (1 –8) so the
tone is stored in the radios memory corresponding to the frequency.
Select for all channels to be scanned. If a 00 tone is selected then
the open channel will be scanned.
To begin scanning, press the key once. A scan icon will
appear on the screen and channels will be scanned.
The radio will continuously scan all 8 channels and lock on to the
active channel for the duration of signal. Scanning will resume 5
seconds after no activity. Use the PTT key to stop scanning and to
reply back on this channel.
If scanning locks on to a channel you do not want to listen to, press
UP or DOWN key to resume scanning.
To end scanning, press the PTT or key once

KEYPAD LOCK
To avoid accidentally changing your radio settings, press and hold
MENU for 3 seconds until displays to lock the radio. You can still turn the
radio on and off, receive, transmit and send a call tone. All other functions
are locked.
To unlock the radio, press and hold MENU for 3 seconds until until is
no longer displayed.
MONITOR
Press and hold in the MON key to open the main channel displayed on
screen and monitor its frequency for any activity.
HEADSET optional
The RX-8 radio is fitted with a socket to fit an external microphone speaker
headset which can be used on PTT or VOX.
Lift the rubber cover at the top of radio to reveal the headset
socket
Contact your supplier if you wish to purchase accessories such as headset,
chargers or batteries.
Table of contents
Other Zartek Two-way Radio manuals

Zartek
Zartek ZA-748 Operating instructions

Zartek
Zartek WT-202 User manual

Zartek
Zartek Pro 5 User manual

Zartek
Zartek ZA-711 User manual

Zartek
Zartek PERSONAL TWO-WAY RADIO User manual

Zartek
Zartek Pro5l Pro8 User manual

Zartek
Zartek PT8 User manual

Zartek
Zartek COM8 User manual

Zartek
Zartek ZA-721 User manual

Zartek
Zartek ZA-758 User manual