Zavor LUX EDGE User manual

OLLA ELÉCTRICA MULTIFUNCIONAL
MULTI-CUISEUR ÉLECTRIQUE
User’s Manual
Manual del Usuario - Manuel d’utilisation
LUX™EDGE
MULTI-COOKER
Scan here to download a free
recipe book with more than 120
delicious recipes to use in your
ZAVOR LUX™ Edge Multi-Cooker.

1
ENGLISH
Contents
Introduction ............................................................................................2
Important Safeguards ............................................................................3
Features and Functions .........................................................................5
Getting Started .......................................................................................7
Operating Functions...............................................................................8
Pressure Cooking Program..................................................................11
Pressure Cooking Charts.....................................................................13
Rice Program........................................................................................18
Soup Program ......................................................................................19
Beans Program.....................................................................................20
Chili Program........................................................................................21
Meat Program.......................................................................................22
Poultry Program ...................................................................................23
Vegetable Program...............................................................................23
Pot Roast Program...............................................................................24
Dessert Program ..................................................................................25
Oats Program .......................................................................................26
Manual Program...................................................................................27
Slow Cooking Program........................................................................27
Yogurt Program ....................................................................................28
Greek Yogurt.........................................................................................31
Simmer Function ..................................................................................31
Sauté Function .....................................................................................32
Steam Function ....................................................................................33
Keep Warm Function ...........................................................................33
Time Delay Function ............................................................................34
Mute Feature ............................................................................... 35
Cleaning and Maintenance..................................................................35
Troubleshooting....................................................................................37
Español .................................................................................................38
Français ................................................................................................77
Limited Warranty ................................................................................117
ENGLISH

3
2
ENGLISH
ENGLISH
Introduction
Thank you for purchasing this state of the art ZAVOR LUX™ EDGE Multi-
Cooker! The ZAVOR LUX™ EDGE can be used to steam, simmer, sauté,
cook rice, soup, pot roast, chili, beans, meat, poultry, dessert, oats,
vegetables, prepare yogurt, as well as pressure cook and slow cook
foods to perfection. The user friendly electronic controls are simple and
straightforward, allowing you to set recipe times with ease. Plus, the
convenient TIME DELAY and KEEP WARM settings provide you with
cooking flexibility that meets your busy schedule.
This ZAVOR LUX™ EDGE Multi-Cooker user’s manual contains
information on the use and care of this product. Please read this manual
carefully before operating the ZAVOR LUX™ EDGE Multi-Cooker to
ensure proper usage and maintenance of the unit. Carefully following
the directions in this manual enables you to optimize the performance
and lifespan of the cooker.
Note: This manual applies to all colors and sizes of the LUX™ EDGE
Multi-Cooker.
IMPORTANT SAFEGUARDS
The product you have purchased is a state of the art appliance. It adheres to
all of the latest safety and technology standards; however, as with any electric
appliance, there are some potential risks. Only operate this cooker following the
instructions provided and only for its intended household use.
PLEASE READ THE INSTRUCTIONS BELOW BEFORE USING THE
APPLIANCE FOR THE FIRST TIME.
• Read all of the instructions contained in this manual before using the appliance.
• This product is not intended for commercial or outdoor use; it is only for
household and indoor use.
• Do not operate the unit if the electric cord or plug is damaged. If the appliance
is not working correctly, has been dropped or damaged, left outdoors or
submerged in water, discontinue use immediately and contact our customer
service department at 1-855-928-6748.
• The multi-cooker has a NEMA 5-15P, 3 pins plug and a 47.24 inch power
cord.
• Attach the plug to the multi-cooker base first, then insert the power plug into
a power outlet. Always ensure that the power cord is completely dry.
• Do not let the electric cord hang over the edge of the table or counter.
• Do not let the electric cord touch hot surfaces.
• If using an extension cord to connect the multi-cooker, please note that a
damaged extension cord can cause the unit to malfunction. Always check
your extension cord for damage and be sure it is compliant with the required
voltage. For safety, be sure to arrange the cord so that it can’t be pulled on by
children or tripped over unintentionally.
• Do not place the multi-cooker near heat-emitting devices such as heaters,
gas cooktops or electric burners. Do not place the cooker in a heated oven.
• Always use the multi-cooker in a well-ventilated area.
• Using accessories or replacement parts that are not recommended or sold by
the manufacturer may cause damage to the multi-cooker or personal injury
• Children need close adult supervision at all times when they are in or around
the kitchen. Keep this appliance out of the reach of children.
• This appliance is not intended for use by persons (including children) with
reduced physical, sensory or mental capabilities, or lack of experience and
knowledge, unless they have been given supervision or instruction concerning
use of the appliance by a person responsible for their safety.
• While in operation, do not cover the appliance or position it near flammable
materials including curtains, draperies, walls, and fabric upholstered furniture.
• Do not open the pressure cooker until the unit has cooled and all internal
pressure is fully released. If the handles are difficult to push apart, this indicates
that the cooker is still pressurized – do not force it open. Any pressure in the
cooker can be hazardous.

5
4
ENGLISH
ENGLISH
• Always cook in the removable cooking pot of the multi-cooker. Cooking without
the removable cooking pot may cause an electric shock or damage to the unit.
• Never deep fry or pressure fry in the cooker. It is dangerous and may cause a fire(s)
and severe damage.
• Never cover or block the pressure valve with anything. This blocking may cause
over pressurizing and lead to serious accidents.
• While you’re cooking, the lid and the outer stainless steel surface of the cooker
might get hot. Handle with care and carry or move the cooker using only the side
handles. Be very cautious when moving any appliance containing hot food or
liquids.
• Keep hands and face away from the pressure regulator knob when releasing
pressure from the cooker to avoid being scalded by hot steam.
• After cooking, use extreme caution when removing the lid. Serious burns can
result from residual steam escaping from inside the unit. Lift the lid facing away
from you and allow the drops of water to trickle back from the lid into the cooker.
• Always unplug and let cool before cleaning and removing parts. Never attempt to
unplug the unit by pulling on the power cable. Keep unplugged when not in use.
• To reduce the risk of an electric shock, never immerse the plug, power cable
or housing in water or any other liquid. Only the removable cooking pot can be
cleaned in the dishwasher.
• Only qualified experts may repair and perform maintenance work on the electric
multi-cooker using authentic ZAVOR replacement and accessory parts. Never
attempt to disassemble and repair the multi-cooker yourself.
• This appliance cooks under pressure. Improper use may result in scalding injury.
Make sure the unit was closed correctly before operating. See “Pressure Cooker
Program.”
• Do not fill the unit over 2/3 full. When cooking with foods that expand such as
rice or dried vegetables, do not fill the removable cooking pot more than 1/2 full.
Overfilling may cause a risk of clogging the vent pipe and will not have enough
room for the proper building of pressure. See “Operating Functions.”
• The following foods tend to foam, froth and/or sputter: applesauce, cranberries,
pearl barley, oatmeal, split peas, noodles/pasta or rhubarb. These items may block
the pressure valve if filled too high in the removable cooking pot. Please be sure
when pressure cooking these items do not fill the removable cooking pot more
than halfway.
• Always check the pressure release devices for clogging before use.
SAVE THESE INSTRUCTIONS
Features and Functions
1.Pressure Regulating Knob
Locking Pin 2.
3.Cool-Touch Handles
4.Floating Valve Y-Shaped Gasket Attachment
6.Safety Pressure Valve
Anti-blocking case 7.
(pull up to remove)
8.Condensation Reservoir
Heating Element
and Temperature Sensor 9.
10.Removable Cooking Pot
11.Stationary Pot
13. Stainless Steel Rack
14.Control Panel
5.
12. Power Cord

7
6
ENGLISH
ENGLISH
is properly powered. To fully insert the power cord, hold the grip of the plug
and firmly push the end into the base of the cooker until it is no longer visible.
13.Stainless Steel Rack: Used to keep food off the floor of the inner pot to
prevent them from sitting in their juices/fats. Allows for better steam flow/
distribution when pressure cooking or steaming foods. The handles make for
easy transporting of the rack.
NOTE: When cooking smaller sized foods, make sure they do not fall through
the grates on the rack.
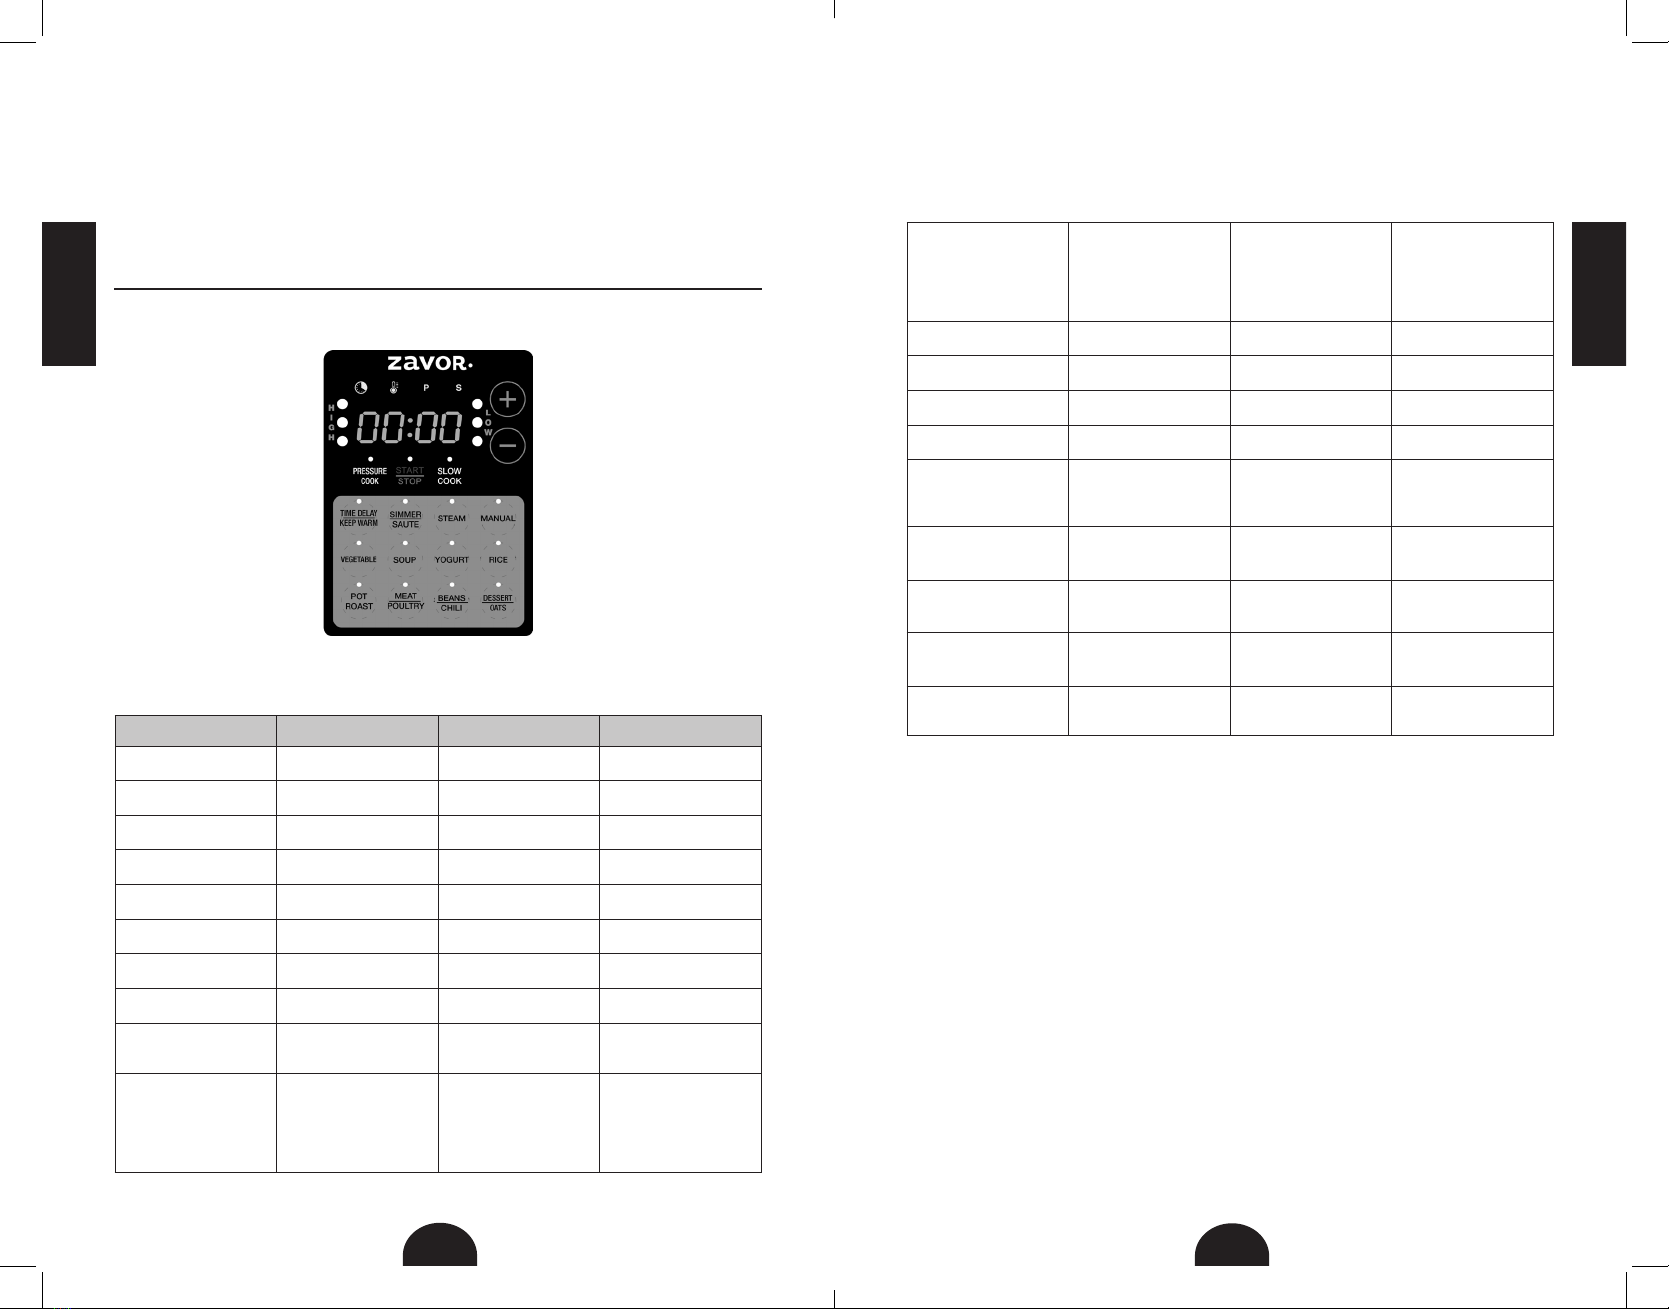
14.Control Panel: The easy to use controls allow you to select the different
programs available with the touch of a finger. The panel is equipped with 4
icons that let you know which stage of the cooking process the multi-cooker
is at. Also, on the control panel you can find the HIGH and LOW indicator
lights which blink while pressure or temperature is building. These three
lights turn solid once the unit has reached proper pressure or temperature.
Getting Started: Before First Use
Read the safety instructions found in this manual before plugging in and
operating the unit. Before using the multi-cooker for the first time, follow
these steps:
1. Remove all packing materials and literature from within the ZAVOR LUX™
EDGE Multi-Cooker. Lift out the removable cooking pot and remove any
pieces of paper from under it. Remove the plastic protection from the control
panel and any stickers from the lid or stainless steel housing.
2. Wash all the removable parts in warm soapy water, rinse, and dry all parts
thoroughly. Wipe the stainless steel outer housing with a clean damp cloth.
NEVER submerge the stainless steel outer housing in water or any other
liquid. Only the removable cooking pot is dishwasher safe.
3. To clean the pressure regulator knob, gently push the pressure regulator
knob down and at the same time turn the pressure regulator knob
counterclockwise past STEAM to the CLEAN setting. Once the white dot on
CLEAN is aligned with the white dot on the base of the pressure regulator,
you can lift the pressure regulator up and out of the lid. Look through the
holes of the pressure regulator to make sure nothing is obstructing, and then
clean the pressure regulator knob with warm soapy water, allowing the water
to run through the pressure regulator to remove all particles.
4. To put the pressure regulator back onto the lid, align the CLEAN setting with
the white dot on the base, gently push down on the pressure regulator and
turn the knob clockwise until it slides back into place.
5. Make sure the silicone gasket is seated correctly inside the lid or else the
cooker cannot function properly.
6. After thorough drying, place the removable cooking pot back into the multi-
cooker before cooking.
1. Pressure Regulating Knob: Turn the regulating knob to the “Pressure”
position when cooking under pressure or when any of the pressure cooking
functions (Rice*, Soup*, Beans, Meat, Poultry, Vegetable*, Pot Roast,
Dessert, Oats, Manual*). Turn the knob to the “Steam” position to release
the pressure after cooking. When slow cooking, using any of the slow cook
functions (Soup**, Chili, Manual**), Steam or Keep Warm functions, be sure
to turn the pressure regulating knob to the “Steam” position.
* this function houses a pressure setting in addition to others, be sure to use the
proper setting when using this function.
** this function houses a slow cook setting in addition to others, be sure to use
the proper setting when using this function.
2. Locking Pin: The lid automatically locks when it is correctly aligned and
closed. While cooking under the pressure function, you cannot open the lid
until all of the pressure is released.
3. Cool-Touch Handles: The cool to the touch handles of the multi-cooker
allow for safe handling and opening of the lid.
4. Floating Valve: The floating valve controls the amount of pressure inside the
cooker by allowing excess pressure to be released.
5. Y-Shaped Gasket Attachment: Sits on the underside of the lid and creates
an airtight seal needed for the cooker to build up pressure. Check the silicone
gasket for any tears or cracks before using any of the pressure cooking
functions. To remove the attachment, hold the center of the Y (not just the
silicone nub) and pull. The ring will detach making for more accessible gasket
removable and replacement. To reattached, place the silicone centerpiece
back on the steel tip and push down until correctly replaced. To order a
new gasket, please contact a ZAVOR Representative at 1-855-928-6748 or
purchase it directly on the ZAVOR website at www.zavoramerica.com.
6. Safety Pressure Valve: The safety pressure valve allows excess pressure
to escape from the cooker when being used for pressure cooking. It works
independently of the floating valve.
7. Anti-Blocking Case: Pull it towards yourself to release the pressure
regulator knob for cleaning.
8. Condensation Reservoir: Collects excess condensation during cooking. If
there is some liquid in the reservoir after cooking, empty it.
9. Heating Element and Temperature Sensor: Both elements regulate the
cooking temperature inside the pot.
10.Removable Cooking Pot: Stainless steel pot is dishwasher safe, but hand
washing is always recommended.
11.Stationary Pot: This pot cannot be removed from the electric multi-cooker
and should NEVER be used for cooking. Before cooking, make sure to place
the removable cooking pot into the stationary pot first. All ingredients should
be placed into the removable cooking pot ONLY.
12.Power Cord: The power cord comes detached from the base of the
stationary pot and needs to be fully inserted to ensure the multi-cooker

9
8
ENGLISH
ENGLISH
Soup Slow: 186°F-190°F
Pressure: 240°F-248°F
Slow: 8 hours
Pressure: 10 minutes
Slow Cook:
30 minutes - 24 hours
30-minute increments
Pressure Cook:
1 minute - 6 hours
1-minute increments
Beans 240°F-248°F 30 minutes 1 minute - 6 hours
1-minute increments
Chili 190°F 4 hours 30 minute - 24 hours,
30-minute increments
Meat 240°F-248°F 40 minutes 1 minute - 6 hours
1-minute increments
Poultry 240°F-248°F 10 minutes 1 minute - 6 hours
1-minute increments
Vegetable Pressure: 226°F-230°F
Steam: 212°F
Pressure: 3 minutes
Steam: 3 minutes
Pressure: 1 minute -
6 hours
Steam: 1-99 minutes
1-minute increments
Pot Roast 240°F-248°F 45 minutes 1 minute - 6 hours,
1-minute increments
Dessert 240°F-248°F 23 minutes 1 minute - 6 hours,
1-minute increments
Oats 240°F-248°F 15 minutes 1 minute - 6 hours,
1-minute increments
Manual 102°F-356°F 30 minutes 1 minute - 10 hours,
1-minute increments
1. Keep Warm: Used to reheat or keep cooked food warm until ready to serve.
2. Steam: This function is used to steam foods such as vegetables and fish.
Add at least a half a cup of water into the bottom of your removable cooking
pot and insert the ZAVOR Stainless Steel Rack or a steamer basket. Make
sure that the rack or basket is positioned above the water. You can purchase
a ZAVOR Stainless Steel Steamer Basket and Trivet on the ZAVOR website
at www.zavoramerica.com.
3. Simmer: This function is used to make soup, stew, sauce or other entrées
that need to be cooked at a lower heat setting. This function is much gentler
than the boiling point of water and makes meat and vegetables very tender.
4. Sauté: Use this function when cooking small pieces of food by preparing
them with very little oil on high heat before using the pressure cooking or
slow cooking function.
5. Pressure Cooking: HIGH-Use this function to cook at high pressure, 10-13
PSI (pounds per square inch). This pressure setting is more suitable to cook
more tough foods such as meats and legumes or other foods that are not
so delicate. LOW- Use this function to cook at low pressure, 4-7 PSI. This
pressure setting is more suitable to cook delicate foods such as tender
Operating Functions:
Panel Programs and Functions
Temperature/Timer Chart
Cooking Function: Temperature: Preset Time: Timer:
Keep Warm 102°F-200°F 12 hours Up to 24 hours,
30-minute increments
Steam 212°F 5 minutes 1 minute - 1 hour,
1-minute increments
Simmer 200°F 30 minutes 1 minute - 2 hours,
1-minute increments
Sauté 266°F-300°F 30 minutes 1-30 minutes,
1-minute increments
High Pressure 240°F-248°F 1 minute 1 minute - 6 hours
1-minute increments
Low Pressure 226°F-230°F 1 minute 1 minute - 6 hours
1-minute increments
High Slow Cooker 208°F-212°F 2 hours 30 minutes - 24 hours,
30-minute increments
Low Slow Cooker 186°F-190°F 2 hours 30 minutes - 24 hours,
30-minute increments
Yogurt HEAT: 180°F
YGRT: 104°F-109°F
HEAT: n/a
YGRT: 8 hours
HEAT: n/a
YGRT: Up to 24 hours,
30-minute increments
Rice
White: 226°F-230°F
Brown: 240°F-248°F
Risotto: 240°F-248°F
Steam: 212°F
White: 10 minutes
Brown: 20 minutes
Risotto: 6 minutes
Steam: n/a
White, Brown and
Risotto:
1 minute - 6 hours,
1-minute increments
(Steam not
programmable)

11
10
ENGLISH
ENGLISH
vegetables and certain types of fish.
6. Slow Cooking: This program cooks food slower than other cooking methods
for up to 24 hours at temperatures of 190°F (LOW) or 212°F (HIGH). Slow
cooking helps food retain maximum flavor and tenderness.
7. Yogurt: This function is perfect for making traditional homemade yogurt and
Greek yogurt.
8. Rice: This function comes equipped with four different rice programs for
White Rice, Brown Rice, Risotto and Rice Steaming.
9. Soups: This function offers HIGH pressure cooking and LOW slow cooking
options for making your favorite soups.
10.Beans: This function uses high pressure and gives you a preset time of 30
minutes to cook different types of beans.
11. Chili: This function uses low pressure and a preset time of 4 hours to help
you make delicious chili.
12.Meat: This function uses high pressure and gives you a preset time of 40
minutes to prepare all types of meat recipes.
13.Poultry: This function uses high pressure and gives you a preset time of 10
minutes to help you prepare perfect chicken recipes.
14.Vegetable: This function offers LOW pressure cooking and steaming options
for cooking vegetables.
15. Pot Roast: This function uses high pressure and a preset time of 45 minutes
to cook your pot roast correctly.
16. Dessert: This function uses high pressure and a preset time of 23 minutes
to help you make your favorite desserts.
17. Oats: This function uses high pressure and a preset time of 15 minutes to
cook oats in the pot or mason jars.
18. Manual: This function is the most versatile function the LUX Edge offers. It
allows you to use the unit as a traditional stockpot, giving you full temperature
control.
19.Start/Stop: To be used after a cooking selection has been made to begin
the cooking process or if you would like to cancel the cooking process.
20.Time Delay: Allows you to delay cooking time up to 6 hours. Push the TIME
DELAY/KEEP WARM button, which increases by 30 minute increments until
you reach the 6 hour maximum time.
Icon Symbol Use Function
Pressure Icon Lights up yellow when
any pressure functions
are selected
Pressure Cook,
Vegetable, Meat,
Poultry, Beans, White
Rice, Brown Rice,
Risotto, Soup, Pot
Roast, Dessert, Oats
Slow Cook Icon Lights up yellow
when any slow cook
functions are selected
Slow Cook, Chili,
Soup
Temperature Icon Lights up yellow when
any temperature
functions are selected
Vegetable, Yogurt,
Rice, Simmer, Sauté
Timer Icon Lights up yellow when
programming the time
delay and blink while
counting down the
delay time.
Time Delay
Pressure Cooking Program
This program allows food to cook faster under pressure by reducing cooking
time up to 70% compared to traditional cooking methods. Pressure cooking is
fast, easy, safe and healthy!
1. Before every use, make sure the silicone gasket and the pressure regulating
valves are clean and correctly placed within the cooker.
2. Plug the cord into a wall outlet.
3. Place the removable cooking pot into the cooker, and add the ingredients
following the recipe. When cooking foods under pressure, a minimum of 1
cup (8 oz.) of liquid is required.
NOTE: Do not fill the pot more than 2/3 full of food and liquid. Do not fill the
unit more than ½ full when cooking foods that expand during cooking.
NOTE: The following foods tend to foam, froth and/or sputter: applesauce,
cranberries, pearl barley, oatmeal, split peas, noodles/pasta, or rhubarb.
These items may block the pressure valve if filled too high in the removable
cooking pot. Please be sure when pressure cooking these items to not fill the
removable cooking pot more than halfway.
4. Place the lid on the cooker; aligning the locking pin on the handle with the
unlocked symbol and turn your lid counterclockwise until it locks into place.
You know when this unit is locked once you hear the pin click into place.
5. Turn the pressure regulator knob to PRESSURE.

13
12
ENGLISH
ENGLISH
6. Choose the desired cooking mode by pressing the PRESSURE COOK
button once for HIGH pressure and twice for LOW pressure.
7. Set the desired cooking time by pressing the + or - buttons once for each
additional minute or to fast advance, hold the button down until you reach
the desired time. The maximum pressure cooking time is 6 hours.
8. Press the START/STOP button to begin cooking. The pressure Icon and
indicator lights flash when the unit has begun to build pressure. If you forget to
select the desired cooking time or forget to press the START/STOP button, the
unit beeps and the digital display reads --:-- after 30 seconds.
NOTE: If you have used any of the cook assist functions prior to pressure
cooking, the cooker may require some time to come down to the proper
temperature. Once the proper temperature has been reached, the unit can
begin running the pressure cooking function.
9. Once pressure builds entirely, all the lights and the pressure icon stay lit, and
then the unit beeps. Then, your cook time begins.
WARNING: NEVER TRY TO FORCE THE LID OPEN WHILE YOU ARE
COOKING UNDER PRESSURE. THIS CAN RESULT IN A SERIOUS ACCIDENT.
WARNING: NEVER DEEP FRY OR PRESSURE FRY IN THE MULTI-COOKER.
IT IS DANGEROUS AND MAY CAUSE A FIRE AND SERIOUS DAMAGE.
10.The cooker beeps once the cooking time ends. It turns the automatic KEEP
WARM function on and the light on the TIME DELAY/KEEP WARM button,
as well as the temperature icon, blinks until you press the START/STOP
button to cancel the program or release the pressure. You have two options
for releasing the pressure:
a. Quick Release Method: Release the pressure immediately by turning the
pressure regulator knob to STEAM.
CAUTION: THE STEAM COMING OUT OF THE COOKER IS HOT, AND MIGHT
CONTAIN DROPLETS OF HOT LIQUID. BE SURE TO USE POTHOLDERS
OR A KITCHEN TOWEL WHEN RELEASING PRESSURE.
b. Natural Release Method: Turn the KEEP WARM function off by pressing
the START/STOP button: this allows the pressure to drop naturally without
turning the pressure regulator knob to STEAM. Natural Release Method
takes several minutes, during which the food inside continues cooking.
Some recipes (such as risotto) benefit from this extra cooking time. You
know when the pressure is all released because the floating valve drops, and
you will be able can open the lid.
NOTE: If you do not press the START/STOP button at the end of the cooking
time, the multi-cooker switches to KEEP WARM and will beep periodically to
remind you to release pressure.
11.Once all the pressure is released, remove the lid by turning it clockwise,
lifting, and tilting the lid away from yourself to avoid any remaining steam or
hot water condensation dripping from the inner portion of the lid.
Pressure Cooking Charts
Pressure cooking times are approximate times. Use these cooking times as a
general guideline. Size and variety of food will most likely alter cooking times.
Pressure Cooking Vegetables (Fresh & Frozen): To achieve the best results
when pressure cooking fresh or frozen vegetables, please refer to the below tips
and hints:
1. Use the STEAM function when making steamed vegetable dishes.
2. Use the quick release method when pressure cooking vegetables so they do
not overcook.
3. Use a minimum of 1 cup of liquid when cooking vegetables.
4. When steaming vegetables, use the stainless steel rack or a steamer basket.
Vegetable Pressure Cooking Chart:
Vegetable Pressure Setting Fresh
(Cooking Time) Frozen
(Cooking Time)
Acorn Squash, chunks High 6-7 minutes 8-9 minutes
Artichoke, 4 medium – large High 8-10 minutes 10-12 minutes
Asparagus High 1-2 minutes 2-3 minutes
Whole Beets, medium – large High 20-25 minutes 25-30 minutes
Broccoli, Florets High 2-3 minutes 3-4 minutes
Brussel Sprouts High 3-4 minutes 4-5 minutes
Butternut Squash, chunks High 8-10 minutes 10-13 minutes
Cabbage, Quartered High 3-4 minutes 4-5 minutes
Carrots, whole or chunk High 2-3 minutes 3-4 minutes
Cauliflower, florets High 2-4 minutes 3-5 minutes
Celery, chunks High 2 minutes 3 minutes
Collard Greens High 4-5 minutes 5-6 minutes
Corn on the Cob High 3-5 minutes 4-6 minutes
Edamame, in pod High 4-5 minutes 5-6 minutes
Eggplant High 2 minutes 3 minutes
Endive High 1-2 minutes 2-3 minutes
Kale, coarsely chopped High 1-2 minutes 2-3 minutes
Leeks High 2-4 minutes 3-5 minutes
Onions, sliced High 2 minutes 3 minutes
Potatoes, whole, small High 5-8 minutes 6-9 minutes
Potatoes, whole, large High 10-12 minutes 11-13 minutes

15
14
ENGLISH
ENGLISH
Potatoes, sliced or cubed High 5-8 minutes 6-9 minutes
Pumpkin, chunks High 4-8 minutes 6-12 minutes
Spinach High 1-2 minutes 3-5 minutes
Sweet Potatoes, cubed High 7-9 minutes 9-11 minutes
Sweet Potatoes, whole High 10-15 minutes 12-19 minutes
Tomatoes, quartered High 2 minutes 4 minutes
Zucchini High 2 minutes 3 minutes
Pressure Cooking Fresh or Dried Fruits: To achieve best results when
pressure cooking dried or fresh fruit, please refer to the below tips and hints:
1. Quick release method is recommended when pressure cooking fruit to
prevent from overcooking.
2. One half cup of water is sufficient for cooking any quantity of fruit because
the cooking time is very short.
3. Add sugar to fruit only after being cooked, not before.
Fruit Pressure Cooking Chart:
Fruit Pressure Setting Fresh
(Cooking Time) Dried
(Cooking Time)
Apples (Slices or Chunks) High 2 minutes 3 minutes
Apples (Whole) High 3 minutes 4 minutes
Apricots, whole or halved High 2-3 minutes 3-4 minutes
Peaches High 2-3 minutes 4-5 minutes
Pears High 2-4 minutes 3-5 minutes
Plums/Prunes High 2-4 minutes 3-5 minutes
Grapes/Raisins High 1-2 minutes 4-5 minutes
Pressure Cooking Beans/Legumes (Dry & Soaked): To achieve best results
when cooking with dried or soaked beans/legumes, please refer to the below
tips and hints:
1. Rinse dried beans/legumes under cold water and drain; discard any pebbles
or other debris in batch.
2. Do not fill the cooker more than half full to allow for beans/legumes to expand
in size.
3. Use enough liquid to cover the beans/legumes
4. Do not salt beans/legumes. Using salt while cooking the beans/legumes
prevents them from cooking properly.
5. Add 1-2 tablespoons of oil to beans/legumes to minimize frothing.
6. Release pressure when cooking dried beans/legumes by using the natural
release method for best results.
Beans/Legumes Pressure Cooking Chart:
Beans/Legumes Pressure Setting Cooking Time
(dry)
Cooking Time
(pre-soaked)
Adzuki Beans High 20-25 minutes 10-15 minutes
Black Beans High 20-25 minutes 10-15 minutes
Black-Eyed Peas High 20-25 minutes 10-15 minutes
Cannellini Beans High 35-40 minutes 20-25 minutes
Chestnuts, pierced High 7-10 minutes 5-7 minutes
Chickpeas (Garbanzo Beans) High 34-40 minutes 20-25 minutes
Great Northern Beans High 28-30 minutes 23-25 minutes
Kidney Beans High 25-30 minutes 20-25 minutes
Lentils (Brown) High 15-20 minutes N/A
Lentils (Green) High 15-20 minutes N/A
Lentils (Red) High 15-17 minutes N/A
Lima Beans High 20-24 minutes 10-15 minutes
Navy Beans High 25-30 minutes 20-25 minutes
Pinto Beans High 25-30 minutes 20-25 minutes
Red Beans High 25-30 minutes 20-25 minutes
Soybeans High 25-30 minutes 20-25 minutes
Split Peas (Green) High 15-20 minutes 10-15 minutes
Split Peas (Yellow) High 15-20 minutes 10-15 minutes
Pressure Cooking Rice/Grains: To achieve best results when pressure
cooking rice/grains, please refer to the below tips and hints:
1. Add 1-2 tablespoons of oil to the dried grains to minimize frothing.
2. Do not fill the removable cooking pot more than halfway to allow rice/grain to
expand in size.
3. Do not use the quick release method to release pressure; Use the natural
release method instead to release pressure from the cooker.
4. Pearl Barley tends to froth, foam, and sputter, which may block the pressure
valve if filled too high in the removable cooking pot. Please be sure not to fill
the removable cooking pot more than halfway.

17
16
ENGLISH
ENGLISH
Rice/Grain Pressure Cooking Chart:
Rice/Grain Pressure Setting or Cooking
Function Grain : Water
Ratio
(180ml Cups)
Cooking Times
Arborio High pressure setting 1:3 6 minutes
Barley High pressure setting 1:3 – 1:4 25-30 minutes
Basmati Low pressure setting or White Rice
function 1:1½ 6-9 minutes
Brown High pressure setting 1:1¼ 20 minutes
Couscous High pressure setting 1:2 5-8 minutes
Jasmine Low pressure setting or White Rice
function 1:1 8-9 minutes
Long Grain Low pressure setting or White Rice
function 1:1½ 10 minutes
Millet High pressure setting 2:3 10-12 minutes
Pearl Barley High pressure setting 1:4 25-30 minutes
Quick Cooking
Oats High pressure setting 1:1 2⁄35-6 minutes
Quinoa High pressure setting 1:2 8-10 minutes
Short Grain Rice Low pressure setting or White Rice
function 1:1½ 8-9 minutes
Steel Cut Oats High pressure setting 1:1 2⁄310 minutes
Sushi Rice Low pressure setting or White Rice
function 1:1½ 9 minutes
Wheat Berries High pressure setting 1:3 25-30 minutes
Wild Rice High pressure setting 1:3 25-30 minutes
Pressure Cooking Meat/Poultry: To achieve best results when cooking meat/
poultry, please refer to the below tips and hints:
1. Cut meat/poultry into pieces of uniform size for even cooking.
2. When mixing meats, cut those that cook more quickly into larger pieces and
those that cook more slowly into smaller pieces.
3. Brown meat in small batches – overcrowding the cooker can result in the
meat becoming tough and flavorless.
Meat/Poultry Pressure Cooking Chart:
Meat/Poultry Pressure Setting Cooking Time
Beef Brisket, whole High 40-50 minutes
Oxtail High 40-50 minutes
Beef Short Ribs High 35-40 minutes
Boneless Chicken Strips High 10-12 minutes
Chicken Breast High 8-10 minutes
Chicken Legs High 10-12 minutes
Chicken Wings High 10-12 minutes
Chicken (Whole) High 20-25 minutes
Cornish Hen High 10-15 minutes
Duck (Whole) High 25-30 minutes
Ham (Uncooked) High 26-30 minutes
Lamb, Cubes High 10-13 minutes
Pork Spareribs High 20-25 minutes
Pork Chops High 8-10 minutes
Pork (Baby Back Ribs) High 19-24 minutes
Pork Loin High 45-50 minutes
Pork Shoulder High 45-50 minutes
Turkey (Drumsticks) High 15-20 minutes
Veal Chops High 5-8 minutes
Beef Cubes High 18-23 minutes
Chicken Cubes High 10-12 minutes

19
18
ENGLISH
ENGLISH
Pressure Cooking Seafood: To achieve the best results when cooking seafood,
please refer to the below tips and hints:
1. Always leave at least 2 inches from the top rim to prevent overflowing.
2. Smaller types of seafood, such as clams and shrimp, do not take long to cook.
Therefore, it’s best to add these types of seafood to a dish during the last few
minutes of cooking.
Seafood Pressure Cooking Chart:
Fish/ShellFish Pressure Setting Cooking Time
(Fresh) Cooking Time
(Frozen)
Fish, whole Low 5-6 minutes 7-10 minutes
Fish Filet Low 2-3 minutes 3-4 minutes
Fish Steak Low 3-4 minutes 4-6 minutes
Crab Legs Low 3-4 minutes 5-6 minutes
Lobster Tail Low 2-3 minutes 3-4 minutes
Lobster (Whole) Low 3-4 minutes 4-6 minutes
Mussels Low 2-3 minutes 4-5 minutes
Scallops (Small) Low 1 minute 2 minutes
Scallops (Large) Low 2 minutes 3 minutes
Shrimp, shell Low 2-3 minutes 3-4 minutes
Shrimp (Med/Large) Low 1-2 minutes 2-3 minutes
Shrimp (Jumbo) Low 2-3 minutes 3-4 minutes
Rice Program
Cook rice to perfection every time with the RICE function. This function comes
programmed with 4 different rice settings - White Rice, Brown Rice, Risotto and
Steamed Rice. Leaving rice fluffy and delicious while eliminating any cooking
hassle. Push the RICE button to scroll through the 4 different settings: the
display shows each setting as you scroll.
1. Place the removable cooking pot into the multi-cooker.
2. Place about 1-2 tablespoons of oil into the removable cooking pot.
3. Add the water and rice ratios needed and any other desired ingredients into
the removable cooking pot.
4. Close and lock the lid of the multi-cooker by aligning the locking pin on the
handle with the open lock symbol and turning the lid counterclockwise. Set
pressure regulator knob to PRESSURE when using the White Rice, Brown
Rice and Risotto settings. Set the pressure regulator knob to STEAM when
using the Steaming Rice setting
5. Press the RICE button according to which rice setting you would like to use:
then the preset time displays. If using the Steaming Rice setting, the screen
shows the outer display lines. If you need to adjust the time for the White
Rice, Brown Rice or Risotto settings, press the + or – buttons and then press
the START/STOP button once to begin cooking.
Rice Function Cooking Settings
Rice Setting Press RICE Button Pressure Knob
Position Preset Time
White Rice Once PRESSURE 10 min
Brown Rice Twice PRESSURE 20 min
Risotto Three Times PRESSURE 6 min
Steamed Rice Four Times STEAM n/a (cooking time
based on food load)
6. When using the White Rice, Brown Rice or Risotto settings: As the
pressure builds, the pressure icon and indicator lights blink. Once pressure
has fully built, the pressure icon and lights turn solid and the unit beeps.
Then, your cooking time begins to count down.
When using the Steamed Rice setting: The temperature icon blinks and
the outer display lines move around the display. There is no preset cooking
time for the Steamed Rice setting as the unit itself detects the water levels in
the unit and beeps once the rice has been steamed correctly. The cooking
time depends on how much rice you are cooking.
NOTE: If you forget to select the desired cooking time or forget to press the
START/STOP button, the unit beeps and the digital display reads --:-- after
30 seconds.
7. Once the cooking time or process is over, the multi-cooker automatically
goes to KEEP WARM function. If you do not press the START/STOP button
or release pressure at the end of the cooking time for the White Rice, Brown
Rice or Risotto settings, the multi-cooker beeps periodically to remind you to
release pressure.
Soup Program
This function allows you to prepare your favorite soups, stews, chowders and
even broths. Please note that the Soup function comes equipped with a pressure
cook setting and a slow cook setting. Press the SOUP button once to slow cook
and twice to pressure cook.

21
20
ENGLISH
ENGLISH
1. Place the removable cooking pot into the multi-cooker. Add your ingredients
to the cooking pot according to your recipe.
2. Place the lid on the cooker; align the locking pin on the handle with the open
lock symbol and turn it counterclockwise until the locking pin clicks into place.
Turn the pressure regulator knob to PRESSURE when using the pressure cook
setting, turn the knob to STEAM when using the slow cook setting.
3. Press the SOUP button once to show the slow cook preset time of 8 hours
at low temperature. Press the SOUP button twice to show the pressure cook
preset time of 10 minutes at high pressure. If you need to adjust the time,
press the + or – buttons or to fast advance, hold the button down until you
reach the desired time. Press the START/STOP button once to begin cooking.
Soup Function Cooking Settings
Cooking Setting Press SOUP
Button Pressure Knob
Position Preset Time
Slow Cook Low Once STEAM 8 Hours
Pressure Cook High Twice PRESSURE 10 min
4. When using the slow cooking setting: The slow cook icon and indicator
lights blink as the temperature rises. Once the temperature has been
reached, the slow cook icon and lights turn solid and the unit beeps. Then,
your cooking time begins to count down.
When using the pressure cooking setting: As the pressure builds, the
pressure icon and indicator lights blink. Once pressure has been reached,
the pressure icon and lights turn solid and the unit beeps. Then, your cooking
time begins to count down.
NOTE: If you forget to select the desired cooking time or forget to press the
START/STOP button, the unit beeps and the digital display reads --:-- after
30 seconds.
5. Once the cooking time is over, the multi-cooker automatically goes to KEEP
WARM function. If you do not press the START/STOP button or release
pressure at the end of the cooking time for the pressure cooking setting, the
multi-cooker beeps periodically to remind you to release pressure.
Beans Program
This function is part of the BEANS/CHILI button and is a pressure cook function.
Dry beans traditionally can take a long time to cook, but with the multi-cooker
you will no longer need to pre-soak the beans overnight. Load your removable
cooking pot with all ingredients and you get perfectly cooked beans in no time.
1. Place the removable cooking pot into the unit.
2. Place all ingredients as needed into the removable cooking pot. Please make
sure to use a minimum of 1 cup (8 oz.) of liquid.
3. Place the lid on the cooker; align the locking pin on the handle with the
open lock symbol, and turn it counterclockwise until the locking pin clicks
into place. Turn the pressure regulator knob to PRESSURE when using the
Beans function
4. Press the BEANS/CHILI button ONCE for the Beans function, the display
shows a preset time of 30 minutes. If you need to adjust the time, press
the + or – buttons once for each additional minute or to fast advance, hold
the button down until you reach the desired time. The maximum pressure
cooking time is 6 hours.
5. Press the START/STOP button once to begin cooking. As the pressure is
building, the pressure icon and indicator lights blink. Once pressure has fully
reached, the pressure icon and lights turn solid, and the unit beeps. Then,
your cooking time begins to count down.
NOTE: If you forget to select the desired cooking time or forget to press the
START/STOP button, the unit beeps and the digital display reads --:-- after
30 seconds.
6. Once the cooking time is over, the multi-cooker automatically goes to KEEP
WARM function. If you do not press the START/STOP button or release
pressure at the end of the cooking time, the multi-cooker beeps periodically
to remind you to release pressure.
Chili Program
This function is part of the BEANS/CHILI button and is a slow cook function.
Prepare your favorite chili recipes at a low temperature to achieve a beautiful
medley of flavors.
1. Place the removable cooking pot into the multi-cooker.
2. Place all ingredients as needed into the removable cooking pot.
3. Place the lid on the cooker; align the locking pin on the handle with the open
lock symbol and turn it counterclockwise until the locking pin clicks into
place. Turn the pressure regulator knob to STEAM.
4. Press the BEANS/CHILI button TWICE for the Chili function, the display
shows the preset time of 4 hours. If you need to adjust the time, press the
+ or – buttons once for each additional minute or to fast advance, hold the
button down until you reach the desired time. The maximum slow cooking
time is 24 hours.

23
22
ENGLISH
ENGLISH
5. Press the START/STOP button to begin the cooking process. The slow cook
icon and indicator lights blink as the temperature rises. Once the temperature
has fully reached, the slow cook icon and lights turn solid; the unit beeps and
begins to count down in 1-minute increments.
NOTE: If you forget to select the desired cooking time or forget to press the
START/STOP button, the unit beeps and the digital display reads --:-- after
30 seconds.
6. Once the cooking time is over, the multi-cooker automatically goes to KEEP
WARM function until you press the START/STOP button to cancel the
program.
Meat Program
This function is part of the MEAT/POULTRY button and is a pressure cook
function. Prepare meat classics by using this program that uses high pressure to
cook meats until it is fall off the bone tender.
1. Place the removable cooking pot into the unit.
2. Place all ingredients as needed into the removable cooking pot. Please make
sure to use a minimum of 1 cup (8 oz.) of liquid.
3. Place the lid on the cooker; align the locking pin on the handle with the open
lock symbol, and turn it counterclockwise until the locking pin clicks into
place. Turn the pressure regulator knob to PRESSURE when using the Meat
function.
4. Press the MEAT/POULTRY button once for the Meat function; the display
shows a preset time of 40 minutes. If you need to adjust the time, press
the + or – buttons once for each additional minute or to fast advance, hold
the button down until you reach the desired time. The maximum pressure
cooking time is 6 hours.
5. Press the START/STOP button once to begin cooking. As the pressure is
building, the pressure icon and indicator lights blink. Once pressure has fully
reached, the pressure icon and lights turn solid and the unit beeps. Then,
your cooking time begins to count down.
NOTE: If you forget to select the desired cooking time or forget to press the
START/STOP button, the unit beeps, and the digital display will reads --:--
after 30 seconds.
6. Once the cooking time is over, the multi-cooker automatically goes to KEEP
WARM function. If you do not press the START/STOP button or release
pressure at the end of the cooking time, the multi-cooker beeps periodically
to remind you to release pressure.
Poultry Program
This function is part of the MEAT/POULTRY button and is a pressure cook
function. Prepare delicious poultry recipes such as chicken, turkey, duck and
more in no time with the Poultry function.
1. Place the removable cooking pot into the unit.
2. Place all ingredients as needed into the removable cooking pot. Please make
sure to use a minimum of 1 cup (8 oz.) of liquid.
3. Place the lid on the cooker; align the locking pin on the handle with the
open lock symbol and turn it counterclockwise until the locking pin clicks
into place. Turn the pressure regulator knob to PRESSURE when using the
Poultry function.
4. Press the MEAT/POULTRY button twice for the Poultry function; the display
shows a preset time of 10 minutes. If you need to adjust the time, press
the + or – buttons once for each additional minute or to fast advance, hold
the button down until you reach the desired time. The maximum pressure
cooking time is 6 hours.
5. Press the START/STOP button once to begin cooking. As the pressure is
building, the pressure icon and indicator lights blink. Once pressure has fully
reached, the pressure icon and lights turn solid, and the unit beeps. Then,
your cooking time begins to count down.
NOTE: If you forget to select the desired cooking time or forget to press the
START/STOP button, the unit beeps and the digital display reads --:-- after
30 seconds.
6. Once the cooking time is over, the multi-cooker automatically goes to KEEP
WARM function. If you do not press the START/STOP button or release
pressure at the end of the cooking time, the multi-cooker beeps periodically
to remind you to release pressure.
Vegetable Program
This function allows you to cook vegetables in a fast and convenient way. Please
note that the Vegetable function comes equipped with 2 settings: a pressure cook
setting and a steam setting. Press the VEGETABLE button once to pressure cook
and twice to steam.
1. Place the removable cooking pot into the unit.
2. Place all ingredients as needed into the removable cooking pot. Please make
sure to use a minimum of 1 cup (8 oz.) of liquid.

25
24
ENGLISH
ENGLISH
3. Place the lid on the cooker; align the locking pin on the handle with the
open lock symbol and turn it counterclockwise until the locking pin clicks
into place. Turn the pressure regulator knob to PRESSURE when using
the pressure cook setting, turn the knob to STEAM when using the steam
setting.
4. Press the VEGETABLE button once to show the pressure cook preset time
of 3 minutes at low pressure. Press the VEGETABLE button twice to show
the steam preset time of 3 minutes. If you need to adjust the time, press the
+ or – buttons once for each additional minute or to fast advance, hold the
button down until you reach the desired time.
Vegetable Function Cooking Settings
Cooking Setting Press VEGETABLE
Button Pressure Knob
Position Preset Time
Pressure Cook Low Once PRESSURE 3 min
Steam Twice STEAM 3 min
5. When using the pressure cooking setting: As the pressure is building,
the pressure icon and indicator lights blink. Once pressure has fully reached,
the pressure icon and lights turn solid and the unit beeps. Then, your cooking
time begins to count down.
When using the steam setting: The temperature icon will blink as the
temperature rises. Once the temperature has fully reached, the temperature
icon turns solid and the unit beeps. Then, your cooking time begins to count
down.
NOTE: If you forget to select the desired cooking time or forget to press the
START/STOP button, the unit beeps and the digital display reads --:-- after
30 seconds.
6. Once the function ends, if you do not press the START/STOP button or
release pressure at the end of the cooking time for the pressure cooking
setting, the multi-cooker beeps periodically to remind you to release pressure.
Note: Use the quick release pressure method when pressure cooking
vegetables, so they do not overcook.
Pot Roast Program
This function allows you to cook your favorite pot roast recipe to perfection
with minimal effort. Please note that the Pot Roast function is a pressure cook
function.
1. Place the removable cooking pot into the unit.
2. Place all ingredients as needed into the removable cooking pot. Please make
sure to use a minimum of 1 cup (8 oz.) of liquid.
3. Place the lid on the cooker; align the locking pin on the handle with the open
lock symbol and turn it counterclockwise until the locking pin clicks into
place. Turn the pressure regulator knob to PRESSURE when using the Pot
Roast function.
4. Press the POT ROAST button; the display shows a preset time of 45 minutes.
If you need to adjust the time, press the + or – buttons once for each
additional minute or to fast advance, hold the button down until you reach
the desired time. The maximum pressure cooking time is 6 hours.
5. Press the START/STOP button once to begin cooking. As the pressure is
building, the pressure icon and indicator lights blink. Once pressure has fully
reached, the pressure icon and lights turn solid, and the unit beeps. Then,
cooking time begins to count down.
NOTE: If you forget to select the desired cooking time or forget to press the
START/STOP button, the unit beeps and the digital display reads --:-- after
30 seconds.
6. Once the cooking time is over, the multi-cooker automatically goes to KEEP
WARM function. If you do not press the START/STOP button or release
pressure at the end of the cooking time, the multi-cooker beeps periodically
to remind you to release pressure.
Dessert Program
This function is part of the DESSERT/OATS button and is a pressure cook
function. With this function, you can prepare delicious desserts like custard,
cheesecake, rice pudding, flan, and so much more.
1. Place the removable cooking pot into the unit.
2. Place all ingredients as needed into the removable cooking pot. Please make
sure to use a minimum of 1 cup (8 oz.) of liquid.
3. Place the lid on the cooker; align the locking pin on the handle with the
open lock symbol and turn it counterclockwise until the locking pin clicks
into place. Turn the pressure regulator knob to PRESSURE when using the
Dessert function.
4. Press the DESSERT/OATS button ONCE for the Dessert function, the display
shows a preset time of 23 minutes. If you need to adjust the time, press
the + or – buttons once for each additional minute or to fast advance, hold
the button down until you reach the desired time. The maximum pressure
cooking time is 6 hours.
5. Press the START/STOP button once to begin cooking. As the pressure is

27
26
ENGLISH
ENGLISH
building, the pressure icon and indicator lights blink. Once pressure has fully
reached, the pressure icon and lights turn solid, and the unit beeps. Then,
your cooking time begins to count down.
NOTE: If you forget to select the desired cooking time or forget to press the
START/STOP button, the unit beeps and the digital display reads --:-- after
30 seconds.
6. Once the cooking time is over, the multi-cooker automatically goes to KEEP
WARM function. If you do not press the START/STOP button or release
pressure at the end of the cooking time, the multi-cooker beeps periodically
to remind you to release pressure.
Oats Program
This function is part of the DESSERT/OATS button and is a pressure cook
function. With this function, you can prepare your favorite oats either in the
removable cooking pot or in mason jars.
1. Place the removable cooking pot into the unit.
2. Place all ingredients as needed into the removable cooking pot. Please make
sure to use a minimum of 1 cup (8 oz.) of liquid.
3. Place the lid on the cooker; align the locking pin on the handle with the open
lock symbol and turn it counterclockwise until the locking pin clicks into
place. Turn the pressure regulator knob to PRESSURE when using the Oats
function.
4. Press the DESSERT/OATS button TWICE for the Oats function, the display
shows a preset time of 15 minutes. If you need to adjust the time, press
the + or – buttons once for each additional minute or to fast advance, hold
the button down until you reach the desired time. The maximum pressure
cooking time is 6 hours.
5. Press the START/STOP button once to begin cooking. As the pressure is
building, the pressure icon and indicator lights blink. Once pressure has fully
reached, the pressure icon and lights turn solid, and the unit beeps. Then,
your cooking time begins to count down.
NOTE: If you forget to select the desired cooking time or forget to press the
START/STOP button, the unit beeps and the digital display reads --:-- after
30 seconds.
6. Once the cooking time is over, the multi-cooker automatically goes to KEEP
WARM function. If you do not press the START/STOP button or release
pressure at the end of the cooking time, the multi-cooker beeps periodically
to remind you to release pressure.
Manual Program
This function allows you to use the unit as a standard stockpot. It gives you the
flexibility to program the temperature from 102°F-356°F and allows you to set
the timer for up to 30 minutes when cooking above 250°F and 10 hours when
cooking at 250°F or below. Use this program as you would a standard pot on
a stove.
1. Place the removable cooking pot into the multi-cooker.
2. Press the MANUAL button. The temperature icon will show, and the display
will show the default temperature of 356°F, you can use the + and – buttons
to adjust the temperature as needed.
3. Once you’ve set the desired temperature, press the MANUAL button again,
the display shows the preset time of 30 minutes. You can use the + and –
buttons to adjust cooking time as needed.
4. Once you’ve set your desired cooking time, press the START/STOP button to
begin heating the unit. As the unit heats, the temperature icon blinks. Once
the temperature has fully reached, the unit beeps, the temperature icon turns
solid, and the unit begins the countdown. The display alternates between
showing the remaining time and the temperature.
5. Once the cooking time is over, the unit switches to the Keep Warm function.
The light on the TIME DELAY/KEEP WARM button and the temperature icon
blinks until you cancel the program.
Slow Cooking Program
Prepare slow cooker classics such as pot roasts, soups and stews in up to 24
hours with this function. Load your ingredients in the morning and dinner will be
waiting for you in the evening.
1. Place the removable cooking pot into the multi-cooker.
2. Place all ingredients as needed into the removable cooking pot.
3. Place the lid on the cooker; align the locking pin on the handle with the
open lock symbol and turn it counterclockwise until the locking pin clicks
into place. Turn the pressure regulator knob to STEAM when using the slow
cooking program.
4. Choose the desired cooking mode by pressing the SLOW COOK button on
the control panel once for HIGH slow cooking or twice for LOW slow cooking.
5. Set the desired cooking time by pressing the + or – buttons or for a quicker
way to set the time, hold the + or - button down till you reach the desired
cooking time. The longest cooking time for slow cooking is 24 hours.
6. Press the START/STOP button to set the multi-cooker. The slow cook icon

29
28
ENGLISH
ENGLISH
and indicator lights blinks as the temperature rises. Once the temperature
has fully reached, the slow cook icon and lights turn solid, and the unit
beeps. If you forget to select the desired cooking time or forget to press the
START/STOP button, the unit beeps and the digital display reads --:-- after
30 seconds.
NOTE: If you have used any of the cook assist functions prior to slow cooking,
the cooker may require some time to come down to the proper temperature.
Once the proper temperature has been reached, the unit can begin running
the slow cooking function.
7. The unit begins to count down in one minute increments after the temperature
has fully reached.
8. When the cooking time is up, the unit beeps and automatically goes into
KEEP WARM mode until you press the START/STOP button to cancel the
program.
Yogurt Program
You only need two ingredients to make yogurt at home: any type of milk and
plain store-bought yogurt (with live active cultures) or starter yogurt.
Choosing the Milk:
The following types of milk may be used:
1. Pasteurized milk of any fat content (full, 2%, 1% or skim milk)
2. Powdered milk
3. Long-life UHT sterilized milk
4. Soy Milk. Be sure to use UHT soy milk, which contains one of the following
ingredients: fructose, honey, or malt. These ingredients are necessary for
fermentation and you cannot be successful if none are available in the milk.
Live Active Cultures-Unflavored Yogurt:
All you need is a small amount of plain, unflavored yogurt with live active cultures,
often called probiotics. The plain yogurt can either be purchased from a store or
used from a previous batch of homemade yogurt. Homemade yogurt can only
be used a maximum of 2 times as starter yogurt. If you use the store bought
yogurt and prefer a particular brand, try using that one as a starter.
The Live & Active Culture seal, from the National Yogurt Association (NYA), helps
you recognize those products containing significant amounts of live and active
cultures. The seal is a voluntary identification available to all manufacturers of
yogurt whose products contain at least 100 million cultures per gram at the time
of manufacture. Since the seal program is voluntary, some yogurt products may
have some live cultures but not carry the seal.
Note: For 5 cups of milk use a ½ cup of plain yogurt or 1 packet starter
culture. For 1 cup of milk use about one tablespoon of plain yogurt.
NOTE: You can make yogurt either directly in the removable cooking pot or
using glass jars in the removable cooking pot by placing them on a steamer.
Yogurt Making Process:
1. Take the starter yogurt from the refrigerator so that it has time to get closer to
room temperature while you heat the milk.
2. Place the amount of milk desired in the removable cooking pot. Place the lid
on the cooker, turn the pressure regulator knob to STEAM and heat the milk
to 180°F-185°F by pressing the YOGURT function ONCE and then pressing
START/STOP. The temperature icon blinks while the unit is heating. The
display reads HEAT, and once the milk reaches the proper temperature of
180°F-185°F, the unit beeps and goes to standby mode. Use a thermometer
to make sure that proper temperature has fully reached.
NOTE: The unit only detects the proper temperature of 180°F-185°F when a
half gallon (8 cups) of milk is used. If using a different amount of milk, please
use a thermometer to make sure that proper temperature has fully reached.
If needed run the HEAT program again to get to the proper temperature.
3. Remove the removable cooking pot from heat and allow the milk to cool to
anywhere between 100°F-110°F. To accelerate the cooling down process,
place the removable cooking pot in cold water. Do not let it cool below 90°F.
Use a thermometer to make sure that proper temperature has been reached.
4. Stir in the plain yogurt or starter culture packet and use a silicone whisk to
mix it with the milk until the consistency is smooth with no lumps remaining.
5. Place the lid on the multi-cooker; align the locking pin on the lid with the
open lock symbol and turn it counterclockwise until the locking pin clicks into
place. Turn the pressure regulator knob to STEAM when using the yogurt
program. Press the YOGURT button TWICE. The preset cooking time is
8 hours. Depending on the flavor of yogurt you like best, you can choose
how long to cook the yogurt for by pressing the + or - button once for each
additional half hour or to decrease the time by a half hour. To fast advance,
hold the button down until you reach the desired cooking time. The longest
cooking time is 24 hours. The preparation time impacts the yogurt taste.
With longer cooking time, the yogurt will have a more tart flavor. With shorter
time, the yogurt will have a milder flavor.

31
30
ENGLISH
ENGLISH
6. Press the START/STOP button to begin the yogurt function. The temperature
icon blinks while the incubation temperature is rising. Once the incubation
process begins, the temperature icon remains lit: the unit begins to count
down in 1-minute increments, and the display alternates between showing
YGRT and the remaining cooking time.
7. When the yogurt is ready, remove the lid. There may be some yellowish
liquid (whey), on top of the yogurt. Don’t worry, this is normal, whey contains
nutrients and protein. Mix it back into the yogurt.
8. If you prefer regular yogurt, cover and place in the refrigerator for 2 to 3 hours
before serving, or until yogurt cools down. If you prefer making Greek yogurt,
please refer to page 31.
NOTE: THE MULTI-COOKER SHOULD REMAIN PERFECTLY STILL DURING
THE COOKING PROCESS. DO NOT MOVE THE APPLIANCE; DO NOT
REMOVE THE REMOVABLE COOKING POT OR THE LID AS THIS WILL
AFFECT THE FIRMNESS OF THE YOGURT. DO NOT ADD ANY FLAVORING
BEFORE COMPLETING THE YOGURT MAKING PROCESS.
Yogurt Making in Glass Jars:
1. Take the starter yogurt from the refrigerator so that it has time to get closer to
room temperature while you heat the milk.
2. When you heat the milk in glass jars, add 1 cup of water into the removable
cooking pot, then insert the stainless steel rack and place your glass jars on
top of the rack. Place the lid on the multi-cooker; align the locking pin on
the handle with the open lock symbol and turn it counterclockwise until the
locking pin clicks into place. Turn the pressure regulator knob to STEAM.
Press the YOGURT button ONCE and then press START/STOP to heat
the milk to 180°F-185°F. Once the unit reaches the proper temperature of
180°F-185°F, the unit beeps and goes to standby mode.
3. After heating the milk, allow it to cool to anywhere between 100°F-110°F
To accelerate the cooling down process,remove the jars from the inner pot
with a kitchen towel or some other form of hand protection. Do not let it cool
below 90°F. Use a thermometer to make sure that proper temperature has
fully reached.
4. Stir in the plain yogurt with live active culture and use a spoon to mix it with
the milk until the consistency is smooth with no lumps remaining.
5. Place the lid on the multi-cooker; align the locking pin on the handle with the
open lock symbol and turn it counterclockwise until the locking pin clicks
into place. Turn the pressure regulator knob to STEAM. Press the YOGURT
button TWICE. The preset cooking time is 8 hours. Depending on the flavor
of yogurt you like best, you can choose how long to cook the yogurt for by
pressing the + or – button once for each additional half hour or to decrease
the time by a half hour. To fast advance, hold the button down until you
reach the desired cooking time. The longest cooking time is 24 hours. The
preparation time impacts the yogurt taste. With longer cooking time, the
yogurt will have a more tart flavor. With a shorter time, the yogurt will have a
milder flavor.
6. Press the START/STOP button to begin the yogurt function. The temperature
icon and YOGURT button light blink while the incubation temperature is
rising. Once the incubation process begins, the temperature icon and
YOGURT button light remain lit; the unit begins to count down in 1-minute
increments and the display alternates between showing YGRT and the
remaining cooking time.
7. When the yogurt is ready, remove the lid. There may be some yellowish
liquid (whey) on top of the yogurt. Don’t worry, this is normal, whey contains
nutrients and protein. Mix it back into the yogurt.
8. If you prefer regular yogurt, cover and place in the refrigerator for 2 to 3
hours before serving, or until yogurt cools. If you prefer making Greek yogurt,
please refer to page 31.
Helpful Hints and Tips:
• The probiotics and live active cultures are at their best when the yogurt is
fresh. For the best results, only repeat the same starter yogurt 2 times max.
After a few days, the probiotics in the previous batch can weaken and the
yogurt may contain a liquid consistency.
• You may choose to make flavored yogurt and add sugar, honey, flavorings,
fruit, or other ingredients prior to eating.
• For best results and ease of preparation, use whole or semi-skimmed UHT
milk or reconstituted milk powder. They don’t need to be heated or cooled
down.
• The best before-date for natural yogurts are the date the yogurts were made
plus 7 days, depending on the freshness of the milk. When in doubt, use the
expiration date on your milk as a guideline.
Greek Yogurt
1. Place a strainer or a cheesecloth inside a container, so the strainer doesn’t
touch the bottom of the container to allow for better drainage.
2. Pour the homemade yogurt into the strainer or cheesecloth and cover with
the lid. Put it in the refrigerator to strain and chill for at least 2 hours. The
longer the time, the thicker the yogurt becomes.
3. Gently remove yogurt from strainer or cheesecloth by turning the strainer or
cheesecloth upside down on a plate or container.
4. Put it back in the refrigerator to chill for another few hours before serving.

33
32
ENGLISH
ENGLISH
Simmer Function
This function is part of the SIMMER/SAUTÉ button, it allows you to make soups,
stocks, sauces, and other wonderful creations. The SIMMER function ensures
your food stays just below the boiling point while still being heated.
1. Place the removable cooking pot into the multi-cooker and add the
ingredients.
2. With the lid off, press the SIMMER/SAUTÉ button once for the Simmer
function and then press the + or – buttons to adjust the cooking time. Press
the START/STOP button to begin cooking.
NOTE: You may adjust time when cooking is in process by pressing the +
or - button.
3. When done simmering, press the START/STOP button to cancel the function.
Sauté Function
This function is part of the SIMMER/SAUTÉ button, it allows you to sauté food
before cooking. Sauté small amounts of food on high heat with very little oil
before cooking.
Pat the food dry with a paper towel before sautéing. For best results, make sure
the oil is hot before adding your food. Sauté the food in batches to keep the
correct oil temperature for even sautéing.
1. Place the removable cooking pot into the multi-cooker.
2. Add the appropriate amount of oil into the removable cooking pot as
indicated in the recipe.
3. Press the SIMMER/SAUTÉ button twice for the Sauté function. The display
shows the default temperature of 284°F. Press the + or - button to confirm
this setting and adjust the temperature. Temperature can be turned down to
a minimum of 266°F.
4. Press the START/STOP button to confirm the temperature, and the unit
starts to heat up, and the display switches to the default cooking time of
30 minutes. Press the + or - buttons to adjust the time in increments of
1-minute. You can adjust the time while the temperature is building.
5. While the unit is reaching temperature, the temperature icon blinks. Once
the temperature has fully reached, the temperature icon turns solid, and the
unit begins the countdown. The display alternates between showing the
remaining time and the temperature. You can now begin sautéing.
6. Once your sautéing is complete, press the START/STOP button to cancel the
Sauté function. You can now use any of the cooking programs to continue
preparing the recipe. Follow the instructions for each program.
NOTE: When switching from Sautéing to any of the main cooking functions,
the unit will require some additional time to come down to the proper
temperature. Once the proper temperature has been reached, the unit can
begin running the main cooking function.
Steam Function
This program allows you to steam delicate foods such as fish and vegetables.
1. Place the removable cooking pot into the multi-cooker.
2. Place about 1-2 cups of water into the bottom of the removable cooking pot.
Place your food into the stainless steel rack or a steamer basket.
3. Place the stainless steel rack or steamer into the cooking pot making sure
that it sits above the water and close the lid of the cooker.
4. Turn the pressure regulating knob to STEAM.
5. Press the STEAM button and the display shows the default cooking time of
5 minutes. You can then press the + or – buttons to adjust the cooking time.
Press the START/STOP button to begin the cooking time. While the unit is
reaching temperature, the temperature icon and the STEAM button light will
blink. Once the temperature has fully reached, the temperature icon and
STEAM button light turn solid, and the unit begins the countdown. Then, the
display alternates between showing the remaining time and the temperature.
6. When done steaming, the unit switchs to the KEEP WARM function. Press
the START/STOP button to cancel the program.
NOTE: If using the STEAM function but there isn’t enough liquid in the
removable cooking pot, the multi-cooker beeps every 5 seconds to alert you
that more liquid needs to be put in.
Keep Warm Function
This function is part of the TIME DELAY/KEEP WARM button, it allows for
reheating of food or can keep cooked food warm for up to 24 hours.
1. Place the removable cooking pot into the multi-cooker. Then place the food
into the removable cooking pot to reheat.
2. Place the lid on the multi-cooker; align the locking pin on the handle with the
open lock symbol and turn it counterclockwise until it locks into place. The
locking pin clicks when it’s in place.
3. Turn the pressure regulator knob to STEAM.
4. Press the TIME DELAY/KEEP button once for the Keep Warm function. The
default warming temperature of 165°F displays on the screen, use the +

35
34
ENGLISH
ENGLISH
and - buttons to adjust warming temperature. Press the TIME DELAY/KEEP
WARM button to confirm the temperature, and the screen switches to the
default time of 12 hours. Use the + and - buttons to adjust warming time.
5. Press the START/STOP button to begin the program. The temperature icon
blinks while the temperature is rising. Once the unit has come to temperature,
the icon turns solid, and the timer begins to count down.
6. Since pressure is not building when warming food, you can open the lid to
check on your food as needed. To turn the program off, press the START/
STOP button once.
NOTE: When using any of the main cooking programs, the KEEP WARM
function automatically starts after the cooking time ends. If pressure or slow
cooking, the pressure or slow icon turns off and the temperature icon turns
on when the unit has switched to KEEP WARM. The food stays warm until
you press the START/STOP button to cancel the program.
Time Delay Function
This function is part of the TIME DELAY/KEEP WARM button; it allows you to
delay the cooking process up to 6 hours. You can use the delay time setting
after choosing any of the main cooking functions.
CAUTION: DO NOT LEAVE PERISHABLE FOODS SUCH AS MEAT, POULTRY,
FISH, CHEESE AND DAIRY PRODUCTS AT ROOM TEMPERATURE FOR MORE
THAN 2 HOURS (OR MORE THAN 1 HOUR WHEN THE ROOM TEMPERATURE
IS ABOVE 90°F). WHEN COOKING WITH THESE FOODS, DO NOT SET THE
DELAY FUNCTION FOR MORE THAN 1-2 HOURS.
1. Select the desired cooking program by pressing the function button and
adjusting the time and temperature/pressure (if permitted) as needed.
2. Press the TIME DELAY/KEEP WARM button. The timer icon and displayed
time of 00:30 (meaning a half hour of delay) will blink, press the + or – buttons
to adjust the desired delay time needed.
3. Press the START/STOP button to begin the Time Delay countdown. The
time on the display turns solid, but the timer icon and button light blink as the
delay time begins to count down. The multi-cooker will begin cooking after
the delay time has elapsed.
EXAMPLE: It is 11:30 a.m. and you want your dinner to be ready by 6 p.m. Your
recipe calls for 12 minutes of high pressure cooking. First press the pressure
cook function once and then adjusting the time with the + button until it reads
00:12 minutes and then press the Time Delay button once and then the + button
until the panel reads 06:00 hours. Next, you press the START/STOP button, and
you’re all set! The cooker will start cooking at 5:30 p.m.
Mute Feature
If you would like to disable all the beeps from the multi-cooker, you may do so
by pressing and holding the + and - buttons simultaneously until the display
shows the word MUTE. All beeps, including button presses and unit notification
sounds, become disabled for the duration of the use.
To unmute the multi-cooker, press and hold the + and - buttons simultaneously
until the display shows the word BEEP and then the unit produces two beeps to
unmute all beeps.
NOTE: If you mute the multi-cooker and then unplug it after use, this disables
the mute feature, and the unit becomes unmuted for its next use.
Cleaning and Maintenance
Do not wash any parts of the multi-cooker in the dishwasher except for the
removable cooking pot. Always wash the removable cooking pot thoroughly
after every use, or if it has not been used for an extended period of time.
1. Unplug the multi-cooker and let the unit cool before cleaning.
2. Remove the removable cooking pot and wash with warm soapy water or in
the dishwasher. However, hand washing is always recommended. Rinse and
dry thoroughly.
3. Wipe the outer housing with a clean damp cloth and rinse the lid with warm
water and soap. Do not submerge the multi-cooker or the lid in water.
NOTE: To remove an odor from the inside part of the lid, clean it with water
and vinegar (1:1 ratio).
4. Remove the condensation reservoir by pulling it down. Wash with warm,
soapy water. Rinse and dry thoroughly. Replace by pushing it back into
place.
5. Carefully remove the y-shaped silicone gasket attachment by grasping the
center of the metal “Y” and pulling. Remove the silicone gasket from the
metal ring. Clean the silicone gasket with warm soapy water. Rinse and
dry thoroughly. Place the gasket back on the metal ring and then place the
Y-shaped attachment back onto the lid by placing the silicone centerpiece
back on the steel tip and pushing down.
NOTE: The silicone gasket must always be positioned correctly on the
underside of the lid; otherwise, the unit cannot work. Check periodically to
make sure that it is clean, flexible, and not cracked or torn. (See “Getting
Started” section in this manual.)
6. If the silicone gasket appears damaged, cracked or torn, do not use the

37
36
ENGLISH
ENGLISH
unit and contact ZAVOR Customer Service Department at 1-855-928-6748
or visit the ZAVOR website to purchase a new silicone gasket at www.
zavoramerica.com.
7. For optimal performance, the inner part of the cooker, under the removable
cooking pot where the temperature sensor and heating pad must be cleaned
after each use. Wipe with a soft damp cloth and be sure to dry thoroughly.
8. Never use abrasive cleaners or scouring pads to clean any of the parts.
Cleaning the Pressure Regular Knob
ALWAYS check that the pressure regulator knob and the pressure safety valves
are in good working order before each use.
1. After the unit has cooled, remove the lid from the multi-cooker.
2. Press down and at the same time turn the pressure regulator knob
counterclockwise past STEAM to CLEAN setting and carefully lift to remove.
Look through the holes to make sure there is no particle build-up, and put it
under running water to clean.
3. Turn the lid over and place it on a table top. Pull out the anti-locking case.
Using a brush or toothpick, check and remove any food or foreign particles
that could be lodged in the floating valve. Replace the anti-locking case by
pressing down.
4. Replace the pressure regulator knob by lining the CLEAN dot with the dot
on the lid of the unit and turning clockwise until it goes into place. The white
dot on the base of the pressure regulator should line up with the PRESSURE
or STEAM setting on the pressure regulator knob. If it doesn’t, remove the
knob again and try realigning the dots the other way around.
(1) (2) (3)
(4) (5)
Troubleshooting
If the LUX™ EDGE detects an internal error or a wrong connection, it displays an
error message with a code on the display panel and will stop functioning. These
codes allow you to identify the cause of the error and help you find the solution
to the problem. If the error persists, please call our customer service department
for assistance at 1-855-928-6748
E1: Internal circuits have disconnected.
Self-help: Call our customer service department for assistance.
E2: The internal sensor has short-circuited and the current is
insufficient or the unit is overheating.
Self-help: Try to cool the unit by turning it off and unplugging as well as
removing the cooking pot.
E4: The pressure switch has malfunctioned.
Self-help: Check the cooking pot for warping. Check the heating plate for
any food residue.
Other manuals for LUX EDGE
1
Table of contents
Languages:
Other Zavor Kitchen Appliance manuals