Zavor LUX LCD Series User manual

LUX™ LCD
MULTI-COOKER
OLLA ELÉCTRICA LUX™ LCD
MULTIFUNCIONAL
MULTI-CUISEUR ÉLECTRIQUE


1
ENGLISH
ENGLISH
Contents
Introduction������������������������������������������������������������������������ 2
Important Safeguards ������������������������������������������������������������ 3
Features and Functions���������������������������������������������������������� 5
Icons Chart������������������������������������������������������������������������� 8
Getting Started �������������������������������������������������������������������� 9
Operating Functions�������������������������������������������������������������10
Pressure Cook Function���������������������������������������������������������10
Pressure Cooking Charts �������������������������������������������������������13
Slow Cook Function �������������������������������������������������������������17
Steam Function ������������������������������������������������������������������19
Brown Function�������������������������������������������������������������������20
Flex Function ���������������������������������������������������������������������21
Simmer Function�����������������������������������������������������������������23
Yogurt Function ������������������������������������������������������������������24
Grains Function ������������������������������������������������������������������28
Eggs Function ��������������������������������������������������������������������31
Dessert Function�����������������������������������������������������������������33
Mute Feature ���������������������������������������������������������������������36
Cleaning and Maintenance�����������������������������������������������������36
Troubleshooting������������������������������������������������������������������38
Español����������������������������������������������������������������������������40
Français ���������������������������������������������������������������������������79
Limited Warranty �������������������������������������������������������������� 119

2
ENGLISH
Introduction
Thank you for purchasing this state of the art Zavor LUX™ LCD Multi-
Cooker! The Zavor LUX™ LCD can be used to steam, simmer, brown,
cook grains, eggs, desserts, to make yogurt, pressure cook and slow
cook foods to perfection. It is equipped with a new, user friendly LCD
panel that has an easy to navigate menu with programmed settings that
allow you to cook your favorite meals more conveniently. Plus, the TIME
DELAY and KEEP WARM settings provide you with cooking flexibility that
accommodates your busy schedule.
This Zavor LUX™ LCD Multi-Cooker user’s manual contains information
on the use and care of this product. Please read this manual carefully
before operating the LUX™ LCD to ensure proper usage and maintenance
of the unit. Carefully following the directions in this manual will enable
you to optimize the performance and lifespan of the cooker.
Note: This manual applies to all colors and sizes of the LUX™ LCD
Multi-Cooker.

3
ENGLISH
IMPORTANT SAFEGUARDS
The product you have purchased is a state of the art appliance. It adheres
to all of the latest safety and technology standards; however, as with any
electric appliance, there are some potential risks. Only operate this cooker
in accordance with the instructions provided and only for its intended
household use.
PLEASE READ THE INSTRUCTIONS BELOW BEFORE USING THE
APPLIANCE FOR THE FIRST TIME.
• Read all of the instructions contained in this manual before using the
appliance.
• This product is not intended for commercial or outdoor use; it is only for
household and indoor use.
• Do not operate the unit if the electric cord or plug is damaged. If the
appliance is not working properly, has been dropped or damaged, left
outdoors or submerged in water, discontinue use immediately and contact
our customer service department at 1-855-928-6748.
• The LUX™ LCD has a NEMA 5-15P, 3 pins plug and a power cord.
• Attach plug to the multi-cooker base first, then insert the power plug into a
power outlet. Always ensure that the power cord is completely dry.
• Do not let the electric cord hang over the edge of the table or counter.
• Do not let the electric cord touch hot surfaces.
• If using an extension cord to connect the multi-cooker, please note that a
damaged extension cord can cause the unit to malfunction. Always check
your extension cord for damage and be sure it is compliant with the required
voltage. For safety, be sure to arrange the cord so that it can’t be pulled on
by children or tripped over unintentionally.
• Do not place the multi-cooker near heat-emitting devices such as heaters,
gas cooktops or electric burners. Do not place the cooker in a heated oven.
• Always use the multi-cooker in a well-ventilated area.
• Using accessories or replacement parts that are not recommended or sold
by the manufacturer may cause damage to the multi-cooker or personal
injury.
• Children need close adult supervision at all times when they are in or around
the kitchen. Keep this appliance out of the reach of children.
• This appliance is not intended for use by persons (including children) with
reduced physical, sensory or mental capabilities, or lack of experience
and knowledge, unless they have been given supervision or instruction
concerning use of the appliance by a person responsible for their safety.
• While in operation, do not cover the appliance or position it near flammable
materials including curtains, draperies, walls, and fabric upholstered
furniture.
• Do not open the pressure cooker until the unit has cooled and all internal
pressure has been released. If the handles are difficult to push apart, this
indicates that the cooker is still pressurized – do not force it open. Any

4
ENGLISH
pressure in the cooker can be hazardous.
• Always cook in the removable cooking pot of the multi-cooker. Cooking
without the removable cooking pot may cause an electric shock or damage
to the unit.
• Never deep fry or pressure fry in the cooker. It is dangerous and may cause
a fire and serious damage.
• Never cover or block the pressure valve with anything. This may cause over
pressurizing and may lead to serious accidents.
• While you’re cooking, the lid and the outer stainless steel surface of the
cooker might get hot. Handle with care and carry or move the cooker
using only the side handles. Be very cautious when moving any appliance
containing hot food or liquids.
• Keep hands and face away from pressure regulator knob when releasing
pressure from the cooker to avoid being scalded by hot steam.
• After cooking, use extreme caution when removing the lid. Serious burns
can result from residual steam escaping from inside the unit. Open the lid
facing away from you and allow the drops of water to trickle back from the
lid into the cooker.
• Always unplug and let cool before cleaning and removing parts. Never
attempt to unplug the unit by pulling on the power cable. Keep unplugged
when not in use.
• To reduce the risk of an electric shock, never immerse the plug, power cable
or housing in water or any other liquid. Only the removable cooking pot can
be placed in the dishwasher.
• Only qualified experts may repair and perform maintenance work on the
electric multi-cooker using authentic ZAVOR replacement and accessory
parts. Never attempt to disassemble and repair the multi-cooker yourself.
• This appliance cooks under pressure. Improper use may result in scalding
injury. Make sure the unit is properly closed before operating. See “Pressure
Cooker Program”.
• Do not fill the unit over 2/3 full. When cooking foods that expand, such as
rice or dried vegetables, do not fill the unit more than 1/2 full. Over filling
may result in clogging the vent pipe and will not allow enough room for
proper building of pressure. See “Operating Functions”.
• The following foods tend to foam, froth and/or sputter: applesauce,
cranberries, pearl barley, oatmeal, split peas, noodles/pasta, rhubarb, etc.
These items may block the pressure valve if filled too high in the removable
cooking pot. Please be sure when pressure cooking these items to not fill
the removable cooking pot more than half way.
• Always check the pressure release devices for clogging before use.
SAVE THESE INSTRUCTIONS

5
ENGLISH
Features and Functions
:[LHTLY)HZRL[^P[O;YP]L[
7YLZZ\YLYLN\SH[PUNRUVI
*VVS[V\JOOHUKSL
:PSPJVULNHZRL[
:HML[`7YLZZ\YL=HS]L
(U[PISVJRPUNJHZL
W\SS\W[VYLTV]L
:[H[PVUHY`WV[
JHUUV[ILYLTV]LK
3*+7HULS
*VUKLUZH[PVUYLZLY]VPY
JHUILYLTV]LK
*VVS[V\JOOHUKSL
;LTWLYH[\YLZLUZVY
/LH[PUNLSLTLU[
:[HPUSLZZZ[LLS
YLTV]HISLJVVRPUNWV[
-SVH[PUN]HS]L
:LSM3VJRPUNWPU
;VWVM[OLSPK
)V[[VTVM[OLSPK
)VK`VM4\S[PJVVRLY
(JJLZZVYPLZ
7YLZZ\YLYLN\SH[PUNRUVI
*VVS[V\JOOHUKSL
@:OHWLK.HZRL[
([[HJOTLU[
:HML[`7YLZZ\YL=HS]L
(U[PISVJRPUNJHZL
W\SS\W[VYLTV]L
:[H[PVUHY`WV[
JHUUV[ILYLTV]LK
*VU[YVSWHULS
*VUKLUZH[PVUYLZLY]VPY
JHUILYLTV]LK
*VVS[V\JOOHUKSL
;LTWLYH[\YLZLUZVY
/LH[PUNLSLTLU[
9LTV]HISLJVVRPUNWV[
-SVH[PUN]HS]L
:LSM3VJRPUNWPU
;VWVM[OLSPK
)V[[VTVM[OLSPK
)VK`VM4\S[PJVVRLY
(JJLZZVYPLZ
:[HPUSLZZ:[LLS9HJR
:[LHTLY)HZRL[^P[O;YP]L[
7YLZZ\YLYLN\SH[PUNRUVI
*VVS[V\JOOHUKSL
:PSPJVULNHZRL[
:HML[`7YLZZ\YL=HS]L
(U[PISVJRPUNJHZL
W\SS\W[VYLTV]L
:[H[PVUHY`WV[
JHUUV[ILYLTV]LK
3*+7HULS
*VUKLUZH[PVUYLZLY]VPY
JHUILYLTV]LK
*VVS[V\JOOHUKSL
;LTWLYH[\YLZLUZVY
/LH[PUNLSLTLU[
:[HPUSLZZZ[LLS
YLTV]HISLJVVRPUNWV[
-SVH[PUN]HS]L
:LSM3VJRPUNWPU
;VWVM[OLSPK
)V[[VTVM[OLSPK
)VK`VM4\S[PJVVRLY
(JJLZZVYPLZ

6
ENGLISH
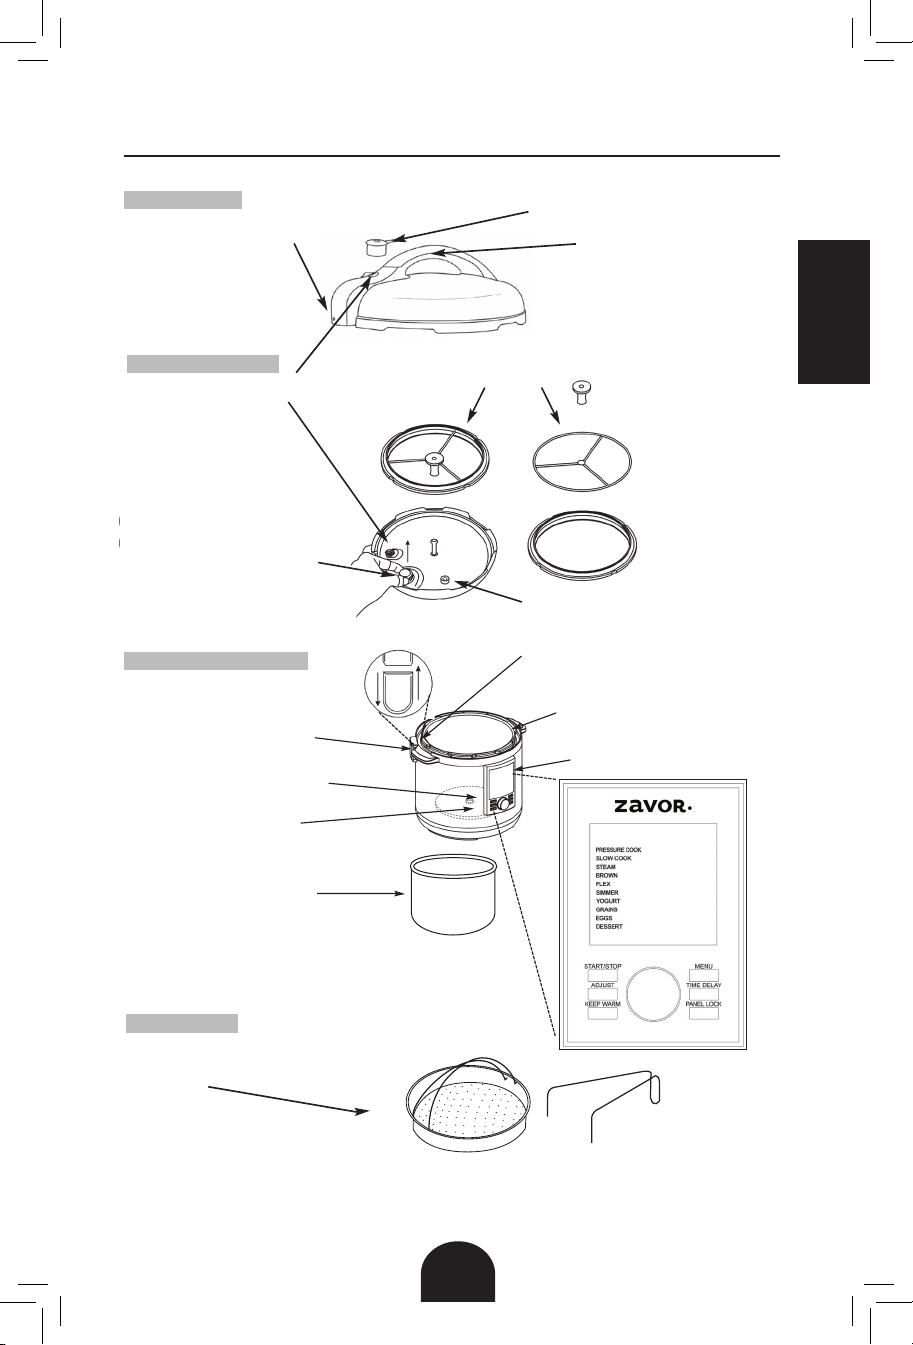
1. Pressure Regulator Knob: Turn the regulator knob to the “Pressure”
position when using any of the pressure cooking functions. Turn the knob to
the “Steam” position to release the pressure after using those functions and
when using any of the other non-pressure functions.
2. Self-Locking Pin: The lid will lock automatically when it is properly aligned
and closed. While cooking under pressure you will not be able to open the lid
until all of the pressure is released.
3. Cool-Touch Handles: The cool to the touch handles of the multi-cooker
allow for easy handling and opening of the lid.
4. Floating Valve: The floating valve controls the amount of pressure inside
the cooker by allowing excess pressure to be released.
5. Y-Shaped Gasket Attachment: Sits on the underside of the lid and creates
an airtight seal needed for the cooker to build up pressure. Check the silicone
gasket for any tears or cracks before using any of the pressure cooking
functions. To remove the attachment, hold the center of the Y (not just the
silicone nub) and pull. The ring will detach making for easier gasket removable
and replacement. To reattached, simply place the silicone center piece back
on the steel tip and push down until properly replaced. To order a new gasket,
please contact a ZAVOR Representative at 1-855-928-6748 or purchase it
directly on the ZAVOR website at www.zavoramerica.com.
6. Safety Pressure Valve: The safety pressure valve allows excess pressure
to escape from the cooker when it is being used for pressure cooking. It works
independently of the floating valve.
7. Anti-Blocking Case: Pull it towards yourself to release the pressure
regulator knob for cleaning.
8. Condensation Reservoir: Collects excess condensation during cooking. If
there is liquid in the reservoir after cooking, simply empty it.
9. Heating Element and Temperature Sensor: Both elements regulate the
cooking temperature inside the pot.
10. Removable Cooking Pot: Stainless steel pot is dishwasher safe, but hand
washing is always recommended.
11. Stationary Pot: This pot should NEVER be used for cooking. Before
cooking, make sure to place the removable cooking pot into the stationary pot
first. All ingredients should be placed into the removable cooking pot ONLY.
12. Steamer Basket with Trivet: Needs to be placed inside the cooking pot
to steam delicate foods and vegetables.
13. LCD Panel: The easy to navigate interactive screen allows you to select
different programs with the touch of a finger. Main functions are: Pressure
Cook, Slow Cook, Steam, Brown, Flex, Simmer, Yogurt, Grains, Eggs and
Dessert. In addition, each of the main functions has a selection of settings with
preset cooking times and temperatures/pressure levels. The control panel also
includes 6 buttons described below.
START/STOP - Used to begin or stop cooking.
MENU – Used to go back to the main MENU screen.
ADJUST – Used to adjust pressure/temperature and cooking time.
TIME DELAY – Used to delay the cooking process by up to 6 hours. You can

7
ENGLISH
use the delay time setting after choosing a cooking function.
Select the desired cooking function and setting. Adjust the time if needed.
Press TIME DELAY and use the dial to adjust the delay time. Press the START/
STOP button to confirm. The multi-cooker will begin cooking after the time
delay has elapsed.
For Example: It is 8:00 am and you want your dinner to be ready at 6:00 pm.
You use a recipe that calls for a SLOW COOK function and the Beans setting
(which is 8 hours preset cooking time). Turn the pressure regulator knob to
“Steam”. Turn a dial until the SLOW COOK function is selected and confirm
it by pressing the dial. From the settings shown to the right, select the Beans
setting and confirm it by pressing the dial. To program your delay time, press
the TIME DELAY button and adjust the time so the screen displays 2 hours.
Press the START/STOP button to confirm and you are all set! The unit will
start cooking at 10:00 am and your dinner will be ready around 6:00 pm.
Please note that exact cooking time may vary since the unit needs to build the
temperature and/or pressure.
CAUTION: DO NOT LEAVE PERISHABLE FOODS SUCH AS MEAT, POULTRY,
FISH, CHEESE AND DAIRY PRODUCTS AT ROOM TEMPERATURE FOR
MORE THAN 2 HOURS (OR MORE THAN 1 HOUR WHEN THE ROOM
TEMPERATURE IS ABOVE 90°F). WHEN COOKING WITH THESE FOODS,
DO NOT SET THE DELAY FUNCTION FOR MORE THAN 1-2 HOURS.
KEEP WARM – Used for keeping cooked food warm up to 12 hours or
reheating it.
After the cooking time is finished, the unit will automatically switch to the
KEEP WARM function (at a temperature of 165°F) for up to 12 hours. Press the
START/STOP button to cancel the KEEP WARM program.
To reheat food:
1. Place the removable cooking pot into the multi-cooker. Then place the food
into the removable cooking pot to reheat.
2. Place the lid on the multi-cooker; align the pin on the handle with the
condensation collector, and turn it counterclockwise until it locks into place.
The locking pin will click when it’s in place.
3. Turn the pressure regulator knob to STEAM.
4. Press the KEEP WARM button. Adjust time and then press START/STOP
button to begin heating food.
5. When the time is up, the unit will beep to let you know the heating process
has ended. Please note the minimum amount of time for this function is 30
min.
PANEL LOCK – Used to disable and re-enable the buttons. This is for safety
reasons, to prevent children from tampering with the multi-cooker. To lock or
unlock, press and hold the PANEL LOCK button.

8
ENGLISH
Icons Chart
Close Lid
The icon appears when the lid is properly
closed and locked. After pressing START/STOP
to begin cooking, the icon disappears. If the lid
is off, the unit will beep and the icon will change
from open to close to let you know to close the
lid.
Open Lid
The icon appears when the lid is open or
removed. For the Brown and Flex (temperature
setting) functions the lid needs to be completely
off the unit. After pressing START/STOP to
begin cooking, the icon will disappear. If the lid
is closed, the unit will beep and the icon will
change from close to open to let you know to
remove the lid.
Favorite Menu
The CUSTOM setting is used to program an
individual pressure level/temperature and time
in the functions: Pressure Cook, Slow Cook,
Brown, Flex (pressure & slow cook settings)
and Grains. Select F1, F2 or F3 by turning the
dial and confirm by pressing the dial. Next,
select the desired pressure level and time and
press the dial to confirm. Press the START/
STOP button to begin cooking. The unit will
automatically save the settings for the selected
function.
Lock Icon Indicates that the buttons are locked. To unlock
them, press and hold the PANEL LOCK button.
Unlock Icon Indicates that the buttons are unlocked. To lock
them, press and hold the PANEL LOCK button.
Press Start
After the setting is chosen, the icon blinks to
let you know to press the START/STOP button
to begin cooking. Once the cooking process
starts, the icon will disappear.
Cooking Indicates that the unit has begun cooking after
preheating.
Preheating Indicates that the unit is building pressure or
temperature.
Preheat Bar Shows the unit’s preheating progress.
Mute Icon Tells you when your unit is muted to silence all
beeps and notification sounds.

9
ENGLISH
Getting Started: Before First Use
Read the safety instructions found in this manual before plugging in and
operating the unit. Before using the multi-cooker for the first time, follow these
steps:
1. Remove all packing materials and literature from inside the Zavor LUX™
LCD Multi-Cooker. Lift out the removable cooking pot and remove any
pieces of paper from under it. Remove the plastic protection from the
control panel and any stickers from the stainless steel body.
2. Wash all removable parts in warm soapy water. Rinse and dry all parts
thoroughly. Wipe the stainless steel outer housing with a clean damp cloth.
NEVER submerge the stainless steel outer housing in water or any other
liquid. Only the removable cooking pot is dishwasher safe.
3. To clean the pressure regulator knob, gently push the pressure regulator
knob down and turn it counterclockwise past STEAM to the CLEAN
setting. Once the dot on CLEAN is aligned with the dot on the base of the
pressure regulator, you can lift the pressure regulator up and out of the
housing. Look through the holes of the pressure regulator to make sure
there is nothing obstructing the pressure stream, then clean the pressure
regulator knob with warm soapy water, allowing the water to run through
the pressure regulator to remove all particles.
4. To put the pressure regulator back into the lid, simply align the CLEAN
setting with the dot on the base, gently push down on the pressure
regulator and turn the knob clockwise until it slides back into place.
5. Make sure the silicone gasket is placed properly inside the lid or else the
cooker will not function properly.
6. After thoroughly drying all parts, place the removable cooking pot back
into the multi-cooker before cooking.

10
ENGLISH
Pressure Cook Function:
This program will allow food to cook faster under pressure by reducing cooking
time up to 70% compared to traditional cooking methods. Pressure cooking is
fast, easy, safe and healthy!
Pressure Cook Function Temperature/Timer Chart:
Setting Pressure Cook Temperature Preset Time Timer
Custom Low or High 226°F-230°F or
240°F-248°F 1 minute* 1 minute-6 hours,
1 minute increments
Meat High 240°F-248°F 40 minutes 1 minute-6 hours,
1 minute increments
Poultry High 240°F-248°F 10 minutes 1 minute-6 hours,
1 minute increments
Beans High 240°F-248°F 30 minutes 1 minute-6 hours,
1 minute increments
Chili High 240°F-248°F 15 minutes 1 minute-6 hours,
1 minute increments
Stock High 240°F-248°F 30 minutes 1 minute-6 hours,
1 minute increments
Soup High 240°F-248°F 10 minutes 1 minute-6 hours,
1 minute increments
Fish Low 226°F-230°F 3 minutes 1 minute-6 hours,
1 minute increments
Vegetable High 240°F-248°F 2 minutes 1 minute-6 hours,
1 minute increments
Barley High 240°F-248°F 30 minutes 1 minute-6 hours,
1 minute increments
Quinoa Low 226°F-230°F 1 minute 1 minute-6 hours,
1 minute increments
OPERATING FUNCTIONS
*Custom preset time applies to initial use of this function, all subsequent uses will use the previously
programmed time.

11
ENGLISH
Risotto High 240°F-248°F 6 minutes 1 minute-6 hours,
1 minute increments
White Rice Low 226°F-230°F 10 minutes 1 minute-6 hours,
1 minute increments
Brown Rice High 240°F-248°F 20 minutes 1 minute-6 hours,
1 minute increments
1. Before each use, make sure the silicone gasket and the pressure regulating
valves are clean and properly positioned in/on the cooker.
2. Plug the cord into a wall outlet. The screen will light up blue and display
all of the main functions.
3. Place the removable cooking pot into the cooker, and add the ingredients
following your recipe. When cooking foods under pressure, a minimum of
1 cup (8 oz.) of liquid is required.
NOTE: Do not fill the pot more than 2/3 full with food and liquid. Do not fill
the unit more than 1/2full when cooking foods that expand during cooking.
NOTE: The following foods tend to foam, froth and/or sputter: applesauce,
cranberries, pearl barley, oatmeal, split peas, noodles/pasta, rhubarb,
etc. These items may block the pressure valve if filled too high in the
removable cooking pot. Please be sure not to fill the removable cooking
pot more than half way when pressure cooking these items.
4. Place the lid on the cooker; align the self-locking pin with the unlocked
symbol and turn your lid counterclockwise until it locks into place. You
will know it’s properly closed and locked once you hear the pin click into
place and the screen will display the Close Lid icon . If you press the
START/STOP button to begin cooking but the lid is open or not locked
properly, the icon on the screen will change from open to close
and the unit will beep to notify you that the lid needs to be closed.
5. Turn the pressure regulator knob to PRESSURE.
6. Turn the dial until the PRESSURE COOK function is selected (the words
will blink) and confirm it by pressing the dial. The screen will show the
settings for this function to the right. In addition to the settings, there
is also a CUSTOM setting. For instruction on how to use the CUSTOM
setting, see page 8.
NOTE: To go back to the main menu, press MENU.
7. Choose your desired setting by turning the dial. Press the dial to select
the setting. The preset pressure level (High or Low) and cooking time will
appear at the top of the screen.
If you wish to adjust those settings, turn the dial to select the pressure level
(High or Low) and then press the dial or the ADJUST button to confirm
it. The cooking time will then start blinking to show it can be adjusted.
Change the time by turning the dial and set your time by pressing the
START/STOP button.
NOTE: Pressing the ADJUST button will only switch the programming
option between pressure level and cooking time.
8. After you press the START/STOP button, the screen will turn green and it
will display the programmed pressure setting and time at the top of the
screen. You will also see the preheat icon on the bottom of the screen and
the preheating bar which will show you how far along in the preheating
process the unit is.

12
ENGLISH
NOTE: If you forget to press the START/STOP button, the unit will beep
twice after 30 seconds, the light on the screen will turn off and the unit will
return to standby mode.
9. Once pressure has been reached, the unit will beep, the cooking icon will
appear at the bottom of the screen and it will start to count down. This is
when your cooking time begins. The floating valve located in the lid will
rise, indicating that there is pressure inside the unit.
WARNING: NEVER TRY TO FORCE THE LID OPEN WHILE YOU ARE
COOKING UNDER PRESSURE, THIS CAN RESULT IN A SERIOUS
ACCIDENT.
WARNING: NEVER DEEP FRY OR PRESSURE FRY IN THE MULTI-COOKER.
IT IS DANGEROUS AND MAY CAUSE A FIRE AND SERIOUS DAMAGE.
10. When the cooking time ends, the unit will beep and switch to the KEEP
WARM function. The unit will beep periodically to let you know that there
is pressure inside the unit. Once you release the pressure, the unit will
stop beeping and will remain on the KEEP WARM function. Press the
START/STOP button to cancel the program.
11. After the cooking time is up, release the pressure. You have two options
for releasing the pressure:
a. Quick Release Method: Release the pressure immediately by turning
the pressure regulator knob to STEAM.
CAUTION: THE STEAM COMING OUT OF THE COOKER WILL BE HOT,
AND MIGHT CONTAIN DROPLETS OF HOT LIQUID. BE SURE TO USE
POT HOLDERS, OVEN MITTS OR A KITCHEN TOWEL WHEN RELEASING
PRESSURE.
b. Natural Release Method: Release the pressure by shutting the unit
off completely. This allows the pressure to drop naturally without turning
the pressure regulator knob to STEAM. This will take several minutes,
during which the food inside will continue cooking. Some recipes (such
as risotto) benefit from this extra cooking time. You will know when the
pressure has been released because the floating valve will drop and you
will be able to open the lid.
12. Once all the pressure is released, remove the lid by turning it clockwise,
lifting it up and tilting it away from yourself to avoid getting burnt by
any remaining steam or hot water condensation dripping from the inner
portion of the lid.
WARNING: AFTER COOKING, THE REMOVABLE COOKING POT WILL
BE HOT.USE POT HOLDERS, OVEN MITTS OR A KITCHEN TOWEL TO
HANDLE IT OR LET IT COOL DOWN BEFORE REMOVING.

13
ENGLISH
Pressure Cooking Charts
Pressure cooking times are approximate times. Use these cooking times as a
general guideline. The amount and type of food will alter cooking times.
Pressure Cooking Vegetables (Fresh & Frozen): To achieve best results
when pressure cooking fresh or frozen vegetables, please refer to the below
tips and hints:
1. Use the Vegetables setting when attempting to pressure cook vegetables.
Use the STEAM function when attempting to steam vegetables.
2. Use the quick release method when pressure cooking vegetables so they
do not overcook.
3. Use a minimum of 1 cup of liquid when cooking vegetables.
4. When steaming vegetables, use the included Stainless Steel Steamer
Basket and Trivet.
Vegetable Pressure Cooking Chart:
Vegetable Pressure Setting Fresh (Cooking Time) Frozen (Cooking Time)
Acorn Squash, chunks High 6-7 minutes 8-9 minutes
Artichoke, 4 medium –
large High 8-10 minutes 10-12 minutes
Asparagus High 1-2 minutes 2-3 minutes
Whole Beets, medium –
large High 20-25 minutes 25-30 minutes
Broccoli, Florets High 2-3 minutes 3-4 minutes
Brussel Sprouts High 3-4 minutes 4-5 minutes
Butternut Squash, chunks High 8-10 minutes 10-13 minutes
Cabbage, Quartered High 3-4 minutes 4-5 minutes
Carrots, whole or chunk High 2-3 minutes 3-4 minutes
Cauliflower, florets High 2-4 minutes 3-5 minutes
Celery, chunks High 2 minutes 3 minutes
Collard Greens High 4-5 minutes 5-6 minutes
Corn on the Cob High 3-5 minutes 4-6 minutes
Edamame, in pod High 4-5 minutes 5-6 minutes
Eggplant High 2 minutes 3 minutes
Endive High 1-2 minutes 2-3 minutes
Kale, coarsely chopped High 1-2 minutes 2-3 minutes
Leeks High 2-4 minutes 3-5 minutes
Onions, sliced High 2 minutes 3 minutes
Potatoes, whole, small High 5-8 minutes 6-9 minutes
Potatoes, whole, large High 10-12 minutes 11-13 minutes
Potatoes, sliced or cubed High 5-8 minutes 6-9 minutes
Pumpkin, chunks High 4-8 minutes 6-12 minutes
Spinach High 1-2 minutes 3-5 minutes
Sweet Potatoes, cubed High 7-9 minutes 9-11 minutes
Sweet Potatoes, whole High 10-15 minutes 12-19 minutes
Tomatoes, quartered High 2 minutes 4 minutes
Zucchini High 2 minutes 3 minutes

14
ENGLISH
Pressure Cooking Fresh or Dried Fruits: To achieve best results when
pressure cooking dried or fresh fruit, please refer to the below tips and hints:
1. The quick release method is recommended when pressure cooking fruit to
prevent overcooking.
2. Half a cup of water is sufficient for cooking any quantity of fruit because
the cooking time is very short.
3. Add sugar to fruit only after it is cooked, not before.
Fruit Pressure Cooking Chart:
Fruit Pressure Setting Fresh
(Cooking Time) Dried
(Cooking Time)
Apples (Slices or
Chunks) High 2 minutes 3 minutes
Apples (Whole) High 3 minutes 4 minutes
Apricots, whole or
halved High 2-3 minutes 3-4 minutes
Peaches High 2-3 minutes 4-5 minutes
Pears High 2-4 minutes 3-5 minutes
Plums/Prunes High 2-4 minutes 3-5 minutes
Grapes/Raisins High 1-2 minutes 4-5 minutes
Pressure Cooking Beans/Legumes (Dry & Presoaked): To achieve best
results when cooking with dried or presoaked beans/legumes, please refer to
the below tips and hints:
1. Rinse dried beans/legumes under cold water and drain; discard any
pebbles or other debris in batch.
2. Do not fill cooker more than half full to allow for beans/legumes to expand
in size.
3. Use enough liquid to cover the beans/legumes
4. Do not salt beans/legumes. Using salt while cooking the beans/legumes
will prevent them from cooking properly.
5. Add 1-2 tablespoons of oil to beans/legumes to minimize frothing.
6. For best results when cooking dried beans/legumes, use the natural
release method.
Beans/Legumes Pressure Cooking Chart:
Beans/Legumes Pressure Setting Cooking Time
(Dried 180ml Cups) Cooking Time
(Soaked Overnight)
Adzuki Beans High 20-25 minutes 10-15 minutes
Black Beans High 20-25 minutes 10-15 minutes
Black-Eyed Peas High 20-25 minutes 10-15 minutes
Cannellini Beans High 35-40 minutes 20-25 minutes
Chestnuts, pierced High 7-10 minutes 5-7 minutes
Chickpeas (Garbanzo
Beans) High 34-40 minutes 20-25 minutes
Great Northern Beans High 28-30 minutes 23-25 minutes

15
ENGLISH
Kidney Beans High 25-30 minutes 20-25 minutes
Lentils (Brown) High 15-20 minutes N/A
Lentils (Green) High 15-20 minutes N/A
Lentils (Red) High 15-17 minutes N/A
Lima Beans High 20-24 minutes 10-15 minutes
Navy Beans High 25-30 minutes 20-25 minutes
Pinto Beans High 25-30 minutes 20-25 minutes
Red Beans High 25-30 minutes 20-25 minutes
Soybeans High 25-30 minutes 20-25 minutes
Split Peas (Green) High 15-20 minutes 10-15 minutes
Split Peas (Yellow) High 15-20 minutes 10-15 minutes
Pressure Cooking Rice/Grains: To achieve best results when pressure
cooking rice/grains, please refer to the below tips and hints:
1. Add 1-2 tablespoons of oil to the dried grains to minimize frothing.
2. Do not fill removable cooking pot more than half way to allow rice/grain to
expand in size.
3. Do not use the quick release method to release pressure; use the natural
release method instead.
4. Pearl Barley tends to froth, foam and sputter which may block the pressure
valve if filled too high in the removable cooking pot. Please be sure to not
fill the removable cooking pot more than half way.
Rice/Grain Pressure Cooking Chart:
Rice/Grain Pressure Setting Grain : Water Ratio
(180ml Cups) Cooking Function &
Cooking Times
Arborio High 1:3 6 minutes
Barley High 1:3-1:4 25-30 minutes
Basmati Low 1:1½ 6-9 minutes
Brown High 1:1¼ 25-30 minutes
Couscous High 1:2 5-8 minutes
Jasmine Low 1:1 8-9 minutes
Long Grain Low 1:1½ 10 minutes
Millet High 2:3 10-12 minutes
Pearl Barley High 1:4 25-30 minutes
Quick Cooking Oats High 1:1 2⁄3 5-6 minutes
Quinoa Low 1:2 8-10 minutes
Short Grain Rice Low 1:1½ 8-9 minutes
Steel Cut Oats High 1:1 2⁄3 10 minutes
Sushi Rice Low 1:1½ 9 minutes
Wheat Berries High 1:3 25-30 minutes
Wild Rice High 1:3 25-30 minutes
Pressure Cooking Meat/Poultry: To achieve best results when cooking
meat/poultry, please refer to the below tips and hints:
1. Cut meat/poultry into equal size pieces for even cooking.
2. When mixing meats, cut those that cook more quickly into larger pieces

16
ENGLISH
and those that cook more slowly into smaller pieces.
3. Brown meat in small batches – overcrowding the cooker can result in the
meat becoming tough and flavorless.
Meat/Poultry Pressure Cooking Chart:
Meat/Poultry Pressure Setting Cooking Time
Beef Brisket, whole High 40-50 minutes
Oxtail High 40-50 minutes
Beef Short Ribs High 35-40 minutes
Boneless Chicken Strips High 10-12 minutes
Chicken Breast High 8-10 minutes
Chicken Legs High 10-12 minutes
Chicken Wings High 10-12 minutes
Chicken (Whole) High 20-25 minutes
Cornish Hen High 10-15 minutes
Duck (Whole) High 25-30 minutes
Ham (Uncooked) High 26-30 minutes
Lamb, Cubes High 10-13 minutes
Pork Spareribs High 20-25 minutes
Pork Chops High 8-10 minuets
Pork (Baby Back Ribs) High 19-24 minutes
Pork Loin High 45-50 minutes
Pork Shoulder High 45-50 minutes
Turkey (Drumsticks) High 15-20 minutes
Veal Chops High 5-8 minutes
Beef Cubes High 18-23 minutes
Chicken Cubes High 10-12 minutes
Pressure Cooking Seafood: To achieve best results when cooking seafood,
please refer to the below tips and hints:
1. Always leave at least 2 inches of head space in the removable pot to
prevent overflowing.
2. Smaller types of seafood, such as clams and shrimp, do not take long to
cook, therefore, it’s best to add these types of seafood to a dish during the
last few minutes of cooking.
Seafood Pressure Cooking Chart:
Fish/ShellFish Pressure Setting Cooking Time
(Fresh) Cooking Time
(Frozen)
Fish, whole Low 5-6 minutes 7-10 minutes
Fish Filet Low 2-3 minutes 3-4 minutes
Fish Steak Low 3-4 minutes 4-6 minutes
Crab Legs Low 3-4 minutes 5-6 minutes
Lobster Tail Low 2-3 minutes 3-4 minutes
Lobster (Whole) Low 3-4 minutes 4-6 minutes
Mussels Low 2-3 minutes 4-5 minutes

17
ENGLISH
Mussels Low 2-3 minutes 4-5 minutes
Scallops (Small) Low 1 minute 2 minutes
Scallops (Large) Low 2 minutes 3 minutes
Shrimp, shell Low 2-3 minutes 3-4 minutes
Shrimp (Med/Large) Low 1-2 minutes 2-3 minutes
Shrimp (Jumbo) Low 2-3 minutes 3-4 minutes
Slow Cook Function
Prepare slow cooker classics such as pot roasts, soups and stews in up to 10
hours with this function. Load your ingredients in the morning and dinner will
be waiting for you in the evening.
Slow Cook Function Temperature/Timer Chart:
Setting Slow Cook Temperature Preset Time Timer
Custom Low or High 190°F or 212°F 30 minutes* 30 minutes-24 hours,
30 minute increments
Meat Low 190°F 8 hours 30 minutes-24 hours,
30 minute increments
Poultry High 212°F 1 hour 30 minutes-24 hours,
30 minute increments
Beans Low 190°F 8 hours 30 minutes-24 hours,
30 minute increments
Chili Low 190°F 4 hours 30 minutes-24 hours,
30 minute increments
Stock Low 190°F 10 hours 30 minutes-24 hours,
30 minute increments
Soup Low 190°F 8 hours 30 minutes-24 hours,
30 minute increments
*Custom preset time applies to initial use of this function, all subsequent uses will use the previously
programmed time.
1. Place the removable cooking pot into the multi-cooker.
2. Place all ingredients as needed into the removable cooking pot.
3. For recipes that require a closed lid, place the lid on the cooker; align the

18
ENGLISH
self-locking pin with the unlocked symbol and turn the lid counterclockwise
until it locks into place.
4. Turn the pressure regulator knob to STEAM.
5. Turn the dial until the SLOW COOK function is selected (the words will
blink) and confirm it by pressing the dial. The screen will show the settings
for this function to the right. In addition to the settings, there is also a
CUSTOM setting. For instruction on how to use the CUSTOM setting, see
page 8.
NOTE: To go back to the main menu screen, press MENU.
6. Choose your desired setting by turning the dial. Press the dial to select
the setting. The preset temperature (High or Low) and cooking time will
appear at the top of the screen.
If you wish to adjust those settings, turn the dial to select the temperature
(High or Low) and then press the dial or the ADJUST button to confirm
it. The cooking time will then start blinking to show it can be adjusted.
Change the time by turning the dial and set your time by pressing the
START/STOP button.
NOTE: Pressing the ADJUST button will only switch the programming
option between temperature and cooking time.
7. After you press the START/STOP button, the screen will turn green and it
will display the programmed temperature and time. You will also see the
preheat icon at the bottom of the screen and the preheating bar which will
show you how far along in the preheating process the unit is.
NOTE: If you forget to press the START/STOP button, the unit will beep
twice after 30 seconds, the light on the screen will turn off and the unit will
return to standby mode.
8. Once the temperature has been reached, the unit will beep, the cooking
icon will appear at the bottom of the screen and it will start to count down
your cooking time.
9. When the cooking time ends, the unit will beep and switch to the KEEP
WARM function. Press the START/STOP button to cancel the program.
Steam Function
This program allows you to steam delicate foods such as fish and vegetables.
This manual suits for next models
1
Table of contents
Languages:
Other Zavor Kitchen Appliance manuals