ZBoard Blue Edition User manual

!
!
!
!
!
!
Owner’s Manual
!
!

2"
CONTENTS
1. START UP CHECKLIST..……….………………….……………...………..…............ 2
2. ZBOARD SPECIFICATIONS.……..................………….……….….……............ 4
3. RIDING INSTRUCTIONS ……….………………………..……….…………..….…... 6
4. SAFETY WARNINGS…………….….………………………...……….……….......... 11
5. MAINTENANCE…………….….……………………..……….….……….………....... 13
6. WARRANTY…………….….……………………..………..……………….………....... 15
________________________
1. START UP CHECKLIST
You can view an instructional video explaining these steps at www.myzboard.com
_______ 1.1. OPEN THE BOX AND CHECK CONTENTS. If anything is missing or
are present:
(1) ZBoard Weight-Sensing Electric Skateboard
(1) Battery Charger
(1) Owner’s Manual
(1) 1/8” Hex Key
(1) Travel Handle (2pcs)
(1) ZBoard Shipping Box*
*Your ZBoard Shipping Box can be used for storage, travel, and warranty claims shipping.
_______1.2. CHARGE THE BATTERY. For best performance and maximum battery life, make
sure to fully charge your ZBoard before your first ride. First, check that your ZBoard is
powered OFF. Unwrap the charger, plug it into any standard 110V1outlet, then insert the
3-pin DIN connector into the mating charge socket on the underside of the battery box.
The red LED should light up on the charger. Once this LED has turned green, your battery
is fully charged and ready for its first ride.
______ 1.3. REVIEW THE FIRST RIDE CHECKLIST:
_____ Are you wearing all necessary safety gear, including a helmet, elbow pads, and knee
pads? (See Section 4: SAFETY WARNINGS for details on safety guidelines and
precautions)
_____ Are you over the age of 18? (See Section 4: SAFETY WARNINGS for other restrictions)
_____ Are you in a smooth, flat, open environment free of vehicle and pedestrian traffic, where
electric skateboarding is allowed?
1220V users may require an adapter to connect to an available power source.
"

3"
"
______ 1.4. READ AND ACKNOWLEDGE SECTION 4: SAFETY WARNINGS. Sign
This will act as your product registration. Regular wear and tear is not covered by your
warranty. Water and debris damage, and/or improper use or care of your ZBoard and
accessories may void your warranty. We reserve the right to refuse warranty parts and
service in accordance with local, state, and federal law.
In exchange for participation in the activity of Electric Skateboard Riding with equipment supplied by Intuitive
Motion Inc (“Intuitive Motion”), of Modesto, California, I agree for myself and (if applicable) members of my family,
to the following:
1. I agree to observe all rules and regulations governing the use of Electrically Motorized Skateboards, and abide
by all applicable laws.
2. I further agree to follow any oral and/or written instructions or directions given by Intuitive Motion, or its
employees, representatives, or agents regarding purchase, use, maintenance, and/or storage of my ZBoard
Weight Sensing Electric Skateboard, its packaging, and/or its accessories.
3. I recognize that there are certain inherent risks associated with the above described activity, and I assume full
responsibility for personal injury or death to myself and (if applicable) members of my family. I further release
and discharge Intuitive Motion for injury, loss, and/or damage arising out of use of my ZBoard, whether caused
by fault of myself, my family, Intuitive Motion, and/or any third party.
4. I agree to indemnify and defend Intuitive Motion against all claims, causes of action, damages, judgments, costs,
and/or expenses, including attorney fees and other litigation costs, which may in any way arise from use of my
ZBoard.
5. Any legal or equitable claim that may arise from participation in the above shall be resolved under California law.
By using this ZBoard Electric Skateboard I acknowledge that I have read this document and understand it in its
entirety. I further understand that by signing this release I voluntarily surrender certain legal rights as outlined
above.
_______________________________________________________________________________________________________
Signature Date
_______________________________________________________________________________________________________
First Name Last Name MI
_______________________________________________________________________________________________________
Address City State Zip Code
Serial #:____________________
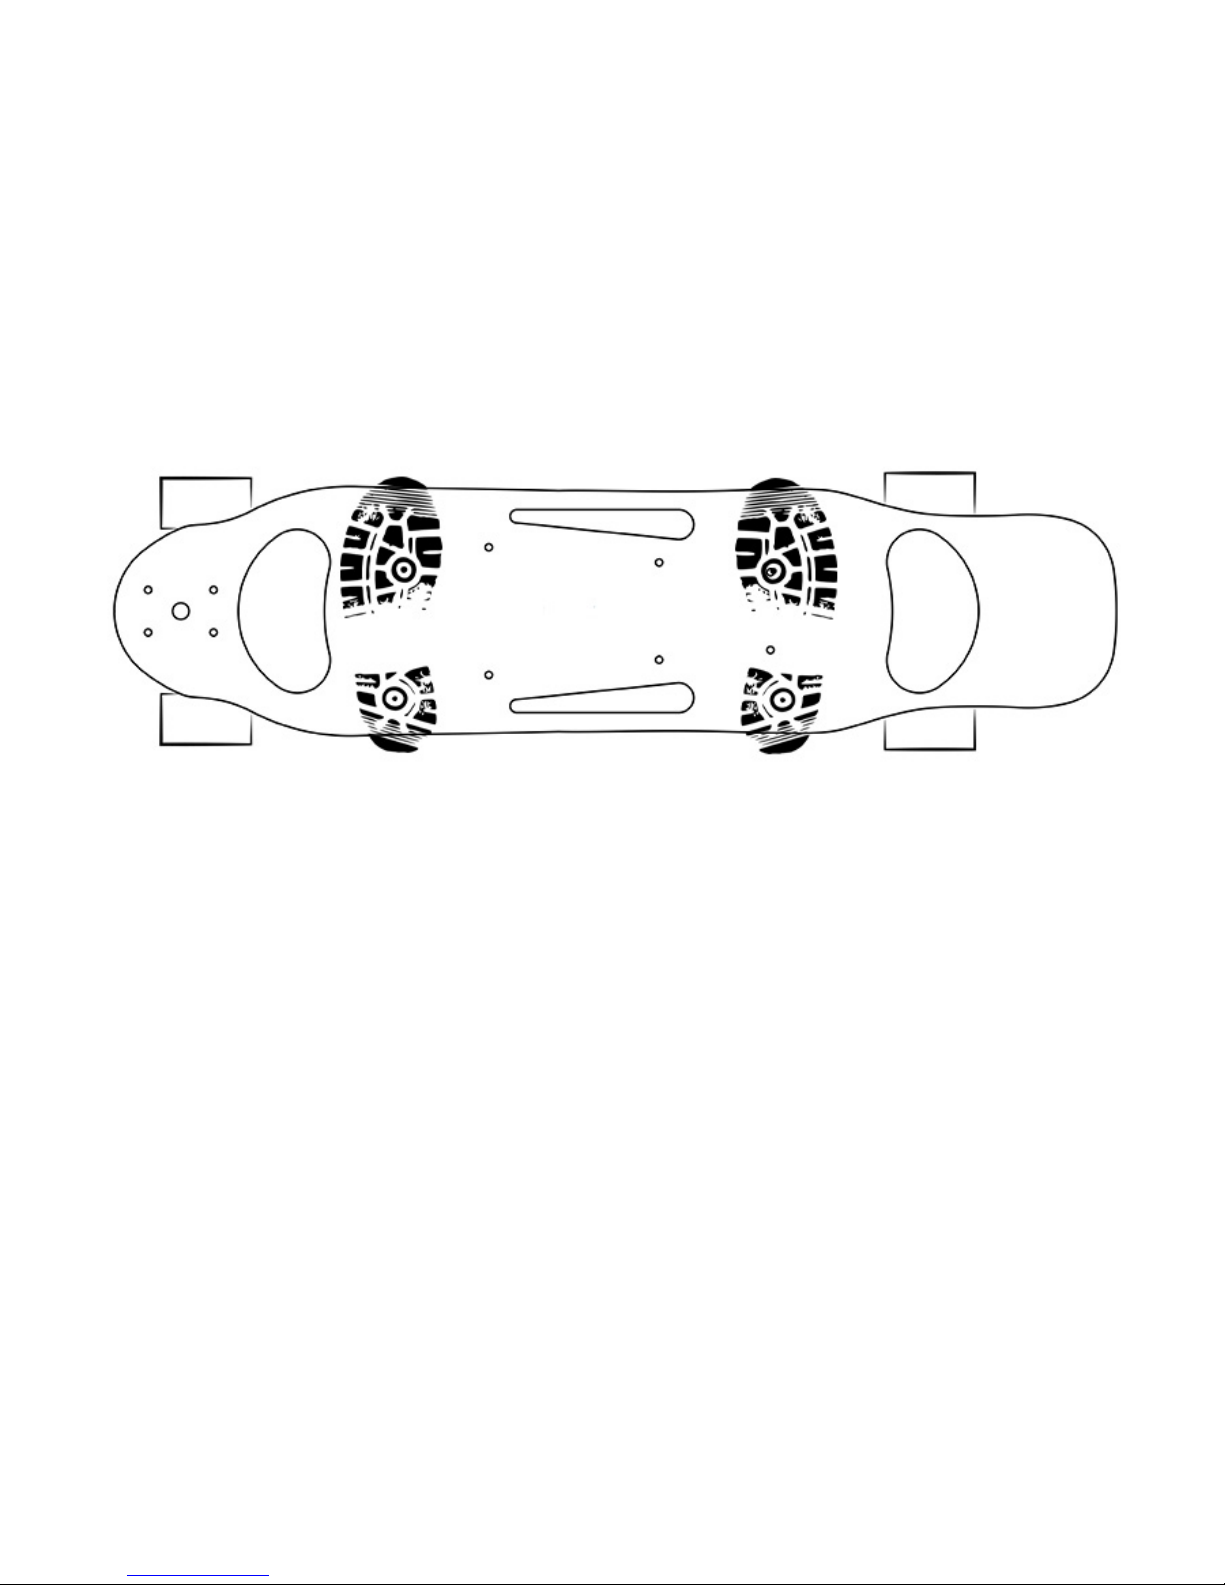
Remember to start slow and work your way up as you familiarize yourself with the
ZBoard’s performance and riding characteristics. HAVE FUN AND BE SAFE!

4"
"
2. SPECIFICATIONS
ZBoard Blue
ZBoard Pearl
Top Speed*
20 mph (32 kph)
20 mph (32 kph)
Range (max)*
16 miles (25 km)
24 miles (38 km)
Charge Time
90 minutes
120 minutes
Weight
17 lbs (7.7 kg)
19 lbs (8.6 kg)
*Top Speed and Range are dependent on rider weight, riding style,
terrain, and other factors.
2.1. COMPONENTS
2.2. TURNING THE ZBOARD ON / OFF
The Power Button is located on the top of the deck near the nose, in front of the front
footpad. To turn the ZBoard power ON, press and release the Power Button. The LED ring
will illuminate. To turn power OFF, press and hold once until the LED ring turns off.
The Power Button also allows you to read battery status and toggle the LED Headlights and
Tail Lights as seen in Sections 2.3 and 2.4.
"

5"
"
2.3. READING THE BATTERY LEVEL INDICATOR
When the board is in the powered ON, the battery level remaining can be determined by
viewing the colors of the LED ring around the Power Button.
SOLID BLUE
Battery level is GOOD
(50% - 100%). Charge
only if necessary
BLINKING BLUE
Battery level is
MEDIUM (25% - 49%).
Charge at next
opportunity
SOLID RED
Battery level is LOW
(10% - 24%). Charge
at next opportunity.
BLINKING RED
Battery level is
CRITICAL (0% - 9%).
Charge at next
opportunity.
2.4. TURNING ON THE HEADLIGHTS / TAIL LIGHTS
Certain ZBoards are equipped with LED Headlights and Tail Lights. With the ZBoard powered
ON, quickly press and release the Power Button to turn both sets of lights ON. Press and
release a second time to make them blink, and press again turn them back OFF. The
Headlights and Tail Lights are set to OFF by default when first turning on the ZBoard. You
may have to wait up to seven seconds after powering on the board to turn on the lights.
2.5. CHARGING THE ZBOARD
To properly charge your board, first plug your charger into any standard 110V outlet then
insert the 3-pin DIN charge connector into the mating charge socket on the underside of the
battery box. The red LED on the charger will light up. Once this LED has turned green, your
battery is fully charged and ready for its first ride. 220V users may require an adapter.
2.6. ADJUSTING SPEED AND ACCELERATION
Your ZBoard is equipped with four speed modes: Beginner, Normal, Expert, and Ludicrous.
Each successive mode has increased acceleration and top speed, along with reduced range
and added heat.
To adjust the Speed Mode, follow these directions:
1) Turn the ZBoard OFF.
2) Tilt the ZBoard vertically, with the nose pointing towards the sky.
3) Press and hold the Power Button until the LED ring begins blinking. Once the LED ring is
blinking, release the Power Button. The board is now in Tuning Mode.
4) View the blink rate and color. Compare it to the chart below.

6"
"
5) To change the speed mode, tap the center of the front footpad while still in Tuning Mode.
You will see the blink rate change.
6) Once the ZBoard is in your preferred Speed Mode, place it on the ground, wheels down.
This will lock in the speed mode. The LED ring will stop blinking. It is now ready to ride
TIP: For a way to quickly check the Speed Mode your board is currently in, simply turn the
board on (quick tap and release of the Power Button) when the board is vertical. The board
will flash its tuning mode for 3 seconds.
SPEED MODES:
BEGINNER MODE
Slow Blue Blink
Top Speed: 6 mph
Acceleration: Slow
Braking: Slow
NORMAL MODE
Moderate Blue Blink
Top Speed: 14 mph
Acceleration: Medium
Braking: Medium
EXPERT MODE
Rapid Blue Blink
Top Speed: 20 mph
Acceleration: Fast
Braking: Fast
LUDICROUS MODE
Rapid Red Blink
Top Speed: 20 mph
Acceleration: Extreme
Braking: Extreme
2.7. TEMPERATURE SAFETY MODES
When riding up and down hills and/or in high heat conditions the ZBoard may go into one of
its Temperature Protection Modes. If you see the board enter one of these modes either
reduce your riding intensity or take a momentary break to allow the board to cool down.
TEMPERATURE WARNING MODE
(Slow Red / Blue Blink)
In Temperature Warning Mode the ZBoard is
within 10 degrees of overheating. Power will
be reduced. Braking will work as normal.
OVER TEMPERATURE MODE
(Rapid Red / Blue Blink)
In Over Temperature Mode the ZBoard has
momentarily overheated. The throttle will be
disabled. Braking will work as normal

3. RIDING INSTRUCTIONS
There are four main skills required to effectively ride the ZBoard: coasting, accelerating, braking
and turning. This section will discuss each skill in detail.
Practice in a safe, flat area free of obstacles and pedestrian and vehicle traffic.
3.1. THE COAST STANCE
Make sure the power is OFF (the LED ring should not be illuminated). Stand on to the ZBoard
with the COAST stance, seen in Figure A.
Figure A: Diagram of standing on the board correctly in the COAST stance
In the COAST stance the rider is neither accelerating nor braking, but rather stationary or
slowing down gradually due to the natural resistance of the motor and bearings. When
coasting downhill it is best to ride in the BRAKING stance described in Section 3.3, to
maintain optimal control of speed.
The correct COAST stance is to orient one’s feet perpendicular to the direction the board is
pointing, at approximately shoulder width with toes flared out slightly for balance.
Get comfortable with the flexibility of the trucks by carefully leaning towards your toes, and
then your heels, bending your knees slightly for balance. Do not yet turn on the board.
If you are unfamiliar with board sports see Section 3.6 to determine which foot to put forward
along with other riding techniques.

8"
"
"
3.2. THE ACCELERATION STANCE
With the ZBoard power still OFF and standing on the ZBoard in the COAST position, flare out
your front foot so the ball of your front foot (near the toes) rests on the center of the front
footpad. You should be able to reach this point with your foot at approximately an angle of
45°or less. If you are unable to reach the center of the footpad, adjust your stance forward
and wider. See Figures B and C for correct and incorrect ACCELERATION stances. Avoid
rotating your front foot much more than 45°from perpendicular to the board, as pointing
your toe too far forward will make turning difficult and the ride less comfortable.
Figure B: The correct ACCELERATION stance.
Figure C: An incorrect ACCELERATION stance. If your front foot is pointed like this,
turning the ZBoard will be difficult and the ride may become uncomfortable.

9"
"
"
3.3. THE BRAKING STANCE
With the ZBoard power still OFF, return to the COAST stance and practice moving your back
foot onto the rear footpad. There are two ways to make this transition:
1) Flare out your rear foot so the ball of your foot rests on the center of the rear footpad,
in a mirror image to the ACCELERATION stance as shown in Figure D below, or
2) If flaring your foot is uncomfortable, you may prefer to make a short slide/step with
your rear foot to move the ball of your rear foot onto the center of the rear footpad.
Both footpads are intentionally raised above the top surface of the board so that they
can be easily located without requiring the rider to look down. It is recommended that
you practice this maneuver until it comes naturally before turning your ZBoard ON.
Figure D: The correct BRAKING stance. Make sure you are able to reach this
position naturally and without looking down before ZBoarding at high speeds.
3.4. TURNING
With the ZBoard still powered OFF, get into the COAST stance and practice shifting your
weight towards your toes and heels, tilting the deck each way. The more you are able to tilt
the deck, the sharper you will be able to turn. The ZBoard’s trucks are designed to provide
the best combination of stability at speed and turning performance. To achieve maximum
turning ability, you may need to shift the placement of your feet toward the edge of the deck.
For more tips on turning, see the notes below in Section 3.6.
3.5. YOUR FIRST RIDE
Once you are comfortable with the COAST, ACCELERATION, and BRAKING stances detailed
above, you are ready for your first ride!

10"
"
"
Step off the board and turn the power to ON by pressing and releasing the Power Button.
The LED ring will light up on the switch to let you know that it has powered up.
Step onto the board in the COAST stance. When comfortable and balanced, flare your front
foot out to the ACCELERATION stance. Press on the front footpad carefully with your front
foot, slowly applying pressure until the board begins to move. The more pressure you apply
to the footpad, the faster the ZBoard will go.
It is important to do this smoothly. Suddenly applying pressure will result in more
aggressive acceleration and make balancing more difficult. The footpad is most sensitive
in the center.
Once moving slowly, apply additional pressure in gradual increments to increase speed and
reduce or remove pressure to coast to a slower desired speed.
Next, try the BRAKING stance. While your ZBoard can coast to a stop, occasionally you’ll want
to use the brake to stop rapidly or modulate to control speed while descending a hill. Practice
shifting your foot onto the brake and braking with different pressures from different speeds.
The ZBoard has regenerative braking to recover some energy from motion, improving the
experience for yourself and your environment.
The ZBoard’s footpads are designed to rise out of the deck so you can feel them with your
feet. Make sure you are able to master all of the above skills without looking down at your
ZBoard.
3.6. RIDING NOTES
REGULAR / GOOFY:If you’re unfamiliar with board sports, try the above steps while
standing on the ZBoard with your left foot closest to the front. This is the REGULAR stance.
Now try again in with your right foot closest to the front instead. This is the GOOFY stance.
The ZBoard controls are built symmetrically to accommodate both stances, so use the one
that is most comfortable.
TURNING: When starting out, we recommend you shift back to the COAST stance when
you are attempting to turn. As you get more comfortable, you can begin turning while in the
ACCELERATION stance by using your back foot to tilt the board.
ONE FOOTPAD AT A TIME: As a safety feature, sensor readings from the rear footpad
are weighted heavier than those from the front footpad in our control algorithm. For strongest
braking, move your front foot completely off the front footpad before pressing the rear
footpad.

11"
"
"
GOING DOWN A HILL: We recommend that you reduce speed before descending any
slope, and position yourself in the BRAKING stance for the duration. Make sure to modulate
pressure on the brake to maintain a safe speed.
GOING UP A HILL: Entering inclines with some speed will improve the ZBoard’s
performance up hills and put less stress on the electronics. If you find that your wheels begin
losing traction or the ZBoard struggles to maintain speed, the hill is too steep. For the safety
of yourself and your board, please find another route or carry the board until the incline
becomes less steep. Riding up hills can dramatically reduce battery life and puts additional
stress on your speed controller, belt, drive wheel, and other components, and should be
avoided when possible.
TACKING: Avoid slamming the ZBoard back down on the ground as this may cause
components to come loose or be damaged.
PRACTICE MAKES PERFECT. START SLOW, BE SAFE, AND HAVE FUN!
4. SAFETY WARNINGS
The ZBoard is not a toy. Wear a helmet and protective gear at all times. Skateboarding, like many
sports, is inherently dangerous and includes risks, including the possibility for injury and even
death, for both the rider and observers.
As a rider you are responsible for:
•Acting within the limits of your ability and the purpose and design of equipment used
•Maintaining control of yourself and the equipment you use
•Refraining from acting in any manner which may cause or contribute to the injury or death
of yourself or others.
Any person who participates in or assists in electric skateboarding assumes the known and
unknown inherent risks in electric skateboarding activities and is legally responsible for all
damages, injury, or death to him or herself or other persons or damages to property, which
result from these activities.
To reduce the chances of these known risks please follow the Riding Safety Warnings below. If
you do not understand any parts of these safety warnings, please contact us at

12"
"
"
RIDING SAFETY WARNINGS:
4.1. WEAR A HELMET AND PROTECTIVE RIDING GEAR AT ALL TIMES.
This includes elbow pads, kneepads, protective eyewear, closed toe shoes, and long pants
and long sleeves that entirely cover arms and legs.
4.2. CAUTION! IT MAY BE HOT.
The ZBoard dissipates a large amount of heat from the bottom of the battery box and the
motor. These areas can reach temperatures in excess of 140°F (60C), which can be
dangerous to the touch. Exercise care while handling the ZBoard during and after use.
4.3. MINIMUM AGE: 18 YEARS OLD.
Riders must be 18+ years old to ride the board.
4.4. MAXIMUM WEIGHT: 220 LBS (100 KG).
Additional weight will reduce performance, accelerate wear and tear, and lead to
maintenance and repair requirements that may not be covered by warranty. The ZBoard is
intended for use by one person at a time.
"
4.5. START SLOW.
Initial rides should be slow and in an open and safe environment. Read Section 3 of this
manual and practice accelerating, coasting, turning, and braking at slow speeds before
increasing your speed, riding on hills, and/or riding in a more crowded environment.
4.6. KNOW WHERE TO RIDE.
The ZBoard does not conform to Federal Motor Vehicle Standards and is not intended for
operation on public streets, roads or highways. Do not operate the ZBoard in traffic or near
pedestrians or other vehicles. Skateboarding and Electric Skateboards are regulated by state
and local laws, which vary by location. As a rider, you are responsible for knowing the
specific requirements, laws, and regulations in your area. Consult local authorities before
use.
4.7. WEAR FLAT, RUBBER SOLED, CLOSED TOE SHOES.
Appropriate footwear is required to correctly interface with the ZBoard’s footpads. Shoes with
raised heels alter the rider’s weight distribution and sandals do not securely attach to your
feet. Because of the possible need to dismount the ZBoard quickly, never ride barefoot or
without proper shoes.

13"
"
"
4.8. ONLY RIDE DURING DAYLIGHT.
Riding at night is extremely dangerous. Poor visibility makes it difficult to see obstructions,
and makes it difficult for others to see you.
4.9. AVOID UNEVEN OR WET SURFACES, OBSTRUCTIONS, POTHOLES, CRACKS,
AND PUDDLES.
Riding on uneven surfaces can lead to loss of balance, traction, or other sudden unforeseen
movement. Avoid puddles, sprinkler runoff, and other wet conditions to keep electronics and
bearings dry. NEVER RIDE IN THE RAIN. Riding in the rain or other wet conditions can lead
to dangerous situations including a slippery deck surface, limited traction, and reduced
visibility for the rider, pedestrians, or vehicles nearby. Riding your ZBoard in the rain may
result in water damage to electronics and moving parts, which are not covered by the
warranty.
4.10. DO NOT ATTEMPT TRICKS OR STUNTS.
Ride in control at all times and never attempt tricks or stunts. The combination of power and
weight make your ZBoard a potentially hazardous object. Improper use can result in property
damage, serious injury, or even death. Understanding all of its features and controls is
necessary for safe riding. The user of this product assumes all risks associated with its use.
5. MAINTENANCE
While the ZBoard is designed to be robust, it will occasionally require basic maintenance. Follow
these guidelines to ensure you minimize unnecessary issues.
5.1. TREAT YOU ZBOARD WITH CARE.
The ZBoard has sensitive electronic parts and must be treated accordingly. Do not slam the
ZBoard against the ground or leave it outside or in direct sunlight for long periods of time.
5.2. CHECK AND TIGHTEN FITTNGS.
When riding, the ZBoard experiences extreme and repeated vibrations, which can loosen
hardware over time. Check the tightness of the hardware on the battery box and trucks before
each ride. Each component can be tightened with pliers and the included hex keys. Apply a
small amount of Loctite Blue to the threads of any screws that repeatedly loosen.
5.3. INSPECT YOUR ZBOARD BEFORE EVERY RIDE.
Before using, turn on your ZBoard and evaluate its functionality. If you hear rattling, smell
burning, your ZBoard is moving without any pressure, or it simply won’t move or turn on, do

14"
"
"
not attempt to ride. Please visit www.myzboard.com or contact customer service for
assistance.
5.4. KEEP THE BOARD AS DRY AS POSSIBLE.
The ZBoard is not waterproof. Avoid wet pavement and puddles at all times to prevent rust
damage to bearings and trucks, and electrical damage. If wet, thoroughly dry your ZBoard off.
5.5. PROPERLY MAINTAIN YOUR BATTERY.
To preserve the life of your battery we recommend that you charge your ZBoard between
uses, even after short rides. Do not charge unattended. Always charge in a warm and dry
location, and never store it in extreme temperatures or conditions as this may negatively
impact battery life. Charge your ZBoard’s battery fully before storing it for an extended period
of time, and take it out of storage to charge at least once a month. When maintained
properly, ZBoard lithium-ion battery packs are rated up to 1,000 charge cycles. NEVER charge
your board when it is ON as this may damage the charger, battery, or speed controller.
"
5.6. TRUCK MAINTENANCE.
The ZBoard’s trucks are rugged and durable, but they will wear over time. Before each use,
check that they are adequately tightened. Avoid over-tightening or you may damage the
bushing, ruining the truck and causing a potentially danger to the rider.
5.7. REPLACE THE DRIVE WHEEL WHEN NEEDED."
The ZBoard’s drive wheel will wear down much faster than the other three wheels. Once this
rubber has worn down such that the belt cover occasionally scrapes against the ground or the
ride becomes uncomfortable or noticeably slower, you may need to replace the drive wheel.
5.8. REPLACE THE DRIVE BELT WHEN NEEDED.
Approximately every three months or after unusually heavy usage, the ZBoard’s drive belt
may wear down or break. Be proactive about this repair and do not wait for your drive belt to
fail. Replacements can be found at zboardshop.com/store.
5.9. CLEAN OR REPLACE BEARINGS WHEN NEEDED.
If you feel that your ZBoard isn’t riding as smoothly as when purchased, this may be caused
by dirty or rusted bearings. To see how to clean and/or replace your bearings, see
www.myzboard.com."

15"
"
"
LETTER FROM THE FOUNDERS
!
TO THE NEWEST MEMBER OF THE ZBOARD FAMILY:
Congratulations on your purchase! We’re so stoked to have you as a part of our new and growing
community of ZBoarders all around the world. A few things we’d like to mention:
GET READY TO RIDE!
Take some time to familiarize yourself with this manual to maximize your experience and get up and
riding as soon as possible.
GET READY TO BE STOPPED ON THE STREET!
You’ll find out pretty quickly that the ZBoard turns heads and gets people’s attention. We don’t
expect you stop and tell everyone every spec, but be sure to tell ‘em it’s a ZBoard and that they can
learn more at zboardshop.com!
GET BACK TO US!
The ZBoard has been shaped substantially by feedback from our community. We want to continue to
offer the highest quality products, the best features, and the best experience we can so if you have
NOW GET OUT THERE AND GO ZBOARDING!
Regards,
Ben Forman
Co-Founder
Geoff Larson
Co-Founder
!
This manual suits for next models
1
Table of contents
Popular Accessories manuals by other brands

Vaisala
Vaisala DSC111 installation manual

ToSee
ToSee SENTINEL user guide

Mitsubishi
Mitsubishi CMY-Y64-G-E manual

SmartPlug
SmartPlug SP1US Guide

Airmar Technology Corporation
Airmar Technology Corporation WeatherStation 33-627-01 Installation instruction supplement

Yamaha
Yamaha UX16 instruction manual

Siemens
Siemens SIMATIC RF640A operating instructions

LED Microsensor NT
LED Microsensor NT MDS-4 instruction manual

Vox
Vox EasyStart VC-12 owner's manual

Burkert
Burkert FULLBORE S056 installation manual

BAPI
BAPI BAPI-Stat 4M Installation & operating instructions

FireSales
FireSales Smoky Multi Socket user manual