ZEEPIN YT60165 Owner's manual

YT60165 Product specification
Latest rev:00
File NO.: PS-YT60165
Issue date: 2018-10-29
Model NO: YT60165 and R39 CUSTOMER MODEL NO:
PRODUCT DESCRIPTION: Digital Thermometer Hygrometer
S
P
E
C
REV content date
00 First rev 2018-10-29
Product picture:

1、Main Features:
Six Button:SET/CH,ALARM,UP/MEM,DOWN/RCC,NAP,SNZ/LIGHT
Time display
Calendar
12/24 hours system
Symbol Radio Control RCC:DCF
DST
indoor temperature+ outdoor temperature
Support 5 Language of display:English、German, French, Spanish, Italian
Temperature in °C / °F
Indoor temperature (-9 °C / 16 °F ~ +70 °C / 158 °F)
Outdoor temperature (-20 °C/-4 °F ~ +70 °C/158 °F)
Humidity(1%~99%)
Single Alarm
Snooze function,setting range 5~120 minutes
Nap function,setting range 5~120 minutes
LED Backlight(can set 4 level by press SNOOZE)
Low current detection(powered on batteries)
AC power detection
Quiescent Current:80<uA
2、Button function:
function
operation
SET/CH DOWN/ RCC U/ MEM SNZ/LIGHT
NAP ALARM
Standard mode
Single
press
Check and
Choose
CH
Check Alarm
Time
Enter
Menu
Enter Snooze
、
Light
backlight,Choos
e level
Enter
NAP
counter
Turn
on/off
Alarm
Hold
press
Enter
timing set
Turn on/off
RCC
ClearMEM
/choose
unit
Delete /enter RF
NAP
setting Alarm
setting
Timing setting
Single
press ok Decrease
single step
Add single
step ------
------ -----
Hold
press -----
Decrease 8
step/s
Add single
8 step/s ------
------
-----
Alarm setting
Single
press ------
Decrease
single step
Add single
step ------
------
ok
Hold
press -----
Decrease 8
step/s
Add single
8 step/s ------
------
-----

3. Power on & reset:
Insert the battery; the LCD is fully displayed for 3 seconds, while the BI
enters into the standard mode, and the backlight is on for 5 seconds.
Default Display:
Time:12:00 AM
Date:2017.JAN.01 SUN
ALARM:6:30 AM OFF
NAP time:10minutes
4. Timing setting:
In the standard mode, press the “SET”button for 2 seconds to enter the
time setting, and the set unit will flash at 1HZ frequency.
Then press “set”button step by step:
languageBEEP ON/OFFTime zone 12/24HR hourminuteyear
monthdaytemperatureSNZ timeExit
During the setting process, press “UP”button once to set the value plus
1; long press to set the value to increase at 8 steps/second.
During the setting process, press the “DOWN”button to decrease the
value by 1; long press to decrease the value at 8 steps/second.
Setting is completed, single-press “SET”button or 20 seconds without
pressing any button to exit setting mode
In the setting mode, press the “SNZ/LIGHT”button to exit the setting
mode directly.
When BEEP (key tone) is set, press “UP”or “DOWN”to select ON/OFF
SNZ time setting range: 5~120 minutes, one unit every 5 minutes, default
10 minutes
time zone setting range: -12 ~ +12
5. Alarming setting
In the standard mode, press the “ALARM”button to view the AL alarm
time.
When viewing the time, press the “ALARM”button to turn the alarm on
or off.
In the standard mode, press the “ALARM”button for 1 second to enter
the alarm setting, and the set item will flash at 1HZ frequency.
Press the “ALARM”button to set the order: hourminuteexit
During the setting process, press “UP”button once to set the value plus
1; long press to set the value to increase at 8 steps/second.
During the setting process, press the “DOWN”button to decrease the
value by 1; long press to decrease the value at 8 steps/second.
Setting is completed, single-press “ALARM”button or 20 seconds
without pressing any button to exit setting mode
In the setting mode, press the “SNZ/LIGHT”button to exit the setting

mode directly.
The alarm that has been set will be automatically turned ON.
6. Alarm clock mode
Alarm time: 2 minutes
The buzzer format is as follows:
0-10 seconds: one second per second
10-20 seconds: BI BI per second
20-30 seconds: BI BI BI BI per second
Continuous BI sound after 30 seconds
When the alarm is ringing, press the “SNZ/LIGHT”button to enter the
10-minute snooze function.
In addition to the SNZ button, press any button to stop the alarm or
snooze, whether it is ringing or snoozing.
7. Snooze function
In standard mode, press the “NAP”button to enter the nap time and
start counting down.
In the standard mode, press the “NAP”button for 1 second to enter the
nap setting, and the set item will flash at 1HZ frequency.
In the setting process, press “UP”button once, set the value plus 5; long
press to set the value to increase at 8 steps/second.
In the setting process, press“DOWN”button once to set the value minus
5; long press to set the value to decrease at 8 steps/second.
nap time setting range: 5~120 minutes, one unit every 5 minutes, default
10 minutes
The way to sound is the same as the alarm
8. Temperature and humidity function
Indoor temperature detection range: 16~158°F (-9.0~70.0°C)
The indoor temperature is less than 16°F and the display is 16°F, and
greater than 158°F is 158°F.
Outdoor temperature detection range: -4F to 158°F (-20.0 to 70.0°C)
Temperature is less than -4F °F shows -4F °F, greater than 158 °F
shows 158 °F
Temperature resolution: 1 °C / 1 °F
Humidity resolution: 1%
Detection period: 30 seconds
Temperature SENSOR: 49.12K (B=3979K)
9. RCC reception:
RCC reception conditions:
Automatically receive RCC after 3 minutes after power on or reset
Press the “DOWN/ RCC”button to force the RCC to receive

Automatically receive every day
RCC reception time 7 minutes
RCC's automatic receiving time is: 1:00, 2:00, 3:00, each time fixed
reception, if received at 3 o'clock, the day will not receive, if not received
at 3 o'clock, 4:00 , 5:00 will be replenished, no matter whether it is
received at 5:00, the day will not receive
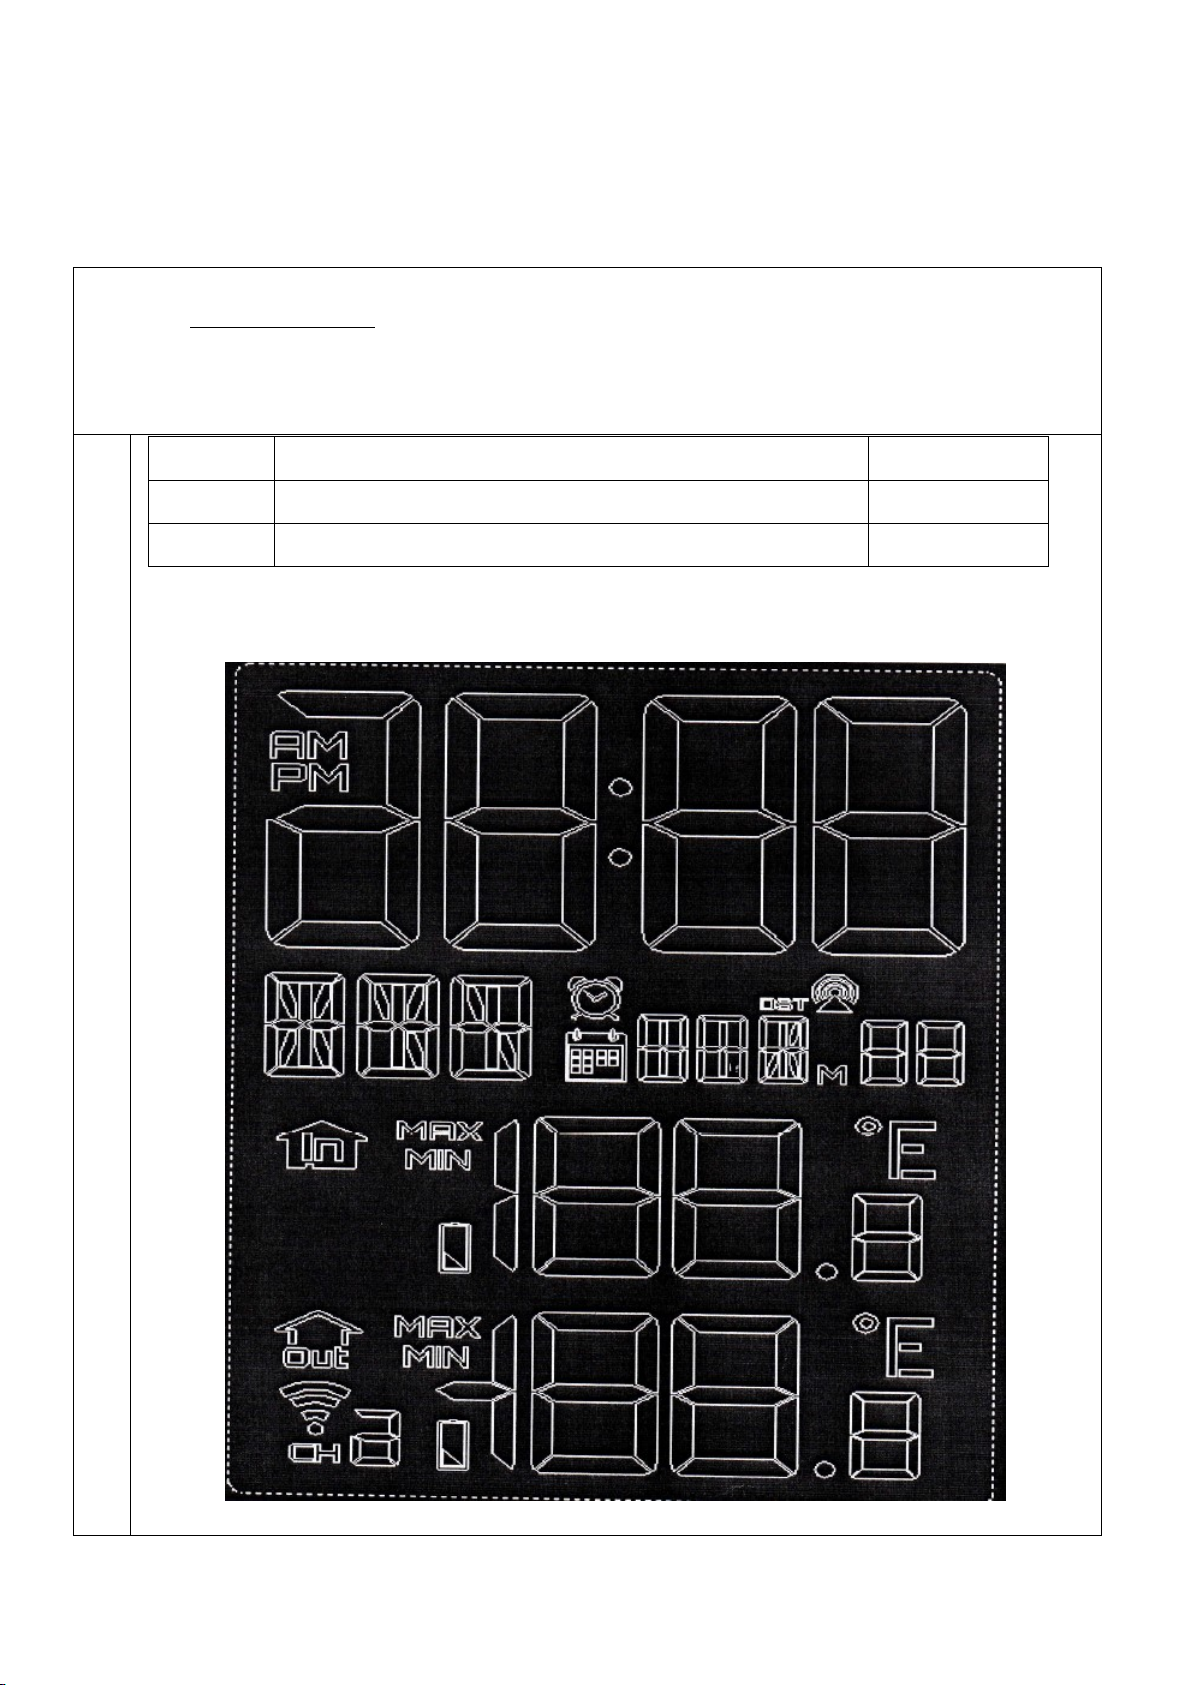
RCC receiving graphics
When entering RCC reception, the tower part of the RCC mark flashes at
1HZ frequency
RC When the received signal is successful, the RCC receive flag will be fully
displayed and will exit the receive state.
During the receiving process, the long “DOWN/ RCC”button will exit the
RCC receiving state for 2 seconds.
If the receiving signal fails on the same day, the next receiving time is 1
o'clock in the next day (0 time zone)
When receiving the RCC, when the alarm is encountered, the RCC will exit
and be transferred to the alarm.
When the DST signal is received, the DST mark of the LCD will be displayed.
RC When the RCC symbol is displayed, the RCC symbol will be turned off
after resetting the time.
10. RF reception:
After loading the battery, after detecting the temperature and humidity, it
will automatically enter the RF reception for 3 minutes, and the display
will be “--.-”flashing.
RF reception is synchronously received according to the transmitter, 1
second in advance, 1 second delay
RF will not be received later if it is not received in registration mode (reset
and long press “CHANNEL”button)
Press and hold the “SNZ/LIGHT”button for 2 seconds in the standard
mode to clear the current display value and re-register the data.
Transmitter synchronization period is CH1=57S; CH2=67S; CH3=79S
RF If the signal of the same ID is not received within one hour, the
temperature data will flash, the ID will not be cleared, and the RF will be
open for 3 minutes. If the signal is not received within 3 minutes, the next
hour will be opened for another 3 minutes. Continued
The channel that has been lost: the temperature and humidity display will
flash once every 3 seconds
11. Power on battery:
In the standard mode, press the “SNZ/LIGHT”button to backlight for 5
seconds, no button sound
In the standard mode, press any key to backlight for 5 seconds, and when

there is function, there is button sound
12. Power on AC:
In the standard mode, the backlight is long and bright, press “SNZ/LIGHT”
to switch the order: light and dark
When the backlight is off, press any key to backlight for 5 seconds. When
there is function, there is button sound.
13. Low voltage function
Low voltage indication: IC internal detection, low voltage symbol when
battery voltage is lower than 2.5V, low voltage is not detected when using
AC power supply
FCC Statement
This equipment has been tested and found to comply with the limits for a Class B
digital device, pursuant to part 15 of the FCC Rules. These limits are designed to
provide reasonable protection against harmful interference in a residential
installation. This equipment generates, uses and can radiate radio frequency energy
and, if not installed and used in accordance with the instructions, may cause harmful
interference to radio communications. However, there is no guarantee that
interference will not occur in a particular installation. If this equipment does cause
harmful interference to radio or television reception, which can be determined by
turning the equipment off and on, the user is encouraged to try to correct the
interference by one or more of the following measures:
—Reorient or relocate the receiving antenna.
—Increase the separation between the equipment and receiver.
—Connect the equipment into an outlet on a circuit different from that to which the
receiver is connected.
—Consult the dealer or an experienced radio/TV technician for help.
FCC Radiation Exposure Statement
This device complies with FCC radiation exposure limits set forth for an uncontrolled
environment and it also complies with Part 15 of the FCC RF Rules. This equipment
must be installed and operated in accordance with provided instructions and the
antenna(s) used for this transmitter must be installed to provide a separation
distance of at least 20 cm from all persons and must not be co-located or operating
in conjunction with any other antenna or transmitter. End-users and installers must
be provided with antenna installation instructions and consider removing the
no-collocation statement.
This device complies with Part 15 of the FCC Rules. Operation is subject to the
following two conditions:
(1) this device may not cause harmful interference, and

(2) this device must accept any interference received, including interference that
may cause undesired operation.
Caution!
Any changes or modifications not expressly approved by the party responsible for
compliance could void the user's authority to operate the equipment.
This manual suits for next models
1
Table of contents