ZENEC Z-E2060 User manual

Z-E2060
INFOTAINER
USER MANUAL
EN

2 Rev.A 3 Rev.A
SAFETY INSTRUCTIONS ..................................................................................................................04
TURN DEVICE ON AND OFF ............................................................................................................05
ANTI-THEFT PROTECTION ...............................................................................................................05
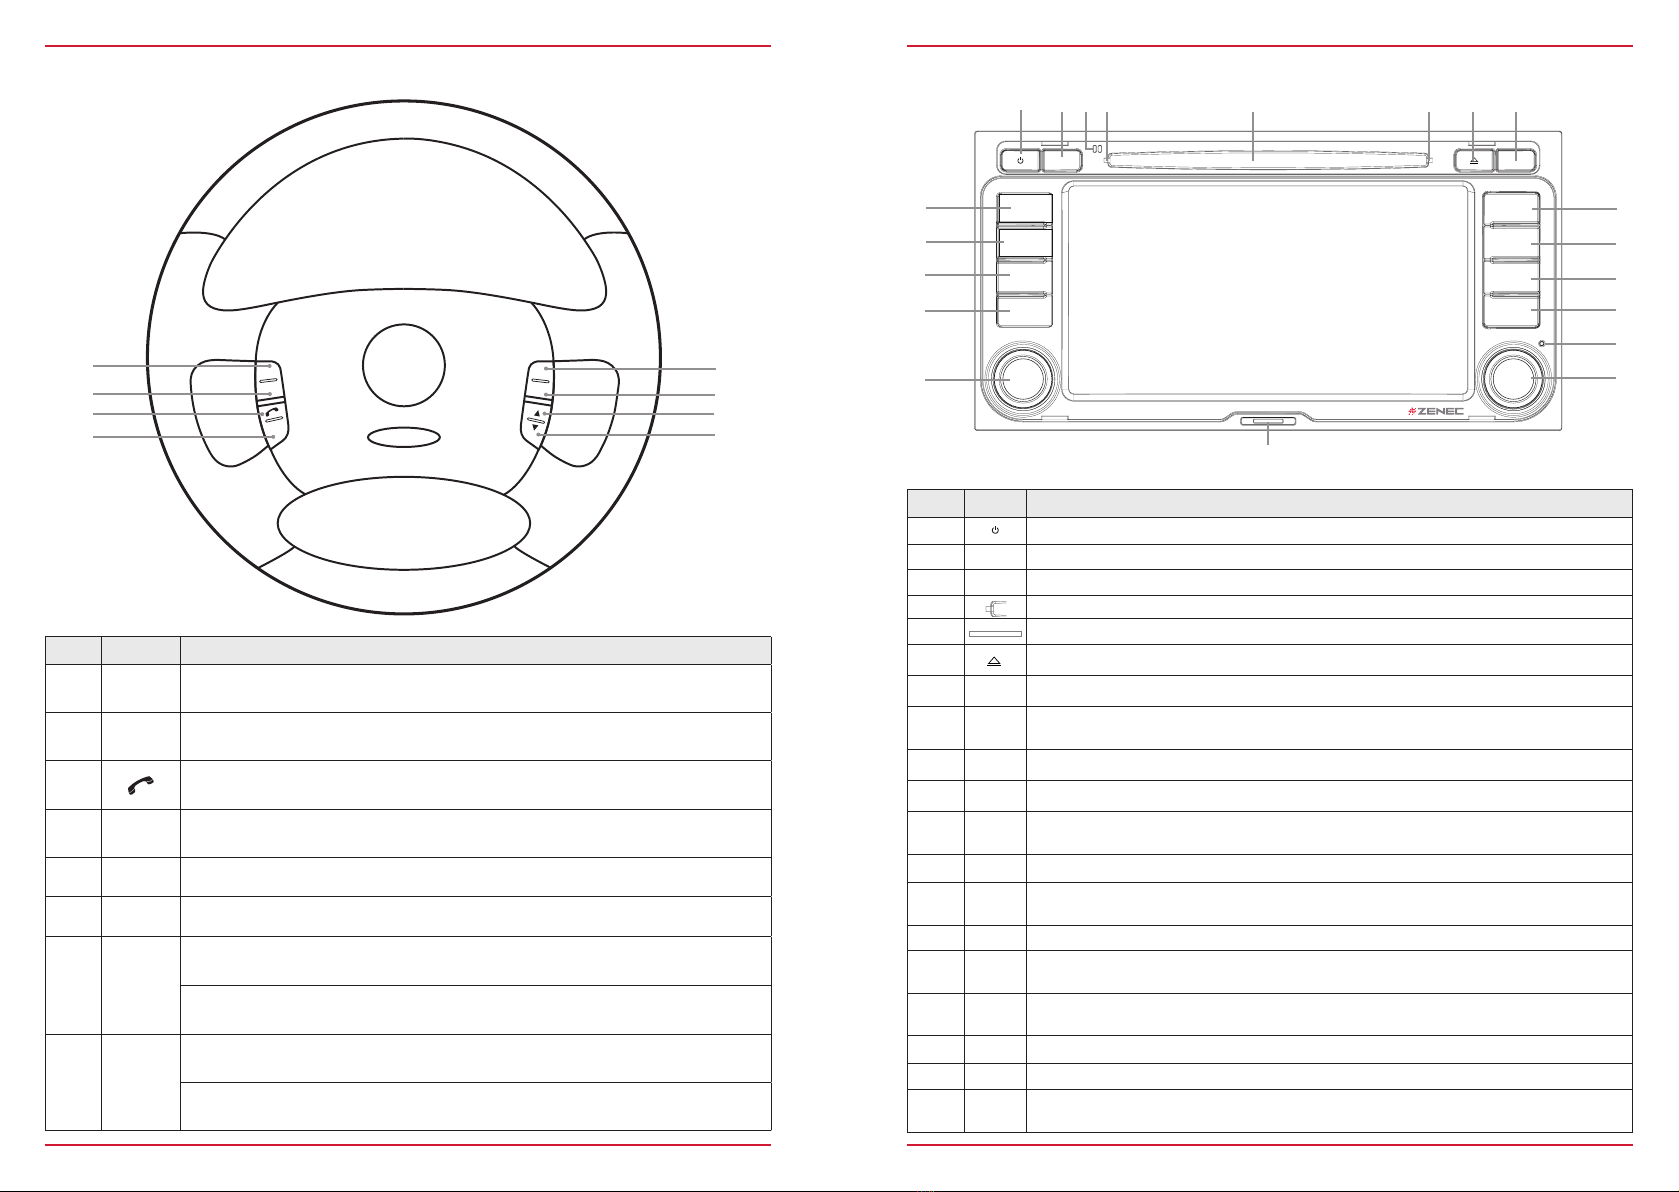
MULTIFUNCTION STEERING WHEEL CONTROLS ........................................................................06
Z-E2060 (FRONT PANEL) ..................................................................................................................07
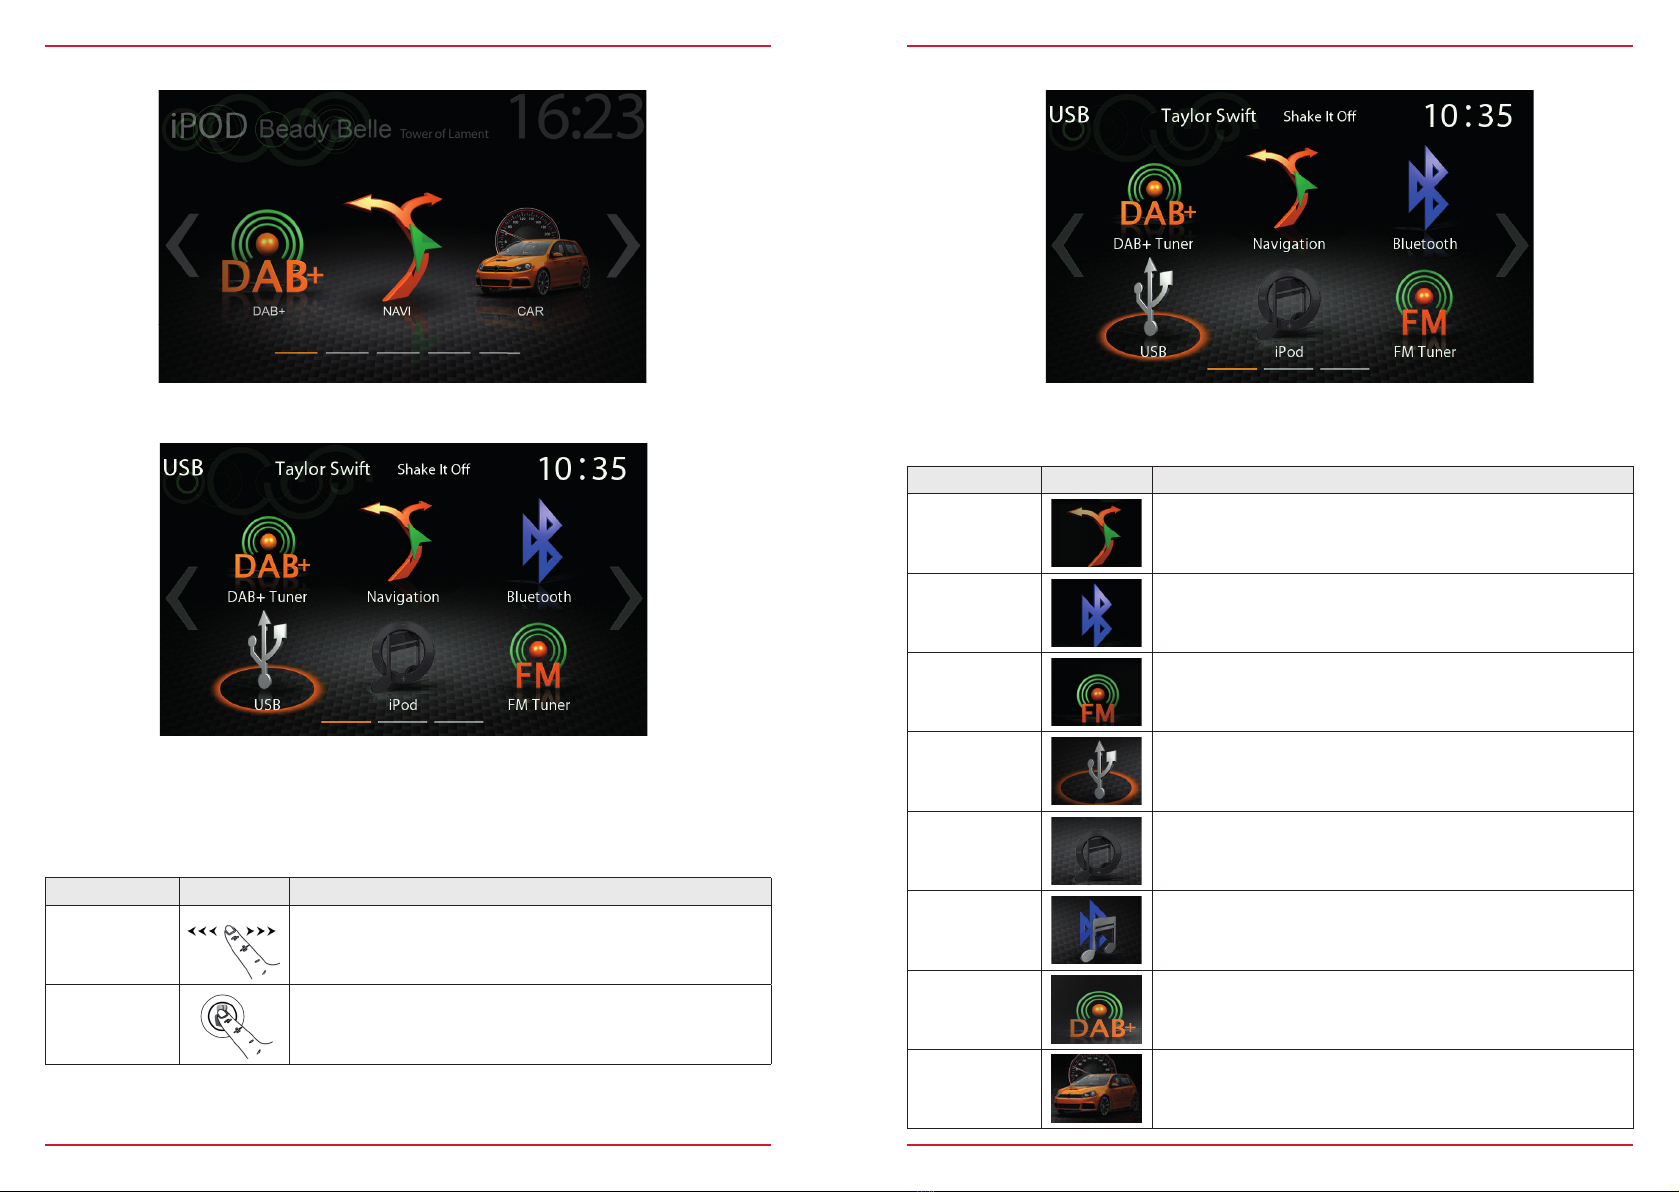
MAIN MENU STRUCTURE ....................................................................................................................08
MAIN MENU ICONS................................................................................................................................09
MEDIA AUDIO SOURCES .................................................................................................................10
INPUT SOURCES................................................................................................................................ 11
STATUS BAR....................................................................................................................................... 12
SEARCH AND INPUT FUNCTION ..................................................................................................... 13
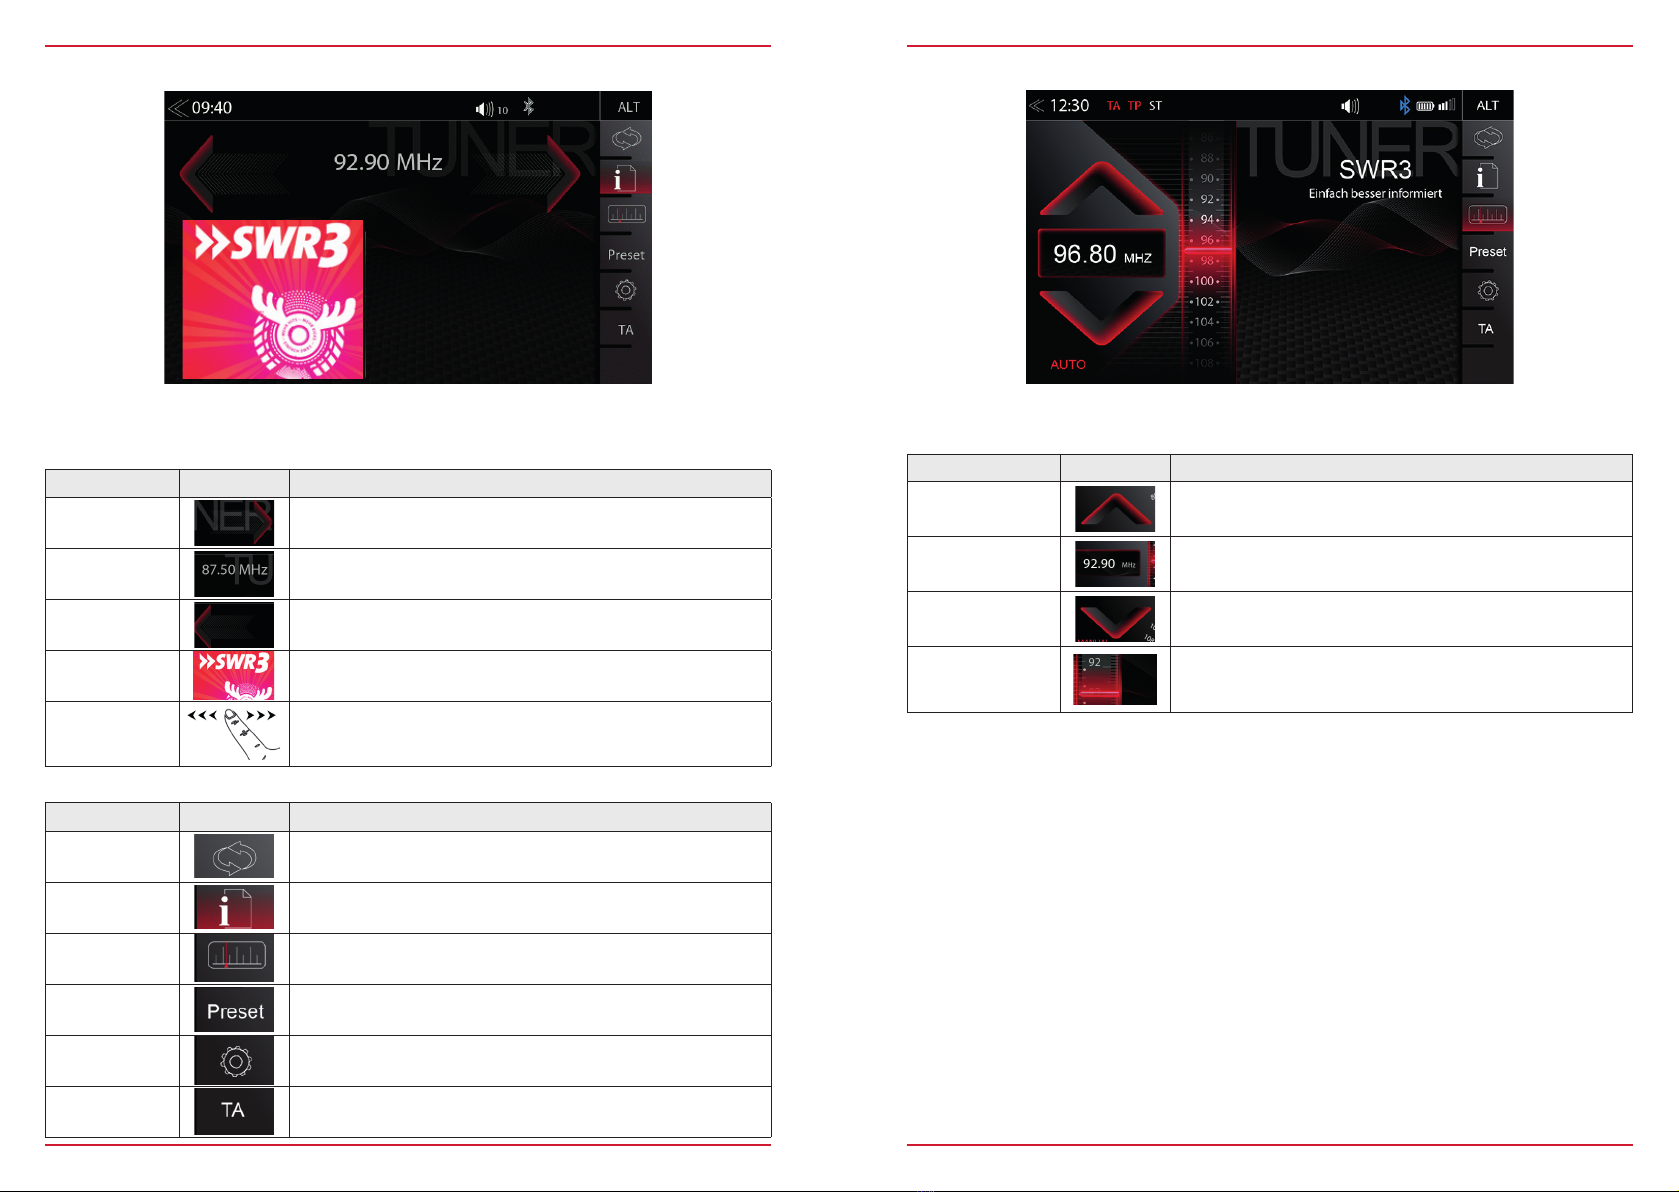
FM RADIO ........................................................................................................................................... 14
FM BAR GRAPH MODE ..................................................................................................................... 15
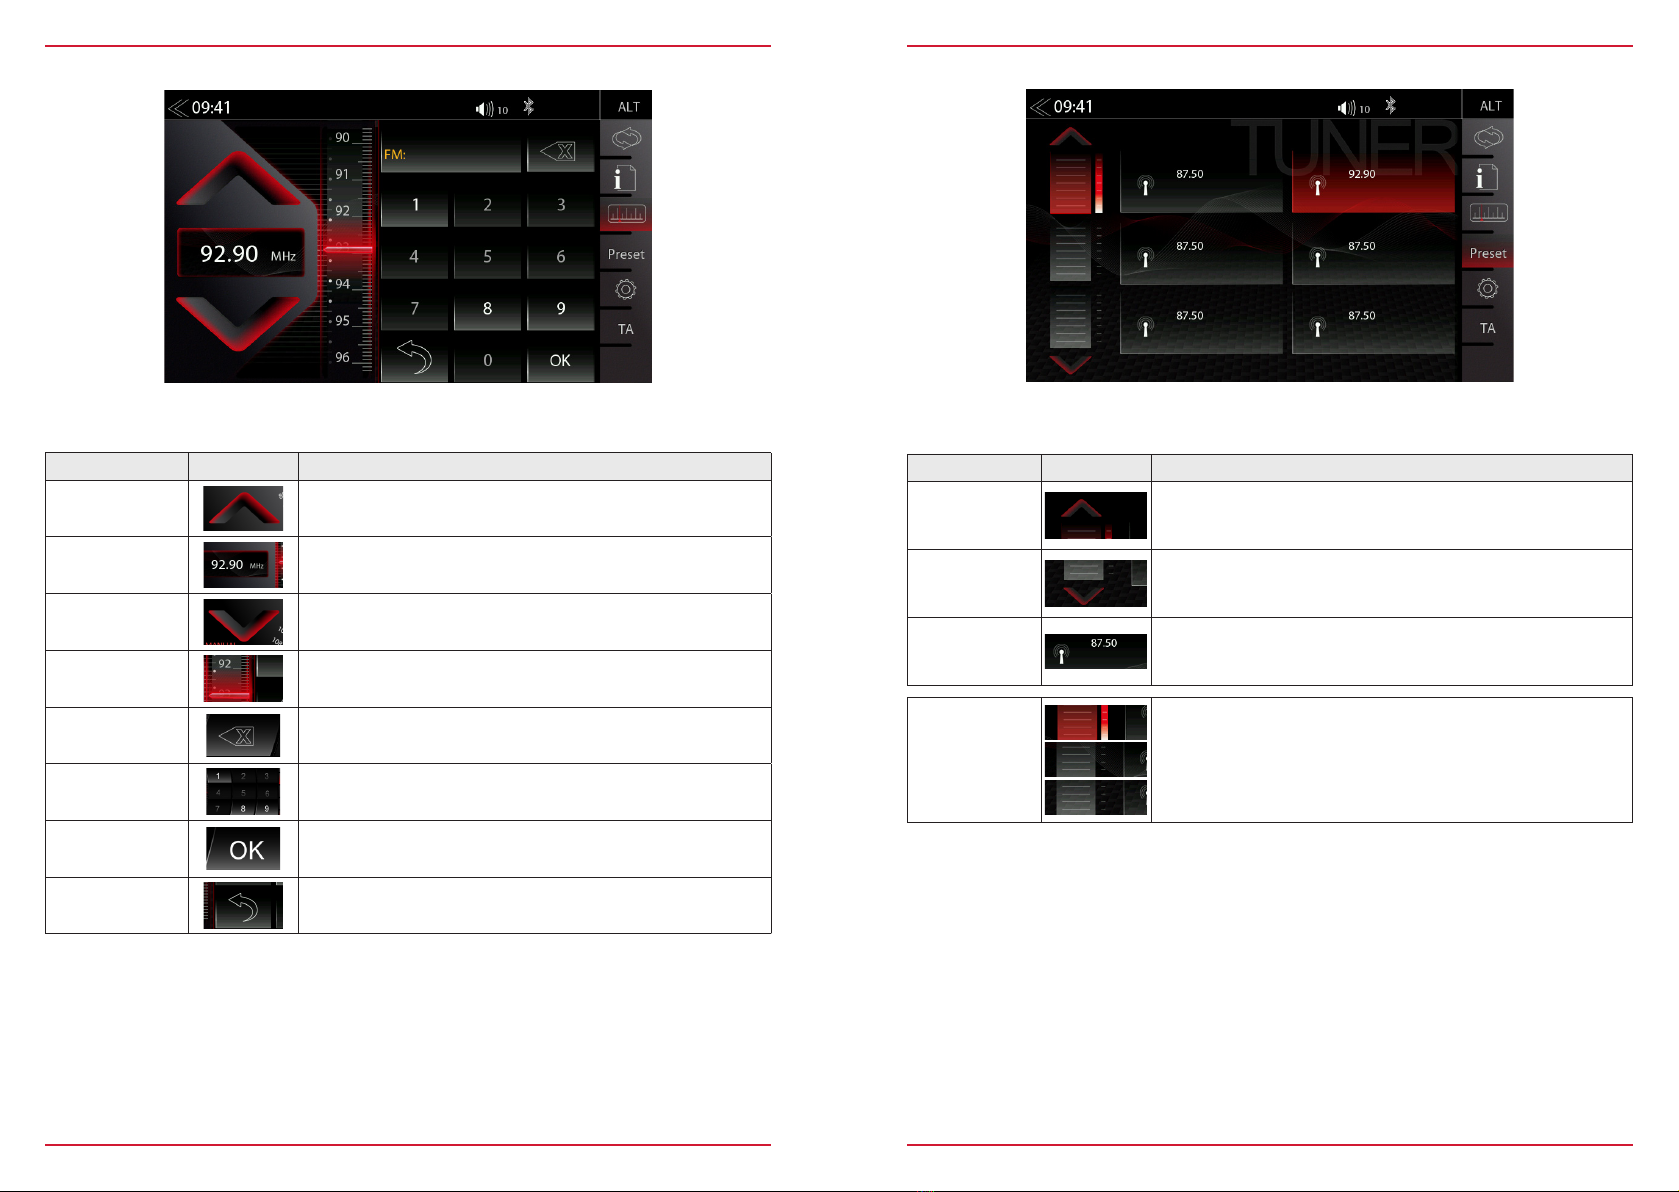
MANUAL FM STATION SEARCH ...................................................................................................... 16
UKW STATION PRESET .................................................................................................................... 17
FM SETUP ........................................................................................................................................... 18
DAB+ RADIO SETUP ...................................................................................................................... ...19
DAB+ ENSEMBLE AND STATION LIST...........................................................................................20
DAB+ SETUP ...................................................................................................................................... 21
DAB+ STATION-PRESETS ................................................................................................................22
USB / BT A2DP / IPOD / DVD / SD (AUDIO) MEDIA ........................................................................ 23
USB / BT A2DP / IPOD / DVD / SD (AUDIO) MEDIA CONTROL AND OPERATION BAR.............24
BT-MUSIC (A2DP) .............................................................................................................................25
iPOD (AUDIO) .....................................................................................................................................26
PLAYLIST (AUDIO) ............................................................................................................................27
VIDEO MEDIA: HARDDISK ...............................................................................................................28
PLAYLIST (VIDEO) .............................................................................................................................29
HDMI / AV/IN........................................................................................................................................30
CAMERA ............................................................................................................................................. 31
OPTICAL PARKING SYSTEM (OPS).................................................................................................32
SMARTLINK DIRECT .........................................................................................................................33
SMARTLINK DIRECT CONTROL INTERFACE ................................................................................34
SMARTLINK DIRECT CONTROL BAR ICONS.................................................................................35
SMARTPHONE APP LINKING...........................................................................................................36
CONTENTS
Device user manual for ZENEC media system
We are delighted that you have chosen a product from ZENEC.
Please read this operating manual before you start your new ZENEC system. In this device user
manual you will find important instructions and information for the safe operation of the ZENEC
system, and to help you make the most of its technical advantages.
All the information in this manual corresponds to the state at the time of going to press, and applies
only to ZENEC systems in original condition. On account of possible updates to device software, the
illustrations and features shown in this operating manual may be different from your ZENEC system.
Differences in the information, illustrations or features cannot form a basis for any claims.
If you sell your vehicle with the ZENEC system still fitted, please ensure that this operating manual
stays with the vehicle, and that any personal data like a phonebook stored in the device is deleted.
BLUETOOTH (HANDS-FREE SYSTEM) ...........................................................................................37
CONTROL AND OPERATION BAR (RIGHT SIDE) ..........................................................................38
DEVICE MANAGER............................................................................................................................39
PAIRING ..............................................................................................................................................40
BLUETOOTH SETUP.......................................................................................................................... 41
BLUETOOTH STATUS BAR............................................................................................................... 41
ACCEPTING/ENDING INCOMING CALLS (VIA DEVICE) ............................................................... 42
OUTGOING CALL VIA NUMERIC PAD .............................................................................................42
OUTGOING CALL VIA PHONEBOOK............................................................................................... 42
BLUETOOTH MENU ...........................................................................................................................43
PHONEBOOK......................................................................................................................................44
CALL LISTS ........................................................................................................................................45
FAVORITES .........................................................................................................................................46
NAVIGATION....................................................................................................................................... 47
NAVIGATION UPDATE ....................................................................................................................... 47
MAP VIEWS (EXAMPLES).................................................................................................................48
SETUP OPERATIONS ........................................................................................................................49
DISPLAY ICON (BRIGHTNESS) ........................................................................................................50
SETUP OF SOURCES ........................................................................................................................ 51
MISC SETUP .......................................................................................................................................52
AUDIO SETUP.....................................................................................................................................53
VOLUME SETUP.................................................................................................................................54
QUICK AUDIO SETUP (BAL/FAD_SUBWOOFER_LOUDNESS) ...................................................55
AUDIO SETUP: EXPERT MODE........................................................................................................56
AUDIO VOLUME – BASE LEVEL SETUP .........................................................................................57
BALANCE / FADER SETUP ...............................................................................................................58
EQUALIZER SETUP ...........................................................................................................................59
TIME ALIGNMENT SETUP.................................................................................................................60
SUBWOOFER SETUP ........................................................................................................................ 61
NAVI-MIXER SETUP ..........................................................................................................................62
TFT DISPLAY CONFIGURATIONS....................................................................................................63
CAR (VEHICLE) SETUP .....................................................................................................................64
AIR CONDITIONING (AC INFO) ........................................................................................................65
DYNAMIC INDICATION OF THE SEAT HEATER .............................................................................66
SYSTEM SETUP ................................................................................................................................. 67
CAR INFORMATION (VEHICLE STATUS) .................................................................................. 68-69
SOFTWARE VERSION ......................................................................................................................70
PASSWORD ........................................................................................................................................ 71
INSTALLATION NOTES .....................................................................................................................72
REMOVAL WORK AND PREPARATION ..........................................................................................72
ABBREVIATIONS ...............................................................................................................................73
OVERVIEW ACCESSORIES .............................................................................................................. 74
COMMISSIONING................................................................................................................................ 74
CONNECTION DIAGRAM Z-E2060..............................................................................................75-76
STATUTORY RIGHTS AND WARRANTY .........................................................................................77

4 Rev.A 5 Rev.A
TURN ON / OFF
Manual On / Off Z-E2060
Press the knob (fig. S/7 ), to turn the ZENEC system on, press and hold the button to
switch off the device.
The ZENEC system is equipped with an anti-theft protection function. If this is active, on restarting
the ZENEC system after interruption of the power supply you will be asked to enter your password.
To change the password:
Device User Manual → Setup → System Setup → Password
Z-E3726 5
GERÄTEBEDIENUNG –Z-E3726
GRUNDSÄTZLICHE BEDIENUNG
EIN-/AUSSCHALTEN
Manuelle Ein-/Ausschaltung
Drehregler links gedrückt halten, bis sich das ZENEC-System ein- oder ausschaltet
(Abb. S/01 )
Automatische Ein-/Ausschaltung
Fahrzeuge mit CAN-Bus Anbindung: Bei Einschalten der Zündung wird das ZENEC-System
aktiviert. Der Bootvorgang kann max. 1,5 Minuten in Anspruch nehmen. Dies kann zur Folge
haben, dass das System nur mit Verzögerung einsatzbereit ist. Das Ausschalten des ZENEC-
Systems wird durch das Ausschalten der Zündung oder Abziehen des Zündschlüssels aktiviert.
HINWEIS
Für eine Nutzung des Multifunktionslenkrads sowie weiterer Fahrzeugfunktionen wird ein
fahrzeugspezifisches CAN/Stalk Interface benötigt. Weitere Informationen erhalten Sie bei einem
autorisierten ZENEC-Fachhändler.
DIEBSTAHLSICHERUNG
Das ZENEC-System ist mit einer Diebstahlschutzfunktion ausgestattet. Ist diese aktiv, werden Sie nach
Trennung der Stromversorgung bei erneutem Einschalten des ZENEC-Systems aufgefordert, das von
Ihnen hinterlegte Password einzugeben.
Um das Passwort zu ändern:
Bedienungsanleitung
Einstellungen
Geräte Konfiguration
Help
Passwort
HINWEIS
Bewahren Sie das
Passwort sorgfältig auf.
Bei einem Verlust des
Passworts muss das
ZENEC-System ausgebaut
und zur Freischaltung des
Diebstahlschutzes an den
ZENEC-Service
eingesendet werden.
Dieser Dienst ist
kostenpflichtig!
ANTI-THEFT PROTECTION
NOTE
Keep your password safe. If the password is
lost the ZENEC system must be uninstalled,
and sent back in to ZENEC Service to
unblock the anti-theft protection. This service
is not free!
Automatic On / Off
The device automatically switches on/off by CAN bus interface ignition signal.
Switching on the ignition will activate the ZENEC system. The boot process can take up to 30sec.
This may result in some delay until the system is ready. The ZENEC system is shut down by
switching off the ignition, or removing the ignition key.
SAFETY INSTRUCTIONS
CAUTION
If the driver of the vehicle is distracted, this may lead to an accident or injury. Operating the
ZENEC system can distract attention from the general traffic situation! Equally, connecting,
changing or inserting data media can distract the driver from the general traffic situation.
CAUTION
Always choose loudspeaker settings such that acoustic signals coming from outside can always
be heard in the vehicle (e.g. signal horns or sirens).
CAUTION
Incorrect installation or commissioning of the ZENEC system may cause damage to the ZENEC
system or to the vehicle electronics. Only let qualified specialists authorized by ZENEC install the
device.
CAUTION
This ZENEC system is intended solely for operation at an on-board voltage of 12 V DC. Operating
the ZENEC system at any other voltage can cause damage to the ZENEC system or to the
vehicles electrical system.
CAUTION
Taking apart or modifying the ZENEC system can result in damage to the device or the vehicle.
Opening the device or modification by a person not authorized by ZENEC will render warranty
claims null and void.
In the event of a malfunction or defect please contact an authorized ZENEC dealer. Unauthorized
repairs will render warranty claims null and void.
CAUTION
Route recommendations and displayed traffic signs on the ZENEC system may differ from the
real situation. Traffic signs and traffic regulations have precedence over route recommendations
and indications of the ZENEC systems.
Speed data displayed in the navigation system corresponds to the permitted speed limit. Please
adjust your speed and driving behavior to the prevailing visibility, weather, road, and traffic
conditions.
CAUTION
The connection and charging leads of external mobile devices can get in the way of the driver.
Please run these so that the driver's freedom of movement is not hindered.
NOTE
The ZENEC system supports functions like multi-function steering wheel, display of air
conditioning settings or optical parking system and multi-function display support. All of them are
in dependence to the vehicle and can only be used, when they are provided by the vehicle.
See detailed information at page 71

6 Rev.A 7 Rev.A
Item Icon Function
1
SMART
DIAL
VOL RESET
HOME
MAP
Z-E2060
DISP
MIC
DAB
BT
NAV
FAV
SRC
CAM
CAR
Power ON/OFF
2○IR receiver for remote control
3MIC Internal microphone
4
SMART
DIAL
VOL RESET
HOME
MAP
Z-E2060
DISP
MIC
DAB
BT
NAV
FAV
SRC
CAM
CAR
Disc indicator
5Disk Slot
6Tap, to eject the DVD
7DISP Adjust TFT screen brightness (3 levels)
8FAV Tap to select preferred content or execute a function
Press and hold to jump to audio settings
9SRC Tap to change the source
10 CAM Press to enter camera source
11 CAR Tap to jump to CAR Information-Menu-1
Press and hold jump to jump to CAR Information-Menu-2
12 RESET Hole in the panel for the reset pin
13 SMART
DIAL Turn for list scrolling
14 MAP microSD card slot for GPS navigation software behind „MAP“ cover
15 VOL Turn to increase or decrease playback volume
Tap to mute/- unmute device
16 NAV Tap to jump to navigation
Press and hold to open Quick Control Bar inside navigation source
17 BT Tap to open the Bluetooth hands-free page
18 DAB Tap to open DAB+ radio source
19 HOME Tap to jump back to main menu
Press and hold jump to audio settings
Z-E2060 (FRONT PANEL)MULTIFUNCTION STEERING WHEEL
Device Front Panel Control Options
SMART
DIAL
VOL RESET
HOME
MAP
Z-E2060
DISP
MIC
DAB
BT
NAV
FAV
SRC
CAM
CAR
Item Icon Function
1RES + Vehicle MFA control function
No ZENEC function
2SET - Vehicle MFA control function
No ZENEC function
3Telephony Press to answer or hang up a call
Press and hold to deny
4CANCEL Vehicle MFA control function
No ZENEC function
5VOL + Press to increase volume
6VOL - Press to decrease volume
7
Radio
source Press to choose the next radio station.
Media
source
Press to choose the next track/title.
Press and hold to fast forward.
8
Radio
source Press to choose the previous radio station.
Media
source
Press to choose the previous next track/title.
Press and hold to fast rewind.
RES +
SET -
CANCEL
VOL +
VOL -

8 Rev.A 9 Rev.A
MAIN MENU STRUCTURE
Display – touch sensitive operation Bedienung
Function Icon Operation
Sliden Swipe to navigate in the main menu by sliding to the left or right
Move Press, hold and move the icon into the desired position
Main menu with 3 Icons
Main menu with 6 Icons
The icon amount shown per main menu page can be adjusted in the setup (see page 51 „Main Menu
Style“).
Function Icon Operation
Navi Tap to open navigation App
Bluetooth Tap to open the Bluetooth hands-free page
FM Tuner Tap to open FM radio source
USB Tap to enter USB source
iPod Tap to open audio playback source (Apple)
BT-Music Tap to open BT-Music source
DAB+ Tap to open DAB+ radio source
CAR Tap to open CAR Infos
MAIN MENU ICONS
You can navigate through main menu pages by swiping or tapping on the orange page markers in
the bottom area of each page.

10 Rev.A 11 Rev.A
MEDIA AUDIO SOURCES
Function Icon Operation
USB Tap to enter USB source
iPod Tap to open audio playback source (Apple)
BT-Music Tap to open BT-Music source
Smartlink Tap to open Smartlink App
FM Tuner Tap to open FM radio source
DAB+ Tap to open DAB+ radio source (only for Z-N426)
HDMI Tap to open HDMI source
DVD Tap to open DVD source
SD Tap to open SD source
You can access / enter connected internal or external sources by tapping on the main icon according
to the following list.
INPUT SOURCES
Function Icon Operation
HDMI Tap to open HDMI source
Camera Tap to enter camera source
Smartlink Tap to open Smartlink App
AV-IN Tap to open AV-IN
CAR Tap to open CAR Info page
Input Sources
NOTE
Icons in the main menu remain greyed out for input source items not connected to device.
To select and open external sources like HDMI, Camera, AV-IN or Smartlink, they need to be paired
or physically connected to the device.

12 Rev.A 13 Rev.A
Function Icon Operation
Back Tap to jump one level up or back
Clock Time Display of time (no interaction possible)
Traffic
Announcement Traffic announcement (if function is set to active)
Volume Shows the current playback volume
ALT Tap to select / start a previously assigned function
Settings → Misc → ALT software button
Screenshot fehlt
STATUS BAR (”INFO BAR”)
The „info bar in the upper hand screen area shows TA, volume and time but also contains two
important controls for device operation: BACK (left side) and ALT (right side).
SEARCH AND INPUT FUNCTION
The input keyboard for search and input is a simple standard numeric layout.
Function Icon Operation
Search &
Input Field Input screen
Delete
Tap to delete a number
Press and hold to delete the full string
Back Tap to end the search or the input
Enter Tap to confirm the input

14 Rev.A 15 Rev.A
FM RADIO
The FM RDS source menu offers a control-/operating section on the right hand side, for fast and
convenient adjustments during the FM radio playback.
Function Icon Operation
Station forward Tap to start the auto FM station search, running up in the
frequency band
Station Station Name / Station Frequency
Station back Tap to start auto FM station search, running down in the
frequency band
Cover Shows radio station graphics or cover picture of artist
(Only with microSD card from Z-EMAP50 bundle)
Info display
area
Finger swiping left and right to access stored FM stations
previous / next
Function Icon Operation
FM/DAB+
Switch Tap to switch between FM/DAB+
Info Tap to show station information
Frequency
Scale Tap to open FM station frequency bar
Preset Tap to show the stored FM station list
Tuner Setup Tuner settings
TA Tap to activate or de-activate the auto switching of RDS based
traffic announcements
Control- and Operating Section
Center Section of Display
FM BAR GRAPH MODE
The FM setup mode (press gear icon) allows to assign two different operation modes to both station
frequency arrows: manual steps in 100kHz, or auto scan (stopping at next station). See page 18.
Function Icon Operation
Station Frequency
UP
Tap to start manual 100kHz jump, or FM station auto search
up
Station
Frequency Tap to open the direct frequency input mode keyboard
Station Frequency
DOWN
Tap to start manual 100kHz jump, or FM station auto search
down
Bar Graph Scale
Press and hold to slide the frequency pointer of the bar graph
into any position. Tap to set a desired frequency value on the
scale

16 Rev.A 17 Rev.A
MANUAL FM STATION SEARCH
Function Icon Operation
Station
Frequency UP Tap to auto seek / manual seek up, depending on setting
Station
Frequency Tap to open and close direct station frequency input via keypad
Station Frequency
DOWN Tap to auto seek / manual seek down, depending on setting
Scale Radio frequency scale display
Delete Tap to delete a number
Press and hold to delete the full number string
Keypad Direct frequency input option
OK Touch to confirm frequency
Hide Hide Keyboard / Keypad
When you tap to the frequency display area, the numeric input keyboard opens for a direct input of
the station frequency.
FM STATION-PRESET
Select a previously stored radio station by tapping on the station preset button.
Function Icon Operation
Previous
page Tap to switch to previous preset page
Next
page Tap to switch to next preset page
Stores Tap to select a stored station. Press and hold the station to save
the actual radio station on any of the station preset buttons
Store
register Tap to goto another store register (3 register each with 6 stores)

18 Rev.A 19 Rev.A
FM SETUP
Function Icon Operation
AF Alternative Frequency ON / OFF
REG Setting for search function sensitivity of auto scan
SCAN Setting to choose the automatic or manual station frequency
search.
TA Tap to activate or de-activate the auto switching of RDS traffic
announcements
Here you can set important FM RDS based settings such are AF and REG.
DAB+ RADIO SETUP
Function Icon Operation
UKW / DAB+
Switch Tap to switch between FM / DAB +
Info Tap to show station information - main display
List Tap to open the station list (showing all currently receivable
radio stations in the environment)
Preset Tap to show the stored DAB station list
Setup Tap to change settings for DAB+ functions
Function Icon Operation
Station up Tap to jump to next station
Press and hold to jump to next Ensemble
Station Station Name / Ensemble Name
Station down Tap to jump to previous station
Press and hold to jump to previous Ensemble
Slideshow Radio station artwork / artist display (”MOT Slideshow”)
Info Display
Area Finger swiping left and right to switch between Preset stations
The DAB+ source menu offers a control- + operating section on the right side of the display, allowing
for simple and convenient direct adjustments in the playback menu.
Control- and Operating Section
NOTE
Select DX to increase the general sensitivity during auto scan to stop at weaker, usually more
distant radio stations
Select LOC when you prefer to stop at local stations with a stronger signal level

20 Rev.A 21 Rev.A
DAB+ ENSEMBLE AND STATION LIST
A tap on each Ensemble opens the related DAB+ station list of the respective Ensemble. The station
list content follows exactly the original Ensemble display format and list sequence.
Function Icon Operation
Radio station
selection Tap to select one particular radio station out of the list
List scrolling Press and hold to move the slider of the station list up and down
Back Tap to jump back to Ensemble selection
Once the first DAB+ band scan has completed, device will show all DAB+ Ensembles and radio
stations of sufficient signal strength. The Ensemble list and its content is auto updated periodically (by
re-scaning).
Function Icon Operation
Ensemble list
selection
Tap to open an Ensemble, showing the assigned DAB+ radio
station list
List scrolling Press and hold to move the slider of the Ensemble list up and
down
DAB+ SETUP
Function Icon Operation
DAB-DAB
Following Tap to turn DAB-DAB station following ON or OFF
DAB
antenna socket
phantom power
Tap to turn the 12V phantom power supply of the DAB
antenna socket ON or OFF
DAB Firmware Displays the current DAB+ Firmware version
The setup page for the DAB+ tuner allows to define important functions such as DAB<>DAB and
FM<>DAB station following. Or to activate the phantom power supply voltage of the DAB antenna
socket.

22 Rev.A 23 Rev.A
DAB+ STATIONS-PRESETS
Select a previously stored DAB+ radio station by tapping on the station preset button.
Function Icon Operation
Previous
page Tap to switch to previous preset page
Next
page Tap to switch to next preset page
Stored
Station
Tap to select a stored DAB+ station. Press and hold the station
to save the actual radio station on any of the station preset
buttons
Store
register Tap to goto another store register (3 registers with 6 stores each)
USB / BT A2DP / iPOD / SD (AUDIO) MEDIA
Function Icon Operation
Album, Art /
Cover
If a cover is stored on the music media, it can be displayed.
This function is not supported for BT Audio playback.
Interpret Information about the artist
Track Information about the track
Album Information about the album
Genre Information about the genre or any other special infos
Back
Tap to skip to the previous track
Press and hold to start fast reverse
Swipe to the left to skip forwards to the next track
Play Tap to play a track
Pause Tap to pause at a track
Forward
Tap to skip to the next track
Press and hold to start fast forward
Swipe to the right to skip back to the previous track
Playback Time
Line Tap or slide to skip within a track
Various types of information shown in the source menu of the audio playback by (USB, BT A2DP,
iPOD, etc.).

24 Rev.A 25 Rev.A
Function Icon Operation
Playlist Tap to display the folder and list
This function is not supported in BT Audio playback mode.
Video <-> Audio
Source
Tap to switch between audio or video playback. This function is
not supported in BT Audio and iPod mode
Shuffle Tap to turn on the random play feature within the folder that is
playing
Repeat Tap to automatically repeat a track or a complete music
collection
Source Touch to jump to next available source
(Available sources USB, iPod, DVD, BT-Music and SD)
The control and operation bar on the right side of the audio playback media menu gives access to
play lists favorites and external USB memory.
USB / BT A2DP / iPOD / DVD / SD (AUDIO) MEDIA CONTROL AND OPERATION BAR BT MUSIC (A2DP)
NOTE
The listed functions depend on the paired mobile phone, installed software versions and the
degree of compatibility.
The A2DP RVC interface offers Play, Pause and Skip control of previously paired smartphones in
audio playback mode. The iD3-Tag meta data display is possible only when tag data is contained in
the streamed music track.

26 Rev.A 27 Rev.A
iPOD (AUDIO)
The order of the Artist display of is given by the sorting sequence on the mobile Apple device and
can not be changed or adapted in any way.
Function Icon Operation
Folder
(uppermost) Tap to go to the next higher level
Folder Touch to show the hard disc root content overview
Search Tap to open keypad for search
Scroll
Scroll in the list:
Touch and hold to move the slider up or down
Tap and hold your finger on the list to move the list up or down
Video <-> Audio
Source
Tap to switch between audio or video playback. This function is
not supported for BT Audio iPod, and DVD
Back Tap to switch back to audio playback
The playlist menu offers convenient navigation in your track list. You can a search for an artist or a
song by alphabet letter index. Selecting a track for playback is just as simple. Vertically swipe on the
audio tracks and tap to select. Or simply slide the bar graph pointer up and down.
PLAYLIST (AUDIO)

28 Rev.A 29 Rev.A
For video playback via USB/DVD/SD, parking cable must be connected during the device
installation. Without this connection, the screen remains black.
VIDEO MEDIA: HARDDISK
Function Icon Operation
Jump inside
Title
Tap to skip directly to the desired position
Slide to reach the desired position
Video<->Audio
Source
Tap to switch between audio or video playback. This function is
not supported in BT Audio and iPod playback mode
Back Tap to skip back to the previous section
Play Tap to play a film
Pause Tap to pause a film
Forward Tap to skip forward to the next section
Playlist Tap to display the folder and list
This function is not supported in BT Audio mode
Shuffle Tap to turn on the random play feature within the folder that is
playing
Repeat Tap to automatically repeat a film or complete video collection
PLAYLIST (VIDEO)
Function Icon Operation
Folder Touch to show the hard disc file overview
Back Tap to skip back to the previous section
Play / Pause Tap to play a film or a video
Tap to pause a film or a video
Forward Tap to skip forward to the next section
Video <-> Audio
Source
Tap to switch between audio or video playback. This function is
not supported for BT Audio and iPod
Scroll
Scroll in the list:
Touch and hold to move the slider up or down
Tap and hold your finger on the list to move the list up or down
Back Tap to switch back to video playback
CAUTION
Playing video files while driving is not permitted by the law. For this reason the screen will
switched off when the vehicle moves.
Playlist (Video) displays the video files on the USB/DVD/SD data carrier with their file name. In this
list sliding up or down is easily possible.

30 Rev.A 31 Rev.A
HDMI / AV-IN
Function Icon Operation
HDMI Tap to open HDMI source mode
Tap to the HDMI icon to open the HDMI source, if a compatible HDMI source is connected, for
example a videogame, smartphone, tablet, notebook.
Tapping the camera icon starts the manual camera mode, if a CVBS capable camera is connected
to the camera input of the unit.
Function Icon Operation
Camera Tap to open camera source
CAMERA
Function Icon Operation
AV-IN Tap to open AV-IN source mode
Tap to the AV-IN icon to open the AV-IN source, if a compatible AV-IN source is connected, for
example a videogame, smartphone, tablet, notebook.

32 Rev.A 33 Rev.A
SMARTLINK DIRECT
Function Icon Operation
Smartlink Direct Tap to enter the Smartlink Direct mode
When a compatible smartphone is connected to the device via USB port, tapping on the Smartlink
Direct main icon opens the pairing options of the Android smartphone, or the display mode if the
phone has been successfully paired before.
Function Icon Operation
Smartlink Direct
Drive Mode
Control Panel
Button
Tapping on this circular button opens five control icons. Press
and hold this Smartlink Direct button allows to move it into any
position on the display screen.
The Drive Mode control interface offers several options to configure and operate this App on the
device, including the control of smartphone functions. See the three icons on the right hand side
vertical area, which target operation and control of the (paired + connected) smartphone.
OPTICAL PARKING SYSTEM (OPS)
Function Icon Operation
Park Assist OFF / CAM / OPS / OPS & CAM
See settings at page 64
If your vehicle is equipped with a orignal factory installed optical parking system, you can use it with
your ZENEC system.
OVERVIEW
NOTE
The effective range of functions is depending on the vehicle manufacturer, vehicle type and
vehicle configuration. The ZENEC system supports all listed functions above. Differences from
this information, features or functions cannot be used for claims.
OFF The function is permanently turned off.
CAM If there is a rear view camera connected, the camera picture will be
displayed automatically.
OPS Indicates the optical parking system depending on the vehicle
configuration.
OPS & CAM
Indicates a combined picture of the rear view camera and the
optical
parking system.
Camera Touch to show the camera picture.
Driver Position Touch to leave this view.

34 Rev.A 35 Rev.A
SMARTLINK DIRECT CONTROL INTERFACE
Function Icon Operation
Drive Mode Panel Back Icon Tap to exit Drive Mode panel
Smartlink Control Bar Icon for
menu control bar (to access
Version info and display setup)
Tap to display infos and open display setup.
See page 34.
Drive Mode Home Icon Tap to jump back to main menu
Smartlink Setup Icon Tap to open the Smartlink Direct setup page
Smartphone disconnect Icon Tap to disconnect the smartphone and to jump
back to smartphone select page
Battery Level and Charge Status
icon Shows battery level and charge status
Drive Mode Icon to activate or
lock screen rotation
Tap to activate screen (auto) rotation, or lock of
screen rotation in dependency to smartphone
Smartlink Icon for menu bar Tap to open menu bar
Display of Time Display of Time (no operating function)
Smartphone Control Bar Icons
to operate the connected smart-
phone (Icons and control logic
may vary in accordance with
connected smartphone model)
Tap to access/ open further functions of the
connected smartphone
SMARTLINK DIRECT CONTROL BAR ICONS
Function Icon Operation
Drive Mode ON/OFF
Icon Tap to close Drive Mode panel
Drive Mode Setup Icon Tap to access Drive Mode setup
Version-Info (Software) Icon
Tap to show current software version info of the
Smartlink Direct application installed on this
device.
Smartlink Direct control bar to access versioninfo and display setup.

36 Rev.A 37 Rev.A
In the Drive Mode panel, you can link Apps on your smartphone to become a Smartlink Direct
embedded function on the ZENEC device. Tap on the respective function field in the Drive Mode
panel, where you want to assign a specific function. With the linked smartphone app, you can
operate the app control functions directly via Zenec device (Android OS).
SMARTPHONE APP LINKING
NOTE
When a main system software update is installed on the device, the Smartlink Direct license will
get overwritten (erased). The Smarttlink Direct App will attempt to reload the UUID based license
after a software update automatically. Make sure to connect a Smartphone right after the update
has completed. Contact the ZENEC Support in case of Smartlink Direct function mishaps, after
such an update.
BLUETOOTH (HANDS-FREE SYSTEM)
ABOUT THIS CHAPTER
This chapter describes how to operate and use the hands-free system. In addition, all the equipment
variants and functions of the ZENEC BT system are described.
CAUTION
Network coverage depends on a number of factors – such as the network provider, or the
geographical position of the vehicle. Tunnels, underpasses, parking garages, or street canyons
in cities may lead to interruption of the connection. Thermal glazing or metallic stickers on the
windows of the vehicle may also disrupt the connection.
SAFETY INSTRUCTIONS
CAUTION
Using the mobile phone with the hand while driving is not permitted. Only enter data or make
changes via ZENEC system, when car is not moving or when the traffic situation allows such
actions.

38 Rev.A 39 Rev.A
Function Icon Operation
Device
manager Tap to access the device manager view
Phonebook Tap to access the phonebook of the currently paired mobile
phone
Favorites Tap to access the stored favorites
Call logs Tap to access the call logs
Numeric pad Tap to open the numeric keypad
Bluetooth
setup Tap to change the most important settings for BT operation
CONTROL AND OPERATION BAR (RIGHT)
The vertical control and operation bar on the right area of the Bluetooth page serves to invoke device
manager, or access phone book, favorites, call logs, numeric keypad and Bluetooth settings.
Function Icon Operation
Device
manager Tap to pair, disconnect, or manage mobile devices
Function Icon Operation
Pair Tap to reconnect a paired Bluetooth device
Disconnect Tap to disconnect a paired Bluetooth device
Delete Tap to delete a Bluetooth device from the list (requires the device
to be disconnected)
DEVICE MANAGER
The BT function on the device must be activated to invoke connection process. Please pay attention
to the smartphone manufacturer's instructions regarding device pairing.
Icon Meaning
This icon indicates that the paired Bluetooth device supports HSP/HFP, and can
be used via the hands-free system.
Other manuals for Z-E2060
1
Table of contents
Other ZENEC Car Receiver manuals

ZENEC
ZENEC DVD & MP3 User manual

ZENEC
ZENEC ZE-MC290 User manual

ZENEC
ZENEC ZE-050DVD User manual

ZENEC
ZENEC ZE-MC194 User manual

ZENEC
ZENEC ZE-100DVD User manual

ZENEC
ZENEC ZE-NA2000 - User manual

ZENEC
ZENEC ZE-MC190 User manual

ZENEC
ZENEC ZE-20MP3 User manual

ZENEC
ZENEC Z-E6150 User manual

ZENEC
ZENEC ZE-MC170 User manual

ZENEC
ZENEC ZE-NC3810 User manual

ZENEC
ZENEC ZE-NE3810 User manual

ZENEC
ZENEC ZE-080DVD User manual

ZENEC
ZENEC ZE-160DVD User manual

ZENEC
ZENEC ZE-MC294 User manual

ZENEC
ZENEC ZE-30MP3 User manual

ZENEC
ZENEC EGO - COMPATIBILITY VIDEO FILES Installation guide

ZENEC
ZENEC ZE-NC2010 User manual

ZENEC
ZENEC PRIME Application guide

ZENEC
ZENEC ZE-MC172 User manual