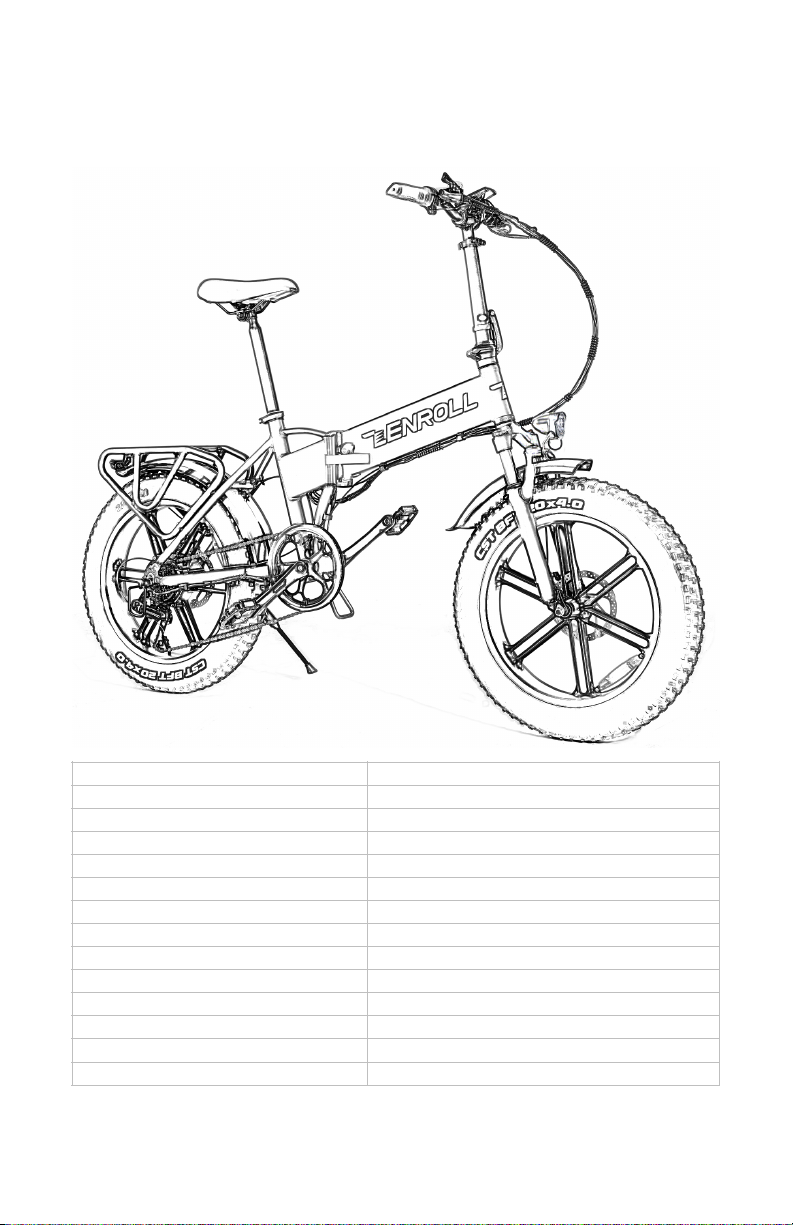
ZENROLL C1 User manual

ZENROLL
ELECTRIC BIKE
USER MANUAL
Model C1

Welcome
Thank you for choosing the ZENROLL electric bike.
“Zenroll” conveys the inspiration about getting into people's cycling life as it is,
with all of its vividness, beauty, joy, challenge and difficulty.
We are committed to deliver a sustainable lifestyle and bring the convenience with
our innovational and stylish products.
“See beauty. Find joy. Conquer difficulty.”
Every ride we made shows our enthusiasm on cycling, whenever during the
Monday traffic jam or the Saturday country life, wherever on the snowfield or on
the beach, and whoever you are a city commuter or a wildlife discover.
About This Manual
Please read and understand this User Manual fully before assembling and riding
your e-bike. It is important that you follow all safety warnings and cautions that
appear throughout the User Manual.
If you have any concerns, questions, or suggestions about the ZENROLL electric
bike, please contact us at the website where you bought the bike, we will always
do our best to serve you.
NOTICE
This User Manual is only a general guide to assist in the assembly of your e-bike.
This is not a complete or comprehensive manual of all aspects of assembly,
maintenance, and repair.
Consult a certified, reputable bike mechanic to assist with assembly, repair, and
maintenance of your e-bike.

TABLE OF CONTENTS
Importance------------------------------------------------------------------------------------------------------1
WARNING! ------------------------------------------------------------------------------------------------------3
Specifications -------------------------------------------------------------------------------------------------4
Assembly Instructions--------------------------------------------------------------------------------------5
Package Contents ................................................................................................................................5
Frame & Handlebar ..............................................................................................................................5
Seat Post & Pedals................................................................................................................................5
4-Step Folding For Easy Travel .........................................................................................................6
Battery & Charging ...............................................................................................................................6
Operation-------------------------------------------------------------------------------------------------------8
Your First Ride........................................................................................................................................8
Pedal-Assisted .......................................................................................................................................8
Cruise Control........................................................................................................................................9
Hand Throttle Control..........................................................................................................................9
Maximizing the Riding Range ............................................................................................................9
Maintenance -------------------------------------------------------------------------------------------------10
Care for the e-bike..............................................................................................................................10
Special Care for the Battery and the Charger .............................................................................10
TroubleShooting --------------------------------------------------------------------------------------------12
Safety Alerts --------------------------------------------------------------------------------------------------13
Helmets and Local Laws....................................................................................................................13
Pre-ride Safety Check and Inspection ...........................................................................................13
Riding in Wet Conditions ...................................................................................................................13
Riding at Night......................................................................................................................................13
Max Weight............................................................................................................................................13

IMPORTANCE
Assembly and Fit
Correct assembly and fit are essential elements of ensuring your bicycling safety,
performance, and comfort. Even if you have the experience, skill, and tools to
complete these essential steps before your first ride, ZENROLL recommends
having a certified, reputable bike mechanic check your work.
Mandatory Equipment and Use Locations
Before all rides, ensure you have all required and recommended safety equipment
and are following all laws pertaining to using an electric bike in your region. For
example, these laws may specify the need for mandatory equipment, use of hand
signals, and where you can ride.
Changing Components or Attaching Accessories
The use of non-original components or spare parts can jeopardize the safety of
your e-bike, invalidate your warranty and, in some cases, cause your e-bike to not
conform with laws pertaining to your bike. The replacement of original
components or installation of third-party accessories or accessories from
ZENROLL not explicitly recommended for your bike model is at your own risk.
Using aftermarket accessories or components may void your warranty, create an
unsafe riding condition, damage to property or your e-bike, or result in serious
injury or death.
Safety Check Before Each Ride
Always check the condition of your bike before you ride in addition to having
regular maintenance performed. If you are unsure of how to conduct a complete
check of the condition of your bike before every ride, you should consult a
certified, reputable bike mechanic for assistance.
Electrical System
The electrical system on your e-bike offers various levels of power assistance and
lighting for different operating conditions and user preferences. It is critical that
you familiarize yourself with all aspects of your e-bike’s electrical system and
check to see that it is working correctly before every ride. The front and rear brake
levers contain safety power cutoffswitches, which disable the hub motor’s
assistance when applied. Both levers should be checked for correct operation.
Brakes
Ensure brakes are working correctly, all braking system components are free from
damage, and properly secured. When you fully squeeze the brake levers, ensure
neither the front nor rear brake levers touch the handlebar. Take your bike to a
certified, reputable bike mechanic to have the brakes repaired if you find a
problem.
- -1

Tires and Wheels
Your wheels should always spin straight and must be repaired or replaced if they
wobble side to side or up and down when spinning. If your wheels become untrue
or spokes loosen, which can happen with normal use, we recommend that a
certified, reputable bike mechanic performs all wheel tuning and truing operations
on your bike. Do not attempt to true wheels or tighten spokes unless you have
adequate knowledge, tools, and experience. Ensure the tires and inner tubes are
in good working condition without any visual damage and have the correct
amount of air pressure. Always replace tires and inner tubes with punctures, cuts,
or damage before you ride. Tires without the correct amount of air pressure can
reduce performance, increase tire and component wear, and make riding your
bike unsafe.
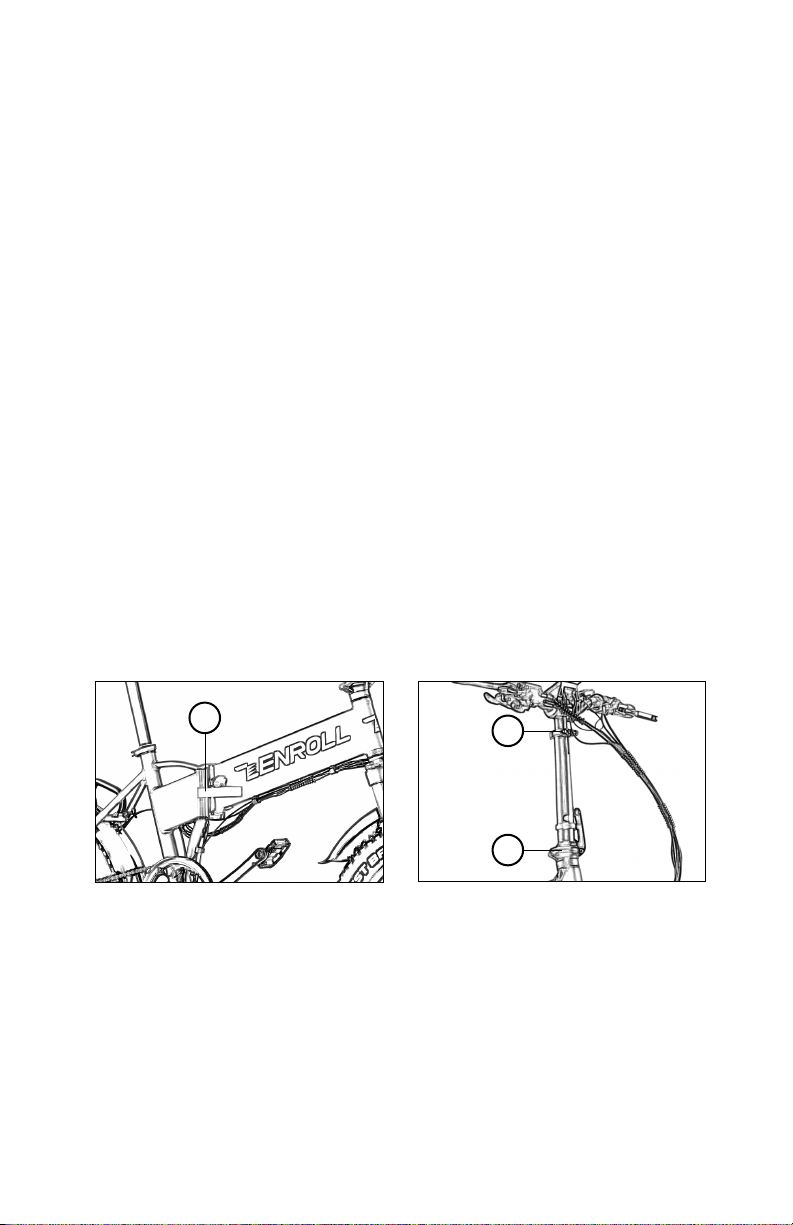
Quick Release Levers
Quick release levers are located on your e-bike for securing the seat-post and the
front wheel to the bike. These provide convenience to the user since they allow
the front wheel to be removed and the seat-post to be adjusted without tools.
Since quick release levers can be loosened during transportation, or accidentally
between or during rides, it is important that you regularly check to ensure these
components are properly secured.
Accessories, Straps, and Hardware
Ensure all hardware is secured and all approved accessories are properly
attached per the specific component manufacturer’s instructions. It is good
practice to look over all hardware, straps, and accessories before each ride and if
you do discover something is wrong or find something you are not sure about,
have it checked by a certified, reputable bike mechanic.
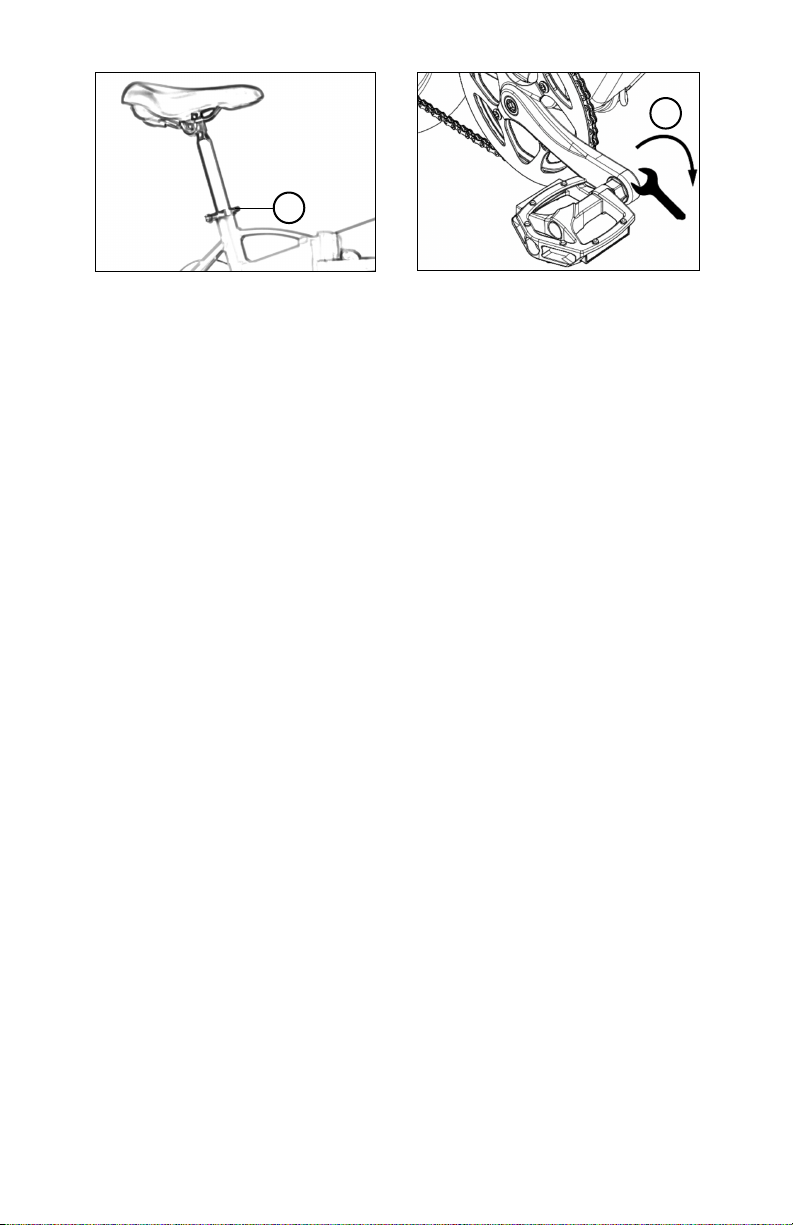
Suspension, Handlebar, Grips, and Seat Adjustments
The suspension fork on your e-bike will affect the handling of the bike so you must
understand how it works before use. The suspension fork should be properly
adjusted for your weight and terrain. Ensure the handlebar and handlebar stem
are properly aligned, fitted to the user, and secured to their recommended torque
values. Handlebar grips should not move easily on the handlebar end. Loose,
worn, or damaged handlebar grips should be replaced before you ride and can be
purchased from www.radpowerbikes.com. The seat and seat-post should be
properly aligned, fitted to the user, and the seat-post quick release should be
properly tightened, fully closed, and secured before riding.
Battery Charged, Secured, and Unplugged
Ensure the battery is adequately charged and operating properly. The battery
gauge on the LCD display and charge status indicator on the battery should read
similarly. Ensure the battery charger is unplugged from the outlet, battery, then
stored in a safe location before you ride. The battery MUST be locked into the
frame battery mount properly before use. Do not operate the electrical system if
the battery is removed.
- -2

WARNING!
1. Read this entire manual before assembling or using your new electric bike.
2. Do not modify, disassemble, or replace the original electrical components on
your e-bike. Doing so will invalidate your warranty and could put you in danger.
3. Avoid water! The e-bike is not waterproof. The electronics may be damaged
due to water and water damage is not covered by our warranty. Riding in wet
conditions is also very dangerous and may result in injury.
4. Avoid prolonged exposure to sun or rain and avoid storage in places with high
temperatures or corrosive gas.
5. Avoid touching the charging port directly and do not let it make contact with a
metal object.
6. We do not cover physical damage due to negligent care and extreme riding.
Whenever you ride the e-bike, you risk severe injury or even death from loss of
control, collisions, and falls. Use caution and ride at your own risk.
7. Do not exceed the posted speed limit and obey all traffic laws. Check all safety
labels are in place and make sure you understand the safety warnings.
8. Check the electric bike over and make sure the electric bike is operating
correctly before each use.
9. Check the braking system is functioning properly before each use.
10.Check that the tires are in good condition, inflated properly, and have sufficient
tread remaining before each use.
11. Make sure that any and all axle guards, chain guards, or other covers or guards
supplied by the manufacturer are in place and in serviceable condition.
12.Keep all body parts away from moving parts while operating the e-bike.
13.Never exceed the 330 lbs (150 kg) maximum load rating.
14.Maximum Speed - Your e-bike goes at a maximum speed of 25 mph.
15.The electric bike should never be used by children under the age of 18.
16.Make note that additional insurance may be required to cover situations you
encounter while riding an electric bike. It is recommended that you contact an
insurance company or broker for advice and consultation.
17. To conserve electricity, use assist mode and avoid zero starting, frequent
braking, driving against the wind, carrying heavy loads including other people,
and riding with insufficient air pressure.
- -3
!

SPECIFICATIONS
*Measurement is based on a 133 lbs (60 kg) load (rider’s weight and any carry-on weight) on a flat road. Actual results may
vary based on differences in temperature, load, wind speed, road conditions and other factors.
Model
C1
Frame Construction
Aluminum Alloy
Gear Range
7-speed type
Tire Size
20 in (56.5 cm)
Climb Grade
30 degree
Maximum Load
330 lbs (150 kg)
Maximum Speed
25 mph (40 km/h)
Power
500 W
Battery Capacity
48 V 10.4 Ah
Battery Charger Input Voltage
110/220 volts AC
Battery Operational Temperature
32° F to 104° F (0° C to 40° C)
Battery Life
Approximately 500 complete charge/discharge cycles
Maximum Riding Range in Pedal Assist Mode 1*
40-50miles (65-80 km)
Maximum Riding Range in Hand Throttle Mode*
20-25miles at 12.5mph (30-40 km at 20 km/h)
- -4

ASSEMBLY INSTRUCTIONS
PACKAGE CONTENTS
Congratulations on your purchase of a new ZENROLL e-bike! Your e-bike comes in
the box fully assembled. Open the bike box and remove the e-bike from the bike
box. Carefully remove the packaging material protecting the bike frame and
components. Open the small box and carefully set out all contents. Ensure all the
following pieces are included with the e-bike:
‣The main body of the e-bike
‣The charger
‣A pair of foot pedals
‣Tools and keys
FRAME & HANDLEBAR
1. To unfold the bike frame, grab the handlebar stem and rear end of the bike
while standing near where the battery is exposed. Lift the bike slightly offthe
ground and swing the bike to its closed position. Push down on the clasp firmly
until it locks into position.
2. Insert the handlebar stem into the steering column. Push the clasp down firmly
so that it is locked in position.
3. Pull the steering column to its upright position. Push the clasp down firmly so
that it is locked in position.
SEAT POST & PEDALS
4. Insert the pedestal stem into the seat column of the main body frame, use the
built-in lever to tighten.
5. Attach a pedal on each side of the crank, note the distinction between left
pedal and right pedal. Match the right pedal with “R” stamped on the axle and
turn clockwise to install it; match the left with “L” and turn counterclockwise.
Tighten the pedals with a 15mm open-end wrench in the tool box.
- -5
1
2
3

After inflating the tires to proper pressure if necessary, your e-bike is a completely
functional bicycle. Check all tightening points to make sure.
Take a short ride. Adjust the height of the handlebar, and the height and the tilt of
the seat, if necessary, for maximum comfort.
4-STEP FOLDING FOR EASY TRAVEL
1. Fold the handlebar stem to the right side.
2. Unlock the seat post latch and slide down the saddle.
3. Push the pedals to the crank direction and turn to its folded position.
4. Unlock the frame latch and fold the bike in half.
BATTERY & CHARGING
The battery is located inside of the front half of the folding frame. The battery
comes with a set of keys that are used to turn it on/offas well as keep it unlocked/
locked to the frame. Each battery has a unique set of keys.
You should plug your battery in when you first receive it to ensure it is fully
charged prior to your first ride. The light on the charger will be RED when the
battery is charging and will turn GREEN when charging has finished.
Charging the battery ON the bike
1. Find the charge port at the bottom of the down tube.
2. Pull out the port cover and insert the charger output plug into the port.
3. Connect the input plug to the power supply.
Charging the battery OFF the bike
1. Insert the key into the lock on the underbelly of the frame.
2. Push the key in firmly and turn counterclockwise to unlock.
3. Remove the key and slide the battery out of the frame until it is free.
4. Insert the charger output plug into the charger port.
5. Connect the input plug to the power supply.
NOTICE Keep at least one key of the battery as a back-up. If you lose both keys,
you will be unable to remove the battery from the e-bike.
- -6
5
4

WARNINGS
‣Do not charge the battery with chargers other than the charger provided by
ZENROLL.
‣Do not leave your battery unattended while it is charging.
‣Only charge the battery indoors in dry spaces which are not excessively hot or
cold (Within 10°F of room temperature).
‣Ensure there is no dirt, debris, or flammable items nearby when using the
charger.
‣The charger will automatically stop charging once the battery reaches its full
capacity.
‣Avoid leaving the charger plugged in when the battery is fully charged.
‣Do not charge the battery if you notice the battery is damaged, excessively hot,
leaking, smells, or is discolored.
‣Charging the battery should take approximately 4-6 hours if the battery is
mostly empty.
‣Store the battery indoors in a dry space, away from heat or flame sources and
out of direct sunlight.
‣The charger may get hot (>165°F) when charging. Use caution and avoid
touching the body of the charger.
- -7
!

OPERATION
READ THIS ENTIRE MANUAL BEFORE OPERATING YOUR E-BIKE.
Your e-bike is equipped with pedal assist, a twist throttle, and can also be used as
a regular bike. To use electric assist, the battery must be charged, inserted into the
frame, and the key must be in the battery.
1. Turned the battery key counterclockwise to the end.
2. Press power button on the left handle bar until the display lights on.
3. Ride on the bike and twist the throttle bar or pedal the e-bike to move.
Change the power level with control buttons:
‣level 1 is the slowest,
‣level 3 is the fastest,
‣level 0 is human model.
Notes: The trip meter will reset when the bike is powered off. The maximum and
average speed will be calculated for a given trip, and will reset when the bike is
powered off. When the bike has not been used for 10 consecutive minutes, the
display will automatically shut down.The pedal assist and throttle features will no
longer work when the display is turned off.
YOUR FIRST RIDE
Please be VERY CAREFUL when you are ready to get on your e-bike for the first
time. The e-bike moves significantly faster than a regular bicycle at the active
power-assisted mode. Take your e-bike to an area with a lot of open space before
you start. Do not pedal hard when you get on the e-bike. You may be unprepared
for the sudden increase in speed at the first time. After a while you will get used to
it and enjoy using the pedal-assisted function.
PEDAL-ASSISTED
You must turn on the battery to use the e-bike in pedal-assisted mode.
In the pedal-assisted mode, power assist is triggered when you pedal forward,
and power assist stops when you stop pedaling, sometime would be delay. In
other words, power assist happens as long as you pedal. You don't need to pedal
hard. All you need is to apply a light force to the pedals continuously to maintain
the current flow.
- -8
!

When you apply one of the brakes, power assist will automatically stop, allowing
the e-bike to slow down and stop. Power assist will turn itself offwhen the e-bike
has reached the maximum speed that the power level you choose.
You should use the gear shifter at the handlebar to set the gears appropriately
according to road conditions and pedal, as usual, you will find that you need to
exert a lot less effort and the e-bike travels faster and at a more steady speed.
CRUISE CONTROL
Cruise Control will be triggered when you holding thumb throttle for 8 seconds,
and it will be released by braking/pedaling or throttling.
HAND THROTTLE CONTROL
In the hand throttle mode, amount of power assist is determined by the throttle
switch controlled by your right hand. You control the throttle by twisting it from its
resting position, the farther the throttle switch is from its resting position, the more
power is delivered to the motor to accelerate the e-bike. When you want to slow
down, you simply release the throttle and let it return to its resting position, and
simultaneously apply the brakes if necessary.
You do not need to pedal the e-bike if you use the hand throttle. However, you can
pedal while commanding power assist. If you do pedal to help the movement, you
conserve energy and the charge in the battery will last longer.
MAXIMIZING THE RIDING RANGE
Many factors affect the rate of use of the electrical energy and the riding range.
‣You should fully charge the battery before a long journey.
‣Rough road conditions and hilly terrain will consume more energy.
‣Frequent change of speed will consume more energy.
‣Carrying more weight on the e-bike will consume more energy.
‣Keeping the tires properly inflated and keeping the e-bike clean and well
lubricated will save energy.
‣Making sure that both wheels move freely when brakes are not applied will save
energy. You should check brake adjustments frequently. Pedaling as you ride will
consume less electrical energy and increase the riding range.
‣When the battery is turned off, your e-bike functions as a regular bicycle. If you
embark on a very long journey, you might want to turn offthe battery for long
stretches where the road is level or downhill and pedal the e-bike as a regular
bicycle so that you can conserve electrical energy stored in the battery.
- -9

MAINTENANCE
CARE FOR THE E-BIKE
To ensure safe riding conditions you must properly maintain your e-bike. Follow
these basic guidelines and see a certified, reputable bike mechanic at regular
intervals to ensure your bike is safe for use and fun to ride.
‣Never immerse or submerge the bike or any components in water or liquid as
the electrical system may be damaged.
‣Periodically check wiring and connectors to ensure there is no damage and the
connectors are secure.
‣To clean, wipe the frame with a damp cloth. If needed, apply a mild non-corrosive
detergent mixture to the damp cloth and wipe the frame. Dry by wiping with a
clean, dry cloth.
‣Store under shelter; avoid leaving the bike in the rain or exposed to corrosive
materials. If exposed to rain, dry your bike afterward and apply anti-rust
treatment to chain and other unpainted steel surfaces.
‣Riding on the beach or in coastal areas exposes your bike to salt, which is very
corrosive. Wipe down the bike frequently and wipe or spray all unpainted parts
with anti-rust treatment. Damage from corrosion is not covered under warranty
so special care should be given to extend the life of the bike when used in
coastal areas or areas with salty air or water.
‣If the hub and bottom bracket bearings have been submerged in water or liquid,
they should be taken out and re-greased. This will prevent accelerated bearing
deterioration.
‣If the paint has become scratched or chipped in the metal, use touch up paint to
prevent rust. Clear nail polish can also be used as a preventative measure.
‣Regularly clean and lubricate all moving parts, tighten components, and adjust as
required.
‣Regularly inspect all pre-attached and optional component hardware to ensure
proper torque spec, secure attachment, and good working condition.
SPECIAL CARE FOR THE BATTERY AND THE CHARGER
KEEPING YOUR BATTERY HEALTHY
‣If you know you won’t be using the battery for more than a few days, keep it
charged at about 75% capacity. At 75%, the battery will degrade less than at
higher charge levels.
‣Periodically check your batteries charge level about once per month and charge
back up to 75% if necessary.
‣If you want to increase the number of cycles your battery will last for, charge your
battery to 100% a few hours before you plan to ride it. For example, if you ride
- -10

the bike and the charge level falls to 50% but you plan to use the bike again in a
few days, wait until the night before you plan to use it again to charge it up to
100%. When the battery is not in use this is healthier for the individual cells in the
long term.
‣Battery charging times may increase with battery age and usage. Under normal
use, the battery will undergo 500 charging and discharging cycles. After much
use, your battery's charge holding capacity will decrease. If you find that your
battery does not hold sufficient charge even for short trips, you should contact
your dealer to order a replacement.
BATTERY SAFETY
‣Do not submerge the battery in liquid of any kind.
‣Do not place the battery near fire or corrosive substances.
‣Do not open or alter the battery or the battery charger.
‣Do not touch the terminals at the back of the battery.
‣Do not connect (short circuit) the two poles of the battery.
‣Do not use the battery to power other electrical devices. Improper use of the
battery will damage the battery and shorten its usage and may cause a fire or an
explosion.
‣Turn offthe battery when not in use and before removing from the bike.
‣The battery should not be excessively difficult to attach or remove from the
battery mount. Do not force the battery to avoid the risk of damage or personal
injury.
‣Only grab the charger by the plug and not the cable when plugging and
unplugging from the wall.
‣When your battery has worn out and is no longer usable, dispose of your battery
according to state and federal regulations. State regulations regarding battery
disposal vary so it is important you find out the rules in your state. Lithium Ion
batteries cannot be put in with normal garbage.
- -11

TROUBLESHOOTING
Problems
Possible Causes
Most Common Solutions
‣The e-bike does not work
‣Insufficient battery power
‣Charge the battery
‣Battery not fully seated in tray
‣Install battery correctly
‣Battery aging or damaged
‣Replace the battery
‣Improper turn on sequence
‣Turn on e-bike with proper sequence
‣The motor does not
respond when the e-bike is
powered on
‣Loose connection of the battery
‣Reconnect the battery
‣Loose wiring
‣Reconnect or repair the wire
‣Loose or damaged throttle
‣Tighten or replace the throttle
‣Damaged motor
‣Repair or replace the motor
‣Pedal assist does not work
‣Throttle does not work
‣Gear does not work well
‣Brake does not work well
‣Display does not light on
‣Damaged speed sensor
‣Repair or replace the speed sensor
‣Rear derailleur mismatch
‣Adjust rear derailleur
‣Brake caliper mismatch
‣Adjust brake caliper
‣Brake Disc is bent
‣Adjust brake disc
‣Poor contact of display line
‣Reconnect the display line
‣Irregular acceleration
‣Reduced top speed
‣Insufficient battery power
‣Charge or replace battery
‣Loose or damaged throttle
‣Replace throttle
‣Reduced range
‣Low tire pressure
‣Adjust tire pressure
‣Low or faulty battery
‣Check connections or charge battery
‣Driving with too many hills, headwind, braking,
or excessive load
‣Assist with pedals or adjust route
‣Battery discharged for long period of time
without regular charges, aged, damaged, or
unbalanced
‣Balance the battery or replace the
battery
‣Brakes rubbing
‣Adjust the brakes
‣Temperature is too low
‣Warm the battery above 32°F (0°C)
- -12

SAFETY ALERTS
HELMETS AND LOCAL LAWS
Always wear a helmet when riding your e-bike. Ensure that the helmet fits your
head and is securely tightened down. Before riding, read local laws and comply
with all rules relating to cycling and eBiking in your area. If you attach a seat for
children to the bike, they must also be wearing a properly fitted helmet at all times.
PRE-RIDE SAFETY CHECK AND INSPECTION
Before each ride, make sure to inspect your e-bike to ensure there are no loose
fasteners or accessories. Make sure to specifically check that both the front and
rear axles are secure. Also make sure both the handlebars and the handlebar
stem are not loose. Check the tire pressure of both wheels before riding to ensure
the tires are inflated to the recommended pressure printed on the side of the tire
walls. Pull the brake levers to make sure your brakes are working properly and
adjust if necessary. Ensure both your seat post and handlebar stem are inserted
past their minimum insertions points as indicated by the markings on them. Make
sure that both the handlebar latch and frame latch are fully closed and locked.
RIDING IN WET CONDITIONS
This electric bicycle can withstand light rain and small splashes, but is not
designed to be subjected to inclement weather, extremely heavy showers, or
submersion in water. Use caution when riding in wet conditions as it will take
longer to use the brakes to slow down, and also when turning as the tires may
slip. The electrical components on the bike are not waterproof. The entire bike has
an IP rating of 65. Water damage is not covered under warranty.
RIDING AT NIGHT
Riding at night comes with more risks than riding during the day due to decreased
visibility so riders are encouraged to exercise increased caution. Before riding at
night, make sure that reflectors are installed on your e-bike. For increased
visibility, also ensure the front headlight is turned on. Riders should wear bright
colored clothing at night.
MAX WEIGHT
The bike can safely carry a total weight of 330 lbs. Failure to adhere to these
weight limits may invalidate your warranty, cause damage to the bike or rack, or
cause serious injury to the rider. Note range and top speed will be affected by
total weight being carried by the bike. If you are over 265 lbs you should lock out
the suspension fork before riding.
- -13

“See beauty. Find joy. Conquer difficulty.”
Table of contents