Zephir ZFL5130S User manual

VENTILATORE A SOFFITTO
ZFL5130S
MANUALE D’ISTRUZIONI

!"#$"%&$'("')*#+,$#-'#."/01"'#'11*$/'2'#'3,%/*#41,-2*#0%#+$*/*22*#56789:;##
#
!"#+$,&<"')*#/"#-,&&,$,#'22,%2'),%2,#-,#"%.*$)'("*%"#1*%2,%02,#"%#=0,42*#)'%0'-,>#"%#=0'%2*#
!"#'"02,$'%%*#'#4.$022'$,#'-#),&-"*#-,#1'$'22,$"42"1<,#/"#=0,42*#'++'$'2*;#
#
?,-#1'4*#4"'#%,1,44'$"*#$"3*-&,$4"#'-#@,$3"("*#/AB44"42,%('#C,1%"1'#56789:>#"%/"1'2,#4,)+$,#
"-#)*/,--*#$"+*$2'2*#40--'#2'$&<,22'#+*42'#40-#$,2$*#/,--A'++'$,11<"*#42,44*#,#"-#)*2"3*#/,--'#
$"1<",42'#/"#'44"42,%('#2,1%"1'D#"%#=0,42*#)*/*#4'$,)*#"%#&$'/*#/"#.*$%"$!"#0%A'44"42,%('#+"E#
$'+"/'#,/#,.."1'1,;#
#
9-#1*%2,%02*#/"#=0,42*#)'%0'-,#$"&0'$/'#-A04*#,#-'#)'%02,%("*%,#/"#=0,42*#'++'$'2*#+,$#10"#
!"#+$,&<"')*#/"#1*%4,$3'$-*#+,$#+*2,$-*#+*"#1*%40-2'$,#"%#4,&0"2*;#
#
F*$/"'-),%2,#
G,42")#@+B#
#
#
#
#
#
#
#
#
#
#
#
#
#
#
#
#
#
#
#
#
#
#
#
#
#
#
#
#
#
#
#
# #

Leggere attentamente questo manuale d’istruzioni poichè all’interno vi sono importanti informazioni sulla
sicurezza, l’uso e la manutenzione dell’elettrodomestico. Conservare il manuale per consultazioni future.
#
PRECAUZIONI
Quando si utilizzano apparecchi elettrici, devono essere sempre rispettate le precauzioni di
sicurezza fondamentali, tra cui le seguenti:
H;# IJ'++'$,11<"*#K#/,42"%'2*#4*-*#'/#0%#04*#/*),42"1*#"%2,$%*;#
L;# M2"-"(('$,#=0,42J'++'$,11<"*#4*-*#1*),#/,41$"22*#%,-#+$,4,%2,#)'%0'-,;#
N;# ?*%#.'$,#0%#04*#")+$*+$"*#/,-#+$*/*22*;#O0,42*#'++'$,11<"*#K#1*%1,+"2*#+,$#0%#04*#
,41-04"3'),%2,#/*),42"1*;#
P;# O0'-4"'4"#'-2$*#04*#%*%#1*%4"&-"'2*#/'-#1*42$022*$,#+0Q#1'04'$,#"%1,%/">#41*44,#
,-,22$"1<,#*#"%1"/,%2"#'#+,$4*%,;#
R;# IJ'++'$,11<"*#+0Q#,44,$,#02"-"(('2*#/'#S')S"%"#/"#,2T#%*%#"%.,$"*$,#'#U#'%%"#,#/'#
+,$4*%,#1*%#$"/*22,#1'+'1"2T#."4"1<,>#4,%4*$"'-"#*#),%2'-">#*#+$"3,#/"#,4+,$",%('#*#
/,--'#%,1,44'$"'#1*%*41,%('>#+0$1<V#4*22*#4*$3,&-"'%('#*++0$,#/*+*#1<,#-,#42,44,#
'SS"'%*#$"1,302*#"42$0("*%"#$,-'2"3,#'--J04*#4"10$*#/,--J'++'$,11<"*#,#'--'#
1*)+$,%4"*%,#/,"#+,$"1*-"#'/#,44*#"%,$,%2";#9#S')S"%"#%*%#/,3*%*#&"*1'$,#1*%#
-J'++'$,11<"*;#I'#+0-"("'#,#-'#)'%02,%("*%,#/,42"%'2'#'/#,44,$,#,..,220'2'#
/'--J02"-"(('2*$,#%*%#/,3,#,44,$,#,..,220'2'#/'#S')S"%"#4,%('#4*$3,&-"'%(';#
W;# 9#),(("#+,$#-'#/"41*%%,44"*%,#/,3*%*#,44,$,#"%1*$+*$'2"#%,-#1'S-'&&"*#."44*#"%#
1*%.*$)"2T#1*%#-,#$,&*-,#/"#1'S-'&&"*#
X;#?*%#")),$&,$,#-J'++'$,11<"*#*#"-#1'3*#/"#'-"),%2'("*%,#"%#'1=0'#*%/,#,3"2'$,#
41*44,#,-,22$"1<,;#
U;# 7$")'#/"#"%42'--'$,#-J'++'$,11<"*#+$*33,/,$,#'#42'11'$,#-'#1*$$,%2,#'22$'3,$4*#
-J"%2,$$022*$,#&,%,$'-,;#@,#4"#"%2,%/,#/"4"%42'--'$,#"-#3,%2"-'2*$,#4+,&%,$,#,#42'11'$,#-'#
1*$$,%2,#'22$'3,$4*#-J"%2,$$022*$,#&,%,$'-,>#+$")'#/"#+$*1,/,$,;#
Y;# @1*--,&'$,#"-#3,%2"-'2*$,#+$")'#/,--'#+0-"("';#
HZ;#?*%#*+,$'$,#"%#+$,4,%('#/"#3'+*$"#,4+-*4"3"#,#[#*#"%."'))'S"-";#
HH;#?*%#+*4"("*%'$,#"-#3,%2"-'2*$,#"%#+$*44")"2T#/"#."')),#-"S,$,>#+"'%"#1*220$'#*#'-2$"#
'++'$,11<"#1<,#&,%,$'%*#1'-*$,;#
HL;#?*%#02"-"(('$,#"%#1'4*#/"#1'3*#3"4"S"-),%2,#/'%%,&&"'2"#*++0$,#"%#+$,4,%('#/"#
'%*)'-",#%,-#.0%("*%'),%2*#/,-#3,%2"-'2*$,;#
HN;#@,#"-#1'3*#/"#'-"),%2'("*%,#K#/'%%,&&"'2*>#%*%#"%42'--'$-*;#\,3,#,44,$,#4*42"20"2*#/'-#
+$*/022*$,>#/'#0%#1,%2$*#/"#'44"42,%('#=0'-"."1'2*#*#/'#+,$4*%'-,#'%'-*&*#+,$#,3"2'$,#
$"41<";#
HP;#7$")'#/"#"%42'--'$,#,#1*--,&'$,#"-#3,%2"-'2*$,>#"%2,$$*)+,$,#"-#.-044*#/"#,%,$&"'#,-,22$"1'#
*+,$'%/*#/'-#=0'/$*#+$"%1"+'-,#/,--'#+$*+$"'#'S"2'("*%,#,#-'41"'$-'#4+,%2'#."%*#'/#
"%42'--'("*%,#1*)+-,2'2';#
HR;#\0$'%2,#-J"%42'--'("*%,#'44"10$'$4"#1<,#-'#/"42'%('#)"%")'#2$'#"-#
+'3"),%2*#,#-,#+'-,>#0%'#3*-2'#'&&'%1"'2*#"-#3,%2"-'2*$,#'#4*.."22*>#4"'#
/"#'-),%*#L>N);#
HW;#?*%#2,%2'$,#)'"#/"#.,$)'$,#-,#+'-,#/,-#3,%2"-'2*$,#=0'%/*#K#"%#
.0%("*%,;#

HX;#C022"#"#1'S-'&&"#/,3*%*#,44,$,#1*%.*$)"#'-#1*/"1,#,-,22$"1*#%'("*%'-,#,#'--,#%*$),#
3"&,%2"#"%#)'2,$"';##
HU;#IA"%42'--'("*%,#/,3,#,44,$,#,4,&0"2'#/'#0%#,-,22$"1"42'#=0'-"."1'2*#'02*$"(('2*;#
HY;#63"2'$,#/"#*42$0"$,#"-#)*3"),%2*#/,--,#+'-,#"%#=0'-4"'4"#)*/*;##
LZ;#?*%#02"-"(('$,#'1=0'#*#/,2,$&,%2"#-"=0"/"#+,$#-'#+0-"("'#/,-#3,%2"-'2*$,#,#/,--,#+'-,;#M%#
+'%%*#'41"022*#*#-,&&,$),%2,#"%0)"/"2*#4'$T#'/'22*#+,$#-'#)'&&"*$#+'$2,#/,--,#
*+,$'("*%"#/"#+0-"("';#@+,&%,$,#-A'-"),%2'("*%,#,-,22$"1'#+$")'#/,--'#+0-"("';#
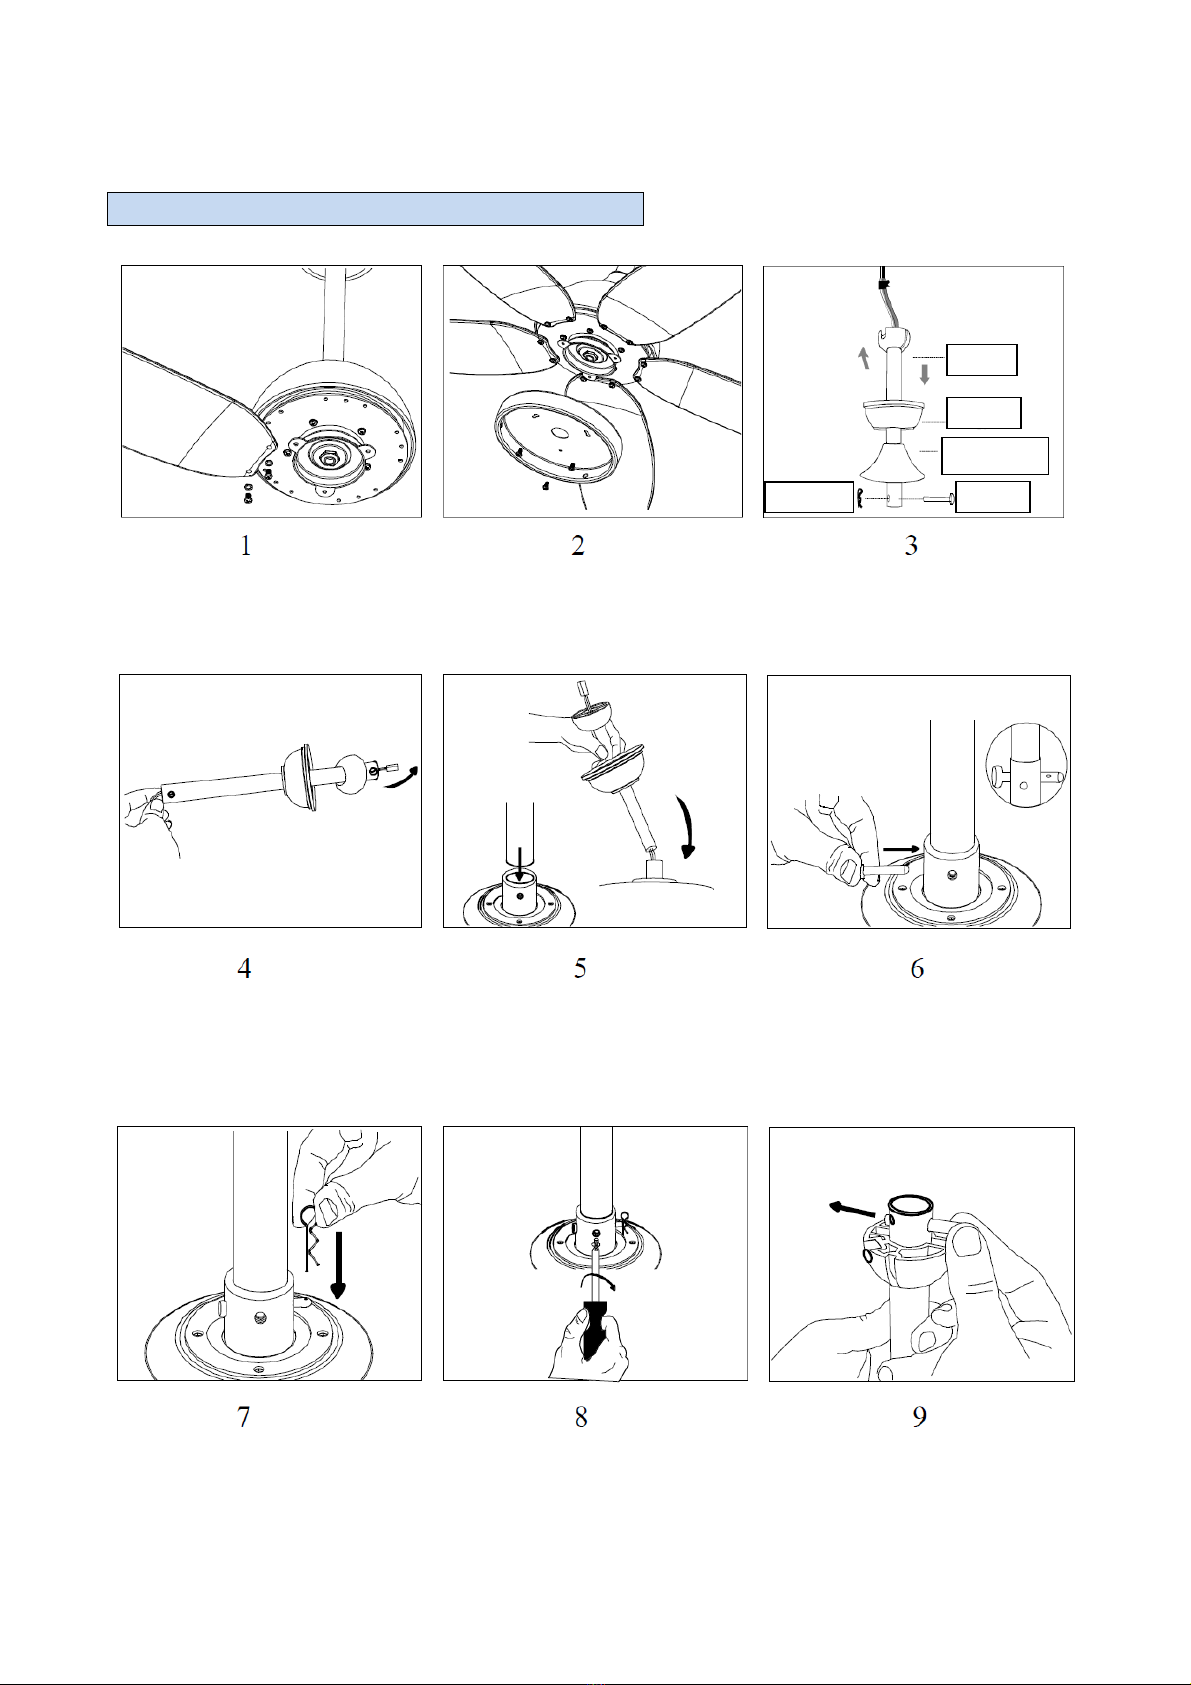
LH;#\*+*#'3,$#,..,220'2*#"#1*--,&'),%2"#,-,22$"1">#"#1*%/022*$"#'#."-*#/,3*%*#,44,$,#$"3*-2"#
3,$4*#-A'-2*#,#4+"%2"#'110$'2'),%2,#%,--'#41'2*-'#/"#041"2';#9#."-"#/,3*%*#,44,$,#
/"42$"S0"2"#4,+'$'2'),%2,#1*%#"-#1*%/022*$,#'#2,$$'#,#"-#1*%/022*$,#/"#),44'#'#2,$$'#40#
0%#-'2*#/,--'#41'2*-'#/"#041"2'#
LL;#\*+*#'3,$#2*-2*#-J")S'--'&&"*#'44"10$'2,3"#/,--J"%2,&$"2T#/,--J'++'$,11<"*;#9%#1'4*#/"#
/0SS"*#%*%#02"-"(('2,#-J'++'$,11<"*#,#$"3*-&,2,3"#4*-*#'#+,$4*%'-,#=0'-"."1'2*;#]-"#
,-,),%2"#/,--J")S'--'&&"*#^4'11<,22"#"%#+-'42"1'>#+*-"42"$*-*>#+0%2"#),2'--"1"#,11;_#%*%#
/,3*%*#,44,$,#-'41"'2"#'--'#+*$2'2'#/,"#S')S"%"#"%#=0'%2*#+*44"S"-"#.*%2"#/"#+,$"1*-*;#
LN;#O0,42*#'++'$,11<"*#/*3$T#,44,$,#/,42"%'2*#4*-*#'--A04*#+,$#"-#=0'-,#K#42'2*#
,4+$,44'),%2,#1*42$0"2*#,#1"*K#1*),#3,%2"-'2*$,#+,$#04*#/*),42"1*;#9-#1*42$022*$,#
%*%#+0Q#,44,$,#1*%4"/,$'2*#$,4+*%4'S"-,#+,$#,3,%20'-"#/'%%"#/,$"3'2"#/'#04"#")+$*+$"#
*/#,$$'2";#
LP;#7$")'#/"#,..,220'$,#=0'-4"'4"#*+,$'("*%,#/"#+0-"("'#*#/"#)'%02,%("*%,>#/"4"%4,$"2,#
-J'++'$,11<"*#/'--'#$,2,#/"#'-"),%2'("*%,#,-,22$"1'#4+,&%,%/*#-J"%2,$$022*$,#
/,--J")+"'%2*;#
LR;#O0'%/*#/,1"/,2,#/"#%*%#02"-"(('$,#+"E#-J'++'$,11<"*#4"#$'11*)'%/'#/"#$,%/,$-*#
"%*+,$'%2,#4+,&%,%/*#-J"%2,$$022*$,#/,--J")+"'%2*;#
LW;#I'#4"10$,(('#,-,22$"1'#/"#=0,42*#'++'$,11<"*#K#'44"10$'2'#4*-2'%2*#=0'%/*#-*#42,44*#K#
1*$$,22'),%2,#1*--,&'2*#'/#0%#,.."1'1,#")+"'%2*#/"#),44'#'#2,$$'#1*),#+$,3"42*#/'--,#
3"&,%2"#%*$),#/"#4"10$,(('#,-,22$"1';#
LX;#?,-#1'4*#"%#10"#4"#3,$"."1'44,$*#4"20'("*%"#'%*)'-,#4+,&%,$,#")),/"'2'),%2,#
-J'++'$,11<"*#,#1*%2'22'$,#"-#$"3,%/"2*$,#*#"-#4,$3"("*#/"#'44"42,%(';#
LU;#?*%#02"-"(('$,#+$,4,#/"#1*$$,%2,#3*-'%2"#*++0$,#1'3"#/'%%,&&"'2";#
LY;#?*%#."44'$,#"%2,$$022*$"#/"#4"10$,(('#1*%#%'42$*#'/,4"3*>#+,$#+,$"1*-*#/"#9%1,%/"*;#
NZ;#`#'44*-02'),%2,#3",2'2*#4)*%2'$,#*#$"+'$'$,#-J'++'$,11<"*#+,$#+,$"1*-*#/"#4<*1a#
,-,22$"1*b#4,#%,1,44'$"*#$"3*-&,$4"#'-#$"3,%/"2*$,#*#1,%2$*#'44"42,%(';#
NH;#?*%#04'$,#-J'++'$,11<"*#%,--,#3"1"%'%(,#/"#0%'#3'41'#/'#S'&%*>#/*11"'>#+"41"%';#
NL;#7$")'#/"#1*--,&'$,#-J'++'$,11<"*#'--'#$,2,#,-,22$"1'#'11,$2'$4"#1<,#-'#2,%4"*%,#4"'#
1*$$,22'#4,1*%/*#=0'%2*#$"+*$2'2*#40--'#2'$&'#/,-#+$*/*22*#,#1<,#-J9)+"'%2*#4"'#
1*%.*$),#'--,#%*$),#3"&,%2";#
NN;#B44"10$'$4"#4,)+$,#1<,#-'#2,%4"*%,#/"#$,2,#,-,22$"1'#4"'#0&0'-,#'#=0,--'#"%/"1'2'#
%,--J,2"1<,22'#/'2"#2,1%"1"#,#1<,#-J")+"'%2*#4"'#1*)+'2"S"-,#1*%#-'#+*2,%('#
/,--J'++'$,11<"*;#
NP;#?*%#2*11'$,#-'#1*%%,44"*%,#'--J'-"),%2'("*%,#1*%#)'%"#0)"/,;#
NR;#?*%#-'41"'$,#,4+*42*#-J'++'$,11<"*#'/#'&,%2"#'2)*4.,$"1"#^+"*&&"'>#4*-,>#,21;_;#
NW;#?*%#"%42'--'$,#-J'++'$,11<"*#3"1"%*#'#.*%2"#/"#1'-*$,#^,4;#C,$)*4".*%,_;#
NX;#c'%2,%,$,#0%'#'/,&0'2'#/"42'%('#/,--,#+'-,#/'#*&&,22"#+*42"#%,--,#3"1"%'%(,;#

NU;#9#S')S"%"#/,3*%*#,44,$,#4*$3,&-"'2"#+,$#4"%1,$'$4"#1<,#%*%#&"*1<"%*#1*%#
-J'++'$,11<"*;#
NY;#I'#42$0220$'#/"#40++*$2*#/,3,#,44,$,#)*%2'2'#"%#)*/*#4"10$*>#1'+'1,#/"#@*++*$2'$,#
0%#+,4*#/"#HR#1<"-*&$'))";#@*%*#1*%4"&-"'2,#4*-*#42$0220$,#"%#),2'--*;#
PZ;#?*%#1')S"'$,#3,-*1"2T#),%2$,#"-#3,%2"-'2*$,#K#"%#.0%("*%,;#7,$#1')S"'$,#3,-*1"2T#"-#
3,%2"-'2*$,#/,3,#+$")'#,44,$,#.,$)'2*;#
PH;#?*%#.$'++*$$,#*&&,22"#40-#+,$1*$4*#/,--,#+'-,#/,-#3,%2"-'2*$,;#
PL;#?*%#02"-"(('$,#-J'++'$,11<"*#"%#+$,4,%('#/"#-"=0"/"#*#&'4#+*2,%("'-),%2,#9%."'))'S"-"#
*#,4+-*4"3"#
PN;#I'#4*$&,%2,#-0)"%*4'#/"#=0,42*#'++'$,11<"*#%*%#K#4*42"20"S"-,b#=0'%/*#-'#4*$&,%2,#
-0)"%*4'#$'&&"0%&,#"-#."%,#3"2'#/,3,#,44,$,#4*42"20"2*#-J"%2,$*#'++'$,11<"*#
DESCRIZIONE DELLE PARTI
VERIFICHE SUL FUNZIONAMENTO
Avvertenza: assicurarsi che tutti i collegamenti siano stati eseguiti correttamente prima di accendere l'interruttore principale.
Cavo di messa a terra
Calotta superiore
Staffa
Calotta inferiore
Blocco motore
Lame ABS
Vano LED
Modulo LED
Coperchio in vetro

GUIDA ALL‘INSTALLAZIONE
Collegare le lame ABS al blocco
motore attraverso le viti e le rondelle.
Collegare il vano LED al blocco
motore attraverso le viti.
Assicurarsi di aver inserito le due
calotte lungo la staffa centrale.
Far passare i cavi elettrici all’interno
della staffa.
Inserire la staffa nella parte superiore
del blocco motore.
Bloccare la staffa applicando il gancio
di sicurezza attraverso le estremità
del foro.
Applicare la coppiglia per evitare che
la vite possa estrarsi da sola.
Bloccare definitivamente la staffa
applicando la vite di sicurezza nel
foro laterale.
Applicare il perno di sicurezza
nell’estremità superiore della staffa.
Staffa
Calotta
Coppiglia
Gancio
Copriflangia

Far scorrere verso il basso il supporto
superiore.
Allentare la vite del supporto
superiore, in modo da permettere il
passaggio dei cavi.
Una volta che i cavi sono passati
dall’estremità, stringere nuovamente
la vite.
Applicare i fori al soffitto in base a
dove si vuole eseguire l’installazione.
Le figure in alto mostrano le modalità con cui installare la staffa di montaggio
in base al materiale presente nel soffitto (legno, cemento)
Attraverso il dip switch utilizzare gli
appositi interruttori per mantenere
spento il ventilatore.
Far passare i cavi e la morsettiera
attraverso il foro presente nella staffa
di montaggio,
Applicare il supporto della staffa di
montaggio, facendo attenzione alla
scanalatura superiore.
Staffa montaggio
Staffa montaggio
Soffitto in legno
Soffitto in cemento
Viti
Viti
Scanalatura
Dado

Ruotare in senso antiorario la staffa
centrale per fissarla al supporto di
montaggio.
Il ricevitore del segnale con la
morsettiera deve essere installato
adiacente al supporto a soffitto.
La figura in altro mostra la
disposizione e la tipologia dei cavi
elettrici del ricevitore.
Sollevare e ruotare la calotta in modo
da fissarla al supporto del soffitto.
Applicare il modulo LED al vano
apposito.
Applicare il coperchio in vetro e
bloccarlo attraverso
Attraverso il dip switch utilizzare gli
appositi interruttori per accendere il
ventilatore.
Ricevitore

SCHEMA MORSETTIERA DEL RICEVITORE
PARAMETRI ELETTRICI
Alimentazione
Potenza Motore
Lampada
220-240Vd 50Hz
35W
20W
Il fabbricante WESTIM spa dichiara che il tipo di apparecchiatura radio Ventilatore da soffitto con radiocomando, modello
ZFL5130S è conforme alla direttiva 2014/53/UE. Il testo completo della dichiarazione di conformità UE è disponibile al
seguente indirizzo Internet: www.zephir.it
- potenza max: < 10dBm
- Frequenza: 433,92 MHz
La comunicazione tra trasmettitore e ricevitore si basa sull’emissione di segnali RF digitali, la cui frequenza di codifica è
inferiore a un milionesimo. (In caso di malfunzionamento è necessario contattare un centro di Assistenza qualificato per
visionare entrambi i dispositivi)
Il ricevitore può essere controllato da qualsiasi angolo del trasmettitore nello spazio prospettico, senza limitazioni di
direzione.
E’ possibile salvare il settaggio di luce e direzione mentre il ventilatore è spento e riprendere quindi l’ultima configurazione
dopo averlo riacceso.
Cavo Luce sotto tensione
Cavo Luce neutro
Cavo verso blocco motore
Cavo alimentazione sotto tensione
Cavo alimentazione neutro
Cavo antenna
Ricevitore

RADIOCOMANDO
Note importanti:
1. Tra trasmettitore e ricevitore viene utilizzata la modalità di “learning code matching mode”. Spostare ad “ON”
l’alimentazione principale e nei successivi 30 secondi premere il pulsante "FAN ON/ OFF" del radiocomando per almeno
5 secondi, in questo caso si dovrebbe avvertire un segnale acustico “beep", il che significa che trasmettitore e ricevitore
comunicano correttamente. (PS: la modalità di accoppiamento è disponibile solo per 30 secondi, dopodiché non avrà
più effetto.)
2. In caso il radiocomando non funzioni correttamente, o il segnale sembra non esser recepito dal ricevitore, controllare lo
stato della batteria, in caso sostituirla.
3. In caso il radiocomando non funzioni correttamente, verificare se nello spazio circostante vi siano altri elettrodomestici
o dispositivi che possano in qualche modo interferire con il segnale inviato al ricevitore.
4. Una batteria quasi esausta influenzerà il funzionamento del radiocomando e di conseguenza la ricezione del segnale
da parte del ricevitore (in questo caso la spia corrispettiva lampeggerà), pertanto è necessario sostituire la batteria con
una nuova.
5. E’ importante rimuovere la batteria del radiocomando in caso questo non venga utilizzato per un periodo prolungato.
6. Durante l’installazione del ventilatore, assicurarsi che la calotta superiore e la staffa di montaggio non compromettano
l’integrita dei cavi elettrici.
GUIDA ALLA RISOLUZIONE DEI PROBLEMI
Problemi minori spesso possono essere risolti senza un elettricista; prima di eseguire qualsiasi verifica, spegnere il
ventilatore ed in caso interrompere l'alimentazione per evitare scosse elettriche.
Problema
Possibile causa
Soluzione
Il ventilatore non funziona
Non c’è corrente o il fusibile è
bruciato
Controllare l’alimentazione
Sostituire il fusibile
Collegamenti errati
Spegnere il ventilatore, estrarre la calotte
e verificare i collegamenti
Dip switch non impostato
correttamente
Impostare il dip switch in modo che sia lo
stesso del trasmettitore e del ricevitore
Batteria scarica
Sostituire la batteria
ON/OFF Ventilatore
ON/OFF Luce
Velocità (1-Bassa
à
5-Alta)
Direzione del ventilatore
Funzione timer
Luce LED
Batteria 12V da utilizzare nel trasmettitore

Non è possibile impostare la
velocità o la luce
Collegamenti errati
Spegnere il ventilatore, estrarre la calotte
e verificare i collegamenti
Luce spenta
Controllare che la lampadina non sia
bruciata.
COME INSERIRE / RIMUOVERE LE BATTERIE DEL RADIOCOMANDO
Porre la pila nello sportellino avendo cura di verificare il corretto posizionamento delle polarità. Inserire
lo sportellino nel radiocomando. Utilizzare 1 pila tipo 23A da 12V (inclusa), conforme alla Direttiva
Batterie 2006/66/CE e modifiche da Direttiva 2013/56/UE. La pila è fornita a corredo del
radiocomando.
Le batterie non ricaricabili non devono essere ricaricate
1. Dopo aver aperto la bustina del radiocomando, rimuovere la protezione e inserire la batteria
(inclusa).
2. Quando si usa il radiocomando l’emettitore della parte frontale del radiocomando deve essere
allineato con la finestra di ricezione sul prodotto.
3. Il radiocomando può essere utilizzato fino ad una distanza di c.ca 5 metri dal prodotto ed entro
un’angolazione di 30 gradi.
4. Evitare che la luce del sole sia diretta sulla finestra di ricezione del prodotto. Questo potrebbe
influenzarne la ricezione dei comandi.
5. Tenere il radiocomando in un posto sicuro ed evitarne le cadute.
6. Se non usato per molto tempo è preferibile estrarre le batterie dal radiocomando e riporlo in un
luogo sicuro, per evitare che si danneggi o che si riducano le prestazioni delle batterie.
Anche le batterie esauste devono essere smaltite in rispetto delle normative ambientali in
vigore, presso un centro di raccolta autorizzato, o depositate negli appositi contenitori
presso il punto vendita dove è stato effettuato l’acquisto.
Consigliamo di scaricare completamente le batterie e di non gettarle nel fuoco
Le batterie devono essere rimosse dall’apparecchio prima del suo smaltimento.
Non gettate le batterie esauste o danneggiate nei rifiuti domestici per non danneggiare
l’ambiente (o per non arrecare danni all'ambiente)

PULIZIA E MANUTENZIONE
#
Attenzione: prima delle normali operazioni di pulizia, spegnere il ventilatore e scollegare la corrente di
alimentazione (Pos. 0/OFF):
• Per la pulizia, utilizzare un panno morbido leggermente inumidito; non usare prodotti abrasivi o
corrosivi. Fare attenzione a non danneggiare il corpo esterno, le lame, i collegamenti elettrici o le
componenti interne.
• Non immergere il ventilatore in acqua o altri liquidi; nel caso in cui una qualsiasi parte di esso venga
a contatto con aqcua, assicurarsi innanzitutto che l’apparecchio sia scollegatodalla presa di
corrente, quindi asciugare con cura, assicurandosi che tutte le parti elettriche siano perfettamente
asciutte: in caso di dubbio, consultare un centro assistenza o un elettricista qualificato.
• È importante mantenere le prese d'aria del motore prive di polvere e lanugine.

Read the manual carefully before operation and keep it for reference.
This manual is only for reference, please comply with actual appliance you selected
H;# C<,#'++-"'%1,#1'%#S,#04,/#Se#1<"-/$,%#'&,/#.$*)#U#e,'$4#'%/#'S*3,#'%/#+,$4*%4#
f"2<#$,/01,/#+<e4"1'->#4,%4*$e#*$#),%2'-#1'+'S"-"2",4#*$#-'1a#*.#,g+,$",%1,#'%/#
a%*f-,/&,#".#2<,e#<'3,#S,,%#&"3,%#40+,$3"4"*%#*$#"%42$012"*%#1*%1,$%"%,#*.#2<,#
'++-"'%1,#"%#'#4'.,#f'e#'%/#0%/,$42'%/#2<,#<'('$/4#"%3*-3,/;##
L;# F<"-/$,%#4<'--#%*2#+-'e#f"2<#2<,#'++-"'%1,;#F-,'%"%&#'%/#04,$#)'"%2,%'%1,#4<'--#%*2#
S,#)'/,#Se#1<"-/$,%#f"2<*02#40+,$3"4"*%;#
N;# M4,#.'%#*%-e#.*$#"%2,%/,/#04,>#'4#/,41$"S,/#"%#"%42$012"*%#)'%0'-;#
P;# C*#+$*2,12#'&'"%42#,-,12$"1'-#4<*1a>#/*#%*2#")),$4,#0%"2>#+-0&>#*$#1*$/#"%#f'2,$#*$#
4+$'e#f"2<#-"=0"/4;#
R;# F-*4,#40+,$3"4"*%#"4#%,1,44'$e#f<,%#'%e#'++-"'%1,#"4#04,/#Se#*$#%,'$#1<"-/$,%;#
W;# M%+-0&#.$*)#*02-,2#f<,%#%*2#"%#04,>#f<,%#)*3"%&#.'%#.$*)#*%,#-*1'2"*%#2*#'%*2<,$>#
S,.*$,#+022"%&#*%#*$#2'a"%&#*..#+'$24#'%/#S,.*$,#1-,'%"%&;#
X;# \*#%*2#*+,$'2,#"%#2<,#+$,4,%1,#*.#,g+-*4"3,#'%/[*$#.-'))'S-,#.0),4;#
U;# \*#%*2#+-'1,#.'%#*$#'%e#+'$24#%,'$#'%#*+,%#.-'),>#1**a"%&#*$#*2<,$#<,'2"%&#
'++-"'%1,4;#
Y;# \*#%*2#*+,$'2,#'%e#'++-"'%1,#f"2<#'#/')'&,/#1*$/#*$#+-0&>#'.2,$#2<,#'++-"'%1,#
)'-.0%12"*%4#*$#<'4#S,,%#/$*++,/#*$#/')'&,/#"%#'%e#)'%%,$;#
HZ;#C<"4#+$*/012#"4#"%2,%/,/#.*$#<*04,<*-/#04,#*%-e#'%/#%*2#.*$#1*)),$1"'-#*$#"%/042$"'-#
04,;#
HH;#9.#2<,#40++-e#1*$/#"4#/')'&,/>#"2#)042#S,#$,+-'1,/#Se#2<,#)'%0.'120$,$>#"24#4,$3"1,#
'&,%2#*$#4")"-'$-e#=0'-".",/#+,$4*%4#"%#*$/,$#2*#'3*"/#'#<'('$/;#
HL;#h,.*$,#f"$"%<,#+'//-,#.'%>#20$%#*..#2<,#,-,12$"1#+*f,$#40++-e#'2#2<,#)'"%#.04,#S*g#
*$#)'"%#1"$10"2#S$,'a,$#'%/#-,'3,#"2#*..#0%2"-#"%42'--'2"*%#"4#1*)+-,2,;#
HN;#C<,#*02-,2#S*g#'%/#40++*$2#42$0120$,#)042#S,#4,10$,-e#)*0%2,/#'%/#
1'+'S-,#*.#$,-"'S-e#40++*$2"%&#'#)"%")0)#*.#NR#+*0%/4;#M4,#*%-e#
),2'--"1#*02-,2#S*g,4;#
HP;#\*#%*2#"%42'--#+'//-,#.'%#-,44#2<'%#L;N)#S,2f,,%#.-**$#'%/#-*f,42#
,/&,#*.#.'%#S-'/,4;##
HR;#?,3,$#'22,)+2#2*#42*+#2<,#.'%#S-'/,4#f<,%#"2#"4#"%#*+,$'2"*%#
HW;#B--#f"$"%&#)042#S,#"%#'11*$/'%1,#f"2<#2<,#?'2"*%'-#6-,12$"1#F*/,#'%/#-*1'-#,-,12$"1'-#
1*/,4;#6-,12$"1'-#"%42'--'2"*%#4<*0-/#S,#+,$.*$),/#Se#'#=0'-".",/#-"1,%4,/#,-,12$"1"'%;#
HX;#\*#%*2#*+,$'2,#$,3,$4"%f"21<#f<"-,#.'%#S-'/,4#'$,#"%#)*2"*%;#i'%#)042#S,#20$%,/#
*..#'%/#S-'/,4#42*++,/#S,.*$,#$,3,$4"%&#S-'/,#/"$,12"*%;#
HU;#B3*"/#+-'1"%&#*Sj,124#"%#2<,#+'2<#*.#2<,#S-'/,4;#
HY;#\*#%*2#04,#f'2,$#*$#/,2,$&,%24#f<,%#1-,'%"%<,#.'%#*$#.'%#S-'/,4;#B#/$e#/042#1-*2<#
*$#-"&<2-e#/')+,%,/#1-*2<#f"--#S,#40"2'S-,#.*$#)*42#1-,'%"%&;#C0$%#*..#2<,#,-,12$"1#
+*f,$#40++-e#S,.*$,#1-,'%"%&;#
LZ;#B.2,$#)'a"%&#,-,12$"1'-#1*%%,12"*%4>#4+-"1,/#1*%/012*$4#4<*0-/#S,#20$%,/#0+f'$/#'%/#
+04<,/#1'$,.0--e#0+#"%2*#*02-,2#S*g;#C<,#f"$,4#4<*0-/#S,#4+$,'/#'+'$2#f"2<#2<,#
&$*0%/,/#1*%/012*$#'%/#2<,#,=0"+),%2k&$*0%/"%*%/012*$#*%#*%,#4"/,#*.#2<,#
*02-,2#S*g;#

LH;#:,)*3,#2<,#+'1a"%&#'%/#)'a,#40$,#2<'2#2<,#'++-"'%1,#"4#"%2'12;;#9%#1'4,#*.#/*0S2#/*#
%*2#04,#"2#'%/#'//$,44#2*#'%#'.2,$k4'-,#4,$3"1,#$,11*)'%/,/#Se#2<,#)'%0.'120$,$;#
F<"-/$,%#4<'--#%*2#+-'e#f"2<#2<,#'++-"'%1,;#
LL;#F-,'%"%&#'%/#04,$#)'"%2,%'%1,#4<'--#%*2#S,#)'/,#Se#1<"-/$,%#0%-,44#2<,e#'$,#*-/,$#
2<'%#U#'%/#40+,$3"4,/;#l,,+#2<,#'++-"'%1,#'%/#"24#1*$/#*02#*.#$,'1<#*.#1<"-/$,%#-,44#
2<'%#U#e,'$4;#
LN;#B.2,$#$,)*3"%<,#+'1a"%&#)'2,$"'-4>#1<,1a#2<,#"%2,&$"2e#*.#2<,#'++-"'%1,b#9.#e*0#'$,#
0%40$,>#/*#%*2#04,#"2#'%/#'4a#.*$#=0'-".",/#+$*.,44"*%'-#<,-+;##
LP;#C<,#+'1a"%&#)'2,$"'-4#^+-'42"1#S'&4>#+*-e42e$,%,#.*')>#%'"-4>#,21;_#)042#S,#a,+2#*02#
2<,#$,'1<#*.#1<"-/$,%#S,1'04,#2<,e#'$,#+*2,%2"'-#4*0$1,4#*.#/'%&,$;#
LR;#h,.*$,#1*%%,12"%<,#'++-"'%1,>#1<,1a#".#2<,#,-,12$"1'-#3*-2'&,#'%/#.$,=0,%1e#*.#2<,#
1"$10"2#1*$$,4+*%/#2*#2<*4,#"%/"1'2,/#*%#2<,#'++-"'%1,;#
LW;#C<"4#'++-"'%1,#)042#*%-e#S,#04,/#.*$#2<,#+0$+*4,#.*$#f<"1<#"2#<'4#S,,%#
)'%0.'120$,/>#2<,$,.*$,#'4#'#.'%;#C<,#)'%0.'120$,$#"4#%*2#$,4+*%4"S-,#.*$#'%e#
/')'&,#1'04,/#Se#")+$*+,$#*$#"%1*$$,12#04,;#
LX;#WARNING:#2<,#"%42'--'2"*%#*.#2<"4#'++-"'%1,#1'%#S,#/*%,#Se#=0'-".",/#,-,12$"1"'%4#
m?In;#
LU;#@"%1,#2<,#"%42'--'2"*%#*.#2<,#,=0"+),%2#4,24>#2<,#+*f,$#*.#2<,#%,2f*$a#)042#S,#/*%,#
2<$*0&<#.-,g"S-,#1'S-,#+-0&#*$#Sek+*-,#4f"21<#f"2<#1*%2'12#*+,%"%&#/"42'%1,#*.#%*2#-,44#
2<'%#N#));#
LY;#\*#%*2#)'a,#)*/"."1'2"*%4#*.#'%e#a"%/#2*#2<"4#'++-"'%1,;#
NZ;#\*#%*2#,g+*4,#2<"4#'++-"'%1,#2*#2<,#f,'2<,$#^$'"%>#40%>#,21;_#
NH;#C<"4#'++-"'%1,#"4#.*$#8mM@68mI\#M@6#m?In;#
NL;#9%42'--#2<,#'++-"'%1,#'2#'%#'/,=0'2,#/"42'%1,#.$*)#f'--4#'%/#*2<,$#*Sj,124>,21;#
NN;#\*#%*2#,g+*4,#2<,#'++-"'%1,#2*#'2)*4+<,$"1#'&,%24#401<#'4#$'"%>#f"%/>#4%*f>#<'"-;#
\*#%*2#04,#*02/**$4;#
NP;#:,&0-'$-e#"%4+,12#2<,#'++-"'%1,#.*$#3"4"S-,#/,.,124;#9.#'%e#.'0-24#'$,#.*0%/>#\*#%*2#04,#
2<,#'++-"'%1,#S02#1*%2'12#2<,#B02<*$"(,/#@,$3"1,#F,%2,$;#
NR;#9.#2<,#'++-"'%1,#/*,4#%*2#.0%12"*%#1*$$,12-e#*$#2<,$,#"4#'#.'0-2>#1*%2'12#'02<*$"(,/#
@,$3"1,#F,%2,$#
NW;#9%#1'4,#2<,#+$*/012#.'--#/*f%#*$#"2#"4#/')'&,/>#*$#/*,4%J2#f*$a#'4#,g+,12,/;1*%2'12#
2<,#B02<*$"(,/#@,$3"1,#F,%2,$#
NX;#6%40$,#2<'2#2<,#,-,12$"1'-#4e42,)#2*#f<"1<#2<,#'++-"'%1,#"4#1*%%,12,/#1*%.*$)4#2*#
'++-"1'S-,#42'%/'$/4;#
NU;#@f"21<#*..#2<,#+*f,$#S,.*$,#1*%%,12"%&#*$#$,+'"$"%<,#.'%;#
NY;#C<,#,-,12$"1'-#+*f,$#40++-e[4*1a,2#2*#f<"1<#2<,#'++-"'%1,#"4#2*#S,1*%%,12,/#)042#S,#
'S-,#2*#+$*3"/,#2<,#)'g")0)#,-,12$"1'-#+*f,$#$,=0"$,/#Se#2<,#'++-"'%1,;#9.#"2#1'%%*2#
/*#4*>#'$$'%&,#.*$#'#+$*.,44"*%'--e#=0'-".",/#,-,12$"1"'%##2*#)'a,#2<,#%,1,44'$e#
)*/"."1'2"*%4;#
PZ;#M4,#'#)0-2"k+*-'$#4f"21<#f"2<#)"%")0)#1*%2'12#/"42'%1,#*.#N#))#2*#"%42'--#2<,#
'++-"'%1,;#
PH;#@f"21<#*..#2<,#'++-"'%1,#'2#2<,#"%42'--'2"*%A4#)'"%#4f"21<D##
k9.#2<,#'++-"'%1,#/*,4#%*2#.0%12"*%#
kh,.*$,#1-,'%"%<,#*024"/,#*.#2<,#'++-"'%1,#
k9.#2<,#'++-"'%1,#"4#%*2#&*"%*#S,#04,/;#

PL;#C*#+$*2,12#'&'"%42#,-,12$"1#4<*1a>#/*#%*2#")),$4,#'%e#f"$,4#*$#'%e#+'$24#*.#2<,#
'++-"'%1,#"%2*#f'2,$#*$#*2<,$#.-0"/4;#
PN;#\*#%*2#"%42'--#'%/#04,#2<,#'++-"'%1,#%,'$#,g+-*4"3,4>#<"&<-e#.-'))'S-,#)'2,$"'-4>#
&'4,4#*$#S0$%"%&#.-'),4;#
PP;#h,#40$,#2*#-,'3,#'/,=0'2,#/"42'%1,#.$*)#2<,#S-'/,4#'%/#'%e#*2<,$#40$$*0%/"%&#
*Sj,12>#
PR;#C<,#04,#*.#'%e#,-,12$"1'-#'++-"'%1,#1'--4#.*$#2<,#'f'$,%,44#*.#4*),#S'4"1#$0-,4>#401<#
'4D#
';# \*#%*2#2*01<#2<,#/,3"1,#f"2<#f,2#*$#/')+#<'%/4#*$#.,,2#
S;# \*#%*2#-,'3,#2<,#'++-"'%1,#,g+*4,/#2*#'2)*4+<,$"1#'&,%24;##
PW;#?,3,$#'22'1<#2<,#.'%#2*#'#+*f,$#+*"%2>#S02#2*#2<,#1,"-"%&#"24,-.;##
PX;#@f"21<#*..#2<,#+*f,$#S,.*$,#1*%%,12"%&#*$#$,+'"$"%<,#.'%;##
PU;#C<,#,-,12$"1'-#f"$"%&#)042#S,#"%#'11*$/'%1,#f"2<#2<,#-*1'-#$,&0-'2"*%4;##
PY;#C<,#.'%#)042#S,#+$*+,$-e#&$*0%/,/#2*#'3*"/#2<,#$"4a#*.#,-,12$"1#4<*1a4;##
RZ;#?,3,$#"%42'--#2<,#.'%#"%#'#)*"42#*$#f,2#$**);##
RH;#?,3,$#2$e#2*#$,+'"$#2<,#.'%#;#?,3,$#/"4)*0%2#"2;#9%#1'4,#*.#%,,/#$,.,$#2*#'#=0'-".",/#
,-,12$"1"'%#*%-e#*$#2*#B02<*$"(,/#C,1<%"1'-#@,$3"1,#
RL;#9%#1'4,#*.#)'-.0%12"*%"%&#*$#/')'&,4#'-f'e4#$,.,$#2*#B02<*$"(,/#C,1<%"1'-#@,$3"1,;#
PARTS DESCRIPTION
TESTING YOUR FAN
Warning: Make sure wiring connection is correct before turning on the main switch.

FAN INSTALLATION INSTRUCTIONS
Connect the ABS blades to the fan
motor with the screws and washers.
Connect the LED housing to the fan
motor with the screws.
Make sure you have inserted canopy
and yoke cover along the central
downrod.
Insert the electrical cables inside the
downrod.
Insert downrod into the top of the fan
motor.
Lock the bracket by applying the
safety hook through the ends of the
hole
Apply the cotter pin to prevent the
screw from pulling out by itself.
Lock the downrod definitively by
applying the safety screw in the side
hole
Apply the safety pin in the upper end
of the downrod.

Slide the upper support down.
Loosen the screw of the upper
support, in order to allow the passage
of the cables.
Once the cables have passed from
the end, tighten the screw again.
Apply the holes to the ceiling
according to the installation place.
The figures above show how to install the mounting bracket according to the
material in the ceiling (wood, concrete)
Using the dip switch, move switches
to keep the fan off
Pass the cables and terminal block
through the hole in the mounting
bracket.
Attach the mounting bracket holder,
paying attention to the upper groove.

Rotate the center bracket
counterclockwise to secure it to the
mounting bracket
The signal receiver with the terminal
block must be installed adjacent to
the ceiling mount
The figure above shows the
arrangement and type of the electrical
cables of the receiver.
Lift and rotate the canopy to secure it
to the ceiling support.
Install the LED module to the LED
housing.
Install the glass lid and lock it
through.
Using the dip switch, move switches
to turn on the fan.

WIRING SCHEMATIC DIAGRAM FOR RECEIVER
POWER PARAMETER LIST
Voltage
Fan
Lamp
110-240v
40w
200w
Adopt RF wireless digit emission technique, biunique controlled, coincident code rate is less than one millionth. (Emitter
and receiver must be sent back for maintenance if damaged)
Receiver can be controlled by any angles of the emitter in perspective space, unrestricted by direction.
With the memory function, the controller can save the status (light and direction) while the supply power OFF and resume
to the original after reload the power supply.
REMOTE CONTROLLER
Kindly reminders:
1. Learning code matching mode is used between emitter and receiver. Turn "ON" the supply power within 30 seconds
and press the emitter's "FAN ON/OFF" button for 5 seconds, it can load normally after hearing a long sound "bee", which
means learning successfully and it can works normally. (PS: Learning mode is not accepted after turn "ON" the supply
power for 30 seconds)

2. When the emitter cannot control the receiver, please check the battery switch touching normally or not, correction of the
positive and negative, full or empty of the power.
3. When the emitter cannot control the receiver, please check is there any existence of similar remote controlled products
nearby, then check whether they works, because remote controlled product with the same frequency will disturb each
other.
4. Low voltage of battery will affect the sensitivity of the emitter and the signal reception accordingly (the indicated light will
flash out its warning when the battery get low voltage), must replace if the battery is getting low voltage.
5. Please take out the battery from the emitter when leaving unused for long time.
6. Supporting 200W lighting power at maximum. PS: please connect the ground wire correctly, otherwise it may cause the
light micro-light or flash.
7. When installing the fan,the fan ceiling cover don't press the antenna(or other wire), it is easy to breakdown the wire and
short-circuited.
TROUBLESHOOTING GUIDE
Minor problems often can be fixed without an electrician, before doing any work, shut off power supply to avoided electrical
shock.
Problem
Possible Cause
Solution
Fail to operate
Power is off or fuse is blown
Turn power on check fuse
Bad wire connection
Turn power off, loose canopy, or check
all connections
Inconsistent location for dip switch
Set the dip switch to be the same of
transmitter and receiver
Battery power is off
Use a new battery
Cannot control speed or light
Bad wire connection
Turn power off and check the receiver
wiring is correct
Light is off
Check the bulb is not burnt
CARE AND CLEANING
#
Attention: before normal cleaning operations, turn the fan off, turn the fan lamp off (if present), and
disconnect from mains power by turning off the isolating switch (pos. 0/OFF).
• For cleaning, use a soft, slightly damp cloth; do not use abrasive orcorrosive products. Be careful
not to damage the equipment, blades, electrical connections, or impair the hardware.
• Do not immerse or soak any part of the fan in water or any other liquid; in the event that this
happens, first ensure the fan is disconnected from the mains power supply, and then wipe the
appliance off carefully, making sure that all electrical parts are perfectly dry: in case of doubt,
consult a qualified professional technician.
• It is important to keep the air vents of the motor free of dust and lint.
Table of contents
Languages:
Other Zephir Fan manuals

Zephir
Zephir ZFL34M User manual

Zephir
Zephir ZFS8120 User manual

Zephir
Zephir PF50CR User manual

Zephir
Zephir ZFS8092 User manual

Zephir
Zephir ZFS8093 User manual

Zephir
Zephir ZFS9107B User manual

Zephir
Zephir ZFR3130M User manual

Zephir
Zephir ZFS9107M User manual

Zephir
Zephir ZFR5130M User manual

Zephir
Zephir ZFS4140S User manual
Popular Fan manuals by other brands

Home Decorators Collection
Home Decorators Collection 51608 Use and care guide

Noaton
Noaton Hovland Instructions for use

Manrose
Manrose Showerlite LEDSLKTC Installation and Wiring

Emerson
Emerson VOLTA CF590BQ00 owner's manual

Munters
Munters MFS36 Manual for use and maintenance

Modern Forms
Modern Forms FR-W1811-54 installation instructions