Zephyr Sleep Technologies MATRx plus User manual

Healthcare Provider Manual
TEST. SELECT. TREAT.

Manufacturer’s Information
Zephyr Sleep Technologies
#102, 701 64th Ave. S.E.
Calgary, Alberta, Canada T2H 2C3
Toll Free: 1.877.341.8814
Technical Support: 1.877.227.9832
Email: info@zephyrsleep.com
www.zephyrsleep.com
MATRx plus™ is a trademark of Zephyr Sleep Technologies Inc. All other trademarks
are property of their respective holders. This device is covered under one or more
patents as set forth at www.zephyrsleep.com/patents.htm.
Masimo, SET ®, , and M-LNCS are trademarks of Masimo. The Masimo SET ® and
Masimo components included within this product are covered under one or more
patents as set forth at www.masimo.com/patents.htm.
©2018 Zephyr Sleep Technologies Inc.
Trademarks and Patents
2

3
Manufacturer’s Information
Trademarks and Patents
Table of Figures
Symbols
Introduction
Intended Use
Product Overview
Principle of Operation
Baseline Study
Oral Appliance (OA) Study
System Components
User Prole
Contraindications
Warnings
Cautions
General Information and System Description
Patient Information Portal
Data Viewer
MATRx plus Tablet
Tablet Connection Icons
MATRx plus Recorder
MATRx plus Sensors
Effort Belt
Nasal Cannula
Pulse Oximeter
Mandibular Positioner (MP)
MATRx plus Titration Trays
MATRx plus System Installation and Set-up
Portal Access and Account Set-up
Data Viewer Software Installation
Minimum PC System Requirements
Data Viewer Download from the Portal
MATRx plus Tablet Set-up
Updating the MATRx plus Tablet Software
MATRx plus Cleaning and Disinfection
Table of Contents
2
2
6
7
8
8
8
9
9
9
10
11
11
11
13
14
14
15
15
17
18
19
19
19
20
20
21
22
22
22
22
22
23
23
23

Preparation
Cleaning
Cleaning Procedure: MP and Tablet Cover
Cleaning Procedure: Recorder, Tablet and Power Adaptors
Disinfection
Disinfection Procedure: MP
Disinfection Procedure: Tablet Cover
Disinfection Procedure: Recorder, Tablet and Power Adaptors
Packaging and Storage
Using the MATRx plus System
MATRx plus Tablet Functions
Charging the Tablet and Recorder
Connecting the Sensors to the Recorder
Connecting the Effort Belt
Connecting the Nasal Cannula
Connecting the Pulse Oximeter
Connecting the Mandibular Positioner (MP)
Preparing for an OA Study: Fitting Trays and Taking Impressions
Portal Functions for Setting up a Study
Create a Patient
Start a Study
Assign a Specialist
Find a Patient
Syncing the Tablet with the Study Ordered
Inspection, Maintenance and Testing
Functional Check
Dispensing the MATRx plus System
Post Study Patient Interview
Downloading the Patient’s Study Data
Reviewing the Patient’s Study Data
Opening the Study
Data Viewer Functions
Reviewing the Data and Editing the Display
Navigating the Study
Adjusting Channel Gain and Offset
Excluding Time Periods
24
25
26
26
27
27
28
28
28
29
29
30
31
31
31
32
33
34
35
35
35
36
37
37
38
38
40
42
43
44
44
44
44
46
49
50
4

5
Scored Events
Creating Custom Layers for Manual Scoring
Preparing a MATRx plus Patient Report
How Parameters are Calculated
Adding an Interpretation to a Report
Baseline Study Report
OA Study Report
Troubleshooting
FAQs
System Troubleshooting
HCP Tablet Error Messages
Patient Tablet Error Messages
Accessories List
Specications
Operating Conditions
MATRx plus Tablet
MATRx plus Recorder
Pulse Oximeter
Effort Belt
Nasal Cannula
Snoring
Data Transfer
Mandibular Positioner
MATRx plus Titration Trays
Impression Material
Masimo License Agreement
Manufacturer Declaration for Emissions
Federal Communications Commission Notices
Industry Canada Statement
Radiation Exposure Statement
Appendix 1: Re-Pairing a Tablet and Recorder
Appendix 2: Using Wi-Fi on the Tablet
Appendix 3: Detailed Principle of Operation of an OA Study
51
52
54
55
55
56
57
60
60
60
64
66
69
70
70
70
70
70
71
71
71
71
73
73
73
73
74
75
76
76
77
78
79

6
Table of Figures
Figure 1 Components of the MATRx plus System
Figure 2 Patient Information Portal: User Interface
Figure 3 Data Viewer: User Interface
Figure 4 MATRx plus Tablet
Figure 5 MATRx plus Recorder Front
Figure 6 MATRx plus Recorder Rear
Figure 7 Eort Belt and Sensor Cable
Figure 8 Nasal Cannula
Figure 9 Pulse Oximeter
Figure 10 Mandibular Positioner (MP)
Figure 11 Lower Titration Tray
Figure 12 Upper Titration Tray
Figure 13 Charging the Recorder
Figure 14 Charging the Tablet
Figure 15 Attaching the Eort Belt
Figure 16 Connecting the Sensor Cable to the Recorder
Figure 17 Attaching the Nasal Cannula
Figure 18 Connecting the Nasal Cannula to the Recorder
Figure 19 Attaching the Pulse Oximeter
Figure 20 Connecting the Pulse Oximeter to the Recorder
Figure 21 Tray Attachment Pins
Figure 22 Securing the Titration Trays to the MP with the Tray Attachment Pins
Figure 23 Connecting the MP to the Recorder
10
14
15
15
18
18
19
19
20
20
21
21
30
30
31
31
31
32
32
32
33
33
34

7
Symbols
SYMBOL NAME DESCRIPTION
Indicates the possibility of damage to equipment or
inability to successfully perform the study.
Caution
The device should be kept within the temperature limit
as stated.
IP22
Indicates the possibility of injury to people.
Rx Only
Note Emphasizes a characteristic or important consideration.
Indicates the device can be only used for prescribed
purposes.
Indicates information that may require further instructions.
Indicates that the accessory supplied is non-sterile.
Indicates the accessories that are single patient use for
one study only.
The device should be kept dry.
The device has a source of non-ionizing radiation.
The device should be kept within the humidity limit as
stated.
Indicates a Type BF Applied Part.
Indicates that the component is protected from touch
by fingers and objects greater than 12 millimeters and
protected from dripping water less than 15 degrees from
vertical.
Warning
Caution
Note
Prescription only
Consult Instructions
Non-Sterile
Do Not Reuse
Keep Dry
Non-ionizing radiation
Temperature Limitation
Humidity Limitation
Waste Electrical and
Electronic Equipment (WEEE)
Device Manufacturer
Date of Manufacture
Batch code
Catalogue number
Serial Number
Type BF
Ingress Protection
Dispose of the device appropriately as per the
applicable regulations.
Indicates the device manufacturer.
Indicates the date of manufacture.
Indicates the manufacturer’s batch code.
Indicates the catalog number of the device.
Indicates the serial number of the component.
Warning

8
Introduction
Intended Use
The MATRx plus is indicated for use by a lay person in a home and hospital environment under the direction of a
Healthcare Professional (HCP).
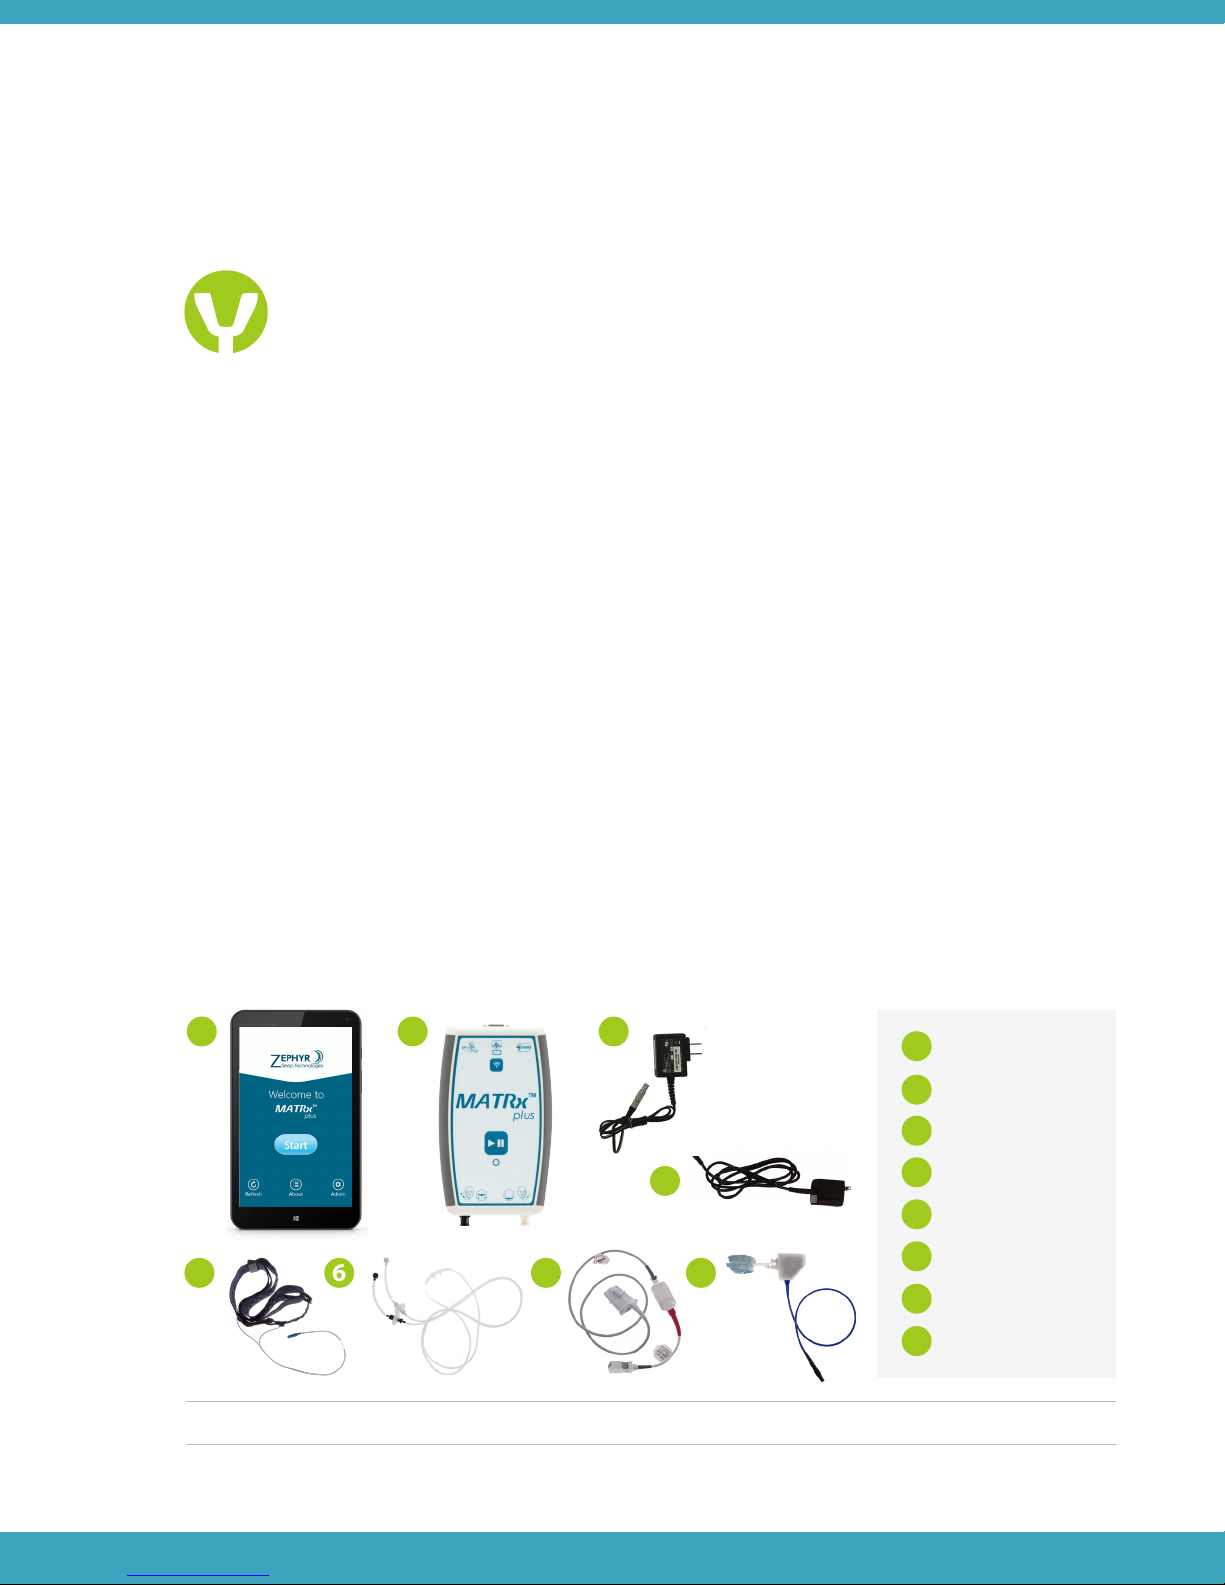
MATRx plus records the following data: patient respiratory nasal airflow, snoring, blood oxygen saturation, pulse,
respiratory effort and body position during sleep. MATRx plus uses these recordings to produce a report for the
HCP that may aid in the diagnosis and assessment of sleep disordered breathing for adult patients.
The MATRx plus device may also be used with an automated mandibular positioner that uses feedback control
to record changes in the patient’s respiratory status related to repositioning of the mandible during an overnight
study.
MATRx plus uses these recordings to produce a report for the HCP that can be used to prospectively identify
patients with mild to moderate obstructive sleep apnea who may be suitable for therapy with an oral appliance
and to recommend a target mandibular position.
The use of the device does not replace the need for follow-up testing to determine the initial and ongoing
effectiveness of the therapy as recommended by clinical practice guidelines.
Product Overview
MATRx plus is a portable recorder used to conduct an overnight sleep study in a clinical, hospital or home
environment excluding: outdoors, vehicles, train stations, bus stations, airports, museums, theatres. This device is
not intended for use near surgical equipment or magnetic resonance imaging equipment.
The device is deployed by a healthcare professional (e.g. sleep technician, dental technician, physician, nurse, etc.).
MATRx plus records breathing through nasal airflow, oxygen saturation and abdominal effort while the patient
sleeps. The device can be used in an Oral Appliance (OA) Study to determine in which patients with obstructive
sleep apnea (OSA) mandibular advancement by an oral appliance will reduce obstruction of airflow, thereby
identifying patients suitable for oral appliance therapy (OAT). This is accomplished by a temporary appliance fit
to the patient’s teeth that automatically incrementally and reversibly advances the patient’s mandible forward
in response to respiratory information detected. The data collected from the OA Study is automatically analysed
and an assessment of whether the patient is expected to achieve successful therapy from the oral appliance is
provided.
The device selects patients as suitable for oral appliance therapy and recommends a target mandibular position
based on a success criterion of an oxygen desaturation index (ODI) of less than 10 events per hour with a 4%
desaturation criterion.

9
OA STUDY
An OA Study cannot be used to make a diagnosis of SDB.
The purpose of an OA Study is to identify OSA patients who will be favourable candidates for OAT
and, in those patients, determine the minimum therapeutic protrusive distance for a custom-fitted
oral appliance. In addition to the standard components, the OA Study employs a mandibular
positioner (MP) to incrementally adjust the position of the mandible during the study.
The study is conducted over the course of 2-3 nights during which the following data will
be collected:
Oxygen saturation (SpO2)
Heart rate
Nasal airflow
Snoring
•
•
•
•
Respiratory effort
Body position
Mandibular position
•
•
•
This multi-night study consists of two different types of studies, a Dynamic Study and a Static
Study. The type of study, and the specific parameters for each successive night will depend on the
data collected and analyzed from the previous study night. The progress from one night to the
next will be automated and communicated to the patient and the HCP by the device.
Dynamic Study
During this type of study night, the system will respond to respiratory events by protruding
the mandible in 0.2 to 0.3mm steps, will moving throughout the patient’s mandibular range of
motion.
1
Principle of Operation
The MATRx plus System can be set up to perform two dierent types of sleep studies, a Baseline Study or
an Oral Appliance (OA) Study.
BASELINE STUDY
The purpose of the Baseline Study is to facilitate the diagnosis of sleep disordered breathing (SDB).
During this study, the following data will be collected:
Oxygen saturation (SpO2)
Heart rate
Nasal airflow
•
•
•
Respiratory effort
Body position
Mandibular position
•
•
•

10
Figure 1 – Components of the MATRx plus System
SYSTEM COMPONENTS
The components of the MATRx plus System include a Tablet, a Recorder and the following sensors: Effort Belt,
Nasal Cannula, Pulse Oximeter and an MP with Titration Trays (see Figure 1). These body-mounted sensors are
used to collect information about the patient’s respiratory pattern while monitoring oxygen saturation and heart
rate. The device interacts wirelessly to upload the data collected from the study to the Patient Information Portal
where a Data Viewer is used to facilitate analysis, interpretation and report generation.
12 3
4
56 7 8
1
2
3
4
5
6
7
8
Tablet
Recorder
Recorder Charger
Tablet Charger
Effort Belt
Nasal Cannula
Pulse Oximeter
MP and Trays
2Static Study
During this type of study night, the system will move the mandible to the target protrusive
position at the calculated during the first night, and will refine the position only as needed.
The majority of patients will only require two OA Study nights. If a third night is needed, it will be
another Static Study at a new target protrusive position.
For a detailed overview on the Principal of Operation during an OA Study, Refer to Appendix 3.
The OA Study workflow is as follows:
Titration Trays are prepared and the MATRx plus System is set-up for the patient (i.e. patient data
and study type are entered)
OA Study is performed and the data is automatically uploaded to the Patient Information Portal
for review
A custom oral appliance is prescribed if patient is predicted to be a responder to OAT
•
•
•

Warnings
Federal Law restricts this device to sale by or on the order of a licensed practitioner. Prescription use only. To
be used only for prescribed purposes.
Read all manuals and labels prior to use. Ensure the patient has received training prior to dispensing.
The device is not certified for continuous monitoring where failure to operate can cause injuries or death.
A Pulse Oximeter should not be used as an apnea monitor.
This device should not be prescribed for patients that are unable to understand and comply with instructions,
including removal of the Titration Trays unassisted.
The HCP (e.g. sleep technicians, dental office staff, sleep physicians and dentists) should consider the medical
history of the patient, including history of asthma, breathing, respiratory disorders, neurologic diseases or
other relevant health problems, and refer the patient to the appropriate HCP before prescribing the device.
Oral appliance prediction may not be accurate in cases of central sleep apnea (CSA) and severe respiratory
disorders.
Patients fitted with an oral appliance after their MATRx plus Study, as prescribed by the interpreting physician,
should be monitored and undergo further sleep testing with their therapeutic appliance in place to ensure
adequate treatment is achieved.
Use of the device during an OA Study may cause:
1.
2.
3.
4.
5.
6.
7.
8.
9.
User Prole
The device is used by the following individuals:
Healthcare Providers who are responsible for dispensing the device, instructing the patient, assessing suitability
and prescribing treatment
Patients who will be using the device for a home sleep study
•
•
Contraindications
This device is not to be used as an apnea monitor or in a life supporting or life sustaining situation
This device is not to be used by patients under the age of 18
The MATRx plus device is MR unsafe
•
•
•
In an OA Study mode, the device is not recommended for use in patients who:
Have loose teeth or advanced periodontal disease
Have full dentures or dental implants
•
•
Temporary bite changes
Gum or tooth discomfort
Jaw discomfort
•
•
•
Jaw joint discomfort
Increased salivation
Dry mouth
•
•
•
11

12
Nausea or vomiting
Jaw or mouth pain
Adverse reaction to any system component
•
•
•
Use of the MATRx plus may cause disruption in sleep from the use of the sensors and mandibular positioner.
Stop use of the device during an OA Study if the patient experiences any of the following:
Electric shock hazard. Do not remove or disassemble any covers, enclosures or parts of system components.
The system is not user serviceable. Do not use the device near liquids. Contact Zephyr for service or repair
inquiries.
Do not charge the Recorder while it is connected to the patient.
Do not use extension cords or adaptors of any type for device charging. The power cord and plug must be
intact and undamaged. Use only the chargers provided.
To ensure patient electrical isolation, connect only to other equipment with electronically isolated circuits
when in use. Do not connect to an electrical outlet controlled by a wall switch or dimmer.
This device needs special precautions regarding EMC and needs to be installed and put into service
according to the EMC information provided (see Manufacturer Declaration for Emissions).
Portable and mobile RF communications equipment such as wireless home network devices, mobile phones,
cordless telephones and their base stations, walkie-talkies can affect this device and should be kept at least a
distance 30 cm away from the equipment.
The device cannot be used during defibrillation.
Do not use the device during radiography or x-ray studies.
Fire, explosion or severe burn hazard. Do not crush, disassemble, heat above 100C (212F), incinerate or expose
the device to water.
Explosion hazard. Do not use the Pulse Oximeter in the presence of flammable anesthetics or other
flammable substances in combination with air, oxygen-enriched environments, or nitrous oxide.
A pulse rate measurement is based on the optical detection of a peripheral flow pulse and therefore may not
detect certain arrhythmias. The Pulse Oximeter should not be used as a replacement or substitute for ECG
based arrhythmia analysis.
A Pulse Oximeter should be considered an early warning device. If a trend towards patient deoxygenation
is observed, blood samples should be analyzed by a laboratory CO-Oximeter to completely understand the
patient’s condition.
Do not place the device or external power supply in any position that might cause it to fall on the patient. Do
not lift the device by the power supply cord or patient cable; use only the body of the device.
Inspect the Titration Trays and tray material carefully prior to each use. Stop the study and return the system
to the Healthcare Provider if:
Use of this equipment adjacent to or stacked with other equipment should be avoided because it could
result in improper operation. If such use is necessary, this equipment and other equipment should be
observed to verify that they are operating normally.
10.
11.
12.
13.
14.
15.
16.
17.
18.
19.
20.
21.
22.
23.
24.
25.
26.
The tray material has degraded
The tray material has come off the Titration Trays during the study. If this occurs, remove any pieces form
the mouth.
The Titration Trays are uncomfortable due to the tray material
•
•
•

13
Cautions
Only use with Zephyr approved parts and accessories.
Failure to use Zephyr approved parts and accessories will void the warranty.
The cables provided are designed for device use only and must not be used with other equipment; the
device must not be used with cables other than those provided. Misuse presents a risk for interference with
and/or damage to other equipment.
Do not blow into the Nasal Cannula connection to avoid causing damage to the device.
Avoid electrostatic discharge. The relative humidity should be at least 5%.
Avoid impeded blood flow (e.g. blood pressure cuff ) as this may affect pulse and saturation measurements.
Do not expose the device to open flames.
Do not prescribe this test for patients who are unable to breathe comfortably through their nose while
supine.
Do not soak or immerse the device or sensors in water, solvents or cleaning solutions.
Do not use a Pulse Oximeter sensor with exposed optical components.
Do not autoclave, pressure sterilize, or gas sterilize the device.
If the accuracy of any measurement does not seem reasonable, first check the patient’s vital signs by an
alternate means. Inaccurate oximetry measurements may be caused by:
1.
2.
3.
4.
5.
6.
7.
8.
9.
10.
11.
12.
Incorrect sensor application or use
Significant levels of dysfunctional hemoglobin (e.g. carboxyhemoglobin, methemoglobin)
Intravascular dyes (e.g. indocyanine green, methylene blue)
Interfering substances: Dyes, nail polish or any substance containing dyes that change usual blood
pigmentation may cause erroneous readings
Exposure to excessive illumination, such as surgical lamps (especially ones with a xenon light source),
bilirubin lamps, fluorescent lights, infrared heating lamps, or direct sunlight. Exposure to excessive
illumination can be corrected by covering the sensor with a dark or opaque material.
Excessive patient movement or motion artifacts
•
•
•
•
•
•
The oxygen saturation measured via pulse oximetry (i.e. SpO2) is empirically calibrated to functional arterial
oxygen saturation in healthy adult volunteers with normal levels of carboxyhemoglobin (COHb) and
methemoglobin (MetHb). A Pulse Oximeter cannot measure elevated levels of COHb or MetHb. Increases
in either COHb or MetHb will affect the accuracy of the oximetry measurement.
Venous congestion may cause erroneous low readings of actual arterial oxygen saturation. Therefore,
assure proper venous outflow from monitored site. Sensor should not be below heart level (e.g. sensor on
hand of a patient in a bed with arm dangling to the floor).
Venous pulsations may cause erroneous low readings (e.g. tricuspid value regurgitation)
Patients who suffer from abnormal pulse rhythms
The pulsations from intra-aortic balloon support can be additive to the pulse rate on the Pulse Oximeter
pulse rate display. Verify patient’s pulse rate against the ECG pulse.
Elevated levels of total bilirubin may lead to inaccurate oximetry measurements
•
•
•
•
•
•

Create a unique patient profile for each MATRx plus study
Find a patient who has previously been entered
Determine the type of study required for each patient (i.e. Baseline Study, OA Study)
View recent patient updates (i.e. patient study status)
Download patient study data
Download the Data Viewer
With very low perfusion at the monitored site, the readings may read lower than core arterial oxygen
saturation
Placement of a sensor on an extremity with a blood pressure cuff, arterial catheter, or intravascular line
Loss of pulse signal can occur in any of the following situations:
13.
The Pulse Oximeter sensor is too tight
There is excessive illumination from light sources such as a surgical lamp, a bilirubin lamp, or sunlight
A blood pressure cuff is inflated on the same extremity as the one with the Pulse Oximeter attached
The patient has hypotension, severe vasoconstriction, severe anemia, or hypothermia
There is arterial occlusion proximal to the Pulse Oximeter
The patient is in cardiac arrest or is in shock
•
•
•
•
•
•
General Information and System Description
Patient Information Portal
The Portal is used to:
•
•
•
•
•
•
•
•
14
Figure 2 – Patient Information Portal: User Interface
Home
Log Out
Portal Function
Selections
Profile

Figure 3 – Data Viewer: User Interface
Toolbar
Sensor Status
Mandibular Protrusion
Oxygen Saturation
Nasal Airflow
Heart Rate
Respiratory Effort
Snoring
Body Position
Review the real-time wave form recorded during the study night(s)
Generate reports for review
Data Viewer
The Data Viewer is used by the HCP to:
•
•
15
Power Adaptor
Connection Port
Power Button
Volume Button
Touch Screen
Windows Button
MATRx plus Tablet
The Tablet’s primary function is to guide the
user in system operation, and to store and relay
patient data to the Patient Information Portal.
Together with the Recorder, the Tablet
intelligently commands movements of the MP
based on the patient’s response during an OA
Study.
The Tablet is equipped with a data plan on the
cellular network.
Figure 4 – MATRx plus Tablet

The HCP uses the Tablet to:
Set-up the patient’s study based on information previously entered in
the Portal
Perform a Functional Check
Perform the cleaning and disinfection procedures
Clear patient data
•
•
•
•
The patient uses the Tablet to:
Verify their mandibular range of motion
View instructions and how-to videos on device use and sensor attachment
Check their sensor signal connections
Start, pause and end their study
Check the progress of their study nights
•
•
•
•
•
16

The Recorder is paired and connected to the Tablet.
The Recorder is fully charged.
This icon can be pressed to see the current battery charge.
The Recorder requires charging.
This icon can be pressed to see the current battery charge.
The Recorder is plugged into power and is charging.
This icon can be pressed to see the current battery charge.
The Recorder is plugged into power and fully charged.
This icon can be pressed to see the current battery charge.
The Eort Belt is connected to the Recorder.
The Nasal Cannula is connected to Recorder and airflow is detected.
The Pulse Oximeter is connected to the Recorder and a heart rate is detected.
The MP is connected to the Recorder.
The Tablet is plugged into a power source.
The Tablet is unplugged. The battery fill shows the current charge.
This icon can be pressed to see the current battery charge.
TABLET CONNECTION ICONS
The icons on the top of the Tablet screen indicate the functional status of all system components.
The icons will be displayed from left to right and only when the component is needed.
A green icon indicates that the component is properly connected as follows:
17

The Recorder will record body position
during the study. It should be clipped
to the Effort Belt and positioned midline
and in front of the patient’s navel.
Effort Belt
Connection Port
Power Adaptor
Connection Port
Paired LED
Pair Button
Pause/Resume
Study Button
Nasal Cannula
Connection Port
MATRx plus Recorder
The Recorder’s primary function is to collect
data from each of the sensors, control the MP
and relay this data to the Tablet.
The body-mounted sensors are connected
to the Recorder and designed to record the
following:
Figure 5 – MATRx plus Recorder Front
Respiratory effort
Nasal airflow
Oxygen saturation (SpO2)
Heart rate
Snoring
Body position
Mandibular position
(only during an OA Study)
•
•
•
•
•
•
•
Figure 6 – MATRx plus Recorder Rear
Pulse Oximeter
Connection Port
Nasal Cannula
Connection Port
Power Charge LED
MP Connection
Port
Recorder
Belt Clip
18

MATRx plus Sensors
EFFORT BELT
The Effort Belt measures respiratory effort.
The Effort Belt is an applied part.
The sensor cable is used to connect the
Effort Belt to the MATRx plus Recorder.
Figure 7 – Effort Belt and Sensor Cable
Figure 8 – Nasal Cannula
Warning
The device and Effort Belt should be worn over clothing.
Caution
Use only Zephyr supplied Effort Belt sensors.
Other sensors may cause inaccurate measurements
or performance.
Note
Before use, carefully read the Effort Belt’s directions
for use.
NASAL CANNULA
The Nasal Cannula measures nasal airflow and snoring.
The Nasal Cannula is an applied part.
It features a dual lumen cannula with air filters. This ensures
the airflow from each nostril is measured independently which
prevents signal inaccuracies when airflow is interrupted from
either nostril during the night.
The air filters prevent transmission of moisture and
contaminants to and from the MATRx plus Recorder.
Warning
The Nasal Cannula is for single patient use only.
Caution
Use only Zephyr supplied Nasal Cannulas.
Other sensors may cause inaccurate measurements or performance. Nasal Prongs
Dual Lumen
Cannula
Air Filters
Cannula Connectors
Effort Belt
Sensor Cable
19

PULSE OXIMETER
The Pulse Oximeter measures oxygen saturation and
heart rate. The Pulse Oximeter is an applied part.
Figure 9 – Pulse Oximeter
Note
Use only Masimo pulse oximeter sensors (see
Pulse Oximeter Sensors). Other sensors may
cause improper measurements or performance.
Before use, carefully read the Masimo pulse oximeter’s
directions for use.
Figure 10 – Mandibular Positioner (MP)
MANDIBULAR POSITIONER (MP)
The MP connects to the patient’s Titration Trays
via the Upper and Lower Tray Attachment Rods
and automatically moves the patient’s mandible
during sleep when respiratory events are
detected.
Throughout the study, the MP sends signals to
the Recorder regarding the patient’s mandibular
position.
Upper Tray
Attachment
Rod
MP Connector
Lower Tray
Attachment
Rod
Sensor Hood
Oximeter Connector
20
Table of contents
Popular Medical Equipment manuals by other brands

Stander
Stander EZ Adjust Bed Rail manual

Olympus
Olympus EVIS EXERA II instructions

MEDIPREVENTIECENTRUM
MEDIPREVENTIECENTRUM Pulse Oximeter Instructions to user

Boston Scientific
Boston Scientific Precision SCS System Series Directions for use

Acteon
Acteon x-mind ac Operator's manual

touch bionics
touch bionics i-Limb Wrist Technical manual