ZEX 82064 User manual

1
ZEX™
3418 Democrat Rd.
Memphis, TN 38118
Phone: 1-888-817-1008 Fax: (901) 375-3430
www.zex.co
m
Part #ZEX162
Revised 10/1/07
Part #82064 Add-A-Stage EFI Nitrous System
Thank you for choosing ZEX™ products; we are proud to be your manufacturer of choice. Please read
this instruction sheet carefully before beginning installation, and also take a moment to review the
included limited warranty information.
Description Qty Description Qty.
Nitrous Solenoid 1 .038 N20/Fuel Jet 1
Fuel Solenoid 1 .043 N20/Fuel Jet 1
24” -4AN Hose, 3 AN nut, 1/8 NPT end 2 .052 N20 Fuel Jet 1
12” Hose -4AN, -4AN Swivel Ends 2 .064 N20/Fuel Jet 1
-4AN Swivel Branch Fitting 2 .074 N20/Fuel Jet 1
Nitrous Nozzle 1 .088 N20/Fuel Jet 1
¼ NPT to -4AN Filter Fitting 2 Pushbutton Switch 1
1/8 NPT Bulkhead Fitting W/ Nut 1 Red 18 GA. Wire 15 ft.
Solenoid bracket 2 Red 14 GA. Wire 15 ft.
.019 N20/Fuel Jet 1 30 amp Fuse Holder 1
.021 N20/Fuel Jet 1 30 amp Fuse 1
.026 N20 Fuel Jet 1 Bosch 20 amp Mini Relay 1
.030 N20/Fuel Jet 1 Solenoid Bracket Screws 4
.034 N20/Fuel Jet 1 1/8-27 NPT Tap 1
.036 N20/Fuel Jet 1
INSTRUCTIONS

2
ZEX™
3418 Democrat Rd.
Memphis, TN 38118
Phone: 1-888-817-1008 Fax: (901) 375-3430
www.zex.co
m
Part #ZEX162
Revised 10/1/07
Why our system is better:
•A complete 2nd stage add-on nitrous system, compatible with any EFI nitrous system. Everything is
included in this kit for an easy, professional installation.
•Adjustable from 50-250 horsepower. Maximum horsepower for all-out racing use.
•The ZEX™ Add-A-Stage Nitrous System is activated by a pushbutton as a second stage of nitrous
on top of your base nitrous kit. Adds power progressively to avoid tire spin.
•Unique nozzle design has Active Fuel Control™ built in. This feature monitors bottle pressure and
when the nitrous system is engaged, it adds or subtracts enrichment fuel so the engine never runs
too rich or too lean.
Quick Start Reference Guide:
How the ZEX™ Add-A-Stage Nitrous System works: The ZEX™ Part #82064 Add-A-Stage
Nitrous System begins with inline T connections to the base kit’s nitrous and fuel supply lines. These
connections then feed the 2nd stage nitrous kit’s fuel and nitrous solenoids. These solenoids are
normally closed but are opened when the base nitrous system is armed and the 2nd stage’s pushbutton
switch is depressed. Once these solenoids open, the nitrous and fuel are delivered to the nitrous nozzle
via flexible delivery lines. The amount of nitrous and fuel that is injected through the nozzle is
adjustable by means of metering jets installed in the nozzle itself. These metering jets allow for easy
changes in horsepower settings.
Work safely. Always wear eye protection and gloves when working with lines or hoses that contain
pressurized nitrous oxide or fuel. Never transport nitrous cylinders loose in a trunk or the back of a
pick-up truck and especially NOT within a vehicle's interior whether the cylinder is full OR empty.
Always disconnect the GROUND side of the battery when working on any electrical components.
Nitrous oxide won't fix problems you already have. Before you install your Add-A-Stage Nitrous
System, be sure your engine is in good mechanical condition. Intermittent wiring problems, etc., can
lead to erratic system performance and possible engine damage.
All the power comes from the fuel, not the nitrous. Nitrous oxide is simply a tool that allows you to
adjust how much and how quickly the engine burns the fuel. If the fuel isn't there, the power won't be
either.
Avoid detonation at all times. Nitrous enhanced detonation is much more damaging than detonation
that occurs when naturally-aspirated due to the increased amount of fuel available for releasing energy
and the fact that more oxygen is present.
When the system is activated, if something doesn't feel or sound right, BACK OFF. If you hear
any detonation or feel anything unusual, get off the throttle. It's a lot easier to check everything over
than it is to just try to drive through it and damage expensive parts. Don't activate or have the system
activated when you hit the rev limiter.
Spark plugs & nitrous performance: Quite often, factory type, wide-gap, projected nose spark plugs
will produce a detonation condition after a few seconds of nitrous use. The solution to the problem is
to install spark plugs that have a colder heat range and proper ground strap design for nitrous use, we

3
ZEX™
3418 Democrat Rd.
Memphis, TN 38118
Phone: 1-888-817-1008 Fax: (901) 375-3430
www.zex.co
m
Part #ZEX162
Revised 10/1/07
recommend ZEX™ spark plugs. Consult your preferred spark plug manufacturer to ensure you install
the correct plugs for the nitrous level you choose to run. Also, due to the cooler and denser inlet air
charge that nitrous creates, it may be necessary to close-up your spark plug gaps to eliminate any
misfiring. In our experience, .030 to .035 in. spark plug gaps typically will ensure proper ignition. You
may be able to run a wider gap, or you may have to close them up, just be aware of this if you start to
experience an ignition misfire when using your nitrous system.
Do not use Teflon sealing tape on any fittings in a ZEX™ Add-A-Stage Nitrous System. It is easy
for Teflon tape to get pulled into the system, causing blockages that can ultimately lead to incorrect
nitrous system performance and potentially, engine damage. Only use liquid thread sealer for all NPT
type fittings. Do not use any thread sealing compound on AN style threads.
Do not attempt to start your engine if nitrous has been accidentally injected into the engine while
it was not running. Disable the ignition, and with the throttle wide open, turn over the engine for
several seconds to clear the nitrous from the engine. Failure to do this before restarting the engine can
lead to a dangerous intake system backfire.
Do not engage your nitrous system below 2500 rpm. This ensures that you will not have excessive
cylinder pressures that could cause engine damage.
When finished using your nitrous system, close the nitrous bottle valve and relieve the line
pressure. This eliminates the possibility that nitrous could inadvertently accumulate in the intake
manifold while the nitrous system is not being used.
Do not run excessive bottle pressures. Excessive bottle pressures, over 1100psi, are dangerous to
your engine. Your ZEX™ Add-A-Stage Nitrous System is calibrated and optimized to operate from
900-1000psi. Exceeding this will not improve performance. Over 1100psi also runs the danger of
locking the nitrous solenoid closed due to excessive pressure working against the valve’s plunger. If
this happens, you must cool the nitrous bottle down to lower the pressure. This will allow the valve to
operate properly again.
Start with the lowest horsepower setting and work your way up This ensures if you have any
tuning issues to work out on your vehicle, they will get sorted out with a smaller shot of nitrous that
will be less likely to damage your engine. Once you have the car working well on the smaller shot, you
can then safely start to step up your add-a-stage horsepower.
Make sure your vehicle has an adequate fuel supply. Nitrous systems put a large demand on your
vehicle’s fuel system. Make sure you have a large enough fuel pump to handle the demands of your
engine, as well as the nitrous system.
How to adjust power levels: The ZEX™ Add-A-Stage Nitrous System is designed for multiple power
levels. Metering jets installed in the nitrous nozzle control these power levels. To change the power
output, all you need to do is install the appropriate set of jets. The correct combination of jets is listed
on the tune-up sheet on the back of this instruction manual.
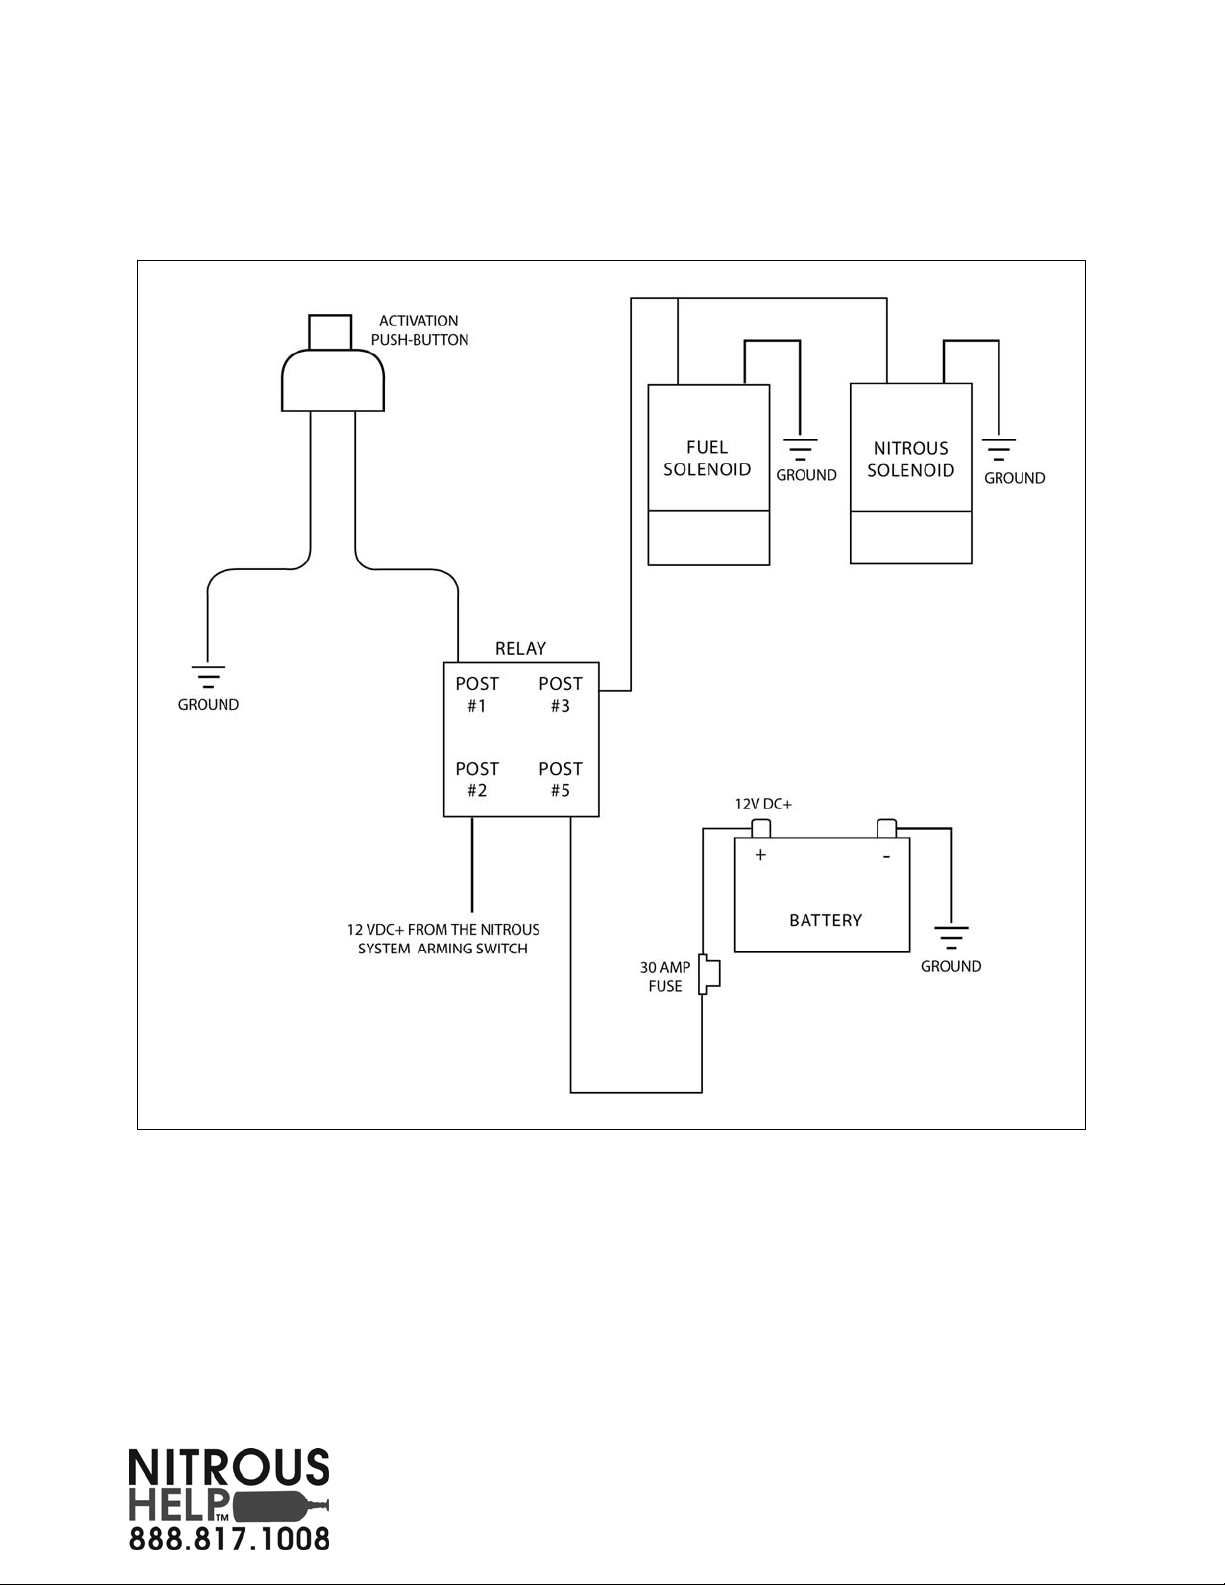
Activate only at wide open throttle. Do not activate the second stage of nitrous at anything other than
wide open throttle. If possible, wire the activation pushbutton in so that the second stage cannot be

4
ZEX™
3418 Democrat Rd.
Memphis, TN 38118
Phone: 1-888-817-1008 Fax: (901) 375-3430
www.zex.co
m
Part #ZEX162
Revised 10/1/07
engaged unless the vehicle is at wide open throttle. For those systems that cannot incorporate a wide
open throttle interrupt, remember to always lift off the activation button before lifting off the throttle.
Failure to follow these recommendations can lead to engine damage and dangerous intake system
backfires.
Installation Instructions:
1. Decide where to put everything. Before you start to install the various components of this kit,
you’ll have to find the best locations of each component by trial fitment and careful
measurement. First, decide where you want to mount the nitrous and fuel solenoids.
Remember, the stainless steel braided lines that connect the solenoids to the nitrous nozzle are
12 inches long. Observe and mark the location on the air inlet tube where you would like to put
the additional nitrous nozzle. The activation pushbutton should be installed in a position
convenient to the driver but not in an area where it could be accidentally engaged.
2. Install inline tee’s for fuel and nitrous.
A. Disconnect both the fuel and nitrous delivery lines where they attach to the solenoid inlets.
B. Attach the -4AN swivel branch fittings to base kit’s fuel & nitrous solenoid inlets (see Fig.
A).
C. Attach the 12in. -4AN hose assemblies to the -4AN swivel branch fittings.
3. Mount nitrous and fuel solenoids. Assemble the –4AN filter fittings into the inlet side of both
the nitrous and fuel solenoids. Install the 2 ft. long, –4AN hoses into the solenoid outlets. Make
sure you use a liquid thread sealant on all NPT pipe threads. Attach the solenoid brackets to the
solenoids using the pan head Allen screws and find a suitable mounting location for them.
Finally, attach the 12 in. nitrous and fuel feed lines, from the -4AN swivel branch fittings, to
the inlets of the 2nd stage nitrous and fuel solenoids.
Fig. A
-4AN Swivel
Branch Fittings
Outlets go to the second
set of fuel and nitrous
solenoid inlets
Inlets attach to nitrous
and fuel delivery lines
Nitrous
Management
Unit or fuel
and nitrous
solenoids
Fuel and nitrous solenoid inlets

5
ZEX™
3418 Democrat Rd.
Memphis, TN 38118
Phone: 1-888-817-1008 Fax: (901) 375-3430
www.zex.co
m
Part #ZEX162
Revised 10/1/07
4. Install nitrous nozzle. Optimum nozzle placement is 6” to 18” from the throttle body. This
range of distance gives the nitrous, fuel, and air, the proper time to mix before it enters the
intake manifold plenum. After you have determined where to mount the nitrous nozzle in the
intake, make sure this location won’t interfere with other components. Mark the spot and
remove the air inlet duct from your engine. Drill a 9/16 inch mounting hole and install the bulk
head fitting through it. Be sure to remove any drill shavings since they can severely damage
your engine if ingested. Install the nitrous nozzle so that the spray is in the direction of airflow.
We’ve enclosed a tap should you need to mount the nozzle in a metal duct (see Fig. B). Just
drill an 11/32 inch hole where you want to mount the nozzle, tap the hole, and install the
nozzle. Once the nozzle is installed, place the appropriate tuning jets in the nozzle and attach
the 2-foot long, -4AN hoses that come from the solenoids (see Fig. C).
5. Wiring
A. Mount the activation pushbutton switch in an easily accessible area for the driver.
B. Using the supplied electrical connectors and wire, refer to the wiring diagram for proper
routing and electrical connections for the nitrous system (see Fig. D). Always use the
supplied fuse for electrical system protection in the event of a short in the system. The best
positive (+) power source for the nitrous system’s solenoids is a direct connection from
relay post #5 to the battery’s positive (+) post. Do not splice into the factory wire harness, it
will not have the ability to supply the current required by the nitrous and fuel solenoids.
6. Check fuel and nitrous pressure lines.
A. Perform a final inspection of all plumbing and electrical connections to ensure that they are
correct.
B. Ensure that the nitrous bottle is turned off, and the line pressure is relieved.
C. Start the engine, and observe all fuel connections for any leaks. Fix any fuel leaks before
proceeding.
D. Turn off the engine.
E. Open the nitrous bottle valve. Listen carefully for any leaks as your valve is opened. Leaks
in the nitrous supply line will be obvious because they will be covered in frost.
F. If everything checks out, close the nitrous bottle and relieve the line pressure.
7. Check fuel quality & ignition timing. The last thing to do before enjoying your new nitrous
system is to ensure that the correct fuel for the horsepower you are making is in the tank and
the engine’s ignition timing is set correctly. All recommended ignition timing retard amounts
on the tune-up sheet are ABOVE AND BEYOND the timing settings you are using for your
Fig. C
Nozzle
Jets
Fuel and nitrous delivery
lines from the solenoids
Nozzle
Fig. B 1/8 NPT Tap

6
ZEX™
3418 Democrat Rd.
Memphis, TN 38118
Phone: 1-888-817-1008 Fax: (901) 375-3430
www.zex.co
m
Part #ZEX162
Revised 10/1/07
base nitrous tune-up. It is important to verify this with a diagnostic device or a timing gun
before you use your nitrous system for the first time. Do not assume that it is set properly. If the
ignition timing is not set correctly, severe engine damage may occur.
Fig. D

7
ZEX™
3418 Democrat Rd.
Memphis, TN 38118
Phone: 1-888-817-1008 Fax: (901) 375-3430
www.zex.co
m
Part #ZEX162
Revised 10/1/07
#82064, Add-A-Stage EFI Nitrous System Tune-Up Sheet
A word on why we have two different jet charts: When nitrous is sprayed into an engine, the nitrous
gas itself displaces a percentage of the air that is normally drawn into the engine. Since engines that do
not use a mass-air meter (i.e. speed-density) do not look at airflow, this displaced air does not affect
the amount of fuel the engine computer feeds to the engine. But, on an engine that uses a mass-air
meter, the air that is displaced by injecting the nitrous, lowers the airflow seen by the mass-air meter.
This causes the engine’s computer to reduce the engine’s fuel injector flow rate. To compensate for
this, the nitrous tune-up on a mass-air meter equipped engine is set-up to flow more fuel than an
equivalent tune-up for a non mass-air meter equipped engine.
Jet chart for engines using a mass-air meter:
50 hp 100 hp 150 hp 200 hp 250 hp
Nitrous (950psi) 36 52 64 74 88
Fuel (40psi) 21 30 36 43 52
Additional Ignition Retard (deg.) 2 4 6 8 10
Jet chart for engines NOT using a mass-air meter (i.e. speed-density):
50 hp 100 hp 150 hp 200 hp 250 hp
Nitrous (950psi) 36 52 64 74 88
Fuel (40psi) 19 26 30 34 38
Additional Ignition Retard (deg.) 2 4 6 8 10
Normally aspirated tuning requirements: For engines less than 10.25-1 compression ratio, using
combined nitrous system settings of 100 hp or less, pump premium fuel is required for safe operation.
For engines with 10.25-1 compression ratio or greater, using combined nitrous system settings higher
than 100 hp, high octane racing fuel is required for safe operation. Nitrous system fuel pressure must
be at least 40psi at the inlet of the fuel solenoid. Base fuel pressures higher than 45psi may require a
slight fuel jet adjustment to achieve optimum nitrous to fuel ratios. Track or dyno tuning will dictate
this.
Forced induction tuning requirements: For engines under 8psi of boost, using combine nitrous
system settings of 100hp or less, pump premium fuel is required for safe operation. For engines using
greater than 8psi of boost, using combined nitrous system settings higher than 100 hp, high-octane
racing fuel is required for safe operation. Nitrous system fuel pressure must be at least 40psi at the inlet
of the fuel solenoid. Base fuel pressures higher than 45psi may require a slight fuel jet adjustment to
achieve optimum nitrous to fuel ratios. Track or dyno tuning will dictate this.

8
ZEX™
3418 Democrat Rd.
Memphis, TN 38118
Phone: 1-888-817-1008 Fax: (901) 375-3430
www.zex.co
m
Part #ZEX162
Revised 10/1/07
Limited Warranty
ZEX™ warrants that all of its products are free from defects in material and workmanship, and against
excessive wear for a period of (1) one year from the date of purchase. This limited warranty shall
cover the original purchaser.
ZEX’s obligation under this warranty is limited to the repair or replacement of its product. To
make a warranty claim, the part must be returned within (1) one year of purchase to the address listed
below, freight prepaid. Items covered under warranty will be returned to you freight collect.
It is the responsibility of the installer to ensure that all of the components are correct before
installation. We assume no liability for any errors made in tolerances, component selection, or
installation.
There is absolutely no warranty on the following:
A) Any parts used in racing applications;
B) Any product that has been physically altered, improperly installed or maintained;
C) Any product used in improper applications, abused, or not used in conjunction with the
proper parts.
There are no implied warranties of merchantability or fitness for a particular purpose. There are
no warranties, which extend beyond the description of the face hereof. ZEX™ will not be responsible
for incidental and consequential damages, property damage or personal injury damages to the extent
permitted by law. Where required by law, implied warranties or merchantability and fitness are
limited for a term of (1) one year from the date of original purchase.
This warranty gives you specific legal rights and you may also have other legal rights, which vary from
state to state.
Table of contents