Zinwell Freeview ZMX-7500 Quick start guide

Zinwell ZMX-7500/DSE7500 Tuning Guides
For adding Bravo+1, Prime, Duke+1 and Prime+1
These instructions may take up to 30 minutes to complete.
Step 1
Check First
Please confirm that the green signal bar that appears for a short time at the bottom of the screen when you change channels
is 100% on both TV1 and TV3.
If this green bar is less than 95% on TV1, These instructions may fail. Click here to some tips which might solve the problem.
If you have a healthy green signal bar then go to next step
Step 2
On your remote press Menu
Then go down to System Configuration using the down arrow key.

Using the right arrow key on your remote, toggle to the right and then using the down arrow key, toggle down to Factory Default.
Press OK and enter in "0000" as the password.
The default password is "0000" unless you have changed it, If 0000 doesn't work, use "1269" instead. The password will revert to
"0000" after a Restore to Defaults".
Select Yes and then when requested pull the small black power plug, out of the right hand corner of your Zinwell Freeview
Receiver.
You should now have a blank screen, wait 10 seconds and then reconnect the power plug
Step 3.
Once rebooted, you will see a screen that will have Satellite, Country Name and City Name,
Please select your nearest city using the remotes arrow keys, then press OK and proceed. (It will now scan for Freeview
Channels, this may take 90 seconds)
Step 4
You will now be at TV One, with your remote press Menu
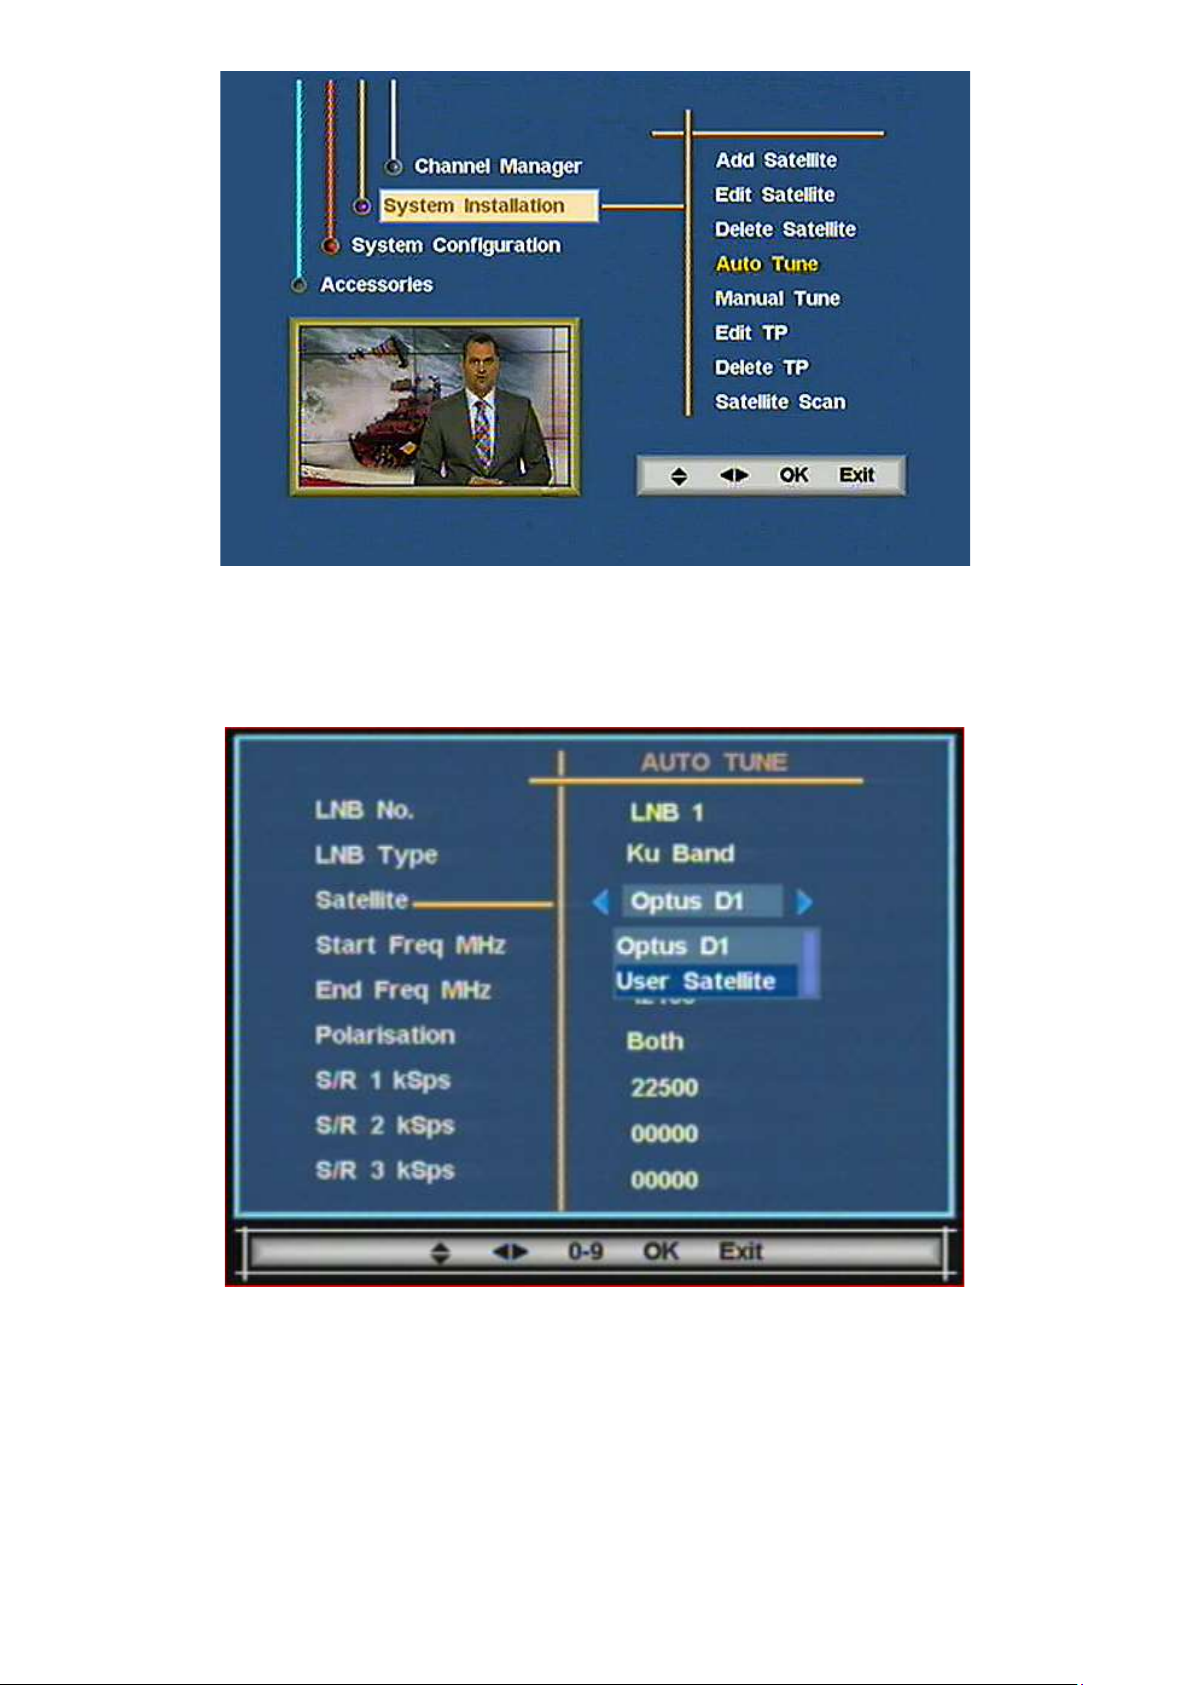
Then select System Installation
Then use the right arrow key to toggle to the right and then select Add Satellite (See photo above)
Enter in the same password “0000”

Step 5
You will now see a menu like this:
With your remote, go down to LNB 1 and check if the Signal Box (Located on the bottom right is showing a Yellow bar (100%
or equivalent).
If not? then toggle right and wait a few seconds and see if the signal box shows any signal. This is normally either LNB 1 or LNB
2
Once you have found which LNB has the signal at 100% then proceed to the next step.
Step 6
Go up to OPTUS D1 and toggle the right arrow key, toggle the down arrow key to select USER SATELLITE, and press OK
(You will notice the signal indicator is at 0%, this is normal)
On your remote, Press OK and OK again to save.
Scroll down to LNB No. and select the LNB number you found in the previous step (That did contain a signal). There will be no
signal indication at this stage.
Press OK to exit.
Then press EXIT to return to the main menu.
Step 7

Use the remote to go down to Auto Tune
Enter in the password
Step 8
1. On the remote toggle Right (You will see the drop down as seen above)
2. Use the arrow keys to select the "User Satellite”. (Do not select Optus D1 or you may lose existing channels and you will need
to go back to Step 2 )
If you don't see another Satellite other than Optus D1, please go back to Step 4
3. Press OK on the remote.

4. Use the remote arrow key to go down 1 to Start Freq MHz
5. Enter 12480 (Don't Push the OK button yet)
6. Then, use the remote arrow key to go down 1 to END Freq MHz
7. Enter 12486 (Don't Push the OK button yet)
8. Arrow key down to Polarisation and toggle right to set HORI
9. Now Press OK on your remote.
10. A message Tuning Complete will appear on screen for about two seconds only, press OK and save.
(If you see a message Tuning Failed instead, check that you have followed steps 4, 5 & 6 exactly).
Step 9

The receiver will start scanning and after about 30 seconds the TVNZ channels (including Maori Television) will be
duplicated. Press Ok and confirm save. Exit.
Step 10
When you have returned to normal TV, Press MENU
Then go down to System Installation, using your remote's arrow keys, toggle right and then toggle down to EDIT TP. Press OK.
Enter password.
Step 11

NOTE: If you see an existing entry with a Freq of 12519 you will need to delete that first using the Delete TP option in the
previous menu or you will get a “TP Exists” error when you try to change 12483 to 12519 as instructed below.
You will now see a screen similar to the one above.
You will now need to select the bottom row which says Freeview and showing User Satellite at the bottom left (It may already
be selected).
Press the OK button
You will then see a screen similar to the one below, with *12483 highlighted (may vary from 12480 to 12486).

Change the new Transponder Frequency (TP) from *12483 to 12519 as shown above
Confirm the Symbol Rate (SR) is 22500, Polarisation is Hori (Horizontal), press OK and save. (Note: you will see the yellow
signal bar as soon as you enter 12519.)
Step 12
It will now scan. Once completed it returns to normal TV. (Do not interrupt the scan or you will need to go back to Step 2)
If it says Service not collected, please continue - this is normal.
Step 13
Go to MENU > Channel Manager and then Channel Organiser
Step 14

Locate Maori Television on channel 9 and press 5
Rename to BravoPlus1.(Need Rename Help - see the end of these instructions)
Press OK and remain in Channel Manager
Locate *TVNZ 1 on channel 10 and press 5
Rename to Prime
Press OK and remain in Channel Manager
Locate *TVNZ 2 on channel 12 and press 5
Rename to DukePlus1
Press OK and remain in the Channel Manager
Locate *TVNZ 1+1 on 16, press 5 and rename to PrimePlus1
Press OK and remain in the Channel Manager
Press OK
*Note: Original Channel name displayed may be different in some areas
Step 15

Then.. Toggle to 17: Press 4 (Delete –a red cross will appear at the end of the line as shown),
Then cursor down to 18: Press 4
Then cursor down to 20: Press 4 and finally OK and confirm
Step 16
Press Menu
Toggle right and then toggle down to EDIT CHANNEL
PRESS OK
Step 17

You will see a screen like the one above.
Use the arrow buttons to select the 9 BravoPlus1 entry as shown
Using the Remote you need to match the information as shown in the picture above:
e.g. For 9 BravoPlus1
Audio: 1114 Press OK and toggle right; Video: 1014 Press OK and toggle right; PCR: 8184 Press OK
Step 18
Repeat for 10 Prime, 12 DukePlus1 and 16 Prime Plus 1 using the numbers shown in the picture above in Step 17 (Note: by
the time you read this 16 PrimePlus1 may not be available.on 16)
Press EXIT to return to live TV
You are done with adding the channels into your receiver, but during and at the start and end of Daylight Saving time we need to
adjust our date and time settings so that the Electronic Programme Guide works properly.

Step 19
1. On your remote press Menu, then go down to System Configuration. Then use the right arrow key, toggle to the right and then
down to System Setup
2. Toggle down to TIME (using the down arrow key on your remote).
3. Toggle right to switch Summer Time to ON*
(If it is not currently daylight saving time, then switch to OFF)
EXIT and return back to normal TV.
*PLEASE NOTE:
For software versions 6C and later, there is no option for Summer Time and the time may need to be set manually.
You are Done restoring all the channels back into your Zinwell ZMX7500 or DSE G7500
Important Information regarding the Electronic Programme Guide (EPG):
You will not be able to load the EPG (on-screen TV listings via the Electronic Programme Guide) from BravoPlus1, PRIME and
Duke+1. i.e. any channel that you have just manually added
You will HOWEVER be able to access the EPG of these channels from another channel e.g. TV1 TV2 etc
If you have a Widescreen TV, here are the additional steps to adjust your ZMX-7500 or DSE-7500 for a wide screen picture
1. Press Menu
2. Select System Configuration
3. Select System Setup
4. Select TV
5. Select Aspect Ratio
6. Change the Aspect Ratio to 16:9 (using the left or right arrow keys)
7. Press Ok then Exit twice to save the new setting.
An older version of these instructions may also be available online at:
http://freeviewforum.co.nz/rescan/zinwelldseguide-1
How to use the rename guide on the DSE7500 and Zinwell ZMX7500?
The window that pops up to rename a channel or service may seem complicated at first, this quick guide will
show you how this works using your remote:
You will see a screen similar to that below (Name will vary e.g. Maori Television, FOUR, New Satellite
etc...)

Tip: To delete a letter/number just press the Audio button on the remote
The red box indicated on the below screenshot shows the blue arrow's selection of the row, you can adjust
where the blue arrow goes by toggling the Up and Down buttons on your remote.
If you want to get a certain letter in a row (for example P) then ensure that the blue arrow is pointing to the
row containing P and push the number which is at the top of the column containing the P, for example you
will need to push 5 to get the P and so on.
After you have renamed your channel, Press ok on your remote to save and exit.
You can adjust the upper case by moving the blue arrow down to the bottom row and then press 9
Made a mistake? Press the AUDIO Button on the remote to delete.
http://freeviewforum.co.nz/forum/topics/how-to-use-the-rename-guide-on-the-dse7500-and-zinwell-zmx7500
Graham Wilson
027 205 7999
grahamw@gmx.com
Updated 26 March 2022
Other manuals for Freeview ZMX-7500
1
This manual suits for next models
1
Table of contents
Other Zinwell Receiver manuals
Popular Receiver manuals by other brands

TECHWOOD
TECHWOOD PLR-85 owner's manual

Tescom
Tescom i-com Series Installation and user manual

Inovonics
Inovonics Ino 634 mini Installation & user guide

McIntosh
McIntosh MAC 4300V Service manual

Visionasia
Visionasia N8760B user manual

Williams Sound
Williams Sound SoundPlus WIR RX22-4 Instructions for use and care