Zip Tie Domes 2V User manual

Zip Tie Domes
2 Frequency
Geodesic Dome
Assembly Manual
Greenhouse Version
(c) 2019 Zip ie Domes
1857 Brindley Hollow Rd
Buffalo Valley, N 38548
(931) 858-6892

Zip Tie Domes - 2V Assembly Manual
Instructions for Assembling the 2V Frequency Geodesic Dome
ools Needed: 8 foot Step Ladder, Wire Cutters
SAFE Y RULES: Do Not Climb On the Dome. It is not designed for climbing.
Step 1. Find a level area wide enough to assemble the dome.
Page 1 of 35
Zip ie Domes 1857 Brindley Hollow Road, Buffalo Valley, N 38548 USA
www.ziptiedomes.com - elephone: (931) 858-6892

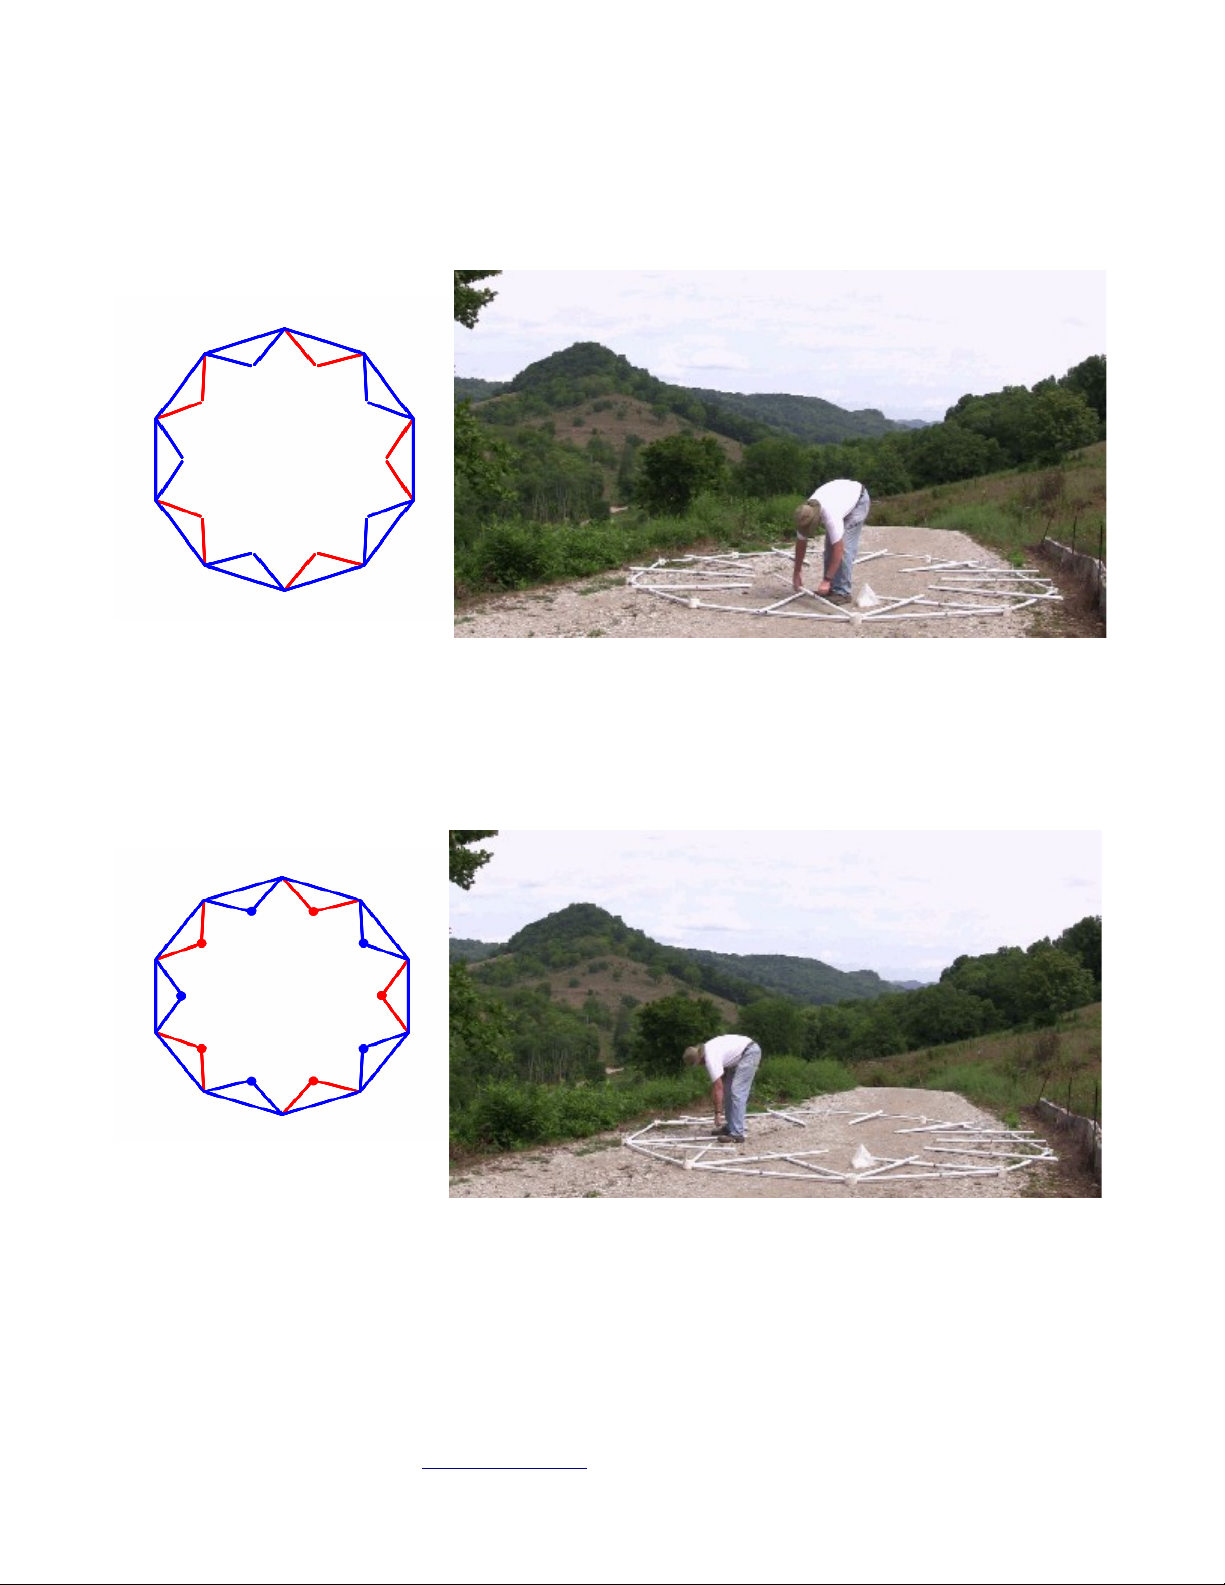
Step 2. Unpack the dome materials and place them in a convenient spot
outside the area where the dome will be constructed. Use wire cutters or manually
unwind the wire for releasing the struts from the restraining wires.
he package will include:
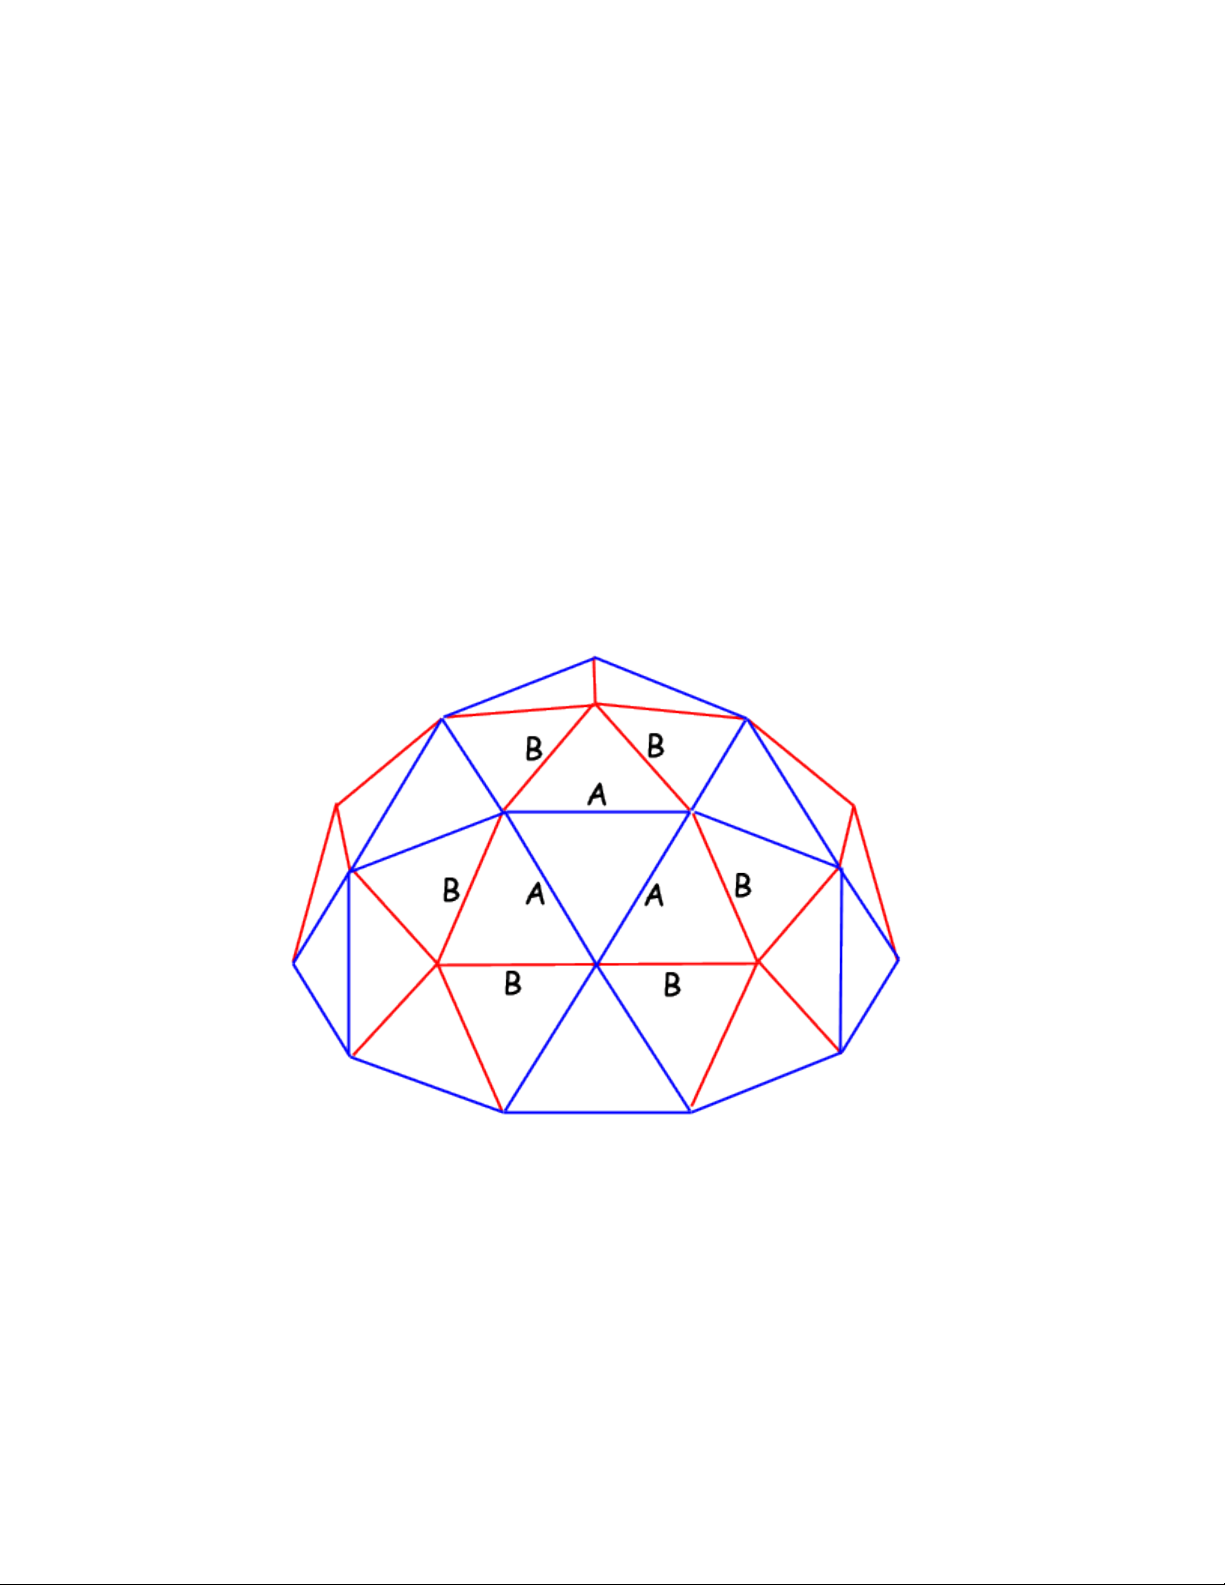
35 Blue Struts – marked with blue tape.
30 Red Struts – marked with red tape.
6 Red 5-way Hubs, marked with red tape. 20 Blue 6-way Hubs, marked with
blue tape.
26 Center Hubs 2” 200 Extra Heavy Duty Black Zip ies (125 lbs)
NO E: he 8” Extra Heavy Duty Zip ies are rated at 125 lbs, and are black to resist
ultraviolet light degradation. hese 8” Heavy Duty ies are suitable for a permanent
installation.
If you are building the dome for a temporary purpose, the standard 75lb white 8” Zip
ies from your local hardware store can be used.
Page 2 of 35
Zip ie Domes 1857 Brindley Hollow Road, Buffalo Valley, N 38548 USA
www.ziptiedomes.com - elephone: (931) 858-6892

Step 3. Build the Foundation Ring.
Select 10 Blue Struts, 10 Blue Hubs, 10 Center Rings, and 10 Zip ies.
Put the end of the Blue Strut into the opening on the Blue Hub.
Insert a Zip ie into the end of the Blue Strut.
Page 3 of 35
Zip ie Domes 1857 Brindley Hollow Road, Buffalo Valley, N 38548 USA
www.ziptiedomes.com - elephone: (931) 858-6892

Step 4. Assemble the Foundation Ring:
Lay the 10 Blue Struts with Blue Hubs in a circle, with one Hub between every two
Struts.
Step 5. Connect each Strut to the next Hub.
Before connecting, make sure each Hub is pointing upwards, with one of the large
openings laid flat on the ground, and with the smaller openings for the struts in a
horizontal position.
he second Strut should be inserted into the Hub opening that is on the opposite side
(180 degrees) of the first Strut, and secured to the Center Ring with a Zip ie.
Page 6 of 35
Zip ie Domes 1857 Brindley Hollow Road, Buffalo Valley, N 38548 USA
www.ziptiedomes.com - elephone: (931) 858-6892

After the Zip ie has secured the strut to the Center Ring, move the strut to where it
locks in a 36 degree angle to form the circle of the foundation ring.
Repeat for all 10 struts to complete the Foundation Ring.
Step 6. Assemble the First ier Supports
Select 10 Red Struts and 10 Blue Struts.
Lay alternate pairs of Red and Blue Struts on top of the Foundation Ring.
Page 7 of 35
Zip ie Domes 1857 Brindley Hollow Road, Buffalo Valley, N 38548 USA
www.ziptiedomes.com - elephone: (931) 858-6892

Spread each of the two struts to make a triangle.
Attach the Struts to the Foundation Hubs with Zip ies to make alternating Red and
Blue triangles.
Select 5 Red Hubs, 5 Blue Hubs, and 10 Center Rings.
Attach the 5 Red Hubs to the Red Struts with Zip ies to complete the Red riangles.
Attach the 5 Blue Hubs to the Blue Struts with Zip ies to complete the Blue riangles
.
Page 8 of 35
Zip ie Domes 1857 Brindley Hollow Road, Buffalo Valley, N 38548 USA
www.ziptiedomes.com - elephone: (931) 858-6892

Step 7. Raise the First ier
Select 10 Red Struts.
Raise the riangles up from the ground to insert the Red Struts between the hubs.
Secure with Zip ies.
Continue until the First ier is complete
Page 9 of 35
Zip ie Domes 1857 Brindley Hollow Road, Buffalo Valley, N 38548 USA
www.ziptiedomes.com - elephone: (931) 858-6892

Step 8. Assemble the Second ier – Part 1.
Select 5 Blue Hubs, 5 Red Struts, and 5 Center Rings.
Attach the 5 Blue Hubs to the 5 Red Struts. Lay the Red Struts with Blue Hubs in a
stack.
Next, attach the other end of the 5 Red Struts into the 5 Red Hubs on the First ier.
Page 10 of 35
Zip ie Domes 1857 Brindley Hollow Road, Buffalo Valley, N 38548 USA
www.ziptiedomes.com - elephone: (931) 858-6892

Step 10. Complete the Second ier
Select 5 Blue Struts.
Using a stepladder for each hub, secure the two Blue Struts from Step 9 to the Blue 6-
way hub at the top of the Second ier.
Next, attach a Blue Strut to the hub to connect the hubs together at the top of the Second
ier.
he Second ier is complete.
Page 12 of 35
Zip ie Domes 1857 Brindley Hollow Road, Buffalo Valley, N 38548 USA
www.ziptiedomes.com - elephone: (931) 858-6892

Step 11. Complete he Dome!
Attach a Red Strut to the remaining Red Hub.
Insert the other end of the Red Strut into a hub on the Second ier.
Insert the other 4 Red Struts into the hubs on the Second ier.
Page 13 of 35
Zip ie Domes 1857 Brindley Hollow Road, Buffalo Valley, N 38548 USA
www.ziptiedomes.com - elephone: (931) 858-6892

Using a stepladder, move the op Red Hub up and down to insert the Struts into the
Hub.
his will be a tight fit as the last pieces will lock the dome together. You may have to
stand near the top of the ladder to apply force.
Secure the Struts with Zip ies. he Dome is Complete!
Page 14 of 35
Zip ie Domes 1857 Brindley Hollow Road, Buffalo Valley, N 38548 USA
www.ziptiedomes.com - elephone: (931) 858-6892

How to Cut Your Own Struts
Use the Dome Calculator at www.Zip ieDomes.com to determine your strut lengths.
he Blue struts on the calculator are always the longest struts, and this is the place to
enter your data. For maximum strength, the longest struts should not be greater than 5
feet in length.
he hubs are designed for 1” PVC pipe with 1.315” OD. If you want to use 3/4” or 1”
EM conduit, upon request we will drill the hubs with the correct apertures for these
ODs as a special order.
he Dome Calculator Material Utilization Chart will indicate the number of pipes that
you will need to purchase.
Common sizes for 10' pipe material are:
16' 2V Dome: 35 Blue Struts – 5' length
30 Red Struts - 4' 5” length
otal pieces of 10' Pipe needed: 33
10' 2V Dome: 35 Blue Struts – 3' 4” length
30 Red Struts - 2' 11 3/8” length
otal pieces of 10' Pipe needed: 22
25' 3V 3/8 Dome: 50 Blue Struts – 5' length
40 Yellow Struts – 4' 10 3/4” length
30 Red Struts - 4' 2 3/4” length
otal pieces of 10' Pipe needed: 60
25' 3V 5/8 Dome: 80 Blue Struts – 5' length
55 Yellow Struts – 4' 10 3/4” length
30 Red Struts - 4' 2 3/4” length
otal pieces of 10' Pipe needed: 83
16' 3V 3/8 Dome: 50 Blue Struts – 3' 4” length
40 Yellow Struts – 3' 3-1/8” length
Page 15 of 35
Zip ie Domes 1857 Brindley Hollow Road, Buffalo Valley, N 38548 USA
www.ziptiedomes.com - elephone: (931) 858-6892

30 Red Struts - 2' 9-7/8” length
otal pieces of 10' Pipe needed: 56
16' 3V 5/8 Dome: 80 Blue Struts – 3' 4” length
55 Yellow Struts – 3' 3-1/8” length
30 Red Struts - 2' 9-7/8” length
otal pieces of 10' Pipe needed: 41
Common sizes for 20' pipe material are:
13' 2V Dome: 35 Blue Struts – 4' length
30 Red Struts - 3' 6-1/2” length
otal pieces of 20' Pipe needed: 13
19' 3V 3/8 Dome: 50 Blue Struts – 4' length
40 Yellow Struts – 3' 11” length
30 Red Struts - 3' 4-5/8” length
otal pieces of 20' Pipe needed: 24
19' 3V 5/8 Dome: 80 Blue Struts – 4' length
55 Yellow Struts – 3' 11” length
30 Red Struts - 3' 4-5/8” length
otal pieces of 20' Pipe needed: 33
How to Cut and Drill the Struts:
Mark the pipe with a marker, using a tape measure or a jig for the length.
Cut the pipe to length using a pipe cutter or chop saw.
Drill a 5/16” or 3/8” hole across each of the ends of the pipe, about 3/8” to 1/2” from the
pipe ends. Use a drill press if possible.
Page 16 of 35
Zip ie Domes 1857 Brindley Hollow Road, Buffalo Valley, N 38548 USA
www.ziptiedomes.com - elephone: (931) 858-6892

Drill slowly so you won't crack the pipe.
he holes on each end of the pipe have to be drilled parallel to each other. If they are 90
degrees off, you won't be able to attach the end of the strut to the center ring. ry to drill
through the lettering on the outside of the pipe, that will help you line up the holes on
each end of the strut so they are parallel to each other.
Mark the pipe with Blue, Red, or Yellow colored tape to help you distinguish them
during setup.
Page 17 of 35
Zip ie Domes 1857 Brindley Hollow Road, Buffalo Valley, N 38548 USA
www.ziptiedomes.com - elephone: (931) 858-6892

How to Attach A reenhouse Covering
Greenhouse Plastic can be purchased from your Farmer's Co-Op, a Greenhouse supply
store, or from Farmtek at www.farmtek.com
Recommended Greenhouse Covering Sizes:
Dome Size: Covering Size:
10' Dome (5' tall) 20' x 20'
13' Dome (6' 6” tall) 24' x 24'
16' Dome (8' tall) 30' x 30'
25' 3/8 Dome (10' tall) 40' x 40'
25' 5/8 Dome (14' tall) 48' x 48'
Prepari g the Dome for the Coveri g:
Before attaching a greenhouse covering, the zip ties must be trimmed so that they do not
extend past the edges of the hub and into the covering. Use a pair of wire cutters or
snips to cut the ends off the zip ties inside the hubs.
Page 18 of 35
Zip ie Domes 1857 Brindley Hollow Road, Buffalo Valley, N 38548 USA
www.ziptiedomes.com - elephone: (931) 858-6892

Pai ti g or Tapi g the Dome to
Separate the PVC from the Gree house Plastic
PVC pipe will slowly produce chlorine gas, which may destroy the UV light stabilizers
in polyethylene greenhouse film. his chlorine gas from PVC pipe will cause certain
types of 4 year greenhouse plastic to have holes and tears after the first year.
For this reason, your greenhouse plastic warranty may be voided if your greenhouse
plastic comes in direct contact with PVC. Contact the greenhouse plastic manufacturer
for details.
Greenhouse plastic can also be damaged by oil based paints, wood preservatives,
chlorine based disinfectants, and certain pesticides, especially those containing sulfur or
copper. his problem is not specific to our geodesic domes, but is evident in any type of
PVC greenhouse structure.
Solutio : Acrylic Latex Pai t
o extend the life of your greenhouse plastic, before you attach your greenhouse plastic,
use a white acrylic latex paint and paint any PVC struts and hubs that will come in direct
contact with your plastic.
Alter ate Solutio : Clear Packi g Tape
Another technique is to cover the hubs and struts with a non-PVC tape, such as clear
packing tape. Applying tape over the hubs helps to smooth any rough edges that might
rub against the plastic sheet.
Page 19 of 35
Zip ie Domes 1857 Brindley Hollow Road, Buffalo Valley, N 38548 USA
www.ziptiedomes.com - elephone: (931) 858-6892