Assembly Instructions
Unfold the Baby Stroller
•Take the stroller out of the package as shown in Fig. 1a
•Unfold the folding hook, pull the handlebar and gradually push to
open the stroller until a„click“ sound is heard as shown in
Fig. Ib and 1c
Install the Front Wheels
As shown in Fig. 2, attach each wheel to
the front wheel axle till a“click”
sound is heard.
Install the Rear wheel
As shown in Fig. 3, insert the rear wheels
into the rear wheel axle till a„click“ sound
is heard and ensure the rear wheels are
locked and cannot be pulled out.
1а 1b 1c
3
2
Folding Hook
Assembly Instructions
Unfold the Baby Stroller
•Take the stroller out of the package as shown in Fig. 1a
• Unfold the folding hook, pull the handlebar and gradually push to
open the stroller until a„click“ sound is heard as shown in
Fig. Ib and 1c
Install the Front Wheels
As shown in Fig. 2, attach each wheel to
the front wheel axle till a“click”
sound is heard.
Install the Rear wheel
As shown in Fig. 3, insert the rear wheels
into the rear wheel axle till a„click“ sound
is heard and ensure the rear wheels are
locked and cannot be pulled out.
1а 1b 1c
3
2
Folding Hook
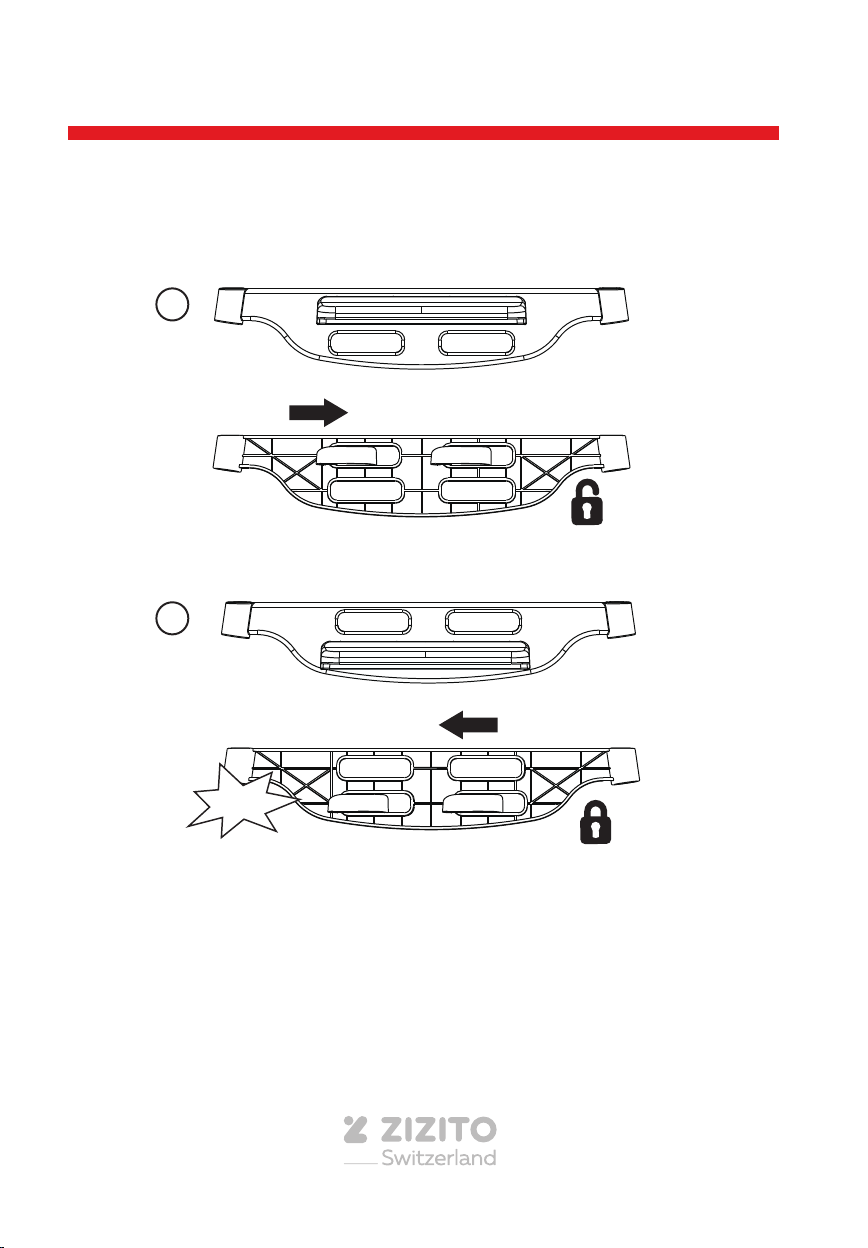
1.Befestigen Sie die Fußstütze (F) an der Fußstützenstütze (E). Führen Sie die Stifte in
die Löcher ein, die an der Fußstützenstütze angebracht sind. Schieben Sie die Fußstütze
nach rechts, um sie zu montieren.
Schieben Sie zum Entfernen die Fußstütze nach links und ziehen Sie sie von der
Fußstützenstütze ab.
2. Nehmen Sie zwei Stuhlbeine (C) und schieben Sie diese durch die hervorgesehenen
Löcher an beiden Seiten der Fußstütze in Position.
Zusammenbau
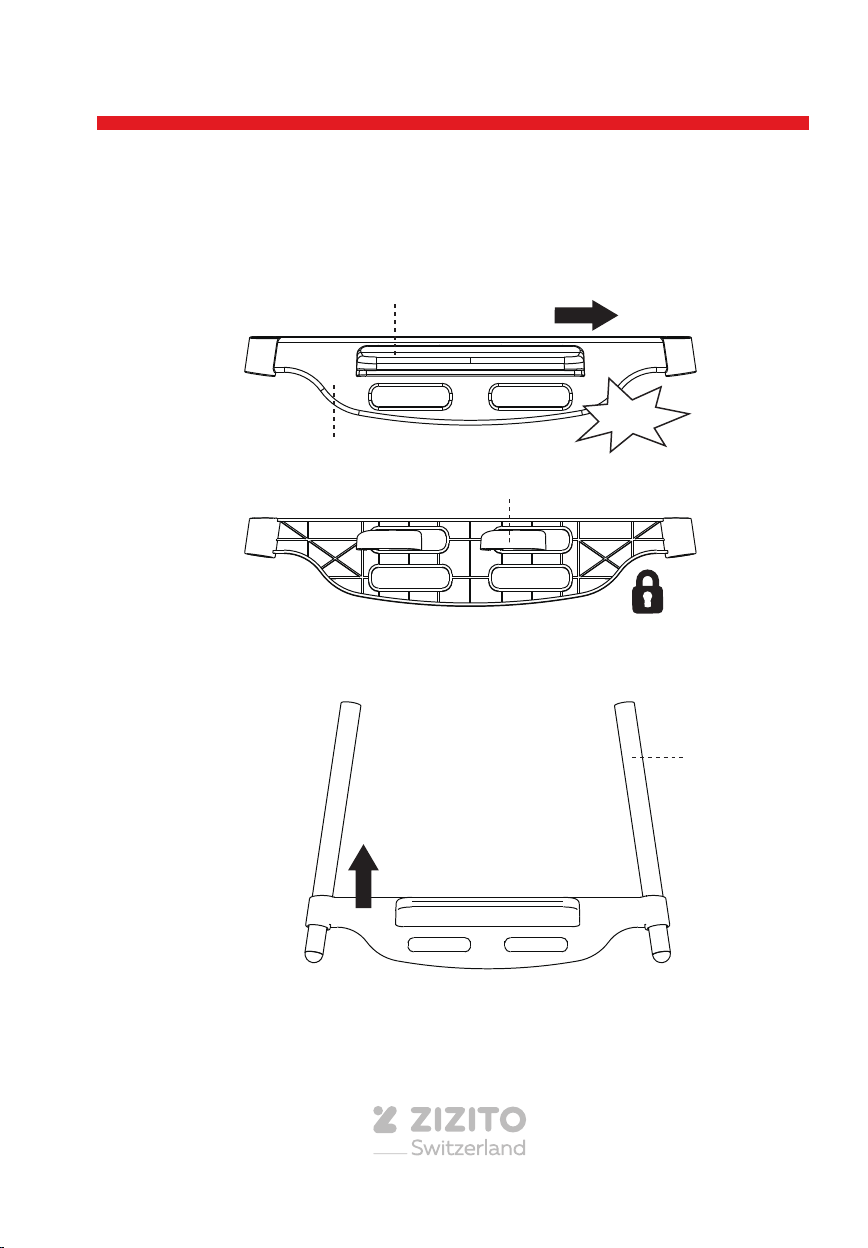
1. Attach the footrest (F) to the footrest support (E). Insert the footrest pegs
into holes allocated on the footrest support. Slide footrest to the right to lock
into position.
To remove, slide footrest to the left and pull away from footrest support.
10 3
E
F
2. Take two upper legs (C) and slide them through the allocated holes in the
assembled footrest.
C
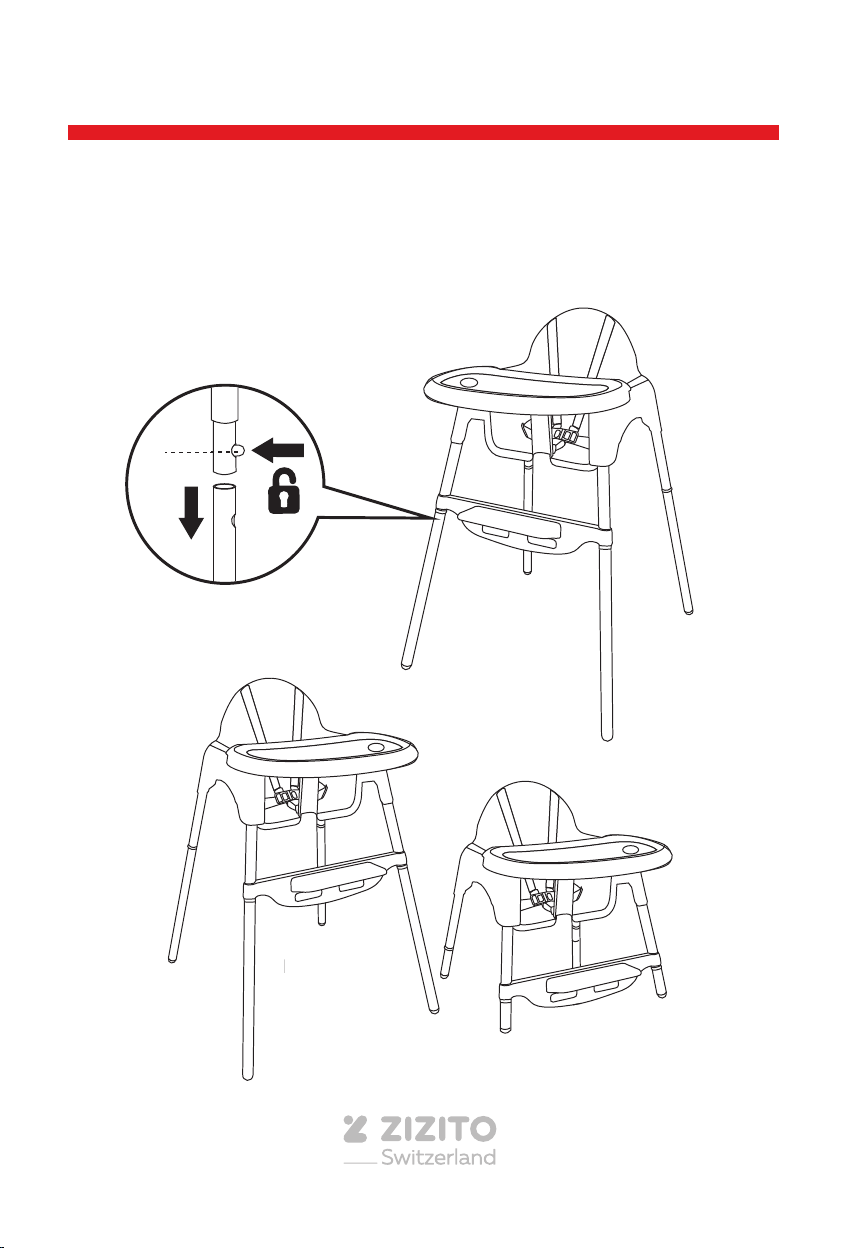
Your highchair converts to a junior chair.
To adjust the leg height, remove the lower legs. Press in the metal spring pin
located at the bottom of the upper leg and pull lower leg away.
Repeat for all 4 lower legs.
WARNING! Do not adjust the height when child is in the seat.
HIGHCHAIR
JUNIOR CHAIR
footrest peg
spring pin
1. Attach the footrest (F) to the footrest support (E). Insert the footrest pegs
into holes allocated on the footrest support. Slide footrest to the right to lock
into position.
To remove, slide footrest to the left and pull away from footrest support.
10 3
E
F
2. Take two upper legs (C) and slide them through the allocated holes in the
assembled footrest.
C
Your highchair converts to a junior chair.
To adjust the leg height, remove the lower legs. Press in the metal spring pin
located at the bottom of the upper leg and pull lower leg away.
Repeat for all 4 lower legs.
WARNING! Do not adjust the height when child is in the seat.
HIGHCHAIR
JUNIOR CHAIR
footrest peg
spring pin
7
Assembly Instructions
Unfold the Baby Stroller
•Take the stroller out of the package as shown in Fig. 1a
•Unfold the folding hook, pull the handlebar and gradually push to
open the stroller until a„click“ sound is heard as shown in
Fig. Ib and 1c
Install the Front Wheels
As shown in Fig. 2, attach each wheel to
the front wheel axle till a“click”
sound is heard.
Install the Rear wheel
As shown in Fig. 3, insert the rear wheels
into the rear wheel axle till a„click“ sound
is heard and ensure the rear wheels are
locked and cannot be pulled out.
1а 1b 1c
3
2
Folding Hook
Assembly Instructions
Unfold the Baby Stroller
•Take the stroller out of the package as shown in Fig. 1a
• Unfold the folding hook, pull the handlebar and gradually push to
open the stroller until a„click“ sound is heard as shown in
Fig. Ib and 1c
Install the Front Wheels
As shown in Fig. 2, attach each wheel to
the front wheel axle till a“click”
sound is heard.
Install the Rear wheel
As shown in Fig. 3, insert the rear wheels
into the rear wheel axle till a„click“ sound
is heard and ensure the rear wheels are
locked and cannot be pulled out.
1а 1b 1c
3
2
Folding Hook
3. An jedem Stuhlbein bendet sich ein Metallfederstift. Drücken Sie diesen Stift ein
und führen Sie die oberen Stuhlbeine in die zugewiesenen Löcher unter der Sitzeinheit
(A) ein. Der Stift hakt automatisch ein, wenn er die korrekte Position erreicht hat.
Wiederholen Sie dies für alle 4 Stuhlbeine (einschließlich der beiden an der Fußstütze
montierten).
4. An der Unterseite jedes Stuhlbeins bendet sich ein Metallfederstift. Drücken Sie
diesen Stift ein und befestigen Sie die unteren Stuhlbeine (D) an der Unterseite der
oberen Stuhlbeine. Der Stift hakt automatisch ein, wenn er die korrekte Position
erreicht hat. Wiederholen Sie dies für alle 4 unteren Stuhlbeine.
Zusammenbau
4 9
3
4
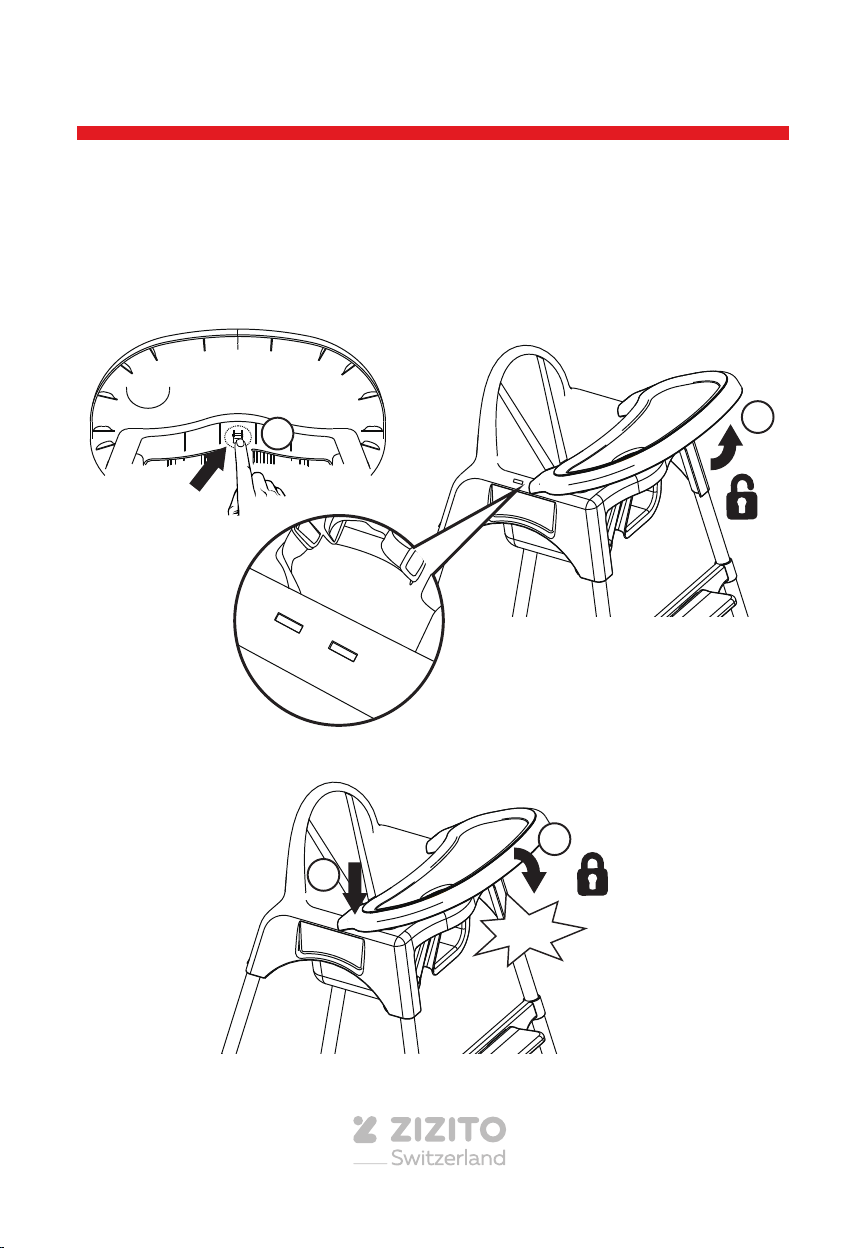
Your highchair has 2 adjustable tray positions.
To adjust the tray, press in the release clip located underneath the tray and pull
upwards to remove. Re-attach the tray in your preferred position. Insert the hooks
into the preferred slots on the seat unit arms. Rotate tray down and press rmly
into position. The tray will click once secure.
12
CLICK
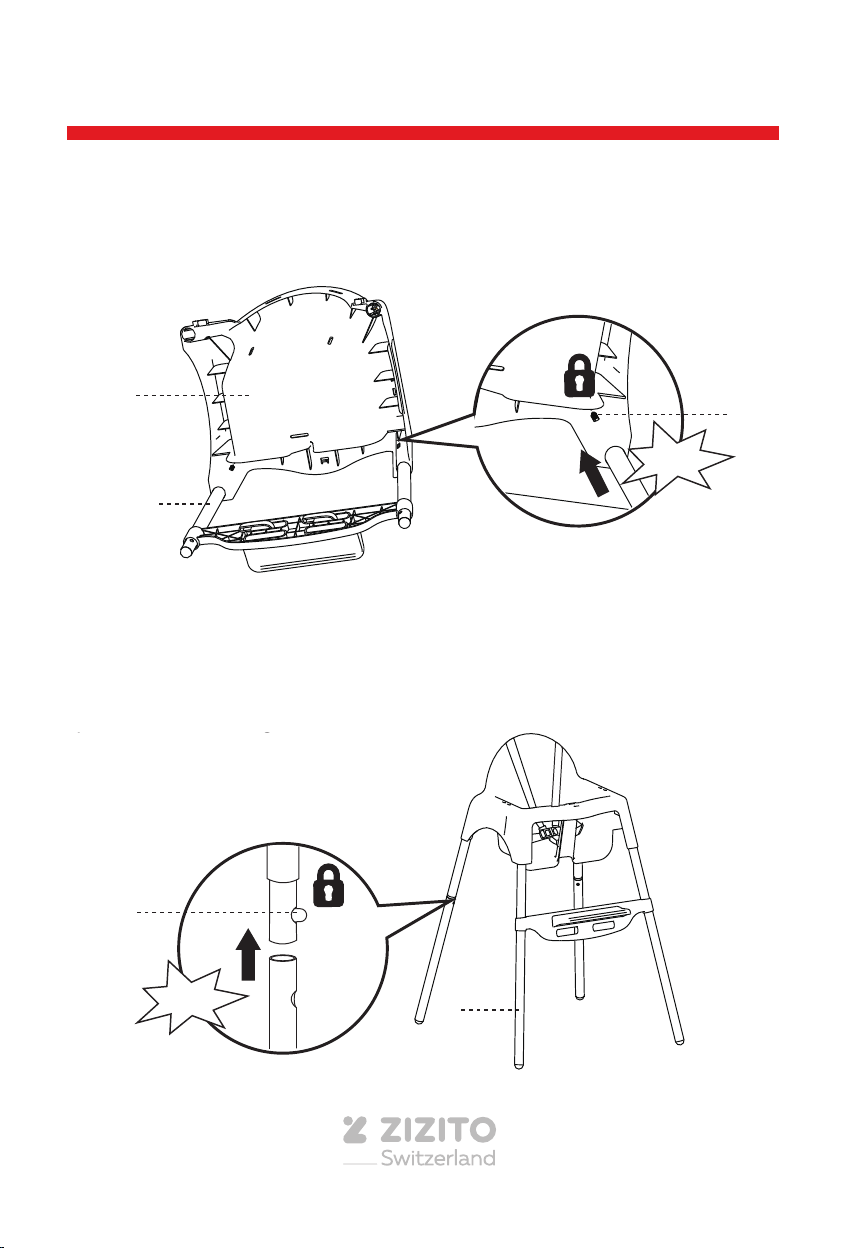
3. Located on the top of each upper leg is a metal spring pin. Press in this pin
and insert upper legs into the allocated holes located underneath the seat unit
(A). The pin will appear through the seat unit corresponding hole when locked
into position.
Repeat for all 4 upper legs (including the two assembled to footrest).
A
C
4. Located on the bottom of each upper leg is a metal spring pin. Press in this
pin and attach lower legs (D) onto the bottom of the upper legs. The pin
will appear through the corresponding hole when locked into position.
Repeat for all 4 lower legs.
D
spring pin
4 9
3
4
Your highchair has 2 adjustable tray positions.
To adjust the tray, press in the release clip located underneath the tray and pull
upwards to remove. Re-attach the tray in your preferred position. Insert the hooks
into the preferred slots on the seat unit arms. Rotate tray down and press rmly
into position. The tray will click once secure.
12
CLICK
3. Located on the top of each upper leg is a metal spring pin. Press in this pin
and insert upper legs into the allocated holes located underneath the seat unit
(A). The pin will appear through the seat unit corresponding hole when locked
into position.
Repeat for all 4 upper legs (including the two assembled to footrest).
A
C
4. Located on the bottom of each upper leg is a metal spring pin. Press in this
pin and attach lower legs (D) onto the bottom of the upper legs. The pin
will appear through the corresponding hole when locked into position.
Repeat for all 4 lower legs.
D
spring pin
Federstift
Federstift
Klicken
Klicken