ZiZZO FERRO User manual

Owner's
Manual
Version 5.2.1
Revised 8/21
For: FERRO Model ONLY
For other models or previous model years, please visit our manual page
at: https://zizzo.bike/pages/owners-manuals

Welcome and congratulations on your new adventure with ZiZZO! Your ZiZZO Bike
is designed to bring you years of enjoyment. By following the instructions, advice and
safety guidelines enclosed in this manual, you’ll ensure years of fun and fitness.
On behalf of your ZiZZO team, thank you and happy riding!
We made two videos for you to help you quickly and easily get started with your ZiZZO
folding bike. Please use your phone to scan QR codes below to view.
Get Started Easy Adjustments

Table of Contents
Visit us at
www.zizzo.bike
for all the latest information
Welcome
Table of Contents
Safety and Precautions
Diagram of =L==2
What's Inside
How to Unfold
Pre-ride Check
How To Fold
Brake Adjustments
Derailleur Adjustments
Maintenance
Maintenance Schedule
Warranty Information
2
3
4
6
7
9
14-15
16
19
20
22
23
24

ALWAYS WEAR A PROPERLY FITTED HELMET WHEN YOU
RID
E YO
UR BI
CYCLE.
AVOID RIDING IN WET CONDITIONS.
Correct fitting ± PDNH VXUH
\RXUKHOPHW FRYHUV \RXU
IRUHKHDGMXVWDERYH\RXUH\HEURZV
Incorrect fitting – :KHQ\RXU
IRUHKHDGLVH[SRVHG\RXDUH
YXOQHUDEOHWRVHULRXVLQMXU\.
HELMETS SAVE LIVES!!!

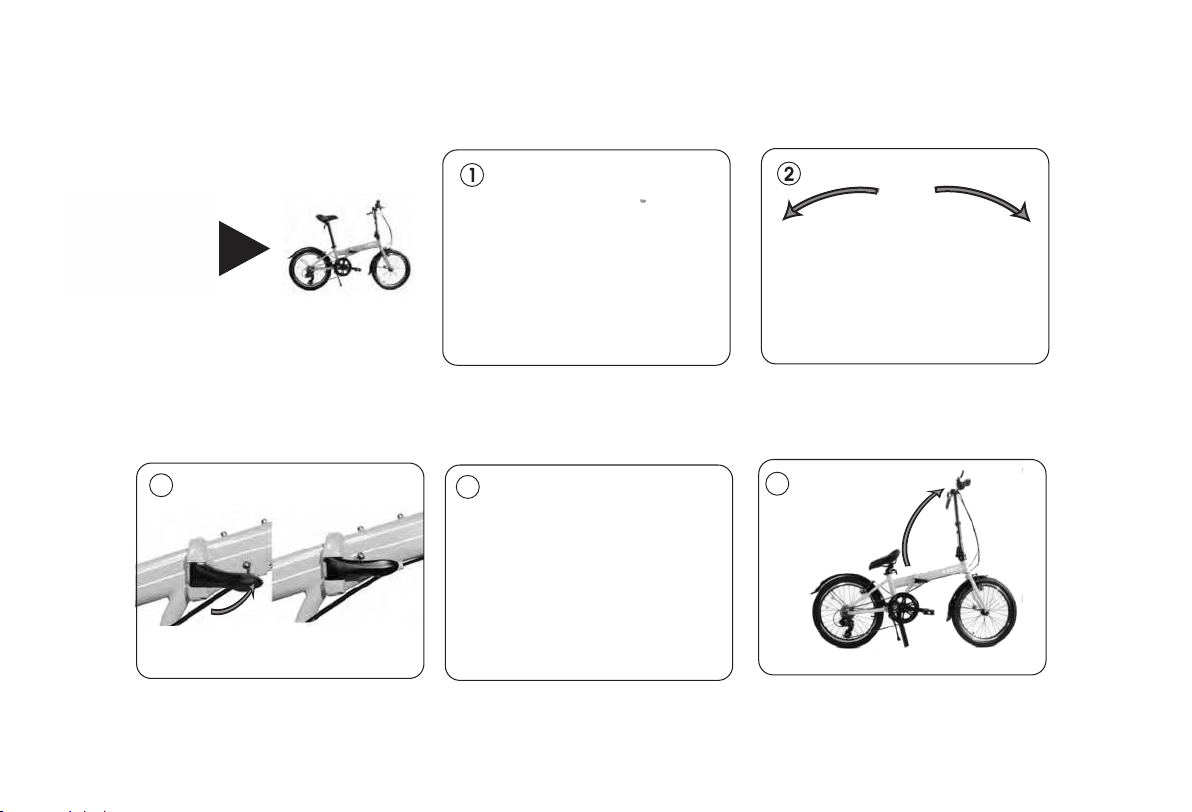
Your bicycle comes fully assembled and
folded in the box. Simply install the seat
post.
Nevertheless, it is essential that you or a
professional bicycle mechanic check this
product before your first ride (and we
recommend doing this before each ride).
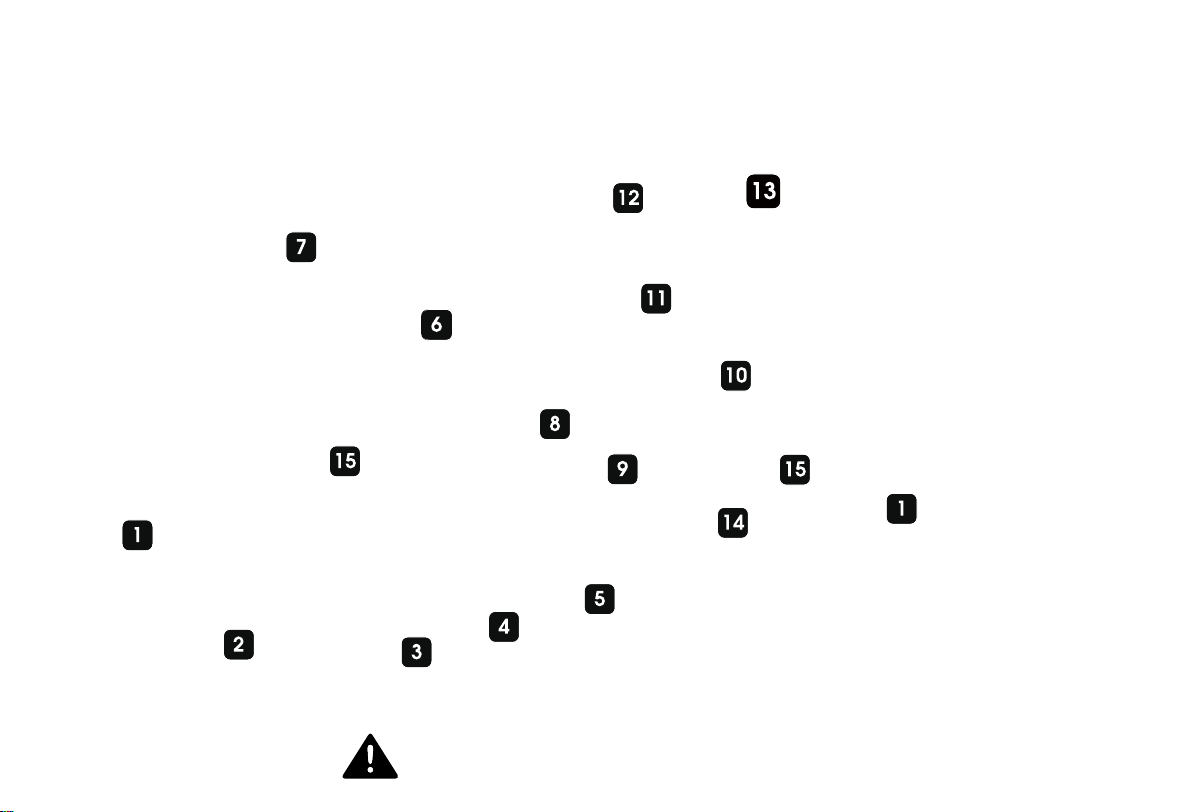
You or the mechanic should check to
ensure that the brakes, drive-train, quick-
releases,
bolts, pedals, seat post, handle
post, latches, wheels, locks, and all other
components are properly installed and
adjusted. Please reference the Pre-Ride
Checklist on page 15.
Folding bicycles have special components
that are different from regular bicycles.
Please read this manual carefully before
using your bicycle.
Suggested Height and Weight
<RXDQGWKHHQWLUHORDGRQWKHELNH
PXVWZHLJKOHVVWKDQOEVIRU
WKH0DULQR8UEDQRDQG9LD
PRGHOV25/%6IRUWKH)RUWH
PRGHO3OHDVHQRWH7KHORDGOLPLW
LQFOXGHVWKHULGHUSOXVDOOWKHJHDU
RQWKHULGHUDQGELNH
,I\RXDUHFDUU\LQJDQ\ZHLJKWRU
EDJVPDNHVXUHWKDWWKHELF\FOHLV
VWDEOH
=L==2ELF\FOHVDUHGHVLJQHGIRU
ULGHUV
IURP¶´WR¶´WDOO
Traffic Safety
7KLVPDQXDOLVIRUUHIHUHQFHRQO\DQGVKRXOGQRW
EHFRQVLGHUHGDFRPSOHWHJXLGH3OHDVHVHHN
RWKHUVRXUFHVRIVDIHW\DQGORFDOWUDIILFODZV
EHIRUHULGLQJ\RXUELF\FOH
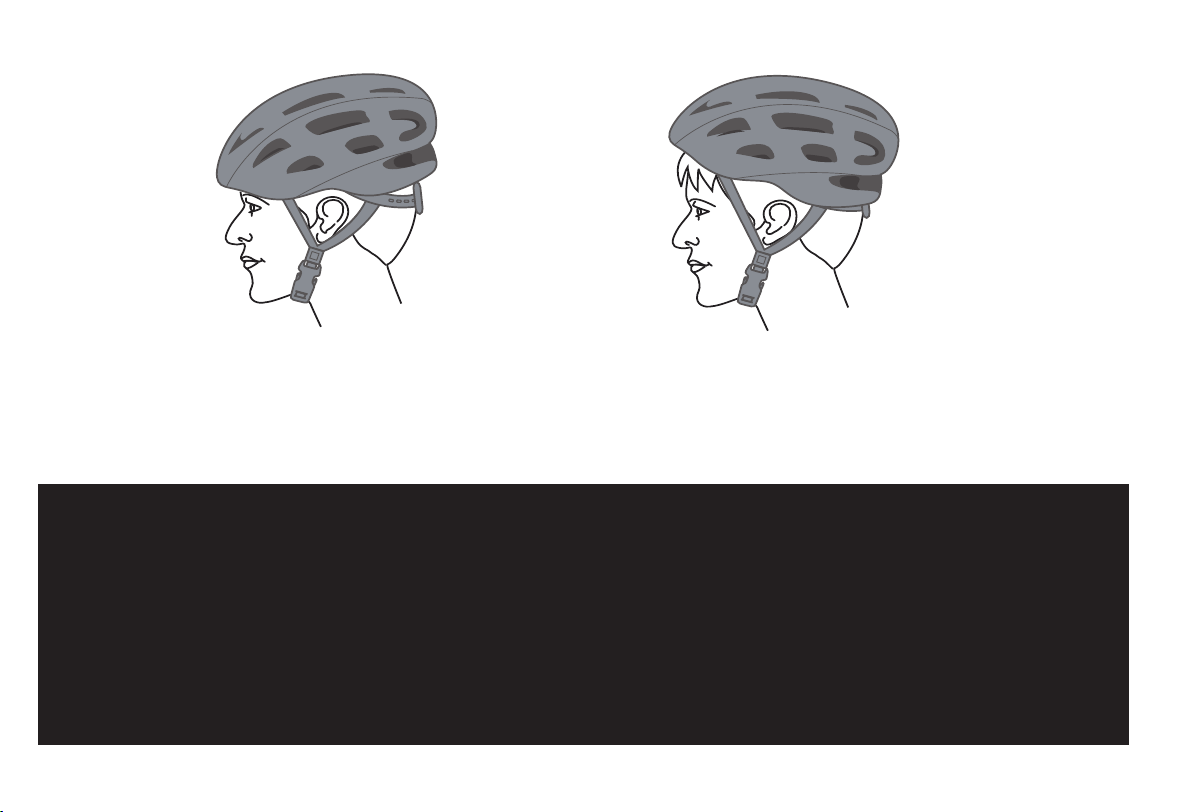
$OZD\VZHDU\RXUKHOPHWDQGVWD\DOHUW
ZKLOHULGLQJ
)ROORZWKHIORZRIWUDIILFDQGULGHLQ
GHVLJQDWHGELF\FOHODQHV
.HHS\RXUVHOIYLVLEOHWRFDUVDQGDYRLG
ULGLQJ\RXUELF\FOHLQEOLQGVSRWVIRUGULYHUV
0DNHH\HFRQWDFWZLWKGULYHUVZKHQ
SRVVLEOHVLJQDO\RXULQWHQWLRQV
:DWFK IRU obstacles LQ WKH URDG RUVLGHZDON
VXUIDFHDQGRWKHUKD]DUGVVXFKDVRSHQLQJ
FDUGRRUVRUFKLOGUHQSOD\LQJ
6RPHSODFHVUHTXLUHWKHXVHRIOLJKWVDQG
RWKHUDFFHVVRULHVZKLOHF\FOLQJPD\EH
SURKLELWHGLQVRPHDUHDV&KHFNORFDOODZV
DQGUHJXODWLRQVDQGREH\WKHPZKLOHULGLQJ
'RQRWXVHKHDGSKRQHVRUVXQJODVVHVWKDW
can DIIHFW\RXU hearing and or YLVLRQ
ZKLOHULGLQJ\RXUELF\FOH
'RQRWULGH\RXUELF\FOHZKLOHXQGHUWKH
LQIOXHQFHRIGUXJVRUDOFRKRO
Your bicycle is designed for regular use
on paved roads by adult riders (13 years
old or older). Jumps or stunts can damage
the bicycle, void all warranties, and/or
put the rider at risk of injury or death.
WARNING
WARNING
When riding at night, make sure to follow all
applicable laws and ordinances.
Make sure to take all appropriate
precautions.
WARNING
When riding in rainy or wet weather, make
sure to take all appropriate precautions.
Make sure your are visible and account for
increased stopping distances.
WARNING

Parts of Your Bicycle
Not intended for off-road use.
:KHHO
5HDU'HUDLOOHXU
&KDLQ
&UDQN6HW
3HGDO
6HDW3RVW
6DGGOH
%ROWVIRU%RWWOH&DJH
)UDPH
+HDG6HW
6teP
+DQGOHEDU
%UDNH/HYHU
)RUN
%UDNHV
127(7KLVPDQXDOLVQRWLQWHQGHG
DVDFRPSUHKHQVLYHXVHVHUYLFH
UHSDLURUPDLQWHQDQFHPDQXDO
3OHDVHVHH\RXUGHDOHURUORFDOELNH
VKRSIRUDOOVHUYLFHUHSDLUVRU
PDLQWHQDQFH
Please refer to these images to
loFate the serial numEer to register
\our EiNe. Registration Fan Ee done
E\mailing in \our registration Fard
or registering RQOLQHat:
KWWSV]L]]RELNHSDJHVUHJLVWHU
6FDQ45FRGHWR
UHJLVWHU\RXUELNH
/RFDWLRQRIVHULDOQXPEHU

CAREFULLY UNPACK AND PREPARE YOUR =L==2 FOLDING BIKE
BEFORE YOUR FIRST RIDE. PRE-RIDE CHECKLIST ON PAGE 14-15.
INCLUDED WITH YOUR BIKE SHOULD BE THE OWNER'S MANUAL AND
REGISTRATION CARD.
You can also register your bike at https://zizzo.bike/pages/register
You can also register your
bike on-line at: https://
zizzo.bike/pages/register
6FDQ45FRGHWRUHJLVWHU
\RXUELNHRQOLQH

Your new =L==2 bike is a uniquely designed machine. The most
remarkable feature of this traditional riding bike is that it folds!
If you've never owned a bike that folds or may not be familiar with a
bike that folds, the following pages will walk you through the
process of safely unfolding and folding your new =L==2 for the first
time.
Some instructions are unique to your particular model of =L==2. Please
note what model you own and what instructions pertain specifically to
your bike.
If you would like a more detailed walk-through, please visit our video
page at: https://zizzo.bike/pages/zizzo-folding-bike-videos

2SHQELNHIUDPH and lower
the kickstand.
/RFNKLQJH3UHVVOHYHUVRWKDWLWLV
IOXVKZLWKWKHIUDPH 0aNing
sure the loFN "SNAPS" in plaFe.
5DLVHKDQGOHEDUSRVW
Unfolding your =L==2
345
7KLVLVZKDW\RXUELNHVKRXOGORRNOLNH
DWWKLVVWHS
$IWHUUePRYLQJWKHSDFNDJLQJPDWHULDO
\RXUELNHVKRXOGORRNOLNHWKLV

$IWHU UDLVLQJ WKH VWHP FORVH
VWHP ORFN OHYHU E\ PDNLQJ
VXUH OHYHU LV IOXVK DJDLQVW
WKHVWHP
7
Stem Locking
/LIW WKH VWHP ORFN OHYHU WR ORFN
WKHVWHP 0DNH VXUH \RX KHDU
WKH ORFN&/,&.LQWRSODFH
Note: These model
bikes have a self-
locking secondary
lock. You do not
need to set this lock
when locking the
MAIN stem lock.

Open the stem TuLFNrelease.
2SHQVHDWSRVWTXLFN
UHOHDVH Insert the VHDWSRVW
(if this is your first time).
/RFNWKH handle
barTXLFNUHOHDVH.
2SHQ the handleEar TuiFNrelease
3RVLWLRQWKe handle bar WR\RXU
OLNLQJ
Setting the Quick Releases
$GMXVW the stem KHLJKWto a
FomfortaEle riding position.
&OoVH the stem TuiFNrelease.
Caution: Do not raise the
stem past the minimum
insertion line.

$GMXVWVHDWWRSURSHUKHLJKW, then close/lock the seat post quickrelease.
15
0,1,16(57
Seat post should not exceed MIN. INSERT line OR
the MAX INSERT line.
Warning line should not be visible (MIN INSERT ONLY).
17
6
19
$IWHUIROORZLQJWKHXQIROGLQJGLUHFWLRQV\RXU
ELNHVKRXOGORRNOLNHWKLV

Unfolding your new =L==2 is completed. Please refer to the following pages for making brake
adjustments, derailleur adjustments, Pre-ride Check and any other adjustments you may
need to make prior to your first ride. If you have any questions, please refer to our website at
www.zizzo.bike for videos and contact information.
NOTE: To fold your =L==2, turn to page
NOTE: For more information, please
For video tutorials visit our video page at
visit us at www.
http://www.
zizzo.bike
zizzo.bike/video
WARNING:
If you are unsure how to make proper adjustments to your bicycle, seek a
qualified bicycle technician for professional adjustments, or visit us at
www.zizzo.bike

Basic Bike Safety Check
Note: %UDNHVDQGGHUDLOOHXUDUHSUHDGMXVWHGDWWKHIDFWRU\+RZHYHU\RXUELNHPD\QHHGDGGLWLRQDO
DGMXVWPHQWVSULRUWRULGLQJ3OHDVHUHIHUHQFHWKLVPDQXDOIRUDGMXVWPHQWV\RXPD\QHHGWRPDNHSULRUWRULGLQJ
3lease FhHFN Eefore riding this EiNe.If \ou dont NnoZ hoZ to maNe an\ of the
reFommended adMustments please Ering this EiNe to D reputaEle EiNe shop for assistanFe.
<RXFDQDOVRHPDLOXVDWVXSSRUW#]L]]RELNH
$s Zith an\EiNHFhHFNoYer \our=L==2Eefore eaFh ride to ensure that all TuiFNUeleases are in
the loFNed position EraNes perform as intended and all adMustments are performed.
(nsure that tires are inflated to the proper pressure WKDWlisted on the sideZall of eaFh tire.
$s noted in the 8nfolding \our =L==2 VHFWLRQensure thatWKH saddle and handleEars are at their proper height.
7his adMustment Yaries from rider to rider and should Ee adMusted for eaFh neZ rider and eaFh time the ELNHis
unfolded.
$EDVLFWXQHXSshould Ee done at least onFe a \ear. 7his Fan Ee performed at KRPHRUan\reputaEle EiNe shop.

BRAKES: Make sure brakes are engaging. Test stopping power. Reference pg 19 in your user manual
CHAIN: Make sure it is snug, but not too tight or loose.
DERAILLEURS: Set barrel adjusters to precisely shift chain across all gears. Reference pg 21 in your user manual.
It is not necessary to bring the bike to a shop to perform the safety check. If you are comfortable
checking over the bike prior to your first ride, that is sufficient to activate the warranty.
Pre-Ride Checklist Before Your First Ride
Your ZiZZO Bike is designed to be "ready to ride." However, due to shipping conditions and/or the natural "breaking-
in" of your bike, it is required that you perform a pre-ride safety check prior to your first ride.
Completing the safety check and registering your bike will activate your warranties for your new bike.
Please reference the checklist below to perform the Pre-Ride Safety Check . If you have any questions, please call us at
1-866-788-2202 or email us at support@zizzo.bike.
For helpful videos, please visit us at: https://zizzo.bike/pages/zizzo-folding-bike-videos
1) LOCKS: Make sure folding FRAME and STEM locks are secure with secondary safety locks engaged.
2) HANDLEBAR AND STEM: Set angle and height of handlebar. Check that both quick-releases are secure.
3) PEDALS: Make sure pedals spin effortlessly and they are threaded completely. If folding, make sure they lock in place.
4) WHEELS: Spin the wheels to check for true (straightness), no wobbles, hops or rubbing on the brakes.
5) SADDLE: Set saddle height. Ensure that saddle mounting is secure and quick-release is secure.
6) AXLES: Tighten quick-release by hand or tighten axle nuts with a 15mm wrench.
7) TIRES: Check tire pressure to make sure it is up to spec. Tire pressure can vary, depending on the tire. You can see the
recommended tire pressure listed on the sidewall of the tire.

3
1
4
Folding your =L==2
Following these steps, you will be able to fold your ZiZZO Bike for storage in
your closet, the trunk of your car, or anywhere you need space!
2pen TuiFN release
to loZer seatpost.
/oZer seatpost and rotate
seatdeg. /oFN TuiFN
Uelease.

2pen the handleEar TuLFNrelease. Rotate the handleEars so that
the EraNe leYers are pointing
83. /oFN the handleEar TuiFN
release
56
2SHQWKHVWHPTXLFN
UHOHDVHRDLVHWKHVWHP
XQWLOWKHVWHPVWRSVDQG
FDQQRWEHUDLVHGIXUWKHU
7KHQORFNWKHVtHPTXLFN
UHOHDVH
7
RAISING THE STEM:
Handlebar and Stem Folding
7RXQORFNWKHVWHP35(66,1WKH
VHFRQGDU\VDIHW\ORFN6HHZKLWH
FLUFOHLQLPDJH:KLOHSUHVVLQJLQ
ORZHUWKHVWHPORFN

3XOOWKHOHYHURXW
To unlock the frame lock, slide
the secRndary lock (silver ball)
forward 1/4"
13
12
14
For more information, visit our website at
https://zizzo.bike/pages/zizzo-folding-bike-videos
Lower the Stem.
1
)ROGWKHELNHLQ half.5DLVHWKHNLFNVWDQG
$WWKLVVWHSVWHPSHGDOVDQGVHDW
VKRXOGEHLQWKHORZHUHGSRVLWLRQ
1
Make sure the handlebar rests
BELOW the fork.
Use your phone to scan this
QR code to view helpful videos

ADJUSTING BRAKES
Your brakes are fine-tuned at our factory.
However, various components will break-in
over the course of the first 1-3 months, like
your bicycle's brakes. Please check your
brakes by squeezing the brake levers hard.
When you do this, they should not touch
the handlebar grips. If they do, you can
adjust the brake barrel adjustment screw
counter-clockwise. After adjustment, tighten
the lock nut hard clockwise. If the brakes
still fail the check, bring the bike to a
reputable bike shop for a standard
adjustment.
%DUUHO$GMXVWHU
/RFN1XW
For more information, visit our website at
https://zizzo.bike/pages/zizzo-folding-bike-videos

&DEOH)L[LQJ%ROW
+LJK/LPLW6FUHZ
'HUDLOOHXU/LPLW$GMXVWPHQW6FUHZV
'erailleur %arrel AdMustment bolts
/RZ/LPLW6FUHZ %DUUHO$GMXVWPHQW
Derailleur Adjustments
If you find that your =L==2 is not getting into the
proper gear, shifting is “sluggish", or you
otherwise need to make any derailleur
adjustments, please read the following
instructions:
WARNING: If you are unaware of how
to make proper adjustments to your
bicycle, seek a qualified bicycle
technician for professional adjustments.
1. Locate the “Barrel” adjustment screw on the rear
derailleur (refer to picture for exact location).
2. Screw the Barrel adjustment screw in or out until
proper shifting is obtained.
VFUHZ
)RULQGH[DGMXVWLQJ
Warning: Never move the shifter while
pedaling backward. And never pedal
backwards immediately after having
moved the shifter. Doing this could jam
the chain and cause serious damage to
the bicycle.