ZMODO ZM-CJAED User manual

1
2
1Welcome!
This quick start guide will help you configure your smart
doorbell for initial use. For detailed instructions and trouble-
shooting, please visit:
www.zmodo.com/support
2Mounting your Smart Doorbell
Smart Doorbell
Quick Start Guide
You will need a strong 2.4GHz WPA/WPA2 WiFi network
connection near your doorbell.
Make sure that your package includes a smart doorbell, 6
screws and anchors for mounting.
Make sure that your existing doorbell wiring is connected to
a mechanical doorbell chime and a transformer with a low-
voltage of 10VAC-36VAC.
Befor you begin:
Warning! Do not attach the smart doorbell directly to a
primary power source (110/120 VAC and 220/230/240 VAC).
The smart doorbell was designed to seamlessly replace a pre-existing doorbell
button with a mechanical doorbell chime. If you do not have a mechanical
doorbell, you must attach a 20 ohm/10 watt resistor (not included) between the
smart doorbell and one wire from the power source. Failing to do so will cause
permanent damage to your smart doorbell and your warranty will be voided.
IMPORTANT! Before you begin, make sure that the power to
your doorbell is turned off. Check your circuit breaker for a
switch.
Remove your existing doorbell button. Once you’ve removed
your old doorbell, make sure that the two wires used to
connect your doorbell button remain exposed.
1
Remove the mounting bracket from your Smart Doorbell.
Loosen the two screws on the bottom of the doorbell and
slide down to remove the mounting bracket as shown:
2
Mark and drill the appropriate holes in the wall for the
mounting bracket. Line the bracket against the wall where
you would like to install your doorbell. Using the bracket as
a guide (try using a level to make sure that the bracket is
properly aligned), mark the wall with the six corresponding
holes for the screws. Remove the mounting bracket and
drill six holes slightly smaller than the wall anchors.
Note: Use the provided screws with anchors when mounting on brick,
concrete, or stucco. When mounting on wood or vinyl, you may use the
screws directly without anchors.
3
Fasten the mounting bracket onto the wall and connect the
wires to the wire terminals. Tap the wall anchors with a
hammer until the anchors are flush against the wall. Using
a Philips screwdriver and the provided screws, fasten the
bracket into place. Make sure that the two wires from Step
1 are fed through the opening and exposed.
4
Once the bracket is secure, fasten the two wires to the
terminals on the bracket. Ensure that each wire is making
contact with the metal plating of each terminal. You can
fasten either wire to either terminal, but make sure that the
wires are not touching each other. (image shown on next
page).
3
ZM-CJAED | VER-Z3
Connect with
Beam

4
Attach the Connected Doorbell to the mounting bracket.
Slide the doorbell onto the mounting bracket, and tighten
the two security screws on the bottom of the doorbell until
secure. Adjust the camera until you have a clear view of
your front porch.
5
13
Mobile Setup
3
The following steps will guide you in connecting your smart
doorbell to an internet connection.
Make sure that you have a strong WiFi connection at the
location of your doorbell. Visit for www.zmodo.com/support
advice on improving your WiFi signal range.
The smart doorbell uses an internal battery for backup
power. Once you have mounted your doorbell, let it charge
for 30 minutes before attempting mobile setup.
Make sure you know the SSID (WiFi network name) and
password of the 2.4GHz WPA/WPA2 WiFi network that
you want your doorbell to connect to. Your network cannot
be hidden.
Note: You cannot connect to an SSID with any space(s) in it. You can replace
the space by entering your router’s settings. For example, “My-Router” is not
allowed, but “My_Router” is allowed.
Before you begin:
7
5
6
TM
Download and install the “Zmodo” app from Google Play
TM
or the App Store . Launch the app and sign up for a free
Zmodo account. All of your devices will be bound to this
account.
Select the network named “ZMD_SAP”
and connect to it.
5
3
Follow the on-screen instructions and
select “Tap here to begin setup” to go
to the WiFi settings page on your
smartphone.
4
Tap to proceed (if you’re setting up
multiple devices at once, tap + to add
additional units).
This device can be set up with a Zmodo Beam. If you own a
Beam, please follow the instructions in your Beam quick guide
to connect your device instead.
Zmodo
We are constantly working to improve our product and app. Please visit
www.zmodo.com/support for updated instructions, manuals, and more.
1
Select the “Zink” connection method
to connect your smart doorbell. Your
doorbell will be added to your Zmodo
account.
2
Log in and select the Add Device
option located on the upper right
corner of the screen.
Connect with
Beam
√
+

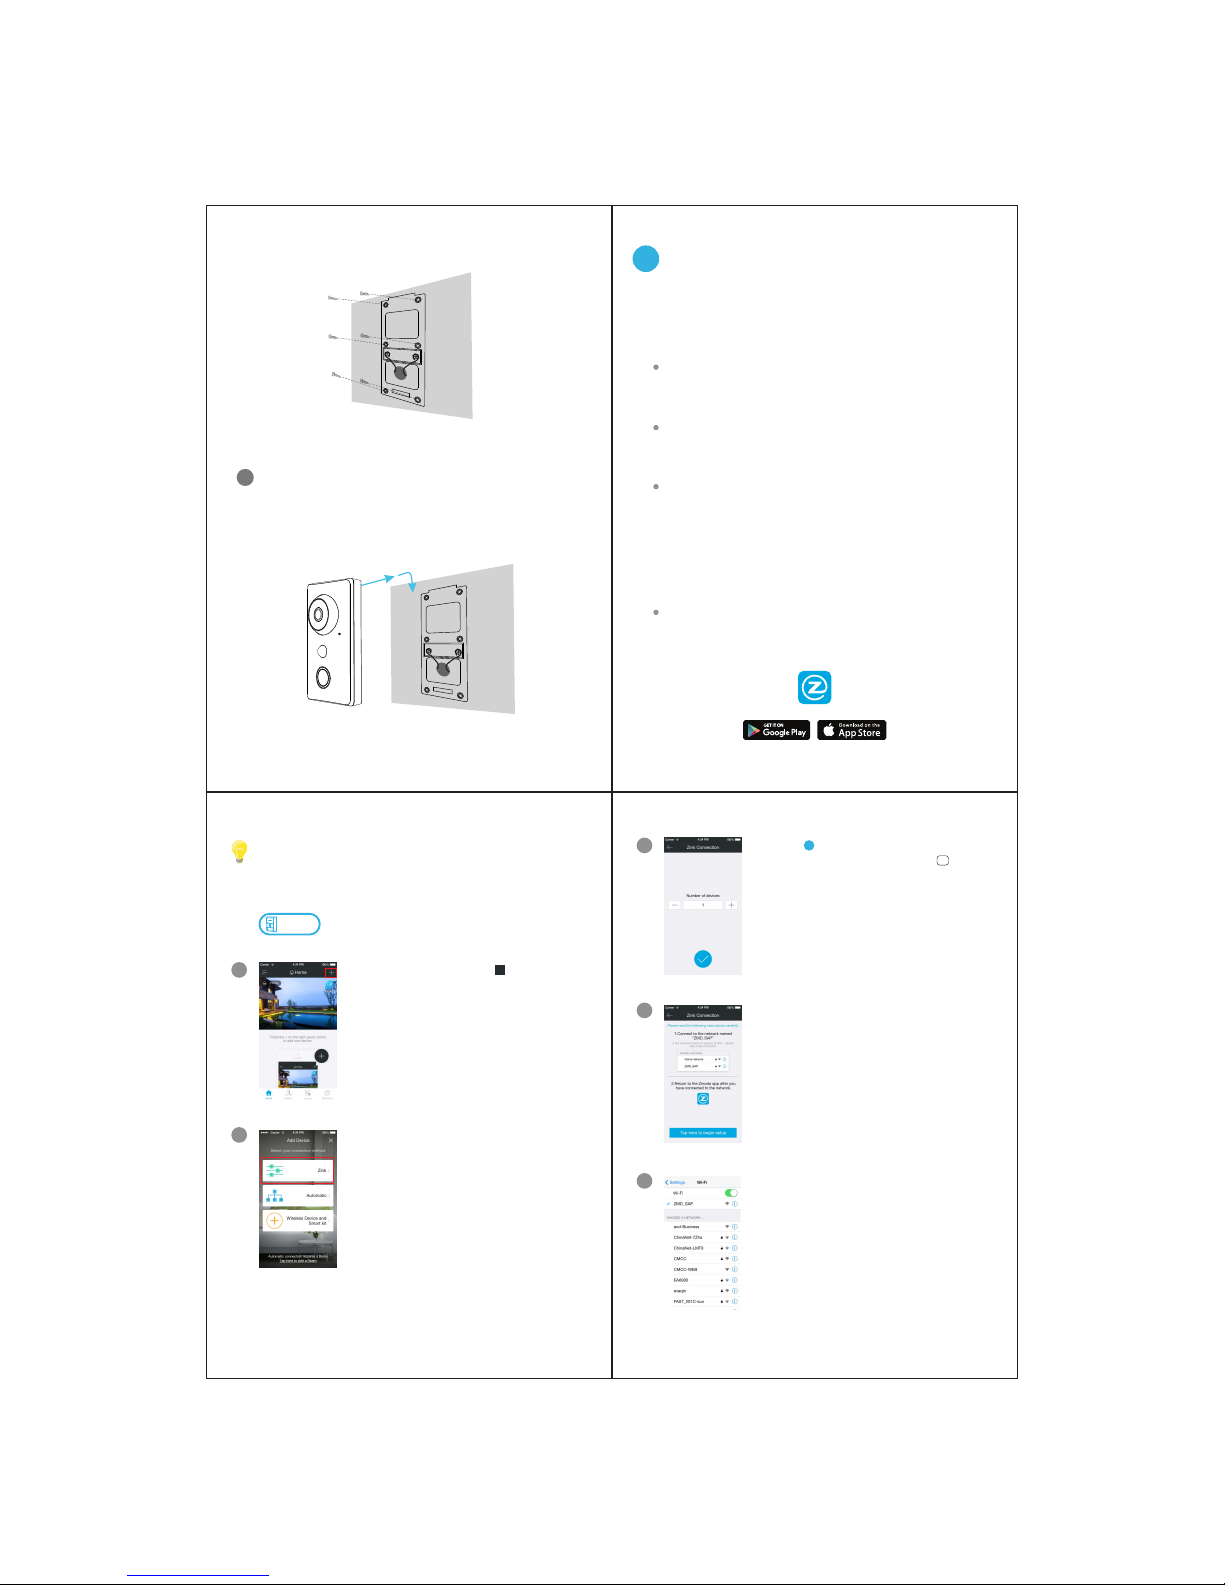
Return to the Zmodo app page and
enter the name and password of the
WiFi network that you want your doorbell
to connect to. Note: the WiFi name and
password are case-sensitive.
Tap to proceed.
6
If you see this screen, the app will
connect your devices to your WiFi
network. This may take a few minutes.
Once it’s completed, please skip to
step 11.
If you do not see this screen, please
proceed to step 8.
7
√
If this app interface appears, please
press “Tap here to select WiFi”.
8
4Main Features
The smart doorbell allows you to answer your door from
anywhere with an internet connection. See, hear, and
speak to your visitors directly from your smartphone.
You can access your doorbell’s full features by using the
TM ®
Zmodo app on your Android or iOS smartphone.
You can also view your doorbell using any web browser by
logging into with your Zmodo accountuser.zmodo.com
information.
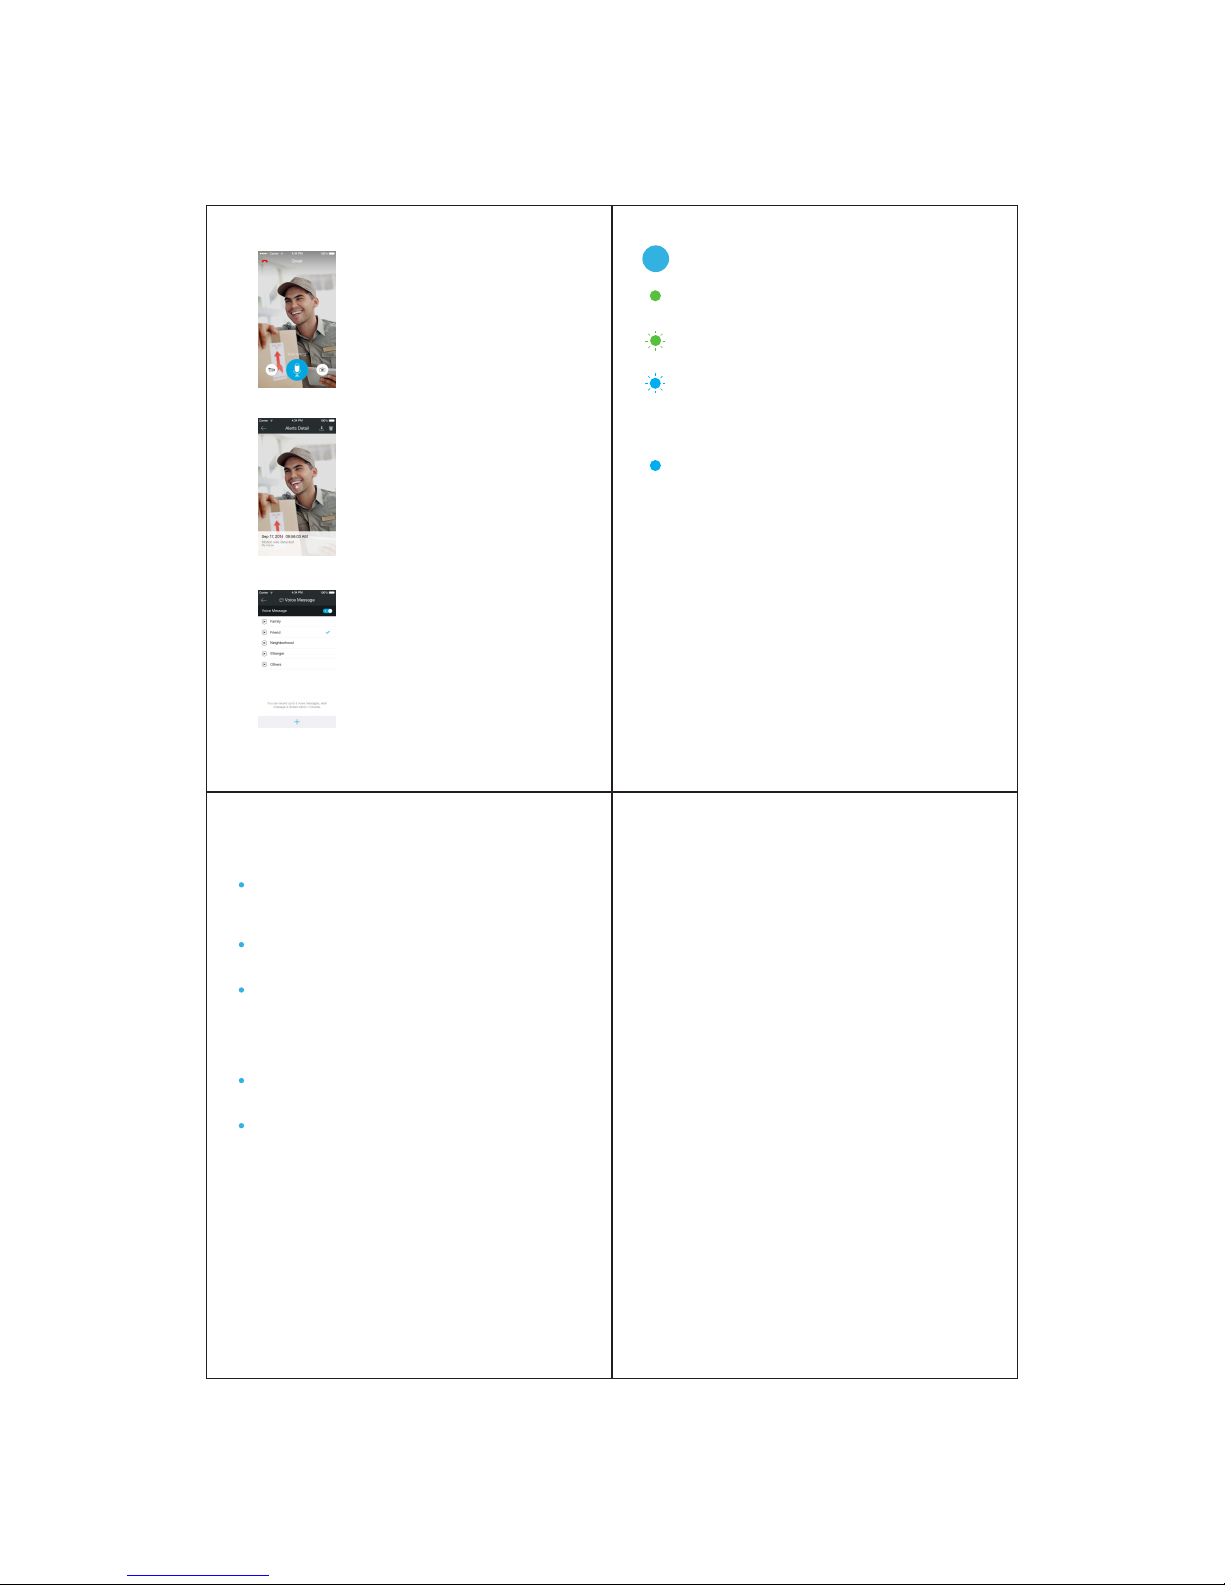
View live video from your smartphone
at any time. No need to wait for alerts
or a call, just access your doorbell
from your device list to see what’s
happening on your front porch.
View live, on-demand video and
record clips
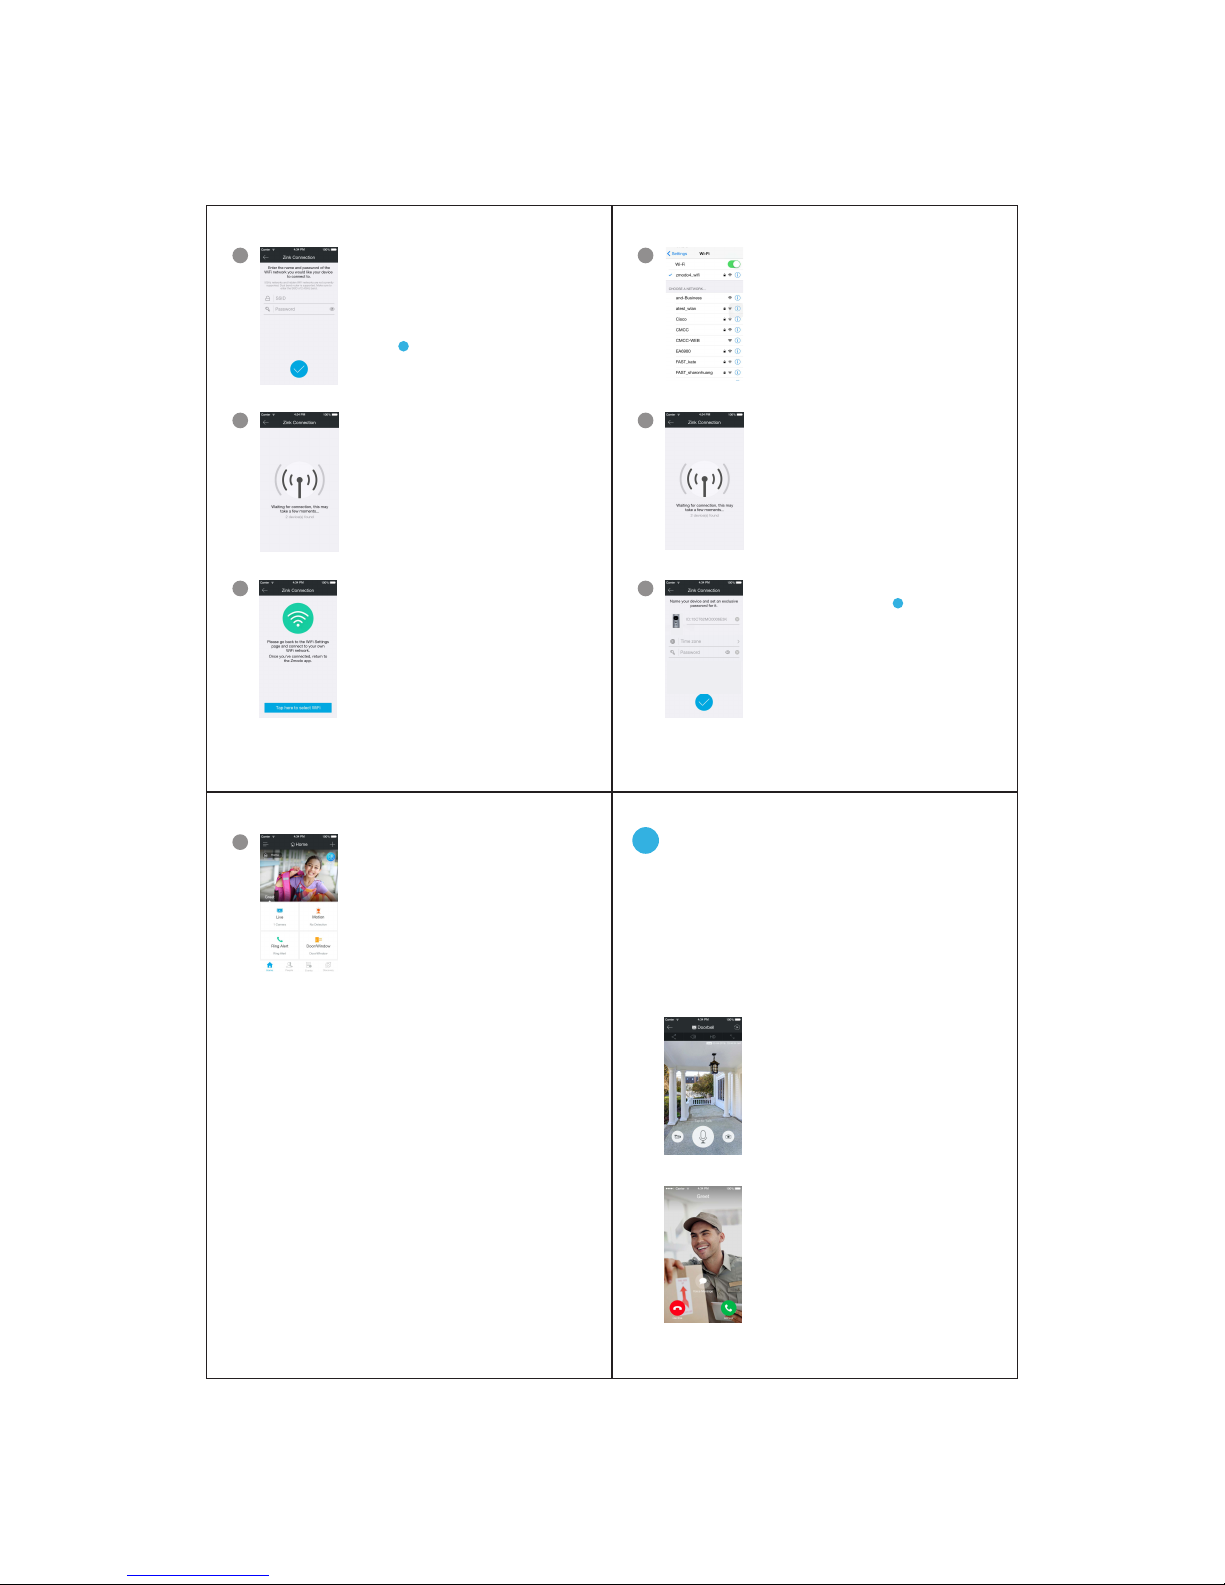
When someone rings your doorbell,
you will receive a call on your
smartphone. You can choose to
accept the call, decline it, or select a
customized voice message to play for
your visitor.
Receive calls on your smartphone
8 9
10 11
Your smart doorbell has been
successfully configured!
Refer to the following pages to see
what your smart doorbell can do.
12
Select the WiFi network that your
doorbell will connect to, and
connect to it. Return to the Zmodo
app once your mobile device is
connected to the WiFi network.
9
The app will automatically search
for your doorbell and connect it to
the WiFi network. This may take a
few minutes.
10
Name your smart doorbell and set a
password for it. Tap to proceed.
Note: The password provides an additional layer
of security for your devices. You will not need to
use this password when accessing your devices
from the Zmodo app. It is not required, but it is
highly recommended.
11
√

14
If you were unable to connect your doorbell successfully:
Make sure that you are connecting to a 2.4GHz
WPA/WPA2 WiFi network, and that your network is not
hidden.
Please make sure that you entered the network name
and password correctly. Note: Both are case-sensitive.
If your SSID (network name) has any space(s) in it, you
will need to change your SSID by entering your router’s
settings. You can replace the space with an “_”. For
example, “My Router” is not allowed, but “My_Router”
is allowed.
You may need to improve your WiFi strength. Visit
www.zmodo.com/support for suggestions.
If your doorbell is restarting when you press the button,
you may need to let the internal battery charge before
connecting your doorbell. After mounting, please wait
30 minutes before configuring your doorbell.
Solid blue
Your doorbell is connecting to the WiFi network.
Please do NOT turn off or unplug your doorbell at
this time.
Blinking blue
Your doorbell has successfully connected to the
WiFi network.
Your doorbell is powering on.
Solid green
Blinking green
Your doorbell is ready for setup.
5LED Light Definitions
13
Your doorbell automatically records
a 30-second video clip whenever it
detects motion, you receive a call,
or you miss a call. Access these
clips in the app and download them
to your phone for safekeeping.
View and save alert clips
Schedule when to receive
notifications and calls from your
doorbell in the device settings. You
can also silence your chime for a
restful night, and record voice
messages to play for visitors when
you decide not to answer a call.
Schedule notifications and record
messages
12
Two-way audio allows you to see,
hear, and speak to your visitor.
Press and hold the microphone
button to talk to your visitor, and let
go to hear them speak.
Hear and speak to your visitors
REV-A07
Table of contents
Other ZMODO Accessories manuals