Zoetis stablelab EQ-1 User manual

USER’S
MANUAL
MANUEL D’UTILISATION
MANUAL DEL USUARIO
MANUAL DO USUÁRIO
MANUALE DELL’UTENTE
GEBRAUCHSANWEISUNG
EQ-1 Handheld Reader
Lecteur portable EQ-1
Lector portátil EQ-1
Aparelho portátil EQ-1
Lettore portatile EQ-1
EQ-1 Handlesegerät
10022977-UG1

3
Contents
1. Stablelab EQ-1 Reader Box Contents.................................................................................................4
2. System Components................................................................................................................................5
3. Getting Started..........................................................................................................................................6
4. Sample Preparation .................................................................................................................................7
4.1 Whole blood samples
4.2 Serum and Plasma samples
5. Standard Mode ..........................................................................................................................................9
6. Quick Mode...............................................................................................................................................10
7. Result Overview....................................................................................................................................... 11
8. Maintenance ..............................................................................................................................................12
8.1 How to change Reader Battery
8.2 “Clean Lens” error: How to clean the Reader Lens
9. Error Message/Troubleshooting ........................................................................................................13
9.1 Battery Low
9.2 Clean Lens
9.3 Check Insert
9.4 Too Late
9.5 No C-Line
9.6 Calibrate Pass
9.7 Calibrate Fail
10. Precautions............................................................................................................................................... 14
10.1 Intended Use
10.2 Reader Care
10.3 Operating/Storage Conditions
10.4 Disclaimer
10.5 Limitations of Use
10.6 Symbol Descriptions
11. Support ...................................................................................................................................................... 16
FOR VETERINARY USE ONLY

4
1. Stablelab EQ-1 Reader Box Contents
EQ-1 Handheld Reader
9V Battery
Screwdriver
Battery Door

5
2. System Components
1 Reader Display
2 Reader Mode Switch
3 Cartridge Port Door
4 Cartridge Port
5 Battery Port
6 Battery Door
Front View Bottom View
Side View
1
2
3
4
5
6

6
3. Getting Started
a. b.
c.
1. Insert the Duracell© Coppertop 9V battery provided, ensure the + and - symbols on the battery and
EQ-1 Reader align (a).
2. Use the enclosed screwdriver to attach and close the battery door (b).
TIP: The ridge on the battery door should lay directly over the + and – symbols and align with the
ridge in the middle of the side of the reader (c).
3. Move the reader mode switch to either Standard or Quick Mode (refer to sections 5 & 6).

7
4. Sample Preparation
The volume of sample used is critical for whole blood, serum and plasma samples. For best results, use
fresh whole blood immediately or refrigerated whole blood, serum and plasma samples within 12 hours
of collection.
4.1 Whole blood samples
ab
c
• Whole blood samples are the easiest, quickest
and most convenient to use at the horse’s side.
• Use standard venipuncture with appropriately
sized needle and syringe to obtain sample.
• Utilize the BloodCaptor
TM
to collect the sample
directly from the syringe hub via capillary
action, immediately following collection
(preferred) (a).
• Alternatively, whole blood can be used from
any anticoagulated blood collection tube.
• A BloodCaptor is included with each individual
test pack and accurately measures 8.5 μl of
whole blood.
• Ensure the BloodCaptor bulb is full but avoid
excess blood on the outside of the bulb.
Should this occur, carefully wipe off, taking
care not to disturb the collected sample within
the BloodCaptor.
• Remove the Mix Solution bottle cap. Firmly
insert the BloodCaptor collection arm with
blood-filled bulb completely into the Mix
Solution so that a tight seal is formed (b).
• Gently agitate the contents and run the
sample immediately according to the
instructions on the Stablelab Serum Amyloid A
Test package insert (c).

8
4.2 Serum and Plasma samples
de
f
• Any standard blood collection tube can be used
including lithium heparin (green top), EDTA
(purple top) and sodium citrate (blue tops)
tubes, as well as serum tubes (red/tiger top).
• After appropriate centrifugation, use a
micropipette device that can measure 5 μl,
in place of the BloodCaptor.
•Measure 5 μl of serum or plasma from the
blood tube and deposit into the Mix Solution
bottle (d).
• Firmly insert the empty BloodCaptor collection
arm completely into the Mix Solution so that a
tight seal is formed (e).
• Gently agitate the contents and run the sample
immediately according to the instructions on
the Stablelab Serum Amyloid A Test package
insert (f).

9
5. Standard Mode
Standard Mode is the simplest and quickest way
to run one Stablelab SAA cartridge in 10 minutes.
Your EQ-1 Reader will time the test and show the
result on the screen after 10 minutes.
Standard Mode
a
1500µg/ml
About
9 Mins
1500µg/ml
Apply
Sample
b
1. Prepare the sample by following the
instructions on the Stablelab Serum Amyloid
A Test package insert.
• Test cartridges should have sample
applied within 10 minutes of opening the
foil packaging.
2. Ensure the reader mode switch is pushed to
the left (a).
3. Insert a new Stablelab SAA test cartridge
into the cartridge port of the reader with
the result window of the cartridge facing
upwards and the sample well protruding
from the cartridge port.
4. The EQ-1 Reader will automatically turn on
and display “Apply Sample”.
5. To apply sample to the cartridge, gently
squeeze the bottle and discard the first few
drops. Then apply exactly 4 drops from the
Mix Solution bottle to the cartridge well.
6. The reader will detect the sample within
60 seconds of sample application and will
initiate an automatic 9-minute countdown
(b).
• Until the countdown is initiated, “Apply
Sample” will remain visible on the
screen - do not apply additional drops.
7. After a total of 10 minutes, the result is
displayed for 20 seconds before reader
powers down to conserve energy.
8. The result is stored until the cartridge is
removed. The result will appear for 5 seconds
after cartridge removal before being deleted
from the device.
9. Reader will power down on its own to
conserve energy.

10
6. Quick Mode
Quick Mode is used to run multiple different
Stablelab SAA cartridges in sequence. Each
test is timed by you independent of the reader,
requiring precise 10-minute timing/cartridge. The
cartridges are individually inserted in series into
the reader at the end of 10 minutes per cartridge
to provide a quantitative SAA value.
Quick Mode
Q
a
b
1. Prepare the sample by following the
instructions on the Stablelab Serum Amyloid
A Test package insert.
• Test cartridges should have sample
applied within 10 minutes of opening the
foil packaging.
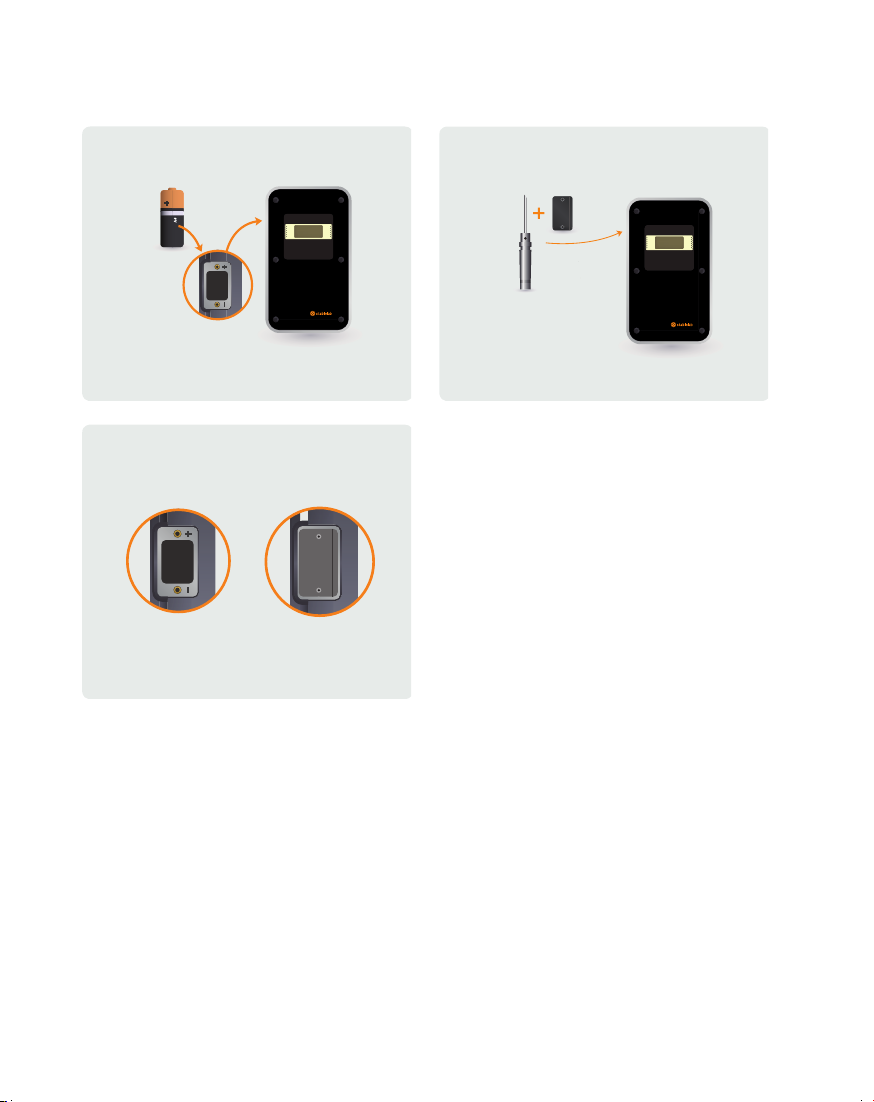
2. Ensure the reader mode switch is to the
right. The letter Q will be displayed in the
upper right corner of the screen when the
cartridge is inserted (a).
3. Have one Stablelab SAA test cartridge per
sample available.
4. When running multiple samples, label the
Mix Solution bottle and respective test
cartridge to avoid confusion.
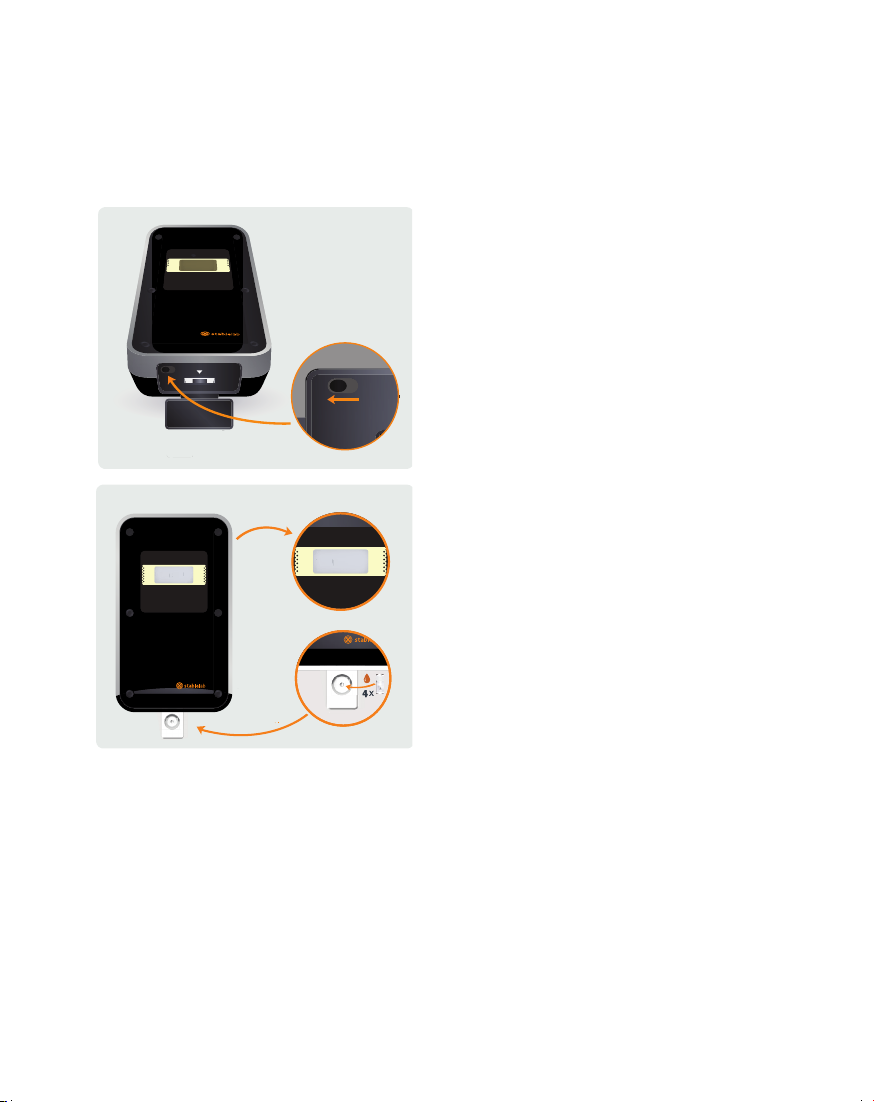
5. To apply sample to the cartridge, first gently
squeeze the bottle and discard the first few
drops. Then apply exactly 4 drops from
the bottle to the cartridge well. Set a timer
for 10 minutes. Repeat procedure for each
additional sample (b).
6. As the sample moves up the test cartridge
a visible control line at ‘C’ will appear,
indicating that the test is working.
7. Keep cartridges on a flat horizontal surface
while developing. Exactly 10 minutes after
sample application, insert the cartridge into
the cartridge port with the result window of
the cartridge facing upwards and the sample
well protruding from the cartridge port.
8. SAA result will be displayed immediately and
stays on screen for 20 seconds before being
deleted permanently from the device.
9. After the SAA result is displayed and
recorded, remove the test cartridge and
insert the next as each additional test
cartridge reaches the 10-minute mark.
10. It is critical to read each test cartridge at
exactly 10 minutes because the cartridge
Control and Test lines continue to develop
over time. Inserting a cartridge beyond the
10-minute mark will falsely elevate the SAA
value measured. Conversely, inserting a
cartridge before 10 minutes have passed, will
read a lower SAA value than is present.
11. Reader will power down on its own to
conserve energy.

11
7. Result Overview
1500µg/ml
1500µg/ml
10 Mins
The reader will display the result in μg/ml on the
screen after 10 minutes (in Standard Mode) or
after the test cartridge has been inserted after
exactly 10 minutes have passed (in Quick Mode).
The detection range is between 0 - 3000 μg/ml,
where zero means SAA is not detected.
1020 300
HIGH SAA
MODERATE SAA
LOW SAA
mins minsmins
Development of test results over time
• Test cartridges must be read by the EQ-1
reader at exactly 10 minutes because the
cartridge Control and Test lines continue to
develop over time.
• This is especially important in Quick Mode as
the test is timed by you, independent of the
reader.
• Inserting a cartridge beyond the 10-minute
mark will display a falsely elevated SAA
value.
• Conversely, inserting a cartridge before
10 minutes have passed, will read a lower
SAA value than is present.
• Important: Re-inserting the test cartridge
beyond the 10-minute mark, to recheck the
result is not recommended and will give an
erroneous, falsely elevated result.

12
8. Maintenance
If your EQ-1 Reader is not performing optimally, reset the device. To reset the device, simply remove the
battery and then reinsert or replace (see section 8.1 for more information)
8.1 How to change the Reader Battery
a. b.
c.
1. The battery port is located on the left side of
the Reader.
2. Remove the two screws from the battery
door using the screwdriver provided (a).
3. Pay close attention to replace the old battery
with a new 9V battery, taking care to align the
+ and – symbols with the battery port (b).
• For optimal performance, a Duracell
Coppertop 9V disposable battery is
recommended.
4. Replace the battery door using the
screwdriver provided, ensuring that it has
been inserted in the correct orientation.
• Important: The ridge on the battery
door should lay directly over the + and –
symbols and align with the ridge in the
middle of the side of the reader (c).
• Do not overtighten the screws, as they
may break or strip.
8.2 “Clean Lens” error: How to clean the
Reader Lens
1. Open the cartridge port door.
2. Tilt the reader up to locate the lens through
the cartridge port door on the inside upper
surface of the Reader.
3. The lens is a silver-black strip coursing front
to back in the middle of the white rectangle.
4. Using a clean cotton swab dipped in 70%
isopropyl alcohol, carefully clean the lens by
running the cotton swab across the lens in a
forward and backwards motion. Do not apply
any other liquid or cloth types directly to the
lens.
5. After the lens has been cleaned, examine to
ensure no particulates remain.
6. Important: As the final step, the reader
MUST be Reset. To do this, remove the
battery from the device completely, re-insert
or replace it (see section 8.1).
7. The reader is now ready for use.

13
9. Error Message/Troubleshooting
Display Message What it means What to do
9.1 Battery Low Indicates that your EQ-1 Reader is
running low on battery and should be
changed immediately.
Follow instructions in section 8.1 for more
information.
9.2 Clean Lens The reader has detected dirt on
the lens that may be affecting
performance.
Follow instructions in section 8.2 for more
information.
9.3 Check Insert Appears when a Stablelab SAA test
cartridge has not been inserted
correctly into the Reader.
Ensure that the Stablelab SAA cartridge is
pushed fully into the cartridge port with
the result window facing upwards and the
sample well protruding from the cartridge
port.
9.4 Too Late Appears in Standard Mode when
your EQ-1 Reader detects that a used
Stablelab SAA test cartridge has been
inserted.
To read a used Stablelab SAA test
cartridge, switch the EQ-1 Reader to Quick
Mode (see section 6 for more information).
If a new Stablelab SAA cartridge has
been inserted in standard mode and the
message is displayed, please contact Zoetis
for further technical support.
9.5 No C-Line A “No C-Line” message indicates the
test cartridge has failed to run. This
occurs by either too little or too much
sample being applied to the test
cartridge well or sample being applied
in operating temperatures outside
recommendations.
Prepare the sample by following the
instructions on the Stablelab Serum
Amyloid A Test package insert and
sections 4-6.
If, on examination of a test cartridge, a
C- Line is present, please contact Zoetis for
further technical support.
9.6 Calibrate Pass A new, blank SAA test cartridge has
been inserted in Quick Mode initiating
a calibration check and the check has
passed.
Continue to use your EQ-1 Reader as
normal and prepare the sample by
following instructions on the Stablelab
Serum Amyloid A Test package insert.
9.7 Calibrate Fail A new, blank SAA test cartridge has
been inserted in Quick Mode initiating
a calibration check and the check has
not passed.
Contact Zoetis for further technical
support.

14
10. Precautions
10.1 Intended Use
This device provides an in-vitro quantitative determination of equine Serum Amyloid A (SAA). This
device is intended for use with equine whole blood, serum or plasma using Stablelab SAA test
cartridges only. This device is an analytical, point of care device designed for veterinary use only.
10.2 Reader Care
• Do not operate close to fire or after the device has contacted water.
• Do not expose or immerse the device in liquid.
• The EQ-1 Reader is only for use with Stablelab SAA cartridges. Inserting incompatible products
may damage the device.
• Do not allow foreign objects to enter the device.
• Do not use if the device is damaged.
• Do not attempt to disassemble or repair the reader. Failure to observe this precaution
could result in fire or electrical shock. If the device needs repair, contact your local Zoetis
representative and/or distributor.
10.3 Operating/Storage Conditions
• This device is calibrated to operate between 15°C - 35°C. Using the device outside of this
temperature range may affect accuracy. Do not operate the device in direct sunlight.
• Performance of the EQ-1 Reader may be impaired if the device is stored below -10°C or above
50°C. Store the device in a cool, dry place. Do not store in locations exposed to extreme
temperatures or moisture.
10.4 Disclaimer
No part of this publication may be reproduced or transmitted in any form or by any means,
electronic or mechanical, including photocopy, recording, or any information storage or retrieval
system, without permission in writing from Zoetis, Inc. Zoetis, Inc. reserves the right to modify
its products and services at any time. Information in this User’s Manual is subject to change
without notice. Although prepared to ensure accuracy, Zoetis assumes no liability for errors, or
for any damages resulting from application or use of this information. No rights are granted for
diagnostic uses. No rights are granted for use of the product for commercial application of any
kind, including but not limited to manufacturing, quality control, or commercial services, such as
contract services or fee for services. It is the responsibility of the purchase/end user to acquire
any additional intellectual property rights that may be required.
10.5 Limitations of Use
Only Stablelab SAA test cartridges are to be used with the device. The device has a detection
range of 0–3000 μg/ml of equine SAA. Factors that might affect performance of the test include
the quality and volume of the sample, accuracy of the reagents, sample handling, time, and
temperature. Great care has been taken to ensure the quality and the reliability of this product.
However, it is possible that in certain cases unusual results may be obtained due to a high level of
interfering factors.

15
10.6 Symbol Descriptions
Symbol Description Symbol Description
Keep away from sunlight.
Manufacturer
Temperature limitations.
Expiration Date
Consult instructions for use
Batch code (Lot)
Serial number
Authorized
Representative in the
European
Community
WEEE Directive 2002/96/EC
Denotes conformity
to specific European
directives

16
11. Support
Sales Order & Technical support
For United States, please contact your Zoetis Representative, Distribution Partner or Zoetis directly
at T 1-888-963-8471
If you are based in Australia, Brazil, Canada, France, Netherlands or the United Kingdom to order
please contact Zoetis directly using the customer service details below:
Australia:
customerservic[email protected]om
T +1800 022 442
Brazil
T 0800 011 1919
Canada
StablelabCanada@zoetis.com
T 1-800-663-8888
France
commandes.zoetis@zoetis.com
T +0810 734 937
Netherlands
NLorder[email protected]om
T + 0845 300 8034
Germany
bestellannahme@zoetis.com
T + (0) 30 33 00 63 - 331
United Kingdom
Zoetis-DirectAc[email protected]om
T + 0845 300 8034
For all other countries, please contact your local market Zoetis representative.
Learn more about Stablelab by visiting www.stablelab.com

17
Zoetis Inc., 333 Portage Street, Kalamazoo, MI, 49007, USA
Zoetis Belgium, Rue Laid Burniat 1, 1348 Louvain-la-Neuve, Belgium
www.stablelab.com
All trademarks are the property of Zoetis Services LLC or a related company or a licensor unless
otherwise noted. Stablelab is a registered trademark of Epona Biotech Limited, used under license.
Duracell is a registered trademark of Duracell, Inc. © 2020 Zoetis Services LLC. All rights reserved.

18

19
Table des matières
1. Lecteur Stablelab EQ-1 – Éléments inclus ..................................................................................... 20
2. Composants du système .......................................................................................................................21
3. Premiers pas.............................................................................................................................................22
4. Préparation de l’échantillon................................................................................................................23
4.1 Échantillon de sang total
4.2 Échantillon de sérum et de plasma
5. Mode Standard ........................................................................................................................................25
6. Mode Rapide ........................................................................................................................................... 26
7. Présentation du résultat.......................................................................................................................27
8. Maintenance .............................................................................................................................................28
8.1 Remplacement de la pile du lecteur
8.2 Erreur « Clean Lens » : nettoyage de la lentille du lecteur
9. Messages d’erreur/Dépannage......................................................................................................... 29
9.1 Battery Low [Batterie faible]
9.2 Clean Lens [Lentille sale]
9.3 Check Insert [Cartouche mal insérée]
9.4 Too Late [Délai dépassé]
9.5 No C-Line [Absence de ligne témoin]
9.6 Calibrate Pass [Étalonnage réussi]
9.7 Calibrate Fail [Échec de l’étalonnage]
10. Précautions d’emploi ........................................................................................................................... 30
10.1 Utilisation prévue
10.2 Mesures de précaution
10.3 Conditions de fonctionnement/stockage
10.4 Déclaration de non-responsabilité
10.5 Restrictions d’utilisation
10.6 Description des symboles
11. Assistance .................................................................................................................................................32
RÉSERVÉ EXCLUSIVEMENT À UN USAGE VÉTÉRINAIRE

20
1. Lecteur Stablelab EQ-1 – Éléments inclus
Lecteur portable EQ-1
Pile de 9V
Tournevis
Couvercle du
compartiment à pile

21
2. Composants du système
1 Écran du lecteur
2 Sélecteur de mode
3 Couvercle du logement
pour cartouche
4 Logement pour cartouche
5 Logement à pile
6 Couvercle du compartiment
à pile
Vue frontale Vue du dessous
Vue du côté
1
2
3
4
5
6
Table of contents
Languages:
Other Zoetis Medical Equipment manuals
Popular Medical Equipment manuals by other brands

sorin
sorin REPLY DR Implant manual

Novametrix Medical Systems
Novametrix Medical Systems OXYPLETH 520A Service manual

Aptalis
Aptalis Flutter Mucus Clearance Device Instructions for use

hatch
hatch X-RAY FS04 Installation and troubleshooting guide

3B Medical
3B Medical Line II QX Series user manual

Fillauer
Fillauer MC ProPlus ETD Prosthetist Manual