SEFAM EcoStar Info User manual
Practitioner and
Home Care Provider manual
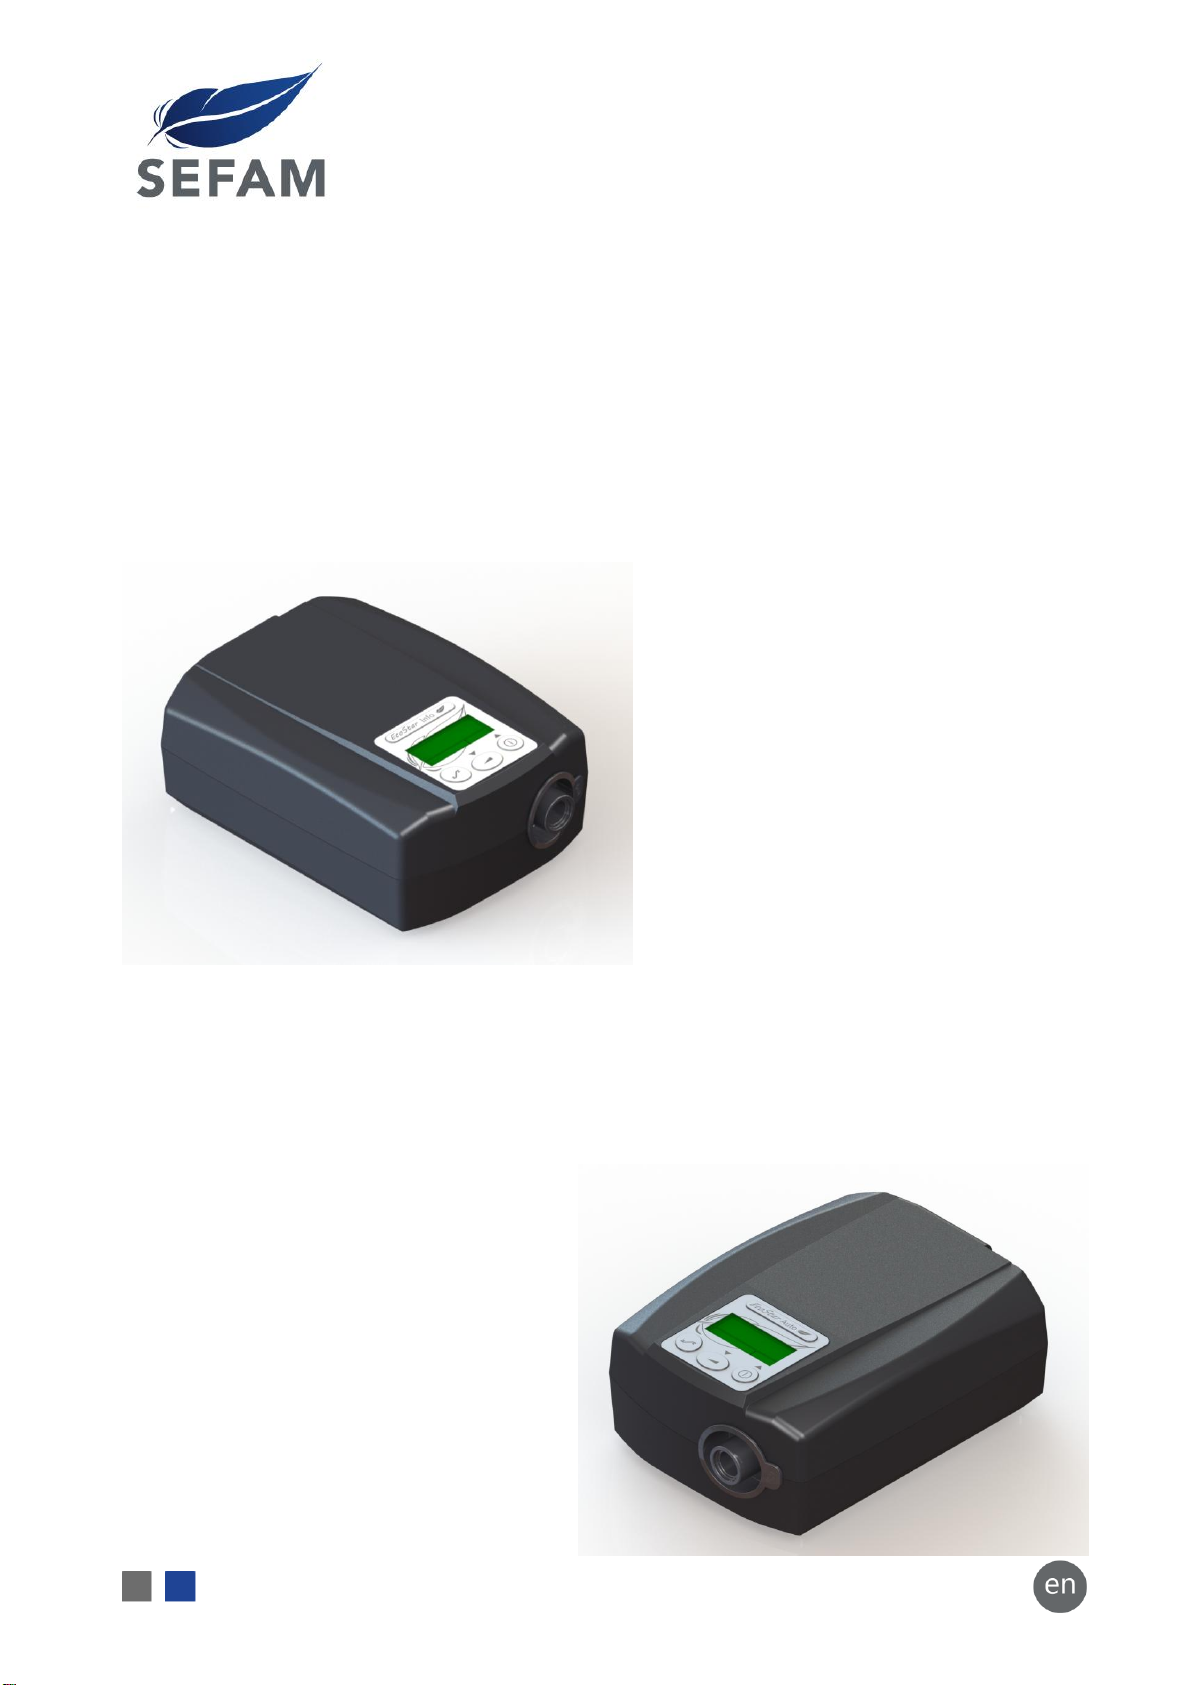
EcoStar Info
EcoStar Auto


EcoStar Info, EcoStar Auto Table of Contents 3
Table of Contents
Before starting ..............................................................................................................................4
Safety instructions...................................................................................................................................... 4
Intended use .............................................................................................................................................. 4
Contraindications ....................................................................................................................................... 5
List of authorised accessories .................................................................................................................... 5
Available features .........................................................................................................................6
Mask unplugged feature ............................................................................................................................ 6
Comfort Calibration.................................................................................................................................... 6
Auto ON feature......................................................................................................................................... 6
Time Ramp feature .................................................................................................................................... 6
Indexed Ramp feature................................................................................................................................ 7
Accessing settings .........................................................................................................................7
Definitions .................................................................................................................................................. 7
Setting ranges ............................................................................................................................................ 8
Accessing the menus.................................................................................................................................. 9
Description of a screen page .........................................................................................................................9
How to access settings ................................................................................................................................10
Description of symbols displayed on the screen ..........................................................................................10
Setting EcoStar Info device ...................................................................................................................... 11
Setting EcoStar Auto device ..................................................................................................................... 13
Setting the clock....................................................................................................................................... 16
Choosing a pressure unit.......................................................................................................................... 17
Adjustment of the pressure at the device outlet ..................................................................................... 17
Specific calibration of the pneumatic configuration ................................................................................ 17
Cleaning and maintenance ..........................................................................................................18
Weekly ..................................................................................................................................................... 18
Air intake filter.............................................................................................................................................18
Monthly.................................................................................................................................................... 18
Device ..........................................................................................................................................................18
Air intake filter.............................................................................................................................................18
Disinfecting the equipment .........................................................................................................19
Disinfecting the surface of the device...................................................................................................... 19
Products which must not be used............................................................................................................ 19
Trouble-shooting.........................................................................................................................20
Information messages.............................................................................................................................. 20
Error messages......................................................................................................................................... 20
Technical characteristics..............................................................................................................22
Device performance................................................................................................................................. 22
Conditions of use ..................................................................................................................................... 22
Electrical characteristics........................................................................................................................... 22
Transport and storage conditions ............................................................................................................ 22
Physical characteristics ............................................................................................................................ 22
Symbols on the device ............................................................................................................................. 23
Disposing of the device at the end of its life ............................................................................................ 23
Standards Compliance ............................................................................................................................. 24
EC marking ............................................................................................................................................... 24
ISO 17510-1:2009 and ISO 80601-2-70:2014 compliant features ........................................................... 25
Static pressure stability at 10 cmH2O ..........................................................................................................25
Dynamic pressure stability...........................................................................................................................25
Maximum flow and pressure .......................................................................................................................26
Sound pressure and sound power levels......................................................................................................26
Essential performance requirements for electromagnetic compatibility ................................................ 27

4 Before starting EcoStar Info, EcoStar Auto
Before starting
This manual is intended for the use of the Practitioner and the Home care Service Provider.
Under no circumstances must it be supplied to the patient.
Safety instructions
WARNING
In this manual, this
signals a risk of injury
or accident to the
patient.
Please familiarize yourself with the safety
instructions in the patient manual.
Refer to the patient manual for installing,
maintaining and storing the device.
You must ensure that the patient reIECves
the manual intended for his use, as well
as the instructions for using the
accessories.
Only use the device with authorised
accessories as listed in this manual.
During treatment, only equipment
included in the list of authorised
accessories must be connected to the
device USB connector. Do not use the
device if connected to a computer.
For proper maintenance and to prevent
the risk of damage, only qualified
personnel are authorized to service the
device or carry out approved
modifications. The user assumes full
responsibility for any malfunction of the
device caused by maintenance performed
by unauthorized personnel.
If you observe any anomaly in the device,
do not begin treatment.
Never use the device without making sure
that the air intake filter is installed.
The device should not be used if it is near
or on top of an equipment other than one
of the authorised accessories.
When using oxygen, the oxygen source
should be placed at more than one meter
from the device.
Do not introduce liquids or objects into the
air outlet.
CAUTION
In this manual, this
indicates that there is a
possibility of material
damage to this device or
any other device.
Since this is a medical electrical device,
please follow the installation instructions
contained in this manual concerning
electromagnetic compatibility.
Like all medical electrical devices, the
device is vulnerable to interference from
mobile and portable radiofrequency
communication equipment (cordless
phones, WiFi) which could be placed
nearby.
Addition of any accessory at the respiratory
circuit level or combination with other
medical equipments may affect the
performance of the device. Check that the
pneumatic configuration selected is
suitable.
Never connect the device to a battery
when it is charging from the mains.
If the device is used with a GoodKnight H2O
heating humidifier:
When using the humidifier's water
chamber, the patient must take
precautions to eliminate the risk of
introducing water into the machine, which
could cause irreversible damage. The
device must be placed on a stable
horizontal surface and must not be tilted.
We recommend disconnecting the device
from the heating humidifier and emptying
the water chamber before moving or
transporting the assembly, to eliminate
any risk of introducing water into the
device, which could cause irreversible
damage.
Intended use
The EcoStar Info and EcoStar Auto devices are Positive Pressure devices indicated for the mask treatment of
Obstructive Sleep Apnea and Hypopnea Syndrome (OSAHS) in patients weighing more than 30 kg (66 lbs).
They can be used at home or in a sleep center.
The device can be used with the GoodKnight H2O humidifier if a prescription for heated humidification has
been added to the patient's treatment. The heating humidifier is designed to heat and raise the humidity of
the air delivered to the patient through the Continuous Positive Airway Pressure device.

EcoStar Info, EcoStar Auto Before starting 5
Contraindications
Studies have shown that the use of positive
airway pressure is contraindicated for certain
patients with one of the following pre-existing
conditions:
Severe bullous emphysema or emphysema
previously complicated by pneumothorax.
Pneumothorax.
Pneumoencephalus, trauma or recent
surgery with sequela of cranio-
nasopharyngeal fistula.
Decompensated cardiac insufficiency or
hypotension, particularly in case of
decreased blood volume or cardiac
arrhythmia.
Dehydration.
Massive epistaxis or history of massive
epistaxis, hemophilia.
Acute sinusitis, otitis media, or perforated
tympanic membrane.
Tracheotomy.
Moreover, as the effect of positive airway
pressure on cardiac output is clear for some
patients, close monitoring of the patient's
blood pressure and heart rate is recommended
when beginning treatment at the effective
pressure. The risks and benefits of Continuous
Positive Airway Pressure must be assessed on a
case-by-case basis for these patients.
List of authorised
accessories
Unless otherwise indicated, the EcoStar Info or
EcoStar Auto device can be used with the following
optional accessories:
Air intake filter
P/N M-415930-01
Fine filter
P/N M-413950-04
Specific power supply
module
P/N M-413910-00
(EU plug)
P/N M-415910-03
(no EU plug)
GoodKnight H2O
heating humidifier
P/N M-114600
Patient Tubing,
22 mm diameter
P/N M-261000-04
Patient Tubing,
15 mm diameter
P/N M-261000-00
Carrying case
P/N M-214531-01
Clinical kit
P/N M-215630-01
Battery cable /
cigarette-lighter plug
P/N M-213930-03
DreamStar Analyze
Software
P/N M-215630-00
RS232/mini USB
2 m cable
P/N M-214831-11
RS 232/mini USB
15 m cable
P/N M-214831-12
Mini USB 2 m cable
P/N M-214831-10
WARNINGS
Use only the authorised accessories listed
above or compliant with EN ISO 17510-
2:2007 standard.
Use only those accessories which can
guarantee patient’s treatment pressure
and reduce re-breathing of CO2.
When a facial mask is necessary, always
use a mask which is equipped with an anti-
asphyxia valve.
6 Available features EcoStar Info, EcoStar Auto
Available features
The EcoStar Info device operates in continuous mode, i.e. the device delivers a constant pressure level. The
EcoStar Auto operates either in constant mode (CPAP) or in automatic mode (Auto-CPAP), i.e. the pressure
fluctuates between a minimum pressure and a maximum pressure as a function of respiratory events
detected.
Mask unplugged feature
If the patient removes his mask, the device automatically switches to low power. The machine will restore
normal power when the mask is reconnected or if one of the three buttons of the device is pressed.
Otherwise, the device will stop after 30 minutes.
Note:
If the patient uses a resistive interface (full face mask with anti-asphyxia valve), a specific calibration of the
pneumatic configuration must be carried out so that the device detects that the mask is unplugged.
Comfort Calibration
The Comfort Calibration(CC) feature is intended to increase the treatment pressure during inspiration and
to decrease it during expiration to make the patient's breathing more comfortable during the treatment. It
can be enabled continuously or during the ramp.
Auto ON feature
Functionality allowing to automatically start the treatment during the first breaths in the mask without
pressing the device button . It can be enabled or disabled.
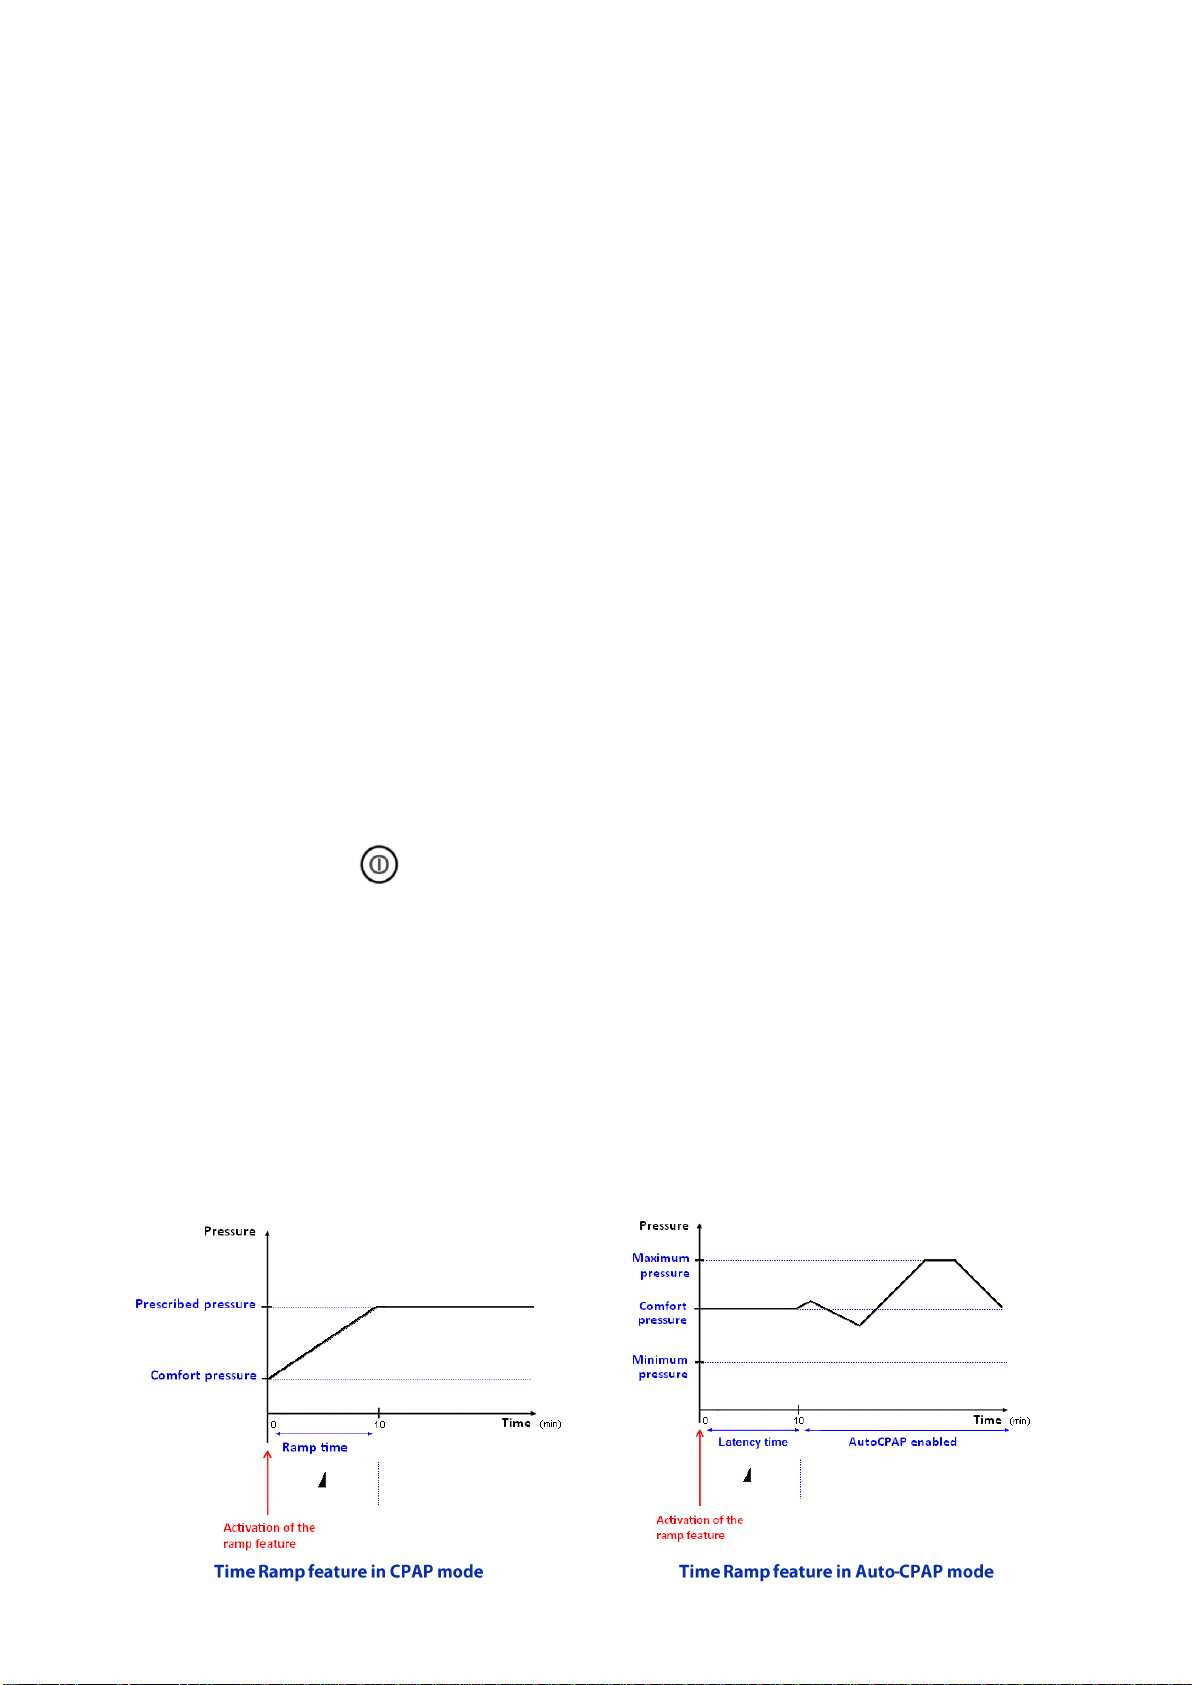
Time Ramp feature
The time ramp feature allows for a gradual rise in pressure to help the patient fall asleep. When it is
programmed (ramp time 0), it will be automatically enabled at the beginning of the session at comfort
pressure.
In CPAP mode, the treatment begins at a reduced pressure called comfort pressure, then the pressure
increases to treatment pressure.
In Auto-CPAP mode, the time ramp feature delays the commands to raise or lower the pressure. If the
comfort pressure is lower than the minimum pressure, the gradual rise in pressure will be made from the
comfort pressure to the minimum pressure during the latency time.

EcoStar Info, EcoStar Auto Accessing settings 7
Indexed Ramp feature
The indexed ramp feature allows to start the treatment at the adjustable comfort pressure, then to have a
rise in pressure in CPAP mode or the activation of the Auto-CPAP as soon as the device starts to detect
respiratory events which indicate that the patient is asleep.
If the end of the indexed ramp is not detected before the value of the maximum ramp time (45 minutes), it
will automatically stop.
Accessing settings
The adjustment of the therapeutic pressure must be determined by the prescribing physician for each
patient individually, with the configuration of the equipment to be used, including the accessories. The
correct installation and positioning of the patient interface constitute a critical condition for the proper
operation of the device.
The most recent compliance data is recorded by session in the device memory within one year and 8 hours
usage day, and they can be retrieved for analysis by using DreamStar Analyze software.
The settings are accessible directly on the device and with the DreamStar Analyze software, by connecting
the machine to a computer via a RS232 / Mini USB cable.
WARNING
Before changing the device settings, confirm that the device delivers sufficient airflow when it is in
operating mode. If it does not, stop immediately and contact the technical support.
Definitions
Hour
counter:
device operating time (ON/OFF).
Compliance
counter:
time during which the patient has
effectively breathed in the mask (time
subtracted from the time when the
mask was removed and the time with
no respiration).
FL:
Inspiratory Flow Limitation with
EcoStar Auto device in Auto-CPAP
mode.
Prescribed
pressure:
level of pressure prescribed for the
patient.
Comfort
pressure:
level of pressure produced by the
device when the time ramp or the
indexed ramp starts up so that the
patient can go to sleep comfortably.
Maximum
pressure on
apnoea
command:
maximum pressure on the EcoStar
Auto beyond which no rise in pressure
can be applied once a respiratory
pause has been detected.
Maximum
pressure:
maximum pressure that the EcoStar
Auto can deliver in Auto-CPAP
mode.
Minimum
pressure:
minimum pressure that the EcoStar
Auto can deliver in Auto-CPAP mode.
Session:
period during which data is recorded
to memory between the time the
device starts operation and the time
it goes into standby.
Ramp time:
in CPAP mode, this is the time taken
by the device to reach the prescribed
pressure from the comfort pressure.
Latency
time:
this is the time taken by the device
to activate the Auto-CPAP feature
when the ramp is enabled.

8 Accessing settings EcoStar Info, EcoStar Auto
Setting ranges
The following tables indicate the parameters
adjustable and the features available on the
EcoStar Info and EcoStar Auto devices, as well as
the pneumatic calibration regarding the
accessories used.
Notes:
As the device is equipped with a differential
pressure sensor, the pressure compensation
for altitude is automatic.
The default pressure unit is cmH2O.
Operating mode on the EcoStar Auto:
Parameter
Display
Default
Operating mode
CPAP
APAP
(Auto-CPAP)
APAP
(Auto-CPAP)
Parameters adjustable on the devices:
Parameter
Minimum
value
Maximum
value
Default
value
Increment
On EcoStar Info and EcoStar Auto devices in CPAP mode:
Pressure level
4 cmH2O
20 cmH2O
8 cmH2O
0.5 cmH2O
Comfort pressure
4 cmH2O
prescribed
pressure
4 cmH2O
0.5 cmH2O
Ramp time
0 min
45 min
15 min
5 min
On EcoStar Auto device in Auto-CPAP mode:
Maximum pressure
4 cmH2O or
minimum
pressure
20 cmH2O
20 cmH2O
0.5 cmH2O
Minimum pressure
4 cmH2O
20 cmH2O or
maximum
pressure
4 cmH2O
0.5 cmH2O
Comfort pressure
4 cmH2O
20 cmH2O or
maximum
pressure
4 cmH2O
0.5 cmH2O
Latency time
0 min
45 min
15 min
5 min
Maximum pressure on apnea
command
minimum
pressure
maximum
pressure
10 cmH2O
0.5 cmH2O
Parameter adjustable on EcoStar Auto device:
Parameter
Display
Default
Pressure decrease speed (in Auto-CPAP mode
only) :
Sd:F
(fast)
Sd:S
(slow)
Sd:S
(slow)
EcoStar Info, EcoStar Auto Accessing settings 9
Features available on the devices:
Feature
Feature
enabled
Feature
disabled
Default
Comfort Calibration
CC:1
(continuously or
during the ramp )
CC:0
CC:1
(during the
ramp )
External module connection
rS:1
rS:0
rS:1
Command on Inspiratory Flow Limitation (in
Auto-CPAP mode only)
FL:1
FL:0
FL:1
Auto ON
Ao:1
Ao:0
Ao:1
Ramp type
Default
Ramp feature
Time ramp
(tr)
Indexed ramp
(ir)
Indexed
ramp (ir)
Pneumatic configuration of the devices regarding the accessories used:
Display calibration pneumatique
Accessory used
Without humidifier
With GKH2O heated
humidifier
Tubing 1.80 m long 22 mm diameter (standard
configuration set by default)
CP:22
CP:HH 22
Tubing 1.80 m long 15 mm diameter
CP:15
CP:HH 15
Other (specific)
CP:SP
(specific calibration present)
CP:--
(specific calibration absent)
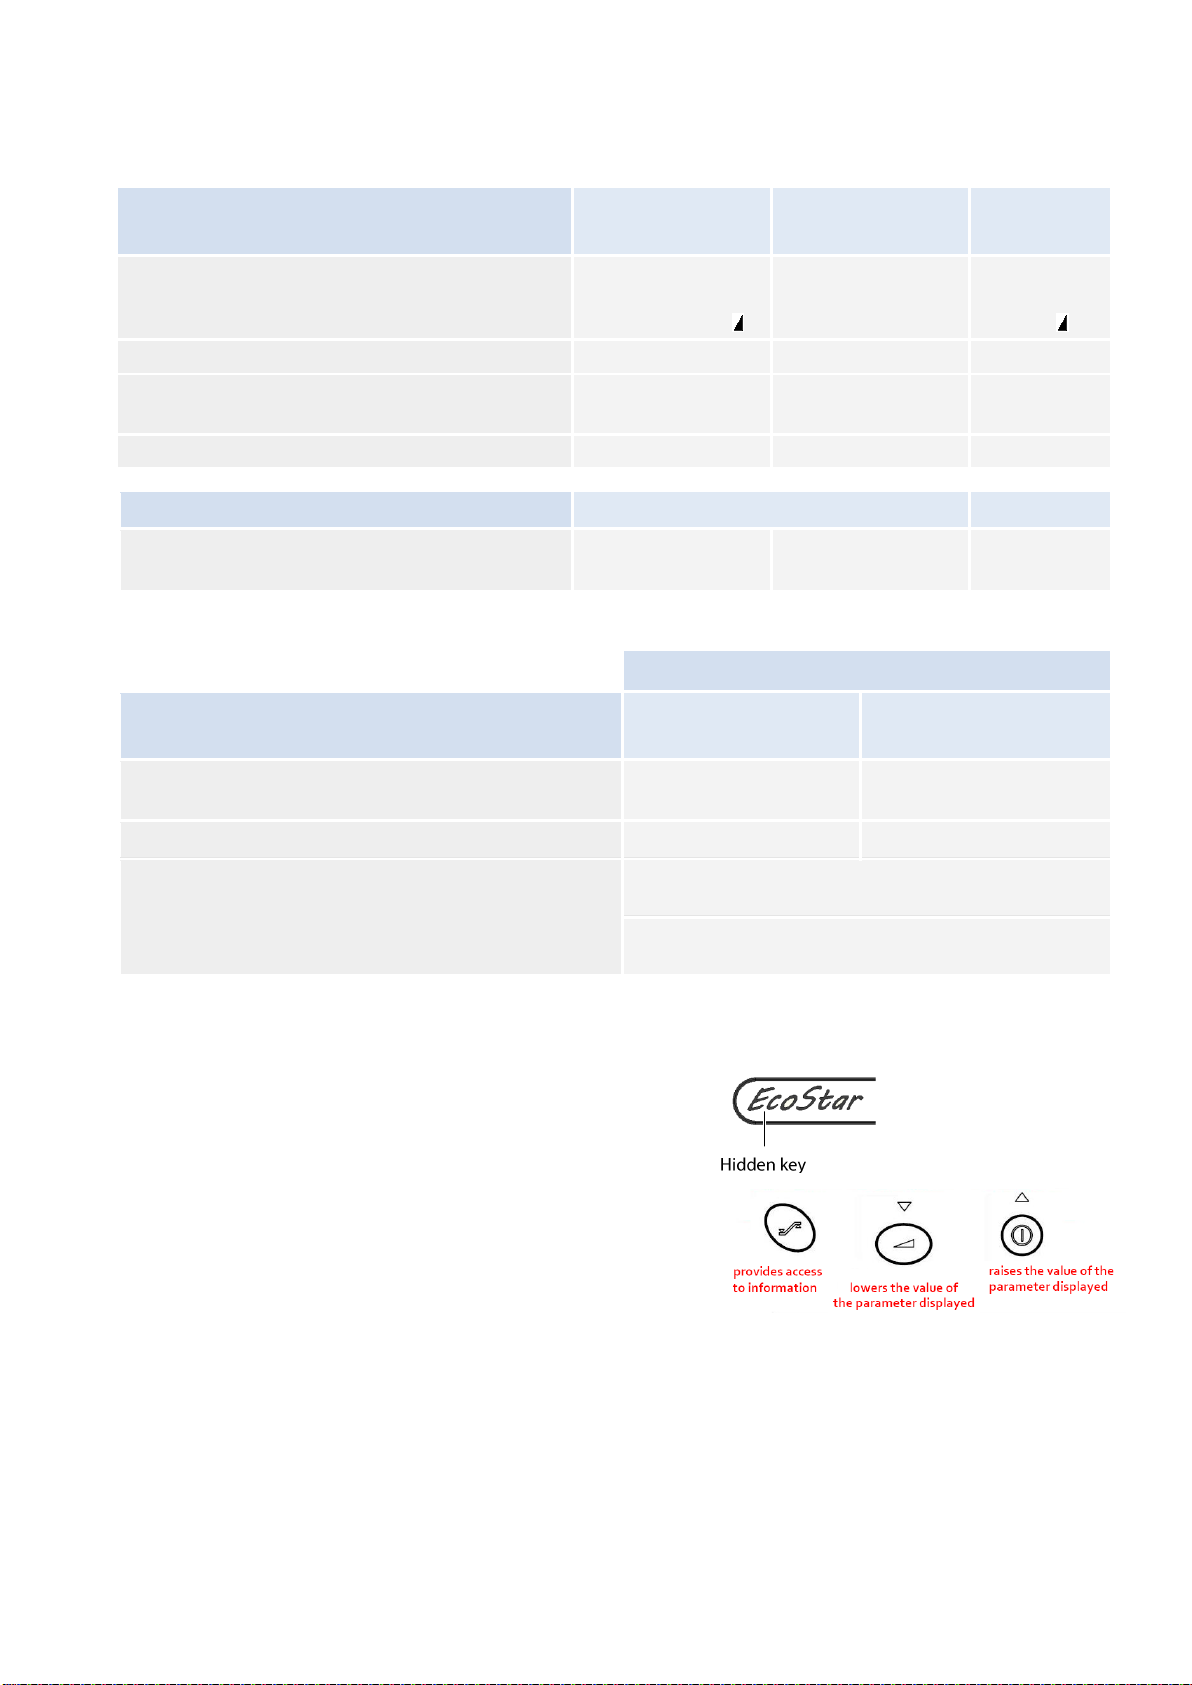
Accessing the menus
In order to restrict access of certain settings to the
medical team, a hidden key has been provided on the
device. It is located under the letters "Ec" of the name
"EcoStar” and is detectable to the touch as a hollow.
Moreover, the three buttons shown at the user
interface allow access to the device settings and are
used to change the value of certain parameters.
Description of a screen page
Each screen of the practitioner settings menu includes:
an upper section indicating the value of the
parameter displayed
a lower section with various symbols indicating the
device's operating mode or the nature of the
parameter displayed (see table entitled
"Description of symbols displayed on the screen").
The parameters accessible on the screen
when the machine is in standby or
operating mode are:
parameters of the device relating to
treatment
compliance counter data.
10 Accessing settings EcoStar Info, EcoStar Auto
How to access settings
To access the device settings:
press the hidden key, then simultaneously the
information access button for one second.
On the screen which appears:
the symbol or the symbol shows if the device
is in standby or in operation.
the symbol indicates that the parameter displayed
can be modified. Raise the parameter value pressing
the on/off button or lower it using the ramp
button .
To access the next data:
press the information access button again.
To return to the previous data:
press the hidden key.
Note:
Exit from the parameter setting menu takes place automatically when you do not press any key for 30 seconds.
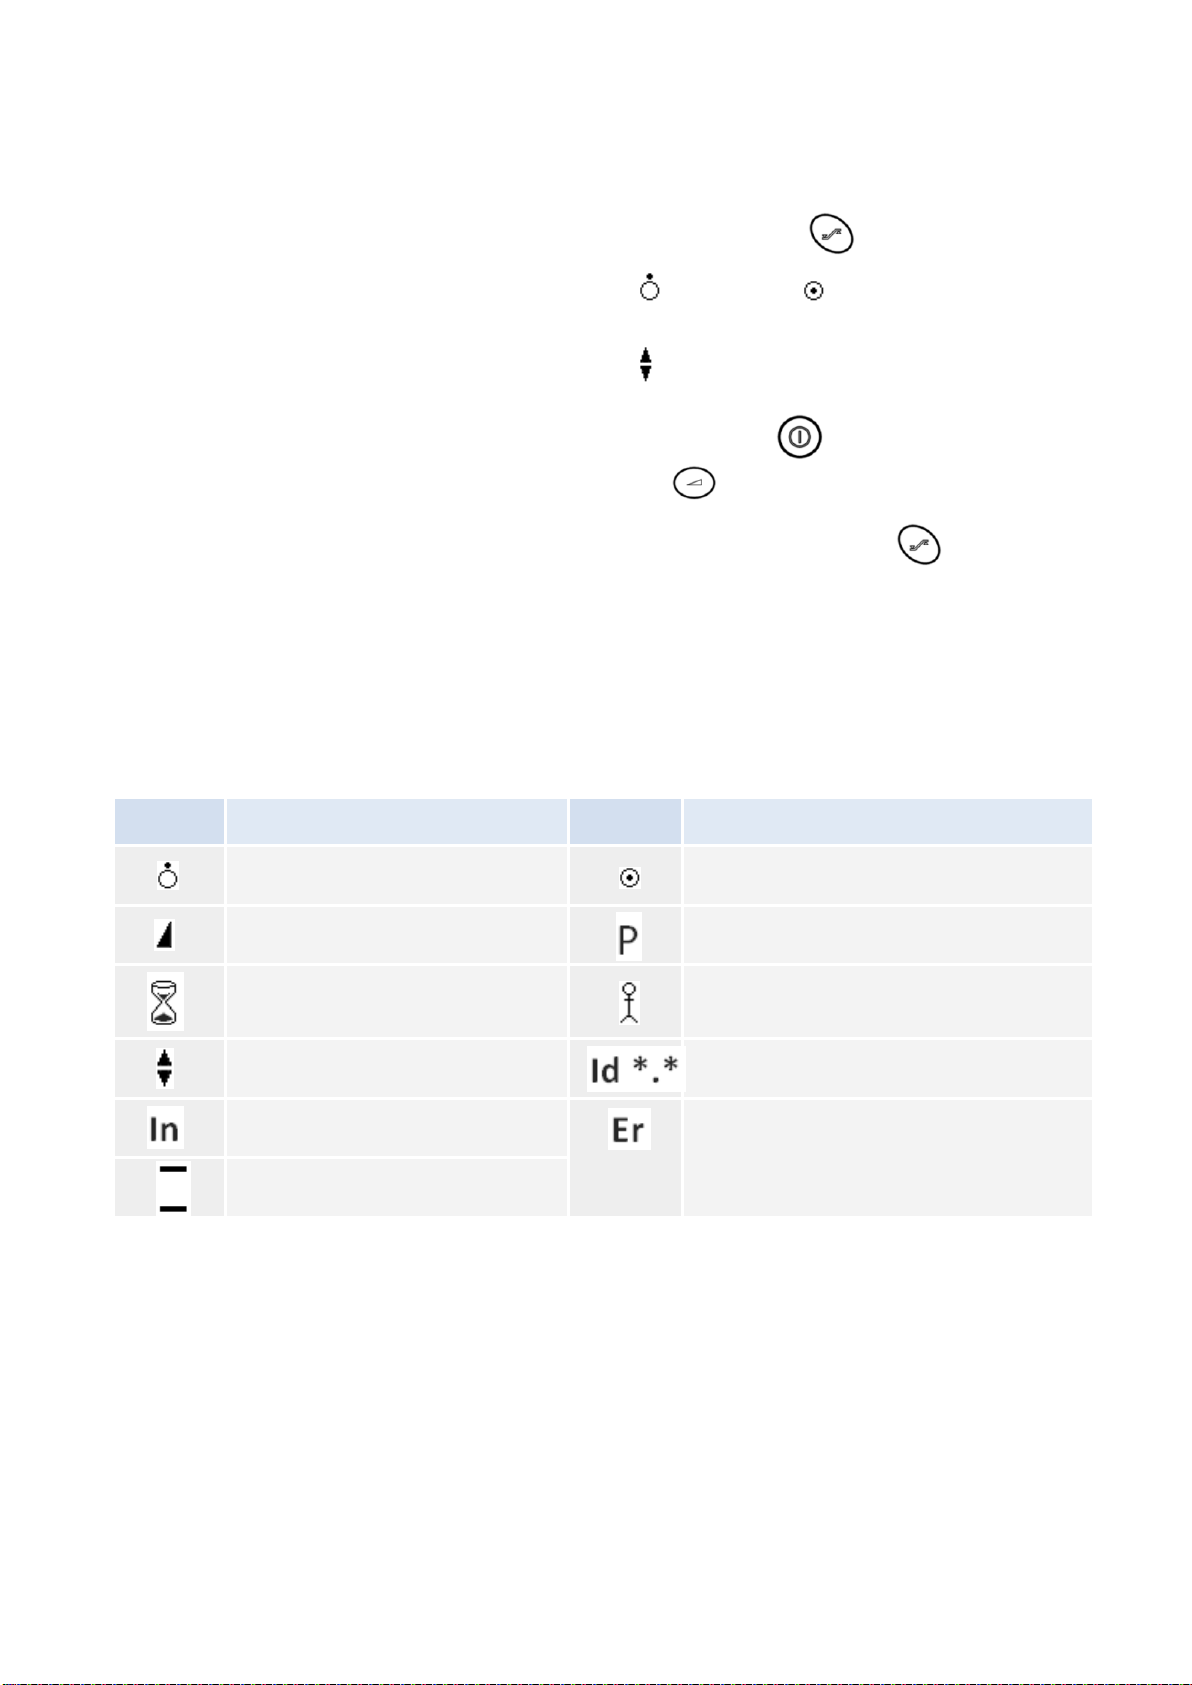
Description of symbols displayed on the screen
Symbol
Description
Symbol
Description
Standby mode
Operating mode
Ramp feature
Pressure symbol
Time symbol
Compliance symbol
Adjustable parameter
Software version
Information message
Error message
Pressure sensor offset
Note :
The EcoStar Info or EcoStar Auto device is shown in operating mode and all the values displayed are given by
way of example.
EcoStar Info, EcoStar Auto Setting EcoStar Info device 11
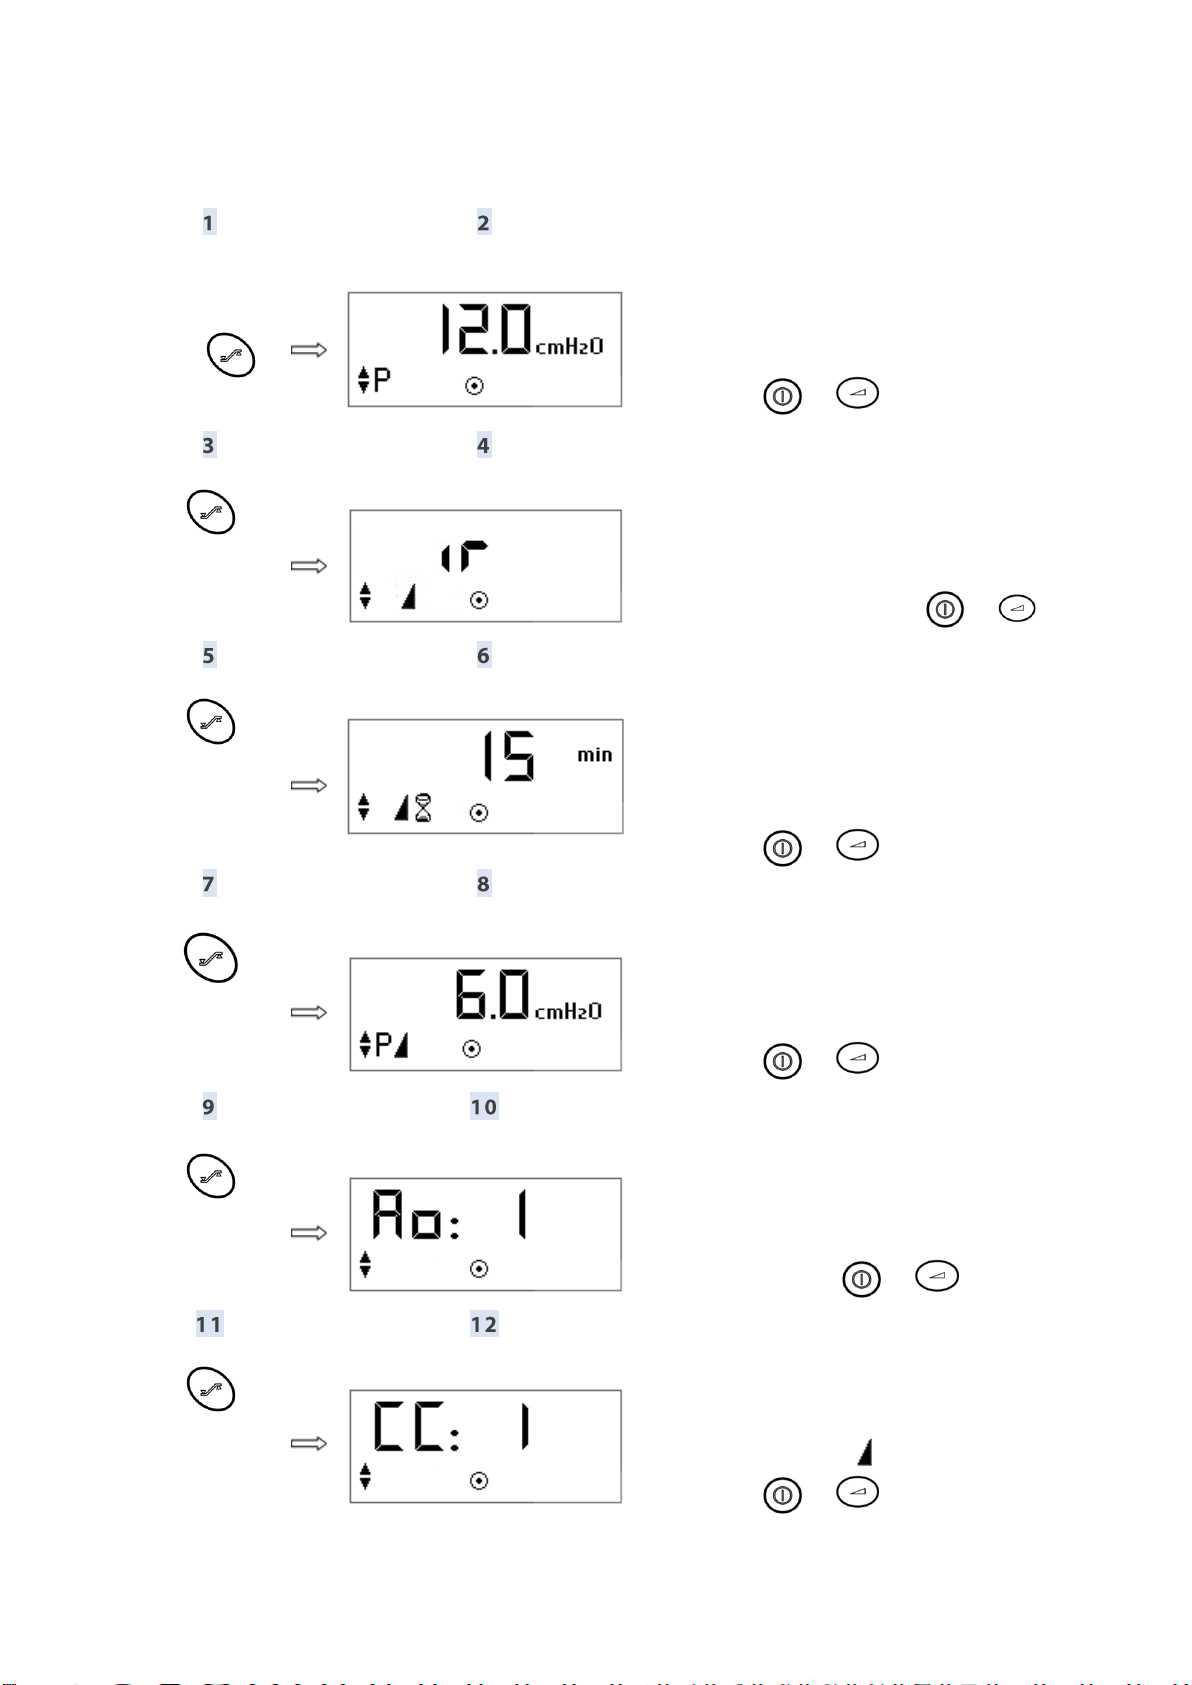
Setting EcoStar Info device
Press
simultaneously
the hidden key
and
for one second.
This screen appears:
Pressure level
Increase or decrease the value displayed pressing
the button or .
Press
This screen appears:
Ramp
You can select the time ramp (tr) or the indexed
ramp (ir) pressing the button or .
Press
This screen appears:
Ramp time when the time ramp tr is selected,
otherwise this parameter is not displayed.
Increase or decrease the value displayed pressing
the button or .
Press
This screen appears:
Comfort pressure
Increase or decrease the value displayed pressing
the button or .
Press
This screen appears:
Auto ON
You can enable (1) or disable (0) the feature
pressing the button or .
Press
This screen appears:
Comfort Calibration
You can enable (1) the feature either continuously,
or during the ramp ( ), or disable it (0) pressing
the button or .
12 Setting EcoStar Info device EcoStar Info, EcoStar Auto
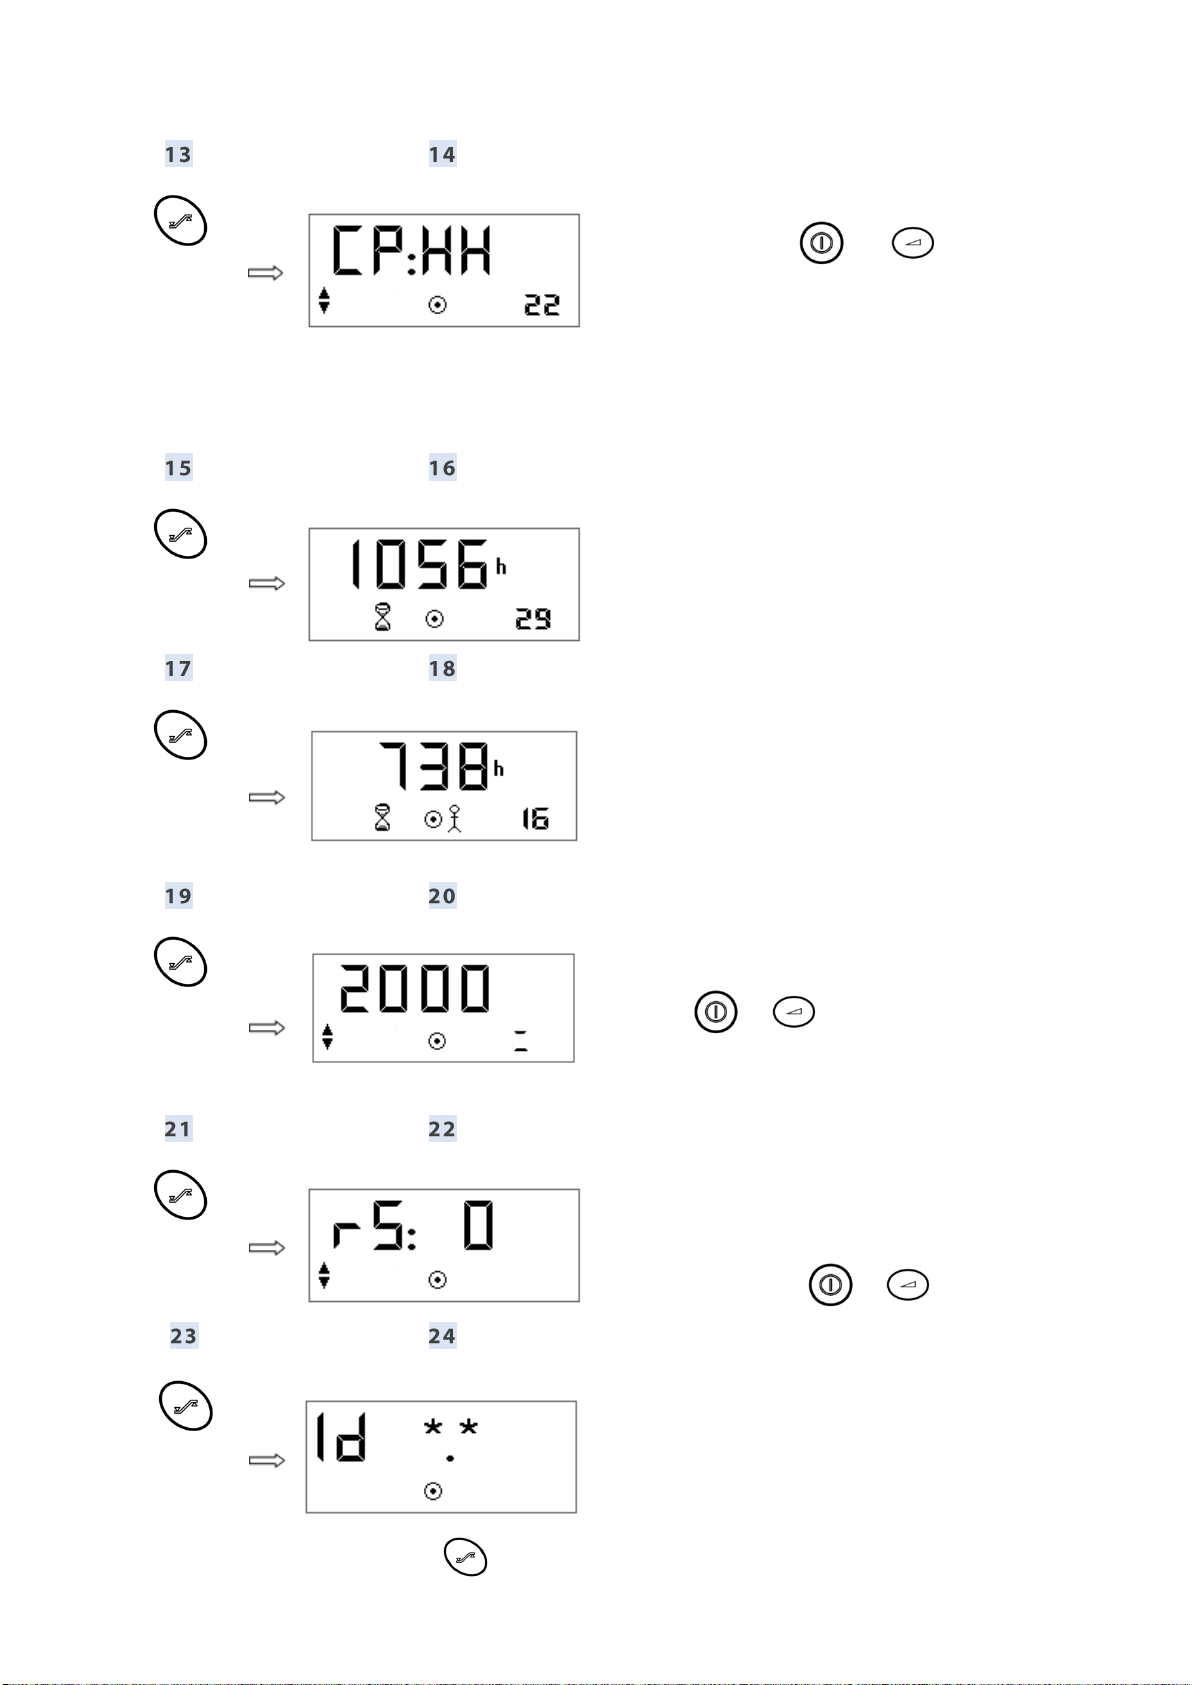
Press
This screen appears:
Pneumatic Calibration
Using the button or , you can select a
configuration 22 (tubing 22 mm diameter, standard),
15 (tubing 15 mm diameter), HH (humidifier), SP
(specific present) or -- (specific absent).
The value on the right below represents the diameter
of the tubing used with the heated humidifier.
For specific calibration, refer to "Specific calibration of
the pneumatic configuration" page 17.
Press
This screen appears:
Hour counter (device operating time). The value
displayed on the right below represents the minutes.
Press
This screen appears:
Compliance counter (time during which the patient
actually breathed with the device). The value
displayed on the right below represents the minutes.
Press
This screen appears:
Built-in pressure sensor
Increase or decrease the value displayed using the
button or .
Refer to "
Adjustment of the pressure at the device outlet" page
17.
Press
This screen appears:
Selection of RS232 connection for an external
module (for example a modem)
The connection can be enabled (1) or disabled (0) by
pressing the button or .
Press
This screen appears:
Software version included with the EcoStar Info
device. The version can be viewed but not modified.
Press the information access button again to exit the parameter settings menu.
EcoStar Info, EcoStar Auto Setting EcoStar Auto device 13
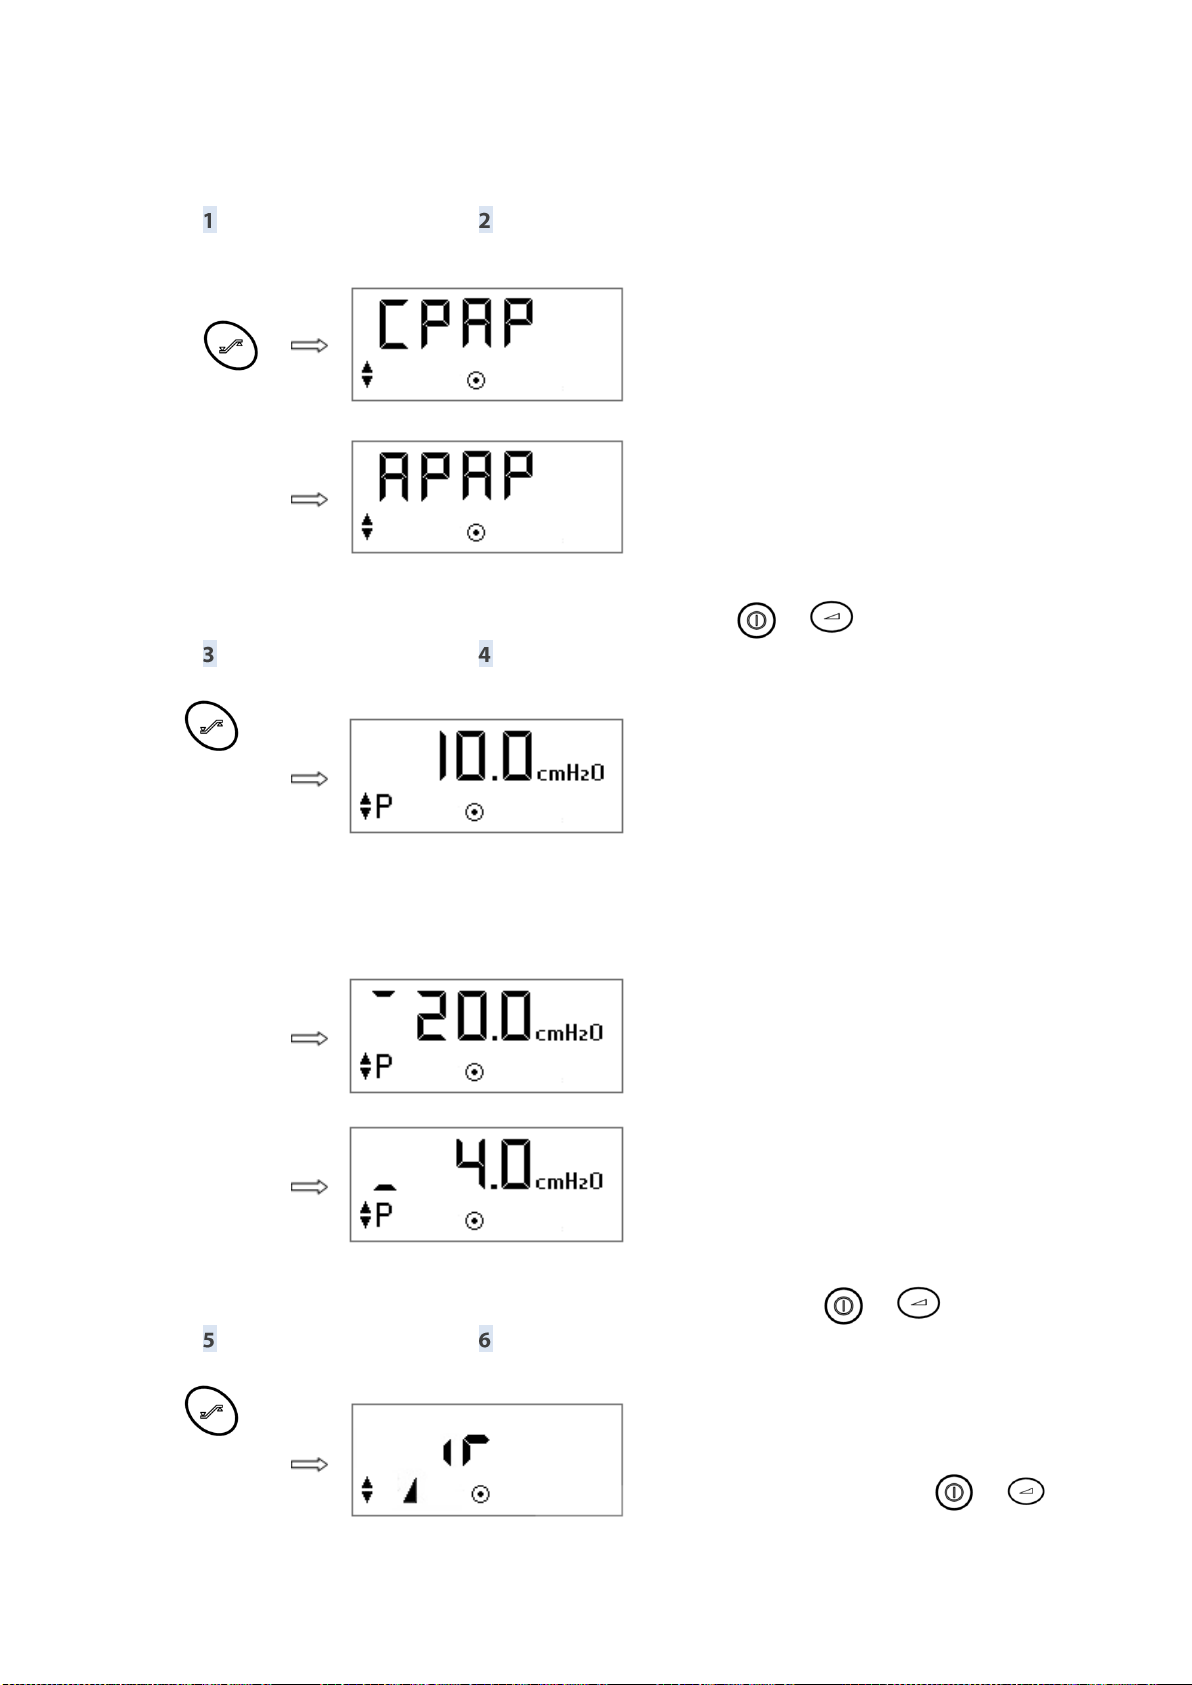
Setting EcoStar Auto device
Press
simultaneously
the hidden key
and
for one second
This screen appears:
Device operating mode.
If CPAP is displayed, the device delivers a constant
pressure level.
If APAP is displayed, the device operates in
automatic mode (Auto-CPAP), and most of +the
parameters are adjustable.
To change from one mode to the other, press the
button or .
Press
This screen appears:
Device pressure level.
In CPAP mode, you can set the pressure level.
In APAP mode, you can set the maximum pressure
and the minimum pressure which can be viewed
successively by pressing each time the information
access button.
Maximum pressure
Minimum pressure
Increase or decrease the pressure value displayed
using the button or .
Press
This screen appears:
Ramp
You can select the time ramp (tr) or the indexed
ramp (ir) pressing the button or .
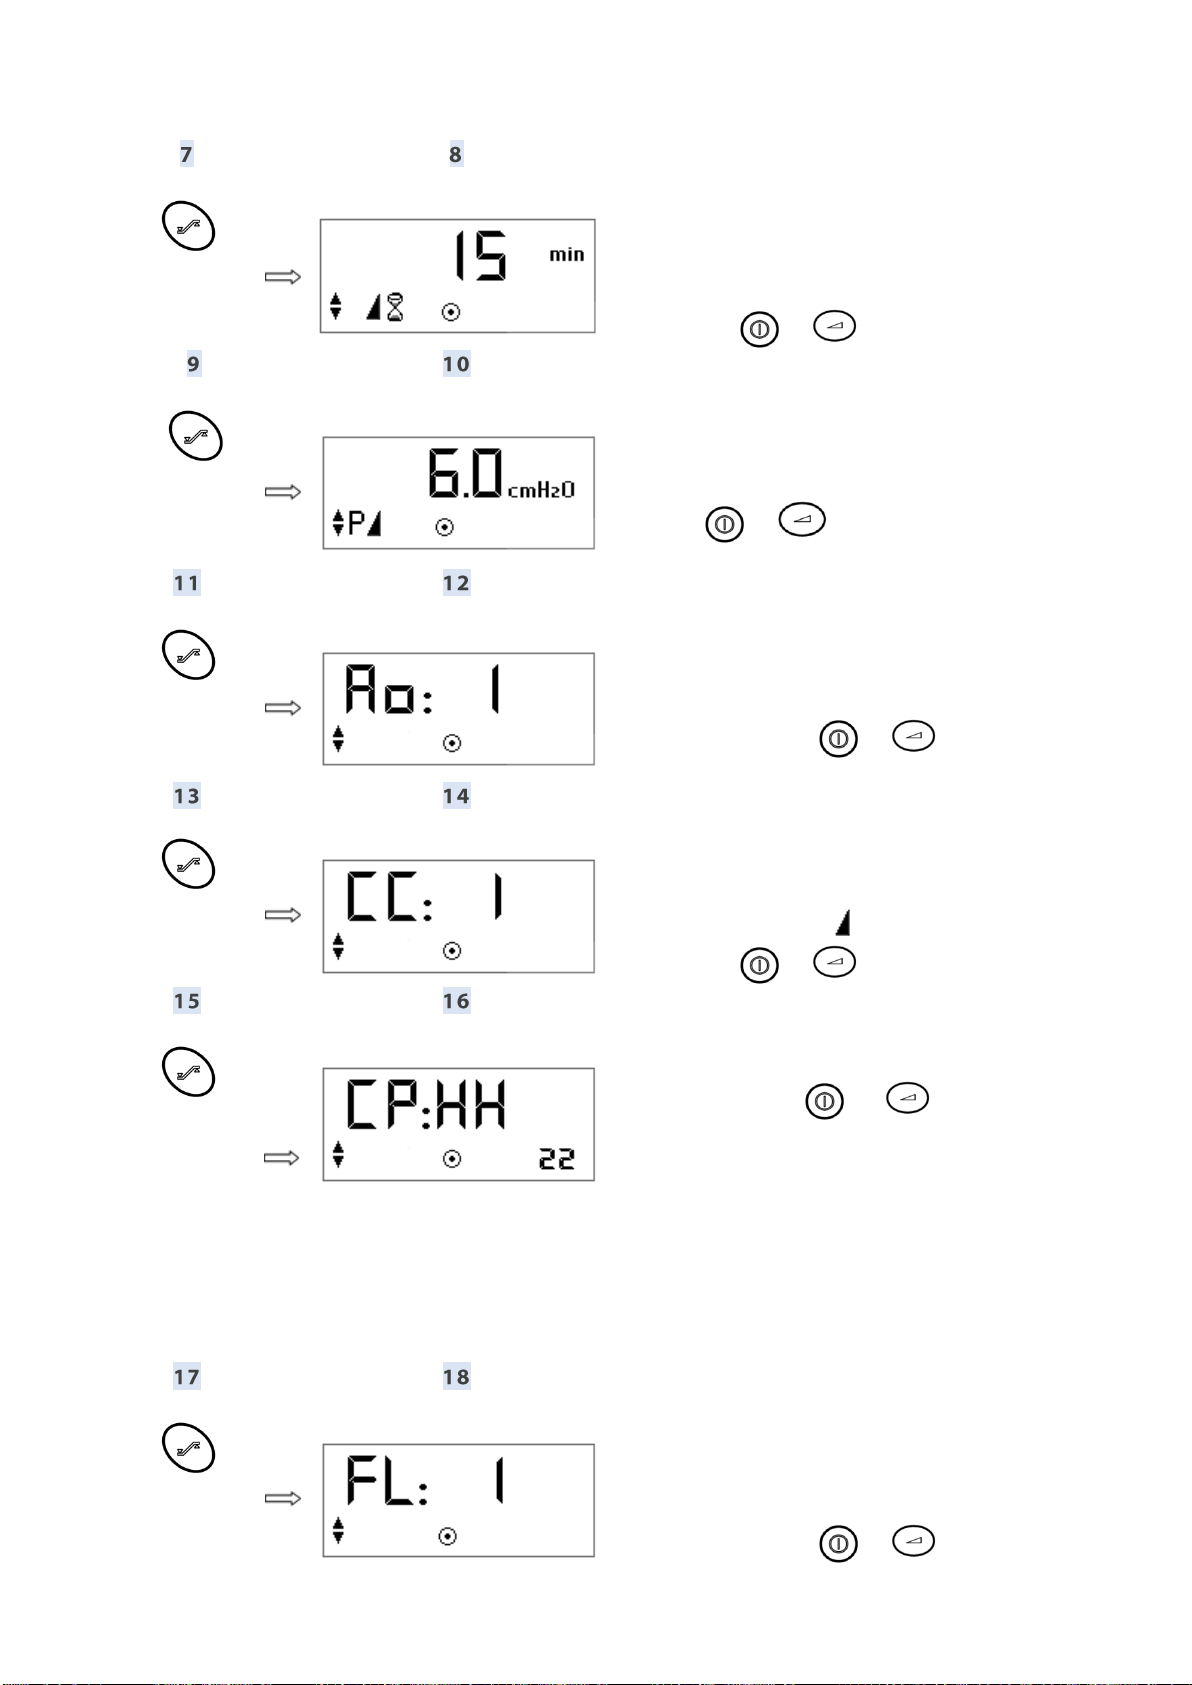
14 Setting EcoStar Auto device EcoStar Info, EcoStar Auto
Press
This screen appears:
Ramp time (in CPAP mode) or latency time (in
APAP mode) when the time ramp tr is selected,
otherwise this parameter is not displayed
Increase or decrease the value displayed pressing
the button or .
Press
This screen appears:
Comfort pressure
Increase or decrease the value displayed using the
button or .
Press
This screen appears:
Auto ON
You can enable (1) or disable (0) the feature
pressing the button or .
Press
This screen appears:
Comfort Calibration
You can enable (1) the feature either continuously,
or during the ramp ( ), or disable it (0) pressing
the button or .
Press
This screen appears:
Pneumatic Calibration
Using the button or , you can select a
configuration 22 (tubing 22 mm diameter,
standard), 15 (tubing 15 mm diameter), HH
(humidifier), SP (specific present) or -- (specific
absent).
The value displayed on the right below represents
the diameter of the patient tubing used with the
heated humidifier.
For specific calibration, refer to "Specific calibration
of the pneumatic configuration" page 17.
Press
This screen appears:
Command on Inspiratory Flow Limitation,
available in APAP mode only.
The command can be enabled (1) or disabled (0)
pressing the button or .
EcoStar Info, EcoStar Auto Setting EcoStar Auto device 15
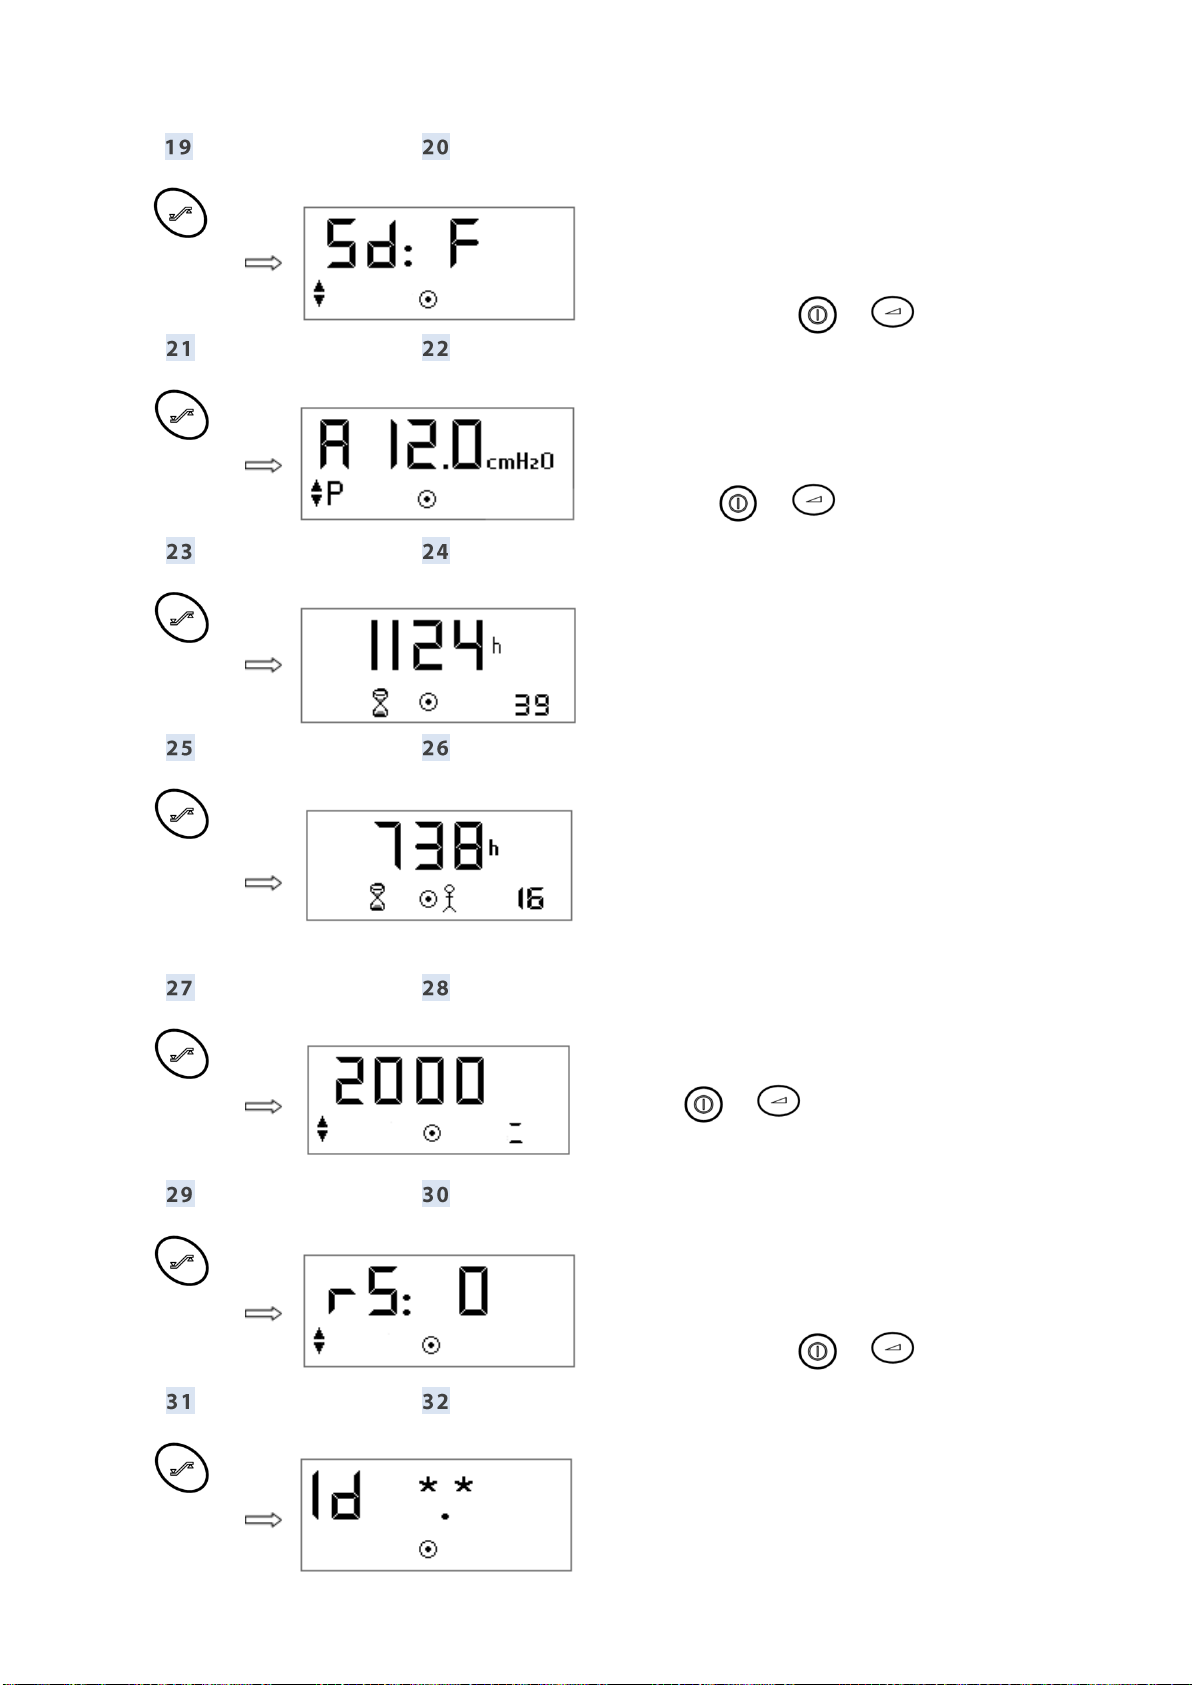
Press
This screen appears:
Pressure decrease speed,available in APAP mode
only.
You can set the speed - slow (S) or fast (F) - by
pressing the button or .
Press
This screen appears:
Maximum pressure on apnea command, available
in APAP mode only.
Increase or decrease the value displayed pressing
the button or .
Press
This screen appears:
Hour counter (device operating time). The value
displayed on the right below represents the
minutes.
Press
This screen appears:
Compliance counter (time during which the patient
actually breathed with the mask). The value
displayed on the right below represents the
minutes.
Press
This screen appears:
Built-in pressure sensor offset.
Increase or decrease the value displayed using the
button or .
Refer to "Adjustment of the pressure at the device
outlet" page 17.
Press
This screen appears:
Selection of RS232 connection for an external
module (for example a modem)
The connection can be enabled (1) or disabled (0) by
pressing the button or .
Press
This screen appears:
Software version included with the EcoStar Auto
device. The version can be viewed but not modified.
16 Setting the clock EcoStar Info, EcoStar Auto
Press the information access button again to exit the parameter settings menu.
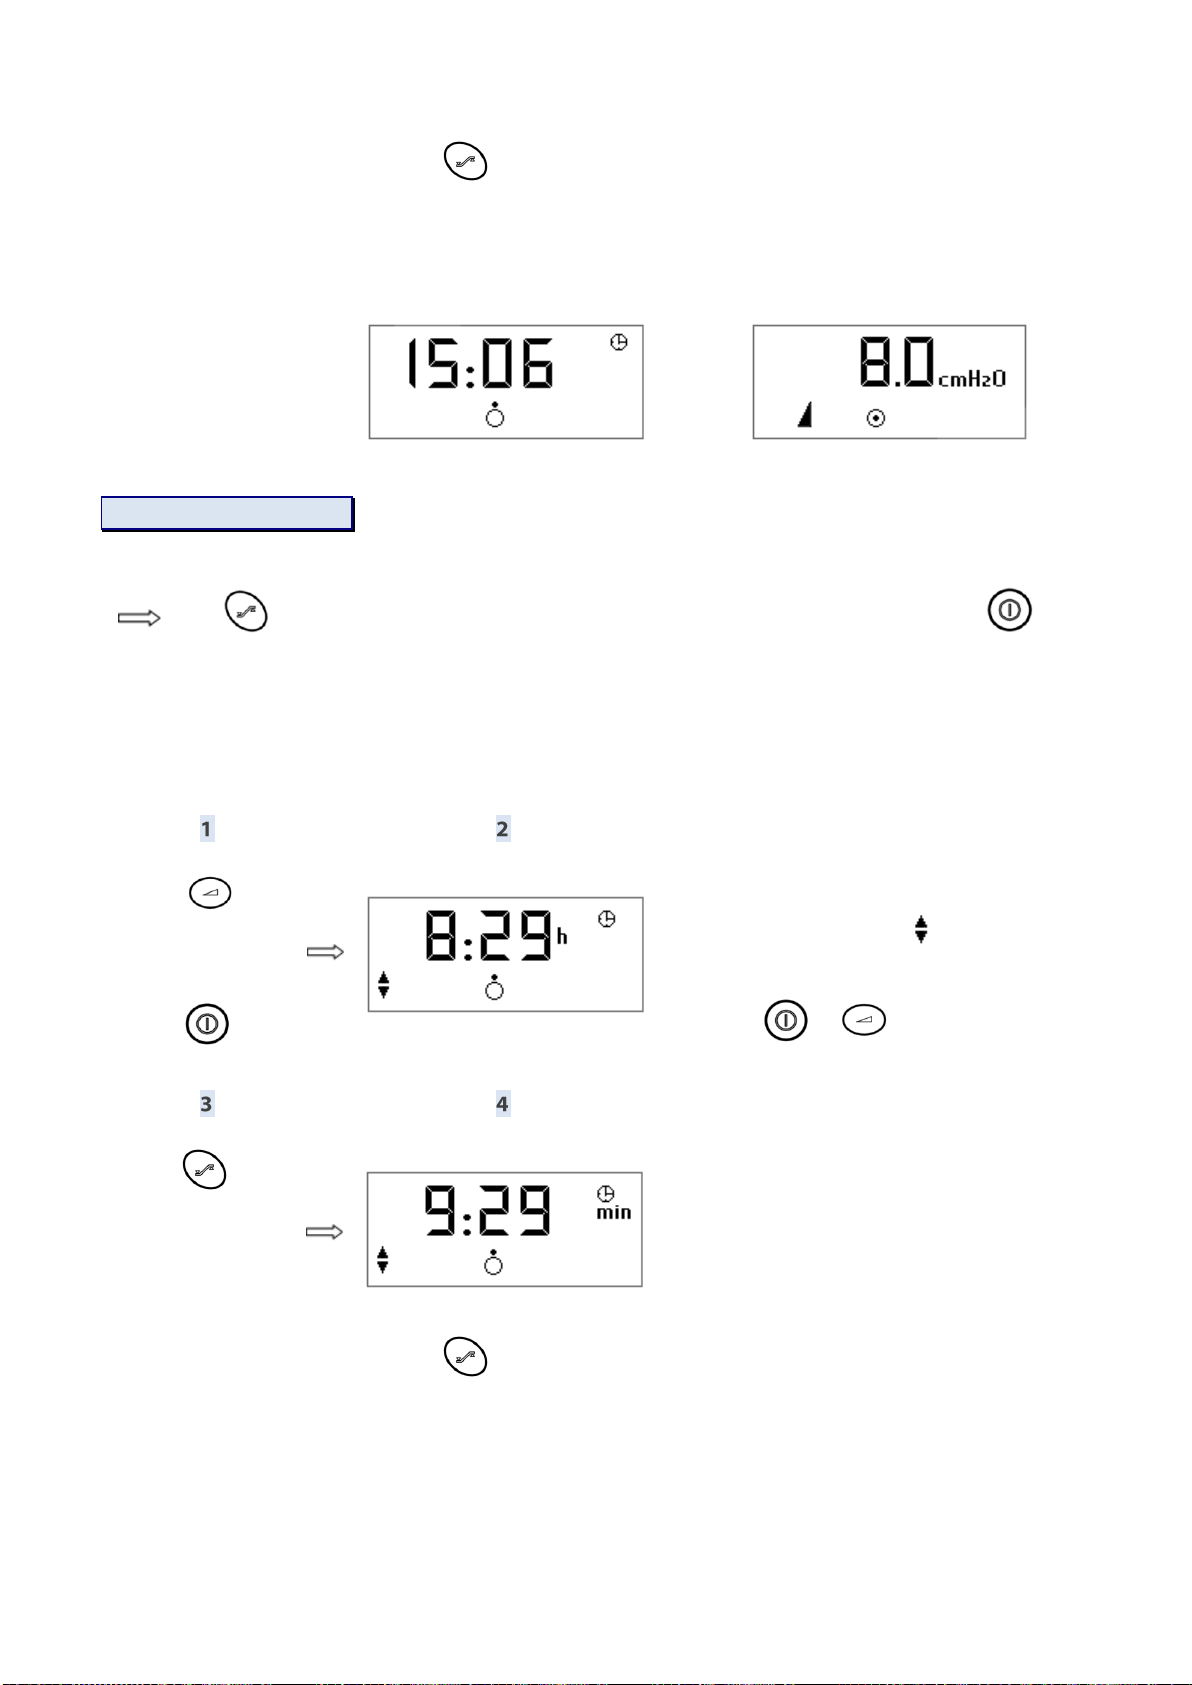
The display will show the status of your device as shown hereafter:
The device is in standby.
The device is in operation.
CAUTION
If, when in use, a problem with the memorized settings is detected, the device stops and displays the
message Er 1.
Press for 1 second (the device displays the blinking message dEF), then the button .
The machine is then automatically reset to the default values and you can set the desired parameters again.
Setting the clock
You can set the time only when the device is in standby.
Press
for 2 seconds,
then keeping it hold
down, press
.
This screen appears:
Once the buttons are released, the
symbol of adjustment appears under
the hour and the letter hblinks. You can
change the time displayed by using the
button or .
Press
This screen appears:
The symbol of minute min blinks in turn.
You can set the minutes by following the
same procedure as for the hour.
Press the information access button to exit the menu.
EcoStar Info, EcoStar Auto Accessing settings 17
Choosing a pressure
unit
You can select hPa instead of cmH2O as
the default pressure unit displayed on the
device, and vice versa.
To select the pressure unit, hold the
hidden key and the button
simultaneously pressed while you connect
the device to the power supply source
(electrical outlet).
The machine displays the unit selected
until you release the hidden key and the
button .
Repeat to change the unit displayed.
Adjustment of the pressure at
the device outlet
1. Connect the spiral tubing to the device outlet
and the free nozzle of the tubing to a plug
equipped with a 4 mm leak and a pressure point.
2. Then connect the pressure point to a
manometer and adjust the pressure to 12
cmH2O.
3. Access the setting of the pressure sensor offset
as shown in "Settings" paragraph of the device
concerned. Adjust the value using the button
or until the pressure 12.0 cmH2O is
read on the manometer.
4. Then, press the button while holding
down the hidden key. The pressure sensor offset
setting is automatically memorized.
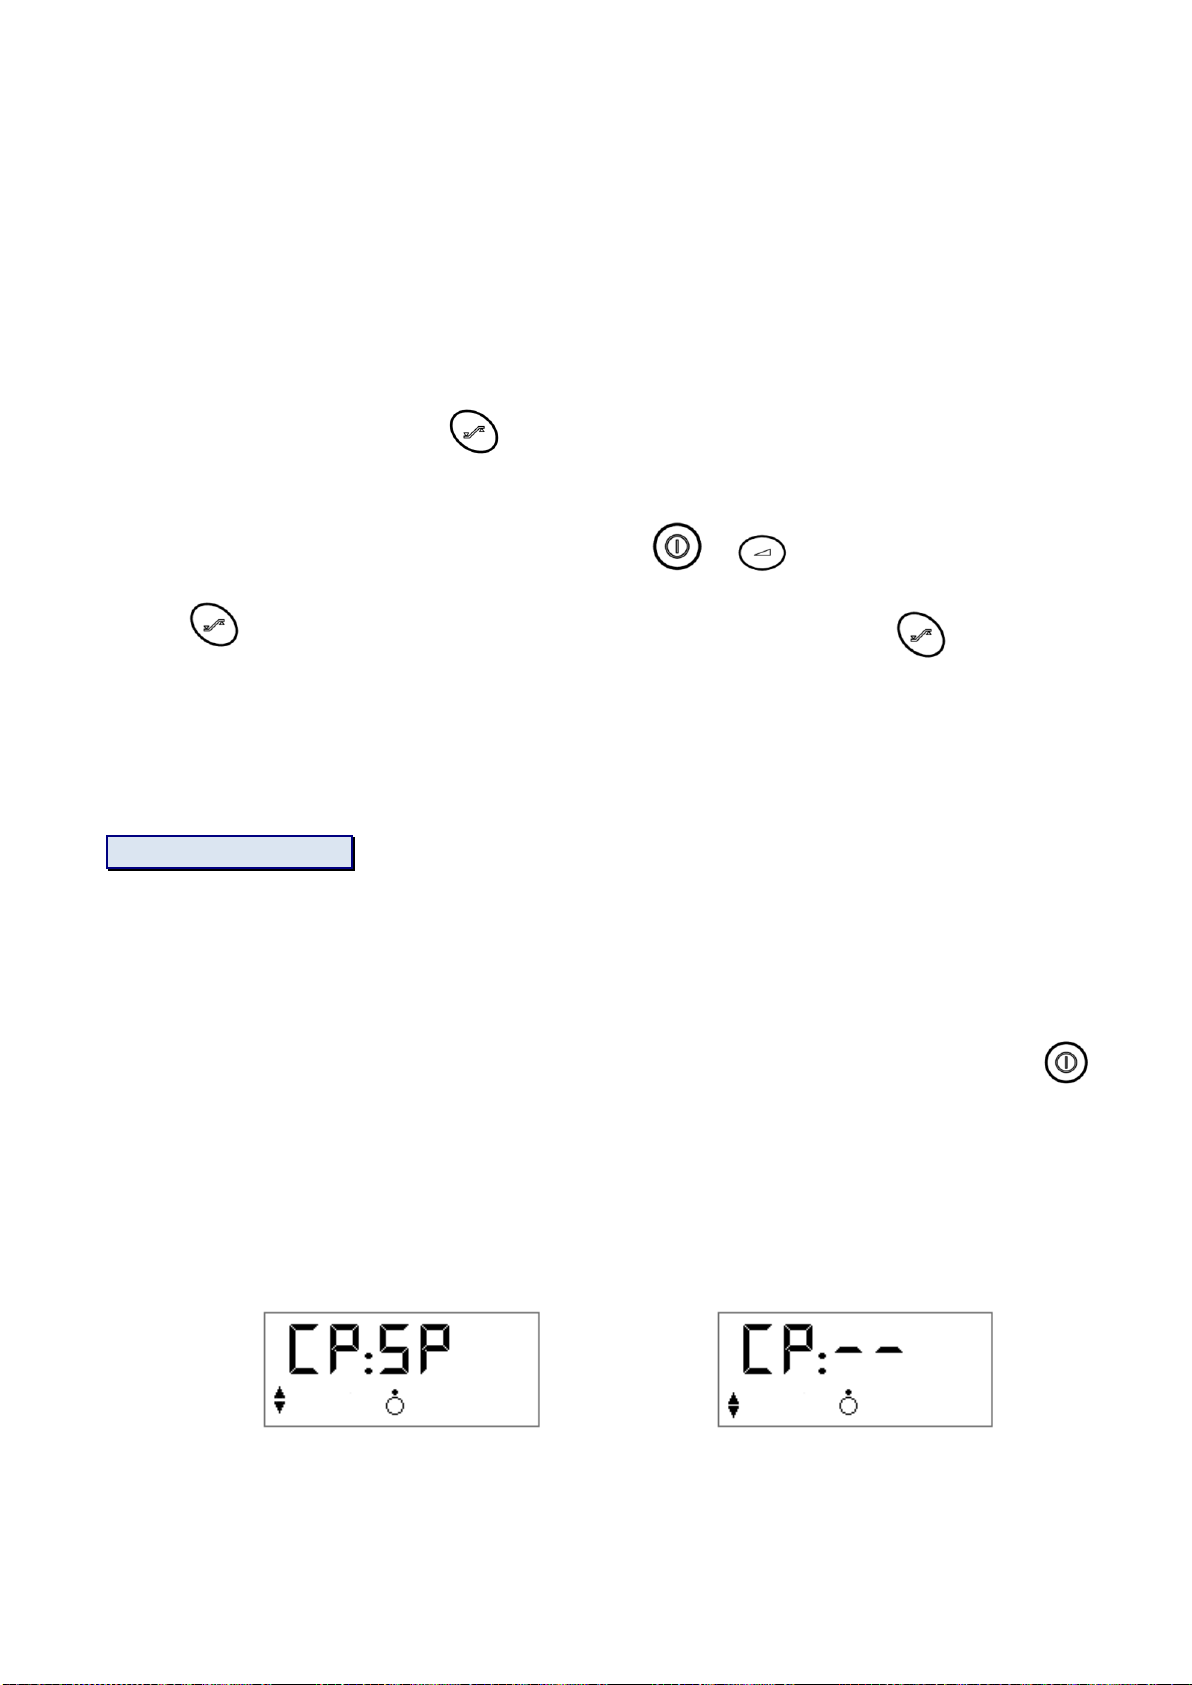
Specific calibration of the pneumatic configuration
CAUTION
Since pressure performance depends on the pneumatic configuration selected, it is important to select the
correct configuration. Specific configurations should be set up by skilled personnel only.
To optimise the performance of the device, it is advised to carry out a specific calibration based on the
pneumatic configuration used. If Comfort Calibration is enabled (1), disable it (0) and follow the procedure
hereafter:
1. Confirm that the device is in standby. If it is operating, stop it by holding down the On / Off button
for several seconds.
2. Set up the desired pneumatic configuration (humidifier, patient circuit, etc.) with the patient interface.
Take care to keep the patient circuit straight and the air outlet unobstructed.
3. Bring up the screen page of the Settings menu related to “Pneumatic Calibration” by following the
settings procedure for the device concerned.
4. Select the specific patient circuit CP:SP or CP:--:
specific calibration already present specific calibration absent
5. Press the hidden key and hold it down until launch of calibration taking care not to touch the pneumatic
circuit.

18 Cleaning and maintenance EcoStar Info, EcoStar Auto
Cleaning and maintenance
Check with the patient that he complies with the following instructions for cleaning and maintenance
below.
WARNING
Unplug the device from the electrical source and always disconnect the respiratory circuit from the device
before cleaning.
CAUTION
Do not let water come into contact with the device.
Use appropriate material for cleaning: do not use harsh detergent, abrasive sponges or brushes with
hard bristles.
Weekly
Air intake filter
Remove the filter at the rear of the device.
Wash the filter with warm water and mild
detergent (for example 1 drop of
dishwashing liquid on the filter).
Rinse well to eliminate any trace of
detergent.
Dry the filter:
oDry the filter by pressing in a
clean, absorbent cloth
oAllow to dry completely away from
sunlight.
Once dry, reinstall the filter at the rear of
the device. Do not use a filter which is not
completely dry.
Monthly
Device
Clean the device exterior regularly by using
a damp cloth or paper towel moistened
with a little water and a drop of gentle
detergent.
Remove detergent residue by repeating
this step with a clean cloth or paper towel,
slightly moistened with just water.
Wipe the entire device with a dry cloth or
paper towel.
Air intake filter
Change the air intake filter whenever it is
damaged or soiled.
The fine filter, which is optional, cannot be
washed; it must be changed once a month at
least, or more often if it is visibly clogged.
WARNINGS
Do not use detergent sprays. Chemical
product residue could enter the air outlet,
the filter's foam or the device interior,
causing airway irritation.
Never use the device without making sure
that an air intake filter is installed.
Note:
The patient must refer to the instructions for the mask, the heating humidifier and the respiratory circuit for more
information about the care and maintenance of these items.

EcoStar Info, EcoStar Auto Disinfecting the equipment 19
Disinfecting the equipment
Please refer to the instructions for the chemical products used to comply with the correct strength and
quantity of the products, contact time, and personal protective equipment needed.
Disinfecting the surface of
the device
A detergent-disinfectant is used to disinfect the
exterior of the machine.
If using a spray or foam detergent-
disinfectant:
oSpray the product onto a disposable
cleaning pad made of a non-woven
material.
oWipe the exterior of the device and
allow it to dry.
If using detergent-disinfectant wipes:
oWipe the exterior of the device and
allow it to dry.
Products which must not
be used
Never use abrasive or highly alkaline
cleaning products, acetone, benzene or
leaded gasoline to clean the device.
Do not use materials such as abrasive
sponges or stiff-bristled brushes.
Never use any pre-disinfecting or
disinfecting product containing aldehydes
and/or its derivatives: formaldehyde,
glutaraldehyde, etc.
Do not use any pre-disinfecting or
disinfecting product which is not effective
on Mycobacterium tuberculosis (BK).
Never disinfect the internal circuit of air
flow using a disinfecting product or with
an Airway Surface Disinfection System
(DSVA).
20 Trouble-shooting EcoStar Info, EcoStar Auto
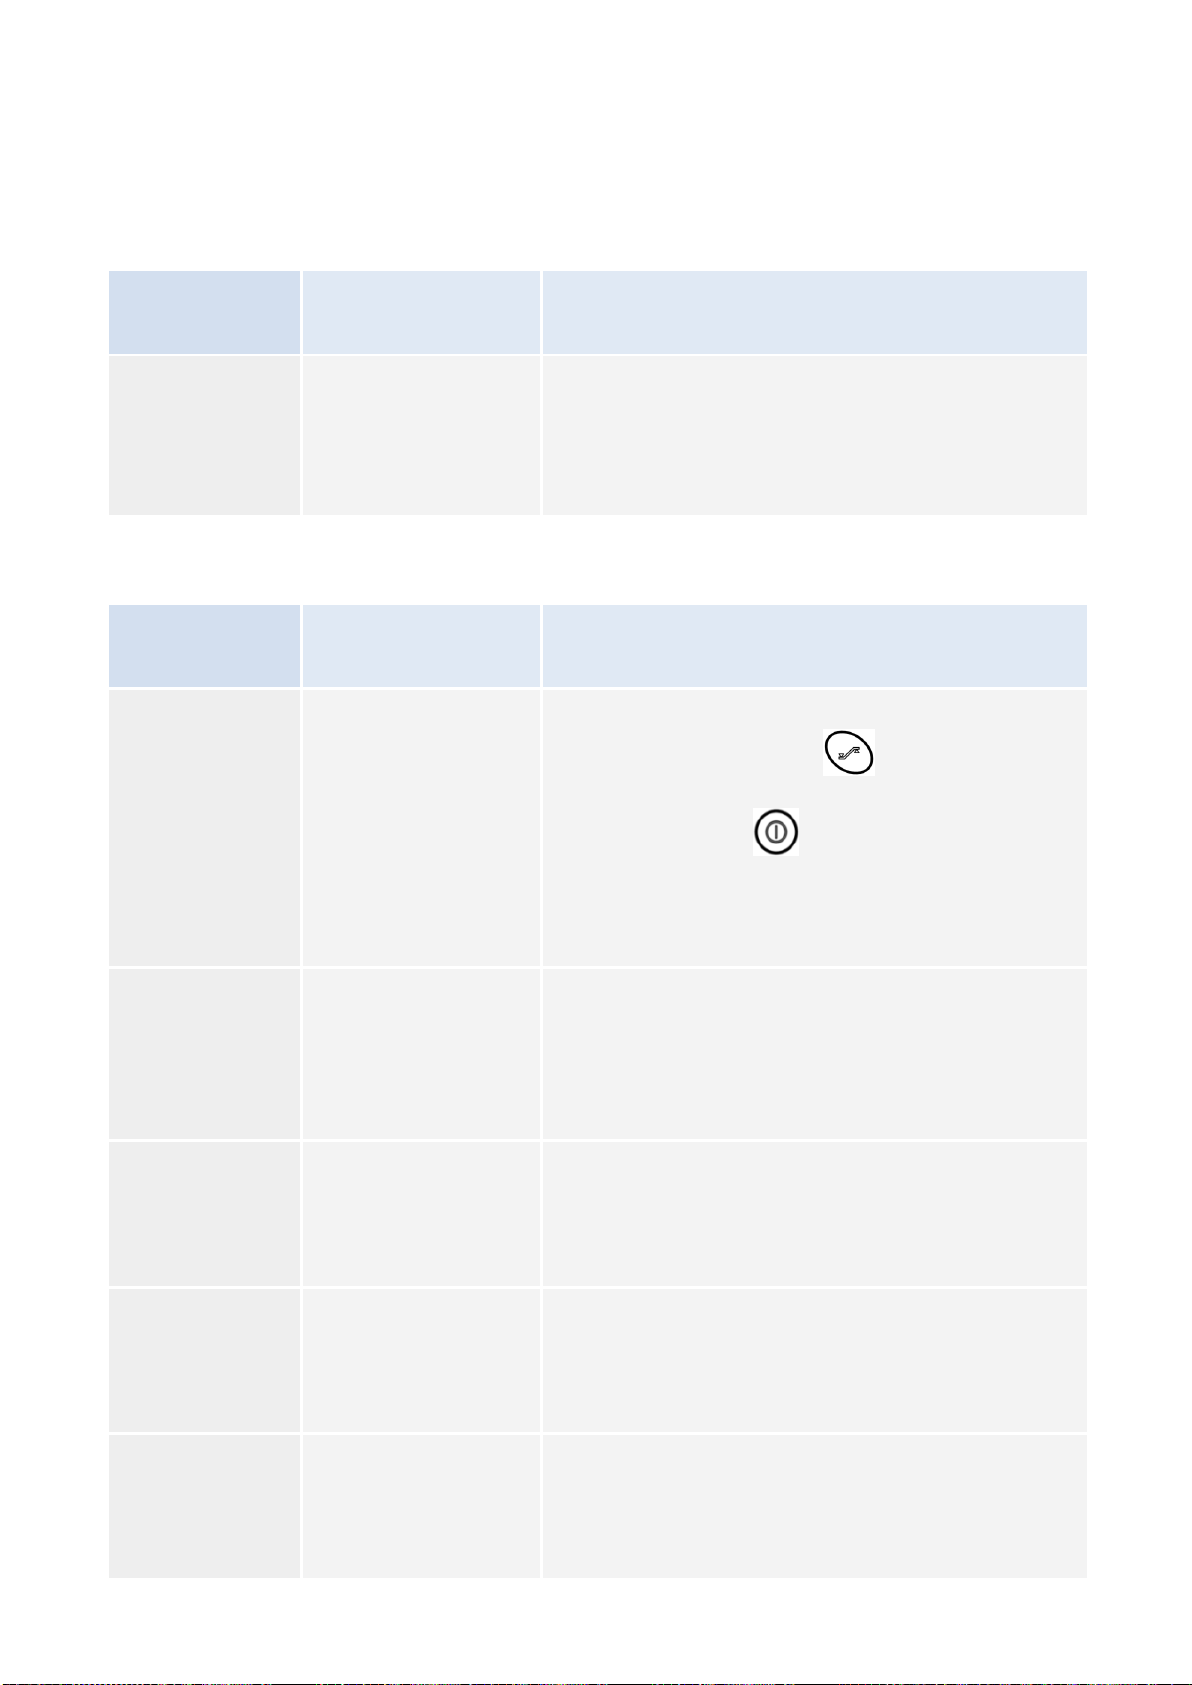
Trouble-shooting
Information messages
Message
displayed
Possible cause
Solution
In 1
The mask is
disconnected.
Check the connections between the mask, the tubing,
and the device. This message disappears when you
breathe in your mask well reconnected or when one of
the three buttons of the device is pressed. Otherwise, the
device will stop after 30 minutes.
Error messages
Message
displayed
Description
Solution
Er 1
Patient settings
problem.
Reinitialize the default settings by holding down the
information access button for 2 seconds, the
blinking "DEF" message will appear. Accept by pressing
the On / Off button. . The device is now set to the
default values and can be reset to the desired values.
If the error persists, return the machine to the technical
support.
Er 2
High motor
temperature.
Unplug the device from all sources of electrical power.
Allow it to cool and plug it in again according to the
instructions in the patient manual.
If the error persists, return the machine to the technical
support.
Er 3
Program battery
overflow.
Unplug the machine from all electrical power. Plug it in
again.
If the error recurs, return the machine to the technical
support.
Er 4
High pressure.
Unplug the machine from all electrical power. Plug it in
again.
If the error recurs, return the machine to the technical
support.
Er 6
CheckSum code error.
Unplug the device from all sources of electrical power.
Plug it in again and turn it on.
If the error persists, return the machine to the technical
support.
Other manuals for EcoStar Info
1
This manual suits for next models
1
Table of contents
Other SEFAM Medical Equipment manuals


Popular Medical Equipment manuals by other brands


Getinge
Getinge Arjohuntleigh Nimbus 3 Professional Instructions for use

Mettler Electronics
Mettler Electronics Sonicator 730 Maintenance manual

Pressalit Care
Pressalit Care R1100 Mounting instruction

Denas MS
Denas MS DENAS-T operating manual

bort medical
bort medical ActiveColor quick guide

AccuVein
AccuVein AV400 user manual


