zogics NSpire PRO Premium H13 HEPA User manual
User Manual

Thank you for purchasing Zogics NSpire PRO Premium H13 HEPA Air Filtration System.
Please read this user manual carefully before you use the appliance.
After reading this manual, keep it in a convenient location for further reference.
Contents
Performance Indicators 1
Product Functions 2
Product Features 2
Filter Screen Features 2
Product Structure 3
Primary Effect Filter Screen 4
Requirements for Product Placement 6
Installing the Filter 6
How to Use 7
Maintenance 10
Do’s and Don’ts 14
Packing List 15
Troubleshooting 16

1
Performance Indicators
SKU
Product Name
Voltage/Frequency
Rated Power
Noise
Anion Concentration
CADR (PM2.5)
CADR (Formaldehyde)
Filter Replace Time
Application Area
Net Weight
Product Size
Order of Cleaning
NSP-HEPA-PRO
Zogics NSpire PRO Premium H13 HEPA Air Filtration System
AC 110~120V, 50/60Hz
85W
≤66dB(A)
353 ft³
28,251 ft³/h
10,594 ft³/h
Filter #1: 2 years
Filter #2: 6 months
Areas up to 1,033 ft²
30.8 lbs
15.75″ x 15.75″ x 26.3″
1. Pre-Filter
2. Composite Carbon Cloth Filter (HEPA + Activated Carbon)
3. Anion Purifier

2
• Purication of gaseous pollutants such as smoke, dust particles and formaldehyde, etc.
• Reduced amounts of anions which can improve the air quality and optimize the
living environment
• Filtration, sterilization and air purication for home, oce, restaurants, bars and
entertainment venues with areas up to 1,033 sq. ft
• Four-color LED lamp to indicate the air quality.
• Dual lter screens to lter and output fresh air.
• Built-in high accuracy particulate matter sensors for real-time detection of air quality.
• Manual operation control and automatic control during night time or when sleeping.
• Four purication modes - manual, automatic, speed and sleep.
• Primary Filter screen: Can lter out large particles such as human hair, pet fur, cotton ber etc.
• H13 HEPA Composite Filter screen: lters out smoke, dust, pollen, allergens, pollutants
and ne particles larger than 0.3 microns, also lters out harmful gases such as benzene,
formaldehyde, etc.
Product Functions
Product Features
Filter Screen Features

3
Product Structure

4
Primary Effect Filter Screen
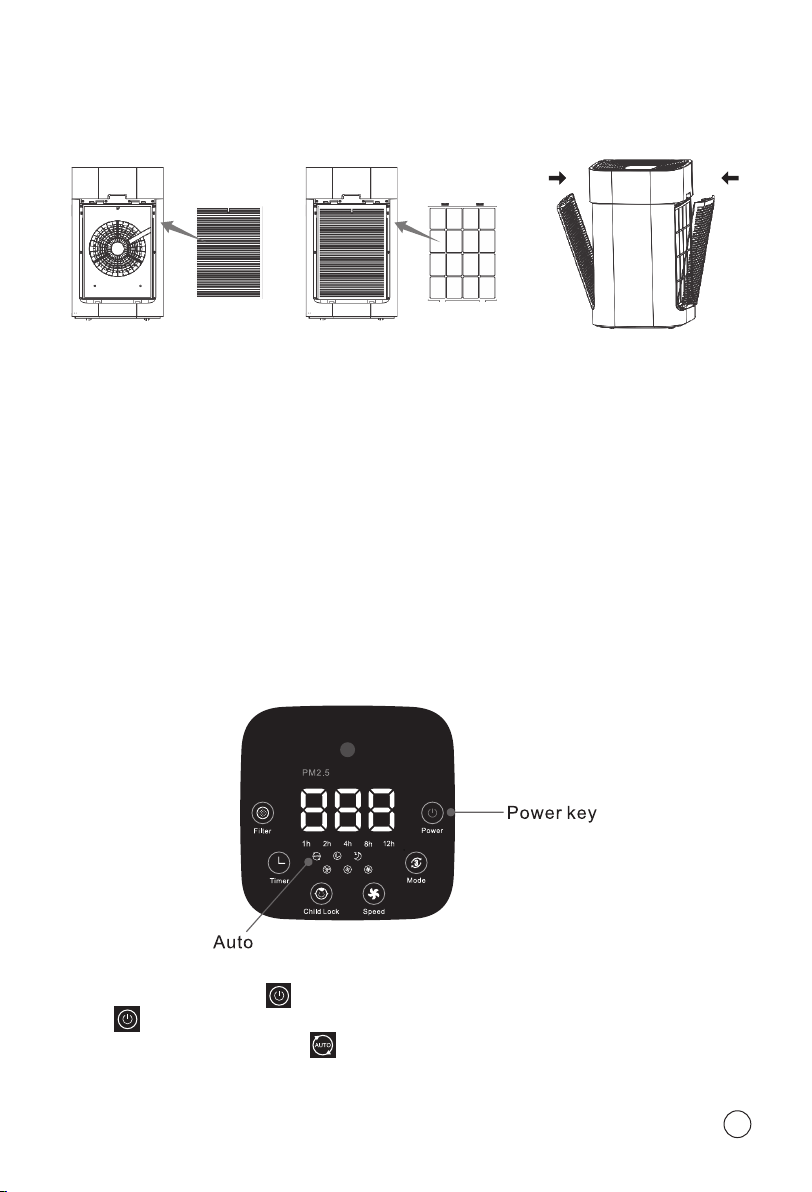
On the display panel, there’s an on/off key, function key, consumable status display and working status display.
1. On/Off Key and Function Key Display

5
2. Replacement Reminder for Filter Screen
This machine has a Filter Screen regular replacement reminder function. The replacement time is set as 3,000
hours. When the machine runs up to the given time, the indication lamp on the panel will light and prompt the
user to replace the lter screen. Meanwhile, the reset function can be restarted again by pressing the Filter
Screen key. (Hold this key for 3 seconds to reset the time and restart timing.)
3. Air Quality Status Indication
Air quality
indication lamp
Blue
(Excellent)
Green
(Good)
Yellow
(Fair)
Red
(Poor)

6
Requirements for Product Placement
Installing the Filter
8″ from wall and back of unit
When the lter is working, please allow 8” space behind the unit and 12”+ on both sides.
12″ from wall12″ from wall
1. Remove the lter from the plastic bag
A. Remove the front and rear covers B. Remove the lters C. Take the lter out of the
packaging. Make sure to
remove the plastic bag
from the lter before use.
7
How to Use
Installing the Filter (cont.)
2. Installing the lter and covers
A. There are differences
between the inside and
the outside of the dust
lter. Note: The side
with a handle should be
placed outwards.
1. Connect the power
For the rst time use, take out the product from the packaging, remove the power cable tie, and insert the
plug into the socket. After the unit is connected to power, the key icon on the panel will turn red.
Lightly touch on the power key . The machine will start with a chord ringtone, power key will turn
green and the machine will enter an automatic mode. Meanwhile, the machine front panel will
display in white lamp simultaneously: (Automatic mode) AUTO.
B. There are differences
between the inside and
the outside of the front
lter. Note: The side with a
handle should be placed
outwards.
C. Install the front & rear
covers. The machine will
not run if the covers are
not in place.
8
How to Use (cont.)
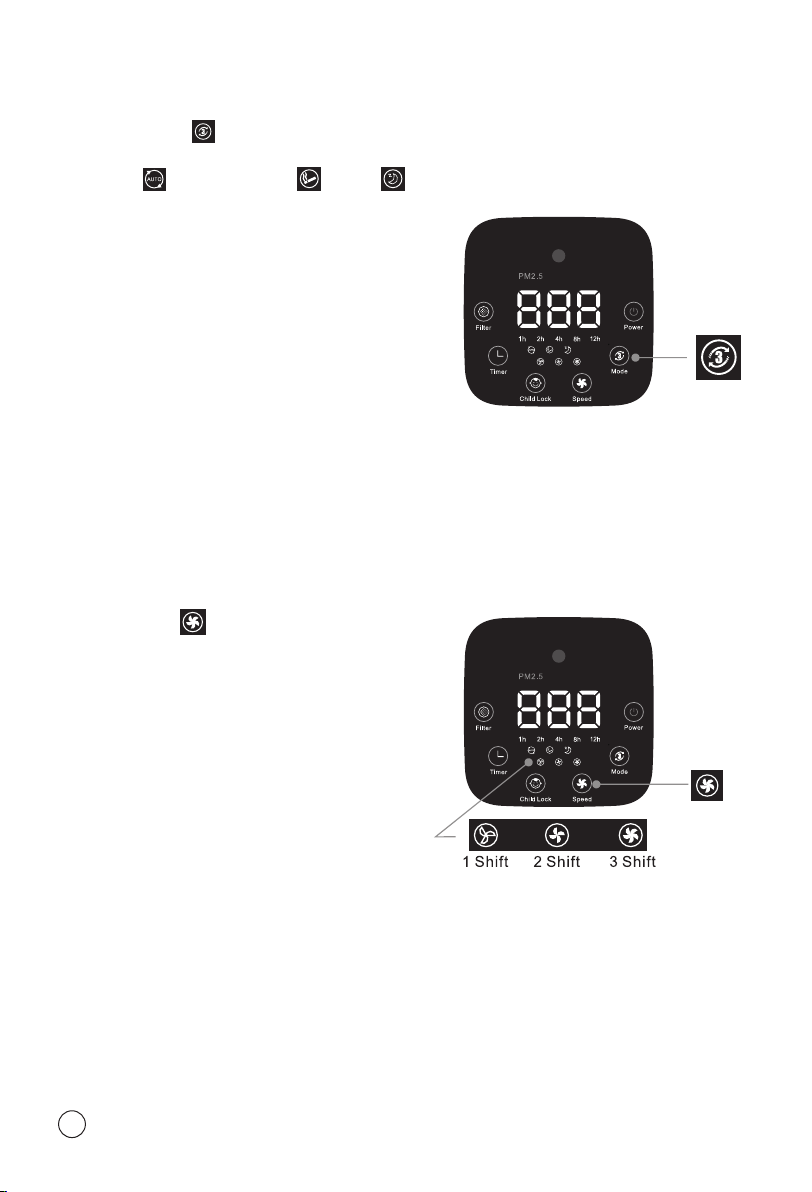
2. Mode selection
In the “on” status, the mode key can select 3 modes:
Automatic / Turbo (for smoke) / Sleep
When the automatic key is lit, the anion function will start;
the motor will shift when receiving the data from the sensor
(the indicator will light up when the auto function is on, and
will light off when the auto function is off). When the turbo
lamp is lit, the machine will enter speed purication mode
after the speed indication is lit. When the sleep lamp is lit,
the lamp brightness will reduce by half to indicate the sleep
function. The machine can only work on the 1st shift and is
not controlled by the sensor.
The timer will work as usual when starting the timing
function, and the machine will enter standby status
after time is up.
3. Manual Mode
When the machine is on, press the wind speed key to shift
the motor’s gear to adjust the machine running speed. The
motor will be not controlled by sensor PM2.5 after manual
modication of the motor gear and can only work on Filter
Power currently set.
Other manuals for NSpire PRO Premium H13 HEPA
1
This manual suits for next models
1
Table of contents
Other zogics Air Cleaner manuals


