ZOSI HD POE User manual

PROFESSIONAL SECURITY MADE EASY
HD POE NVR
For more information of your new system, please refer to www.zositech.com
Z18.8.T.2.4040000720
HD Network Video Surveillance Recorder
NVR Quick Start Guide --- 1
Manual de instalación --- 11
Installationsanleitung --- 21
Notice d'installation --- 31
Руководство по установке --- 41

1
Need Help?
Connecting your system
Visit us online for up-to-date software and complete instruction manuals.
Information in this document is subject to change without prior notice. As our products are subject to continuous improvement,
ZOSI Corporation and our subsidiaries reserve the right to modify product design, specifications and prices, without notice
and without incurring any obligation.
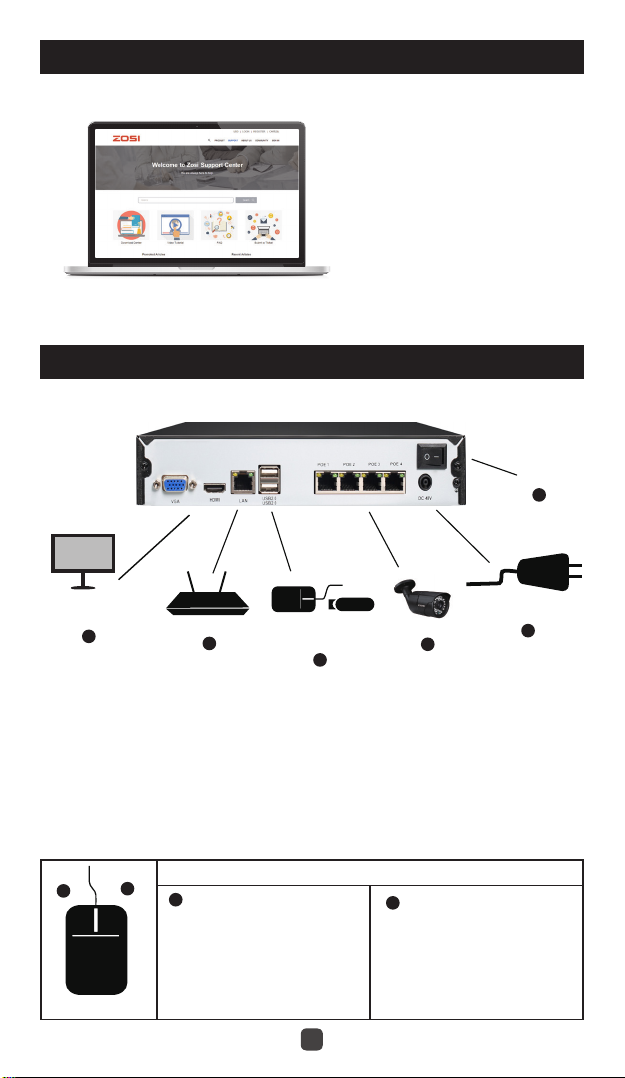
1.Visit support.zositech.com.
2. Search the model number of your product.
3. Click on your product in the search results.
4. Click on the Downloads tab.
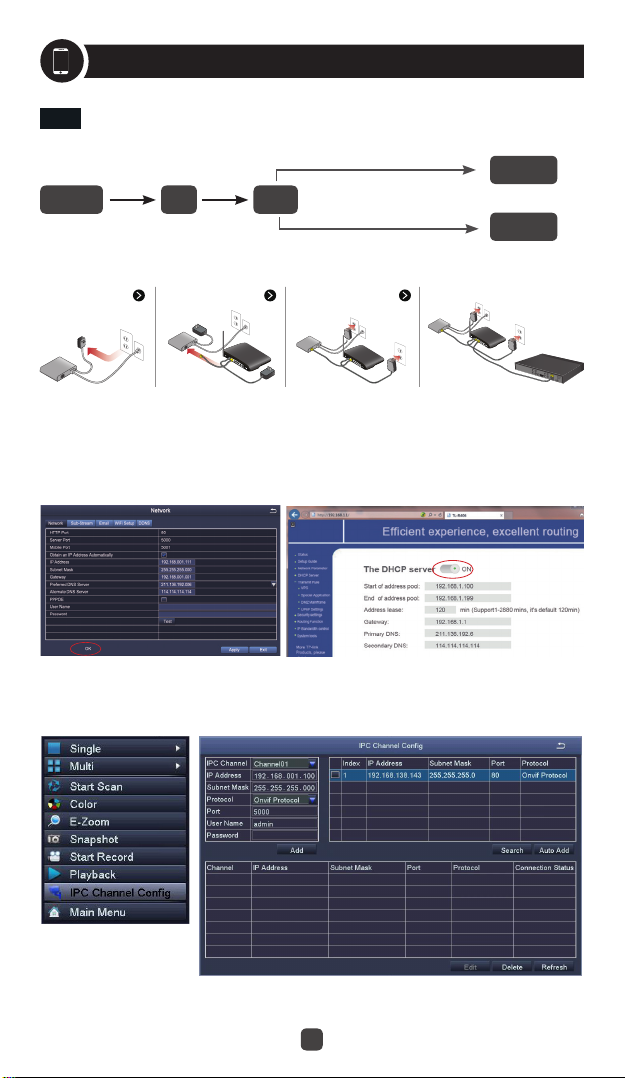
1. Ethernet Extension Cable*
NOTE: It might take one minute or so for cameras to start up and transmit video to your NVR.
2. Recommended:Connect cameras to NVR.
3. Connect cameras to a PoE Switch* or Router* on your network. See “Adding cameras from the LAN” on reverse for more
details.
Left-click
mouse
Right-click
During split-screen display mode: Click an
individual channel to view it in full-screen.
Click again to return to the split-screen
display mode.
During live view:Right-click anywhere on
the screen to open the Quick Menu.
On navigation menus: Click to open a
specific menu.
Within system menus: Right-click to exit
menus.
Using the mouse
4 channel configuration shown as above. 8 channel NVR have the respective number of video inputs.
For camera compatibility information,welcome to visit support.zositech.com
*Not included/sold separately.
Monitor/TV*
(VGA/HDMI)
5
6
3
IP Camera*
Power Port
ON
Router* Mouse & USB
BACK UP
124
AA
B
B

2
1. Setting the Startup Wizard
1. In the startup wizard, please click the 'finish" button.
2.Set the POE NVR password. (The password should no less than 6 characters.Please do not use symbol, such as “.” or “,”
as password.)
3.Login your POE NVR with the password that you have set.

3
2. View on Smart phone
1. Click the right mouse button, and select IPC Channel Config
2. Click the search icon,the NVR will start to search the IPC which is in the same network segment with NVR.
Step 1 Connect the DVR to the Internet
Fibre Optic DSL Router
DVR/NVR
PC
RJ45 cable
WIFI or RJ45 Cable
A: How to connect DVR to LAN ?
Unplug the modem,and then connect router to NVR's Ethernet port.
DSL/CABLE
MODEM
DSL/CABLE
MODEM
DSL/CABLE
MODEM
DSL/CABLE
MODEM
ROUTER ROUTER
ROUTER
NVR
B: How to test your DVR's network ?
(1) Right click Mouse > Go to Main Menu > Setup > Network
(2) Tick 'Obtain IP address automatically'
(3) Click 'Test', if 'OK' is displayed, the DVR is connected to network successfully.
Note: Please ensure DHCP in your router is open.

4
3. Please add searched IPC to different channels of NVR.
Tips:
1. In default status, NVR will add IPC to NVR channel automatically, and IPC’s default segment is 192.168.138.X. NVR can not
match IPC automatically if you modify IPC to other segments.
2. Only if the NVR is set to be a fixed default IP address, can IPC be added automatically. After adding IPC successfully, tick
”Obtain an IP Address Automatically” in the Network page (Main menu-Setup-Network ), then try to connect the system to
mobile app.
ステップ3
Step 2 Download App
Search Zosi Smart in App store or Google Play. Or Scan the QR Code to download the App.
Step 3 Run the App
Zosi Smart App store Google play
A: Install the free Zosi Smart App.
B: Tap Register and input your mobile phone number to get validation code, click next to input email box, password, then save
it.
C: Log in the App and enter the main interface (My Device). Click “+” in the upper right corner where three different options of
device adding are available.

5
3. View on PC Client Software
Enter the Device ID or Scan QR Code.
Password: Enter the DVR’s Password
Device name: Create a name for your system as needed.
D: Click “DVR/NVR” and “Scan QR Code”
1
2
3
E: Back to the device list > Tap the device > Tap “+” to select the corresponding channel > Tap “Confirm” to start preview.
1 2 3 4
1
2
3
Download AVSS PC Client , install and start it as below picture.

6
Click the Devices Manage to add the device.
First, create a group.
Then, add device under the group.
Please pay attention to choose device type (DVR or IPC) when adding device.
There are two ways to add device.
One way is adding device by directly input UID number.
Another way is adding the local device by searching LAN on search bar.

7
The system may not include Hard Disk depending on the kit you selected.This system works with most 3.5" SATA
Hard Disk or 2.5" SATA Hard Disk.
1. Install a Hard Disk (if your system has preinstalled Hard Disk, please skip this step)
2. Record video
Right click mouse > Go to Main Menu > Setup > Record
You shall see the record settings for all channels. Change the record setting according to your preference and apply the
changes.
Note:
After installing a Hard Disk, you need to first format the Hard Disk before recording.
Right click the mouse > go to Main Menu > Disk Management > Select the Hard Disk > Click Format > Apply.
①Unplug your DVR from power, unscrew and remove the top cover.
②Connect the SATA power and data cables from the DVR to the corresponding ports on your Hard Disk (as shown).
③Place the Hard Disk into the DVR. Any cable should cross up over the Hard Disk.
④Holding the Hard Disk and the DVR, gently turn it over and line up the holes on the Hard Disk with the holes on the DVR.
Using a Phillips screwdriver, screw the provided screws into the holes. Assemble the cover.
①
③
②
④
4. Record video
Click “ok” to complete device adding.
Click “PreView” on menu, and double click
the device you want to watch on list, the
image will show up.
REC

8
Get into system Main Menu > Search, system presents picture as following.
Select the channel Start playing
Search the video you want via time or Event, then play it.
Previous Record: Move to last recorded event
Next Record: Move to next recorded event
Fast Forward: video can be played at different speed, from 1/4 times to 16 times.
Rewind: Video play can be rewinded at 1 time, 8 times, 16 times and 32 times.
Screen Display Mode: Both single-screen and multi-screen are available.You can choose how many channels you want to
playback one time.Channel without records presents blank screen.
Previous Record Next Record
Rewind
Fast
Forward
Play/Pause
Next frame
Previous
frame Single-screen display
Multi-screen display
5. Playback video

9
Select Camera. Tick the Channel you want to record on motion detection.
Holding Time. Set recording time length after motion stops.
Trigger. Multi-channels can be set to record when detecting the motion by one of cameras.For example,when camera 1
detects motion,camera 2 and camera 3 can be triggered to record as well.
Area. It is allowed to set sensitivity area of camera viewing range.
Click STAR to make the whole viewing range as sensitivity area;
Click Trash Box to remove sensitivity area;
Click and drag mouse to draw or erase the sensitivity area.
Set motion Detection,DVR will record only when motion or movement is detected.
Right click mouse > Main Menu > Setup > Alarm > Motion > Motion detection.
The system records when motion is detected by the camera. An icon is shown when motion is detected.
Click to save setting Click to exit
As Color and luminance is important for sensitivity, so it's necessary to adjust its value at specific conditions.The default
value is 4 while value range is from 1 to 8.
Right click mouse to show or hide control menu at screen bottom.
Test the setting by moving something or some one walk through grid area within camera viewing range. If DVR detects
movement within grid area, a yellow hunanoid figure would be presented in the screen. The grid could not cover flag, trees or
some other flow objects in the wind to avoid false alerts.
6. Motion Detection

10
Set Time scheduled record, you may configure each channel to record at specific times based on time of day.
Right click the mouse > go to Main Menu >Setup > Schedule.
The schedule for automatic recording can be set either of two ways.
1 By highlighting individual hours for specific days by using the pencil tool in the upper right of the window. The adjacent
eraser tool removes the highlighting in a block. click on either the pencil or eraser tool to turn them off.
Settings can be copied and applied to any or all of the channels and to any other day.
7. Time scheduled Record
8. Backup the video for memory
Note:
Recording Priority: Alarm Recording > Motion Detection Recording > Manual Recording > Time Scheduled Recording.
2. Blocks of time to be recorded can also be set up by double clicking on a field adjacent to a day. Multiple schedules can be
created and saved with start and stop times down to the minute.These can then be applied to multiple days and cameras.
1. Plug an USB flash disk to your
DVR’s USB port.
2. Right click the mouse > Main
Menu > Backup > choose the
channel and time period > Search >
Choose the video clips you want to
backup > Click Backup.

11
¿Necesita ayuda?
Conectar su dispositivo
Vea los videos tutoriales y léalo bien el manual.
La información en este documento está sujeta a cambios sin previo aviso. Como queremos mejorar nuestros productos,
ZOSI y sus filiales reservan el derecho de modificar el diseño del producto, las especificaciones y los precios sin previo aviso
y sin incurrir en ninguna obligación.
1.Visite support.zositech.com.
2. Busque en la página el modelo adquirido
3. Lea los documentos relativos.
4. Descargue los documentos si necesita.
1. Cable de extensión ethernet
NOTA: Puede tomar aproximadamente un minuto para que las cámaras se inicien y transmitan video a su NVR.
2. Recomendado: conecte las cámaras al NVR.
3. Conecte las cámaras a un Conmutador PoE * o Router * en su red. Consulte "Agregar cámaras desde la LAN" en reversa
para obtener más detalles.
Botón de clic izquierdo
mouse
Botón de clic derecho
Durante el modo de visualización de pantalla
dividida: haga clic en un canal individual
para verlo en pantalla completa. Haga clic
nuevamente para regresar al modo de
visualización de pantalla dividida.
Durante la visualización en vivo: haga clic
con el botón derecho en cualquier parte
de la pantalla para abrir el menú rápido.
En el menú de navegación: haga clic para
abrir un menú específico.
Dentro del menú del sistema: haga clic
con el botón derecho para salir del menú
Usando el mouse
Configuración de 4 canales como se muestra arriba. 8 canales NVR tienen la cantidad respectiva de entradas de video.
Para obtener información de compatibilidad de la cámara, invitamos a visitar support.zositech.com
* No incluido / vendido por separado.
Monitor/TV
(VGA/HDMI)
5
6
3
IP Cámaras
Fuente de
alimentación
ON
Router Ratón/ USB
124
AA
BB

12
1. Configuración del asistente de inicio
1. 1. En el asistente de inicio, haga clic en ‘Terminar’.
2. Configure la contraseña de POE NVR. (La contraseña no debe tener menos de 6 caracteres. No utilice símbolos, como "."
O "," como contraseña)
3. Inicie su POE NVR con la contraseña que ya configuró.

13
2.Ver las imágenes en su móvil
1. Dar clic en el botón derecho, seleccione “Configuración de canal de IPC”
2. Haga clic en “búsqueda”, el NVR comenzará a buscar el IPC que se encuentra en el mismo segmento de red.
Paso 1 Conectar el NVR al Internet
Fibre óptica DSL Router
NVR
PC
RJ45 cable
WIFI or RJ45 Cable
Pregunta A: ¿Cómo se puede conectar el NVR al Internet?
Desenchufe el módem y conéctelo al Router; Conecte el Router al dispositivo.
DSL/CABLE
MODEM
DSL/CABLE
MODEM
DSL/CABLE
MODEM
DSL/CABLE
MODEM
ROUTER ROUTER
ROUTER
NVR
Pregunta B: ¿Cómo se examina la red de su NVR?
(1) Haga clic en el botón derecho del ratón > Menú principal > Configuración > Red
(2) Marque “Obtener una dirección IP automáticamente”.
(3) Elija “Prueba”. Se mostrará “OK” si se obtiene la red con éxito.
Nota: Asegúrese de que DHCP en su enrutador está activado.

14
3. Agregue el IPC buscado a diferentes canales de NVR.
Nota:
1. Generalmente, NVR agregará automáticamente IPC al NVR, y la dirección IP de IPC es 192.168.138.X. NVR no puede
hacer coincidir el IPC automáticamente si modifica el IPC a otros segmentos.
2. Solo cuando el NVR se establece de manera predeterminada en una dirección IP fija, se puede agregar automáticamente
la IP cámara. Después de agregar la cámara con éxito, marque "Obtener una dirección IP automáticamente" en la página de
red (Menú principal-Configuración-Red), luego conecte el sistema a la aplicación móvil.
ステップ3
Descargue la App
Buscar ZOSI Smart en tienda de App o Google Play.También se puede escanear el código QR para descargar la aplicación.
Ejecute la App
Zosi Smart App store Google play
A: Instale la aplicación Zosi Smart.
B: Elija Quiero registrar, éntre su número de teléfono móvil para obtener el código de validación, haga clic al lado de ingresar
el cuadro de correo electrónico y la contraseña, luego guárdelo.
C:Ingrese la App, elija Administración de dispositivo > Pulse el botón de +, tres opciones diferentes de adicción al dispositivo
están disponibles.
Paso 2
Paso 3

15
3. Ver vídeo en PC Client Software
Ingrese la ID del dispositivo o escanee el código QR.
Contraseña: ingrese la contraseña del DVR.
Nombre: Elija un nombre para su sistema de su elección.
D: Haga clic en "DVR / NVR" y "Escanear código QR"
1
2
3
E: Luego volverá a la lista de dispositivos> Tocar el dispositivo> Toque "+" para seleccionar el canal que necesita> Toque
Confirmar para iniciar la vista previa..
1 2 3 4
1
2
3
Descargue AVSS PC Client, instálelo e inícielo como se muestra a continuación.

16
Haga clic en el Dispositivo Administrar para agregar el dispositivo.
Primero, crea un grupo.
Luego, agrega el dispositivo debajo del grupo.
Tenga en cuenta que debe elegir el tipo de dispositivo (DVR o IPC) cuando agregue el dispositivo.
Hay dos formas de agregar el dispositivo.
Una forma es agregar el dispositivo ingresando directamente el número de UID.
Otra forma es agregar el dispositivo local buscando la LAN en la barra de búsqueda.

17
Si usted ha comprado un DVR sin disco duro, necesita comprar un disco duro interno de 3.5” o 2.5” SATA.
1. Instalar un disco duro (Si el equipo que ha comprado ya tiene un disco duro preinstalado, puede omitir estos pasos).
①Desenchufe el DVR, Desenrosque y retire la cubierta superior.
②Conecte los cables de alimentación y de datos a los puertos correspondientes del disco duro (como se muestra la foto).
③Coloque el disco duro en el DVR, y cada cable debe cruzar el disco duro.
④Sosteniendo el disco duro y el NVR, voltéalo suavemente, y atornille los tornillos con un destornillador Phillips, así se
puede montar la tapa.
①
③
②
④
4. Grabar el video
Haga clic en "Aceptar" para completar el
agregado del dispositivo.
Haga clic en "Vista previa" en el menú, y
haga doble clic en el dispositivo que desea
ver en la lista, la imagen se mostrará.
REC
2. Grabar videos.
Haga clic con el botón derecho del ratón—Menú principal—configuración—Grabación.
Verá la configuración de grabación para todos los canales. Cambie la configuración de grabación de acuerdo a su
preferencia.
Ojo:
Andes de grabar videos, debe formatear el disco duro. Haga clic con el botón derecho del ratón—Menú
principal—Administración del disco—Seleccione el disco—Formato—Aplicar.

18
5. Video repetición
Diríjase al Menú principal—Buscar, y el sistema mostrará como la foto.
Seleccionar los canales Reproducir el video
Busque el video que quiere según Tiempo o Evento.
Grabación anterior: Ir al último evento grabado.
Grabación siguiente: Ir al siguiente evento grabado.
Avance rápido: El video se puede reproducir a diferentes velocidades, de 1/4 a 16 veces.
Rebobinar: Se puede rebobinar el video a diferentes velocidades: 1 vez, 8 veces, 16 veces y 32 veces.
Modelo de reproducción: Uni-pantalla y multi-pantalla son disponibles, usted puede seleccionar el número de los canales
para la repetición de videos a la vez. Las pantallas de los canales sin grabación se presentarán en blanco.
Grabación anterior Grabación siguiente
rebobinar
Avance
rápido
Reproducir/Pausar
Foto siguiente
Foto
anterior Uni-pantalla
Multi-
pantalla

19
Seleccione las cámaras. Marque los canales.
Horario de detención: Ajuste de la duración del tiempo de grabación después de pararse el movimiento.
Trigger: Los canales se pueden configurar para grabar cuando detectan el movimiento por una de las cámaras. Por ejemplo,
cuando la cámara 1 detecta el movimiento, la cámara 2 y la cámara 3 pueden activarse para grabar también.
Zona: Se permite establecer el área de sensibilidad del rango de visualización de la cámara.
Hacer todo el rango de visualización como área de sensibilidad;
Borrar el área de sensibilidad. Haga clic y arrastre el ratón para dibujar o borrar el área de sensibilidad
Si usted configure Detección de Movimientos, el DVR graba cuando se detectan los movimientos.
Haga clic con el botón derecho—Menú Principal—Configuración—Alarma—Movimientos
El DVR graba cuando se detectan los movimientos, y se mostrará el icono del hombre en la pantalla.
Guardar la configuración Salir
Como el color y la luminancia es importante para la sensibilidad, es necesario ajustar su valor en condiciones específicas. El
valor por defecto es 4, mientras el rango de valores es de 1 a 8.
Haga clic con el botón derecho del ratón para mostrar u ocultar el menú de control en la parte inferior de la pantalla.
Pruebe el ajuste moviendo algo o alguien caminando por el área de la cuadrícula dentro del rango de visión de la cámara.
Si la cámara detecta alguno movimiento, se mostrará en la pantalla un icono amarillo del hombre. El área no podría cubrir la
bandera, árboles u otros objetos de flujo en el viento para evitar alertas falsas.
6. Detección de movimientos
Table of contents
Languages:
Other ZOSI DVR manuals