ZPE Nodegrid Hive SR User manual
The Nodegrid Hive SR (HSR)
provides access to the
internet for devices attached
to the LAN ports. As a result,
care must be taken to avoid
compromising your security
policies.
From the factory, this
equipment is shipped with
the following settings:
•DHCP –ENABLED in WAN
and SFP ports
•DHCP Server –ENABLED in
LAN ports
•USB, SFP, WAN, and LAN
ports –ENABLED
•Firewall –ENABLED in
WAN and SFP ports
•One default user with
passwords:
–admin / admin
ZPE requires changing the
default passwords of admin
at the first login, as well as
carefully configuring security
settings immediately after
initial setup.
Please consult the HSR User
Guide for more information
on security settings.
Please consult the HSR Safety
Information before
installation.
This equipment is intended
only for installation in a
RESTRICTED ACCESS
LOCATION.
Quick Start Guide for Nodegrid Hive SR
Security Warning
For manual downloads and support, visit: docs.zpesystems.com
For further assistance please contact ZPE Technical Support (support@zpesystems.com).
1Desktop, wall mount, or rack mount
your HSR
For detailed rack mounting and wall
mounting instructions, see the Nodegrid
Manual.
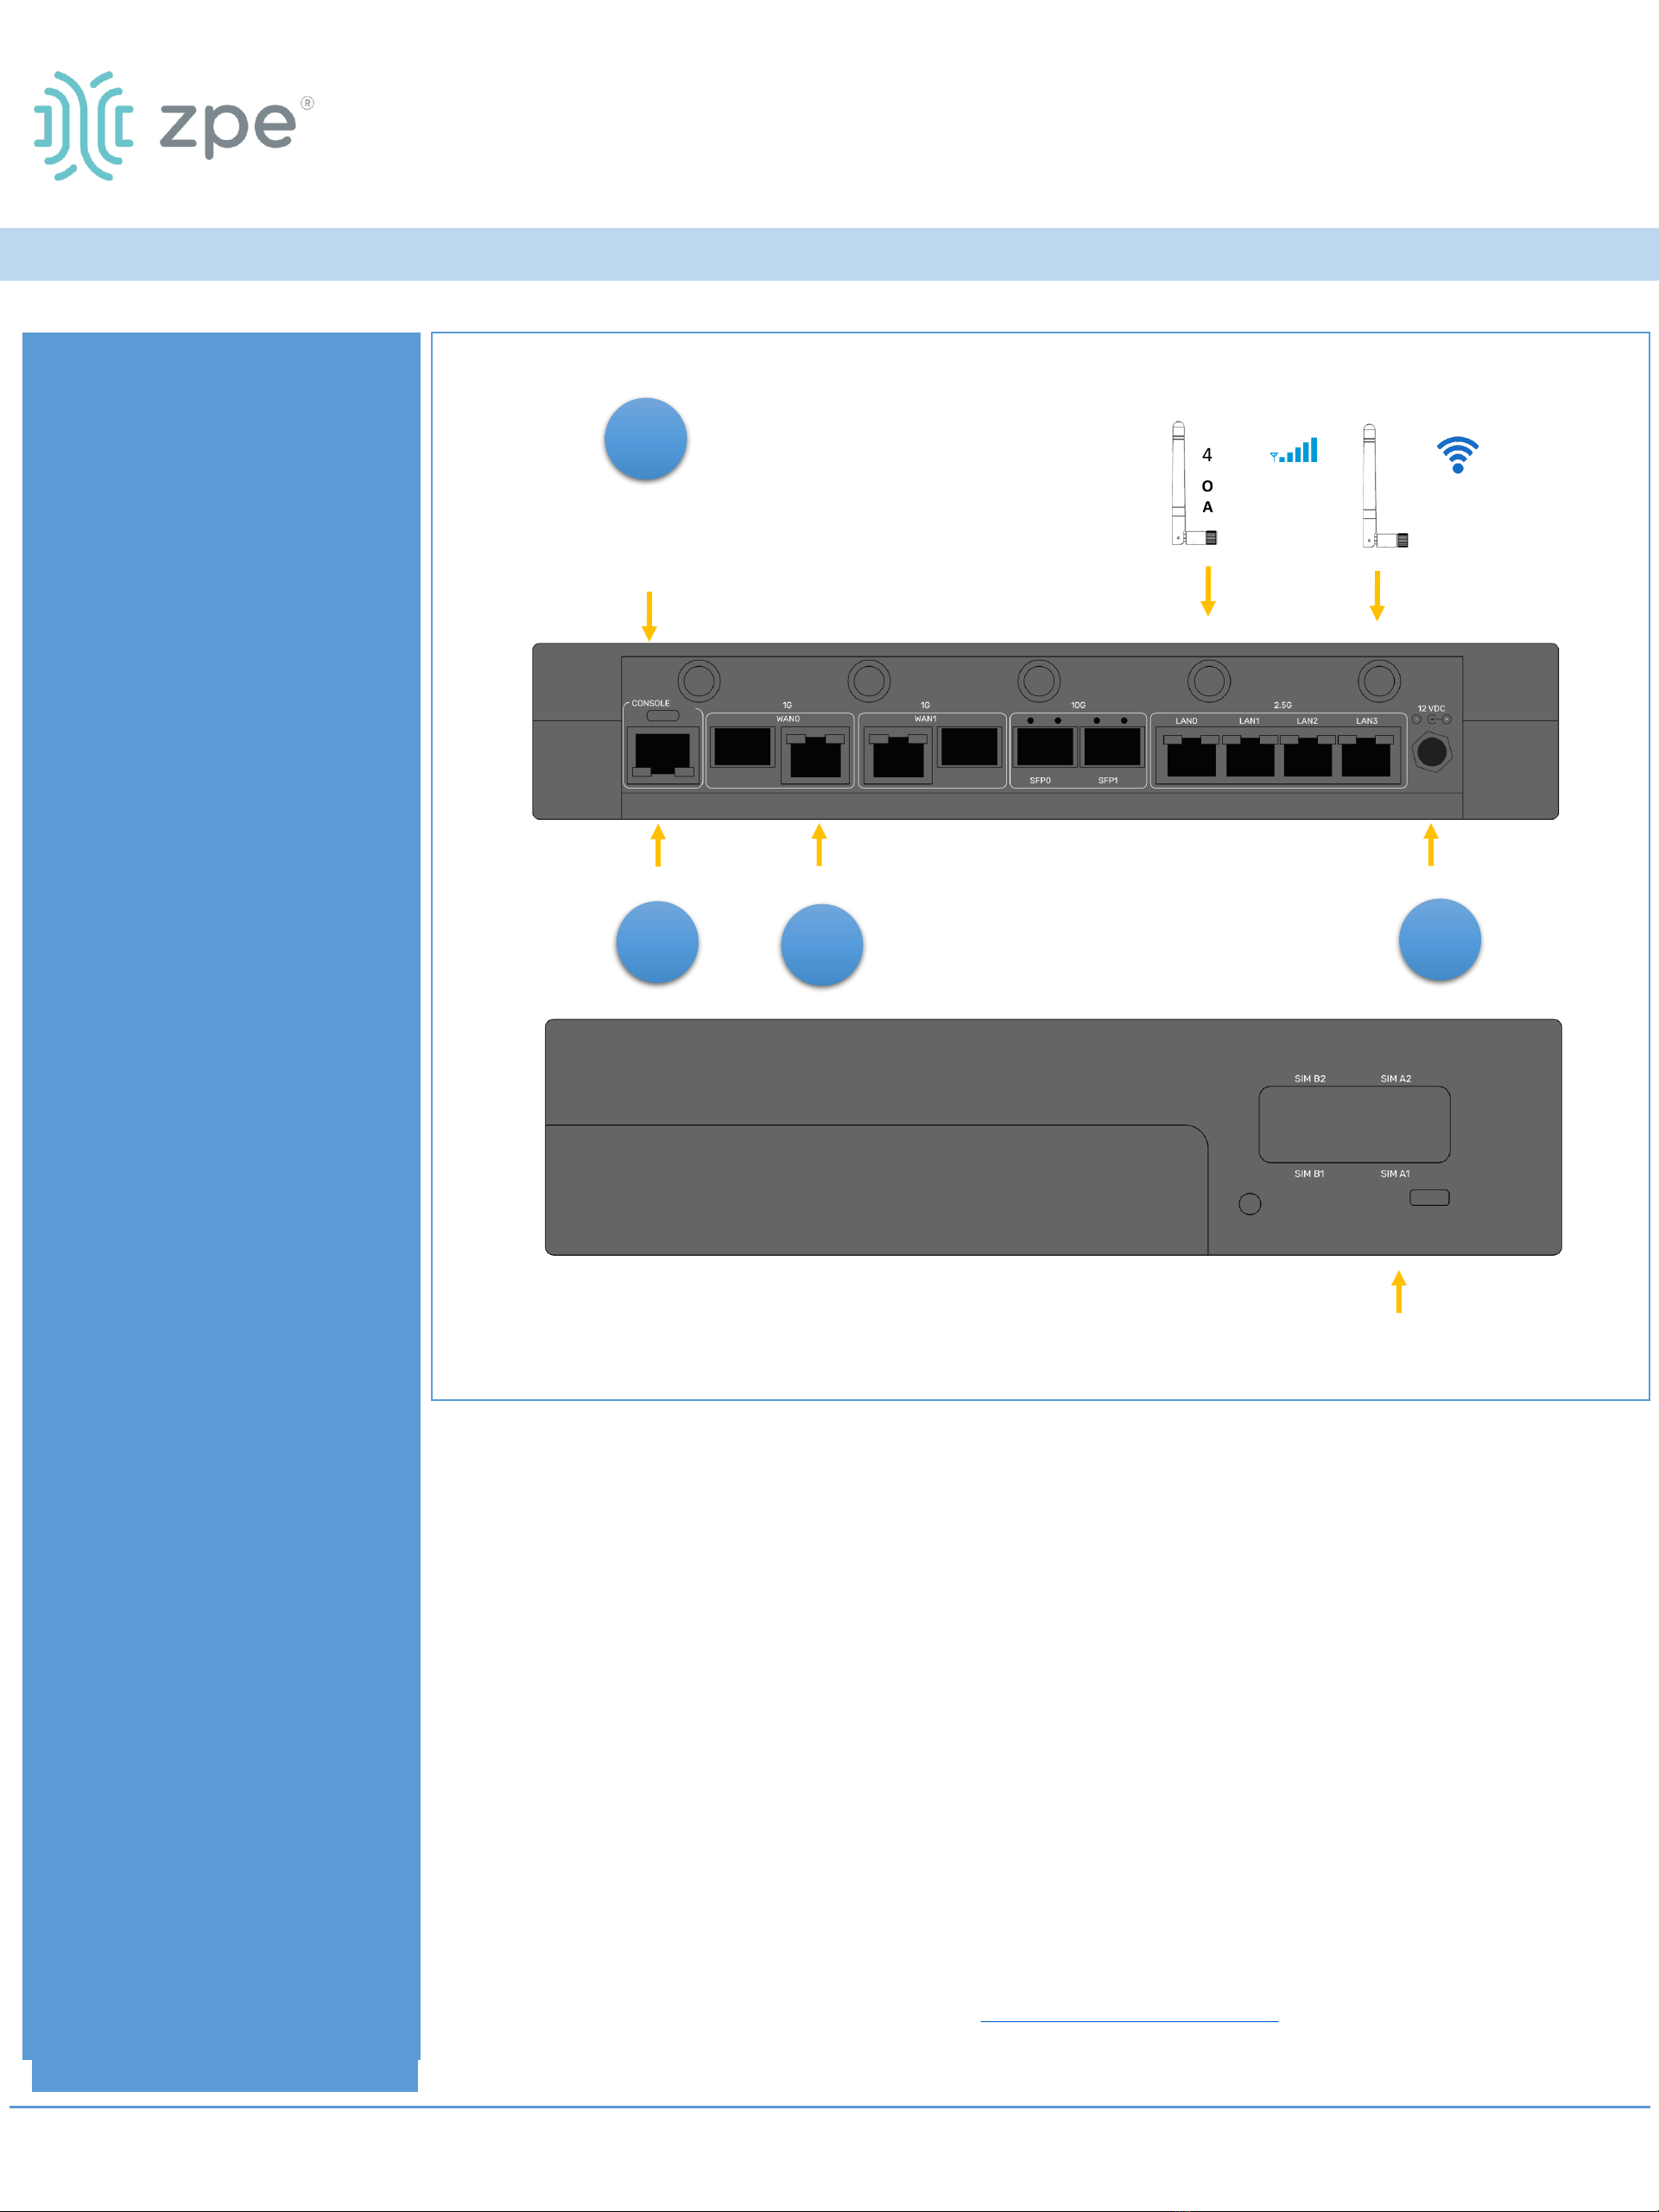
2Connect to your network
Connect a ZPE-recommended
CAT 5e or CAT 6 cable from the
WAN0 port to your network.
3Connect to the Serial Console port
Using the ZPE’s RJ-45 console adaptor,
connect a terminal or workstation to the
serial console port on the HSR. The HSR will
be configured using a terminal or terminal
emulator with session settings of: 115200
bps, 8, N, 1 no flow control.
4Connect power adaptor to turn HSR on
Connect the power cord to the appliance.
Power will automatically turn on.
Nodegrid Hive SR
TM
Nodegrid Hive SR
Console
1
2
3
By installing, copying, or otherwise using this device, you agree to be bound by the terms of the licensing, maintenance and sale agreements set forth on
www.zpesystems.com/docs/legal. if you do not agree to the terms of those agreements, do not install or use the Hardware and/or Software Product(s).
Rack mounting, wall
mounting, or desktop
(desktop shown)
WAN0
Back
Side
Note: All remaining manual setup steps are required the first time you configure your HSR.
4G/LTE
Optional
Antenna
Wi-Fi
Optional
Antenna
DC power adaptor
4
Optional
SIM card

5Configure network parameters
NOTE: Skip to step 6 if you have a DHCP
environment. DHCP is the default IP configuration.
If no DHCP server is available, please log in to
Nodegrid Hive SR via its console port using admin
credentials and configure a static IP address using
CLI instructions as follows:
[admin@nodegrid /]# cd
settings/network_connections/WAN0/
[admin@nodegrid WAN0]# set ipv4_mode=static
[admin@nodegrid WAN0]# set ipv4_address=10.0.0.10
[admin@nodegrid WAN0]# set ipv4_bitmask=24
[admin@nodegrid WAN0]# set ipv4_gateway=10.0.0.1
[admin@nodegrid WAN0]# show
name: WAN0
type: ethernet
ethernet_interface = wan0
connect_automatically = yes
set_as_primary_connection = yes
enable_lldp = no
ipv4_mode = static
ipv4_address = 10.0.0.10
ipv4_bitmask = 24
ipv4_gateway = 10.0.0.1
ipv4_dns_server =
ipv4_dns_search =
ipv6_mode = address_auto_configuration
ipv6_dns_server =
ipv6_dns_search =
[admin@nodegrid WAN0]# commit
[admin@nodegrid WAN0]# exit
Login as root with default credentials and change
the root password.
6Configure network & USB devices
NOTE: To check your current IP address, connect to
the HSR console port and hit Enter at the login
prompt until you see the IP address of WAN0
interface.
To configure the HSR for the first time via Network:
a) Connect laptop to the LAN0 port
via CAT 5e/6 cable. The laptop will
receive IP address in the
192.168.10.0/24 network.
b) Open browser on the laptop to
connect to 192.168.10.1
c) Log in to your HSR as admin.
d) Set your HSR basic configuration:
- Security
Security, Services page: Select the
desired services and Ports,
cryptographic protocols and cipher
suite levels. Click Save when finished.
Authentication page: add your Remote
Authentication servers (AD, LDAP,
Tacacs+, Radius and/or Kerberos). Click
Save when finished.
Authorization page: create users groups,
set profiles and assign devices. Click
Save when finished.
- Network
Network Settings tab: Set your desired
Network parameters. Click Save for
each submenu.
Network Connections tab: Set your
desired Network Interfaces
parameters. Click Save for each
submenu.
- USB ports
Managed Devices tab: Enable and
configure your desired USB ports.
- Change Admin Password
At any time, click admin@domain.com
in the upper right corner of your
screen and click “Change Password” to
change your system password. Click
Save when finished.
Congratulations!
Your Nodegrid Hive SR is now
configured and ready to accept users
and connections to its ports and
interfaces.
7Additional Configuration
NOTE: We recommend that you set up
a new Administrator account (in admin
group with full privileges) and use the
new account instead of the default
admin account.
Add New Users
Click Security tab, Local Accounts, Add,
set options, Save.
Alerts & logging
Set and send alerts by email, SMS,
and/or SNMP.
Power
Control network attached PDU power
strips and server, network and storage
devices.
For advanced configuration options,
how-tos and tips please refer to your
Nodegrid Hive SR User Guide.
8Get technical updates
To automatically receive future
firmware updates and technical
information, sign up here:
www.zpesystems.com/loop/
Quick Start Guide for Nodegrid Hive SR
Contact ZPE Technical Support at support@zpesystems.com
TM
Nodegrid Hive SR
Other ZPE Network Hardware manuals


Popular Network Hardware manuals by other brands

Matrix Switch Corporation
Matrix Switch Corporation MSC-HD161DEL product manual

B&B Electronics
B&B Electronics ZXT9-IO-222R2 product manual

Yudor
Yudor YDS-16 user manual

D-Link
D-Link ShareCenter DNS-320L datasheet

Samsung
Samsung ES1642dc Hardware user manual

Honeywell Home
Honeywell Home LTEM-PV Installation and setup guide


