Zuvo Water Purator User manual

Page 1
Spout
On/Off lever
Faucet body
Chrome washer
Rubber gasket/O-ring
Slotted washer
Nut
Wall mount bracket and screws
Elbow tube adapter
Fig. 1
Butler Faucet Kit
Zuvo Water Purator™
Unpack all pieces and insure that you have all components listed below. If any parts are missing contact
Zuvo or your Zuvo dealer.
Butler Faucet Assembly
The Zuvo™ Water Purator™ Butler Faucet Kit allows connection of your Zuvo unit to a separate, dedicated
faucet mounted to your sink top. Installing the kit is straight forward and most “do-it-yourself”types will
find it relatively easy. If you are uncomfortable working with or around plumbing, enlist the help of a
licensed plumber.
Prior to installing
the Butler Faucet,
locate and record
the serial number
on your Zuvo
Water Purator.
This serial number
appears on the
lower back of the
device.
Installation Guide
1. UNPACKING AND INSPECTION

Page 2
Butler Faucet Kit Components
For installation into an existing hole in sink
Additional tools necessary to drill a 1-inch hole in sink
2. TOOLS REQUIRED
Item Purpose
Zuvo Butler Faucet Assembly
1/2" Pipe Tap
(1/2" MSJ x 1/2" MSJ Adapter)
with Rubber Seals
1/4" C x 1/4" MIP Adapter (1 ea.)
3/8" Supply Adapter ‑
Compression
1/4"C x 1/4" Stem Elbow Fitting
Teflon® Tape
Wall mount bracket and screws
Above sink, dedicated faucet for dispensing water treated
with the Zuvo Water Purator. RED, YELLOW/WHITE, and
BLUE tubing, BLACK base.
WARNING: Do not use any faucet other than the one
supplied by Zuvo. Failure to follow these instructions may
void your warranty and/or damage your Zuvo unit.
Brass plumbing fitting that attaches to cold water supply
shut off valve. Use if your shutoff valve has 1/2" thread.
1/2" Male Slip Joint (MSJ) x 1/2" Female Slip Joint (FSJ)
Plastic plumbing fitting with 1/4" pipe thread and 1/4"
quick connect fitting that attaches to the 1/2" pipe tap
or to the 3/8" supply adapter – compression to allow cold
water to be diverted to the Zuvo Water Purator
Brass plumbing fitting that attaches to cold water supply
shut off valve. Use if your shutoff valve has 3/8" thread.
Plastic plumbing fitting that attaches to YELLOW/WHITE
tube of Zuvo Butler Faucet Assembly and to inlet in base
of Zuvo Water Purator
Teflon® “plumber’s” tape used to wrap male pipe threads
to prevent leaking in tapered thread joints
Plastic bracket for securely mounting Zuvo Water Purator
to under-counter wall.
1" diamond core drill bit
for granite sinks
Scissors or shears to
trim plastic tubing
Drill
Adjustable wrench
Step drill bit for
metal sinks
Pliers

Page 3
Use existing capped hole or drill new hole
3. BUTLER FAUCET INSTALLATION INSTRUCTIONS
Prior to installing the Butler Faucet, select a suitable under-counter location for mounting or placing your
Zuvo unit (Refer to your Owner’s Manual for installation details). The Zuvo unit should be mounted/located
no more than about 3 feet from the Butler Faucet.
NOTE: If you do not have a Ground-Fault Interrupter (GFI) outlet under your sink, consult an electrician.
It is possible that a capped (soap) hole already exists on the lip of your sink for an auxiliary dispenser or
faucet. Using it will make for the easiest installation.
If no hole exists, you will need to drill the 1" hole required for the faucet. Hole location will vary
depending on sink type.
Butler Faucet – Re-routes cold tap water through
the Zuvo unit and back out the faucet.
1/2"pipe tap or 3/8"supply adapter with
1/4"C x 1/4"MIP compression adapter
YELLOW/WHITE Tube – Delivers cold tap water (in) to
Zuvo unit
RED Tube – Delivers cold tap water
BLUE Tube – Delivers clean water (out) from Zuvo unit
back to Butler Faucet
CAUTION!
If you have a granite, porcelain enamel,
stainless steel or other non-metallic sink
and need to drill a hole for the Butler
Faucet, consider hiring a professional,
licensed contractor to perform this work.
Note however, with commonly available
tools, you can do this yourself. When
drilling a hole in a metal sink, make sure
to plug the drill into a Ground-Fault
Interrupter (GFI) outlet. Do not come in
contact with water at any time.
Fig. 2
Fig. 3
Butler Faucet Assembly Overview

Page 4
Push slotted tool
against grey or blue
ring, pull out tubes.
White Diverter Hoses
Spanner
Insert tool in the gap between
grey and blue rings and push the
tool in the direction of the arrow
while pulling on the tube.
Grey and blue rings
4. PREPARATION OF THE ZUVO WATER PURATOR
When drilling a new hole, ensure you have proper
clearance beneath your sink (for the attachment of
retaining nut, etc.).
Make sure that the under‑counter location you
have selected for your Zuvo Purator is within 3
feet of the Butler Faucet.
Insert the Butler Faucet spout into the faucet body.
The spout is designed so that it freely swivels during
use.
Unscrew and remove the nut and slotted washer
from the faucet assembly. Leave the decorative
chrome washer and rubber gasket on the stem of the
faucet assembly.
Feed the RED, YELLOW/WHITE, BLUE tubing through
the hole and position the faucet
From beneath the counter, first slide the slotted
washer then the hex nut over the tubing up to the
base of the faucet. Hand-tighten the nut to hold the
faucet in position while you complete the installation.
If your Zuvo Water Purator has white diverter hoses
installed, they will need to be removed prior to under
sink installation.
Lay the Zuvo Water Purator on a flat surface with the
back (spine) exposed. Locate the plastic “spanner”
tool that came in the package with the faucet aerator
adapter.
Use the tool to press the release flanges of the
compression sleeve and to free the diverter tubes as
shown. It is easier to remove the tube in the spine
(BLUE fitting) before removing the tube in the base
with the elbow fitting.
Fig. 4
Fig. 5

Page 5
Cold water supply
Cold water supply
Cold water supply
5. 1/2" PIPE TAP or 3/8" COMPRESSION TEE INSTALLATION
Turn off cold water supply shutoff valve
Turn off the cold water supply by turning the shut off
valve handle all the way to the right.
Test your faucet to ensure there is no cold water flow.
Place a bucket or pan on the floor under the cold
water supply in the event that a small amount of
water drains down from the sink.
Move cold water supply line (riser) away from
shutoff valve
Typically, there is a flexible hose with a 3/8" or 1/2"
thread fitting that connects the cold water supply
line from your faucet to the cold water shutoff valve.
Remove this at the junction of the cold water shutoff
valve. An adjustable wrench is likely required to
remove the compression nut.
Wrap Teflon® tape firmly around threads on 1/4" C x
1/4" MIP adapter (4-5 times). Thread the adapter into
the 1/2" pipe tap or 3/8" supply adapter until firmly
seated.
Attach 1/2" ‑or‑ 3/8" adapter to cold water supply
shutoff
Depending on your shutoff valve thread size, install
the 1/2" pipe tap or the 3/8" supply adapter on the
cold water shutoff valve.
NOTE: When installing the 1/2" pipe tap, you will
need to use the flat rubber washer in the female
threads and you may need to use the cone washer on
the side with the male threads if your riser does not
have a rubber seal.
Fig. 6
Fig. 7
Fig. 8
or
or
Fig. 9

Page 6
Cold water supply
Cold water supply
Reconnect the flexible hose to the 1/2" pipe tap or
the 3/8" supply adapter. Use adjustable wrench to
tighten nut securely.
Using scissors, trim the RED tubing, coming from the
Butler Faucet, to the desired length.
AVOID CUTTING THE TUBE TOO SHORT!
Insert the RED tubing into the 1/4" MIP adapter until
fully seated.
Pull RED tubing firmly to ensure that tubing does not
come free.
The basic interconnections for the separate faucet
installation are shown in Figure 12 (at left).
NOTE: The plastic tubing connections used in this
installation are a self-locking, self-sealing type. All that
is required to make the connections is to insert the
tubing fully into each fitting. If you need to remove
the tubing, hold the lock-ring against the flange and
pull the tubing away from the fitting as shown in
Figure 5.
It is recommended that you leave enough tubing
length so that the entire Purator can be removed
from your under counter cabinet – without disturbing
established plumbing connections – when it comes
time to replace the filter.
6. PLUMBING CONNECTIONS
Fig. 10
Fig. 11
Fig. 12

Page 7
Insert YELLOW/WHITE and BLUE tubing into
compression fittings
Place your Zuvo Water Purator in the appropriate
location and trim the YELLOW/WHITE tubing from
the Butler Faucet to length.
AVOID CUTTING THE TUBE TOO SHORT!
Insert the YELLOW/WHITE tubing into the 1/4"
compression fitting on the elbow adapter until fully
seated.
Insert the elbow connector into the inlet in the base
of the Zuvo Water Purator until fully seated.
Trim the BLUE tubing to length and insert it into the
compression fitting in the spine of the Zuvo Water
Purator until fully seated.
AVOID CUTTING THE TUBE TOO SHORT!
Pull on tubes to be sure they are seated properly
Firmly pull on YELLOW/WHITE and BLUE tubing to
ensure that they are tightly held in the compression
fittings. The tubing should not come free. If either
tube detaches from the compression fitting, re-insert
it until fully seated and perform the pull test again.
Attach optional wall mount bracket
Use two screws to attach wall mount bracket to
cabinet wall under sink. You may need to pre-drill
the two holes with a #32 drill bit (max). Ensure that
bracket is attached high enough to provide clearance
to hang the Zuvo Water Purator.
NOTE: Once the unit is installed below the counter,
out-of-sight, it should be inspected periodically to
ensure the lamp is operating.
Fig. 13
Fig. 14
Fig. 15

Page 8
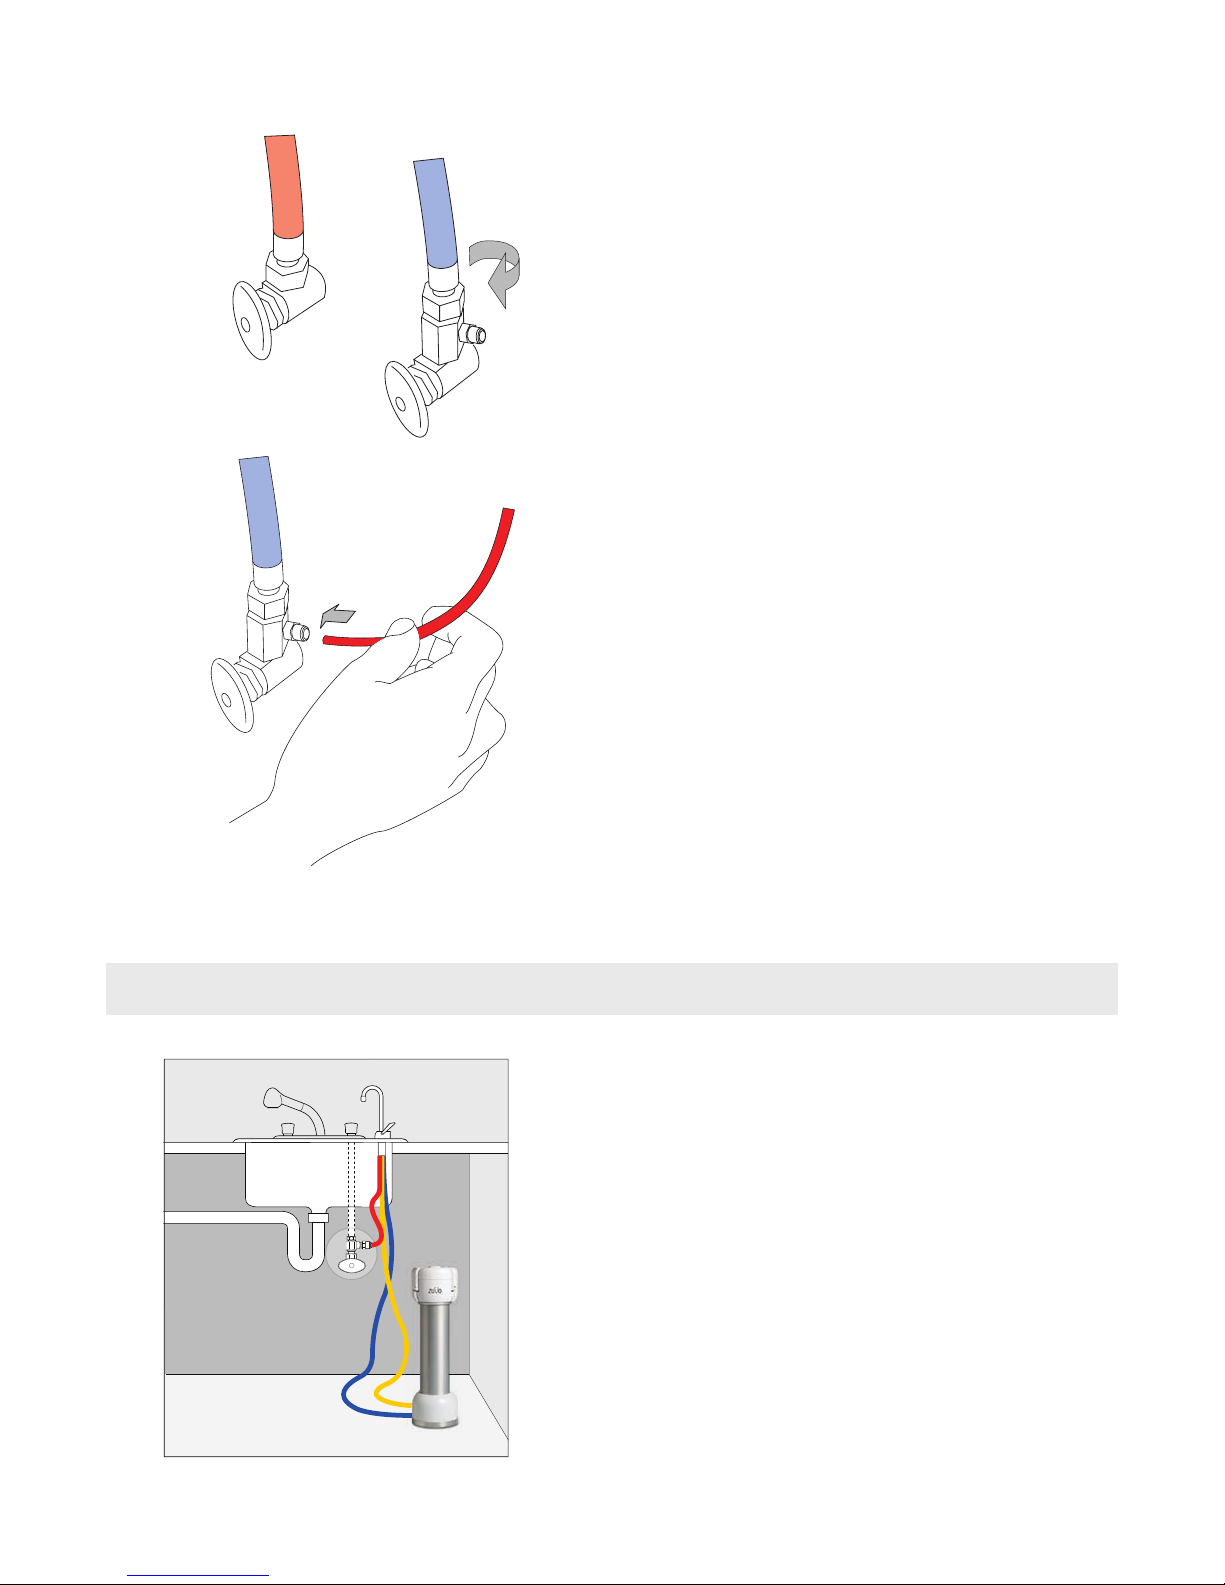
Open the cold water shutoff valve and visually verify that no water is leaking from around the threads of the
1/2" pipe tap, the 3/8" supply adapter or the 1/4" compression adapter and RED tubing.
After you are certain there are no leaks, fix the position of the Butler Faucet by tightening the hex nut at the
bottom.
Ensure that the Zuvo Water Purator is plugged into an electrical outlet.
NOTE: Do not use an outlet that is intended for a garbage disposal as power to this outlet is controlled by a
switch.
Ensure that the faucet arm is fully inserted into the faucet base. The 2 o-ring seals on the bottom of the arm
should form a snug fit in the faucet base, but allow the arm to swivel.
The Zuvo Water Purator can be turned on by pressing down and holding the faucet lever or by
flipping the lever up.
Flip the lever on the faucet base upward. This should light up the UV lamp and initiate water flow through the
Zuvo Water Purator. You should observe a swirling upward motion of water as well as a constant stream of
bubbles when the unit is on. If there is no flow, close the faucet lever and check to make sure the cold water
supply is open, then retry lifting the faucet lever to turn on the system. If water is filling from the top of the
Zuvo unit rather tan swirling up from the bottom, you have crossed the BLUE and YELLOW/WHITE tubing at-
tachments. You need to disconnect and reverse these.
IMPORTANT
After first installing your Zuvo Water Purator or when changing the filter, always allow water to
flow through the device for five (5) minutes before drinking or using water.
Note: it is a normal part of the Zuvo Water Purator operation for the UV lamp to remain on for
about 20 – 30 seconds after use.
CONGRATULATIONS! YOUR INSTALLATION IS COMPLETE.
© Copyright 2009. Zuvo™, the Zuvo logo and the Purator™ name are trademarks of Zuvo Water LLC. Zuvo Water Purator is protected by U.S. patents #6,461,520, #7,033,502, #5, 266, 215,
#5,540, 848, DES 357,058, and other U.S. and foreign patents pending. All rights reserved. L129 06/09
Zuvo Water LLC
404 Villa Street
Mountain View CA 94041
Tel: 650.265.1665
info@zuvowater.com
www.zuvowater.com
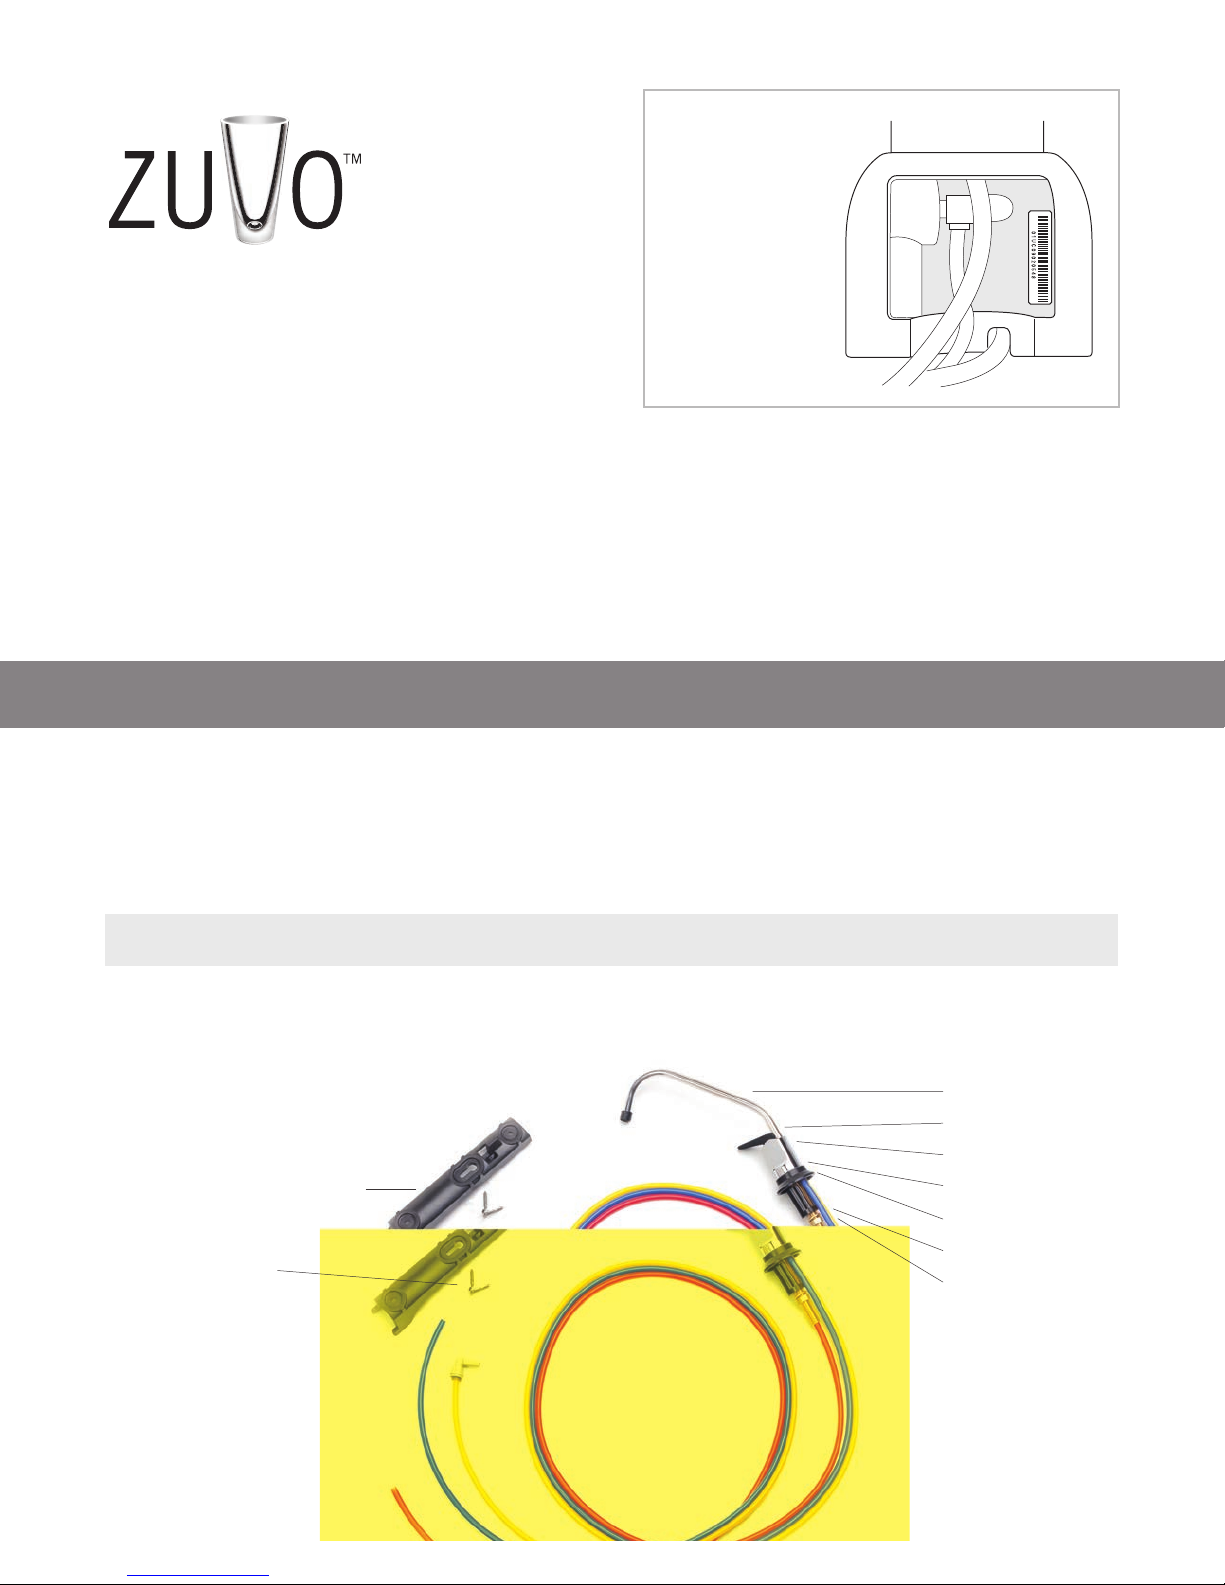
7. PLUMBING CHECKOUT
8. SYSTEM CHECKOUT
Other manuals for Water Purator
1
Table of contents
Other Zuvo Water Filtration System manuals
Popular Water Filtration System manuals by other brands

Clean Water Systems
Clean Water Systems Tannin 5900e Series Installation & start?up guide

Katadyn
Katadyn Exstream user guide

Atlantic Ultraviolet
Atlantic Ultraviolet Bio-Logic BIO 1.5 Installation operation & maintenance

Pentair
Pentair GRO-2550 Installation and operation manual

Millipore
Millipore milli-q user manual

Atlas Filtri
Atlas Filtri BIG F PRO Instructions for installation, use and maintenance manual