2mag MIXdrive 1 XS User manual

Operation Manual
English
cuvetteMIXdrive 1 Order no.: 40400
MIXdrive 1 XS Order no.: 40300
MIXdrive 1 eco Order no.: 40101
MIXdrive 1 Order no.: 40001
MIXdrive 6 Order no.: 40006
MIXdrive 15 Order no.: 40015
MIXdrive 60 Order no.: 40060
MIXdrive OEM Order no.: 4xxxx
MIXdrive 1 XS HT Order no.: 40303
MIXdrive 1 eco HT Order no.: 40301
MIXdrive 1 HT Order no.: 40201
MIXdrive 6 HT Order no.: 40206
MIXdrive 15 HT Order no.: 40215
MIXdrive 60 HT Order no.: 40260
MIXdrive OEM HT Order no.: 4xxxx
with
MIXcontrol eco Order no.: 90100
MIXcontrol eco DINrail (0-10V) Order no.: 90150
MIXcontrol eco DINrail (Poti) Order no.: 90140
MIXcontrol 20 Order no.: 90200
MIXcontrol 20 RS232 Order no.: 90210
MIXcontrol 20 DINrail (0-10V) Order no.: 90220
MIXcontrol 20 DINrail (RS232) Order no.: 90221
MIXcontrol 40 Order no.: 90400
MIXcontrol 40 RS232 Order no.: 90410
MIXcontrol 40 DINrail (0-10V) Order no.: 90420
MIXcontrol 40 DINrail (RS232) Order no.: 90421
Version 5.1 Issue 10/2015 www.2mag.de

© 2mag AG Page 2 of 44 Version: 5.1
Includes:
Quick start
Operation Manual
Technical Documentation
Specifications

© 2mag AG Page 3 of 44 Version: 5.1
Thank you for your confidence shown in us!
Congratulations to the purchase of your new product.
For any enquiries, questions or suggestions please do not hesitate to
2mag
Main competence of 2mag is based upon mixing, tempering and
measuring/controlling. In these fields we are offering support with our
products to the modern laboratory within the standardized daily business
as well as for the implementation of highly complex processes in the
state-of-the-art research. Due to the fact that 2mag is developing
according to customer’s needs, is manufacturing self-contained and under
permanent quality control and is also selling on-site together with
competent contact persons, we can guaranty our customer an outstanding
quality and product performance.

© 2mag AG Page 4 of 44 Version: 5.1
Contents
A Quick start ______________________________________________ 5
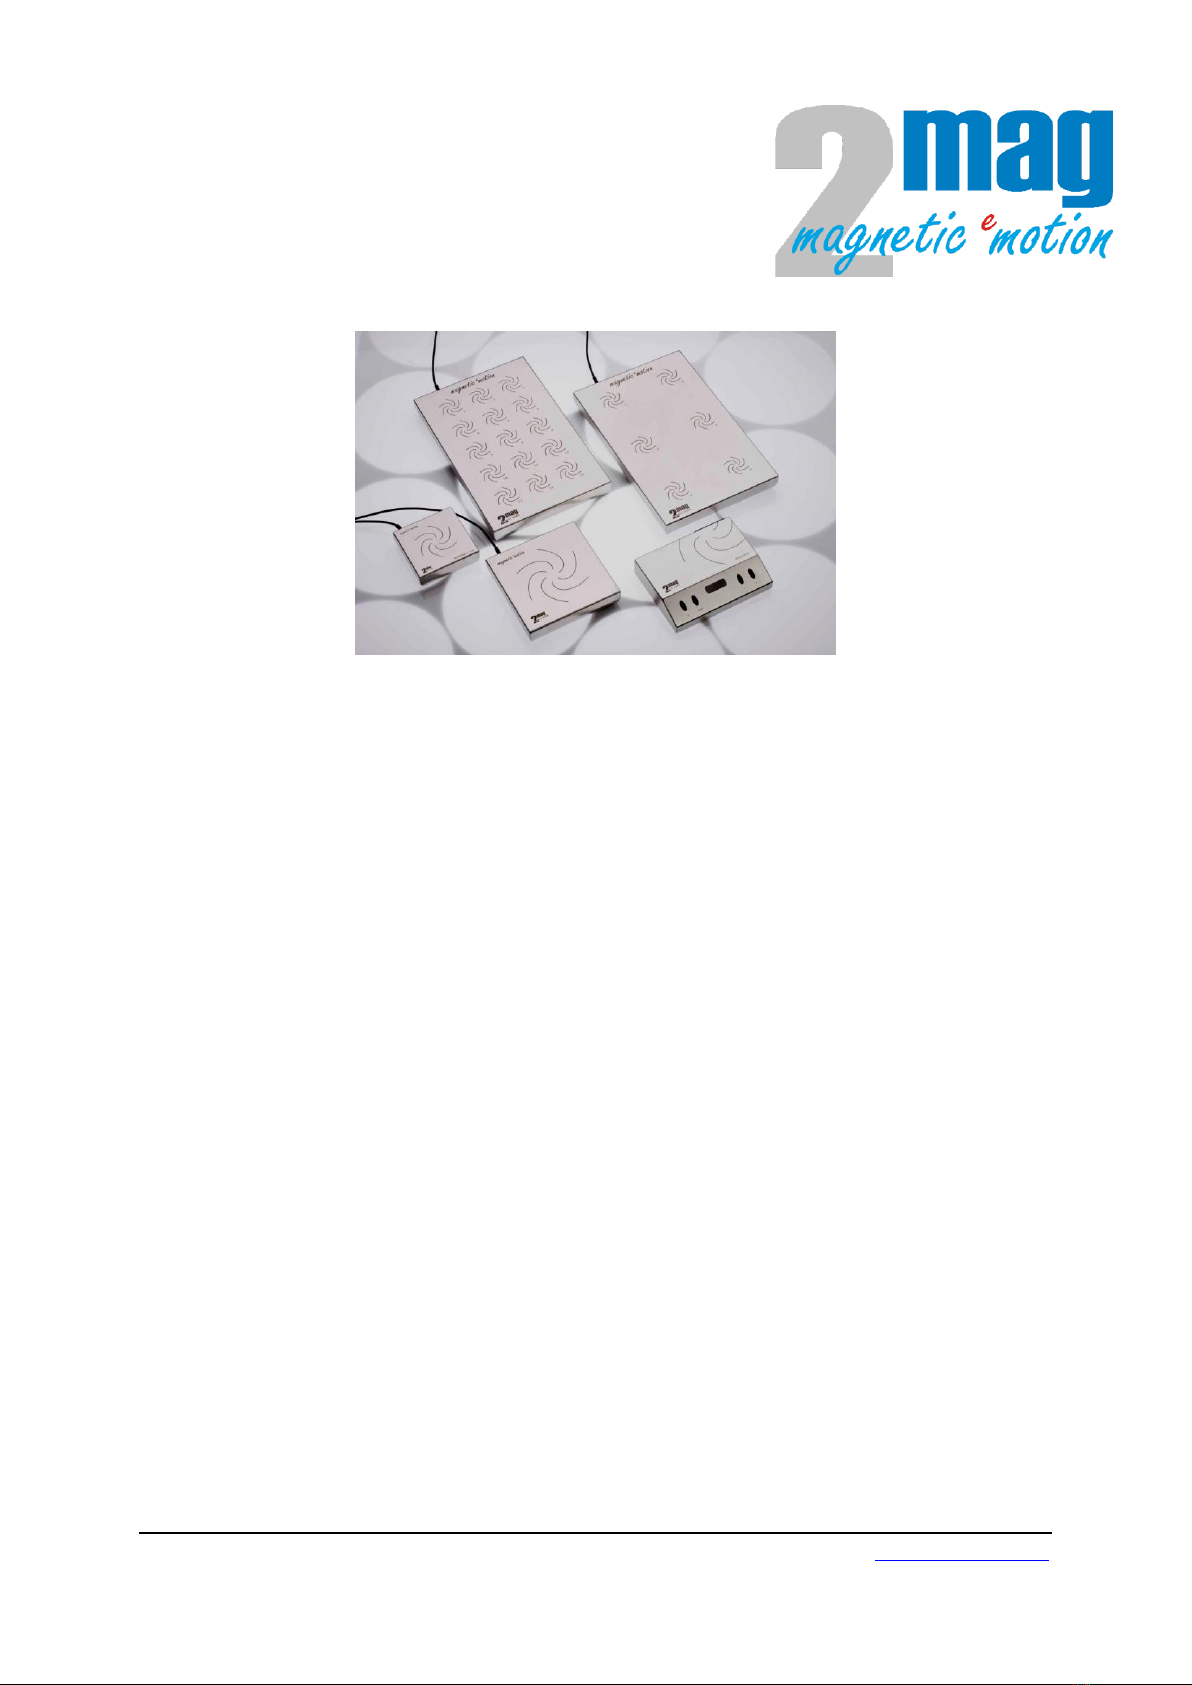
1. Overview of your product _______________________________________ 5
2. Applications __________________________________________________ 6
2.1 Operator __________________________________________________ 6
2.2 Basic functions _____________________________________________ 6
2.3 Product combinations________________________________________ 6
2.4 Application not for the intended use ____________________________ 6
2.5 Combinations of vessels______________________________________ 7
2.6 Stirring bars _______________________________________________ 8
2.6.1 ASTEROID Stirring Bars ____________________________________ 8
2.7 Tips and hints to the topic stirring ______________________________ 9
3. Installation__________________________________________________ 10
3.1 Safety advice _____________________________________________ 10
3.2 Installation, connection to the control unit MIXcontrol eco __________ 11
3.3 Installation, connection to the control unit MIXcontrol 20___________ 13
3.4 Installation, connection to the control unit MIXcontrol 40___________ 14
4. Operating of the control units ___________________________________ 15
4.1. Operating of the control unit MIXcontrol eco ______________________ 15
4.1.1 Description functional elements MIXcontrol eco _________________ 15
4.1.2 Stirring operation and stirrer control MIXcontrol eco _____________ 16
4.2. Operating of the control unit MIXcontrol 20/40 ____________________ 17
4.2.1 Description operating elements MIXcontrol 20/40 _______________ 17
4.2.2 Stirring operation and stirrer control MIXcontrol 20/40 ___________ 18
4.3 Interface (analog) –0-10 Volts _________________________________ 20
4.3.1 Technical data ___________________________________________ 20
4.3.2 Pin-assignment, SUB-D connector ___________________________ 21
4.3.3. PIN-assignment –MIXcontrol eco –housing for cap rails _________ 22
4.3.3. Connections/PIN-assignment –MIXcontrol 20/40 DINrail __________ 23
4.4 PC-Interface –RS232 ________________________________________ 24
4.4.1 RS232 Commands________________________________________ 24
4.4.2 Format –Command –Feedback _____________________________ 25
4.4.3 Hints to Parameter Operation _______________________________ 25
4.3.4 Control of more than one units______________________________ 26
4.4.5 Control with HyperTerminal ________________________________ 27
4.4.6. Screenshots –Preferences HyperTerminal ____________________ 28
4.5 Combinations Stirring Drives –Control Units ______________________ 30
4.6 Accessory –Distributor distriBOX 4 / distriBOX 8 ___________________ 31
4.7 Accessory –Extension Cord for MIXdrive _________________________ 31
5. External heating operation in incubators and water baths _____________ 32
5.1 Accessory –Stainless Steel Bath mixBATH ______________________ 32
6. Maximum operation temperatures _______________________________ 33
B Maintenance, Cleaning and Care ____________________________ 34
C Service case and customer service___________________________ 35
D Errors _________________________________________________ 36
E Technical details _________________________________________ 37

© 2mag AG Page 5 of 44 Version: 5.1
A Quick start
1. Overview of your product
Magnetic stirrer MIXdrive with control unit MIXcontrol
Image 2: 15-position magnetic stirrer MIXdrive 15 with control unit MIXcontrol 40
Your product contains at despatch:
A modern inductive magnetic stirring system (MIXdrive)
consisting of a stainless steel stirring plate with 1, 6, 15 or 60
stirring points with fixed stirrer control cable (4-pin plug, with
screw nut)
An external control unit with one connector socket (MIXcontrol
eco / MIXcontrol 20) respectively two connector sockets
(MIXcontrol 40) for connection of the stirrer control cables as
well as a pluggable power cable (country-specific) and with
RS232 PC-interface (option).

© 2mag AG Page 6 of 44 Version: 5.1
2. Applications
2.1 Operator
The 100% maintenance- and wear-free magnetic stirrers MIXdrive are
used in the fields of chemistry, medicine, pharmacy, microbiology and
biotechnology.
The operators are generally working in research and development,
production and quality assurance.
2.2 Basic functions
Basic function is stirring of liquids in suitable and chemically resistible
vessels.
The stirrer housing is hermetically close and therefore immersible.
The maximum ambient temperature is +50°C in air and +50°C in water
immersed.
The maximum ambient temperature of the high temperature versions
(MIXdrive HT-series) is +200°C in air and +95°C in water immersed.
2.3 Product combinations
In addition to the use at the conventional laboratory desk our products
have also been tested for the application in
Laminar flow devices
Safety cabinets
Safety cabins
Water baths
Incubators
Please note: For using the stirrer in incubators please set the adjustable
stirring power to the minimum usable power to reduce the additional
heating effect caused by the magnetic stirring drive. Please see chapter “5
External heating operations in incubators and water baths” at page 23.
2.4 Application not for the intended use
The magnetic stirrers MIXdrive are explicitly not intended for the
application:
Stirring and warming of flammable liquids
Warming of pressure-tight closed and NOT pressure-
resistant vessels or glasses
(e.g. Erlenmeyer flasks, lab flasks)
At general atmosphere or danger of explosion

© 2mag AG Page 7 of 44 Version: 5.1
The 2mag is offering special products for the just mentioned application
combinations. More information for this can be found at www.2mag.de or
2.5 Combinations of vessels
Please use round, chemical resistant and where required heat-resistant
vessels made of glass or non-magnetic metal. You can use vessels up to
the maximum size stated in the spreadsheet 1.
The vessels should have a thin, even wall thickness. Flat glass bottoms
(without any curve to the inside) and smooth surfaces will improve the
operating characteristic of the magnetic stirring bar. Uneven surfaces
would reduce the stirring power and would cause reaming up of the
stirring bar’s gliding surface.
In case you intend to stir large amount of liquids, please chose such
stirring flasks that have a comparatively small diameter and thin bottom.
The magnetic stirring bar can then be centred better.
Magnetic Stirrer
Stirring vessels
Nominal content
Max. amount
cuvetteMIXdrive 1
cuvettes
up to 25 ml
1
MIXdrive 1 XS
MIXdrive 1 XS HT
lab flasks
beaker glasses
1,000 ml
1
MIXdrive 1 eco
MIXdrive 1 eco HT
Erlenmeyer flasks
lab flasks
beaker glasses
3,000 ml
1
MIXdrive 1
MIXdrive 1HT
Erlenmeyer flasks
lab flasks
beaker glasses
10,000 ml
1
MIXdrive 6
MIXdrive 6 HT
Erlenmeyer flasks
and lab flasks
beaker glasses
(high design)
25 ml
50/100 ml
250/500 ml
1,000 ml
2,000 ml
3,000 ml
25 ml
50 ml
100/250 ml
600/1000 ml
3,000 ml
6
6
6
6
3
2
6
6
6
6
2
MIXdrive 15
MIXdrive 15 HT
Erlenmeyer flasks
and lab flasks
beaker glasses
(high design)
25 ml
50/100 ml
250/500 ml
1,000 ml
2,000 ml
3,000 ml
25 ml
50 ml
100/250 ml
600/1000 ml
3,000 ml
15
15
8/6
6
3
2
15
15
15
8
2
MIXdrive 60
MIXdrive 60 HT
Reaction vessels
small volume glasses
50 ml
2
Spreadsheet 1: Combination examples for vessels

© 2mag AG Page 8 of 44 Version: 5.1
Please always place the flasks in the magnetic
centre of the magnetic stirrer. This will ensure the
optimum stirring effect!
Do never use any pressure-tight closed flasks.
RISK OF BURSTING!
Do only use temperature-resistant vessels.
Be careful with plastic flasks!
2.6 Stirring bars
In general, all stirring bars matching the length and diameter can be used.
But we recommend using the commercial stirring bars with Samarium
Cobalt magnetic core (SmCo). By using this highly energetic magnetic
material the maximum stirring power of the magnetic stirrer can be
achieved, especially when mixing viscose media.
2.6.1 ASTEROID Stirring Bars
We recommend using 2mag –ASTEROID stirring bars to increase the
stirring performance at enhanced requirements.
ASTEROID stirring bars a newly developed, high-effective and ideal for:
large mixing volumes
viscous media
stirring over wide distances
at disadvantageous vessel bottoms.
2mag ASTEROID stirring bars transmit more than 4x higher torque.
Therefore the bars creating an unbeatable increased mixing effect in
comparison to conventional stirring bars. The high energetic and long-
term stable magnetic field does not have any demagnetization effect. The
concave design is made for a minimum of bearing surface and reliable
rotation. Significantly higher rotation speed reachable! 300% less PTFE
abrasion than comparable round shape stirring bars. The triangular shape
raises the powerful shear force and increases the mixing effect at lower
rotation speed.

© 2mag AG Page 9 of 44 Version: 5.1
The high quality PTFE cover is even and sealing the magnet, FDA-conform
and steam sterilizable at 121°C.
2.7 Tips and hints to the topic stirring
The mixing flasks should be filled max. up to the middle (high speed
range) resp. up to ¾ (low speed range).
Place one magnetic stirring bar in each stirring flask.
Place the stirring flasks right in the centre of the stirring point on the
Stirring Hotplate resp. in one borehole of the Stirring Drybath.
In case the magnetic stirring bar turns in an unsteady or jerky
way or bounces:
The interaction between the alternating magnetic field and the magnetic
stirring bar is too high.
Increase the speed or
Use a smaller magnetic stirring bar or
Decrease the stirring power.
In case the magnetic stirring bar will not be centred or leaves the
centre permanently:
The interaction between the alternating magnetic field and the magnetic
stirring bar is too low.
Or the stirring bar has a bottom that is uneven or too thick-walled.
Move the flask slightly back and fro and centre it again onto the stirring
point of the stirrer surface.
Reduce the speed or use a longer magnetic stirring bar or one with a
larger diameter or
Use a smaller flask with a thin-walled, even bottom or
Reduce the filling amount in the flasks or
Increase the stirring speed.
In case the stirring activity is too weak:
Use commercial magnetic stirring bars with SamariumCobalt-core.
Use a longer stirring bar or a stirring flask with smaller diameter.
We recommend using 2mag –ASTEROID stirring
bars to increase the stirring performance.

© 2mag AG Page 10 of 44 Version: 5.1
3. Installation
3.1 Safety advice
Please ensure the following basic conditions prior to installation:
The wear-free inductive drive works with magnetism.
Cardiac pacemakers, data storage mediums,
magnetic cards and other devices, which can be
affected by magnetic fields, have to be kept away from
the fields of the stirring unit as well as from the stirring
bars.
The device must not be used in explosive rooms.
The control unit MIXcontrol must not be dipped in water
or any cleaning solutions.
Your supply voltage has to comply with the label of the
control unit. The control unit has to be switched off
before any power connection or power disconnection.
To increase the operation safety, the control unit should
be placed apart from chemical materials and reactions
as well as away from thermal influences.
ATTENTION!
The control unit has to be switched off,
BEFORE you connect or disconnect the
plugs.
Always turn off the power switch first before
handling the connection cables.

© 2mag AG Page 11 of 44 Version: 5.1
3.2Installation, connection to the control unit MIXcontrol eco
Step by step instruction (please also see image 3 and 4)
Switch off the control unit MIXcontrol eco BEFORE you
handle the connection cables by disconnection of the
power supply unit (1) and the low-voltage power cable
(2)!
The stirrer control cable (8) of the magnetic stirrer MIXdrive has
now to be connected to the 4-pin socket of the control unit (7).
Please secure this plug connection by turning the screw
nut situated at the plug. Only by this a trouble-free operation
can be guaranteed.
Take the low-voltage power cable (2) of the power supply unit
(1) and connect the plug (3) to the power input socket (4) of the
control unit (5).
Connect the power supply unit (1) with power socket
The control unit is now connected to the magnetic stirrer and
ready for operation.
Image 3: Installation, magnetic stirrer MIXdrive with control unit MIXcontrol eco
9
4
10
3
2
1
7
8
5
9
4
10
3
2
1
7
8
5

© 2mag AG Page 12 of 44 Version: 5.1
Description functional elements of control unit MIXcontrol eco
1 Power supply unit 100-240 volts
2 Low-voltage cable between power supply unit and control unit
3 Low-voltage connector of the stirrer control cable
4 Low-voltage socket for the stirrer control cable
5 Control unit MIXcontrol eco
6 Speed control (rpm)
7 Socket for control cable for the magnetic stirrer
8 Control cable of the magnetic stirrer
9 Magnetic stirrer
10 Changeable country-specific power adapter
(content of delivery)
Image 4: Installation, close-up of control unit MIXcontrol eco
3
4
5
7
8
6

© 2mag AG Page 13 of 44 Version: 5.1
3.3 Installation, connection to the control unit MIXcontrol 20
Step by step instruction (please also see image 5a)
Switch off the control unit MIXcontrol BEFORE you handle
the connection cables with the power switch (5) and
disconnect the power cable (4)!
The stirrer control cable (1) of the magnetic stirrer MIXdrive has
now to be connected to the 4-pin socket of the control unit (2).
Please secure this plug connection by turning the screw
nut situated at the plug. Only by this a trouble-free operation
can be guaranteed.
Connect the power cable (4) to the power input (3) rear-side and
afterwards to the power socket.
The control unit is now connected to the magnetic stirrer and
ready for operation.
Image 5a: Installation, rear side of the control unit MIXcontrol 20
Description functional elements of control unit - backside
1 Connector of the stirrer control cable
2 Socket for the stirrer control cable
3 Power socket
4 Power cable
5 Power switch
6 Control unit 2mag –MIXcontrol 20
7 Stirring drive unit 2mag - MIXdrive
3
4
1
2
5
6
7

© 2mag AG Page 14 of 44 Version: 5.1
3.4Installation, connection to the control unit MIXcontrol 40
Step by step instruction (please also see image 5b)
Switch off the control unit MIXcontrol BEFORE you handle
the connection cables with the power switch (5) and
disconnect the power cable (4)!
The stirrer control cable (1) of the magnetic stirrer MIXdrive has
now to be connected to the 4-pin socket of the control unit (2).
Please secure this plug connection by turning the screw
nut situated at the plug. Only by this a trouble-free operation
can be guaranteed.
It can be connected directly up to two stirring drives
MIXdrive of the identical type.
Connect the power cable (4) to the power input (3) rear-side and
afterwards to the power plug.
The control unit is now connected to the magnetic stirrer and
ready for operation.
Image 5b: Installation, rear side of the control unit MIXcontrol 40
Description functional elements of control unit - backside
1 Connector of the stirrer control cable
2 Socket for the stirrer control cable
3 Power socket
4 Power cable
5 Power switch
6 Control unit 2mag - MIXcontrol 40
7 Stirring drive unit 2mag - MIXdrive
3
4
1
2
5
6
7

© 2mag AG Page 15 of 44 Version: 5.1
4. Operating of the control units
4.1. Operating of the control unit MIXcontrol eco
Image 6: Functional elements, control unit MIXcontrol eco
4.1.1 Description functional elements MIXcontrol eco
5 Control unit 2mag - MIXcontrol eco
6 ON/OFF and SPEED-button
5
6

© 2mag AG Page 16 of 44 Version: 5.1
Operating of the magnetic stirrer
After the cables have been installed correctly according to Installation,
connection to the magnetic stirrer, the magnetic stirring system
MIXdrive will be ready for operation.
4.1.2 Stirring operation and stirrer control MIXcontrol eco
Turning On
Turn the SPEED-button (6) clockwise. The magnetic stirrer will be turned
on.
Turning Off
Turn the SPEED-button (6) counter-clockwise to the “OFF” sign until the
left stop of the button. The magnetic stirrer will be turned off.
SoftStart
After the magnetic stirrer was switched on, the stirring bars in the flasks
will first be caught, afterwards centred in the flask and then –to increase
the operating safety –be smoothly accelerated to the set speed
accurately.
Stirrer speed adjustment
The speed of the magnetic stirrer can be adjusted by turning of the speed
button.
Choose a speed which allows the stirring bar to work reliable and safe.
The wear-free inductive drive works with magnetism.
Cardiac pacemakers, data storage mediums,
magnetic cards and other devices, which can be
affected by magnetic fields, have to be kept away from
the fields of the stirring unit as well as from the stirring
bars.

© 2mag AG Page 17 of 44 Version: 5.1
4.2. Operating of the control unit MIXcontrol 20/40
Image 7: Control unit MIXcontrol 20 / 40
Image 8: Close-up, operating elements control unit MIXcontrol 20 / 40
4.2.1 Description operating elements MIXcontrol 20/40
7 Control unit 2mag - MIXcontrol 20 / 40
Stirrer control
8 ON/OFF key for magnetic stirrer
9 MODE-key (M) for power adjustment of the magnetic stirrer
10 Display for speed indicator and power indicator
11 MINUS-key (-) for reduction of stirrer speed
12 PLUS-key (+) for increase of the stirrer speed
7
8
9
11
12
10
7
8
9
11
12
10

© 2mag AG Page 18 of 44 Version: 5.1
Operating of the control unit
After the cables have been installed correctly according to “Installation,
Connection to the control unit”, the magnetic stirrer system MIXdrive
will be ready for operation.
4.2.2 Stirring operation and stirrer control MIXcontrol 20/40
Turning On and Off
Please turn on the power switch (5) at the rear side of the control unit
MIXcontrol.
Please press the On/OFF-key (8) once. The magnetic stirrer will be
switched on by that. The current stirring speed will be shown in the
display (10).
By pressing the ON/OFF-key (8) once more, the magnetic stirrer will be
switched off again. The display indicator (10) expires.
SoftStart
After the magnetic stirrer was switched on, the stirring bars in the flasks
will first be caught, afterwards centred in the flask and then –to increase
the operating safety –be smoothly accelerated to the set speed
accurately.
The accelerating phase will be shown by the illumination of a dot at the
right segment of the LED-display (10).
Power adjustment
A newly developed and extremely efficient magnetic stirrer will come into
operation.
The inductive drive concept causes an operational heat output by the
magnetic stirrer. To reduce the heat output the power of the magnetic
stirrer can be adjusted.
A high power setting is necessary to mix viscose media and large
amounts to be stirred in a strong and efficient way.
A low power setting guaranties a warming-free long-term use for
example of aqueous probes at room temperature.
The stirring power can be adjusted in four steps by using the MODE-key
(9). By pressing the MINUS-key (11) respectively the PLUS-key (12) just
after pressing the MODE-key, the power can be adjusted between
25/50/75/100%.
The current value is now shown on the display (10). The display (10) will
turn back to the current speed indicator after approx. 5 seconds.
The power adjustment is finished again at the time the speed range is
shown.
The power adjustment can also be finished immediately by pressing the
MODE-key (9) again.

© 2mag AG Page 19 of 44 Version: 5.1
Stirrer speed adjustment
The speed of the magnetic stirrer can be adjusted by pressing the MINUS-
(11) resp. the PLUS-key (12).
The adjusted speed will be shown in the display (10) when the magnetic
stirrer is switched on. The speed range can be adjusted between 100 and
2000 rpm in steps by 10.
By constantly pressing the MINUS- resp. the PLUS-keys, an accelerated
adjustment of the speed can be achieved.
QuickSet
To enter the start- respectively maximum speed directly and quickly there
is the Quickset-function available.
The use of the following described keys will be made with the stirrer
turned on.
Setting the Start Speed
Press the MINUS-key (11) permanently and press shortly the ON/OFF-key
(8) afterwards. The start speed “100” will be set.
Setting the Maximum Speed
Press the PLUS-key (12) permanently and press shortly the ON/OFF-key
(8) afterwards. The maximum speed “2000” (MIXcontrol 20: “1600”) will
be set.
Display, Magnetic Stirrer
The display (10) provides as described above a description of:
Current stirring speed (always with switched on magnetic stirrer)
Set power (after pressing the MODE-key (9))
To check, whether the magnetic stirrer is switched on. The display
will not be illuminated in case the stirrer is switched off.
The wear-free inductive drive works with magnetism.
Cardiac pacemakers, data storage mediums,
magnetic cards and other devices, which can be
affected by magnetic fields, have to be kept away from
the fields of the stirring unit as well as from the stirring
bars.

© 2mag AG Page 20 of 44 Version: 5.1
4.3 Interface (analog) –0-10 Volts
The control units MIXcontrol eco (as well as OEM-circuit versions) are
available with an analog 0-10V interface.
The speed and the ON-OFF function can be controlled via this interface.
A special housing for a fast and easy installation on cap rails e.g. in
control boxes is available, too.
4.3.1 Technical data
MIXcontrol eco
Supply voltage: 24V
Stirring power: 10 watts, not adjustable
Speed range: 100–1000 rpm
Control voltage / rpm correlation: linear
OFF < 0,25V (ca. 0,03V hysteresis)
100 rpm 0,25V –0,28V
1000 rpm > 9,4V
MIXcontrol 20
Supply voltage: 48V
Stirring power: 20 watts, not adjustable
Speed range: 100–1600 rpm
Control voltage / rpm correlation: linear
OFF < 0,25V (ca. 0,03V hysteresis)
100 rpm 0,25V –0,28V
1600 rpm > 9,4V
MIXcontrol 40
Supply voltage: 48V
Stirring power: 20 watts, not adjustable
Speed range: 100–2000 rpm
Control voltage / rpm correlation: linear
OFF < 0,25V (ca. 0,03V hysteresis)
100 rpm 0,25V –0,28V
2000 rpm > 9,4V
This manual suits for next models
45
Table of contents
Other 2mag Laboratory Equipment manuals
Popular Laboratory Equipment manuals by other brands

YOKOGAWA
YOKOGAWA 701977 user manual

MRC
MRC SI-600 Operation manual

Environmental Express
Environmental Express SimpleDist C6000 Operation & instruction manual

Dado Lab
Dado Lab QB1 user manual

Hardy Diagnostics
Hardy Diagnostics QuickSlide AFB-PRO User's operation manual

PlexBio
PlexBio IntelliPlex IW100 user manual