3D Corporation ProJet 5000 User manual

1. Table of Contents . . . . . . . . . . . . . . . . . . . . . . . . . . . . . . . . . . . . . . . . . . . . . . . . . . . . . . . . . . . . . . . . . . . . . . . . . . . . . . . . . . . . . . . . . . . . 3
1.1 01.0 Introduction . . . . . . . . . . . . . . . . . . . . . . . . . . . . . . . . . . . . . . . . . . . . . . . . . . . . . . . . . . . . . . . . . . . . . . . . . . . . . . . . . . . . . . . . 5
1.1.1 1.1 About this Guide . . . . . . . . . . . . . . . . . . . . . . . . . . . . . . . . . . . . . . . . . . . . . . . . . . . . . . . . . . . . . . . . . . . . . . . . . . . . . . . . 5
1.1.2 1.2 Copyright . . . . . . . . . . . . . . . . . . . . . . . . . . . . . . . . . . . . . . . . . . . . . . . . . . . . . . . . . . . . . . . . . . . . . . . . . . . . . . . . . . . . . . 6
1.1.3 1.3 Useful Documents . . . . . . . . . . . . . . . . . . . . . . . . . . . . . . . . . . . . . . . . . . . . . . . . . . . . . . . . . . . . . . . . . . . . . . . . . . . . . . . 6
1.1.4 1.4 What's Inside . . . . . . . . . . . . . . . . . . . . . . . . . . . . . . . . . . . . . . . . . . . . . . . . . . . . . . . . . . . . . . . . . . . . . . . . . . . . . . . . . . . 7
1.1.5 1.5 Features . . . . . . . . . . . . . . . . . . . . . . . . . . . . . . . . . . . . . . . . . . . . . . . . . . . . . . . . . . . . . . . . . . . . . . . . . . . . . . . . . . . . . . 7
1.1.6 1.6 Packaging . . . . . . . . . . . . . . . . . . . . . . . . . . . . . . . . . . . . . . . . . . . . . . . . . . . . . . . . . . . . . . . . . . . . . . . . . . . . . . . . . . . . . 9
1.2 02.0 Safety Symbols & Definitions . . . . . . . . . . . . . . . . . . . . . . . . . . . . . . . . . . . . . . . . . . . . . . . . . . . . . . . . . . . . . . . . . . . . . . . . . . 9
1.3 03.0 Safety Guidelines . . . . . . . . . . . . . . . . . . . . . . . . . . . . . . . . . . . . . . . . . . . . . . . . . . . . . . . . . . . . . . . . . . . . . . . . . . . . . . . . . . . 10
1.3.1 3.1 General . . . . . . . . . . . . . . . . . . . . . . . . . . . . . . . . . . . . . . . . . . . . . . . . . . . . . . . . . . . . . . . . . . . . . . . . . . . . . . . . . . . . . . . 10
1.3.2 3.2 Electrical . . . . . . . . . . . . . . . . . . . . . . . . . . . . . . . . . . . . . . . . . . . . . . . . . . . . . . . . . . . . . . . . . . . . . . . . . . . . . . . . . . . . . . 11
1.3.3 3.3 Ultraviolet (UV) Light . . . . . . . . . . . . . . . . . . . . . . . . . . . . . . . . . . . . . . . . . . . . . . . . . . . . . . . . . . . . . . . . . . . . . . . . . . . . . 11
1.4 04.0 Part Material Safety . . . . . . . . . . . . . . . . . . . . . . . . . . . . . . . . . . . . . . . . . . . . . . . . . . . . . . . . . . . . . . . . . . . . . . . . . . . . . . . . . . 11
1.4.1 4.1 Disposal . . . . . . . . . . . . . . . . . . . . . . . . . . . . . . . . . . . . . . . . . . . . . . . . . . . . . . . . . . . . . . . . . . . . . . . . . . . . . . . . . . . . . . . 11
1.4.2 4.2 Health Hazards . . . . . . . . . . . . . . . . . . . . . . . . . . . . . . . . . . . . . . . . . . . . . . . . . . . . . . . . . . . . . . . . . . . . . . . . . . . . . . . . . 12
1.4.3 4.3 Material Handling . . . . . . . . . . . . . . . . . . . . . . . . . . . . . . . . . . . . . . . . . . . . . . . . . . . . . . . . . . . . . . . . . . . . . . . . . . . . . . . 13
1.4.4 4.4 Personal Protection Equipment . . . . . . . . . . . . . . . . . . . . . . . . . . . . . . . . . . . . . . . . . . . . . . . . . . . . . . . . . . . . . . . . . . . . . 13
1.4.5 4.5 Regulatory Information . . . . . . . . . . . . . . . . . . . . . . . . . . . . . . . . . . . . . . . . . . . . . . . . . . . . . . . . . . . . . . . . . . . . . . . . . . . 14
1.4.6 4.6 Spilled VisiJet® Material . . . . . . . . . . . . . . . . . . . . . . . . . . . . . . . . . . . . . . . . . . . . . . . . . . . . . . . . . . . . . . . . . . . . . . . . . . 14
1.4.7 4.7 Waste Removal . . . . . . . . . . . . . . . . . . . . . . . . . . . . . . . . . . . . . . . . . . . . . . . . . . . . . . . . . . . . . . . . . . . . . . . . . . . . . . . . . 14
1.4.8 4.8 Material Storage . . . . . . . . . . . . . . . . . . . . . . . . . . . . . . . . . . . . . . . . . . . . . . . . . . . . . . . . . . . . . . . . . . . . . . . . . . . . . . . . 15
1.5 05.0 System Requirements . . . . . . . . . . . . . . . . . . . . . . . . . . . . . . . . . . . . . . . . . . . . . . . . . . . . . . . . . . . . . . . . . . . . . . . . . . . . . . . . 16
1.6 06.0 Familiarization . . . . . . . . . . . . . . . . . . . . . . . . . . . . . . . . . . . . . . . . . . . . . . . . . . . . . . . . . . . . . . . . . . . . . . . . . . . . . . . . . . . . . . 17
1.6.1 6.1 System Functions . . . . . . . . . . . . . . . . . . . . . . . . . . . . . . . . . . . . . . . . . . . . . . . . . . . . . . . . . . . . . . . . . . . . . . . . . . . . . . . 18
1.7 07.0 Printer Setup . . . . . . . . . . . . . . . . . . . . . . . . . . . . . . . . . . . . . . . . . . . . . . . . . . . . . . . . . . . . . . . . . . . . . . . . . . . . . . . . . . . . . . . 19
1.7.1 7.1 Power on Printer . . . . . . . . . . . . . . . . . . . . . . . . . . . . . . . . . . . . . . . . . . . . . . . . . . . . . . . . . . . . . . . . . . . . . . . . . . . . . . . . 19
1.7.2 7.2 Install & Remove Material Bottles and Build Platform . . . . . . . . . . . . . . . . . . . . . . . . . . . . . . . . . . . . . . . . . . . . . . . . . . . . 19
1.7.2.1 7.2.1 MDM Installation . . . . . . . . . . . . . . . . . . . . . . . . . . . . . . . . . . . . . . . . . . . . . . . . . . . . . . . . . . . . . . . . . . . . . . . . . . 21
1.7.3 7.3 Install and Run ProJet™ 3-D Modeling Client Software . . . . . . . . . . . . . . . . . . . . . . . . . . . . . . . . . . . . . . . . . . . . . . . . . . 21
1.7.4 7.4 Create STL File(s) to Build . . . . . . . . . . . . . . . . . . . . . . . . . . . . . . . . . . . . . . . . . . . . . . . . . . . . . . . . . . . . . . . . . . . . . . . . 23
1.7.5 7.5 Submit Test Build . . . . . . . . . . . . . . . . . . . . . . . . . . . . . . . . . . . . . . . . . . . . . . . . . . . . . . . . . . . . . . . . . . . . . . . . . . . . . . . 24
1.7.6 7.6 Build Demo . . . . . . . . . . . . . . . . . . . . . . . . . . . . . . . . . . . . . . . . . . . . . . . . . . . . . . . . . . . . . . . . . . . . . . . . . . . . . . . . . . . . 25
1.8 08.0 Operations . . . . . . . . . . . . . . . . . . . . . . . . . . . . . . . . . . . . . . . . . . . . . . . . . . . . . . . . . . . . . . . . . . . . . . . . . . . . . . . . . . . . . . . . . 25
1.8.1 8.1 Print Preview Overview . . . . . . . . . . . . . . . . . . . . . . . . . . . . . . . . . . . . . . . . . . . . . . . . . . . . . . . . . . . . . . . . . . . . . . . . . . . 26
1.8.1.1 8.1.1 Add Part . . . . . . . . . . . . . . . . . . . . . . . . . . . . . . . . . . . . . . . . . . . . . . . . . . . . . . . . . . . . . . . . . . . . . . . . . . . . . . . . 27
1.8.1.2 8.1.2 Part Selections, Translation,Rotation . . . . . . . . . . . . . . . . . . . . . . . . . . . . . . . . . . . . . . . . . . . . . . . . . . . . . . . . . . 28
1.8.1.3 8.1.3 Submit Job . . . . . . . . . . . . . . . . . . . . . . . . . . . . . . . . . . . . . . . . . . . . . . . . . . . . . . . . . . . . . . . . . . . . . . . . . . . . . . 29
1.8.1.4 8.1.4 Trackball View . . . . . . . . . . . . . . . . . . . . . . . . . . . . . . . . . . . . . . . . . . . . . . . . . . . . . . . . . . . . . . . . . . . . . . . . . . . 29
1.8.1.5 8.1.5 Triangle Selection . . . . . . . . . . . . . . . . . . . . . . . . . . . . . . . . . . . . . . . . . . . . . . . . . . . . . . . . . . . . . . . . . . . . . . . . . 30
1.8.1.6 Align Parts Facings . . . . . . . . . . . . . . . . . . . . . . . . . . . . . . . . . . . . . . . . . . . . . . . . . . . . . . . . . . . . . . . . . . . . . . . . . . . . 31
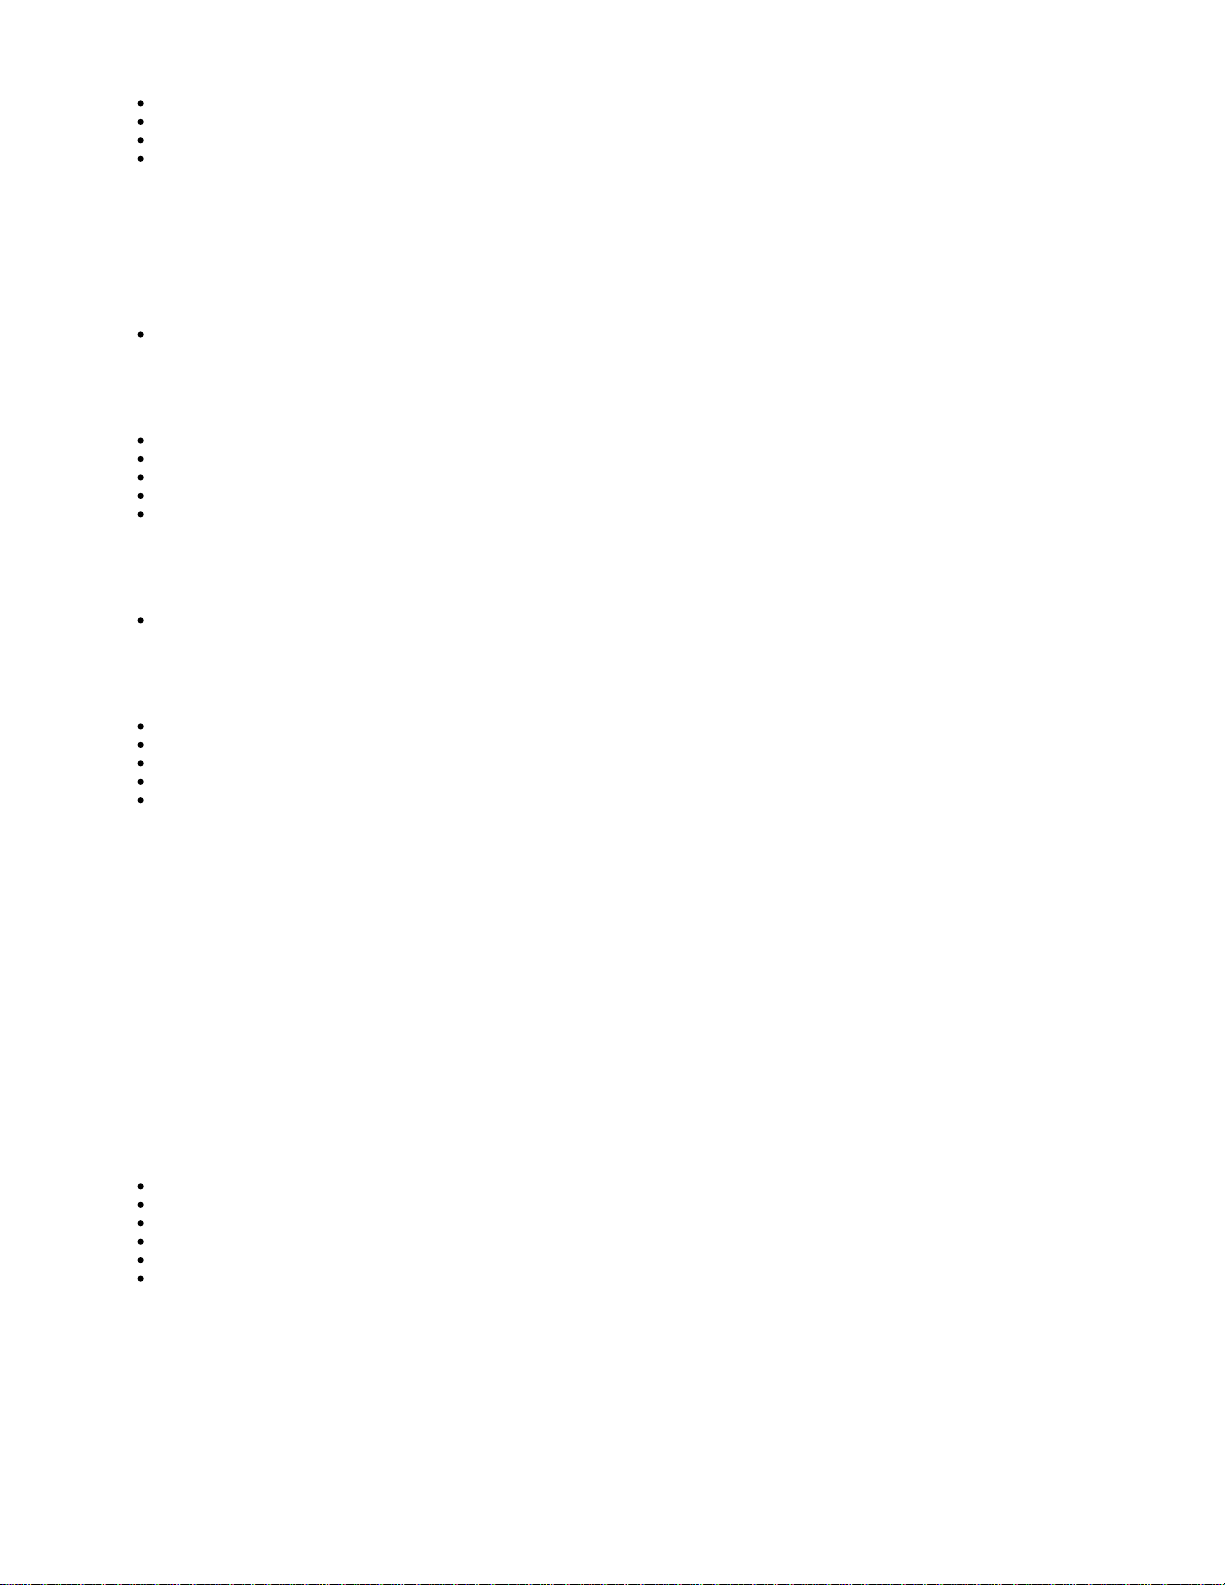
1.8.1.7 Auto Part Placement . . . . . . . . . . . . . . . . . . . . . . . . . . . . . . . . . . . . . . . . . . . . . . . . . . . . . . . . . . . . . . . . . . . . . . . . . . . 32
1.8.1.8 Back View . . . . . . . . . . . . . . . . . . . . . . . . . . . . . . . . . . . . . . . . . . . . . . . . . . . . . . . . . . . . . . . . . . . . . . . . . . . . . . . . . . . 33
1.8.1.9 Bottom View . . . . . . . . . . . . . . . . . . . . . . . . . . . . . . . . . . . . . . . . . . . . . . . . . . . . . . . . . . . . . . . . . . . . . . . . . . . . . . . . . . 34
1.8.1.10 Bounding Box Display . . . . . . . . . . . . . . . . . . . . . . . . . . . . . . . . . . . . . . . . . . . . . . . . . . . . . . . . . . . . . . . . . . . . . . . . . 35
1.8.1.11 Copy . . . . . . . . . . . . . . . . . . . . . . . . . . . . . . . . . . . . . . . . . . . . . . . . . . . . . . . . . . . . . . . . . . . . . . . . . . . . . . . . . . . . . . 36
1.8.1.12 Delete . . . . . . . . . . . . . . . . . . . . . . . . . . . . . . . . . . . . . . . . . . . . . . . . . . . . . . . . . . . . . . . . . . . . . . . . . . . . . . . . . . . . . 37
1.8.1.13 De-Select all . . . . . . . . . . . . . . . . . . . . . . . . . . . . . . . . . . . . . . . . . . . . . . . . . . . . . . . . . . . . . . . . . . . . . . . . . . . . . . . . 37
1.8.1.14 De-Select all Triangles . . . . . . . . . . . . . . . . . . . . . . . . . . . . . . . . . . . . . . . . . . . . . . . . . . . . . . . . . . . . . . . . . . . . . . . . 38
1.8.1.15 Display Support Creation Surface . . . . . . . . . . . . . . . . . . . . . . . . . . . . . . . . . . . . . . . . . . . . . . . . . . . . . . . . . . . . . . . . 39
1.8.1.16 Estimate Build Time . . . . . . . . . . . . . . . . . . . . . . . . . . . . . . . . . . . . . . . . . . . . . . . . . . . . . . . . . . . . . . . . . . . . . . . . . . . 40
1.8.1.17 Front View . . . . . . . . . . . . . . . . . . . . . . . . . . . . . . . . . . . . . . . . . . . . . . . . . . . . . . . . . . . . . . . . . . . . . . . . . . . . . . . . . . 40
1.8.1.18 Help Topics . . . . . . . . . . . . . . . . . . . . . . . . . . . . . . . . . . . . . . . . . . . . . . . . . . . . . . . . . . . . . . . . . . . . . . . . . . . . . . . . . 41
1.8.1.19 Isometric View . . . . . . . . . . . . . . . . . . . . . . . . . . . . . . . . . . . . . . . . . . . . . . . . . . . . . . . . . . . . . . . . . . . . . . . . . . . . . . . 42
1.8.1.20 Mirror . . . . . . . . . . . . . . . . . . . . . . . . . . . . . . . . . . . . . . . . . . . . . . . . . . . . . . . . . . . . . . . . . . . . . . . . . . . . . . . . . . . . . . 43
1.8.1.21 Right View . . . . . . . . . . . . . . . . . . . . . . . . . . . . . . . . . . . . . . . . . . . . . . . . . . . . . . . . . . . . . . . . . . . . . . . . . . . . . . . . . . 44
1.8.1.22 Rotate . . . . . . . . . . . . . . . . . . . . . . . . . . . . . . . . . . . . . . . . . . . . . . . . . . . . . . . . . . . . . . . . . . . . . . . . . . . . . . . . . . . . . 45
1.8.1.23 Scale . . . . . . . . . . . . . . . . . . . . . . . . . . . . . . . . . . . . . . . . . . . . . . . . . . . . . . . . . . . . . . . . . . . . . . . . . . . . . . . . . . . . . . 46
1.8.1.24 Scale inch to mm . . . . . . . . . . . . . . . . . . . . . . . . . . . . . . . . . . . . . . . . . . . . . . . . . . . . . . . . . . . . . . . . . . . . . . . . . . . . . 47
1.8.1.25 Scale mm to inch . . . . . . . . . . . . . . . . . . . . . . . . . . . . . . . . . . . . . . . . . . . . . . . . . . . . . . . . . . . . . . . . . . . . . . . . . . . . . 48
1.8.1.26 Select all . . . . . . . . . . . . . . . . . . . . . . . . . . . . . . . . . . . . . . . . . . . . . . . . . . . . . . . . . . . . . . . . . . . . . . . . . . . . . . . . . . . 49
1.8.1.27 Selected Part Information . . . . . . . . . . . . . . . . . . . . . . . . . . . . . . . . . . . . . . . . . . . . . . . . . . . . . . . . . . . . . . . . . . . . . . 50
1.8.1.28 Selected Parts . . . . . . . . . . . . . . . . . . . . . . . . . . . . . . . . . . . . . . . . . . . . . . . . . . . . . . . . . . . . . . . . . . . . . . . . . . . . . . . 51
1.8.1.29 Shaded Display . . . . . . . . . . . . . . . . . . . . . . . . . . . . . . . . . . . . . . . . . . . . . . . . . . . . . . . . . . . . . . . . . . . . . . . . . . . . . . 52
1.8.1.30 Top View . . . . . . . . . . . . . . . . . . . . . . . . . . . . . . . . . . . . . . . . . . . . . . . . . . . . . . . . . . . . . . . . . . . . . . . . . . . . . . . . . . . 53
1.8.1.31 Translate . . . . . . . . . . . . . . . . . . . . . . . . . . . . . . . . . . . . . . . . . . . . . . . . . . . . . . . . . . . . . . . . . . . . . . . . . . . . . . . . . . . 54
1.8.1.32 Undo . . . . . . . . . . . . . . . . . . . . . . . . . . . . . . . . . . . . . . . . . . . . . . . . . . . . . . . . . . . . . . . . . . . . . . . . . . . . . . . . . . . . . . 55
1.8.1.33 Undo Zoom . . . . . . . . . . . . . . . . . . . . . . . . . . . . . . . . . . . . . . . . . . . . . . . . . . . . . . . . . . . . . . . . . . . . . . . . . . . . . . . . . 56
1.8.1.34 Verify . . . . . . . . . . . . . . . . . . . . . . . . . . . . . . . . . . . . . . . . . . . . . . . . . . . . . . . . . . . . . . . . . . . . . . . . . . . . . . . . . . . . . . 57
1.8.1.35 View All Parts . . . . . . . . . . . . . . . . . . . . . . . . . . . . . . . . . . . . . . . . . . . . . . . . . . . . . . . . . . . . . . . . . . . . . . . . . . . . . . . . 57
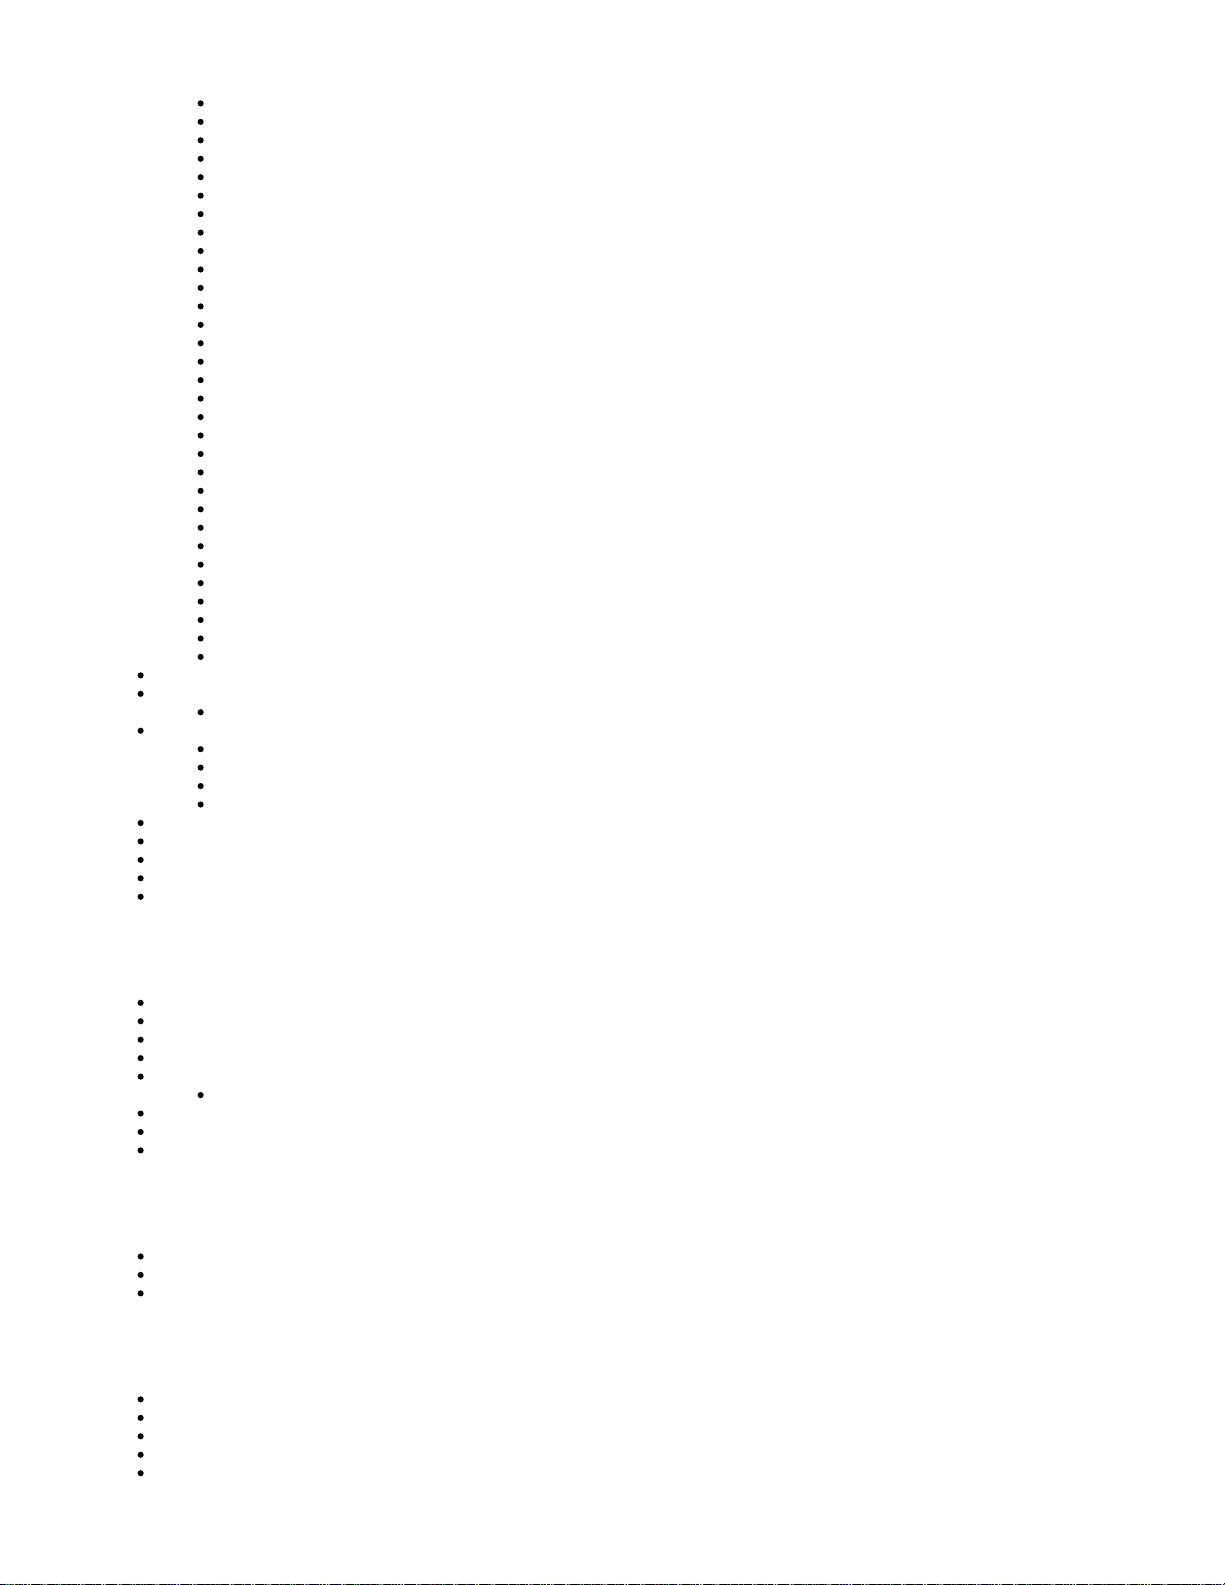
1.8.1.36 View Platform and Parts . . . . . . . . . . . . . . . . . . . . . . . . . . . . . . . . . . . . . . . . . . . . . . . . . . . . . . . . . . . . . . . . . . . . . . . 58
1.8.1.37 Wire Frame Display . . . . . . . . . . . . . . . . . . . . . . . . . . . . . . . . . . . . . . . . . . . . . . . . . . . . . . . . . . . . . . . . . . . . . . . . . . . 59
1.8.1.38 Zoom . . . . . . . . . . . . . . . . . . . . . . . . . . . . . . . . . . . . . . . . . . . . . . . . . . . . . . . . . . . . . . . . . . . . . . . . . . . . . . . . . . . . . . 60
1.8.2 8.2 Save a Build Job . . . . . . . . . . . . . . . . . . . . . . . . . . . . . . . . . . . . . . . . . . . . . . . . . . . . . . . . . . . . . . . . . . . . . . . . . . . . . . . . 61
1.8.3 8.3 Submit a Build Job . . . . . . . . . . . . . . . . . . . . . . . . . . . . . . . . . . . . . . . . . . . . . . . . . . . . . . . . . . . . . . . . . . . . . . . . . . . . . . 62

1.8.3.1 8.3.1 Remove Build Platform . . . . . . . . . . . . . . . . . . . . . . . . . . . . . . . . . . . . . . . . . . . . . . . . . . . . . . . . . . . . . . . . . . . . . 66
1.8.4 8.4 Manage Build Jobs . . . . . . . . . . . . . . . . . . . . . . . . . . . . . . . . . . . . . . . . . . . . . . . . . . . . . . . . . . . . . . . . . . . . . . . . . . . . . . 67
1.8.4.1 8.4.1 Delete Build Jobs . . . . . . . . . . . . . . . . . . . . . . . . . . . . . . . . . . . . . . . . . . . . . . . . . . . . . . . . . . . . . . . . . . . . . . . . . 68
1.8.4.2 8.4.2 Pause Build Job . . . . . . . . . . . . . . . . . . . . . . . . . . . . . . . . . . . . . . . . . . . . . . . . . . . . . . . . . . . . . . . . . . . . . . . . . . 70
1.8.4.3 8.4.3 Abort Build Job . . . . . . . . . . . . . . . . . . . . . . . . . . . . . . . . . . . . . . . . . . . . . . . . . . . . . . . . . . . . . . . . . . . . . . . . . . . 70
1.8.4.4 8.4.4 Repeat Build Job . . . . . . . . . . . . . . . . . . . . . . . . . . . . . . . . . . . . . . . . . . . . . . . . . . . . . . . . . . . . . . . . . . . . . . . . . 71
1.8.5 8.5 Printer Status . . . . . . . . . . . . . . . . . . . . . . . . . . . . . . . . . . . . . . . . . . . . . . . . . . . . . . . . . . . . . . . . . . . . . . . . . . . . . . . . . . . 72
1.8.6 8.6 Empty Waste Drawer . . . . . . . . . . . . . . . . . . . . . . . . . . . . . . . . . . . . . . . . . . . . . . . . . . . . . . . . . . . . . . . . . . . . . . . . . . . . 72
1.8.7 8.7 Shutdown Printer . . . . . . . . . . . . . . . . . . . . . . . . . . . . . . . . . . . . . . . . . . . . . . . . . . . . . . . . . . . . . . . . . . . . . . . . . . . . . . . . 73
1.8.8 8.8 Remove Part from Build Platform . . . . . . . . . . . . . . . . . . . . . . . . . . . . . . . . . . . . . . . . . . . . . . . . . . . . . . . . . . . . . . . . . . . 74
1.8.9 8.9 Shrink Compensation for VisiJet® MX Part Material . . . . . . . . . . . . . . . . . . . . . . . . . . . . . . . . . . . . . . . . . . . . . . . . . . . . . 74
1.9 09.0 Maintenance . . . . . . . . . . . . . . . . . . . . . . . . . . . . . . . . . . . . . . . . . . . . . . . . . . . . . . . . . . . . . . . . . . . . . . . . . . . . . . . . . . . . . . . 76
1.9.1 9.1 Cleaning Printer Surfaces . . . . . . . . . . . . . . . . . . . . . . . . . . . . . . . . . . . . . . . . . . . . . . . . . . . . . . . . . . . . . . . . . . . . . . . . . 76
1.9.2 9.2 Cleaning the Waste Drawer . . . . . . . . . . . . . . . . . . . . . . . . . . . . . . . . . . . . . . . . . . . . . . . . . . . . . . . . . . . . . . . . . . . . . . . 77
1.9.3 9.3 Preventive Maintenance . . . . . . . . . . . . . . . . . . . . . . . . . . . . . . . . . . . . . . . . . . . . . . . . . . . . . . . . . . . . . . . . . . . . . . . . . . 78
1.9.4 9.4 Return Printer for Repair . . . . . . . . . . . . . . . . . . . . . . . . . . . . . . . . . . . . . . . . . . . . . . . . . . . . . . . . . . . . . . . . . . . . . . . . . . 78
1.9.5 9.5 UV LED Cleaning Procedure . . . . . . . . . . . . . . . . . . . . . . . . . . . . . . . . . . . . . . . . . . . . . . . . . . . . . . . . . . . . . . . . . . . . . . . 78
1.9.5.1 9.5.1 UVLED Board Removal Procedure . . . . . . . . . . . . . . . . . . . . . . . . . . . . . . . . . . . . . . . . . . . . . . . . . . . . . . . . . . . 80
1.9.6 9.6 Cleaning MDM Areas . . . . . . . . . . . . . . . . . . . . . . . . . . . . . . . . . . . . . . . . . . . . . . . . . . . . . . . . . . . . . . . . . . . . . . . . . . . . 81
1.9.7 9.7 Changing the Charcoal Fan Filter . . . . . . . . . . . . . . . . . . . . . . . . . . . . . . . . . . . . . . . . . . . . . . . . . . . . . . . . . . . . . . . . . . . 81
1.9.8 9.8 Printhead Maintenance . . . . . . . . . . . . . . . . . . . . . . . . . . . . . . . . . . . . . . . . . . . . . . . . . . . . . . . . . . . . . . . . . . . . . . . . . . . 82
1.10 10.0 Error Messages . . . . . . . . . . . . . . . . . . . . . . . . . . . . . . . . . . . . . . . . . . . . . . . . . . . . . . . . . . . . . . . . . . . . . . . . . . . . . . . . . . . . 82
1.10.1 10.1 Build Messages . . . . . . . . . . . . . . . . . . . . . . . . . . . . . . . . . . . . . . . . . . . . . . . . . . . . . . . . . . . . . . . . . . . . . . . . . . . . . . . 82
1.10.2 10.2 Material Messages . . . . . . . . . . . . . . . . . . . . . . . . . . . . . . . . . . . . . . . . . . . . . . . . . . . . . . . . . . . . . . . . . . . . . . . . . . . . 83
1.10.3 10.3 Status and Message Lines . . . . . . . . . . . . . . . . . . . . . . . . . . . . . . . . . . . . . . . . . . . . . . . . . . . . . . . . . . . . . . . . . . . . . . 83
1.11 11.0 Troubleshooting . . . . . . . . . . . . . . . . . . . . . . . . . . . . . . . . . . . . . . . . . . . . . . . . . . . . . . . . . . . . . . . . . . . . . . . . . . . . . . . . . . . 85
1.11.1 11.1 Communication Errors . . . . . . . . . . . . . . . . . . . . . . . . . . . . . . . . . . . . . . . . . . . . . . . . . . . . . . . . . . . . . . . . . . . . . . . . . . 85
1.11.2 11.2 Head Maintenance Station Errors . . . . . . . . . . . . . . . . . . . . . . . . . . . . . . . . . . . . . . . . . . . . . . . . . . . . . . . . . . . . . . . . . 85
1.11.3 11.3 Material Feed and Waste System Errors . . . . . . . . . . . . . . . . . . . . . . . . . . . . . . . . . . . . . . . . . . . . . . . . . . . . . . . . . . . 86
1.11.4 11.4 Material Quality Guarantee Errors . . . . . . . . . . . . . . . . . . . . . . . . . . . . . . . . . . . . . . . . . . . . . . . . . . . . . . . . . . . . . . . . . 86
1.11.5 11.5 Material Waste Errors . . . . . . . . . . . . . . . . . . . . . . . . . . . . . . . . . . . . . . . . . . . . . . . . . . . . . . . . . . . . . . . . . . . . . . . . . . 86
1.11.6 11.6 Motion System Errors . . . . . . . . . . . . . . . . . . . . . . . . . . . . . . . . . . . . . . . . . . . . . . . . . . . . . . . . . . . . . . . . . . . . . . . . . . 87
1.11.7 11.7 UV Subsystem Errors . . . . . . . . . . . . . . . . . . . . . . . . . . . . . . . . . . . . . . . . . . . . . . . . . . . . . . . . . . . . . . . . . . . . . . . . . . 87
1.11.8 11.8 Vacuum Regulator Errors . . . . . . . . . . . . . . . . . . . . . . . . . . . . . . . . . . . . . . . . . . . . . . . . . . . . . . . . . . . . . . . . . . . . . . . 87
1.11.9 11.9 Power Outage . . . . . . . . . . . . . . . . . . . . . . . . . . . . . . . . . . . . . . . . . . . . . . . . . . . . . . . . . . . . . . . . . . . . . . . . . . . . . . . . 87
1.12 12.0 Finishing . . . . . . . . . . . . . . . . . . . . . . . . . . . . . . . . . . . . . . . . . . . . . . . . . . . . . . . . . . . . . . . . . . . . . . . . . . . . . . . . . . . . . . . . . 88
1.13 13.0 Projet™ Spare Parts List . . . . . . . . . . . . . . . . . . . . . . . . . . . . . . . . . . . . . . . . . . . . . . . . . . . . . . . . . . . . . . . . . . . . . . . . . . . . . 88
1.13.1 13.1 Consumables and Replacement Modules . . . . . . . . . . . . . . . . . . . . . . . . . . . . . . . . . . . . . . . . . . . . . . . . . . . . . . . . . . . 88
1.14 14.0 Other Documents . . . . . . . . . . . . . . . . . . . . . . . . . . . . . . . . . . . . . . . . . . . . . . . . . . . . . . . . . . . . . . . . . . . . . . . . . . . . . . . . . . 88
1.14.1 14.1 Parts Finisher User Guide . . . . . . . . . . . . . . . . . . . . . . . . . . . . . . . . . . . . . . . . . . . . . . . . . . . . . . . . . . . . . . . . . . . . . . . 89
1.14.2 14.2 Material Safety Data Sheets (MSDS) . . . . . . . . . . . . . . . . . . . . . . . . . . . . . . . . . . . . . . . . . . . . . . . . . . . . . . . . . . . . . . 89
1.14.3 14.3 Projet™ Quick Reference Guide . . . . . . . . . . . . . . . . . . . . . . . . . . . . . . . . . . . . . . . . . . . . . . . . . . . . . . . . . . . . . . . . . . 89
1.14.4 14.4 Facility Requirements Guide . . . . . . . . . . . . . . . . . . . . . . . . . . . . . . . . . . . . . . . . . . . . . . . . . . . . . . . . . . . . . . . . . . . . . 89
1.14.5 14.5 VisiJet® Material Handling and Post-Processing Guide . . . . . . . . . . . . . . . . . . . . . . . . . . . . . . . . . . . . . . . . . . . . . . . . 89
1.15 15.0 Service and Support . . . . . . . . . . . . . . . . . . . . . . . . . . . . . . . . . . . . . . . . . . . . . . . . . . . . . . . . . . . . . . . . . . . . . . . . . . . . . . . . 89
1.15.1 15.1 Contacts . . . . . . . . . . . . . . . . . . . . . . . . . . . . . . . . . . . . . . . . . . . . . . . . . . . . . . . . . . . . . . . . . . . . . . . . . . . . . . . . . . . . 89
1.16 16.0 Online Help . . . . . . . . . . . . . . . . . . . . . . . . . . . . . . . . . . . . . . . . . . . . . . . . . . . . . . . . . . . . . . . . . . . . . . . . . . . . . . . . . . . . . . . 90
1.16.1 16.1 Frequently Asked Questions (FAQ) . . . . . . . . . . . . . . . . . . . . . . . . . . . . . . . . . . . . . . . . . . . . . . . . . . . . . . . . . . . . . . . 90
1.16.2 16.2 Getting Help . . . . . . . . . . . . . . . . . . . . . . . . . . . . . . . . . . . . . . . . . . . . . . . . . . . . . . . . . . . . . . . . . . . . . . . . . . . . . . . . . 91
1.16.3 16.3 Part Material . . . . . . . . . . . . . . . . . . . . . . . . . . . . . . . . . . . . . . . . . . . . . . . . . . . . . . . . . . . . . . . . . . . . . . . . . . . . . . . . . 91
1.16.4 16.4 Printer Hardware and Installation . . . . . . . . . . . . . . . . . . . . . . . . . . . . . . . . . . . . . . . . . . . . . . . . . . . . . . . . . . . . . . . . . 92
1.16.5 16.5 Facility Requirements . . . . . . . . . . . . . . . . . . . . . . . . . . . . . . . . . . . . . . . . . . . . . . . . . . . . . . . . . . . . . . . . . . . . . . . . . . 92
1.17 17.0 Glossary of Terms . . . . . . . . . . . . . . . . . . . . . . . . . . . . . . . . . . . . . . . . . . . . . . . . . . . . . . . . . . . . . . . . . . . . . . . . . . . . . . . . . . 92
1.18 18.0 Index . . . . . . . . . . . . . . . . . . . . . . . . . . . . . . . . . . . . . . . . . . . . . . . . . . . . . . . . . . . . . . . . . . . . . . . . . . . . . . . . . . . . . . . . . . . . 93

Table of Contents
01.0 Introduction
1.1 About this Guide
1.2 Copyright
1.3 Useful Documents
1.4 What's Inside
1.5 Features
1.6 Packaging
02.0 Safety Symbols & Definitions
03.0 Safety Guidelines
3.1 General
3.2 Electrical
3.3 Ultraviolet (UV) Light
04.0 Part Material Safety
4.1 Disposal
4.2 Health Hazards
4.3 Material Handling
4.4 Personal Protection Equipment
4.5 Regulatory Information
4.6 Spilled VisiJet® Material
4.7 Waste Removal
4.8 Material Storage
05.0 System Requirements
06.0 Familiarization
6.1 System Functions
07.0 Printer Setup
7.1 Power on Printer
7.2 Install & Remove Material Bottles and Build Platform
7.2.1 MDM Installation
7.3 Install and Run ProJet™ 3-D Modeling Client Software
7.4 Create STL File(s) to Build
7.5 Submit Test Build
7.6 Build Demo
08.0 Operations
8.1 Print Preview Overview
8.1.1 Add Part
8.1.2 Part Selections, Translation,Rotation
8.1.3 Submit Job
8.1.4 Trackball View
8.1.5 Triangle Selection
Align Parts Facings
Auto Part Placement

Back View
Bottom View
Bounding Box Display
Copy
Delete
De-Select all
De-Select all Triangles
Display Support Creation Surface
Estimate Build Time
Front View
Help Topics
Isometric View
Mirror
Right View
Rotate
Scale
Scale inch to mm
Scale mm to inch
Select all
Selected Part Information
Selected Parts
Shaded Display
Top View
Translate
Undo
Undo Zoom
Verify
View All Parts
View Platform and Parts
Wire Frame Display
Zoom
8.2 Save a Build Job
8.3 Submit a Build Job
8.3.1 Remove Build Platform
8.4 Manage Build Jobs
8.4.1 Delete Build Jobs
8.4.2 Pause Build Job
8.4.3 Abort Build Job
8.4.4 Repeat Build Job
8.5 Printer Status
8.6 Empty Waste Drawer
8.7 Shutdown Printer
8.8 Remove Part from Build Platform
8.9 Shrink Compensation for VisiJet® MX Part Material
09.0 Maintenance
9.1 Cleaning Printer Surfaces
9.2 Cleaning the Waste Drawer
9.3 Preventive Maintenance
9.4 Return Printer for Repair
9.5 UV LED Cleaning Procedure
9.5.1 UVLED Board Removal Procedure
9.6 Cleaning MDM Areas
9.7 Changing the Charcoal Fan Filter
9.8 Printhead Maintenance
10.0 Error Messages
10.1 Build Messages
10.2 Material Messages
10.3 Status and Message Lines
11.0 Troubleshooting
11.1 Communication Errors
11.2 Head Maintenance Station Errors
11.3 Material Feed and Waste System Errors
11.4 Material Quality Guarantee Errors
11.5 Material Waste Errors

11.6 Motion System Errors
11.7 UV Subsystem Errors
11.8 Vacuum Regulator Errors
11.9 Power Outage
12.0 Finishing
13.0 Projet™ Spare Parts List
13.1 Consumables and Replacement Modules
14.0 Other Documents
14.1 Parts Finisher User Guide
14.2 Material Safety Data Sheets (MSDS)
14.3 Projet™ Quick Reference Guide
14.4 Facility Requirements Guide
14.5 VisiJet® Material Handling and Post-Processing Guide
15.0 Service and Support
15.1 Contacts
16.0 Online Help
16.1 Frequently Asked Questions (FAQ)
16.2 Getting Help
16.3 Part Material
16.4 Printer Hardware and Installation
16.5 Facility Requirements
17.0 Glossary of Terms
18.0 Index
01.0 Introduction
Thank you for purchasing a ProJet™ 3-D Printer System. We pride ourselves in our ability to offer customers three dimensional modeling
solutions. The 3D Systems team is confident your system will provide many years of service.
1.1 About this Guide
1.2 Copyright
1.3 Useful Documents
1.4 What's Inside
1.5 Features
1.6 Packaging
1.1 About this Guide
This guide describes how to create finished parts using the ProJet™ 3-D Printer. It also provides user's with an understanding of key features,
system requirements, and operating procedures.
Should additional questions arise, consult Section of this guide. If further assistance is required, contact 3D Systems11.0 Troubleshooting
or visit Web Site.Technical Support http://www.3dsystems.com/

1.2 Copyright
© 2012 by 3D Systems, Inc. All rights reserved. This document is subject to change without notice. This document is copyrighted and contains
proprietary information that is the property of 3D Systems, Inc. The licensed user, in the name of whom this document is registered (the "Licensed
User") does not have the right to copy, reproduce, or translate this document in any way or to any media without the prior written consent of 3D
Systems, Inc. No copies of the document may be sold or given to any person or other entity.
ProJet™ is a trademark and the 3D logo and VisiJet® are registered trademarks of 3D Systems, Inc.
Improvements
3D Systems may (but shall not be obligated to) make improvements to this document from time to time. However, the Licensed User
acknowledges that at any time after the expiration of the date of issuance, 3D Systems may institute a periodic charge or fee payable by the
licensed user in return for ongoing receipt of improvements. It is the responsibility of the licensed user to provide 3D Systems with current
information as to its name and address. The licensed user also undertakes to notify 3D Systems promptly in the event that it considers any of the
data contained in this document to be incomplete or erroneous in any respect, in connection with licensed user's particular use or generally.
FCC Notice
This equipment has been tested and found to comply with the limits for a class "A" digital device, pursuant to Part 15 of the FCC Rules. These
limits are designed to provide reasonable protection against harmful interference when the equipment is operated in a commercial environment.
This equipment generates, uses, and can radiate radio frequency energy and, if not installed and used in accordance with the instruction manual,
may cause harmful interference to radio communications. Operation of this equipment in a residential area is likely to cause harmful interference
in which case the user will be required to correct the interference at their expense.
Changes or modifications not expressly approved by 3D Systems could void your authority to operate this equipment.
Limitations of Warranty and Liability
This information is provided by 3D Systems for the convenience of its customers. It is believed to be reliable, but NO REPRESENTATIONS,
GUARANTEES, OR WARRANTIES OF ANY KIND ARE MADE AS TO ITS ACCURACY, FITNESS FOR A PARTICULAR USE, OR THE
RESULTS TO BE OBTAINED THEREFROM. The information is based in whole or in large part on laboratory work and does not necessarily
indicate performance in all conditions. Notwithstanding any information provided by 3D Systems or its affiliates, the customer remains fully
responsible for determining which federal, state, or local laws or regulations, or industry practices are relevant to activities in which it engages, as
well as assuring that those laws, regulations, or standards are complied with under actual operating conditions, and 3D Systems undertakes no
responsibility in these areas.
IN NO EVENT WILL 3D Systems BE RESPONSIBLE FOR DAMAGES OF ANY NATURE, INCLUDING SPECIAL OR CONSEQUENTIAL
DAMAGES, RESULTING FROM THE USE OF OR RELIANCE UPON THIS INFORMATION. THE CUSTOMER ASSUMES ALL RISK
RESULTING FROM THE USE OF THIS INFORMATION. Customer use of the materials that follow is an acknowledgment of its agreement to the
foregoing. Any customer not wishing to be bound should return this material to 3D Systems. Nothing contained herein is to be considered as
permission, recommendation, nor as an inducement to practice any patented invention without permission of the patent owner.
1.3 Useful Documents
The documents listed listed in this section, will assist you in finding solutions to questions that may arrise during operation. To access documents,
click on their title.
: Run the client software, select in the modelers window or in Build Preview windowProJet™ 3-D Modeling Client Online Help Help > Help Topics
to launch the client online help. The online help provides detailed instructions on how to use the client software to setup, run, and manage build
jobs.
: Download the quick reference for advice on how to operate the control panel functions, how to load /ProJet 5000 Quick Reference Guide.pdf
remove material bottles, and how to run a test build.
This document has everything needed to guide you in safely handling and disposing ofVisiJet® Material Handling and Post-Processing Guide:
VisiJet® material, including relevant regulatory guidelines for material disposal worldwide. It also provides information on how to clean parts once
the build process is completed.
. This guide provides the dimensional data that is required when the 3D System's authorized FieldProjet™ 5000 Facility Requirements Guide
Service Engineer or your authorized servicing reseller installs the printer.
VisiJet® Material Safety Data Sheets (MSDS's). Ensure that everyone who handles VisiJet™ materials is familiar with MSDS's and follows the
safety guidelines. To obtain extra copies of the MSDS / SDS, click on . to downloadhttp://www.3dsystems.com/services/materials/index.asp
MSDS/SDS.
Radio Frequency Transmission
This product generates 13.56 MHz using an Inductive Loop System as a Radio Frequency Identification device (RFID). This RFID device
complies with the requirements specified in FCC Part 15, Industry Canada RSS-210, European Council Directive 99/5/EC, and all applicable local
laws and regulations.
Operation of this device is subject to the following two conditions: (1) this device may not cause harmful interference, and (2) this device must
accept any interference received, including interference that may cause undesired operation.
The device referenced in this guide contains transmitter, FCC ID: 2ADGF-SKTKM1 IC: 12666A-SKTKM1. Access to the transmitter for service
technicians is available through common enclosure access methods including use of common tools and removal of covers.
Note: Changes or modifications to this equipment not specifically approved by 3D Systems may void the user's authority to operate this
equipment.

1.4 What's Inside
Safety: Read prior to handling VisiJet® materials or operating the printig system. The safety sections inform you of handling the material properly
and avoid damage and injury when operating the printer. For more detailed material safety information, refer to .VisiJet® Material Handling Guide
System Requirements: Provides electrical requirements prior to plugging in your modeler for operation. For more detailed facility requirements
information, see .ProJet™ 5000 Facility Requirements Guide
Familiarization: Provides a brief description of the printing system.
Printer Setup: Provides information on preparing the 3-D printer for builds using the software, and how to send test and demo builds to the
printer from your computer. Also; refer to your online help for software instructions.
Operations: Describes loading and running the printer; start and stop build jobs; monitor and control build jobs; unload build parts and disposing
waste material.
Error Messages: Defines error messages you may see on the printer's LCD and provide the actions to take to correct the problem.
Finishing:Provides information on finishing models.
Maintenance: List printer maintenance procedures which must be done to ensure high part yield and low printer down time. Semi-annual
preventive maintenance requires a certified 3D Systems Technical Support Representative.
Troubleshooting: If problems occur with the printer, look for solutions in this section first. It describes some common problems which can occur
and suggests corrective actions.
Technical Support: List of contact numbers of sale and support personnel for your printer system.
1.5 Features
Dual Mode
The new ProJet™ 5000 3-D Production System, features two build styles to meet a variety of model making applications.
The High Definition (HD) Mode allows the
user rapid model making capability on a full
platform size of 550 x 393 x 399 mm, (21.6 x
15.4 x 15.7 inches), (x,y,z). This mode
produces high quality parts for concept models,
verification designs and patterns for casting.

The Ultra High Definition (UHD) Mode allows
the users to build extremely high resolution
parts with exceptional surface finish and
superior accuracy. The platform size in UHD
mode is 550 x 393 x 399 mm, (21.6 x 15.4 x
15.7 inches), (x,y,z). Models build in UHD mode
are typically used for show models, fit testing
and direct manufacturing using patterns for
investment casting of fine detailed and high
precision components.
Part Stacking and Nesting
The new ProJet™ 3-D Production System, features part stacking and nesting capability in both build modes.
Stacking: The user can now utilize the entire
build volume by stacking parts vertically in the
z-direction to fill up the entire build envelop with
parts. The user can control the space between
layers to minimize support material usage and
build time. Now, hours can be saved by
stacking parts and submitting single, long builds
overnight and weekends

Nesting capability allows parts to be placed
within the boundaries of one another but not
overlapping the part structure itself. Nesting
also allows the user to fully utilize the Y and X
axis of the build platform.
1.6 Packaging
Packaging
Do not damage or discard any packaging materials or crate. If the printer needs to be returned to the manufacturer, it should be shipped in it's
original packaging and crate. If other method of packaging is used, the customer will be responsible for any shipping damages that may occur.
Only Certified/Qualifed Service Personnel can install the 3-D printer.
02.0 Safety Symbols & Definitions

This symbol designates the accompanying texts or figures as either a or a .CAUTION WARNING
Caution: Indicates something may happen that could cause loss of data, damage to equipment, or personal injury.
WARNING:Indicates a hazard to both equipment and personnel that may be in the immediate area.
This symbol is used to warn of the presence of potentially High voltage electricity is accessible in theHAZARDOUS VOLTAGE.
vicinity of this sign or behind the access panel. High voltage can cause severe burns or death. Access panels are for service only
and should be opened only by certified service personnel or trained maintenance personnel.
is accessible in the vicinity of this sign or behind the panel. Radiation can cause eye injury. Access panels Invisible UV radiation
are for service only and should be opened only by certified service personnel. Use UV radiation eye and skin protection when
servicing with "bypass engaged."
is accessible in the vicinity of this sign or behind the access panel. Avoid contact. Hot surfaces can cause severeA hot surface
burns. Access panels are for service only and should be opened only by certified service personnel or trained maintenance
personnel.
: Indicates that skin or eye irritation could result while exposed to a chemical composition.Harmful Irritant Warning
When accompanied by the word the text and symbol are meant to call attention to a practice whose implementation can"NOTE",
save time or prevent subsequent inconvenience to the user.
03.0 Safety Guidelines
Before using the printer, your company should have a safety program in place. The safety program should:
Label and point out hazardous equipment, materials, and procedures.
Explain what to do in case of an emergency.
Provide information about hazards of equipment and materials in the form of Material Safety Data Sheets (MSDSs). The MSDSs are
provided with all materials supplied by 3D Systems.
3.1 General
3.2 Electrical
3.3 Ultraviolet (UV) Light
3.1 General
The printer is designed with built in safety features. Improper use can lead to malfunctions that can cause injury to personnel. To prevent unsafe
operation, the printer will automatically shut down if unsafe conditions are detected.
Follow these safety guidelines when operating the printer:
Read and follow all printer instructions.
Follow all safety rules and heed all cautions and warnings in this guide.
Do not attempt to open chamber door while build in progress.
Do not use any material without reviewing the Material Safety Data Sheets (MSDS).
Dress power and communication cables behind printer to prevent tripping.
Do not attempt to access, service, or adjust printer components. Do not attempt to perform any maintenance procedures unless
specifically trained to do so.
Do not operate without all safetys and guards in place and functional.
Operators are trained to operate system and perform all necessary tasks to create a part.
Certified service personnel are those who completed the 3D Systems service training package and were certified to perform service tasks.
Certification may occur at different levels, and service providers should only perform tasks they are authorized and certified to complete.
Do not ignore warning signs posted during printer service operations.
If an error message appears on the printer's LCD refer to Section within this guide before resuming operation.10.0 Error Messages

To prevent potential skin-irritation and sensitization due to contact with waste material, follow all guidelines within .Build Material Safety
To prevent pinch and crush injuries to the hand, use caution when replacing platform inside the build chamber.
3.2 Electrical
WARNING: Hazardous voltage exists inside the printer. Injury or death from electrical shock can result if you remove the
printer's external panels. Panels should only be removed for service by trained and certified 3D Systems Technical
Support personnel or your servicing reseller.
To prevent electrical shock, the printer will not operate unless external panels are installed. Verify facility's electrical
service rating before connecting power to the printer.
NOTE: This equipment is not designed for connection to an IT system.
3.3 Ultraviolet (UV) Light
CAUTION: Hazardous UV radiation exists inside the printer's build chamber during build job. Eye injury or blindness
. If build job is running, abort build jobcan result if the chamber door is opened while a build job is in progress
before attempting to open chamber door. To prevent eye injury, ultraviolet (UV) light inside the chamber will not
operate when chamber door is open. When closed, the chamber door keeps UV radiation from escaping. The
chamber door remains locked if build job is paused.
04.0 Part Material Safety
Users of the printer should be informed of potential hazards of part material prior to working with a printer, or performing duties which may result
in exposure to uncured part material, such as removal and disposal of empty material bottles and / or waste bag.
4.1 Disposal
4.2 Health Hazards
4.3 Material Handling
4.4 Personal Protection Equipment
4.5 Regulatory Information
4.6 Spilled VisiJet® Material
4.7 Waste Removal
4.8 Material Storage
4.1 Disposal
Disposal of part material produced by the printer is not subject to regulations of any known agency worldwide. Disposable bag filledfully cured
with VisiJet® support and part materials and the material bottles may be disposed of according to your local codes.
Uncured part material waste is classified as regulated, and in some areas hazardous requiring special packaging, transportation, and disposal.
The disposal of partially cured or uncured part material must comply with all local, state, and federal environmental safety regulations. Applicable
part material "waste" include bottles (empty or full) and waste bag. Any cleaning materials used to clean up spilled uncured part material should
be disposed of in compliance with local, state, and federal environmental safety regulations.

To find out facility disposal requirements, contact a local waste disposal provider. (Local environmental regulatory agency should have a list of
qualified providers.) You will need to give disposal service provider a copy of the part material MSDS, and possibly other forms included in the
Appendix of your , such as Waste Profile Worksheet and SNUR (Significant New Use Regulation - U.S. only).VisiJet® Material Handling Guide
A report will be provided, indicating disposal requirements, as well as a quotation for regularly scheduled pickups. If assistance is needed locating
a waste disposal provider, or completing a waste disposal form, contact 3D Systems; Hotline.Technical Support
3D Systems assumes no liability or responsibility for proper disposal of uncured part material. Proper disposal of uncured material is the sole
responsibility of the user.
4.2 Health Hazards
Irritant
Caution: Uncured VisiJet® part material is
a sensitizer. Skin or eye irritation could
occur when exposed to the chemical
composition of the material.
Any chemical may exert harmful effects if contacts or enters the body. VisiJet® part material is
a sensitizer and irritant.
Skin Sensitization: Uncured VisiJet® part
material is a sensitizer. Skin or eye irritation
could occur when exposed to the chemical
composition of the material.
Uncured material is a sensitizer, and can cause allergic reactions if contacts skin without
protective gloves. Refer to for more information. To avoidpersonal protection equipment
sensitization, do not allow uncured material to contact skin. Consult the MSDS for specific
information about the sensitization potential.
Ingestion: Uncured VisiJet® part material is
toxic if ingested. Uncured material is toxic if ingested. Uncured material must not be present where food and
drink are *stored, prepared, or consumed and not ingested. After handling materials, wash
hands with soap and water before consuming or preparing food.
Inhalation: Under normal operation, inhalation is not an expected route of entry.
Contact With Uncured Material
Employees should be alerted to clean and rinse off any contacted surface promptly in order to prevent further contamination. Ensure a convenient
washroom location is provided with access to soap, water, and disposable paper towels.
Handling Finished Parts
Finished (cured) parts can be handled or disposed of the same as standard household plastic products. VisiJet® parts are not recyclable. VisiJet®
materials are not intended for, and cannot be used for medical implant, or food or drink handling applications.

Exposure control
The printer has a variety of built-in engineering controls which are designed to prevent operator exposure. Do not try to change or disable these
controls.
Appropriate hygienic practices should be followed, including washing with soap and water before meals, breaks, smoking, applying cosmetics,
using toilet facilities, and after work.
4.3 Material Handling
Emergency (MSDS)
Chemtrec USA ; Europe(800) 424-9300 +1-703-527-3887
Packaging Inspection
VisiJet® materials are supplied in bottles. These bottles are packaged with cardboard packing material inside the shipping carton. Upon receipt of
material shipments, inspect cardboard carton exterior for signs of damage and leakage. If leakage is observed, DO NOT open carton, contact 3D
Systems' Hotline. If no leakage is observed, store shipping carton until material is used. (VisiJet® MX is depicted in the photo)Technical Support
Building
If uncured material is observed on the part or platform after build, this is an abnormal condition, and is an indication the printer requires servicing
by 3D Systems. Assume any liquid or paste-like material is part material. Do not directly touch uncured part material without protective gloves.
Discontinue use of the printer, pending service by a 3D Systems Technical Support Representative or your servicing reseller.
Flammability and Combustibility
Do not expose materials to heat at or above 230°F (110°C), flames, sparks, or any source of ignition. (Though the U.S. Department of
Transportation does not consider VisiJet® materials a "flammability hazard," they do classify them "combustible" based on flash points.) For more
information on VisiJet® material flash points and combustibility, see .VisiJet® Material Handling Guide
4.4 Personal Protection Equipment
Skin Protection: When removing and disposing of the part material bottles and waste bag, exposure to uncured part
material may occur To prevent contact, wear chemically resistant protective gloves - nitrile or neoprene gloves are
recommended. Do not use Latex gloves.

Eye protection: In the event of a leak or spill of uncured part material, wear safety glasses with side shields to provide
eye protection.
Respiratory protection: Because of the printer's built in engineering controls, respiratory protection is not necessary
during normal operation. A NIOSH-approved (or equivalent) dust mask is recommended when dry sanding cured
material parts.
4.5 Regulatory Information
VisiJet® support material has no known regulatory requirements.
In the U.S., material is subject to special EPA disposal regulations and record-keeping requirements. "Uncured VisiJet® material"uncured
includes any part material bottles (empty or full), and waste bag; about half of which is uncured part material. For complete disposal regulation
details, see the .VisiJet® Material Handling Guide
In the U.S., the following disposal records must be kept for five years after the date of disposal:
The quantity of part material received (new or "virgin").
The name and address of the shipping location (the "responsible party" - generally your waste disposal service provider).
The quantity of part material shipped (disposed). For further information, see the VisiJet® Material Handling Guide.
For assistance, contact 3D Systems .Technical Support
4.6 Spilled VisiJet® Material
Spills of material are HIGHLY UNLIKELY, and should NOT occur in normal operation of the printer.
The first priority is to protect users from inadvertently touching material. Spills of support material can be cleaned without use of protective gear,
and disposed of as office trash. Handling uncured part material requires use of gloves and other to ensure nopersonnel protective equipment
direct contact with uncured part material. If you don't know which material it is, assume it to be uncured part material, and handle accordingly -
with the recommended personal protective equipment.
Promptly clean up spilled material, dispose of clean up materials and waste material per local regulatory requirements. Discontinue use of the
printer, and contact 3D Systems for a service visit to determine and repair the source of leakage.Technical Support
Small spills of uncured liquid part material can be cleaned up using disposable towels, non-reusable rags, or absorbing materials such as
sawdust, clay, diatomaceous earth, or activated charcoal. If spilled material is hot (liquid), wait until cools and gels before wiping up. After wiping
up the spill, wipe surface with denatured or isopropyl alcohol and clean thoroughly with soap and water.
Consider avoiding placement of the printer over carpeting, or consider use of barriers to avoid the possibility of carpet damage if inadvertant spills
were to occur.
Advise service provider involved, of the spilled material, and provide MSDS and other material information prior to contact with the material.
Advise them of disposal requirements for part material and clean-up products if part material (uncured) is the spilled material. Use of heat above
65°C (149°F) may prove helpful in removing spilled part material from carpet.
Tools contaminated with part material should be cleaned prior to reuse. Solvents such as denatured alcohol or Iso-Propyl Alcohol (IPA), are
normally required to clean equipment and tools. Wash with soap and water to remove any traces of excess part material or solvent. Contact
solvent suppliers for information on proper handling of solvents if used for clean-up.
4.7 Waste Removal
Caution: Uncured part material is a sensitizer. Skin or eye irritation could occur when exposed to the chemical composition
of the material.
Wear protective gloves Before removing any waste product from the printer. Be careful not to spill, drop, or expose others to these materials -

particularly part material bottles or waste bag. Dispose of all waste material appropriately per local regulatory requirements.
Open waste drawer.
Remove the waste bag from the waste bag holder by pushing the top frame in and rolling the bag that is lap over the holder upward.
Seal bag and dispose according to your local regulatory guidelines.
Replace new waste bag by reversing the previous process. Close waste drawer after waste bag is installed.
4.8 Material Storage
PART MATERIAL SUPPORT MATERIAL
VisiJet® MX VisiJet® S300
- 1 yr.Shelf life - 2 yr.Shelf life
- Cool, dry area with adequate ventilationClimate - Cool, dry area with adequate ventilationClimate
- 60°F (16°C) to 80°F (27°C)Temperature Range - 60°F (16°C) to 80°F (27°C)Temperature Range
- 95°F (35°C)Maximum Storage Temp - 95°F (35°C)Maximum Storage Temp
- No direct sunlight, heat, flames, or UVEnvironmental Conditions
energy. - No direct sunlight, heat, flames, or UVEnvironmental Conditions
energy.

NOTE: For optimal results, keep stored cartons closed, and do not open until bottle is ready for use.
Always check bottle's expiration date before loading. Do not load bottles into printer if they are about to expire. When printer detects an expired
bottle, it aborts the build and rejects the bottle if the expiration date has expired for support material or more than one year past the expiration
date for part material.
NOTE: When storing material bottles that have been used but still have materials in
them, do not lay the bottles on their side when storing; stand bottles in the upright
position. Also, in the case where used bottles with materials are removed from the MDM
and are still warm, it must be stored with the cap vented. If the warm bottle is not
vented, the wax will contract during cooling and the bottle's bottom may become flat
which will prevent reengagement in the MDM.
Support material bottles must be loaded in the side material delivery module. The part material bottles must be loaded in the materialleft right
delivery module. Before loading material bottles into the printer, inspect bottles for signs of damage or leakage. Do not load a damaged or leaking
bottle. Dispose of them according to local regulations.
05.0 System Requirements
Power Rating
Country Voltage Frequency Amps (A) Phase Power Cord
France 200-240 VAC 50 Hz 15 A single P/N 21684-101-XX
Germany 200-240 VAC 50 Hz 15 A single P/N 21684-101-XX
Hong Kong 200-240 VAC 50 Hz 15 A single P/N 21684-111-XX
Italy 200-240 VAC 50 Hz 15 A single P/N 21684-101-XX

Japan 115-127 VAC
194-240 VAC 50/60 Hz
50/60 Hz 20 A
15 A single
single P/N 23417-802-XX
P/N 316262-00
Switzerland 200-240 VAC 50 Hz 15 A single P/N 21684-107-XX
United Kingdom 200-240 VAC 50 Hz 15 A single P/N 21684-105-XX
USA 115-127 VAC
194-240 VAC 60 Hz
60 Hz 20 A
15 A single
single P/N 23417-802-XX
P/N 316262-00
06.0 Familiarization
The ProJet® 3-D Printer is a multi-jet-printing type system. The solid imaging printer produces plastic prototype parts from 3D solid
Computer-Aided Design (CAD) and through the ProJet Client Software. The parts are generated in a rapid prototyping (RP) environment. The
primary features are the operator panel, build chamber, material delivery systems, and waste drawer.
The three dimensional solid parts built by the printer consist of two materials (support material and part material). The support material is a wax
based material providing adhesion to build platform, as well as, providing material used to produce supports required to build the model.

The part material used to build parts is an ultraviolet (UV) curable material. After a layer of material is deposited in the build chamber, the part is
exposed to a UV flash lamp. The UV energy is absorbed by the material converting the liquid build material to a solid polymer. When the build is
complete the part (consisting of the two materials) is adhered to the build platform by means of the support material.
The material is delivered in a 2kg. plastic bottle and are placed in the machine's material delivery module (MDM). Support material modules are
located on the left side of the machine and the part material modules are located on the right side of the machine.
Waste Path, HMS Cleaning & Planerization
A vacuum system draws the waste from the head maintenance and planerization operations to a waste tank. The waste tank is periodically
discharged into a waste bag for disposal. A curing light resides above the bag to cure the top layer of material in the bag.
After the build is complete, the platform and the part are removed. A secondary operation, known as finishing, is required to provide a finish/clean
part. For cleaning and finishing instructions, refer to the .VisiJet® Material Handling
6.1 System Functions
The instructions use special text formats to highlight menu commands, keys on the keyboard, operator panel buttons, and text on the operator
panel display.
Menus: Menu names and menu options are capitalized in boldface text. Instructions for selecting menu options will appear as described:
"Select ." This means "select (click or highlight) the , then select on the menu.Menu>Option Menu Option
Keys: Keyboard key names are capitalized; for example, "Press the Enter key."
Buttons: Command buttons on the modeler's operator panel are in boldface upper case text; for example, "Press the button." TheONLINE
command buttons are: , , , , , , and .MENU LIGHT PAUSE ONLINE YES NO ABORT
Display
:Text: Text on the printer's display appears in uppercase in this guide; for example, "When the display shows ? , pressPAUSE JOB Y/N
.YES

1.
2.
3.
07.0 Printer Setup
To prepare and build part files, connect your PC and printer to the network. For additional information refer to the Client Workstation
in the Facility Requirements Guide.Requirements
Component Type Software Requirements
PC XP Professional, Vista, Windows 7
7.1 Power on Printer
7.2 Install & Remove Material Bottles and Build Platform
7.2.1 MDM Installation
7.3 Install and Run ProJet™ 3-D Modeling Client Software
7.4 Create STL File(s) to Build
7.5 Submit Test Build
7.6 Build Demo
7.1 Power on Printer
Warning: Read and follow all safety guidelines in Electrical Safety. Ignoring these guidelines could result in death, bodily
injury, or printer damage due to electrical shock or fire.
Confirm power source is appropriate for use prior to connection.
Warning: Verify printer's rear panel power switch is OFF. When connecting the power with switch on can damage the
printer and cause bodily injury or death due to sudden, unexpected mechanical motion.
Plug printer's power cord into printer's rear panel socket. Plug power cord into a grounded power outlet.
Place switch on the rear of printer to the ON position.
Wait 4 hours for printer to warm up before pressing to start a build job.ONLINE
Jobs can not be submitted to the printer while it is warming up.
7.2 Install & Remove Material Bottles and Build Platform
Material Bottles

1.
2.
3.
4.
5.
6.
The printer has up to four material delivery modules for part materials and up to four material delivery modules for support materials. The support
delivery modules are located on the left side and the part delivery modules are located on the right side of the printer. Each delivery module holds
one (1) bottle of material.
NOTE: Before handling the part material bottle, read the Material Safety Data Sheet (MSDS.
Unpack bottles and the MSDS/SDS Sheet from cartons.
Open left and/or right material delivery doors. Pull material
delivery module (MDM) handle down and out to open.
Install bottle into the MDM; press bottle down until a click
sounds.
To ensure that bottle is locked in place, gently pull on bottle. If
bottle is loose, press bottle down to ensure it is secured in MDM.
Loosen bottle cap 1/2 to 3/4 turn counterclockwise to allow the
bottle to vent.
Before removing bottle from the MDM, re-tighten bottle cap to
prevent spillage. To remove bottle, open material delivery
module and press release latch down and lift bottle out of
module.
Build Platform
Table of contents