3DTALK DF100 User manual

Jiangsu Ouring 3D Technology co.,Ltd
User Guide of 3DTALK DF100
Version: V3.0

Jiangsu Ouring 3D Technology co.,Ltd
1
Catalogue
1. Product Description.................................................................. 3
2. Product View............................................................................... 5
3. Printer Preparation.................................................................. 12
4. Software introduction.............................................................20
5. Printing Process.......................................................................37
6. Resin vat release film replacement instruction.............. 39
7. Printer use instruction........................................................... 41
8. Warranty..................................................................................... 43

Jiangsu Ouring 3D Technology co.,Ltd
2
1. Product Description
General
3DTALK-DF100 series printer is a high-tech digital 3D resin printer developed
and produced by Jiangsu Ouring 3D Technology Co., Ltd. (referred to as
Ouring). Users of 3DTALK-DF100 are advised to read the product manual
carefully before start. Ouring reserves all rights. This manual is subject to
upgrade without prior notice.
Precautions
Note: Do not allow children to operate the printer without adult
supervision to avoid injury.。
Note: The printer should be placed on a horizontal table to avoid falling
or causing the resin flowing out from the vat.
Note: Do not place the printer in a damp or dusty environment, such as a
bathroom or transportation area.
Note: Please place and use the printer in a well ventilated environment.
A small amount of non-toxic odor will be produced during printing.
Having a well-ventilated area will ensure a more comfortable
environment
Note: Please lower the cabin door during printing. Do not use a metal
blade to clean the resin vat.
Note: To ensure the maximum print quality, please use original resin.
Note: Wear appropriate protective printer to avoid contact with resin. For
example: goggles, masks, protective gloves.
Note: Do not pour waste resin into the bottle and sink to avoid
contaminating the intact resin in the bottle and clogging the sewer,
please place the waste resin in a plastic bag and discard it in the sun
after cured.
Note: For unrecoverable problems, please contact the factory after-sales
staff or sales representative.
Jiangsu Ouring 3D Technology co.,Ltd
3
Warning: Do not place objects on the top of the printer to avoid falling
into the printer and causing printing problems and safety hazards.
Warning: Keep the printer, resin, and alcohol away from fire.
Warning: Please use the power cord that comes with the printer, and
ensure that the power supply voltage is stable. The live, neutral, and
ground wires are properly connected properly, otherwise the printer may
be damaged.
To ensure safety, kindly operate the printer carefully. Read and follow all safety
precautions described in the precautions.
Jiangsu Ouring 3D Technology co.,Ltd
4
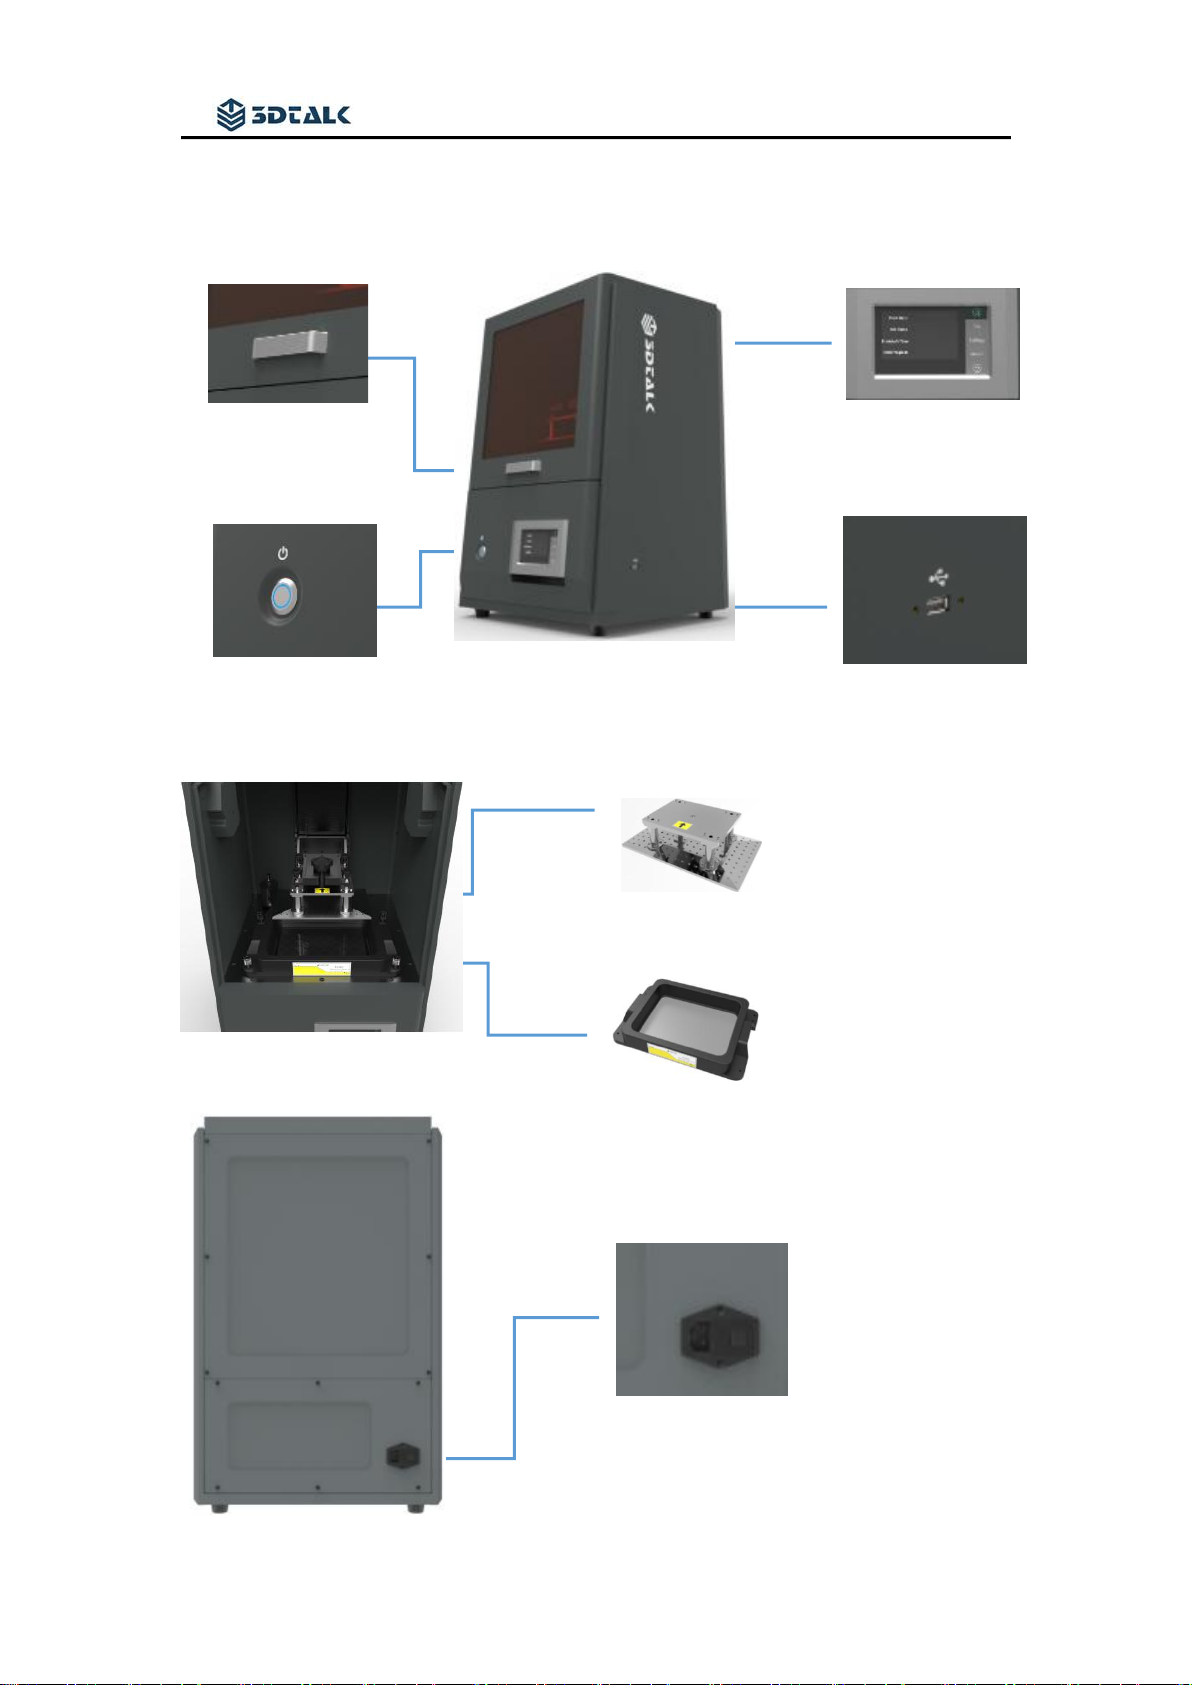
Open Handle
Power socket
2.Product View
Resin vat
USB connector
Building plate
Touch screen
Screen button
Jiangsu Ouring 3D Technology co.,Ltd
5
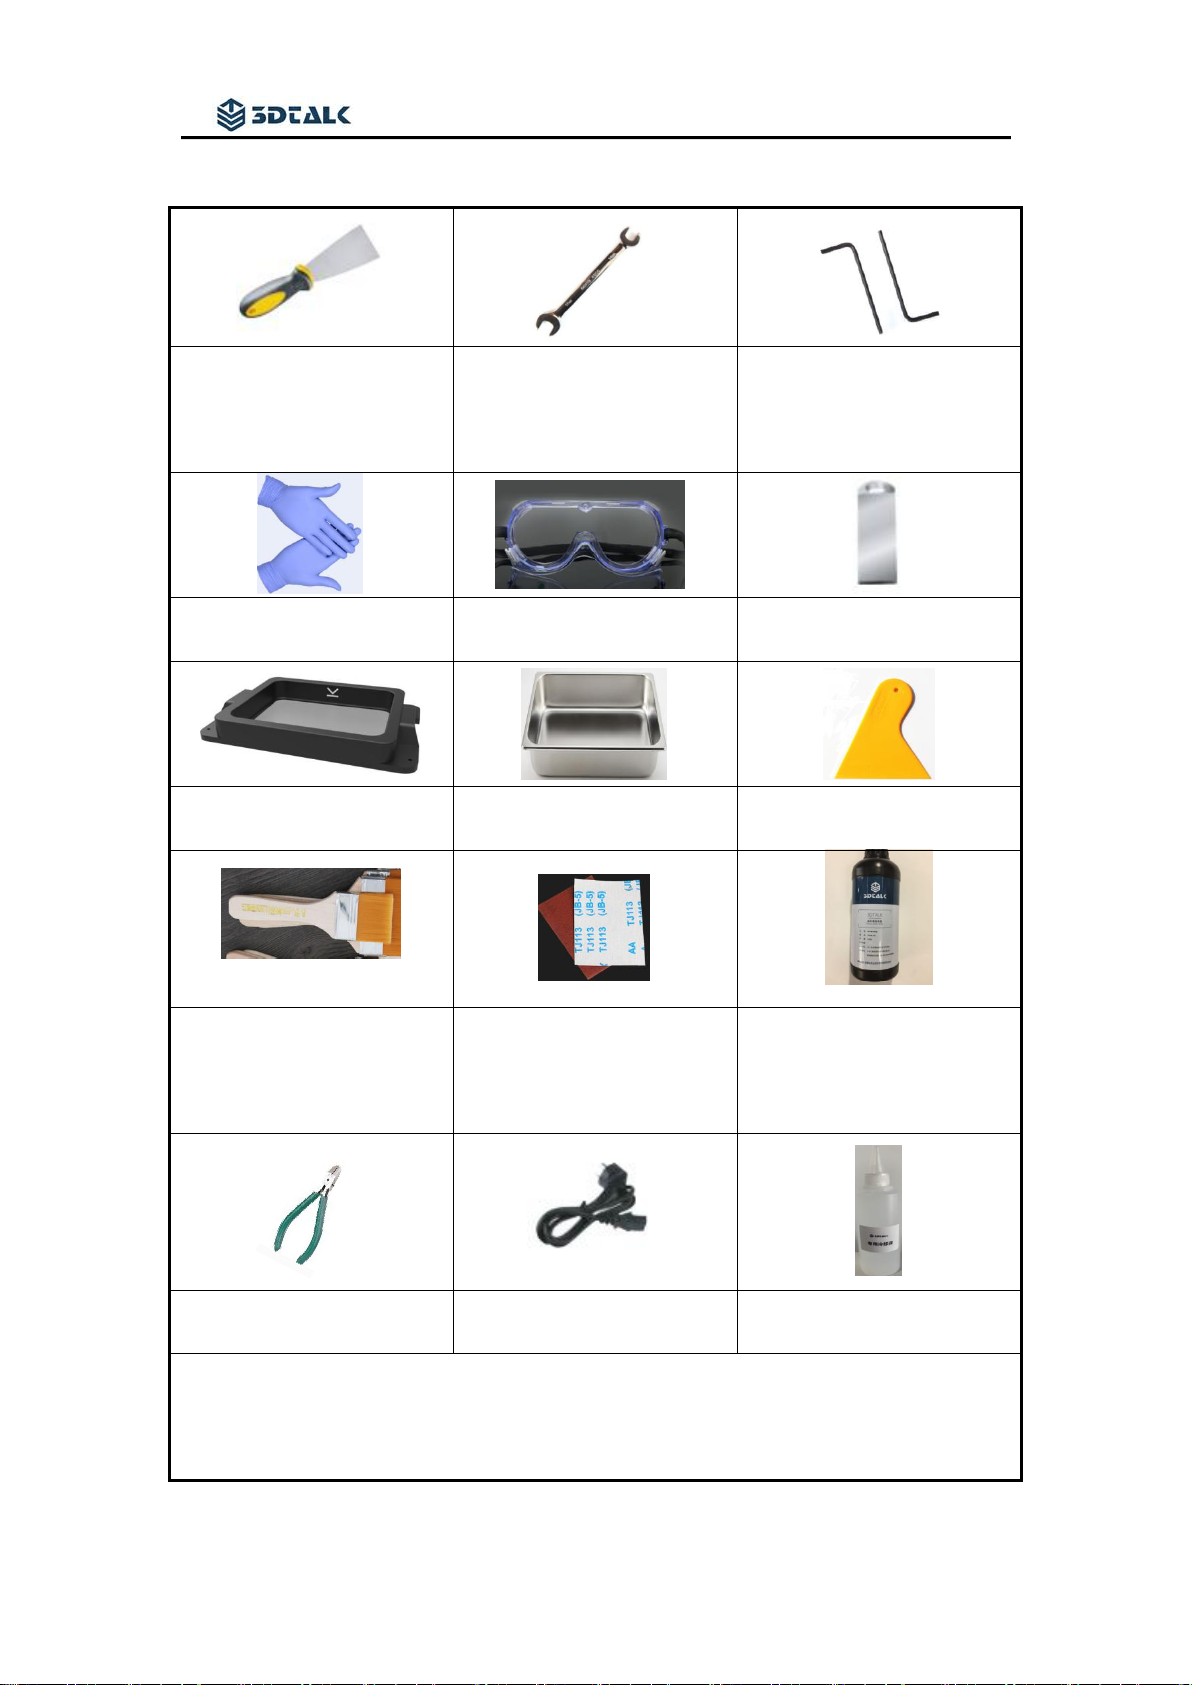
Spare Parts
Flat shovel X 1
Open end wrench
(6 - 7mm)
Hex wrench(2, 2.5, 3mm)
Protective gloves X 2
Protective glasses X 1
U Drive X 1
Resin vat X 2
Cleaning Vat X 1
Resin Scraper X 1
Cleaning brush X 1
Sandpaper (400mesh) X 2
Dental Model Resin X 1
1000ml
Pliers X 1
Power Line X 1
Cooling Liquid X 1
Note:
The photos of accessories listed here should be based on the real

Jiangsu Ouring 3D Technology co.,Ltd
6
accessories.
3DTALK accessory purchase link:
https://list.tmall.com/search_product.htm?q=3dtalk&type=p&vmarket=&spm=87
5.7931836%2FB.a2227oh.d100&from=mallfp..pc_1_searchbutton
Performance Parameter
3D Technology
LCD Light Curing
Printer Size
525 X 460 X 725mm (L * W * H)
Working Tem
18 - 28℃
Build Volume
68 X 120 X 200mm (X * Y * Z)
XY Resolution
75um 2560 X 1600px
Layer Thickness
0.016mm、0.025mm、0.05mm(suggest)、0.1mm(option)
Light source
405nm UV LED
Interface
USB
Control
5 inch touch screen

Jiangsu Ouring 3D Technology co.,Ltd
7
File format
3D Format:.stl、.obj、amf、3mf etc; Printing File:.zip
Resin vat
Detachable integrated resin vat
Cooling system
Liquid cooling system
Sealing
Dustproof, anti-static
Resin
Dental resin, Jewel resin, Normal UV resin
Transfer
USB drive, wifi
Power input
AC110/220V 50/60Hz 400W
Environmental Requirements
Avoid placing the resin in the following environment: high
temperature environment, local heat source, oxidizing environment,
freezing environment, direct sunlight, ultraviolet radiation, inert gas
coverage, dust environment;
The stability of print quality is affected by the heat and humidity, so
please ensure the proper operating conditions. (Temperature 18 -
28 ° C / humidity 40 - 80% RH)

Jiangsu Ouring 3D Technology co.,Ltd
8
Please place the printer in a clean office environment that meets the
above conditions.;
In view of the size of the printer, please prepare the desk length and
width ≥ device length in advance.;
One computer(system version - Windows7, Windows8, Windows10
or above ,don’t support Mac operation system;
CPU - lnter i5 above;
RAM - 4GB above;
Graphics card - Nvdia series,1G and above,supporting
OpenGL3.3 above)
Model cleaning alcohol (90% ~ 95%), alcohol vat, ultrasonic cleaner
(optional), UV curing box (optional) etc.
Touch Screen Introduction
Boot Interface
In the [File] tab, select the print file stored in the printer and the inserted
USB disk of the printer for printing.
Jiangsu Ouring 3D Technology co.,Ltd
9
[Local file] is stored in the model print file of the printer. All files
printed by the printer will be stored in this location.;
[Udisk file] After the USB disk is inserted into the printer, the print
model file will be recognized by the printer;
Operate the related selected files by using the [Print], [Pause], [Stop],
and [Delete] buttons.
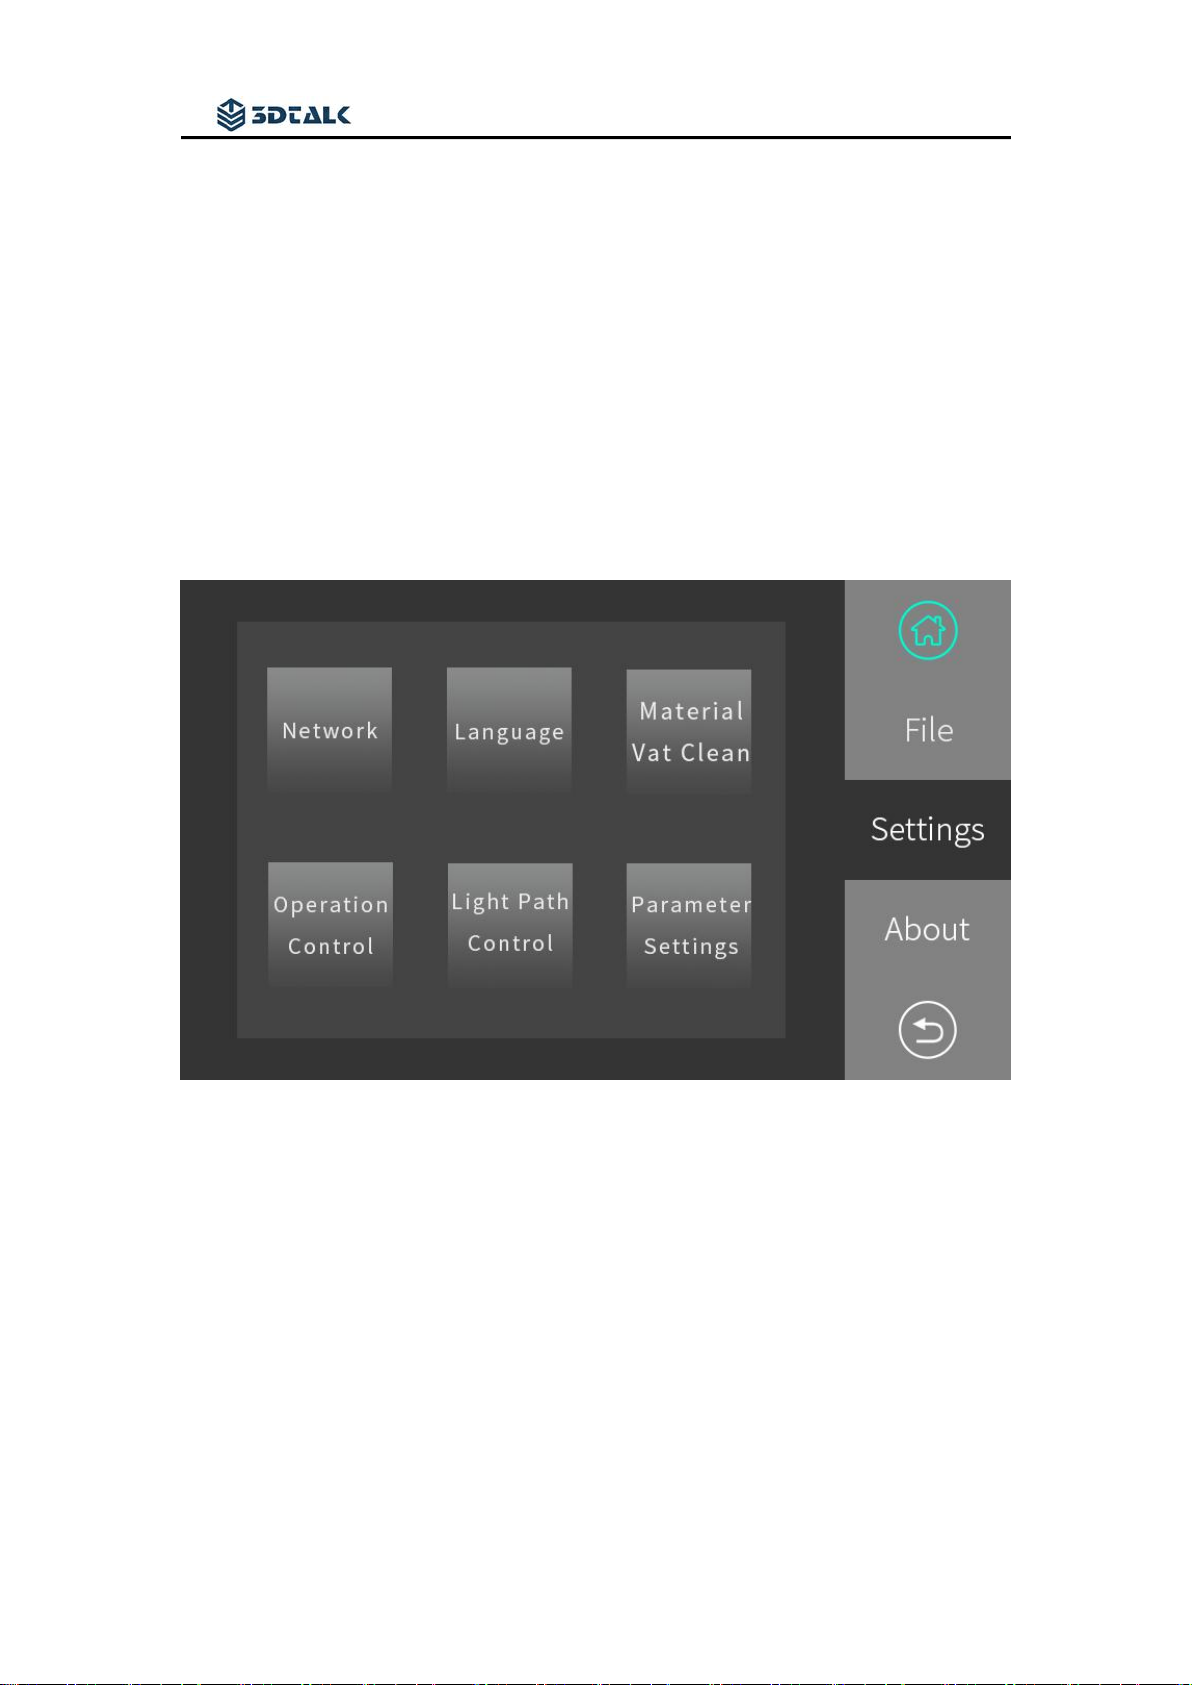
Set interface
[Network] controls the printer through the LAN. (Development tools
are not supported for use current now.)
[Language] Users can set the language version of the printer to a
localized language;
[Material Vat Clean] When there are many impurities in the bottom of
the printer resin vat, this function can be used to cure the resin at the
bottom of the vat, solidify the impurities and remove the cured resin.;
Table of contents


